
SPZ5000 - Webcam PHILIPS - Free user manual and instructions
Find the device manual for free SPZ5000 PHILIPS in PDF.


| Product Type | Webcam |
| Brand | Philips |
| Model | SPZ5000 |
| Dimensions (approx) | 10 x 5 x 5 cm |
| Weight (approx) | 100 g |
| Power Source | USB powered (5V) |
| Resolution | Up to 1080p Full HD |
| Frame Rate | 30 fps |
| Field of View | 80 degrees |
| Microphone | Built-in omnidirectional |
| Autofocus | Yes |
| Low Light Compensation | Yes |
| Mounting | Adjustable clip for monitor or tripod |
| Compatibility | Windows, macOS, Chrome OS |
| Connection | USB 2.0 or higher |
| Cable Length | 1.5 m |
| Maintenance | Clean lens with soft, dry cloth |
| Safety | Avoid exposure to liquids and extreme temperatures |
| Repairability | Non-user serviceable; contact Philips support |
| Warranty | 2 years |
Frequently Asked Questions - SPZ5000 PHILIPS
User questions about SPZ5000 PHILIPS
0 question about this device. Answer the ones you know or ask your own.
Ask a new question about this device
Download the instructions for your Webcam in PDF format for free! Find your manual SPZ5000 - PHILIPS and take your electronic device back in hand. On this page are published all the documents necessary for the use of your device. SPZ5000 by PHILIPS.
USER MANUAL SPZ5000 PHILIPS
natural_image
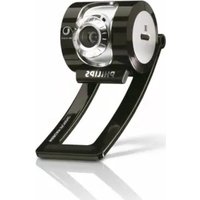
Black Philips 3.3 Megapixel digital camera with visible lens and base mount (no text or symbols on device body)EN
User
manual
Contents
1 Your Webcam 2
Welcome
What's in the box 2
Functional overview 3
2 Get started 4
(Optional) Install the webcam software and driver
Connect the webcam to your PC/notebook 5
3 Use the webcam for video chatting 6
4 Philips CamSuite 7
5 Philips CamSuite Capture 8
Take and view a photo 8
Record and play a video 8
Screen mode 8
Image resolution 9
Gallery 9
Photo/Video menu 9
Open the photo/video folder 9
Send photo(s)/video(s) via email 10
Delete photo(s)/video(s) from the gallery 10
Upload a video to YouTube 10
6 Features provided by Webcam Driver
SPZ5000 12
Properties 13
General tab 13
Video tab 14
Audio tab 15
Features tab 15
7 Upgrade software 17
Software version of Philips CamSuite 17
Download the latest software and driver on line 17
Upgrade software via Philips Intelligent
Agent 17
8 Technical specifications 18
2
9 Frequently asked questions (FAQ) 19
How can I adjust image quality? 19
The microphone of my Philips SPZ5000 webcam or headset does not work (properly). What should I do? 19
Using my Philips SPZ5000 webcam makes my PC/notebook run slow. What should I do? 20
No image is available on the screen. What should I do? 21
How can I restore my Philips webcam to the default factory settings? 21
10 Service and support 22
Need help? 22
Information to the customer 22
Safety precautions 22
Copyright 22
Disclaimer 22
FCC compliance 23
Compliance with Electro-Magnetic Field (EMF) 23
Recycling 23
Disclaimer of warranty 24
Limitations of damages 24
1 Your Webcam What's in the box
Congratulations on your purchase, and welcome to Philips! To fully benefit from the support that Philips offers, register your product at www.philips.com/welcome.
- At www.philips.com/welcome, select your language and choose Register my product. Then follow the on-screen instructions for registration.
Please read the following instructions carefully, and retain them for future reference.
Welcome
The Philips SPZ5000 webcam you have just purchased is manufactured to the highest standards and will give you years of trouble-free use. Brilliant images and amazing sound quality, that's what you get with the SPZ5000 webcam.
The Philips SPZ5000 webcam can be used for all sorts of applications.
- Video : Use the Philips SPZ5000 webcam for video chatting. The webcam works with Skype, Windows® Live Messenger, Yahoo! Messenger, AOL Instant Messenger, QQ and other instant messages and VoIP (Voice over Internet Protocol) services;
• Video sharing : Make your own personal videos and share them with friends and family via YouTube;
- Snapshot images: With Philips applications installed, use the snapshot button to easily take photos and share your photos via Facebook, Flickr, MySpace, and etc.;
- Special effects: After you install Philips CamSuite, you can enjoy some special features, such as "Fun frame", "Fun logo", and "Fun effect", provided by it.
The following sections in this manual give a step-by-step description of the installation process and explain how to use the Philips SPZ5000 webcam.
Please check that the following items are packed in the Philips SPZ5000 webcam box.
• Philips SPZ5000 webcam

natural_image
Line drawing of a camera with lens and attached bracket (no text or symbols)- Quick start guide

• Installation CD-ROM, including
• User manual of the webcam
• Webcam Driver SPZ5000
• Philips CamSuite
• Philips Intelligent Agent

Functional overview

① Snapshot button
With Philips applications installed, • take photos directly
② Power LED
Lights up when the webcam is in use•
③ Focus ring
Adjust the focus of the image • manually
④ Built-in microphone
Capture voice and sound during • video calling and recording
⑤ Rotating joint
Change the viewing fi eld of the • webcam manually
⑥ Clamp with rubber rims
Mount the webcam on your (fl at • panel) PC monitor or notebook display
Fold the clamp when the webcam is • placed on a desk or (large) desktop monitor
⑦ USB connector
- Connect the webcam to the USB port of the notebook or desktop PC
• Supply power to the webcam when it is connected to the notebook or desktop PC
2 Get started ^2
When the language selection window is displayed, select your language.
- If the language selection window is not displayed automatically, click Start > My computer, double-click the installation CD-ROM, and then double-click the Setup.exe icon.
(Optional) Install the webcam software and driver

Note
To use the special features provided by Webcam Driver SPZ5000, Philips CamSuite, and Philips Intelligent Agent, install the software in the provided CD-ROM.
• Before the installation of Philips CamSuite, disconnect the webcam from the PC/notebook.
The software supplied only works on PCs with the operating systems Microsoft® Windows® XP (SP2 and higher), Vista, or Windows 7. After the software installation, you can adjust Philips SPZ5000 webcam settings on respective property pages.
1 Place the installation CD-ROM into the CD-ROM/DVD drive on the PC/notebook.

natural_image
Line drawing of a CD or DVD device with an open lid and arrow indicating rotation (no text or symbols)
3 Follow instructions on the screen to continue the installation.
4 When the Reboot window is displayed, select Yes and then click Finish to restart the PC/notebook.

The Philips CamSuite icon 🔒 is displayed in the Windows toolbar (at lower right of the screen).
In the Philips CamSuite control panel, you can adjust the webcam settings.
Connect the webcam to your PC/notebook

flowchart
graph TD
    A["Computer monitor"] --> B["Tower tower"]
    B --> C["Bay tube with cable"]
    C --> D["Cable cable with cable icon"]
    style A fill:#f9f,stroke:#333
    style B fill:#ccf,stroke:#333
    style C fill:#cfc,stroke:#333
    style D fill:#fcc,stroke:#333
1 Turn on the PC/notebook.
2 For the first time you use the webcam with Philips CamSuite, install the software in the provided CD-ROM.
After the software installation is → complete, the Philips CamSuite icon is displayed at the lower right corner of the screen.
3 Use the clamp to mount the webcam on your PC monitor or notebook display.
Fold the clamp to place the webcam • on a desk or (large) desktop monitor.
4 Connect the cable to a USB port on the PC/notebook.
After the webcam is properly connected, the following pop-up window is displayed at the lower right corner of the screen.

Found New Hardware
Your new hardware is installed and ready to use.

北京中卫 2:37 p.m.
5 Aim the webcam in a proper angle.
After you launch Philips CamSuite, you can use the features provided by the application for Philips SPZ5000 webcam.
3 Use the webcam for video chatting
Philips SPZ5000 webcam works with Skype, Windows® Live Messenger, Yahoo! Messenger, AOL Instant Messenger, QQ and other instant messegings and VoIP (Voice over Internet Protocol) services.
After you install one of the above applications, you can plug the webcam into the PC/ notebook and use it for video chatting.
After use, you can fold the camera to store it.

natural_image
Diagram showing a device being processed with a blue arrow indicating compression or disassembly (no text or symbols present)4 Philips CamSuite
Philips CamSuite provides a quick access to a number of the most used features and settings.
To enjoy the special features and settings provided by Philips CamSuite, install it before using it with Philips SPZ5000 webcam.
After you install Philips CamSuite, you can double-click the Philips CamSuite icon 📁 on the Windows toolbar to access the Philips CamSuite control panel.
If Webcam Driver SPZ5000 is not • installed, the following control panel is displayed :

If you also have Webcam Driver • SPZ5000 installed on the PC/notebook, a different interface of the Philips CamSuite control panel is displayed and a different [Properties] window is displayed after you click 🔒.

5 Philips CamSuite Capture
Record and play a video
Via Philips CamSuite Capture, you have access to the following webcam features:
Take photos•
Record videos•
Send photos or videos by email•
Upload your videos to YouTube directly•
Adjust settings for photo, video, •
mute, and multimedia folders
Know the software version of Philips • CamSuite
1 To launch Philips CamSuite Capture, click 📄 on the Philips CamSuite control panel or double-click 🔒 on the desktop.
2 To close Philips CamSuite Capture, click the close button at the top right corner of the Philips CamSuite Capture window.

Tip
- If you are already using the webcam in another application, you will not be able to see any image in the viewer of Philips CamSuite Capture.
Take and view a photo
Aim the webcam in a proper angle.
2 In the Philips CamSuite Capture window, click 🔒.
A photo is taken and stored in the photo gallery (also in the selected photo folder on the PC/notebook).
• To view a photo in the photo gallery, double-click it.

Note
- If you select any resolution higher than 640 x 480 (VGA), the recording icon is disabled. You can select a lower resolution to enable recording.
1 Aim the webcam in a proper angle. 2 In the Philips CamSuite Capture window, click 📋 to start recording. • To pause recording, click.
3 To stop recording, click ■.
A video is recorded and stored in the video gallery (also in the selected in the video folder on the PC/notebook).
• To play a video in the video gallery, double-click it.

Tip
- Before you play a video, ensure that you have a multimedia player installed on the PC/notebook.
Screen mode
Via Philips CamSuite Capture, you can view a photo or play a video in different modes:
• Normal screen mode
• Full screen mode
- Fit on screen
1 In the Philips CamSuite Capture window, click
to switch between modes, from [Normal screen mode] to [Full screen mode] / [Fit on screen] or from [Full screen mode] / [Fit on screen] to [Normal screen mode].
→ You can select [Fit on screen] or [Full screen mode] in the drop down list.

Image resolution
You can set different image resolutions for photos/videos taken via the webcam:
160 × 120 (SQVGA) •
176 × 144 (QCIF) •
320 × 240 (E-mail size) •
352 × 288 (CIF) •
640 × 480 (VGA) •
1280 × 1024 (1.3MP, for photo only) •
2560 × 2048 (for photo only) •

Note
For video recording, the maximum resolution is up to 640 × 480 (VGA).
1 In the Philips CamSuite Capture window, click the drop-down arrow.
→ The provided resolution options are listed.
2 Select a preferred resolution option.
• To apply another resolution setting, repeat Step 1 and Step 2.
Gallery
Photos and videos taken via the webcam are stored in the photo or video gallery and in the selected photo or video folder (multimedia folders).
To access the gallery :
1 In Philips CamSuite Capture, click Gallery to show gallery.
2 Click to show the photo gallery.
• Click to show the video gallery.
• To hide the gallery, clickGallery.
Photo/Video menu
To display the photo/video menu via right-click on the mouse :
1 In the photo/video gallery, select a photo/video.
2 Right-click the mouse. → The photo/video menu is displayed.
3 Select an option to continue.
Options on the photo menu :

• [View]: To view the selected photo(s)
• [Email]: To send the selected photo(s) via email
• [Delete]: To delete the selected photo(s)
Options on the video menu :

• [Play]: To play the selected video(s)
• [Email]: To send the selected video(s) via email
• [Delete]: To delete the selected video(s)
• [Upload video to YouTube]: To upload the selected video(s) to YouTube.
Open the photo/video folder
In the photo gallery :
1 Select a photo and then click 📄 to open the photo folder.
In the video gallery :
1 Select a video and then click 📄 to open the video folder.
Send photo(s)/video(s) via email
1 In the photo/video gallery, select photo(s)/video(s) that you want to send via email.
2 Click
An email message is displayed with the selected photo(s)/video(s) attached.
3 Send the email.
Delete photo(s)/video(s) from the gallery
1 In the photo/video gallery , select photo(s)/video(s) that you want to delete.
2 Click ✗ beside 📄.
3 In the pop-up window, click [Yes].

→ The selected photo(s)/video(s) are deleted from the gallery.
• To cancel the deletion, click [No] in the pop-up window.
Upload a video to YouTube

Note
To enjoy Instant YouTube upload feature • with this webcam, you need to install Philips CamSuite in the provided CD-ROM. • Before you upload a video to YouTube, you need to have a YouTube account and Internet access.
1 In the video gallery , select a video that you want to upload to YouTube.
2 Clickor
→ The [Upload video to YouTube] window is displayed.
3 For the first time you use this feature, follow the following steps A-C:
A. If you do not have a YouTube account, click [Create account] to create one as instructed on the YouTube website.
B. In the [YouTube account] pane, enter the [Username:] and [Password:] of your YouTube account.

Philips CamSuite Capture
Upload video to YouTube


C. Check the [Remember my account] box.
→ Philips CamSuite will remember the account information.
4 In the [Publishing information] pane, select [Video category:] in the drop-down list when applicable.

- Change information in the [Title:], [Description:], and [Tags:] boxes whenever applicable. To make your video on YouTube as private, check the [Make my video private] box.
5 Click [Upload video].
To cancel upload, click • [Cancel] during uploading. → When uploading is successful, the following window is displayed. You can close the window or click [Notify friend(s)] to continue.

Philips CamSuite Capture Upload status


6 Features provided by Webcam Driver SPZ5000
If both Webam Driver SPZ5000 and Philips CamSuite are installed on the PC/notebook, Philips CamSuite provides a quick access to the following features provided by Webcam Driver SPZ5000:

Fun settings
Fun frame•
Fun logo•
Fun effect•

Image settings
Digital zoom•
Face tracking•

Audio settings
- Noise reduction

Camera settings
• Select an available Philips webcam
- Adjust properties
1 Click one of the buttons on the Philips CamSuite control panel to access a settings panel.
2 In each settings panel, check the boxes to activate the features.
• To disable a feature, clear the box.
For details of the features, see the "Properties" section.
Properties
1 In the Philips CamSuite control panel, click 📄.
2 Click the [Webcam settings] button. → The [Properties] window is displayed.
3 In the [Properties] window, click one of the following four tabs to go on with settings adjustment:
General•
Video•
Audio•
Features•
General tab

On the [General] tab, you can adjust the following settings:
[Flickerless image]
The [Flickerless image] option should only be used under flickering light conditions (e.g. fluorescent or neon lamps) to prevent flickering or strangely colored video images. If this option
is used under normal lighting conditions, the video image may be overexposed.
[Region]
During installation, this parameter will be set automatically to the correct region frequency.
When you travel, you may need to change the setting to optimize the image quality.
The region frequency settings for different countries are listed below.
| Country (region) | Region frequency |
| Europe | 50 Hz |
| North America | 60 Hz |
| China | 50 Hz |
| Taiwan | 60 Hz |
| Japan | Region-dependent |
![PHILIPS SPZ5000 - [Region] - 1](/content/2026/06/1278816/images/52e9a46d1758e1cf9171e4586e13a8834c1cd6f76fd3c4c61a5794dc736c5dc2.jpg)
Tip
- Please check your local mains output to find the correct region setting.
Video tab

On the [Video] tab, you can now adjust the following settings:
[Full automatic control]
This full automatic control mode provides a very easy way to get the best out of your Philips SPZ5000 webcam. Or you can choose to have maximum manual control over the webcam settings by switching the full automatic control mode off. Full automatic control 'on' is the preferred setting for normal use.
Techniques active within full automatic control mode are:
Automatic exposure control and • automatic white balance control, to provide the best video source signal possible;
Automatic frame rate selection for • improved webcam sensitivity in low light conditions.
[Frame rate]
A frame is a single picture or still shot, that is shown as part of a larger video or movie. The frame rate is the number of frames displayed per second. The higher the frame rate, the better the video display but the higher the load on the processor.
You can use the scroll open menu to set the frame rate of the video that you wish to capture. For example, 30 fps means that the webcam will capture video at 30 frames per second.
[Auto Exposure]
The exposure is the amount of light received by the sensor and is determined by how long the sensor is exposed to capture a snapshot or video frame. The result depends on the sensitivity of the sensor. The webcam will find the optimal setting if you select the automatic exposure option.
[Shutter Speed]
The shutter speed determines how long the camera shutter remains open as a picture is taken. The slower the shutter speed, the longer the exposure time. The shutter speed controls the total amount of light reaching the sensor.
Use the slider to set the desired shutter speed.
[Gain]
In video, gain is the amount of white in a video picture. Use the slider to set the desired gain level.
[Reset]
Press this button if you would like to reset the webcam settings to the default factory settings.
[Restore]
Press this button if you would like to restore your preferred settings.
[Save]
Press this button if you would like to save your preferred settings.
[Auto White Balance]
Most light sources are not 100% pure white but have a certain 'color temperature'. Normally our eyes compensate for lighting conditions with different color temperatures.
If the automatic white balance is selected, the webcam will look for a reference point which represents white. It will then calculate
all other colors based on this white point and compensate the other colors accordingly, just like the human eye.
You can also select fixed settings for [Indoor],
[Outdoor] and [Fluorescence] conditions or use the 'Red' and 'Blue' effect if you would like to set the webcam according to your color temperature preferences.
[Brightness]
Brightness enables you to adjust the brightness of the displayed image or video to suit your own preference. Use the slider to find your preferred setting.
[Contrast]
Contrast enables you to control the ratio between dark and light according to your own preference. Use the slider to find your preferred setting.
[Gamma]
Gamma enables you to brighten dark areas within the displayed image or video and visualize more details without over-exposing already light areas. Use the slider to find your preferred setting.
[Saturation]
Saturation enables you to set the color reproduction from black and white to a full color image or video according to your own preference. Use the slider to find your preferred setting.
[Black & White]
The [Black & White] checkbox is used to switch from color images to black and white or bring back the color.
[Backlight compensation]
Turn on the backlight compensation to improve the image quality when you have a scene where the background has a high illumination level (for instance when you are sitting in front of a bright light).
[Mirror]
When you enable this function, the image fl ips horizontally. You can use this feature when you want to use the Philips SPZ5000 and monitor as a mirror, or to take pictures of mirrored images.
Audio tab

On the [Audio] tab, you can now adjust the following settings:
[Noise Reduction]
With this function, you can signifi cantly reduce all stationary noises picked up by the webcam's microphone, such as air conditioner noise and the noise made by the fan inside your computer. It enhances clarity of speech in both quiet and noisy environments.
Volume slider
This slider provides manual control over the microphone.
Features tab
On the [Features] tab, you can now adjust the following settings:
[Face tracking]
If you activate the [Face tracking] option, the webcam will track your face. This gives you more convenience during video chatting, because you stay in the centre of the image even if you move during video chatting.
[Digital Zoom]
With this function, you can get a closer view of an object.
1 Use the slider to dynamically zoom in and out.
![PHILIPS SPZ5000 - [Digital Zoom] - 1](/content/2026/06/1278816/images/028fed4f78e74206eab44cfd96098167a5fb18b5a25fc4466409b139fea4fed0.jpg)
Tip
Digital zoom magnifi es the pixels but not the • actual image.
[Add Logo] ([Fun logo])
With this function, you can add fun logos to the images. You can add one of the provided logos or one of your own logos (pictures).
1 Check the box of the [Add Logo] feature.
2 Select one of the provided logos from the drop-down list.
To select one of your own logos, click the [Browse] button and follow the on-screen instructions to finish the selection.
3 Click one of the four click-button on the four corners of the logo to select a logo placement.
4 Move the slide to adjust the logo size.
[Video Frames] ([Fun frame])
With this function, you can add fun frames to the images.
1 Check the box of the [Video Frames] feature.
2 Select one of the provided frames from the drop-down list.
[Video Effects] ([Fun effect])
With this function, you can select one of the provided video effects.
1 Check the box of the [Video Effects] feature.
2 Select one of the provided effects from the drop-down list.
7 Upgrade software
Software version of Philips CamSuite
To know the software version of Philips CamSuite:
1 In the Philips CamSuite Capture window, click [Help] > [About].
The software version of Philips CamSuite is displayed.
Download the latest software and driver on line
1 At www.philips.com/support, click the Choose country / language box to select your country/language.
2 Click the Search box, enter SPZ5000 and click the search button.
3 Click SPZ5000 under the search results.
4 Click Support.
Under Product support, you will find information about Software and drivers.
5 Download the software or driver installer that you want.
6 Run the installer and follow the instructions on the screen to complete the installation.
Upgrade software via Phili Intelligent Agent

Note
Ensure that you select Philips Intelligent Agent during software installation.
Philips Intelligent Agent has its own HTTP download manager for retrieving software from the Philips server. If an update is available for Philips SPZ5000 webcam, Philips Intelligent Agent provides a download button for the appropriate update. After clicking the download button, you can download the appropriate update that will be automatically saved in a dedicated folder located at My Documents\ Philips Intelligent Agent.
You can also enable an automatic check that will periodically verify if the software of Philips SPZ5000 webcam products are still up-to-date.
8 Technical specifications
| Sensor resolution | 1.3 MP (1280 x 1024 pixels) |
| Video capture resolution (Max.) | 2.0 MP (Software enhanced, with Philips CamSuite installed) |
| Photo resolution (Max.) | 5.0 MP (Software enhanced, with Philips CamSuite installed);8.0 MP (Software enhanced, with Philips CamSuite and Webcam Driver SPZ5000 installed) |
| Frames per second | 60 fps Max. @VGA |
| Lens F-number | F2.6 |
| Lens angle of view | 80 degrees (wide-angle lens) |
| Minimum subject illumination | < 5 lux |
| Video format | YUY2, RGB24 and I420 (With Webcam Driver SPZ5000 installed) |
| Microphone | Built-in microphone with audio enhancement |
| Windows® OS | Windows® 7 compliant |
| USB interface | USB 2.0 High speed |
| USB video class | UVC compliant |
| USB cable length | 1.5 m |
| Power | Supplied via USB cable;5V DC, 0.15A |
System requirements for a Microsoft
Windows-based PC :
• Minimum system requirements:
• 1.6 GHz or equivalent
• 512 MB RAM for XP,
• 1 GB RAM (32Bit) for Windows Vista and Windows 7
OS: Windows XP SP2, Vista and Windows 7 200 MB of available hard disk space One free USB2.0 port Soundcard and speakers (OS-compatible) 16-bits Color display @ 800x600 with DirectX 3D support DirectX 9.0c or higher Microsoft .Net Framework 2.0 Broadband Internet connection to download drivers, CamSuite, manuals and to upload YouTube files Adobe reader to read *PDF files
• Recommended system requirements:
• 2.4 GHz dual core or equivalent
• 1 GB RAM (32Bit) / 2GB RAM (64Bit) for XP, Vista, and Windows 7 DirectX 9.0c or higher•
• Microsoft .Net Framework 2.0.
- Broadband Internet connection to upload fi les to YouTube Adobe reader to read *PDF fi le
Recommended system requirements for an Apple Mac :
• Mac OS X v10.4 'Tiger' - 10.5 'Leopard' 200 MB of available hard disk space • USB port 2.0

Note
- This webcam works with Mac OS X as plug-and-chat device.
- The software for video and sound enhancement is only compatible with Windows XP and later versions.
9 Frequently asked questions (FAQ)
How can I adjust image quality?
The default settings of the Philips webcam usually offer the best possible image quality. You can also adjust image quality according to your own personal preferences.
To adjust the image resolution, see • "Image resolution" section .
- To adjust other properties of image, see the "Properties" section.
The microphone of my Philips SPZ5000 webcam or headset does not work (properly). What should I do?
For Windows XP (SP2):
1 On the PC/notebook, click Start > Control panel.
2 Click Sounds and Audio Devices.
3 Click the Voice tab in the displayed window.

4 Set the Philips SPZ5000 webcam or the connected headset as default device for Voice recording.
5 Click OK to save your settings.
For Windows Vista :
1 On the PC/notebook, click Start > Control panel.
2 Click Hardware and Sound.
3 Click Sound.
4
Click the Recording tab in the displayed window.

5 Select the Philips SPZ5000 webcam or the connected headset and click Set Default.
6
Click OK to save your settings.
For Windows 7 :
1
On the PC/notebook, click Start > Control panel.
2
Click Hardware and Sound.
3
Click Sound > Manage audio device.
4
Click the Recording tab in the displayed window.
5 Select the Philips SPZ5000 webcam or the connected headset and click Set Default.
6
Click OK to save your settings.
Using my Philips SPZ5000 webcam makes my PC/ notebook run slow. What should I do?

Note
Ensure that both Webcam Driver SPZ5000 and Philips CamSuite are installed on the PC/ notebook.
1 Close software applications that do not necessarily need to run.
2 Double-click the Philips CamSuite icon on the Windows toolbar (at the lower right of your screen) to open the Philips CamSuite control panel.
3
Click 📋 on the Philips CamSuite control panel, to open the [Properties] page.
→ The [Properties] window is displayed.
4
Click the [Video] tab.
5
If the [Full automatic control] feature is activated, clear the box to disable the [Full automatic control] feature.
6
Set [Frame rate] to a minimum of 5 fps.
7
Click [Ok] to save your settings.

Tip
- The maximum frame rate (frames per second (fps) produced by the webcam) and the maximum image resolution depend on the specifications of your PC/notebook. With the 'Full automatic control' feature, the webcam software will automatically adjust frame rate and resolution as good as possible for your particular situation. It might be possible that the specifications of your PC/notebook do not meet the requirements for maximum frame rate and resolution setting.
No image is available on the screen. What should I do?
1 Ensure that the webcam is connected properly.
2 Check whether you are using the webcam in another application.
3 Close the other application.

Tip
You cannot use the webcam in more than one application at the same time.
How can I restore my Philips webcam to the default factory settings?

Note
Ensure that Webcam Driver SPZ5000 and Philips CamSuite are installed on the PC/ notebook.
2
1 Double-click the Philips CamSuite icon on the Windows toolbar (at the lower right of your screen) to open the Philips CamSuite control panel.
Click 📋 on the Philips CamSuite control panel, to open the [Properties] page.
→ The [Properties] window is displayed.
3
Click the [Video] tab.
4
Click the [Reset] button. All webcam settings are now reset back to the default factory settings.
5
Click [Ok] to save the settings.
10 Service and support
Need help?
First of all, read this user manual carefully.
The model number of your product is SPZ5000.
When you need further support about registration, setup, usage, features, software upgrade, specification, and warranty, etc. of the product, see www.philips.com/support.
1 At www.philips.com/support, click the Choose country / language box to select your country/language.
2 Click the Search box, enter SPZ5000 and click the Search button.
3 Click SPZ5000 under the search results.
4 Click Support.
Under Product support, you will find information about Overview, Latest updates, Manuals and documentation, Frequently asked questions, Production information, Product registration.
→ Under Service information, you will find information on warranty.
Under Contact, you will find telephone numbers of Philips Consumer Care helpdesk.
Information to the customer
Safety precautions
Observe the following guidelines to ensure that the webcam will operate safely and to prevent defects.
- Do not use your webcam in environments outside the following range: temperature: 0°C to 40°C, relative humidity: 45% \~ 85%.
Do not use or store your webcam in/under: • direct sunlight exposure; • very humid and dusty environment; • near any kind of heat sources. •
If your webcam gets wet, dry it with soft • cloth as soon as possible.
If the lens is dirty, do NOT touch the lens • with your fingers.
Clean the outside of the webcam with a • soft cloth.
Do NOT use cleaning fluids based on • alcohol, methylated spirit, ammonia, etc.
Do NOT attempt to disassemble or repair • your webcam by yourself. Do not open the webcam. In the event of technical difficulties return it to your Philips retailer.
• Do NOT use your webcam in the water.
Protect the webcam from oil, vapour, • steam, moisture, and dust.
• Never point the webcam lens at the sun.
Copyright
Copyright © 2009 by Philips Consumer Lifestyle B.V.
All rights reserved. No part of this publication may be reproduced, transmitted, transcribed, stored in a retrieval system or translated into any language or computer language, in any form or by any means, electronic, mechanical, magnetic, optical, chemical, manual or otherwise, without prior written permission from Philips. Brands and product names are trademarks or registered trademarks of their respective companies.
Disclaimer
Philips makes no warranty of any kind with regard to this material, including, but not limited to, the implied warranties of merchantability and fitness for a particular purpose.
Philips assumes no responsibility for any error that may appear in this document. Philips makes no commitment to update nor to keep current the information contained in this document.
FCC compliance
This device complies with Part 15 of the FCC Rules.
Operation is subject to the following two conditions:
① this device may not cause harmful interference, and
② this device must accept any interference received, including interference that may cause undesired operation.

Note
This equipment has been tested and found to comply with the limits for a Class B digital device, pursuant to Part 15 of the FCC Rules.
- These limits are designed to provide reasonable protection against harmful interference in a residential installation.
This equipment generates, uses and can radiate radio frequency energy and, if not installed and used in accordance with the instructions, may cause harmful interference to radio communications.
However, there is no guarantee that interference will not occur in a particular installation.
If this equipment does cause harmful interference to radio or television reception, which can be determined by turning the equipment off and on, the user is encouraged to try to correct the interference by one or more of the following measures:
Reorient or relocate the receiving • antenna.
- Increase the separation between the equipment and receiver.
- Connect the equipment to an outlet on a circuit different from that to which the receiver is connected.
- Consult the dealer or an experienced radio/TV technician for help.
Any unauthorized modification to this equipment could result in the revocation of the authorization to operate the equipment.
Compliance with Electro-Magnetic Field (EMF)
Koninklijke Philips Electronics N.V. manufactures and sells many products targeted at consumers, which, like any electronic apparatus, in general have the ability to emit and receive electromagnetic signals.
One of Philips' leading Business Principles is to take all necessary health and safety measures for our products, to comply with all applicable legal requirements and to stay well within the EMF standards applicable at the time of producing the products.
Philips is committed to develop, produce and market products that cause no adverse health effects. Philips confi rms that if its products are handled properly for their intended use, they are safe to use according to scientific evidence available today.
Philips plays an active role in the development of international EMF and safety standards, enabling Philips to anticipate further developments in standardisation for early integration in its products.
Recycling

Your product is designed and manufactured with high quality materials and components, which can be recycled and reused.
When you see the crossed-out wheel bin symbol attached to a product, it means the product is covered by the European Directive 2002/96/EC:

Never dispose of your product with other household waste. Please inform yourself about the local rules on the separate collection of electrical and electronic products. The correct disposal of your old product helps prevent
potentially negative consequences on the environment and human health.
All redundant packing material has been omitted. We have done our utmost to make the packaging easily separable into mono materials.
Please observe the local regulations regarding the disposal of packing materials.

Warning
Plastic bags can be dangerous. To avoid danger of suffocation, keep this bag away from babies and small children.
Disclaimer of warranty
The software on the CD-ROM supplied is sold ‘as is’ and without warranties whether expressed or implied. Because of the various software and hardware environments into which this program may be put, no warranty of fi tness for a particular purpose is offered.
Limitations of damages
The vendor will not be liable for any indirect, special, incidental or consequential damages (including damages for loss of business, loss of profits, or the like), whether based on breach of contract, tort (including negligence), product liability or otherwise, even if the vendor or its representatives have been advised of the possibility of such damages and even if a remedy set forth herein is found to have failed its essential purpose.



- Contents
- Your Webcam 2
- Get started 4
- Use the webcam for video chatting 6
- Philips CamSuite 7
- Philips CamSuite Capture 8
- Features provided by Webcam Driver
- SPZ5000 12
- Upgrade software 17
- Technical specifications 18
- Frequently asked questions (FAQ) 19
- Service and support 22
- Your Webcam What's in the box
- Welcome
- Functional overview
- Get started 2
- (Optional) Install the webcam software and driver
- Note
- Connect the webcam to your PC/notebook
- Found New Hardware
- Use the webcam for video chatting
- Philips CamSuite
- Philips CamSuite Capture
- Record and play a video
- Tip
- Take and view a photo
- Screen mode
- Image resolution
- Gallery
- Photo/Video menu
- Select an option to continue.
- Open the photo/video folder
- Send photo(s)/video(s) via email
- Delete photo(s)/video(s) from the gallery
- Upload a video to YouTube
- Philips CamSuite Capture
- Features provided by Webcam Driver SPZ5000
- Fun settings
- Audio settings
- Camera settings
- Properties
- [Flickerless image]
- [Region]
- Video tab
- [Full automatic control]
- [Frame rate]
- [Auto Exposure]
- [Shutter Speed]
- [Gain]
- [Reset]
- [Restore]
- [Save]
- [Auto White Balance]
- [Brightness]
- [Contrast]
- [Gamma]
- [Saturation]
- [Black & White]
- [Backlight compensation]
- [Mirror]
- [Noise Reduction]
- Volume slider
- Features tab
- [Face tracking]
- [Digital Zoom]
- [Add Logo] ([Fun logo])
- [Video Frames] ([Fun frame])
- [Video Effects] ([Fun effect])
- Upgrade software
- Software version of Philips CamSuite
- Download the latest software and driver on line
- Upgrade software via Phili Intelligent Agent
- Technical specifications
- System requirements for a Microsoft
- Windows-based PC :
- Frequently asked questions (FAQ)
- How can I adjust image quality?
- The microphone of my Philips SPZ5000 webcam or headset does not work (properly). What should I do?
- Using my Philips SPZ5000 webcam makes my PC/ notebook run slow. What should I do?
- No image is available on the screen. What should I do?
- How can I restore my Philips webcam to the default factory settings?
- 2
- 3
- 4
- 5
- Service and support
- Need help?
- Information to the customer
- Safety precautions
- Copyright
- Disclaimer
- FCC compliance
- Compliance with Electro-Magnetic Field (EMF)
- Recycling
- Warning
- Disclaimer of warranty
- Limitations of damages
Brand : PHILIPS
Model : SPZ5000
Category : Webcam