
SPZ6500 - Webcam PHILIPS - Free user manual and instructions
Find the device manual for free SPZ6500 PHILIPS in PDF.


| Product Type | Webcam |
| Brand | Philips |
| Model | SPZ6500 |
| Video Resolution | Full HD 1080p |
| Frame Rate | 30 fps |
| Lens Type | Wide-angle, fixed focus |
| Microphone | Built-in noise-cancelling microphone |
| Field of View | 90° |
| Connection Interface | USB 2.0 |
| Cable Length | 1.5 m |
| Mounting | Clip or tripod mount |
| Power Supply | USB bus-powered |
| Dimensions (LxWxH) | 95 x 60 x 45 mm |
| Weight | 120 g |
| Operating System Compatibility | Windows 7/8/10/11, macOS 10.10 or later |
| Plug-and-Play | Yes (no driver required) |
| Warranty | 1 year limited |
| Care Instructions | Wipe with a soft dry cloth; avoid liquids |
| Safety Precautions | Do not use near water or in humid environments |
| Spare Parts Available | USB cable, mounting clip |
| Repairability | Not intended for user repair; contact support |
Frequently Asked Questions - SPZ6500 PHILIPS
User questions about SPZ6500 PHILIPS
0 question about this device. Answer the ones you know or ask your own.
Ask a new question about this device
Download the instructions for your Webcam in PDF format for free! Find your manual SPZ6500 - PHILIPS and take your electronic device back in hand. On this page are published all the documents necessary for the use of your device. SPZ6500 by PHILIPS.
USER MANUAL SPZ6500 PHILIPS
Contents
1 Things you should know 2-4
Safety precautions 2
Copyright 3
Disclaimer 3
FCC compliance 3
Environmental information 3-4
System requirements 4
Disclaimer of warranty 4
Limitations of damages 4
2 Your WebCam 4
Welcome 4
3 What's in the box? 5
4 Functional overview 5
5 Installation 6-7
5.1 Installing the WebCam software 6-7
5.2 Connecting the WebCam to your PC / laptop 7
6 WebCam settings 8-16
6.1 WebCam Companion 8
6.2 Fun settings menu 8-10
6.3 Image settings menu 11-12
6.4 Audio settings menu 12
6.5 Property pages 13-16
7 Operating the WebCam 16
8 Technical data 17
9 Frequently asked questions
(FAQ) 17-20
9.1 How can I adjust image quality? 17-18
9.2 The microphone of my Philips WebCam does not work (properly). What should I do? 18-19
9.3 Using my Philips WebCam makes my PC / laptop run slow. What should I do? 19-20
9.4 How can I restore the settings of my Philips WebCam to the default factory settings? 20
9.5 How can I clean the lens of my Philips WebCam? 20
1 Things you should know
Please read the following instructions carefully, and retain them for future reference. It may be helpful to have the instructions for use for the PC at hand for reference.
Safety precautions
Observe the following guidelines to ensure that the WebCam will operate safely and to prevent defects.
- Do not use your WebCam in environments outside the following range: temperature: 0°C to 40°C, relative humidity: 45% \~ 85%.
- Do not use or store your WebCam in/under:
- direct sunlight exposure;
- very humid and dusty environment;
- near any kind of heat sources.
- If your WebCam gets wet, dry it with soft cloth as soon as possible.
- If the lens is dirty, do NOT touch the lens with your fingers.
- Clean the outside of the WebCam with a soft cloth.
- Do NOT use cleaning fluids based on alcohol, methylated spirit, ammonia, etc.
- Do NOT attempt to disassemble or repair your WebCam by yourself. Do not open the WebCam. In the event of technical difficulties return it to your Philips retailer.
- Do NOT use your WebCam in the water.
- Protect the WebCam from oil, vapour, steam, moisture, and dust.
- Never point the WebCam lens at the sun.
Copyright
Copyright © 2008 by Philips Consumer Electronics B.V.
All rights reserved. No part of this publication may be reproduced, transmitted, transcribed, stored in a retrieval system or translated into any language or computer language, in any form or by any means, electronic, mechanical, magnetic, optical, chemical, manual or otherwise, without prior written permission from Philips. Brands and product names are trademarks or registered trademarks of their respective companies.
Disclaimer
Philips makes no warranty of any kind with regard to this material, including, but not limited to, the implied warranties of merchantability and fitness for a particular purpose.
Philips assumes no responsibility for any error that may appear in this document. Philips makes no commitment to update nor to keep current the information contained in this document.
FCC compliance
This device complies with Part 15 of the FCC Rules.
Operation is subject to the following two conditions:
1 this device may not cause harmful interference, and
2 this device must accept any interference received, including interference that may cause undesired operation.

Note!
This equipment has been tested and found to comply with the limits for a Class B digital device, pursuant to Part 15 of the FCC Rules.
These limits are designed to provide reasonable protection against harmful interference in a residential installation.
This equipment generates, uses and can radiate radio frequency energy and, if not installed and used in accordance with the instructions, may cause harmful interference to radio communications.
However, there is no guarantee that interference will not occur in a particular installation. If this equipment does cause harmful interference to radio or television reception, which can be determined by turning the equipment off and on, the user is encouraged to try to correct the interference by one or more of the following measures:
- Reorient or relocate the receiving antenna.
- Increase the separation between the equipment and receiver.
- Connect the equipment to an outlet on a circuit different from that to which the receiver is connected.
- Consult the dealer or an experienced radio/TV technician for help.
Any unauthorized modification to this equipment could result in the revocation of the authorization to operate the equipment.
Environmental information
Disposal of your old product Your product is designed and manufactured with high quality materials and components, which can be recycled and reused.


When this crossed-out wheeled bin symbol is attached to a product it means the product is covered by the European Directive 2002/96/EC.
Please inform yourself about the local separate collection system for electrical and electronic products.
Please act according to your local rules and do not dispose of your old products with your normal household waste. The correct disposal of your old product will help prevent potential negative consequences for the environment and human health.
Warning
Plastic bags can be dangerous. To avoid danger of suffocation, keep this bag away from babies and small children.
System requirements
- Microsoft Windows XP (SP2) or Vista;
- Intel Pentium 4 2.4 GHz or AMD equivalent processor;
- 512 MB RAM and 300 MB free hard disk space;
- One free USB port and CD-ROM or DVD drive.
Disclaimer of warranty
The software on the CD-ROM supplied is sold ‘as is’ and without warranties whether expressed or implied. Because of the various software and hardware environments into which this program may be put, no warranty of fitness for a particular purpose is offered.
Limitations of damages
The vendor will not be liable for any indirect, special, incidental or consequential damages (including damages for loss of business, loss of profits, or the like), whether based on breach of contract, tort (including negligence), product liability or otherwise, even if the vendor or its representatives have been advised of the possibility of such damages and even if a remedy set forth herein is found to have failed its essential purpose.
2 Your WebCam
Congratulations on your purchase and welcome to Philips. To fully benefit from the support that Philips offers, register your product at www.philips.com/welcome
Welcome
The Philips SPC2050NC WebCam you have just purchased is manufactured to the highest standards and will give you years of trouble-free use. Brilliant images and amazing sound quality, that's what you get with the SPC2050NC WebCam.
After installation, the new WebCam can be used for all sorts of applications, such as:
Video:
use the Philips SPC2050NC WebCam for video chatting and video calling. The WebCam works with Skype, Windows® Live Messenger, Yahoo! Messenger, AOL Instant Messenger, QQ and other instant messaging and VoIP (Voice over Internet Protocol) services;
Video sharing:
make your own personal videos and share them with friends and family via YouTube, Yahoo! Video, etc.;
Snapshot images:
use the Snapshot button to easily take photos without using your mouse and share your photos via Flickr, MySpace, etc.;
Editing and special effects:
edit images and recordings using WebCam Companion.
The following sections in this manual give a step-by-step description of the installation process and explain how to use the Philips SPC2050NC WebCam.
3 What's in the box?
Please check that the following items are packed in the Philips SPC2050NC box.
They are provided to help you set up and use your Philips SPC2050NC.
Philips SPC2050NC WebCam
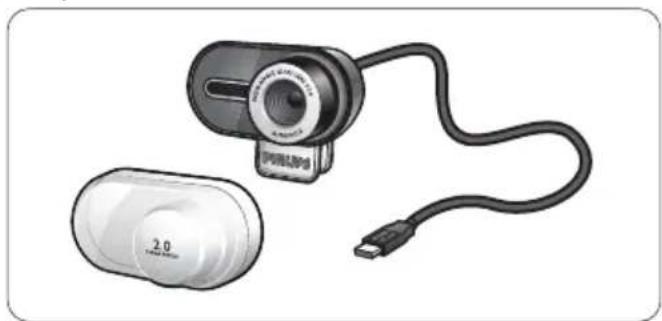
Installation CD-ROM including user manual

4 Functional overview

1 Snapshot button
Enables you to take photos without using your mouse.
2 Rotating foot
For manually changing the vertical angle of the WebCam.
3 Clamp
For attaching the WebCam to your flat PC monitor or laptop screen.
4 USB connector
For connecting the WebCam to the USB port of the PC or laptop.
5 Two digital microphones
For adding voice and stereo sound when video calling and video recording.
6 Power LED
Lights up red when the WebCam is in use.
7 Cover
For protecting the WebCam when it is not in use.
5 Installation
5.1 Installing the WebCam software
The software supplied only works on PCs with the operating systems Microsoft® Windows® XP (SP2) and Vista. Also refer to 1 'Things you should know' - 'System requirements'.

Notes
- Unplug all your USB devices (except USB keyboard and USB mouse) before you start.
- Do not plug in your WebCam yet. Run the Installation CD-ROM first.
- Have your Windows CD-ROM at hand.
1 Place the installation CD-ROM in your PC's / laptop's CD-ROM / DVD drive.

• After a couple of seconds the 'Language selection' screen appears.

Note
If the 'Language selection' screen does not appear automatically, open 'Computer' or 'My computer', double click on the CD, then double click on the 'Setup.exe' icon.

Select your language.

• Installation continues automatically.
• The 'Welcome' screen appears.

Click 'Next' to continue.

• The 'Manual' screen appears.

Select the first option if you wish to continue installation and read the manual later.
Or:
Select the second option if you wish to read the user manual before continuing installation. You can print out the manual so you will have it at hand during the rest of the installation process
Click 'Next' to continue.

- The 'Installation' screen appears. The items that can be installed are shown on the left side of the screen. An explanation of each item is given on the right side. All required items are selected by default.

Click the 'Next' button if you wish to install all items.

Or:
If there are certain items you do not wish to install, check the boxes before these items. Select at least 'WebCam Driver SPC2050NC' and 'Philips CamSuite'.
Click the 'Next' button.
•The following software license agreement appears.
6 Click on 'Yes' to continue the installation.

• The following screen appears.
7 Click 'Next' to continue.
![graph TD A["Laptop"] --> B["Server"] C["Desktop"] --> D["Server"] E["User"] --> F["Download Arrow"] style A fill:#f9f,stroke:#333 style B fill:#ccf,stroke:#333 style C fill:#cfc,stroke:#333 style D fill:#fcc,stroke:#333 style E fill:#ffc,stroke:#333 style F fill:#cff,stroke:#333](/content/2026/06/1278799/images/8b6d08fb80d9f6b6016059acbbf18d67fc8b31912a35d542e85bf318ab563e55.jpg)
• The 'Reboot' screen appears.
8 Select 'Yes', then click 'Finish' to restart your PC / laptop.

- After installation, the 'Philips CamSuite' shortcut will be visible in the Windows taskbar (bottom right of your screen). - In the 'Philips CamSuite' you can adjust the WebCam settings. For this, refer to 6 'WebCam settings'.
9 You can now connect your WebCam.
5.2 Connecting the WebCam to your PC / laptop

1 Be sure to run the installation CD first, before connecting the WebCam to the PC / laptop. For this, refer to 5.1 'Installing the WebCam software'.
2 Turn on the PC / laptop.
3 Connect the USB connector of the USB cable to the USB port of the PC / laptop. • The WebCam will now derive its power from the PC / laptop.
4 Aim the webcam as required.
5 Use the clamp to attach the WebCam to your flat PC monitor or laptop screen.
6 WebCam settings
All SPC2050NC WebCam settings can be adjusted in the property pages. The Philips CamSuite application however, enables you to easily access a number of the most used settings (properties). When activating instant messaging or VoIP service (Skype, Windows® Live Messenger, Yahoo! Messenger, etc.), the Philips CamSuite control panel appears automatically.
The control panel can also be accessed by double clicking the Philips CamSuite icon 📞 in the Windows taskbar (bottom right of your screen).
The following settings can be made via the Philips CamSuite control panel:
- WebCam Companion (launches the WebCam Companion application);
- Fun settings;
- Image settings;
- Audio settings;
- Advanced settings (Property pages).

6.1 WebCam Companion
Via WebCam Companion you have access to WebCam features as:
- capturing images;
- making video recordings;
- adjusting monitor settings;
- broadcasting your videos over the Internet.
- Click the ‘’ button in the Philips CamSuite control panel or double click the WebCam Companion icon ‘on the desktop to launch WebCam Companion.
- For detailed information on how to use WebCam Companion, refer to the 'Help' menu or press the 'F1' button within the application.

Note:
WhenWebCam Companion is not selected during installation, the WebCam Companion icon ‘will not be visible on the desktop and a message will appear when clicking the ‘button. For installation refer to 5.1 ‘Installing the WebCam software’.
6.2 Fun settings menu
In the Fun settings menu you can juice up your video chats and video calls by placing fun logos and fun frames, adding fun effects and changing your background image.
- Click the ‘💡’ button in the Philips CamSuite control panel to open the Fun settings menu.

- Check the box before an item to activate that item.
- Click the ▶' button to open the control panel for that item.
- Click the '▼' button to close the control panel for the selected item.
- Click the ‘ ’ button again to return to the Philips CamSuite control panel.
6.2.1 Change Your Background
Enables you to replace the actual (real-time) background image by one from the WebCam background list or by one of your own pictures.
1 Open the Change Your Background control panel ('▶').
- In the control panel, a background image is shown in a preview window. The background name is displayed above the window. By default, the last selected background is shown. When this option is enabled for the first time, the first image from the WebCam background list is selected and shown.
2 Use the ‘◀’ and ‘▶’ buttons on both sides of the preview window to select a background from the WebCam background list.
Or:
Use the 'Browse' button to browse and load pictures from your computer's hard disk.

3 Take a picture of the actual background: Click 'Take Picture' and step out of the WebCam field of view.
- Three seconds are now counted down and a picture of the actual background is taken.
You will hear a shutter sound. - The actual background is now replaced by the selected background.
Notes:
When changing the background, make sure that:
- the actual background is static. There should be no movement within the WebCam field of view. Not even the movement of a curtain.


- there is sufficient light in the room. The better the lighting conditions, the better the performance of the ‘Change Your background’ feature.


• lighting conditions are not changed.
Even a slight change in the lighting conditions will negatively influence the image.
• the colors of the cloths you wear are not the same as the background color.


- the WebCam does not move, even the slightest movement will negatively influence the image.


4 Use the tuning slider 'to optimize image quality.
6.2.2 Fun frame
Enables you to place an overlay (frame) over the current video stream.
1 Open the Fun frame control panel ('▶').
- In the control panel, a frame image is shown in a preview window. The frame name is displayed above the window. By default, the last selected frame is shown. When this option is enabled for the first time, the first frame from the WebCam frame list is selected and shown.
2 Use the ‘◀’ and ‘▶’ buttons on both sides of the preview window to select a frame from the WebCam frame list.

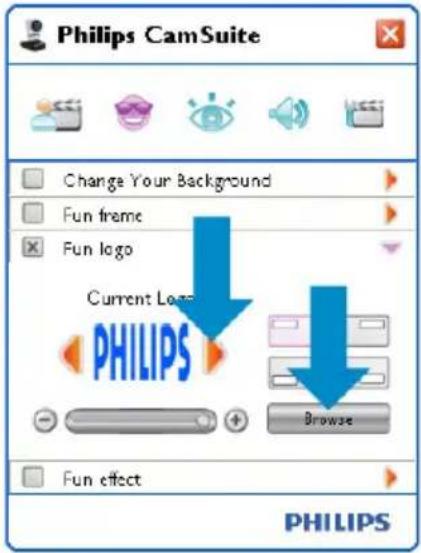
6.2.3 Fun logo
Enables you to add fun logos to the image. You can add a logo from the WebCam list of logos or one of your own logos (pictures).
1 Open the Fun logo control panel ('▶').
- In the control panel, a logo is shown in a preview window. The logo name is displayed above the window. By default, the last used logo is shown. When this option is enabled for the first time, the Philips logo will be selected and shown.
2 Use the ‘◀’ and ‘▶’ buttons on both sides of the preview window to select a logo from the WebCam logo list.
Or:
Use the 'Browse' button to browse and load pictures from your computer's hard disk.
6.2.4 Fun effect
Enables you to add fun effects to your video recordings and video calls. For example, you can display the video with canvas effect, distortion effect, embossing effect and many more.
1 Open the Fun effect control panel ('▶').
- In the control panel, an effect is shown in a preview window. The fun effect name is displayed above the window. By default, the last selected effect is shown. When this option is enabled for the first time, the first effect from the WebCam effect list is selected and shown.
2 Use the ‘◀’ and ‘▶’ buttons on both sides of the preview window to select an effect from the WebCam effect list.

6.3 Image settings menu
Enables you to optimize image quality.
- Click the ‘’ button in the Philips CamSuite control panel to open the Image settings menu.

- Check the box before an item to activate that item.
- Click the '▶' button to open the control panel for that item.
- Click the '▼' button to close the control panel for the selected item.
- Click the “’ button again to return to the Philips CamSuite control panel.
6.3.1 Digital zoom
Gets an object closer.
1 Open the Digital zoom control panel ('▶').

2 Use the slider to dynamically zoom in and out.
- The frame shows the position to the overall image. The frame increases / decreases according to zoom factor.
- Use the panning arrows (left / right / up / down) to move the frame.
- Use the center button to position the frame in the center of the image.

Note!
Digital zoom magnifies the pixels but not the actual image. It degrades image quality.
6.3.2 Face tracking
If you activate the Face tracking option, the WebCam will track your face. This gives you more convenience while video chatting, because you stay in the centre of the image even if you move during a video conference.
- Just check the box before Face tracking to activate this option.

6.3.3 Pixel Plus
This option enables Philips patented Pixel Plus technology and helps you to enhance the image and video quality of the WebCam, giving you natural-looking, razor sharp pictures with incredible detail. Use the slider to adjust the level of Pixel Plus, added to the live video of your WebCam.
1 Use the slider to adjust the level of Pixel Plus, added to the live video of your WebCam.

6.3.4 Autofocus
Autofocus ensures razor sharp videos and photos without the need for manual adjustment.
1 Select 'Autofocus' in order to disable the slider. If Manual focus is selected, use the slider to adjust the focus manually. The 'icon' icon is for close range, the 'icon' is for focusing further away.

6.4 Audio settings menu
Enables you to optimize audio quality.
- Click the ‘’ button in the Philips CamSuite control panel to open the Audio settings menu.
6.4.1 Echo reduction
This echo reduction technology suppresses echoes so the other person hears your voice more clearly.
- Just check the box before Echo reduction to activate this option.

6.4.2 Noise reduction
Significantly reduces all stationary noises picked up by the WebCam's microphone, such as air conditioner noise and the noise made by the fan inside your computer. It enhances clarity of speech in both quiet and noisy environments. The result is more listening comfort and easier communication.
- Just check the box before Noise reduction to activate this option.


Note:
Only one of the two reductions can be active at the same time.
6.5 Property pages
In the Property pages you can adjust all possible SPC2050NC WebCam settings (properties): General,Video,Audio and Features.

Note!
For easy access to the most used WebCam settings (Fun, Image, Audio), open the Philips CamSuite control panel and make settings as described in the previous chapters.
- Click the 'button in the Philips CamSuite control panel to open the Property pages.
• The General settings screen appears.

6.5.1 General settings
- You can now adjust the following general settings:
1 Flickerless image
The Flickerless image option should only be used under flickering light conditions (e.g. fluorescent or neon lamps) to prevent flickering or strangely colored video images. If this option is used under normal lighting conditions the video image may be overexposed.
2 Region
If you are using the Philips SPC2050NC in Europe, select '50 Hz' and if you are using the Philips SPC2050NC in North America, select '60 Hz'. For Asia this setting is dependent on the local mains output. E.g. for China, select '50 Hz' and for Taiwan, select '60 Hz'. For Japan the setting is region dependent. Please check your local mains output to find the correct 'Region' setting.
3 Autofocus
Refer to 6.3.4 'Autofocus' for an explanation of the feature and information on how to activate it via the Philips CamSuite control panel.
6.5.2 Video settings
- Click the Video tab.
• The Video settings screen appears.

- You can now adjust the following video settings:
4 Picture enhancement on/off
Refer to 6.3.3 'Pixel Plus' for an explanation of the feature and information on how to activate it via the Philips CamSuite control panel.
5 Demo mode
Select 'Demo mode' to see a 'live preview' video image on your monitor so you can see the effect of the adjustment on your screen. The lower part of the screen will be split in two halves; on the left you see the current picture, on the right you see the enhanced picture.
In order to see the 'live preview', you need to have an image beforehand (for instance created with WebCam Companion, refer to 6.1 'WebCam Companion').
6 Full automatic control: on/off
This full automatic control mode provides a very easy way to get the best out of your Philips SPC2050NC WebCam. Or you can choose to have maximum manual control over the WebCam settings by switching the full automatic control mode off. Full automatic control 'on' is the preferred setting for normal use.
Techniques active within full automatic control mode are:
• Automatic exposure control and automatic white balance control, to provide the best video source signal possible;
• Automatic frame rate selection for improved WebCam sensitivity in low light conditions.
7 Frame rate
You can use the scroll open menu to set the frame rate of the video you wish to capture. E.g. 30 fps means that the WebCam will capture video at 30 frames per second.
8 Reset
Press this button if you would like to reset the WebCam settings to the default factory settings.
9 Restore
Press this button if you would like to restore your personal preferred settings.
10 Save
Press this button if you would like to save your personal preferred settings.
11 Auto Exposure
The exposure is the amount of light received by the sensor and is determined by how long the sensor is exposed to capture a snapshot or video frame. The result depends on the sensitivity of the sensor. The WebCam will find the optimal setting if you select the automatic exposure option.
Shutter speed
The shutter speed determines how long the camera shutter remains open as a picture is taken. The slower the shutter speed, the longer the exposure time. The shutter speed controls the total amount of light reaching the sensor. Use the slider to set the desired shutter speed.
Gain
In video, gain is the amount of white in a video picture. Use the slider to set the desired gain level.
12 Auto White Balance
Most light sources are not 100% pure white but have a certain ‘color temperature’. Normally our eyes compensate for lighting conditions with different color temperatures.
If the automatic white balance is selected, the WebCam will look for a reference point which represents white. It will then calculate all other colors based on this white point and compensate the other colors accordingly, just like the human eye.
13 Brightness
Brightness enables you to adjust the brightness of the displayed image or video to suit your own preference. Use the slider to find your preferred setting.
14 Contrast
Contrast enables you to control the ratio between dark and light according to your own preference. Use the slider to find your preferred setting.
15 Gamma
Gamma enables you to brighten dark areas within the displayed image or video and visualize more details without over-exposing already light areas. Use the slider to find your preferred setting.
16 Saturation
Saturation enables you to set the color reproduction from black and white to a full color image or video according to your own preference. Use the slider to find your preferred setting.
17 Black and white
The 'Black and white' checkbox is used to switch from color images to black and white and back.
18 Backlight compensation
Turn on the backlight compensation to improve the image quality when you have a scene where the background has a high illumination level (for instance when you are sitting in front of a bright light).
19 Mirror
Clicking the 'Mirror Image' checkbox flips the image horizontally. You can use this feature when you want to use the Philips SPC2050NC and monitor as a mirror, or to take pictures of mirrored images.
6.5.3 Audio settings
- Click the Audio tab.
• The 'Audio settings' screen appears.

- You can now adjust the audio volume setting:
20 Noise reduction
Refer to 6.4.2 'Noise reduction' for an explanation of the feature and information on how to activate it via the Philips CamSuite control panel.
21 Echo reduction
Refer to 6.4.1 'Echo reduction' for an explanation of the feature and information on how to activate it via the Philips CamSuite control panel.
22 Volume slider
This slider provides manual control over the microphone.
6.5.4 Features settings
- Click the Features tab.
• The 'Features settings' screen appears.

- You can now adjust the following features settings:
23 Face tracking
Refer to 6.3.2 'Face tracking' for an explanation of the feature and information on how to activate it via the Philips CamSuite control panel.
24 Digital zoom
Refer to 6.3.1 'Digital zoom' for an explanation of the feature and information on how to activate it via the Philips CamSuite control panel.
25 Change Background
Refer to 6.2.1 'Change Your Background' for an explanation of the feature and information on how to activate it via the Philips CamSuite control panel.
26 Add logo
Refer to 6.2.3 'Fun logo' for an explanation of the feature and information on how to activate it via the Philips CamSuite control panel.
27 Video Frames
Refer to 6.2.2 'Fun frame' for an explanation of the feature and information on how to activate it via the Philips CamSuite control panel.
28 Video Effects
Refer to 6.2.4 'Fun effect' for an explanation of the feature and information on how to activate it via the Philips CamSuite control panel.
7 Operating the WebCam
The Philips SPC2050NC WebCam works with all instant messaging and VoIP (Voice over Internet Protocol) applications such as Skype, Windows® Live Messenger, Yahoo! Messenger, AOL Instant Messenger and QQ.
After installing an application, make the required WebCam settings within the application in order to be able to properly use the WebCam via the specific application. For this, refer to the help function of the application.
Also refer to 6.1 'WebCam Companion'.
8 Technical data
Sensor 2.0 MP CMOS
Real video resolution (Max.) 2.0 MP
Real still image resolution (Max.) 2.0 MP
Interpolated still image resolution (Max.) 8.0 MP
Frames per second 90 fps
F-number 2.0
Lens view angle 70 degrees, wide-angle
Lens construction 5 elements, glass
Autofocus Yes
Minimum subject illumination < 2 lux
Data format YUY2, MJPEG
Interfacing USB 2.0
USB video class UVC
USB cable length 80 cm
Microphone Two digital built-in
Power Supplied via USB cable
Voltage requirements 5V ( --- ), 0.5A
9 Frequently asked questions (FAQ)
9.1 How can I adjust image quality?
The default settings of the Philips WebCam usually offer the best possible image quality. It might be possible that you are not completely satisfied with the current image quality. In this case, follow the steps below to adjust image quality according to you own personal preferences.
1 Open a WebCam viewer such as WebCam Companion or an instant messaging service such as Skype, Windows® Live Messenger or Yahoo! Messenger to see what you are filming.
- The Philips CamSuite control panel appears automatically. If not, open Philips CamSuite by double clicking the Philips CamSuite icon 📄 in the Windows taskbar (bottom right of your screen).

2 Click the ‘☐’ button to open the property pages.
• The General settings screen appears.
3 Check the Region setting for the WebCam and adjust if necessary.
- Select '50 Hz' for Europe and China.
- Select '60 Hz' for North America and Taiwan.
- For other regions, check your local mains output to find the correct ‘Region’ setting.
4 Click 'OK' to save your settings.

5 Click the Video tab.
• The Video settings screen appears.

6 Adjust the gamma value of the displayed image or video. The gamma setting enables you to visualize more details.
- Use the slider to find your preferred setting. Slide to the left to see more details; slide to the right to see less details. Gamma
7 Adjust the brightness of the displayed image or video.
- Use the slider to find your preferred setting. Sliding to the left makes the image darker; sliding to the right makes the image brighter.

8 Click 'OK' to save your settings.
9.2 The microphone of my Philips WebCam or headset does not work (properly). What should I do?
9.2.1 Windows ® XP (SP2)
1 Click the Windows 'Start' button (bottom left of your screen).
2 Open the 'Control panel'.
3 Click 'Sound, speech and audio devices'.
4 Click 'Sound and Audio Devices'.
5 Click the 'Voice' tab in the screen that appears.
6 Set the Philips WebCam or the connected headset as default device for 'Voice recording'.
7 Click 'OK' to save your settings.

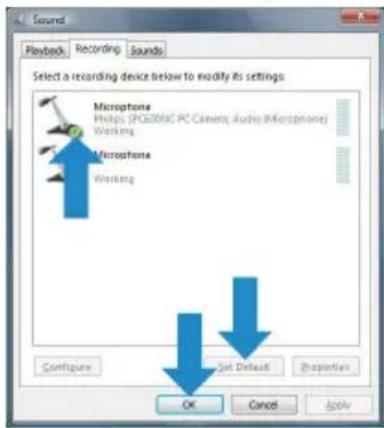
9.2.2 Windows ® Vista
1 Click the Windows 'Start' button (bottom left of your screen).
2 Open the 'Control panel'.
3 Click 'Hardware and Sound'.
4 Click 'Sound'.
5 Click the 'Recording' tab in the screen that appears.
6 Select the Philips WebCam or the connected headset and click 'Set Default'.
7 Click 'OK' to save your settings.
9.3 Using my Philips WebCam makes my PC / laptop run slow. What should I do?
1 Close software applications that do not necessarily need to run.
2 Open the Philips CamSuite control panel by double clicking the Philips CamSuite icon in the Windows taskbar (bottom right of your screen).
3 Click the 📋button to open the property pages.
• The General settings screen appears.
4 Click the Features tab.
• The Feature settings screen appears.
5 Check whether the following features are enabled (boxes checked):
- Change Background;
- Add logo;
- Video Frames;
- Video Effects.
If enabled, disable these features by dischecking the boxes.

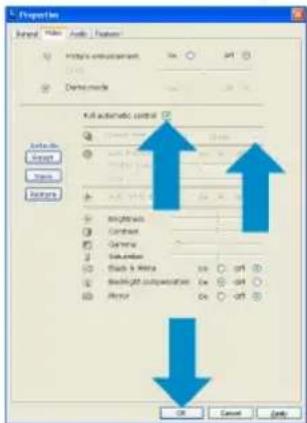
6 Click the Video tab.
• The Video settings screen appears.
7 Check whether Full automatic control is enabled (box checked). If enabled, disable Full automatic control by dischecking its box.
8 Set Frame rate to a minimum of 5 fps.
9 Click 'OK' to save your settings.

Note!
The maximum frame rate (frames per second (fps) produced by the WebCam) and the maximum image resolution depend on the specifications of your PC / laptop. The WebCam software will automatically adjust frame rate and resolution as good as possible for your particular situation. It might be possible that the specifications of your PC / laptop do not meet the requirements for maximum frame rate and resolution setting.
9.4 How can I reset the settings of my Philips WebCam to the default factory settings?
1 Open the Philips CamSuite control panel by double clicking the Philips CamSuite icon in the Windows taskbar (bottom right of your screen).
2 Click the 🔊 button to open the property pages. • The General settings screen appears.
3 Click the Video tab.
4 Click the 'Reset' button.
- All WebCam settings are now reset back to the default factory settings.
5 Click 'OK' to save your settings.

9.5 How can I clean the lens of my Philips WebCam?
1 Blow the dust from the lens, using an air brush.
2 Use a lens cleaning tissue to softly wipe the lens.Wipe from centre to edge in a counterclockwise direction.
- If there are still spots on the lens, dip a cotton bud into a lens cleaning fluid and softly wipe the lens, as described in step 2.
3 When the cleaning fluid has evaporated, clean the lens using a lens cleaning tissue.

All rights reserved. Reproduction in whole or in part is prohibited without the prior written consent of the copyright owner. The information presented in this document does not form part of any quotation or contract, is believed to be accurate and reliable and may be changed without notice.
No liability will be accepted by the publisher for any consequence of its use.
Publication there of does not convey nor imply any license under patent- or other industrial or intellectual property rights.
August 2008
www.philips.com


- CONTENTS
- 1 THINGS YOU SHOULD KNOW 2-4
- 2 YOUR WEBCAM 4
- 3 WHAT'S IN THE BOX? 5
- 4 FUNCTIONAL OVERVIEW 5
- 5 INSTALLATION 6-7
- 6 WEBCAM SETTINGS 8-16
- 7 OPERATING THE WEBCAM 16
- 8 TECHNICAL DATA 17
- 9 FREQUENTLY ASKED QUESTIONS
- 1 THINGS YOU SHOULD KNOW
- SAFETY PRECAUTIONS
- COPYRIGHT
- DISCLAIMER
- FCC COMPLIANCE
- NOTE
- ENVIRONMENTAL INFORMATION
- WARNING
- SYSTEM REQUIREMENTS
- DISCLAIMER OF WARRANTY
- LIMITATIONS OF DAMAGES
- 2 YOUR WEBCAM
- WELCOME
- VIDEO
- VIDEO SHARING
- SNAPSHOT IMAGES
- EDITING AND SPECIAL EFFECTS
- 3 WHAT'S IN THE BOX
- 4 FUNCTIONAL OVERVIEW
- 1 SNAPSHOT BUTTON
- 2 ROTATING FOOT
- 3 CLAMP
- 4 USB CONNECTOR
- 5 TWO DIGITAL MICROPHONES
- 6 POWER LED
- 7 COVER
- 5 INSTALLATION
- 5.1 INSTALLING THE WEBCAM SOFTWARE
- NOTES
- OR
- 5.2 CONNECTING THE WEBCAM TO YOUR PC / LAPTOP
- 6 WEBCAM SETTINGS
- 6.1 WEBCAM COMPANION
- 6.2 FUN SETTINGS MENU
- 6.2.1 CHANGE YOUR BACKGROUND
- 6.2.2 FUN FRAME
- 6.2.3 FUN LOGO
- 6.2.4 FUN EFFECT
- 6.3 IMAGE SETTINGS MENU
- 6.3.1 DIGITAL ZOOM
- 6.3.2 FACE TRACKING
- 6.3.3 PIXEL PLUS
- 6.3.4 AUTOFOCUS
- 6.4 AUDIO SETTINGS MENU
- 6.4.1 ECHO REDUCTION
- 6.4.2 NOISE REDUCTION
- 6.5 PROPERTY PAGES
- 6.5.1 GENERAL SETTINGS
- 1 FLICKERLESS IMAGE
- 2 REGION
- 3 AUTOFOCUS
- 6.5.2 VIDEO SETTINGS
- 4 PICTURE ENHANCEMENT ON/OFF
- 5 DEMO MODE
- 6 FULL AUTOMATIC CONTROL: ON/OFF
- 7 FRAME RATE
- 8 RESET
- 9 RESTORE
- 10 SAVE
- 11 AUTO EXPOSURE
- SHUTTER SPEED
- GAIN
- 12 AUTO WHITE BALANCE
- 13 BRIGHTNESS
- 14 CONTRAST
- 15 GAMMA
- 16 SATURATION
- 17 BLACK AND WHITE
- 18 BACKLIGHT COMPENSATION
- 19 MIRROR
- 6.5.3 AUDIO SETTINGS
- 20 NOISE REDUCTION
- 21 ECHO REDUCTION
- 22 VOLUME SLIDER
- 6.5.4 FEATURES SETTINGS
- 23 FACE TRACKING
- 24 DIGITAL ZOOM
- 25 CHANGE BACKGROUND
- 26 ADD LOGO
- 27 VIDEO FRAMES
- 28 VIDEO EFFECTS
- 7 OPERATING THE WEBCAM
- 8 TECHNICAL DATA
- 9 FREQUENTLY ASKED QUESTIONS (FAQ)
- 9.1 HOW CAN I ADJUST IMAGE QUALITY
- 9.2 THE MICROPHONE OF MY PHILIPS WEBCAM OR HEADSET DOES NOT WORK (PROPERLY). WHAT SHOULD I DO
- 9.2.1 WINDOWS ® XP (SP2)
- 9.2.2 WINDOWS ® VISTA
- 9.3 USING MY PHILIPS WEBCAM MAKES MY PC / LAPTOP RUN SLOW. WHAT SHOULD I DO
- 9.4 HOW CAN I RESET THE SETTINGS OF MY PHILIPS WEBCAM TO THE DEFAULT FACTORY SETTINGS
- 9.5 HOW CAN I CLEAN THE LENS OF MY PHILIPS WEBCAM
Brand : PHILIPS
Model : SPZ6500
Category : Webcam