
UKS 16158 - Refrigerator AMICA - Free user manual and instructions
Find the device manual for free UKS 16158 AMICA in PDF.


| Product type | Refrigerator |
| Brand | Amica |
| Model | UKS 16158 |
| Height (cm) | 143 |
| Width (cm) | 55 |
| Depth (cm) | 60 |
| Net weight (kg) | 35 |
| Power supply | 220-240 V ~ 50 Hz |
| Energy class | A++ |
| Annual consumption (kWh) | 140 |
| Gross refrigerator capacity (L) | 180 |
| Gross freezer capacity (L) | 25 |
| Defrost type | Automatic defrost (fan cooled) |
| Interior lighting | LED |
| Adjustable compartments | Adjustable glass shelves |
| Adjustable feet | Yes |
| Door reversibility | Yes |
| Care and cleaning | Clean with a soft cloth and soapy water |
| Noise level (dB) | 39 |
| Spare parts | Available through Amica after-sales service |
| Reparability | Reparability index not provided |
Frequently Asked Questions - UKS 16158 AMICA
User questions about UKS 16158 AMICA
0 question about this device. Answer the ones you know or ask your own.
Ask a new question about this device
Download the instructions for your Refrigerator in PDF format for free! Find your manual UKS 16158 - AMICA and take your electronic device back in hand. On this page are published all the documents necessary for the use of your device. UKS 16158 by AMICA.
USER MANUAL UKS 16158 AMICA
natural_image
Simple icon of a document with a minus sign and an asterisk (no text or symbols)UM130.3 AA / UKS 16158 / UM130.3 / UKS 16148
PL - Spis treści
WSKAZÓWKI DOTYCZĄCE BEZPIECZEŃSTWA 17 INSTALACJA I WARUNKI PRACY URZĄDZENIA 22
INSTALACJA PRZED PIERWSZYM URUCHOMIENIEM 22
MINIMALNE ODLEGŁOŚCI OD ŻRÓDEŁ CIEPŁA 22
PODŁĄCZENIE ZASILANIA 23
ODŁĄCZENIE OD ZASILANIA 23
KLASA KLIMATYCZNA 23
ROZPAKOWANIE 24 USUWANIE ZUŻYTYCH URZĄ DZEŃ 25 STEROWANIE 26
STEROWANIE URZĄDZENIEM 26
EN - Table of contents
GUIDELINES CONCERNING THE SAFETY OF USE 40
INSTALLATION AND OPERATING CONDITIONS OF THE APPLIANCE 45
INSTALLATION BEFORE USING THE APPLIANCE FOR THE FIRST TIME 45
MINIMUM DISTANCES FROM THE HEAT SOURCES 45
MAINS CONNECTION 46
DISCONNECTING THE MAINS 46
CLIMATE RANGE 46
UNPACKING 47
DISPOSAL OF OLD APPLIANCE 48
CONTROLS 49
APPLIANCE CONTROLS 49
ADJUST TEMPERATURE INSIDE THE APPLIANCE 49
ADDITIONAL INFORMATION ON THE TEMPERATURE 50
LIGHTING 50
REPLACE THE LIGHT BULB 50
OPERATION AND FUNCTIONS 51
STORAGE OF FOOD IN THE FRIDGE-FREEZER 51
FREEZING FOOD** 51
USING THE REFRIGERATOR EFFICIENTLY 53
PRACTICAL EVERYDAY TIPS 53
UNDERSTANDING THE STARS 53
PRACTICAL TIPS 54
FOOD THAT SHOULD NOT BE STORED IN A REFRIGERATOR 54
DEFROSTING, WASHING AND MAINTENANCE 55
DEFROSTING THE FRIDGE*** 55
DEFROSTING THE FREEZER** 55
DEFROST THE FREEZER CHAMBER FOLLOWING STEPS:** 56
AUTOMATIC FRIDGE DEFROSTING**** 56
AUTOMATIC FRIDGE DEFROSTING**** 56
WASHING THE FRIDGE AND FREEZER CHAMBERS MANUALLY**** 56
TAKING OUT AND PUTTING IN THE SHELVES***** 56
TAKING OUT AND PUTTING IN THE DOOR SHELF***** 56
TROUBLE-SHOOTING 57
REVERSE THE DOOR 59
INSTALLATION 59
REVERSE THE FREEZER COMPARTMENT DOOR 60
WARRANTY AND AFTER SALES SERVICE 61
WARRANTY 61
GARANTIE, NACHVERKAUF-SERVICE 84
GARANTIE 84
CS - Obsah
POKYNY TÝKAJÍCÍ SE BĘZPEČNOSTI POUŽÍVÁNÍ 86 INSTALACE A PROVOZNI PODMINKY SPOTREBICE 91
INSTALACE PŘED PRVNÍM SPUŠTĚNÍM 91
MINIMÁLNÍ VZDÁLENOSTI OD TEPELNÝCH ZDROJŮ 91
PŘIPOJENÍ NAPÁJENÍ 92
ODPOJENÍ OD NAPÁJENÍ 92
KLIMATIČKÁ TRÍDA 92
VYBALENI 93
LIKVIDAÇE OPOTŘEBOVANÝCH ZAŘÍZENÍ 94 OVLÁDÁNI 95
OVLÁDÁNÍ ZAŘÍZENÍ 95
REGULACE TEPLOTY UVNITŘ ZAŘÍZENÍ 95
DALŠÍ INFORMACE O TEPLOTĚ 96
OSVĚTLENÍ 96
VÝMĚNA OSVĚTLENÍ 96
OBSLUHA A FUNKCE 97
UCHOVÁVÁNÍ POTRAVIN V CHLADNIČCE A MRAZNIČCE 97
ZMRAZOVÁNÍ VÝROBKŮ** 97
JAK EKONOMICKY POUŽIVAT CHLADNIČKU 99
PRAKTICKÉ PORADY 99
CO ZNAMENAJÍ HVĚZDIČKY? 99
ZÓNY V CHLADNIČCE 100
PRODUKTY, KTERÉ BY NEMĚLY BÝT PŘECHOVÁVANÉ V CHLADNIČCE 100
ODMRAZOVÁNÍ, MYTÍ A ÚDRŽBA 101
ODMRAZOVÁNÍ CHLADNIČKY*** 101
ODMRAZOVÁNÍ MRAZNIČKY** 101
PRO ODMRAZENÍ MRAZICÍHO PROSTORU MRAZNIČKY JE TŘEBA** 102
AUTOMATICKÉ ODMRAZOVÁNÍ CHLADNIČKY**** 102
AUTOMATICKÉ ODMRAZOVÁNÍ MRAZNIČKY**** 102
RUČNÍ MYTÍ MRAZICÍHO PROSTORU CHLADNIČKY A MRAZNIČKY**** 102
VYTAHOVÁNÍ A VKLÁDÁNÍ POLIC ***** 102
VYTAHOVÁNÍ A VKLÁDÁNÍ DVERNÍHO REGÁLU ***** 102
URÇOVANI ZAVAD 103
DÔLEŽITÉ BEZPEČNOSTNÉ PQKYNY 109
INSTALÁCIA A PREVÁDZKOVÉ PODMIENKY SPOTREBIČA 114
INSTALÁCIA PRED PRVÝM SPUSTENÍM 114
MINIMÁLNE VZDIALENOSTI OD TEPELNÝCH ZDROJOV 114
PRIPOJENIE NAPÁJANIA 115
ODPOJENIE OD NAPÁJANIA 115
KLIMATICKÁ TRIEDA 115
ROZBALENIE 116
LIKVIDÁCIA ZARIADENÍ 117
OVLÁDANIE 118
OVLÁDANIE ZARIADENIA 118
NASTAVENIE TEPLOTY VO VNÚTRI ZARIADENIA 118
DODATOČNÉ INFORMÁCIE O TEPLOTE 119
OSVETLENIE 119
VÝMENA OSVETLENIA 119
OBSLUHA A FUNKCIE 120
UCHOVÁVANIE POTRAVÍN V CHLADNIČKE A MRAZNIČKE 120
ZMRAZOVANIE VÝROBKOV** 120
AKO EKONOMICKY POUŽIVAT CHLADNIČKU 122
PRAKTICKÉ RADY 122
ČO ZNAMENAJÚ HVIEZDIČKY? 122
ZÓNY V CHLADNIČKE 123
PRODUKTY, KTORÉ BY NEMALI BYŤ PRECHOVÁVANÉ V CHLADNIČKE 123
ODMRAZOVANIE, UMÝVANIE A ÚDRŽBA 124
ODMRAZOVANIE CHLADNIČKY*** 124
ODMRAZOVANIE MRAZNIČKY** 124
PRE ODMRAZENIE MRAZIACEHO PRIESTORU MRAZNIČKY JE POTREBA** 125
AUTOMATICKÉ ODMRAZOVANIE CHLADNIČKY**** 125
AUTOMATICKÉ ODMRAZOVANIE MRAZNIČKY**** 125
RUČNÉ UMÝVANIE KOMORY CHLADNIČKY A MRAZNIČKY**** 125
VYŤAHOVANIE A VKLADANIE POLÍC***** 125
VYTAHOVANIE A_VKLADANIE PRIEHRADKY***** 125
LOKALIZACIA ZAVAD 126
ZMENA SMERU OTVARANIE DVIEROK 128
INSTALÁCIA 128
ZMENA SMERU OTVÁRANIE DVIEROK KOMORY NÍZKEJ TEPLOTY
129
ZÁRUKA, POPREDAJNY SERVIS 130
ZÁRUKA 130
natural_image
Simple line drawing of a three chasing recycling symbol (no text or labels)natural_image
Symbol of a trash bin crossed out by two diagonal lines (no text or numbers present)
From now on, your daily housework will be easier than ever before. Your appliance Air*optionally easy to use and extremely efficient. After reading these Operating Instructions, operating the appliance will be easy.
Before being packaged and leaving the manufacturer, the appliance was thoroughly checked with regard to safety and functionality.
Before using the appliance, please carefully read these Operating Instructions. By following these instructions carefully you will be able to avoid any problems in using the appliance. It is important to keep these Operating Instructions and store them in a safe place so that they can be consulted at any time.
Follow these instructions carefully in order to avoid possible accidents.
Sincerely,
Amica
GUIDELINES CONCERNING THE SAFETY OF USE
- The appliance is intended for household use only.
- The manufacturer reserves the right to introduce changes which do not affect the operation of the appliance.
- Some provisions in this user manual are unified for refrigerating products of different types (for a refrigerator, refrigerator-freezer or freezer)
- The Manufacturer shall not be held liable for damage arising from the failure to observe the instructions contained in this manual.
- Keep this manual for future reference, or to pass it over to the next user.
- This appliance is not intended for use by persons (including children) with limited physical or mental capabilities and persons who lack experience or familiarity with the appliance.
- Do not allow children to use the appliance. Do not allow them to play with the appliance. They must not climb inside the drawers and swing on the doors.
- The appliance operates properly at the ambient temperature (see product fiche). Do not use it in the cellar, unheated summer cottage during autumn and winter.
- When placing, moving, lifting the appliance, do not hold the door handles, do not pull the condenser at the rear part of the refrigerator and do not touch the compressor unit.
-
When transporting, moving or positioning the fridge-freezer do not tilt it by more than 40° from the vertical position. Should such a situation occur, the appliance should be switched on after minimum 2 hours from its replacement in the right position (fig.2).
-
Pull the plug out from the mains socket before each maintenance activity. Do not pull on the cord, but hold the body of the plug instead.
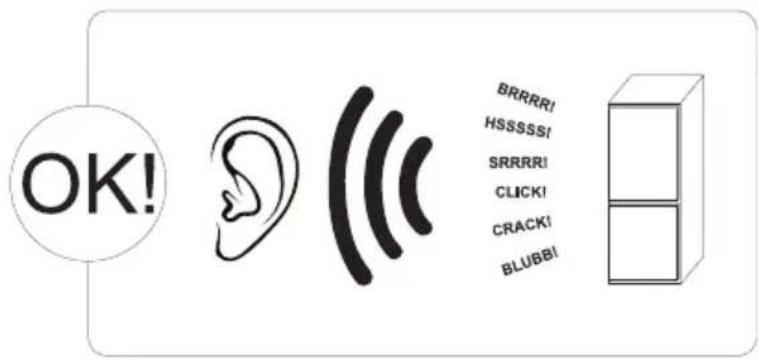
- The “cracking” sound, which the appliance may emit is caused by the expansion and contraction of parts as a result of temperature variations.
- For safety reasons do not repair the appliance yourself. Repairs carried out by persons who do not have the required qualifications may result in serious danger for the user of the appliance.
- Air the room in which the appliance is placed for a few minutes (the size of the room for a product containing isobuthane/R600a must be at least 4m^3 ) to avoid damage to the cooling system.
- Do not refreeze partly thawed products.
- Do not store beverages in bottles and cans, especially carbonated beverages, in the freezer chamber. The cans and the bottles may explode.
- Do not put frozen products, taken out directly from the freezer (lollies, ice cubes, etc.) into your mouth, their low temperature may cause severe frostbite.
- Make sure you do not damage the cooling system, by puncturing the refrigerant pipes in the evaporator or breaking the pipes. The refrigerant is flammable. If the refrigerant makes contact with the eyes, rinse them with clean water and call for medical assistance immediately.
- If the power wire gets broken, it should be replaced with a new one in a specialist repair shop.
- This appliance is intended for food storage, do not use it for other purposes.
- When performing activities, such as cleaning, maintenance or moving, the appliance must be completely disconnected from power supply (by pulling the plug out from the socket)
- This appliance can be used by children aged 8 years and older or by persons with physical, men-
tal or sensory handicaps, or by those who are inexperienced or unfamiliar with the appliance, provided they are supervised or have been instructed how to safely use the appliance and are familiar with risks associated with the use of the appliance. Ensure that children do not play with the appliance. Cleaning and maintenance of the appliance should not be performed by children unless they are 8 years or older and are supervised by a competent person.
- In order to obtain more space in the freezer, you can remove the drawers and place the food directly on the shelves. This has no effect on the product mechanical properties and cooling performance. Declared freezer capacity was calculated with the drawers removed.

WARNING: Risk of fire / flammable materials
- Children aged from 3 to 8 years are allowed to load and unload refrigerating appliances.
To avoid contamination of food, please respect the following instructions:
- Opening the door for long periods can cause a significant increase of the temperature in the compartments of the appliance.
- Clean regularly surfaces that can come in contact with food and accessible drainage systems.
- Store raw meat and fish in suitable containers in the refrigerator, so that it is not in contact with or drip onto other food.
- Two-star frozen-food compartments are suitable for storing pre-frozen food, storing or making ice-cream and making ice cubes.
- One-, two- and three-star compartments are not suitable for the freezing of fresh food
| Compartments TYPE | Target storage temp.[°C] | Appropriate food | |
| 1 | Fridge +2≤+8 | Eggs, cooked food, packaged food, fruits and vegetables, dairy products, cakes, drinks and other foods are not suitable for freezing. | |
| 2 | Freezer *** | ≤-18 | Seafood (fish, shrimp, shellfish), freshwater aquatic products and meat products (recommended for 3 months, the longer the storage time, the worse the taste and nutrition), suitable for frozen fresh food. |
| 3 | Freezer *** | ≤-18 | Seafood (fish, shrimp, shellfish), freshwater aquatic products and meat products (recommended for 3 months, the longer the storage time, the worse the taste and nutrition), are not suitable for frozen fresh food. |
| 4 | Freezer ** | ≤-12 | Seafood (fish, shrimp, shellfish), freshwater aquatic products and meat products (recommended for 2 months, the longer the storage time, the worse the taste and nutrition), are not suitable for frozen fresh food |
| 5 | Freezer * | ≤-6 | Seafood (fish, shrimp, shellfish), freshwater aquatic products and meat products (recommended for 1 months, the longer the storage time, the worse the taste and nutrition), are not suitable for frozen fresh food. |
| 6 | 0-star compartment | -6≤0 | Fresh pork, beef, fish, chicken, some packaged processed foods, etc. (Recommended to eat within the same day, preferably no more than 3 days). Partially encapsulated processed foods (non-freezable foods) |
| 7 | Chill 2≤+3 | Fresh/frozen pork, beef, chicken, freshwater aquatic products, etc.(7 days below 0°C and above 0°C is recommended for consumption within that day, preferably no more than 2 days). Seafood (less than 0 for 15 days, it is not recommended to store above 0°C) | |
| 8 | Fresh Food | 0≤+4 | Fresh pork, beef, fish, chicken, cooked food, etc. (Recommended to eat within the same day, preferably no more than 3 days) |
| 9 | Wine | +5≤+20 | red wine,white wine,sparkling wine etc. |
- Note: please store different foods according to the compartments or target storage temperature of your purchased products.
- If the refrigerating appliance is left empty for long periods, switch off, defrost, clean, dry, and leave the door open to prevent mould developing within the appliance.
- Water dispenser cleaning (special for water dispenser products): Clean water tanks if they have not been used for 48 h; flush the water system connected to a water supply if water has not been drawn for 5 days.
- Pursuant to Commission Regulation (EU) 2019/2019, the minimum availability period for spare parts necessary to repair the appliance is 7 or 10 years depending on the type and purpose of the spare part.
- The list of spare parts and the ordering procedure are available on the websites of the manufacturer, importer or an authorized representative.
- For more information about the product, please refer to the EU EPREL Product Database at https://eprel.ec.europa.eu. For more information, please use your mobile device to scan the QR code on the energy label or enter the product model listed on the energy label in the EPREL search engine https://eprel.ec.europa.eu/
INSTALLATION AND OPER- ATING CONDITIONS OF THE APPLIANCE
This refrigeration appliance is intended for use as a built-in appliance.
Installation before using the appliance for the first time
- Take the product out of the package, remove the scotch tape protecting the door and the equipment. Any remaining adhesive stains may be removed with a mild washing agent.
- Do not throw away the polystyrene elements of the packaging. If it is necessary to transport the fridge-freezer, pack it in the polystyrene elements and film as well as protecting it with scotch tape
- Clean the interior surface of the fridge- freezer and the elements of the equipment with a washing agent dissolved in lukewarm water, then wipe it dry.
- Place the fridge-freezer on an even, flat and stable surface, in dry, aired and shaded room, far from the heat sources such as: oven, hob, central heating radiators, central heating pipes, hot water installation, etc.
- On the exterior surface of the product may be a protective foil, this foils should be removed.
- Make sure the appliance is placed in a horizontal position by screwing in the 2 adjustable front legs (fig. 3)
- To ensure that the door opens freely, the distance between the side of the appliance (on door hinges side) and the wall is shown on figure 5.*
- Ensure adequate ventilation of the room and free air circulation from all sides of the appliance (fig. 6).*
Minimum distances from the heat sources
• from the electric gas and other ovens - 30 mm,
• from oil or coal fired ovens - 300 mm,
• from built-in ovens - 50 mm
If there is no possibility of ensuring the above-mentioned distances, provide an appropriate insulation board.
Warning:
- The rear wall of the refrigerator, in particular, the condenser and other elements of the cooling system must not contact other elements, which may damage them, (e.g. central heating pipes and the water supply pipes).
- It is forbidden to readjust or modify any parts of the unit. It is crucial not to damage the capillary tube visible in the compressor recess. The tube may not be bent, straightened or wound.
- If the capillary tube is damaged by the user the guarantee will be void (fig. 8).
- In some models the handle is put into the appliance, You should screw it with Your own screwdriver,
Mains connection
- Prior to connection, it is recommended to set the temperature control knob to an "OFF" or other position that disconnects the appliance from the power supply (See page with the control description).
- This appliance should be connected to AC 220-240V '50Hz supply socket. The socket must be fitted properly, and must be supplied with an earthing conduit and a 10A fuse.
- It is a legal requirement that the appliance is properly earthed. The manufacturer will not be held liable for any damage or injury which may result from the failure to fulfil this requirement.
- Do not use adapters, multiple sockets and two-wire extension leads. If it is necessary to use the extension lead, it must be equipped with a protection ring and a single socket and must have a VDE/GS safety certificate.
- If an extension lead is used (with a protection ring and safety certificate), its socket must be located at a safe distance, away from the sinks, and must not be in a place where it could be flooded by water or waste water.
- See the type plate at the lower part of the internal wall of the appliance for detailed specifications**.
Disconnecting the mains
Make sure the appliance can be easily disconnected from the mains, either by pulling the plug out of the mains socket, or by switching the two-pole switch off (fig. 9).
Climate range
The information about the climate range of the appliance is provided on the rated plate. It indicates at which ambient temperature (that is, room temperature, in which the appliance is working) the operation of the appliance is optimal (proper).
Climate class Allowable ambient temperature
| SN Extended Temperate | This refrigeration appliance is intended for use at an ambient temperature ranging between 10°C and 32°C |
| N Temperate | This refrigeration appliance is intended for use at an ambient temperature ranging between 16 °C and 32°C |
| ST Subtropical | This refrigeration appliance is intended for use at an ambient temperature ranging between 16 °C and 38 °C |
| T Tropical | This refrigeration appliance is intended for use at an ambient temperature ranging between 16 °C and 43 °C |
UNPACKING

natural_image
Simple line drawing of a three chasing recycling symbol (no text or labels)During transportation, protective packaging was used to protect the appliance against any damage. After unpacking, please dispose of all elements of packaging in a way that will not cause damage to the environment.
All materials used for packaging the appliance are environmentally friendly; they are 100% recyclable and are marked with the appropriate symbol.
Important! Packaging materials (bags, polyethylene, polystyrene, etc.) should be kept away from children during unpacking.
DISPOSAL OF OLD APPLIANCE

natural_image
Symbol of a trash bin crossed out by two diagonal lines (no text or numbers present)
In accordance with European Directive 2012/19/EU and local legislation regarding used electrical and electronic goods, this appliance is marked with the symbol of the crossed-out waste container. This marking indicates that the appliance must not be disposed of together with other household waste after it has been used.
The user is obliged to hand it over to waste collection centre collecting used electrical and electronic goods. The collectors, including local collection points, shops and local authority departments provide recycling schemes.
Proper handling of used electrical and electronic goods helps avoid environmental and health hazards resulting from the presence of dangerous components and the inappropriate storage and processing of such goods.
CONTROLS
Appliance controls
The control panel is shown in figure 10. For reference it is also shown below:
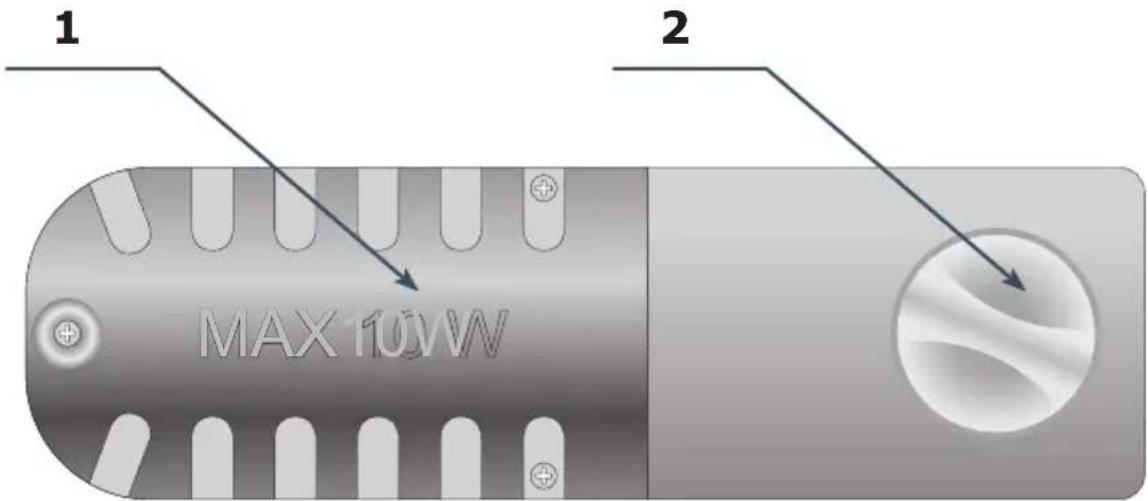
1 — Light
2 — Témerature control dial
Adjust temperature inside the appliance
Turn the dial to adjust the temperature in the appliance:
OFF/0 position Appliance is off
Setting 1 The highest temperature inside the appliance (warmer)
Settings 2-5 Medium temperature inside the appliance
Setting 6 The lowest temperature inside the appliance (cooler)
Note:
- The temperature control dial in your appliance can be marked differently than in this manual. The general principle of operation is described above.
- If there is no position marked "OFF" or "0" on the dial, turn off your appliance by unplugging the power cord from the wall outlet. Before unplugging set the lowest setting on the temperature control dial.
Additional information on the temperature
- The temperature inside the appliance is influenced by many factors. How you set the temperature control dial depends on the ambient temperature, sun exposure, how often you open the door and the amount of food stored. The middle setting of the dial is most optimal in most cases.
- Do not put food into the fridge freezer before it has reached its operating temperature, which takes minimum 4 hours.
- Do not change the temperature settings due to the change in the season of the year. The ambient temperature increase will be detected by the sensor and the compressor will be switched on automatically for a longer period of time in order to maintain the temperature set inside the chambers.
- The slight changes in temperature are perfectly normal and may occur, for instance during the storage of great quantities of fresh products in the fridge, or when the door is open for a longer period of time. This will not affect the condition of the stored foodstuff, and the temperature will quickly return to its set value.
LIGHTING
This section applies to units factory equipped with incandescent lightbulb and selected appliances equipped with LED lighting with E14 thread.
Replace the light bulb
- Set the knob to "OFF", then unplug the appliance.
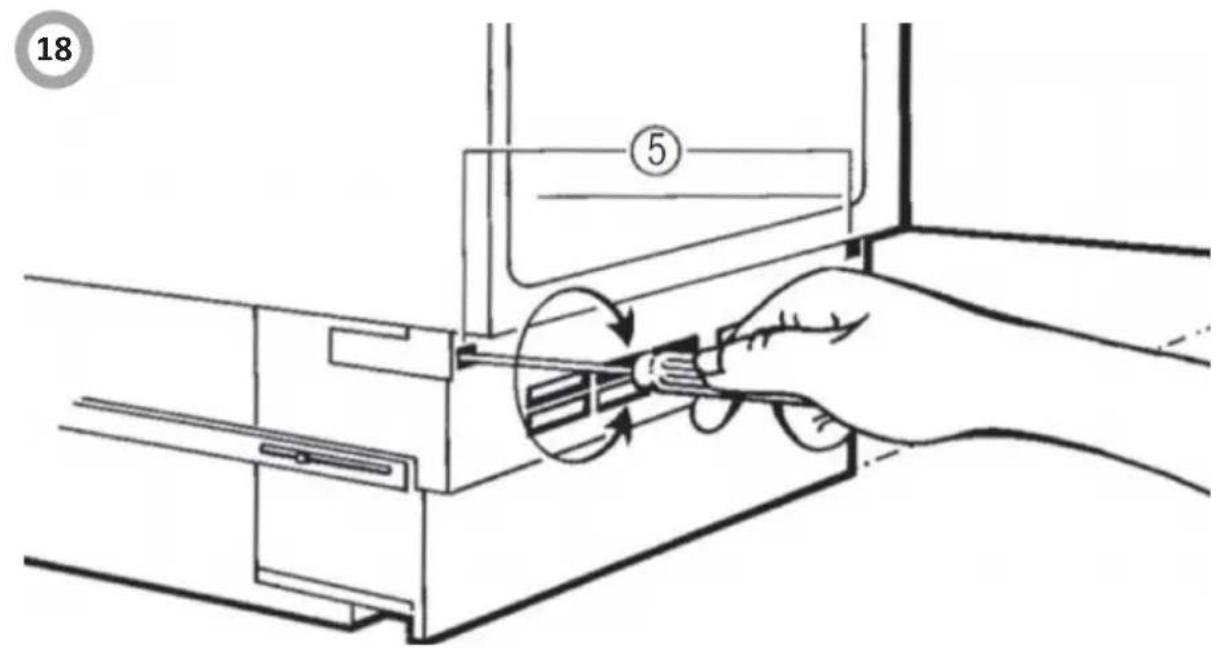
- Remove the bulb cover (Fig. 18).
- Replace the bulb with one having identical parameters as the factory installed bulb (E14 thread, 220-240V, maximum dimensions: 26 mm diameter, 55 mm length).
- Replace the bulb cover.
- Bulbs of a higher or lower power should not be used, only use bulbs of the specification given above.
Note:
- The light bulb must not be used for room illumination.
- If Figure 18 is not shown in this manual, light source can only be replaced by a qualified service technician.
OPERATION AND FUNCTIONS
Storage of food in the fridge-freezer
- The products should be placed on plates, in containers or packed in food wrap. Distribute them evenly over the shelves.
- If the food contacts the rear wall, it may cause frosting or wetting of the products.
- Do not put dishes with hot food into the fridge
- Products which absorb flavours easily such as butter, milk, white cheese and products with intense flavour, such as fish, smoked meat, hard cheese must be placed on shelves, packed in food wrap or in tightly sealed containers.
- The storage of vegetables containing significant quantities of water will cause the deposition of condensation on the vegetable containers, it does not impact on the proper functioning of the fridge.
- Before putting the vegetables into the fridge, dry them well.
- Excessive moisture shortens the shelf life of vegetables, especially the leafed vegetables.
- Do not wash the vegetables before storing in the refrigerator. Washing removes the natural protection, therefore it is better to wash the vegetables directly before consumption.
-
It is recommended to place the products in freezer drawers 1, 2, 3* up to natural loading capacity (Fig. 11a / 11b).**
-
Packed products
- Shelf
- Natural loading capacity
-
* * * *
-
Stacking of products on the freezer shelves is acceptable.*
- It is acceptable to place products beyond the natural loading capacity by 20-30 mm.**
- In order to increase the loading capacity of the freezer chamber and allow the stacking of products on the freezer evaporator wire shelves up to maximum height it is possible to remove drawers 1 and 2.*
Freezing food\*\*
- Practically all the food products, except for vegetables consumed raw, such as lettuce can be frozen.
- Only food products of the highest quality, divided into small portions for single use, should be frozen.
- Products should be packed in materials that are odourless, resistant to air and moisture penetration, and not susceptible to fat. Plastic bags, polyethylene and aluminium sheets are the best wrapping materials.
- The packaging should be tight and should stick to the frozen products. Do not use glass containers.
- Keep fresh and warm foodstuff at ambient temperature away from the products, which have already been frozen.
-
We advise you not to place more of fresh food at a time to the freezer per day (see table witch technical specification).
-
In order to maintain optimum quality of the frozen food, reorganise the food that is in the middle of the freezer, so that it does not touch the products that are not yet frozen.
- It is recommended that you move the already frozen products to one side and place the fresh products that are to be frozen on the opposite side, as close to the rear and side walls as possible.
• To freezing products, use space marked * * * * : - Bear in mind that the temperature in the freezer is affected by several factors, including the ambient temperature and the quantity of food products in the chamber, the frequency of opening the door, the amount of frost in the freezer, and the thermostat setting.
- If you cannot open the freezer door immediately after closing it, allow 1-2 minutes for the negative pressure to compensate, and try again to open the door.
The storage time for frozen products depends on their quality before freezing when fresh, and on the storage temperature. The following storage periods are recommended when the temperature of -18^ or lower is maintained:
Products Months
| Beef 6-8 | |
| Veal 3-6 | |
| Giblets 1-2 | |
| Pork 3-6 | |
| Poultry 6-8 | |
| Eggs 3-6 | |
| Fish 3-6 | |
| Vegetables | 10-12 |
| Fruit 10-12 | |
Do not store frozen food in rapid cooling chamber. Ice cubes can be prepared and stored in this chamber.
Note: If the appliance does not have a freezer compartment ( ^ ^** ), it is not suitable for freezing foodstuffs.
USING THE REFRIGERATOR EFFICIENTLY
Practical everyday tips
- Do not place fridges or freezers next to radiators, heaters, stoves or in direct sunlight.
- Make sure that air vents are not covered up and clean the dust off them once or twice a year.
- Select the right temperature: 6 to 8°C in your refrigerator and -18°C in your freezer is sufficient.
- When on holiday, turn up the temperature in your fridge.
- Only open your fridge or freezer when necessary. It helps if you know what food each contains and where it is located. Return food to the fridge or freezer as soon as possible after you have used it so that it does not warm up too much.
- Wipe the inside of your fridge regularly with a cloth soaked in a mild detergent. Appliances which are not self-defrosting will require regular defrosting. Do not allow frost layers thicker than 10 mm to form.
- Keep the seal around the door clean, otherwise it will not shut properly. Always replace broken seals.
Understanding the stars

Temperature is at least -6^ ; sufficient to store frozen food for about a week. Drawers or compartments marked with one star used to be a feature of (mostly) cheaper fridges.

Food can be stored at -12^ C or below for 1-2 weeks without losing its taste. Not suitable for freezing food.
This rating is mainly used to store foods at -18°C or below. Can also be used to freeze up to 1 kilogram of fresh food.

This appliance is suitable for storing foods at -18^ C or below and freezing larger quantities of fresh foods.
Practical tips
Due to the natural circulation of the air in the appliance, there are different temperature zones in the refrigerator chamber.
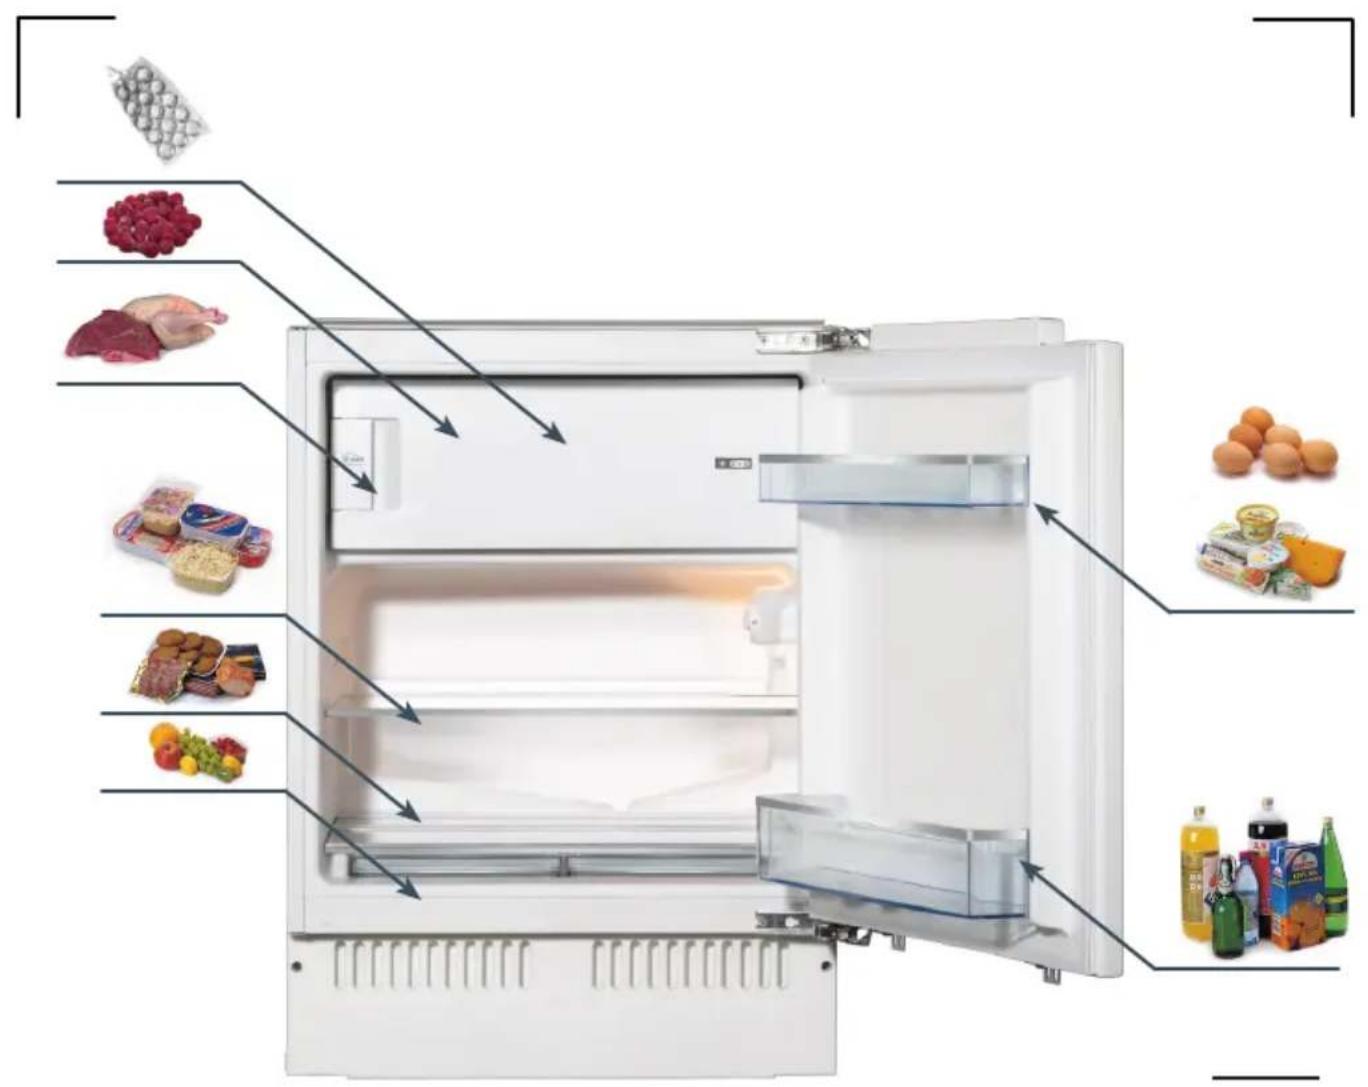
- The coldest area is directly above the vegetables drawers. Use this area for all delicate and highly perishable food e.g.:
- Fish, meat, poultry
- Sausage products, ready meals
- Dishes or baked goods containing eggs or cream
- Fresh dough, cake mixtures
- Pre-packed vegetable and other fresh food with a label stating it should be kept at a temperature of approx 4^ C.
- The warmest area is in the top section of the door. Use this for storing butter and cheese.
Food that should not be stored in a refrigerator
- Not all food is suitable for storing in the refrigerator, particularly:
- Fruit and vegetables which are sensitive to cold, such as bananas, avocado, papaya, passion fruit, aubergines, peppers, tomatoes and cucumbers.
- Fruit which is not yet ripe
- Potatoes
Warning:
Example of storing the food - see figure 12.
To achieve the most effective food preservation for the longest possible time and to avoid wasting any food, position the products as shown in Figure 12. In addition, this figure illustrates the layout of drawers, baskets and shelves, which allows the most efficient use of energy.
Optimal temperature and storage conditions will extend product shelf life and optimize electricity consumption. Optimal storage temperature range should be stated on the food product packaging.
DEFROSTING, WASHING AND MAINTENANCE
Never clean the product's casing or plastic parts using solvents or strong, abrasive detergents (e.g. washing powders or creams)! Use mild liquid detergents and soft cloths only. Do not use sponges.
Defrosting the fridge\*\*\*
- Frost settles on the rear wall of the fridge chamber. It is removed automatically. During the defrosting, the condensate, which contains contaminants may clog the opening in the through. Should it occur, carefully unclog the opening with the cleaning plug (fig. 13).
- The appliance operates in cycles: it refrigerates (then the frost settles on the rear wall), and defrosts (water flows down the rear wall)
- Disconnect the appliance from the mains before cleaning by removing the plug from the mains socket or switching off the fuse. Prevent water from penetrating the control panel or the light.
- Do not use defrosting aerosols. They may cause the formation of an explosive mixture, or contain solvents which may damage the plastic components of the appliance and even be harmful to health.
- Make sure the water used for cleaning does not flow into the evaporation container through the discharge opening.
- The whole appliance, except for the door gasket must be cleaned with a mild cleaning detergent. The door gasket should be cleaned with water and wiped dry.
- Wash all the accessories (vegetable containers, door shelves, glass shelves, etc.).
Defrosting the freezer\*\*
- It is recommended to combine defrosting the appliance with washing it.
- Excessive accumulation of ice on the freezing areas impairs the appliance's freezing capacity and increases the energy consumption.
- Defrost the appliance at least once or twice a year. In case of a higher ice build-up, defrosting must be carried out more frequently.
- If there is food in the freezer, set the knob to the max. position about 4 hours before the planned defrosting. This will ensure the possibility of storing the food at the ambient temperature for a longer time.
- After taking the food out of the freezer, put it in a container, wrap it with several layers of paper, a blanket and store it at a cool place.
- The defrosting operation should last as short as possible. Long storage of food at the ambient temperature shortens their shelf life.
Defrost the freezer chamber following steps:\*\*
- Switch of the appliance using the control panel and pull the plug out from the socket..
- Open the door and remove the food from the freezer.
- Depending on the model, pull out the drainage tube located in the bottom of the freezer compartment and place a suitable vessel underneath.
- Leave the door open, this will speed up the defrost process. Additionally, a pot with hot water (not boiling) may be placed inside the freezer compartment.
- Wash the interior of the freezer and wipe it dry.
- Switch on the appliance as per the relevant point in the manual.
Automatic fridge defrosting\*\*\*\*
The fridge chamber has been equipped with an automatic defrosting function. However, frost may settle on the rear wall of the fridge chamber. This happens usually, when large quantities of fresh food products are stored in the fridge.
Automatic fridge defrosting\*\*\*\*
The freezer chamber has been equipped with an automatic defrosting function (no-frost). The food is frozen in the cooled circulation air, and the moisture from the freezer chamber is discharged outside. As a result, no ice and frost is produced in the freezer and the products do not freeze on each other.
Washing the fridge and freezer chambers manually\*\*\*\*
It is recommended to wash the fridge and freezer chambers at least once a year. This prevents the formation of bacteria and bad odours. Switch off the appliance, using button (1), remove the food from the chambers and wash them using water with a mild detergent. Then, wipe the chambers dry with a cloth.
Taking out and putting in the shelves\*\*\*\*\*
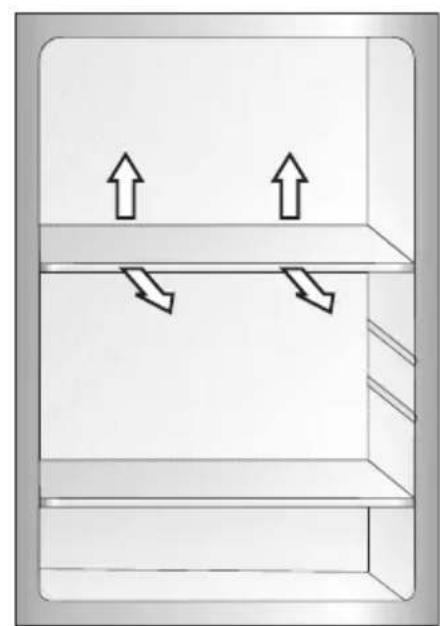
Slide the shelf out, then slide it in as much as possible so that its clamp could fit the guide groove (fig. 15).
Taking out and putting in the door shelf\*\*\*\*\*
Lift the door shelf, remove it and put it back from the top into its required position (fig. 16).
WARNING! You must not put an electric heater, a heating fan or a hair dryer into the freezer by any means.
TROUBLE-SHOOTING
Problems Possible causes Remedies
| The appliance does not work | The electric circuit is disrupted | - check whether the plug is properly inserted into the socket- check whether the power cable of the appliance is not damaged- check whether there is voltage in the socket, by plugging another appliance, e.g. a night lamp- check whether the appliance is switched on by setting the thermostat to a position above 0. |
| The lighting inside the chamber does not work | The bulb is loose or fused (only appliances with bulb lightning type) | - fit the bulb correctly or replace it (see section above "Replacing the interior light bulb) |
| The appliance works continuously | Incorrect setting of the adjustment knob | - reset the knob to a lower position |
| See. "Temperature inside the appliance is not low enough for description of other possible causes | See. "Temperature inside the appliance is not low enough for description of other possible remedies | |
| Water collects in the lower part of the appliance | The water discharge opening is clogged (depending on the model) | - clean the discharge opening (see the operating manual - chapter entitled "Defrosting the fridge") |
| Internal air circulation obstructed | - place the food and containers in such a way as that they do not touch the rear wall of the fridge | |
| The appliance generates unusual noise | Incorrect levelling of the appliance | - level the appliance properly |
| The appliance is touching furniture and/or other objects | - place the appliance at a location that ensures proper clearances around it |
Problems Possible causes Remedies
| Incorrect setting of the adjustment knob | - reset the knob to a higher position | |
| The ambient temperature is higher or lower than the climate range from table with technical specification | - the appliance is adapted to operation in the climate range from table with technical specification. | |
| The appliance is located in a sunlit place or near heat sources | - move the appliance to another place. Observe the guidelines contained in the manual | |
| Too much warm food loaded at a time | - wait 72 hours until the food becomes cool (freezes) and the required temperature is reached inside the chamber | |
| Internal air circulation obstructed | - place the food and containers in such a way that they do not touch the rear wall of the fridge | |
| The air circulation at the back of the appliance is obstructed | - move the appliance min. 30 mm away from the wall | |
| The door of the fridge/freezer is opened too often and/or remains open for too long | - reduce the frequency of opening the door and/or shorten the time when door remains open | |
| The door does not close completely | - place the food and containers so that they would not interfere with door closed | |
| The compressor is switched on too rarely | - check whether the ambient temperature is not lower than climate class | |
| Door gasket inserted incorrectly | - press the gasket in |
Certain sounds can be heard during normal use of the refrigerator, which do not affect its correct operation.
Sounds, which can be easily prevented:
- noise caused by the appliance which is not level - adjust the position with the adjustable turn-in front feet. Alternatively, place pads made of soft material under the rear rollers, especially when the appliance is placed on tiles.
- touching the adjacent piece of furniture - move the refrigerator away.
- creaking of the drawers or shelves - take out and put back the drawer or shelf.
- sounds of clinking bottles - move bottles apart.
Sounds heard during normal use are mainly due to operation of the thermostat, compressor (switching on) and cooling system (thermal expansion and contraction of the radiator caused by flow of the cooling agent).
REVERSE THE DOOR
The refrigerator door can be opened both from the left or right as required. The following are the steps required to position the door to open to the right (Fig. 20)
- Unscrew the upper vent frame.
- Unscrew the hinge bolt from the vent frame and screw it on the opposite side of the vent frame.
- Remove the door from the bottom hinge.
- Unscrew the bottom hinge on the right side and remove the screw hole plugs on the left side.
- Remove the bolt from the hinge. Turn the hinge 180^ and screw in the bolt on the opposite side.
- Screw the hinge on the left side of the appliance. Insert the hole plugs on the right side.
- Fit the door on the bottom hinge.
- Install and screw the upper vent frame and the hinge bolt. The hinge bolt must be in the upper hole of the door hinge.
- Screw the door handle on the correct side.
- When installed, open and close the door to ensure it operates smoothly.
INSTALLATION
VENTILATION
Level the kitchen cabinet unit with a spirit level and a try square. Level the unit by placing packing material underneath if required. A minimum gap of 38mm must be maintained at the back of the appliance for ventilation. Air inlet A must be at least 200 cm square and air must flow through the panel in the cabinet plinth. Check that the position of the power socket (1) is correct. Mains voltage where the appliance is to be used must comply with that shown on the data plate located on the left inside wall of the appliance next to the vegetable bins. The power supply must be suitably earthed.
INSTALLATION OF THE APPLIANCE
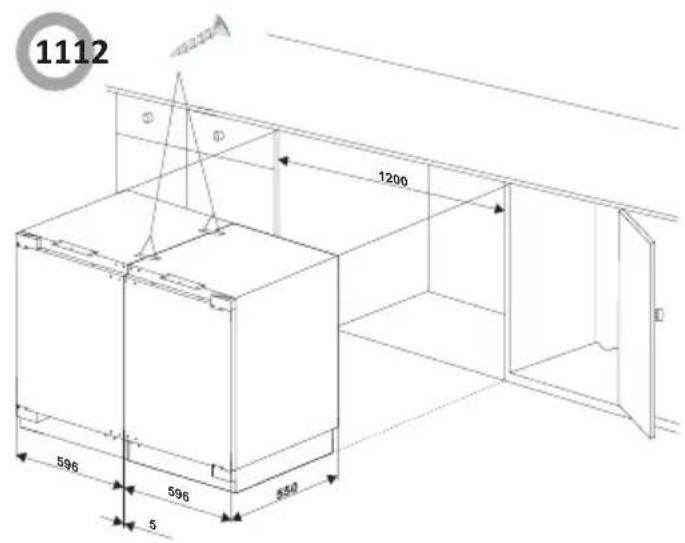
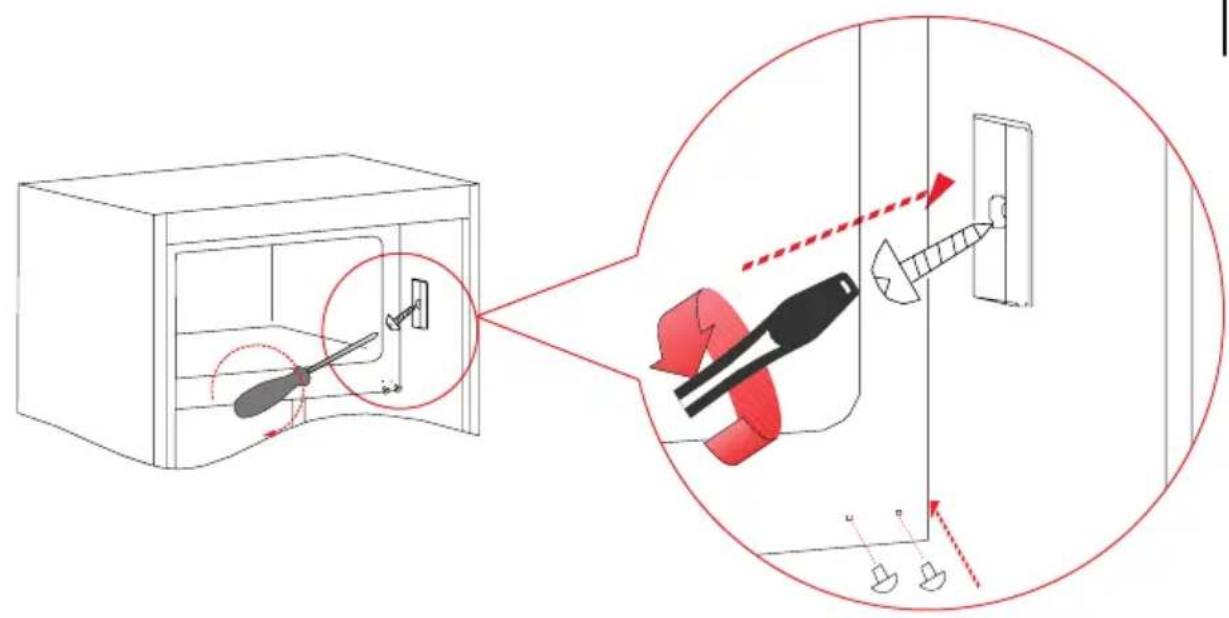
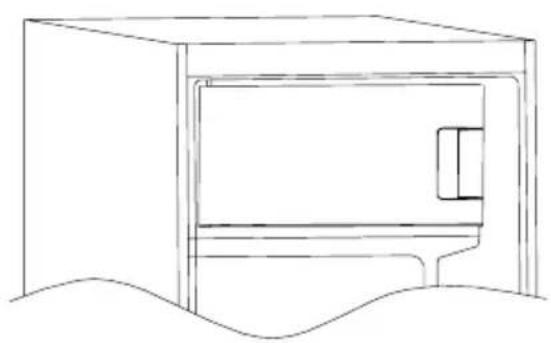
Installation of the appliance should be performed by a qualified installer. The appliance should be placed in furniture case. Run the mains cable through the unit such that it can be connected to the power supply after installing the appliance. Remove the cover (6) only if space is restricted. Place the refrigerator into the kitchen unit. Fix the brackets (1) with screws (2) onto the upper frame when two third of the refrigerator has been inserted. Then insert the refrigerator in completely, ensuring that the gib clamp of the brackets stuck on the horizontal
frame of the kitchen unit. Adjust the position of the refrigerator making a 6mm space between inside wall of the kitchen unit and external sides of the refrigerators. Fix the brackets to the horizontal frame of the kitchen unit with screws. Insert the seal in the aperture (approx. 10mm) between the lower front frame and bottom board of the kitchen. Fix lower brackets (3) to the lower front frame with screws (2). Fix the lower brackets to the bottom board of the kitchen unit with screws (2). Properly insert seals in the apertures on the left, upper and right sides of the refrigerator.
REVERSE THE FREEZER COMPARTMENT DOOR
Reverse the freezer compartment door (Fig. 21).
- Unscrew the door hinge and remove it. When removing the hinge, hold the door and set it aside (fig. 21, item 2).
- Remove the screw securing the door stop. Remove the door hinge screw hole plugs (Fig. 21, Item 3).
- Transfer the door stop to the opposite side of the compartment and tighten the screw. Also replace the hinge screw hole plugs (figure 21, item 4).
- Reverse the door by 180° and install on the opposite side.
- Install and tighten the screw of the bottom hinge that supports the door on the opposite side (Fig. 21, item 5).
- When installed, open and close the door to ensure it operates smoothly.
WARRANTY AND AFTER SALES SERVICE
Warranty
Warranty service as stated on the warranty card. The manufacturer shall not be held liable for any damage caused by improper use of the product.
Service
- The manufacturer recommends that all repairs and adjustments be carried out by the Factory Service Technician or the Manufacturer's Authorized Service Point. For safety reasons, repairs should be referred to professionals.
- Repairs carried out by unqualified persons may seriously endanger the appliance user.
- The minimum warranty period for the appliance offered by the manufacturer, importer or authorized representative is given in the warranty card.
- The warranty shall be void if you make any independent adaptations or alterations, tamper with seals or other appliance safety devices or its parts or interfere with the appliance contrary to operating instructions.
In the event of appliance malfunction, request assistance or repair.
If your appliance needs repair, please contact the service centre. Please see warranty card for address and contact details of our service centre. Before contacting us, please have ready the appliance serial number, which can be found on the identification sticker: For your convenience, please write it down below:
Manufacturer's Declaration
The manufacturer hereby declares that this product meets the requirements of the following European directives:
• Low Voltage Directive 2014/35/EC
• Electromagnetic Compatibility (EMC) Directive 2014/30/EC
• ErP Directive 2009/125/EC
• Directive RoHS 2011/65/EC
and has thus been marked with the symbol and been issued with a declaration of compliance made available to market regulators.
natural_image
Simple line drawing of a three chasing recycling symbol (no text or labels)natural_image
Symbol of a trash bin crossed out by two diagonal lines (no text or numbers present)GARANTIE, NACHVERKAUFSERVICE
Garantie
natural_image
Recycling symbol composed of three chasing arrows forming a triangle (no text or labels)natural_image
Symbol of a trash bin crossed out by two diagonal lines (no text or numbers present)
DÔLEŽITÉ BEZPEČNOSTNÉ POKYNY
natural_image
Recycling symbol composed of three chasing arrows forming a triangle (no text or labels)natural_image
Symbol of a trash bin crossed out by two diagonal lines (no text or numbers present)
natural_image
Recycling symbol composed of three chasing arrows forming a triangle (no text or labels)natural_image
Symbol of a trash bin crossed out by two diagonal lines (no text or numbers present)
natural_image
Recycling symbol composed of three chasing arrows forming a triangle (no text or labels)natural_image
Symbol of a trash bin crossed out by two diagonal lines (no text or numbers present)
natural_image
Simple line drawing of a three chasing recycling symbol (no text or labels)natural_image
Symbol of a trash bin crossed out by two diagonal lines (no text or numbers present)
natural_image
Recycling symbol composed of three chasing arrows forming a triangle (no text or labels)natural_image
Symbol of a trash bin crossed out by two diagonal lines (no text or numbers present)
natural_image
Recycling symbol composed of three chasing arrows forming a triangle (no text or labels)natural_image
Symbol of a trash bin crossed out by two diagonal lines (no text or numbers present)natural_image
Recycling symbol composed of three chasing arrows forming a triangle (no text or labels)natural_image
Symbol of a trash bin crossed out by two diagonal lines (no text or numbers present)
natural_image
Simple line drawing of a three chasing recycling symbol (no text or labels)natural_image
Symbol of a trash bin crossed out by two diagonal lines (no text or numbers present)
natural_image
Simple line drawing of a three chasing recycling symbol (no text or labels)Uređaj je za vreme transporta zaštićen od oštećenja. Posle vađenja uređaja iz pakovanja molimo Vas da elemente ambalaže uklonite na način koji ne ugrožava prirodnu sredinu.
Svi materijali korišteni za ambalažu nisu štetni za prirodnu okolinų, 100% je moguća reciklaža i označeni su
odgovarajućim simbolom.
Pažnja! Ambalažne materijale (polietilenske kesice, komadiće stiropora itd.) prilikom uklanjanja ambalaže držati daleko od dece.
ODLAGANJE ISTROŠENIH UREĐAJA

natural_image
Symbol of a trash bin crossed out by two diagonal lines (no text or numbers present)
Ovaj uređaj je označen u skladu sa evropskom direktivom 2012/19/EU. Ujedno je označen simbolom precrtanog kontejnera za otpatke. Oznaka na proizvodu pokazuje da ovaj proizvod posle njegovog životnog veka ne može da buđe biti tretiran kao ostali kućni otpad.
Korisnik ima obavezu da ovaj' proizvod pređa na odgovarajuće sabirno mesto za reciklažu potrošene električne i elektronske opreme. Institucije za prikupljanje ovakvog otpada, uključujući lokalne sabirne tačke, kupovna mesta, opštinske jedinice, sačinjavaju odgovarajući sistem koji omogućava zbrinjavanje ove opreme. Pravilno odlaganje potrošene električne i elektronske opreme sprečava potencijalne negativne posledice za okolinu i ljudsko zdravlje koje inače mogu da budu uzrokovane neodgovarajućim odlaganjem ovog proizvoda.
UPRAVLJANJE
natural_image
Diagram of a mechanical device with a magnified inset showing a lever mechanism (no text or symbols)13
12
natural_image
Diagram of a storage or ventilation system with two upward arrows and two downward arrows inside a rectangular chamber (no text or symbols)15

natural_image
Diagram of a cylindrical container with two upward arrows indicating flow or movement (no text or symbols)16


natural_image
Line drawing of a hand holding a tool with a handle, next to a vertical rod and angle markers (no text or symbols)

natural_image
Diagram of a mechanical device with a hand operating it, showing no text or symbols
natural_image
Illustration of a hand holding a tool near a vertical structure, with no visible text or symbols
natural_image
Technical line drawing of a mechanical assembly with no visible text or symbols
natural_image
Line drawing of a hand holding a tool, with no visible text or symbols
natural_image
Illustration of a hand using a tool to adjust or install a component on a metal panel (no text or symbols visible)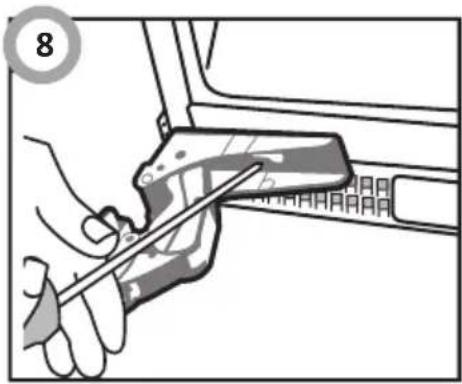
natural_image
Illustration of a hand using a tool to adjust or install a component, no text or symbols visible
natural_image
Line drawing of a refrigerator with front panel and side legs (no text or symbols)10



natural_image
Architectural line drawing of a cabinet and door assembly with an inset showing ceiling fixtures (no text or symbols)
1

natural_image
Line drawing of a simple cabinet or enclosure with a door and base, no text or symbols present2

3

21
14
5

6
21
natural_image
Line drawing of a simple cabinet or enclosure with a handle and side panel, no text or symbols presentAmica S.A.
ul . Mickiewicza 52 / 64-510 Wronki
tel. 67 25 46 100 / fax 67 25 40 320
www.amica.pl
Amica International GmbH
Lüdinghauser Str. 52
D-59387 Ascheberg
Tel: 0 25 93 - 95 67-0
www.amica-group.de
- PL - Spis treści
- WSKAZÓWKI DOTYCZĄCE BEZPIECZEŃSTWA 17 INSTALACJA I WARUNKI PRACY URZĄDZENIA 22
- ROZPAKOWANIE 24 USUWANIE ZUŻYTYCH URZĄ DZEŃ 25 STEROWANIE 26
- EN - Table of contents
- GUIDELINES CONCERNING THE SAFETY OF USE 40
- INSTALLATION AND OPERATING CONDITIONS OF THE APPLIANCE 45
- UNPACKING 47
- DISPOSAL OF OLD APPLIANCE 48
- CONTROLS 49
- LIGHTING 50
- OPERATION AND FUNCTIONS 51
- USING THE REFRIGERATOR EFFICIENTLY 53
- DEFROSTING, WASHING AND MAINTENANCE 55
- TROUBLE-SHOOTING 57
- REVERSE THE DOOR 59
- INSTALLATION 59
- REVERSE THE FREEZER COMPARTMENT DOOR 60
- WARRANTY AND AFTER SALES SERVICE 61
- GARANTIE, NACHVERKAUF-SERVICE 84
- CS - Obsah
- POKYNY TÝKAJÍCÍ SE BĘZPEČNOSTI POUŽÍVÁNÍ 86 INSTALACE A PROVOZNI PODMINKY SPOTREBICE 91
- VYBALENI 93
- LIKVIDAÇE OPOTŘEBOVANÝCH ZAŘÍZENÍ 94 OVLÁDÁNI 95
- OSVĚTLENÍ 96
- OBSLUHA A FUNKCE 97
- JAK EKONOMICKY POUŽIVAT CHLADNIČKU 99
- ODMRAZOVÁNÍ, MYTÍ A ÚDRŽBA 101
- URÇOVANI ZAVAD 103
- DÔLEŽITÉ BEZPEČNOSTNÉ PQKYNY 109
- INSTALÁCIA A PREVÁDZKOVÉ PODMIENKY SPOTREBIČA 114
- ROZBALENIE 116
- LIKVIDÁCIA ZARIADENÍ 117
- OVLÁDANIE 118
- OSVETLENIE 119
- OBSLUHA A FUNKCIE 120
- AKO EKONOMICKY POUŽIVAT CHLADNIČKU 122
- ODMRAZOVANIE, UMÝVANIE A ÚDRŽBA 124
- LOKALIZACIA ZAVAD 126
- ZMENA SMERU OTVARANIE DVIEROK 128
- INSTALÁCIA 128
- ZMENA SMERU OTVÁRANIE DVIEROK KOMORY NÍZKEJ TEPLOTY
- 129
- ZÁRUKA, POPREDAJNY SERVIS 130
- Amica
- GUIDELINES CONCERNING THE SAFETY OF USE
- INSTALLATION AND OPER- ATING CONDITIONS OF THE APPLIANCE
- Installation before using the appliance for the first time
- Minimum distances from the heat sources
- Warning:
- Mains connection
- Disconnecting the mains
- Climate range
- UNPACKING
- DISPOSAL OF OLD APPLIANCE
- CONTROLS
- Appliance controls
- Adjust temperature inside the appliance
- Note:
- Additional information on the temperature
- LIGHTING
- Replace the light bulb
- OPERATION AND FUNCTIONS
- Storage of food in the fridge-freezer
- Freezing food\*\*
- USING THE REFRIGERATOR EFFICIENTLY
- Practical everyday tips
- Understanding the stars
- Practical tips
- Food that should not be stored in a refrigerator
- DEFROSTING, WASHING AND MAINTENANCE
- Defrosting the fridge\*\*\*
- Defrosting the freezer\*\*
- Defrost the freezer chamber following steps:\*\*
- Automatic fridge defrosting\*\*\*\*
- Washing the fridge and freezer chambers manually\*\*\*\*
- Taking out and putting in the shelves\*\*\*\*\*
- Taking out and putting in the door shelf\*\*\*\*\*
- TROUBLE-SHOOTING
- REVERSE THE DOOR
- INSTALLATION
- VENTILATION
- INSTALLATION OF THE APPLIANCE
- REVERSE THE FREEZER COMPARTMENT DOOR
- WARRANTY AND AFTER SALES SERVICE
- Warranty
- Service
- Manufacturer's Declaration
- GARANTIE, NACHVERKAUFSERVICE
- Garantie
- DÔLEŽITÉ BEZPEČNOSTNÉ POKYNY
- ODLAGANJE ISTROŠENIH UREĐAJA
- UPRAVLJANJE
Brand : AMICA
Model : UKS 16158
Category : Refrigerator