
TSE 1410 - Refrigerator BEKO - Free user manual and instructions
Find the device manual for free TSE 1410 BEKO in PDF.


| Product type | Refrigerator with freezer compartment |
| Brand | Beko |
| Model | TSE 1410 |
| Total capacity | 220 liters (estimated) |
| Refrigerator capacity | 180 liters (estimated) |
| Freezer capacity | 40 liters (estimated) |
| Energy class | A+ (estimated) |
| Annual consumption | 200 kWh (estimated) |
| Noise level | 40 dB (estimated) |
| Dimensions (H x W x D) | 143 x 54 x 60 cm (estimated) |
| Weight | 45 kg (estimated) |
| Power supply | 220-240 V, 50 Hz |
| Main features | Interior lighting, glass shelves, vegetable drawer, freezer compartment, adjustable thermostat |
| Maintenance and cleaning | Clean with a soft cloth and soapy water; manual defrosting of the freezer |
| Safety | Door handle, adjustable feet |
| Spare parts and repairability | Available through Beko after-sales service |
Frequently Asked Questions - TSE 1410 BEKO
User questions about TSE 1410 BEKO
0 question about this device. Answer the ones you know or ask your own.
Ask a new question about this device
Download the instructions for your Refrigerator in PDF format for free! Find your manual TSE 1410 - BEKO and take your electronic device back in hand. On this page are published all the documents necessary for the use of your device. TSE 1410 by BEKO.
USER MANUAL TSE 1410 BEKO
Transport instructions..../2
Disposal..../2
Appliance Setup..../2
Get to know your appliance..../3
How to use the accessories ....../3
Prior to startup..../3
Setting the operating temperature..../4
Cooling..../4
Defrosting of the appliance (Fresh Food)....../5
Replacing the interior light bulb ....../5
Cleaning and care ....../6
Practical tips and notes ....../6
Examples of use..../7
Normal operating noises..../7
What, if..../8
Reversing the doors..../8
Reversing the doors....../8
Meaning of the energy label..../9
hu-Index 1-9
2

3

4

5

Congratulations on your choice of our product, which will certainly provide you with many years of good service.
Safety comes first!
Please read this Instruction Manual carefully. It contains important information on how to use your new appliance. If instructions are not adhered to, you may lose your right to service at no charge during the warranty period. Please keep this manual in a safe place and pass it on to later users if applicable.
- Do not connect your appliance to the power supply until all packing and transit protectors have been removed.
- Leave to stand upright for at least 4 hours before switching on to allow the system to settle if transported horizontally.
- This appliance must only be used for its intended purpose, i.e. the storing and freezing of edible foodstuff.
- We do not recommend use of this appliance in an unheated, cold room e.g. garage, conservatory, annex, shed, outdoors, etc., see 'Location'.
- On delivery, check to make sure that the product is not damaged and that all the parts and accessories are in perfect condition.
- Do not operate a damaged appliance; if in doubt, check with your dealer.
- Do not allow children to play with the appliance.
- Do not sit or stand on, or let the children sit or stand on the appliance or on the pull-out parts.
- Do not hang on the appliance door.
- Your appliance contains no fluoridated coolants (CFC/HFC), but isobutane (R 600 a), a natural gas which is highly compatible with the environment.
(R 600 a) is easily flammable. Therefore, be sure that the cooling circuit is not damaged either during transport or during operations.
In the event of damage;
- Avoid any open flame, sources of sparks and flammable substances.
- Immediately air the room in which the appliance is located. • In case the coolant spraying out contacts you eyes it may cause eye injuries.
- The space in the room where the appliance is installed must not be smaller than 10 cubic metres.
- Do not dispose of the appliance in a fire. Your appliance contains non CFC substances in the insulation which are flammable.
- Please contact your local authority in your region for information on disposal methods and facilities available.
⚠ Warning - Keep ventilation openings on the appliance enclosure or in the built-in structure, clear of obstruction.
⚠ Warning - Do not use mechanical devices or other means to accelerate the defrosting process, other than those recommended by the manufacturer.
⚠ Warning - Do not damage the refrigerant circuit.
⚠ Warning - Do not use electrical devices inside the food storage compartments of the appliance, unless they are of the type recommended by the manufacturer.
- Avoid touching the metal condenser wiring on the backside of the appliance; there is risk of injury. In the event of a possible malfunction, disconnect the appliance from the power supply first.
- Prior to cleaning the appliance, always unplug the appliance or switch off the circuit breaker. Do not pull from the power cable. Pull from the plug.
- Repairs to the electrical equipment may only be made by qualified experts. If the power cable is damaged, the manufacturer or customer service must replace it in order to avoid danger.
Transport instructions
The appliance should be transported only in upright position.
The packing as supplied must be intact during transportation.
If the appliance is transported in the horizontal position, it must be placed vertically and left in this position for 4 hours before taking into operation.
The appliance must be protected against rain, moisture and other atmospheric influences.
The manufacturer assumes no liability if safety instructions are disregarded.
⚠ Disposal
Make the appliance unusable immediately. Pull out the mains plug and cut the power cable. Remove or destroy snap or latch locks before disposing of the appliance. In this manner you prevent children from locking themselves in and endangering their lives.
Appliance setup
- Do not operate your appliance in a room where the temperature is likely to fall below 10 °C at night and/or especially in winter. At lower temperatures the appliance may not operate, resulting in a reduction in the storage life of the food.
- The climate class rating of your appliance is indicated on the rating label located inside the appliance. It specifies the appropriate operating ambient temperatures as explained below.
Climatic class Ambient temperatures
SN.....+10 °C to 32 °C
N....+16 °C to 32 °C
ST .....+18 °C to 38 °C
T.....+18 °C to 43 °C
SN-ST.....+10 °C to 38 °C
SN-T .....+10 °C to 43 °C
Location
Only place the appliance in dry rooms that can be ventilated.
Avoid direct sunlight or direct heat sources such as a stove or a heater.
If this cannot be avoided, the following minimum distances should be maintained:
Electric stoves: 3.00 cm
Heater: 3.00 cm
Cooling devices: 2.50 cm
- Make sure that sufficient room is provided around the appliance to ensure free air circulation.
Fit the two plastic wall spacers supplied with the appliance rotating 1/4 turn to the condenser at the back of the appliance (Fig. 2).
- The appliance should be located on a level surface. The two front feet can be adjusted as required. To ensure that your appliance is standing upright adjust the two front feet by turning clockwise or counter-clockwise, until the product is in firm contact with the floor.
Correct adjustment of feet avoids excessive vibration and noise.
Electrical connections
Warning
This appliance must be grounded.
- Check whether the power type and voltage in your region corresponds to the one stated on the rating label inside the appliance.
- The electrical safety of the appliance is only assured when the grounding system in the house is installed in accordance with regulations.
- When placing the appliance, do not let the power cable get stuck under it; otherwise the cable will be damaged.
- Ensure that the plug remains readily accessible. Do not use a multiple adapter bar or an extension cable.
- The electrical specifications of your appliance is given on the rating label located inside the appliance.
- Route power cable to allow easy connection and disconnection after installation.
- A contact separator should be used if the power cable is not accessible. (for built-in models)
Get to know your appliance

Warning
The following information about accessories is provided for reference only. The accessories may not be exactly the same as those of your appliance.
Fig. 1
- Movable shelves
- Interior light & Thermostat knob
- Defrost water collection channel - Drain tube
- Crisper cover
- Crisper
- Adjustable front feet
- Dairy compartment
- Door shelf
- Egg tray
- Bottle shelf
- Bottle gripper
- Top trim
Do not place hot objects or any appliance that generates heat on the top trim, otherwise the top trim may be damaged.
Prior to startup
Before you start operating your appliance, the following points should be re-checked for safety:
- Is the appliance standing level on the floor?
- Is there sufficient space for good air circulation?
- Is the interior clean? (Also see the section "Cleaning and care")
- Set the thermostat knob halfway between 1 and 5 or Min. and Max.
- Now connect the appliance to the mains.
- The compressor is turned on; the interior light comes on when the door is opened.
Do not place foodstuff into the refrigerator until the temperature has reached the desired level.
Setting the operating temperature
(Fig. 4)
The operating temperature is regulated by the temperature control.
(Or) Min. Max.
1 = Lowest cooling setting (Warmest setting) 5 = Highest cooling setting (Coldest setting)
(Or)
Min. = Lowest cooling setting
(Warmest setting)
Max. = Highest cooling setting
(Coldest setting)
The average temperature inside the fridge should be around +5°C.
Please choose the setting according to the desired temperature.
You can stop operation of your appliance by turning the thermostat knob to "0" position.
Please note that there will be different temperatures in the cooling area.
The coldest region is immediately above the vegetable compartment.
The interior temperature also depends on ambient temperature, the frequency with which the door is opened and the amount of food kept inside.
Frequently opening the door causes the interior temperature to rise.
For this reason, it is recommended to close the door again as soon as possible after use.
Cooling
Food storage
The fridge compartment is for the short-term storage of fresh food and drinks.
Store milk products in the intended compartment in the refrigerator.
Bottles can be stored in the bottle holder or in the bottle shelf of the door.
Raw meat is best kept in a polyethylene bag in the compartment at the very bottom of the refrigerator.
Allow hot food and beverages to cool to room temperature prior to placing them in the refrigerator.

Attention
Store concentrated alcohol in a container only standing upright and tightly closed.

Attention
Do not store explosive substances or containers with flammable propellant gases (canned cream, spray cans etc.) in the appliance.
There is a danger of explosion.
Defrosting of the appliance
The fridge compartment defrosts automatically. The thawing water flows through the drain channel into a collection container at the back of the appliance (Fig. 5).
During defrosting, water droplets form at the back wall of the fridge due to the evaporation. If not all of the drops run down, they may freeze again after defrosting competes.
Remove them with a soft cloth dampened with warm water. Do not use hard or sharp objects.
Check the flow of the thawed water from time to time. It may become blocked occasionally. Clean it with a q-tip or similar (see the section "Cleaning and care").
Replacing the interior light bulb
(Fig. 4)
Should the light fail to work, switch off at the socket outlet and pull out the mains plug. Follow the instructions below to check if the light bulb has worked itself loose.
If the light still fails to work, obtain a replacement E14 screw cap type 15 Watt (Max) bulb from your local electrical store and then fit it as follows:
- Switch off at the socket outlet and pull out the mains plug. You may find it useful to remove shelves for easy access.
- Remove the light diffuser cover as shown in figure (b-c).
- Replace the burnt-out light bulb.
- Reassemble the light diffuser cover as shown in figure (d).
Push firmly to ensure cover is fitted properly.
- Carefully dispose of the burnt-out light bulb immediately.
Replacement light bulb can easily be obtained from a good local electrical or DIY store.
Cleaning and care
Interior and Exterior Surfaces

Attention
Always unplug the power cable or switch off the circuit breaker before cleaning.
Clean the exterior using lukewarm water and a mild detergent.
Never use detergents, abrasive or acidic agents.
Wipe the inside compartment dry.
Be careful to prevent water from getting into contact with the electrical connections of the temperature control or the interior light.
If the appliance is not going to be used for a long period of time, unplug the power cable, remove all food. Clean the appliance and keep the door open.
To preserve the appearance of your appliance, you can polish the exterior and the door accessories with a silicone wax.
Clean the condenser at the back of the appliance once a year using a brush or a vacuum cleaner. Dust build-up leads to increased energy consumption.
Inspect the door gasket at regular intervals.
Clean with water only, and wipe totally dry.
Cleaning of the accessories
Door shelves:
Remove all food from the door shelves.
Lift the cover of the shelf upwards and pull it off sideward.
Remove the door shelf by pushing it upwards from the bottom.
Collecting container (Pan):
Make sure that the pan at the back of the appliance is always clean.
Gently release the snap of the pan from the compressor by pushing it using a tool (like screwdriver), so that the pan can be removed.
Lift the pan, clean it and wipe it dry.
Re-assemble in reverse order.
Crisper or Drawers:
To clean a drawer, pull it out as far as possible, tilt it upwards and then pull it out completely.
Practical tips and notes
Cooling
- Clean fresh food and vegetables before storing in the crisper bin. • Always pack or wrap food, or put it in a suitable container, before storing it in the appliance.
- Wrap food which is not suitable for storage at cold temperatures in polyethylene bags (pineapple, melons, cucumbers, tomatoes etc.).
- Food with strong odour or apt to acquire odour should be wrapped in airtight or smell-proof packaging material.
- Keep fresh food separate from cooked food, to avoid bacteria contamination.
- Never keep fresh meat in the fridge for more than 2 or 3 days.
- Remove any left-over canned food from the can and store it in a suitable container.
- Refer to the shelf life indicated on the food packaging.
- Do not obstruct the air circulation inside the appliance by covering the shelves.
- Never keep any dangerous or poisonous substances inside your appliance. • Always check food that has been stored for a long period of time for its suitability for consumption.
- Do not store fresh and cooked food together in the same container.
- Close the door immediately after opening, to avoid unnecessary energy consumption.
- Do not use hard or sharp objects to remove the ice build-up.
- Do not load hot food into your appliance.
Examples of Use
| White wine, beer and mineral water | chill before use |
| Bananas | do not store in a fridge |
| Fish or offal | store in polyethylene bags only |
| Cheese | use airtight containers or polyethylene bags; for best results, take out from the fridge an hour before consumption. |
| Melons | store only for a short period of time, use airtight packaging/wrapping |
| Raw meat and poultry | do not store together with delicate food such as cooked food or milk |
Normal operating noises
Various functional noises are completely normal due to the operation of the cooling system of your appliance;
- Gurgling, hissing, boiling or bubbling noises are caused by the refrigerant, circulating inside the cooling system. These noises can still be heard for a short period of time after the compressor shuts off.
- Sudden, sharp cracking or popping noises are caused by the expansion and contraction of the inside walls or some components inside the cabinets.
- Buzzing, whirring, pulsating or high-pitched humming noises are caused by the compressor. These noises are slightly louder at the start-up of the compressor and reduce when the appliance reaches the operating temperatures.
Also to avoid disturbing vibrations and noises make sure that;
- Your refrigerator is standing level on all four feet.
- Your refrigerator is not in contact with the walls, surrounding objects or kitchen cabinets and furniture.
- Cans, bottles or dishes inside the refrigerator are not touching and hitting each other.
- All shelves and bins are mounted correctly inside the refrigerator cabinets and doors.
What, if....
1- The appliance will not work, even though it is switched on.
- Check if the power cable is properly connected!
- Check if the mains supply is in order, or if a circuit breaker has been tripped!
- Check the temperature control for correct setting!
2- The interior light does not work.
Check the power supply!
Check the installation of the light bulb! Unplug the power cable before checking the light bulb. (Also see the section "Replacing the interior light bulb")
3- Other possible malfunctions
Not every malfunction is a case for our customer service. Very often, you can easily resolve the problem without requesting service. Before requesting service, please check if the malfunction has been caused by an operating error. If this is the case, and a service has been requested, a service charge will be levied even if the appliance is still under guarantee.
If the problem persists please contact your dealer or customer service.
Please have the type and serial number of your appliance ready when calling. The rating label is located inside the appliance.
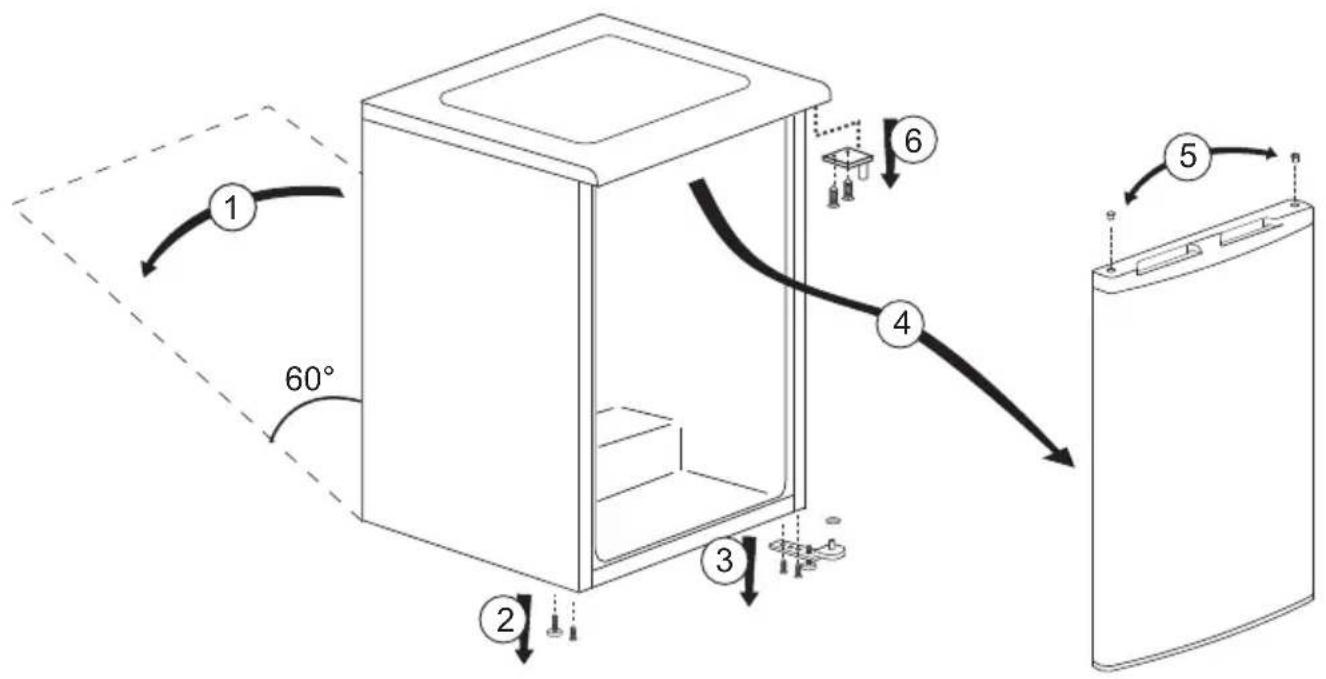
Reversing the doors
Proceed in numerical order (Fig. 6).
Energy
Manufacturer Model
More efficient
Less efficient
Energy consumption kWh/year
(Based on standard test results for 24 h)
Actual consumption will depend on how the appliance is used and where it is located
Fresh food volume I Frozen food volume I Chill compartment volume I
Noise
(dB(A) re 1 pW)

You may stick the energy niche provided in the polybag to the area above.

- HU-INDEX
- SAFETY COMES FIRST
- TRANSPORT INSTRUCTIONS
- ⚠ DISPOSAL
- APPLIANCE SETUP
- CLIMATIC CLASS AMBIENT TEMPERATURES
- LOCATION
- ELECTRICAL CONNECTIONS
- WARNING
- GET TO KNOW YOUR APPLIANCE
- FIG
- DO NOT PLACE HOT OBJECTS OR ANY APPLIANCE THAT GENERATES HEAT ON THE TOP TRIM, OTHERWISE THE TOP TRIM MAY BE DAMAGED
- PRIOR TO STARTUP
- SETTING THE OPERATING TEMPERATURE
- COOLING
- FOOD STORAGE
- ATTENTION
- DEFROSTING OF THE APPLIANCE
- REPLACING THE INTERIOR LIGHT BULB
- (FIG. 4)
- CLEANING AND CARE
- INTERIOR AND EXTERIOR SURFACES
- CLEANING OF THE ACCESSORIES
- DOOR SHELVES
- COLLECTING CONTAINER (PAN)
- CRISPER OR DRAWERS
- PRACTICAL TIPS AND NOTES
- NORMAL OPERATING NOISES
- WHAT, IF
- REVERSING THE DOORS
- ENERGY
- LESS EFFICIENT
- NOISE
Brand : BEKO
Model : TSE 1410
Category : Refrigerator