PHILIPS SensoTouch 2D SensoTouch - Razor

SensoTouch 2D SensoTouch - Razor PHILIPS - Free user manual and instructions

Find the device manual for free SensoTouch 2D SensoTouch PHILIPS in PDF.

📄 166 pages English EN Download 💬 AI Question 10 questions ⚙️ Specs
Notice PHILIPS SensoTouch 2D SensoTouch - page 7
Pick your language and provide your email: we'll send you a specifically translated version.
Product type Rotary electric shaver
Brand Philips
Model SensoTouch 2D (RQ1180, RQ1160, RQ1150)
Power supply Mains adapter (100-240V) with foldable charger
Charging time Approximately 1 hour
Quick charge 5 minutes for one shave
Battery life 50 minutes (RQ1180/RQ1160) or 40 minutes (RQ1150)
Shaving types Dry and wet (with foam or gel)
Display LED display with charge indicator, low battery, lock, and replacement reminder
Travel lock system Yes, activation by long press of 3 seconds on the on/off button
Integrated trimmer Yes (some models), for sideburns and mustache
Jet Clean cleaning system Yes (some models), automatic cleaning and drying program
Cleaning fluid capacity Approximately 15 days of daily use
Replacement reminder for shaving heads Every 12 months, shaver symbol flashes after 9 sessions
Weight Approximately 200 g (including pouch)
Included accessories Charger, cleaning brush, pouch (some models), HQ200 fluid (some models)
Maintenance and cleaning Rinse under hot water, brush or Jet Clean system
Warranty Standard Philips (2 years)

Frequently Asked Questions - SensoTouch 2D SensoTouch PHILIPS

How long does the Philips SensoTouch 2D shaver take to charge?
Full charge takes about 1 hour. A quick charge of 5 minutes provides enough energy for one shave.
How do I clean the shaver?
You can clean the shaver by rinsing it under hot water, using the provided brush, or using the Jet Clean system (depending on the model) for automatic cleaning.
When and how should I replace the shaving heads?
It is recommended to replace the shaving head support every 12 months for optimal performance. The replacement reminder appears as a flashing shaver symbol. To reset, press and hold the on/off button for 10 seconds after changing the head.
How do I use the integrated trimmer?
Remove the shaving unit, then insert the trimmer by snapping the tab into the slot. Press the trimmer's on/off button to use it for sideburns and mustache.
How do I lock the shaver for travel?
Press the on/off button for 3 seconds to activate the lock. The lock symbol appears on the display. To unlock, press and hold again for 3 seconds.
Can I use the shaver with foam or gel?
Yes, the shaver is suitable for wet shaving. Wet your skin, apply foam or gel, then rinse the shaving unit under the tap regularly during shaving.
How does the Jet Clean system work?
Place the shaver in the Jet Clean system support and press the on/off button. The program automatically cleans and dries the shaver. The cleaning cycle takes a few minutes, followed by drying for about 2 hours.
What do the indicators on the display mean?
The indicators show the charge level, quick charge (flashing orange/white), low battery (flashing orange or plug symbol), and lock (padlock symbol). See the manual for details according to the model.
What is the battery life?
For models RQ1180 and RQ1160, the battery life is 50 minutes (about 15 days). For the RQ1150, it is 40 minutes (about 12 days).
How do I reset the replacement reminder?
After replacing the shaving head support, press and hold the on/off button for 10 seconds until the reminder symbol stops flashing.

User questions about SensoTouch 2D SensoTouch PHILIPS

0 question about this device. Answer the ones you know or ask your own.

Ask a new question about this device

The email remains private: it is only used to notify you if someone responds to your question.

No questions yet. Be the first to ask one.

Download the instructions for your Razor in PDF format for free! Find your manual SensoTouch 2D SensoTouch - PHILIPS and take your electronic device back in hand. On this page are published all the documents necessary for the use of your device. SensoTouch 2D SensoTouch by PHILIPS.

USER MANUAL SensoTouch 2D SensoTouch PHILIPS

Always here to help you

Register your product and get support at

www.philips.com/welcome

Question? Contact Philips

RQ1100

Series

Black-and-white photo of a Philips SenseTouch electric shaver with visible brand logo and power button (no text-heavy elements)

User manual

PHILIPS

Simple line drawing of an open book with a grid on the left and a closed page on the right (no text or symbols)

A 1 2 3 4 B 5 6 7 8 9 D C 10 PHILIPS Jet Clean solution G F E H

ENGLISH 6

DANSK 18

DEUTSCH 31

ΕΛΛΗΝΙΚΑ 44

ESPAÑOL 57

SUOMI 69

FRANÇAIS 82

ITALIANO 94

NEDERLANDS 106

NORSK 118

PORTUGUÊS 130

SVENSKA 142

TÜRKÇE 154

General description (Fig. 1)

A Shaver
1 Display
2 Shaver on/off button
3 Protection cap
4 RQ11 Shaving unit
B CRP331 Trimmer (specific types only)
C Jet Clean System (specific types only)
1 Shaver holder
2 'Cleaning chamber empty' symbol
3 Cleaning symbol
4 Drying symbol
5 Jet Clean System on/off button
6 Cleaning chamber release button
D Adapter
E Foldable charger
F Cleaning brush
G HQ200 Cleaning fluid (specific types only)
H Pouch (specific types only)

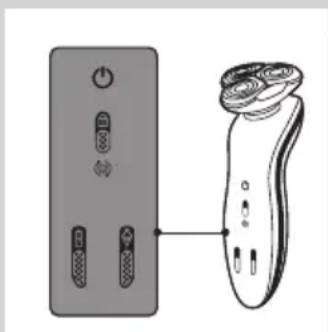
The display

PHILIPS SensoTouch 2D SensoTouch - The display - 1

Note: If there is a protective foil on the display, remove it before you use the shaver for the first time.

The various shaver types have different displays, which are shown in the figures below.

- RQ1180

- RQ1160

- RQ1150

Charging

- Charging takes approx. 1 hour.

RQ1180

- When the shaver is charging, first the bottom charging light flashes, then the second charging light, and so on until the shaver is fully charged.

- Quick charge: When the shaver contains enough energy for one shave, the bottom charging light alternately flashes orange and white.

RQ1160/RQ1150

Note: The displays of the various shaver types look different, but work in the same way.

  • When the shaver is charging, first the plug symbol and the battery symbol flash alternately. After some time, the plug symbol goes out and the battery symbol continues to flash until the shaver is fully charged.
  • Quick charge: When the shaver contains enough energy for one shave, the alternate flashing of the plug symbol and battery symbol stops and only the battery symbol flashes.

Battery fully charged

RQ1180

- When the battery is fully charged, all charging lights light up continuously. After approx. 30 minutes, the display automatically switches off again.

RQ1160/RQ1150

Note: The displays of the various shaver types look different, but work in the same way.

- When the battery is fully charged, the battery symbol lights up continuously. After approx. 30 minutes, the display automatically switches off again.

Battery low

RQ1180

- When the battery is almost empty (when there are only 5 or fewer shaving minutes left), the bottom charging light flashes orange.

- When you switch off the shaver, the bottom charging light continues to flash for a few seconds.

RQ1160/RQ1150

Note: The displays of the various shaver types look different, but work in the same way.

- When the battery is almost empty (when there are only 5 or fewer shaving minutes left), the plug symbol flashes.

- When you switch off the shaver, the plug symbol continues to flash for a few seconds.

Remaining battery capacity

RQ1180

- The remaining battery capacity is indicated by the number of charging lights that are on.

Travel lock

3 sec.

You can lock the shaver when you are going to travel. The travel lock prevents the shaver from being switched on by accident.

Activating the travel lock

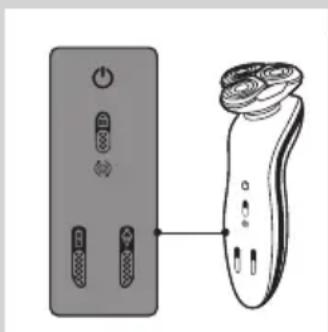
1 Press the on/off button for 3 seconds to enter the travel lock mode.
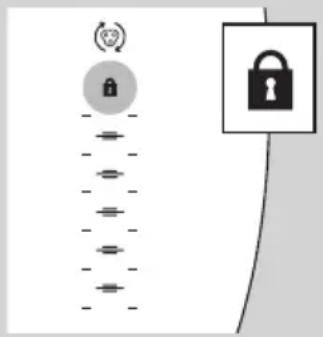
Diagram showing a vertical line with a lock icon and a padlock icon, likely representing security or security update.

The lock symbol lights up on the display.

Note: The displays of the various shaver types look different, but show the same symbol.

Deactivating the travel lock

1 Press the on/off button for 3 seconds.

The motor starts running to indicate that the travel lock has been deactivated.

The shaver is now ready for use again.

Note: When you place the shaver in the plugged-in charger or Jet Clean System, the travel lock is automatically deactivated.

Replace shaving head holder

Diagram showing electrical connections and a circular symbol with a heart icon, likely illustrating a power or signal flow system.

Note: The displays of the various shaver types look different, but show the same symbol.

For maximum shaving performance, we advise you to replace the shaving head holder every 12 months.

- To remind you to replace the shaving head holder, the appliance is equipped with a replacement reminder which is activated automatically after approx. 12 months. The replacement reminder is repeated at 9 successive shaves or until you reset the shaver.

Charging

Charging takes approx. 1 hour.

RQ1180/RQ1160: A fully charged shaver has a shaving time of up to 50 minutes or 15 days.

RQ1150: A fully charged shaver has a shaving time of up to 40 minutes or 12 days.

Charge the shaver before you use it for the first time and when the display indicates that the battery is almost empty (see section 'Battery low' in chapter 'The display').

Quick charge

After the shaver has charged for 5 minutes, it contains enough energy for one shave.

Charging in the charger

Diagram of a mechanical device with a curved arrow indicating rotational motion (no text or symbols)

1 Insert the small plug into the charger.
2 Unfold the charger ('click').
3 Put the adapter in the wall socket.

Diagram illustrating hairpin insertion process with labeled parts and directional arrows

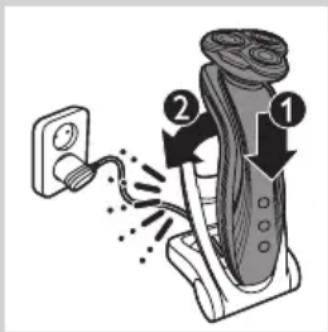
4 Put the shaver in the charger (1) and press it backwards until it locks into place (2).
The display shows that the shaver is charging (see section 'Charging' in chapter 'The display').

Charging in the Jet Clean System (specific types only)
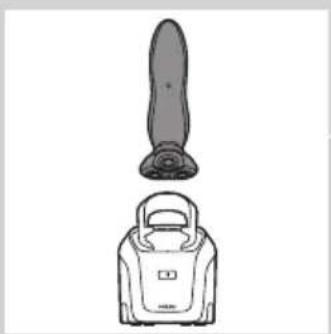
Illustration of a device with a cylindrical top and a smaller labeled device (no text or symbols)

1 Put the small plug in the Jet Clean System.
2 Put the adapter in the wall socket.
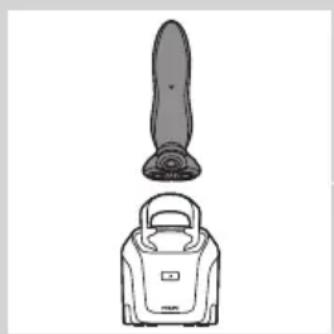
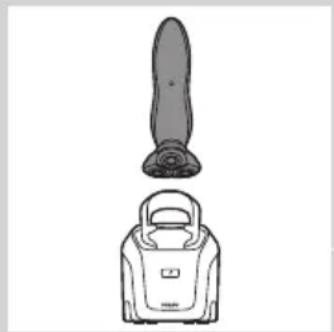
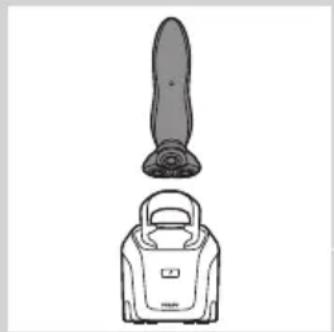
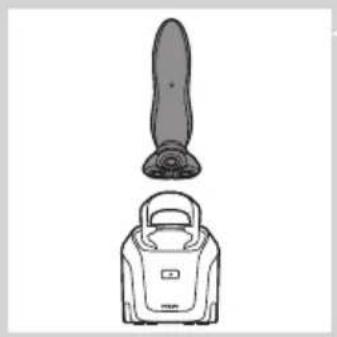
3 Hold the shaver upside down above the holder with the back of the shaver pointing towards the holder.

Note: RQ1180 only: when you turn the shaver upside down, the battery indication on the display is also turned upside down so you can still see to what level the battery is charged.

Diagram showing two mechanical components with arrows indicating motion or force, no text or symbols present

4 Place the shaver body in the holder behind the two clips (1) and press it down until it locks into place (2).

Note: The shaver cannot be placed in the Jet Clean System when the protection cap is on the shaving unit or when the trimmer is placed on the shaver.

The display shows that the shaver is charging (see chapter 'The display').

Using the shaver

Shaving

Skin adaptation period

Your first shaves may not bring you the result you expect and your skin may even become slightly irritated. This is normal. Your skin and beard need time to adapt to any new shaving system.

We advise you to shave regularly (at least 3 times a week) for a period of 3 weeks to allow your skin to adapt to the new shaver. During this period, use your new electric shaver exclusively and do not use other shaving methods. If you use different shaving methods, it is more difficult for your skin to adapt to the new shaving system.

Illustration of a person applying facial massage to the ear with directional arrows indicating motion (no text or symbols)

1 Press the on/off button once to switch on the shaver.

DRQ1180: The display lights up for a few seconds.

2 Move the shaving heads over your skin in circular movements.

- Do not make straight movements.

3 Press the on/off button once to switch off the shaver.

DRQ1180: The display lights up for a few seconds and then shows the remaining battery capacity.

Wet shaving

You can also use this shaver on a wet face with shaving foam or shaving gel.

To shave with shaving foam or shaving gel, follow the steps below:

1 Apply some water to your skin.
2 Apply shaving foam or shaving gel to your skin.
3 Rinse the shaving unit under the tap to ensure that the shaving unit glides smoothly over your skin.
4 Press the on/off button once to switch on the shaver.
5 Move the shaving heads over your skin in circular movements.

Note: Rinse the shaver under the tap regularly to ensure that it continues to glide smoothly over your skin.

6 Dry your face and thoroughly clean the shaver after use (see chapter 'Cleaning and maintenance').

Note: Make sure you rinse all foam or shaving gel off the shaver.

Using the trimmer (specific types only)

You can use the trimmer to groom your sideburns and moustache.

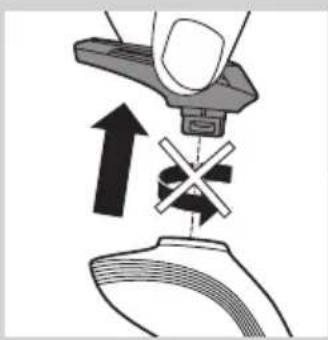
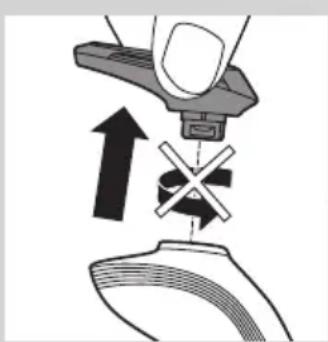
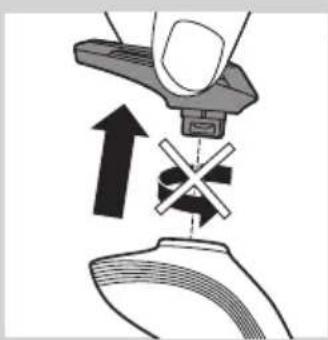
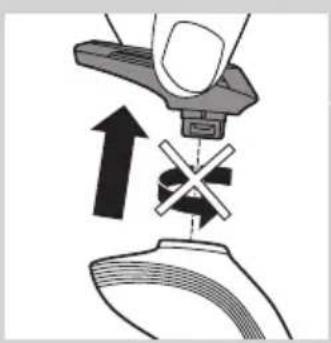
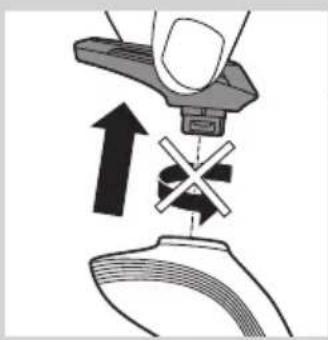
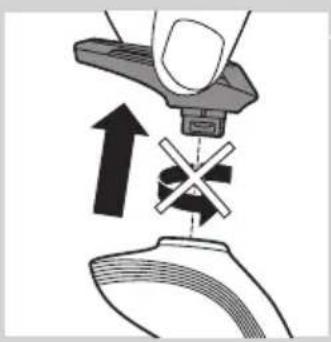
1 Pull the shaving unit straight off the shaver.

Note: Do not twist the shaving unit while you pull it off the shaver.
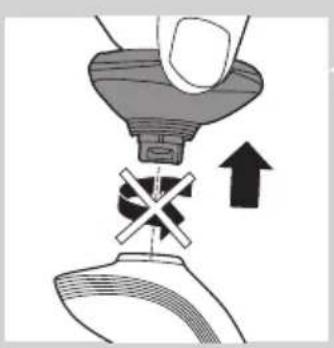
Diagram showing a hand pressing down a funnel with a cross symbol, indicating mechanical or electrical hazard (no text or labels present)

Diagram showing spray application process with labeled steps 1 and 2, including a magnified inset view.

Diagram showing a hand using a tool to press or install a mechanical component with an upward arrow and cross symbol (no text or labels)

Diagram illustrating spray application process with labeled steps 1 and 2, showing spray bottle and nozzle setup

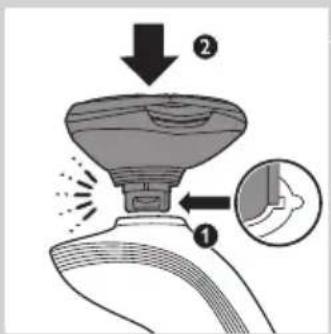
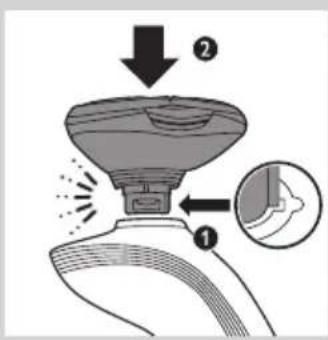
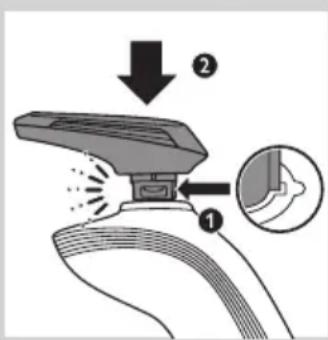
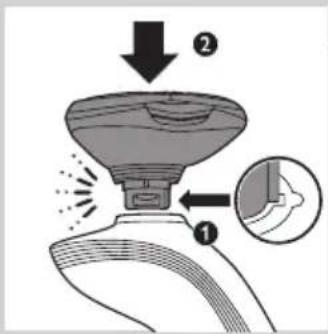
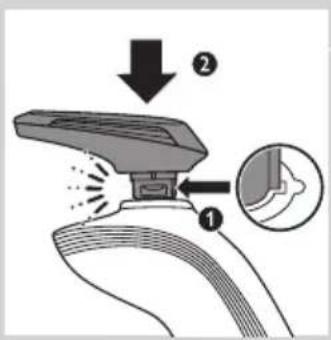
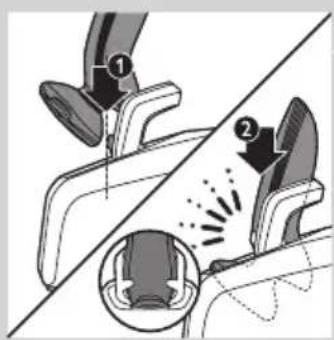
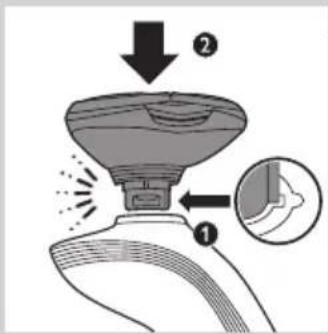
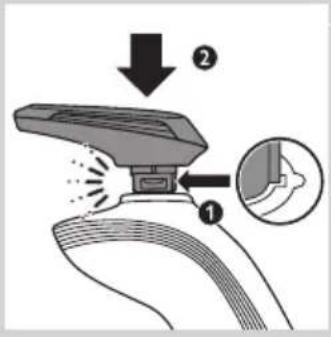
2 Insert the lug of the trimmer into the slot in the top of the shaver (1). Then press down the trimmer (2) to attach it to the shaver ('click').
3 Press the on/off button once to switch on the trimmer. DRQ1180: The display lights up for a few seconds.
4 You can now start trimming.
5 Press the on/off button once to switch off the trimmer. ▶RQ1180: The display lights up for a few seconds to show the remaining battery capacity.
6 Pull the trimmer straight off the shaver.

Note: Do not twist the trimming unit while you pull it off the shaver.
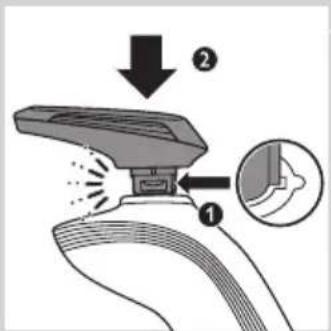
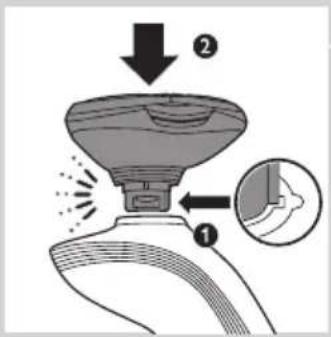
7 Insert the lug of the shaving unit into the slot in the top of the shaver (1). Then press down the shaving unit (2) to attach it to the shaver ('click').

Cleaning and maintenance

Never use scouring pads, abrasive cleaning agents or aggressive liquids such as petrol or acetone to clean the shaver, its accessories and the Jet Clean System (specific types only).

  • The best and most hygienic way to clean the shaver is in the Jet Clean System (specific types only). You can also rinse the shaver under the tap or clean it with the brush supplied.
  • Clean the shaver after every shave for optimal shaving performance.
  • You can clean the outside of the shaver with a damp cloth.
  • Regular cleaning guarantees better shaving performance.

Cleaning the shaving unit

Be careful with hot water. Always check if the water is not too hot, to prevent your hands from getting burnt.

1 Switch off the shaver. Remove it from the charger or remove it from the Jet Clean System (specific types only).
2 Rinse the shaving unit under a hot tap for some time.

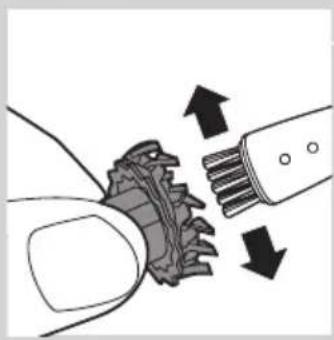
Note: You can also clean the shaving unit with the cleaning brush supplied.
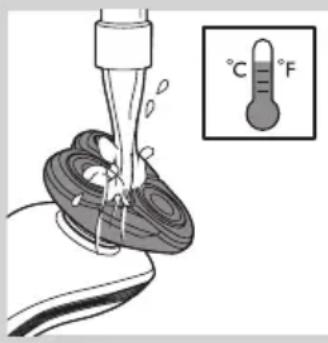
°C °F

Illustration of a hand holding a circular object with concentric rings, and a separate view of a device with three circular components (no text or symbols)

Illustration of a hand holding a circular object with a downward arrow indicating a process or transformation (no text or symbols present)

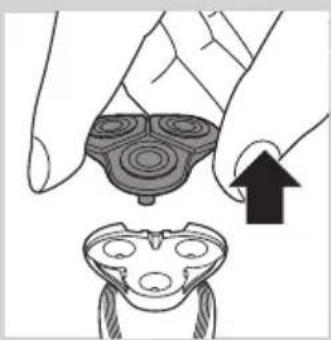
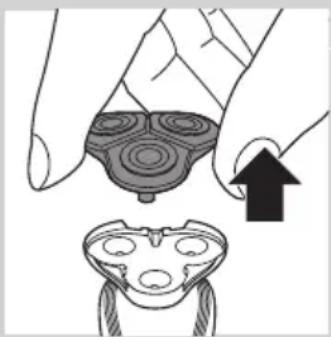
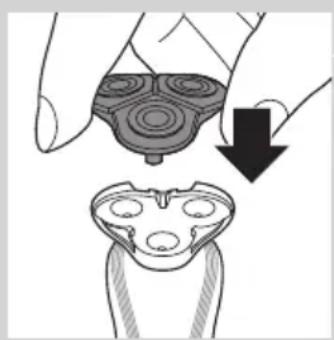
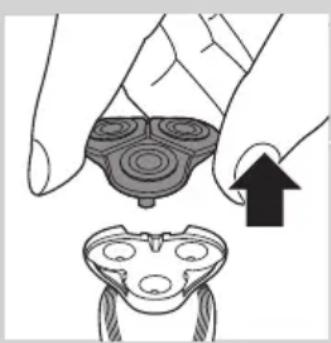
3 Pull the shaving head holder off the bottom part of the shaving unit and rinse it under a hot tap for 30 seconds.

Note: You can also clean the shaving head holder with the cleaning brush supplied.

4 Carefully shake off excess water and let the shaving head holder dry.

Never dry the shaving unit with a towel or tissue, as this may damage the shaving heads.

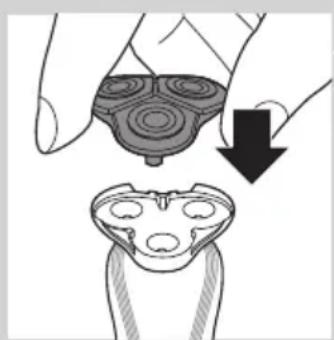
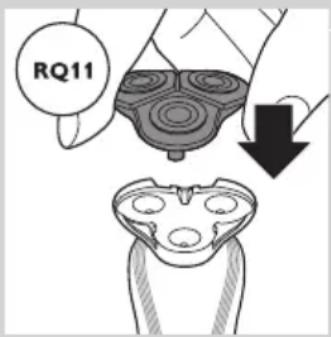
5 Reattach the shaving head holder to the bottom part of the shaving unit ('click').

Cleaning the shaving unit in the Jet Clean System (specific types only)

The Jet Clean System has an automatic cleaning program. When you press the on/off button, the Jet Clean System starts cleaning in this automatic cleaning program.

Preparing the Jet Clean System for use

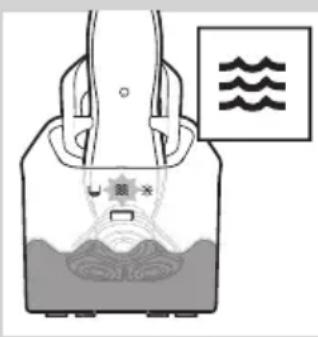
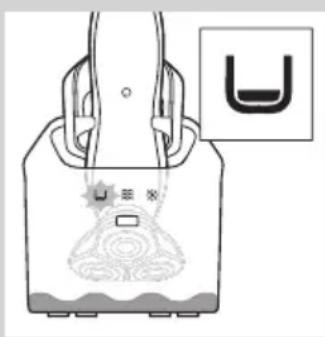
Fill the cleaning chamber before first use.

Diagram illustrating a hand holding a device with two directional arrows labeled ① and ②, indicating movement or process steps.

1 Put the small plug in the Jet Clean System.
2 Put the adapter in the wall socket.
The holder automatically moves to the highest position.
3 Simultaneously press the release buttons on both sides of the cleaning chamber (1). Then lift the Jet Clean System off the cleaning chamber (2).
The cleaning chamber remains behind.
4 Fill the cleaning chamber with HQ200 cleaning fluid to a level between the two lines.
5 Place the Jet Clean System back onto the cleaning chamber.
Make sure the release buttons click back into place.

Using the Jet Clean System

Note: If you use the shaver with shaving foam or shaving gel, we advise you to rinse it under the hot tap before you clean it in the Jet Clean System. This guarantees an optimal lifetime for the cleaning fluid.

Illustration of a device with a cylindrical top and a rectangular base (no text or symbols)

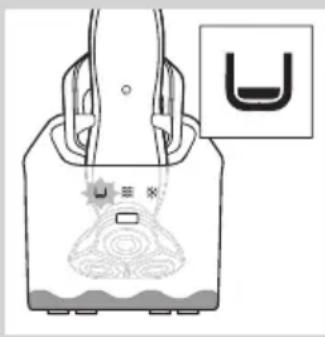
1 Hold the shaver upside down above the holder with the back of the shaver pointing towards the holder.
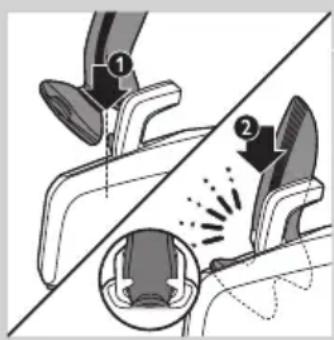
Diagram showing two mechanical components with arrows indicating motion or force, no text or symbols present

2 Place the shaver body in the holder behind the two clips (1) and press it down until it locks into place (2).

The display shows that the shaver is charging (see chapter 'The display').
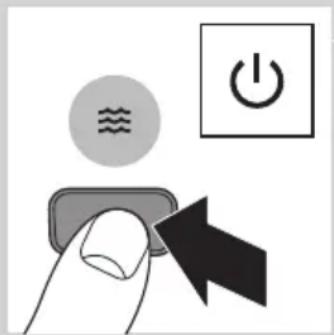
Diagram showing a finger pressing a button with icons for power, thermal, and current control

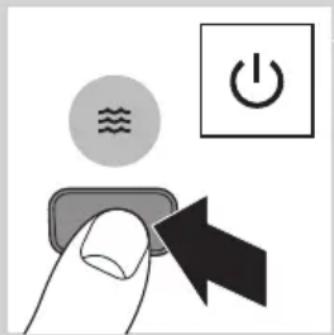
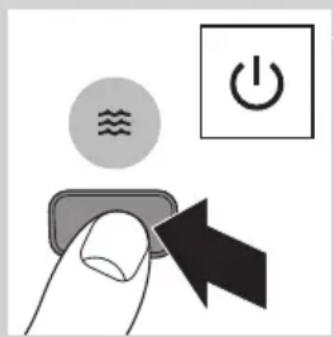
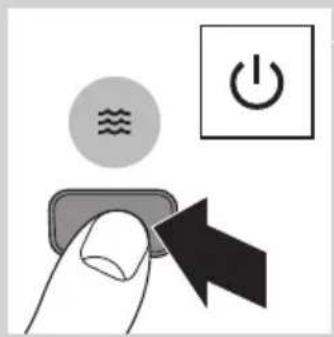
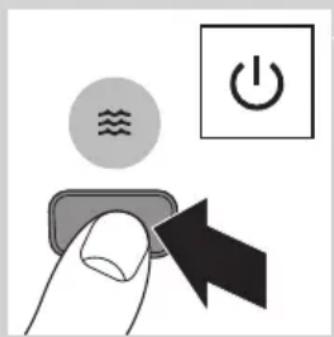
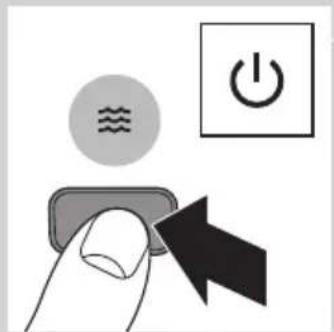
3 Press the on/off button on the Jet Clean System to start the cleaning program.

The shaver display stops showing the charging indication.

Simple line drawing of a container with a lid and wavy lines above, no text or symbols present.

Diagram of a device with a sun symbol and control panel, no text or labels present

Illustration of a handbag with decorative patterns and a small inset showing a U-shaped symbol (no text or labels)

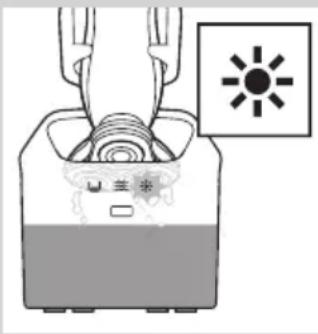
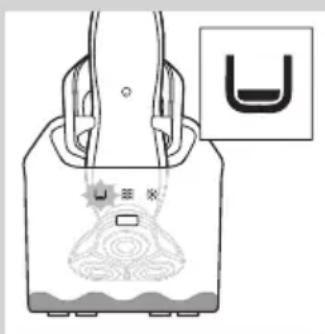
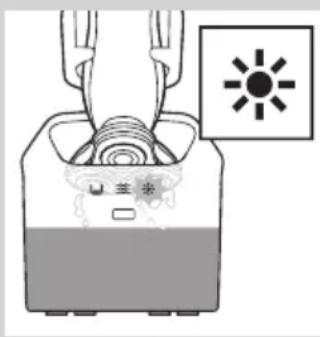
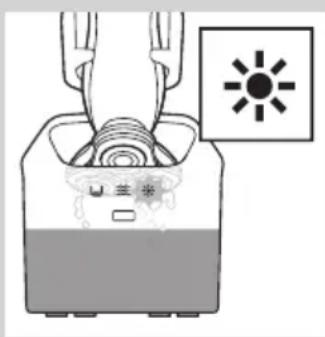
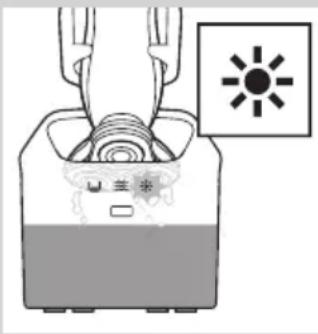
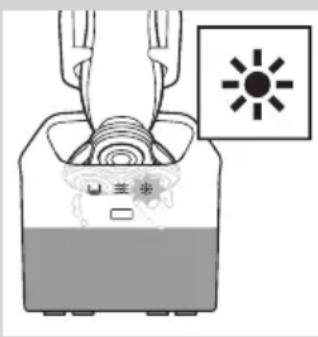
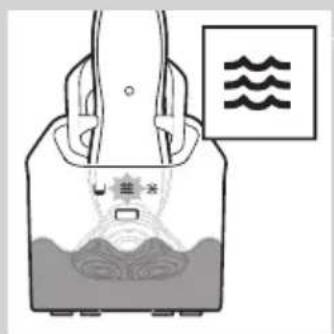
The cleaning light starts to flash and the shaver is automatically lowered into the cleaning fluid.

The cleaning light flashes throughout the cleaning program, which takes a few minutes.

During the first phase of the cleaning program, the shaver automatically switches on and off several times and moves up and down.

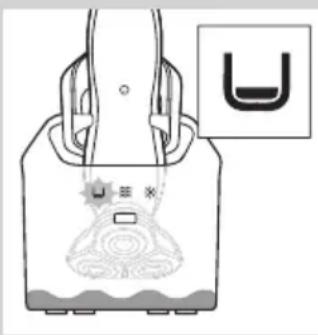
During the second phase of the cleaning program, the shaver is placed in the drying position, indicated by the flashing drying symbol. This phase takes approx. 2 hours. The shaver stays in this position until the end of the program.

After the cleaning program, the charging indication appears on the shaver display (see chapter 'The display').

Note: If you press the on/off button of the Jet Clean System during the cleaning program, the program aborts. In this case, the cleaning or drying light stops flashing and the holder moves to the highest position.

Note: If you remove the adapter from the wall socket during the cleaning program, the program aborts. The holder remains in its current position. When you put the adapter back into the wall socket, the holder moves to the highest position.

- When the cleaning fluid drops below the minimum level, the 'cleaning chamber empty' symbol starts to flash and the holder returns to its starting position.

- If you use the Jet Clean System to clean your shaver every day, you need to refill the cleaning chamber approx. every 15 days.

Cleaning the Jet Clean System

Clean the cleaning chamber every 15 days.

You can wipe the outside of the Jet Clean System with a damp cloth.

1 Simultaneously press the release buttons on both sides of the Jet Clean System (1). Then lift the Jet Clean System off the cleaning chamber (2).

The cleaning chamber remains behind.

2 Pour any remaining cleaning fluid out of the cleaning chamber. You can simply pour the cleaning fluid down the sink.

3 Rinse the cleaning chamber under the tap.

The cleaning chamber is not dishwasher-proof.

4 Fill the cleaning chamber with HQ200 cleaning fluid to a level between the two lines.

5 Place the Jet Clean System back onto the cleaning chamber.

Make sure the release buttons click back into place.

Extra-thorough cleaning method

Make sure the appliance is switched off.

1 Pull the shaving head holder off the bottom part of the shaving unit.
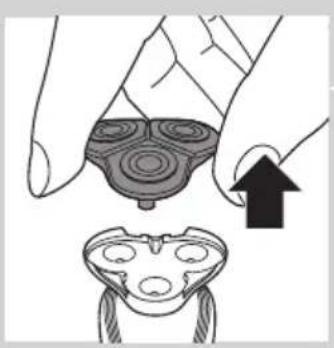
Illustration of a hand holding a circular object with concentric rings, next to a separate abstract shape with four circles (no text or symbols)

Abstract symmetrical pattern with concentric rings and a central arrow (no text or symbols)

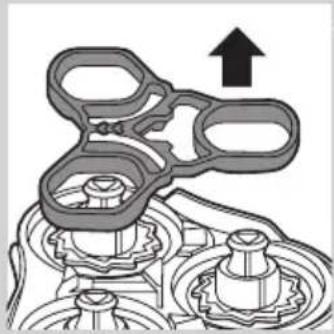
Mechanical assembly diagram showing gears and shafts with an upward arrow (no text or symbols)

Mechanical gear assembly diagram showing a central shaft and housing with an upward arrow (no text or symbols)

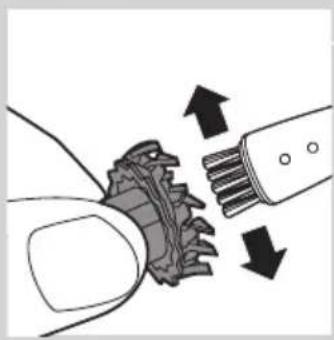
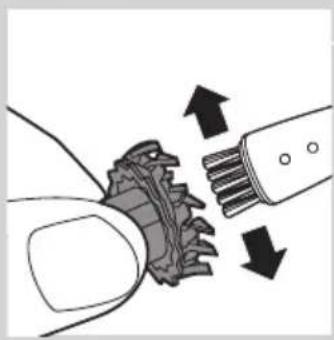
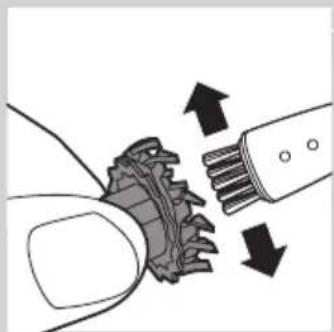
Diagram showing a hand holding a car wheel with gear teeth and a brush, indicating mechanical or electrical components (no text or symbols present)

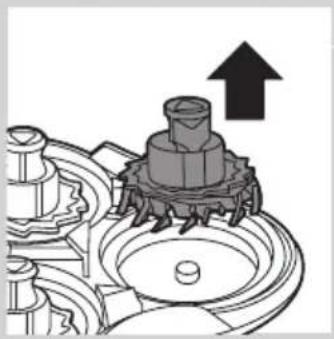
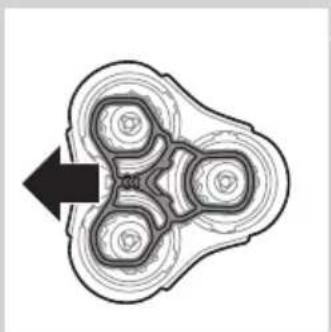
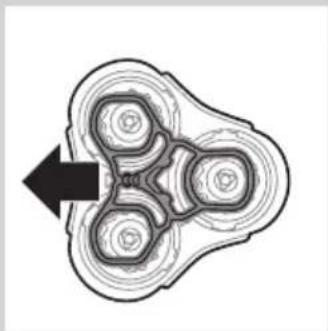
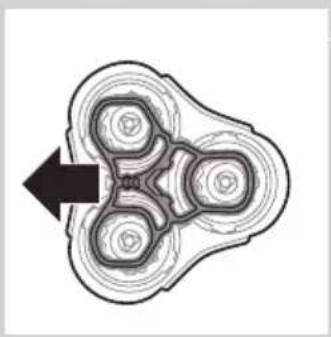
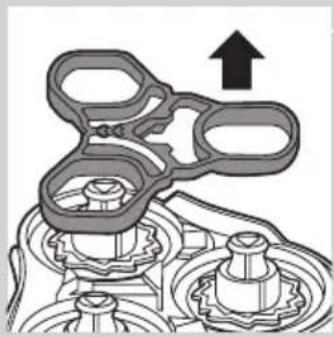
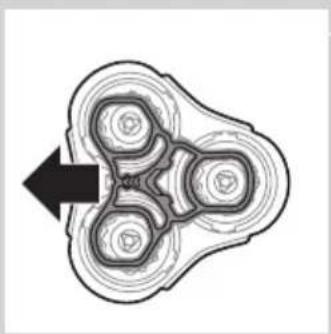
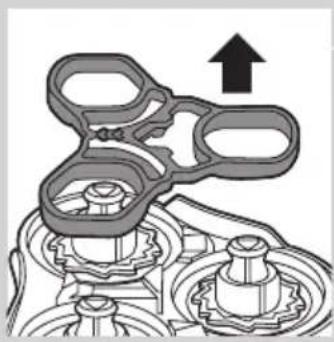
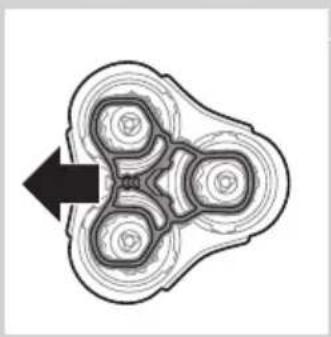
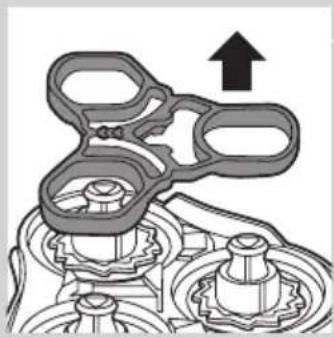
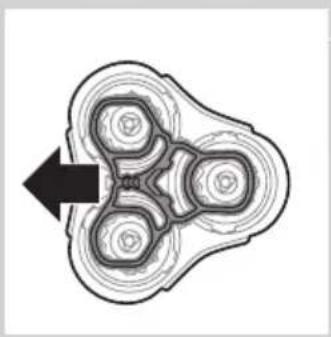
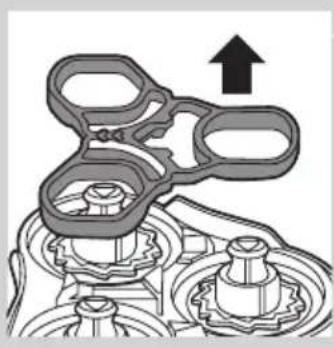
2 Slide the green retaining frame in the direction of the arrows indicated on the retaining frame.

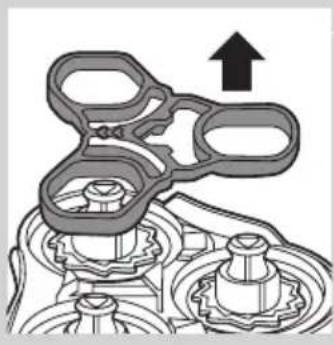
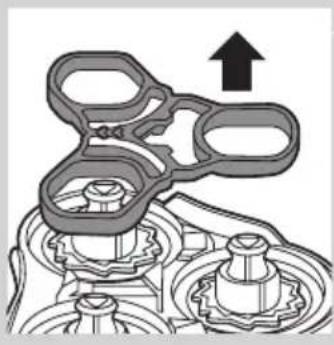
3 Lift the retaining frame out of the shaving head holder.

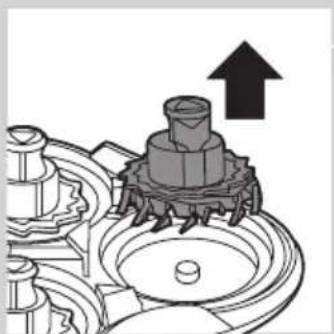
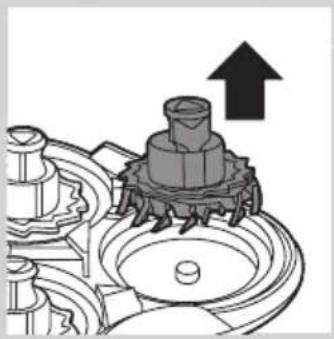
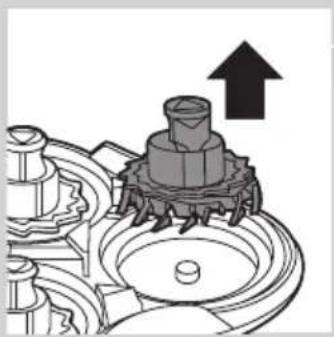
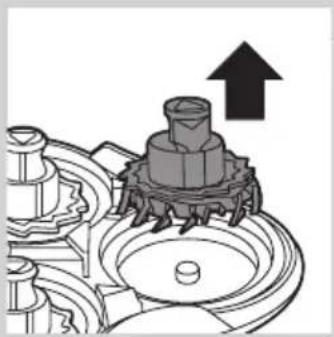
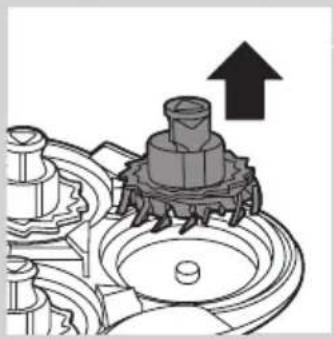
4 Remove the cutter from the shaving guard.

Note: Do not clean more than one cutter and shaving guard at a time, since they are all matching sets. If you accidentally put a cutter in the wrong shaving guard, it may take several weeks before optimal shaving performance is restored.

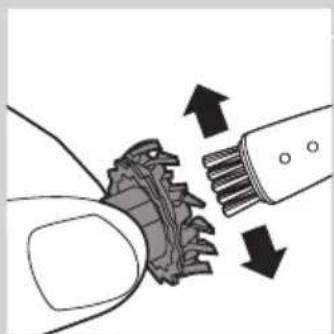
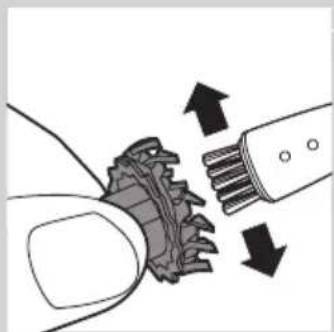
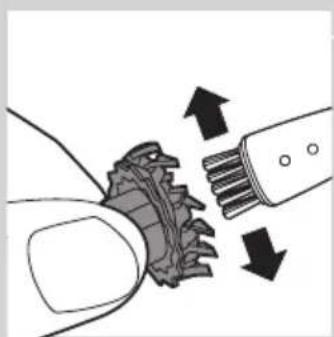
5 Clean the cutter with the cleaning brush supplied.

Mechanical assembly diagram showing a brush tool interacting with a gear mechanism (no text or symbols visible)

6 Clean the inside of the shaving guard.

Mechanical assembly diagram showing a gear-like component with a downward arrow indicating motion (no text or symbols present)

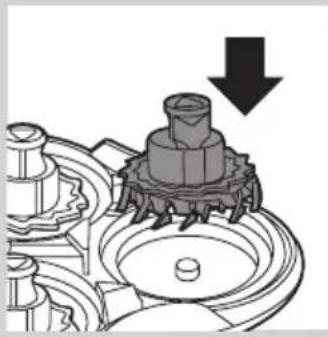
7 After cleaning, place the cutter back into the shaving guard with the cutter legs pointing downwards.

Mechanical assembly diagram showing gear and shaft components with a downward arrow indicating motion (no text or symbols)

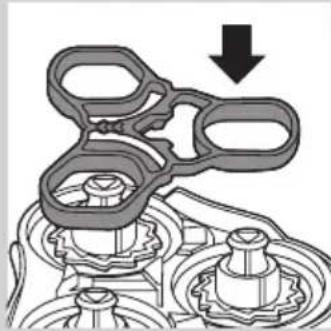
8 Place the retaining frame back onto the shaving head holder.

Abstract diagram of a symmetrical, multi-layered structure with radiating lines and a black arrow pointing inward (no text or symbols)

9 Slide the guard back into place ('click').

Illustration of a hand holding a three-layered device with a downward arrow indicating compression or disassembly (no text or symbols present)

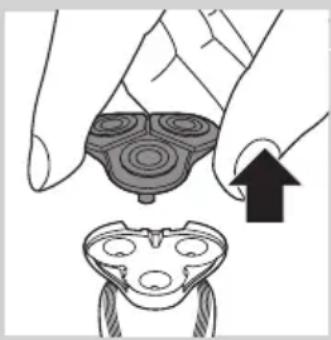
10 Reattach the shaving head holder to the bottom part of the shaving unit.

Cleaning the trimmer

Clean the trimmer every time you have used it.

1 Switch on the appliance with the trimmer attached.
2 Rinse the trimmer under a hot tap for some time.
3 After cleaning, switch off the appliance.

Tip: For optimal trimmer performance, lubricate the trimmer teeth with a drop of sewing machine oil every six months.

Replacement

For maximum shaving performance, we advise you to replace the shaving head holder every 12 months.

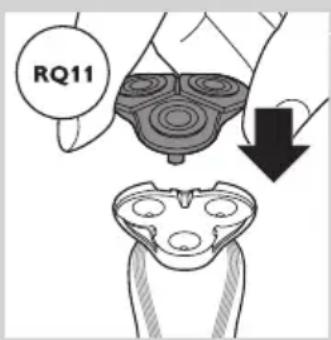
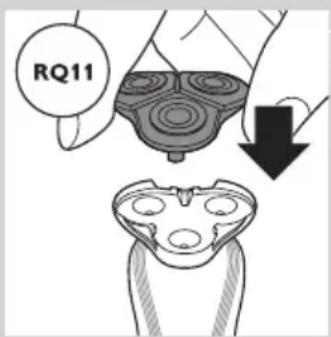
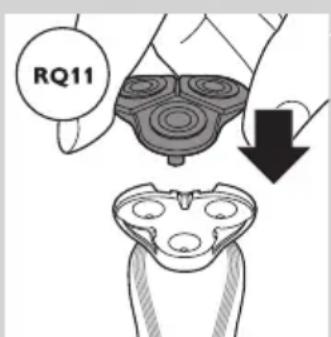
Only replace the shaving head holder with an original RQ11 Philips Shaving Head Holder.

Replacement reminder

To remind you to replace the shaving head holder, the appliance is equipped with a replacement reminder which is activated automatically after approx. 12 months. The replacement reminder is repeated at 9 successive shaves or until you reset the shaver.

1 The shaving unit symbol flashes when you switch off the shaver.

Note: The displays of the various shaver types look different, but show the same symbol.

Diagram showing electrical connections with power and current symbols, including a circular symbol and a square with circular icons.

Illustration of a hand holding a circular object with concentric rings, next to a separate view of a device with three circular features (no text or symbols)

RQ11

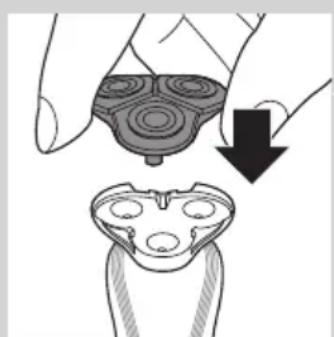
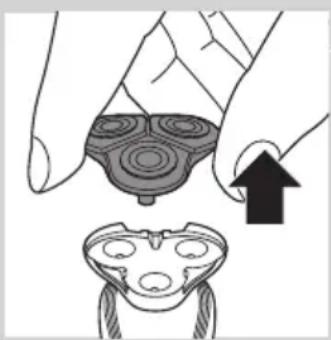
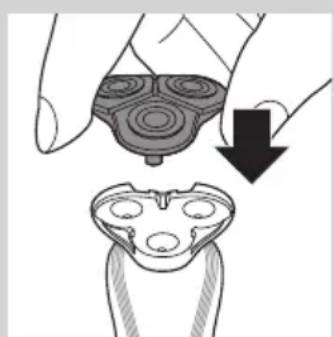
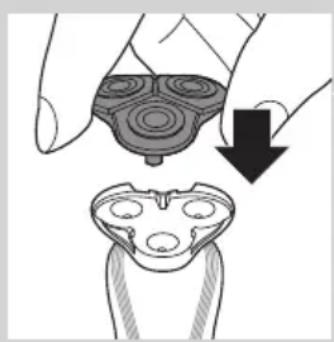
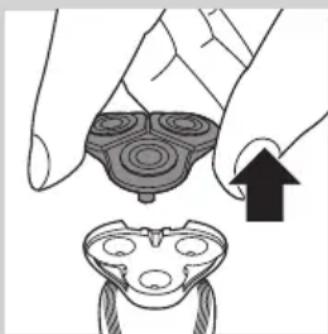
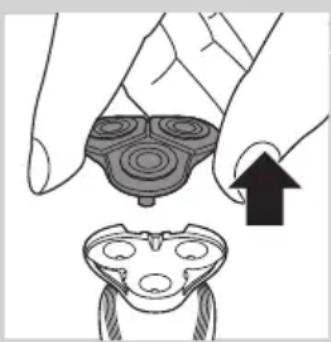
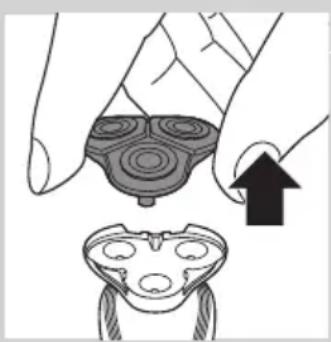
2 Pull the shaving head holder off the bottom part of the shaving unit.
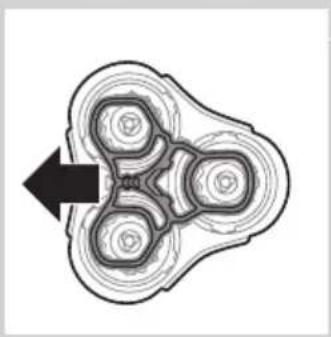
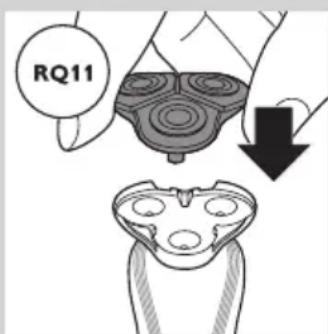
3 Attach the new shaving head holder to the bottom part of the shaving unit ('click').
4 To reset the shaver, press and hold the on/off button for approx. 10 seconds.

Note: If you do not reset the shaver at the first replacement reminder, it continues to show the shaving unit symbol at 8 more shaves or until you reset the shaver.

- RQ1160

Diagram showing a device with two connected buttons and a brush-like device (no text or symbols)

- RQ1150

Opladning

4 Placer selve shaveren i holderen bag de to klemmer (1), og tryk den ned, indtil den låses på plads (2).
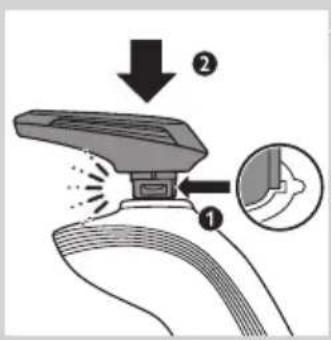
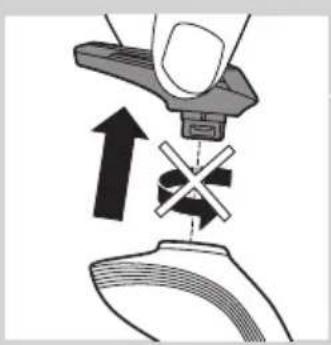
Diagram showing a spray gun with labeled parts and an inset magnified view of the tip area

Diagram showing a hand operating a tool to press a device with an X symbol (no text or labels present)

Diagram illustrating a spray gun with labeled parts and an inset showing the tip area

Illustration of a hand holding a device with a downward arrow indicating process (no text or symbols)

Illustration of a device with a tall cylindrical object above a smaller rectangular device (no text or symbols)

Diagram showing two mechanical components with arrows indicating motion or force, no text or symbols present

2 Placer selve shaveren i holderen bag de to klemmer (1), og tryk den ned, indtil den låses på plads (2).
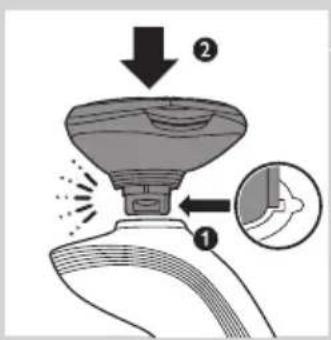
Diagram of a scientific apparatus with labeled components and wave symbols, including Chinese characters for 'wavy' and 'star'.

Diagram of a device with a sun symbol and a warning label, no readable text or symbols present.

Illustration of a handbag with a U-shaped symbol and abstract patterns on the side (no text or symbols)

Illustration of a hand holding a circular object with concentric rings, next to a separate abstract shape with three circles (no text or symbols)

- RQ1160

Diagram showing a device with two connected buttons and a brush-like device (no text or symbols)

- RQ1150

Laden

Diagram illustrating hairpin insertion process with labeled parts 1 and 2, showing electric shock and power outlet connections.

Diagram showing a hairdryer with labeled parts and an inset close-up view of the tip area

Diagram showing a hand operating a device with an upward arrow and a cross symbol (no text or labels)

Diagram illustrating a spray gun with labeled parts and an inset showing the tip of the spray gun.

Illustration of a hand holding a device with a magnified view below showing internal components (no text or symbols)

Illustration of a device with a cylindrical top and a rectangular base (no text or symbols)

Diagram showing two mechanical components with arrows indicating motion or force, no text or symbols present

Diagram showing a finger pressing a button with icons for power, thermal, and current control

Diagram of a device with a sun symbol and control panel, no text or labels present

Illustration of a handbag with a decorative bag and a small U-shaped symbol (no text or symbols present)

Abstract symmetrical pattern with concentric rings and a black arrow pointing left (no text or symbols)

Mechanical assembly diagram showing gear and shaft components with an upward arrow (no text or labels)

Mechanical assembly diagram showing a gear and shaft assembly with an upward arrow (no text or symbols)

Illustration of a hand holding a circular object with concentric rings, next to a separate sketch of a frog-like creature (no text or symbols)

- RQ1160

Diagram showing a device with two buttons connected to a handheld device (no text or symbols present)

- RQ1150

Φόρτιση

Diagram showing spray application process with labeled steps 1 and 2, including a magnified inset view of the step 1.

Diagram showing a hand holding a device with an upward arrow and a cross symbol, next to a curved object (no text or labels)

Diagram illustrating a spray gun with labeled parts and an inset showing the tip of the spray gun.

Illustration of a hand holding a device with a magnified view showing internal components (no text or symbols)

Diagram of a scientific apparatus with labeled components and wave symbols, likely illustrating an experimental setup or measurement.

Diagram of a device with a sun symbol and Chinese characters, no readable text or symbols present.

Simple line drawing of a bag with a handle and a small U-shaped symbol, no text or labels present.

Abstract symmetrical pattern with concentric rings and a black arrow pointing left (no text or symbols)

Mechanical assembly diagram showing gears and shafts with an upward arrow (no text or symbols)

Mechanical assembly diagram showing a gear-like component with an upward arrow indicating motion (no text or symbols present)

Illustration of a hand holding a circular object with concentric rings, being pointed at by an arrow (no text or symbols present)

RQ11

- RQ1160

Diagram showing a device with two buttons connected to a handheld device (no text or symbols present)

- RQ1150

Carga

Illustration of a hand holding a device with a downward arrow indicating process (no text or symbols)

Illustration of a device with a cylindrical top and a rectangular base (no text or symbols)

Diagram showing two mechanical components with arrows indicating motion or force, no text or symbols present

Diagram showing a finger pressing a button with icons for power, thermal, and current control

Diagram of a device with a sun symbol and control panel, no text or labels present

Simple line drawing of a bag with a decorative pattern and a small icon labeled 'U' (no text or symbols on the bag itself)

Abstract symmetrical pattern with concentric rings and a central arrow (no text or symbols)

Mechanical assembly diagram showing gears and shafts with an upward arrow (no text or symbols)

Mechanical gear assembly diagram showing a central shaft and surrounding gears with an upward arrow (no text or symbols)

Diagram showing a hand holding a car tire with arrows indicating motion or force (no text or symbols)

Illustration of a hand holding a circular object with concentric rings, next to a separate abstract shape with arrows indicating direction (no text or symbols)

RQ11

- RQ1160

Diagram showing a device with two buttons connected to a handheld device (no text or symbols present)

- RQ1150

Lataaminen

1 Kytke parranajokoneeseen virta painamalla virtapainiketta kerran.

Diagram showing a spray gun with labeled parts and directional arrows, including a magnified inset view.

Diagram showing a hand holding a device with an upward arrow and a cross symbol, next to a curved object (no text or labels)

Diagram illustrating a spray gun with labeled parts and an inset showing the tip area

Illustration of a hand holding a circular object with concentric rings, and a magnified view of a device with internal components (no text or symbols)

Illustration of a showerhead and a portable device (no text or symbols)

Diagram illustrating foot massage technique with labeled parts and motion arrows

Diagram of a scientific apparatus with labeled components and wave symbols, likely illustrating an experimental setup or measurement.

Diagram of a device with a sun symbol and Chinese characters, no readable text or symbols present

Diagram of a hand holding a device with a U-shaped symbol and a small inset showing the same symbol (no text or labels present)

Abstract symmetrical pattern with concentric rings and a black arrow pointing left (no text or symbols)

Mechanical assembly diagram showing gears and shafts with an upward arrow (no text or symbols)

Mechanical gear assembly diagram showing a rotating shaft and housing with an upward arrow (no text or symbols)

Illustration of a hand holding a circular object with concentric rings, next to a separate abstract shape with three circles (no text or symbols)

- RQ1160

Diagram showing a device with two buttons connected to a handheld device (no text or symbols present)

- RQ1150

Charge

Illustration of a hand holding a circular object with a downward arrow indicating a process or transformation (no text or symbols present)

Illustration of a vacuum cleaner with a cylindrical component and a flat blade (no text or symbols)

Diagram showing two mechanical components with arrows indicating motion, no text or symbols present

Diagram showing a finger pressing a button with icons for power, battery, and switch symbols

Diagram of a device with a sun symbol and Chinese characters, no readable text or symbols present.

Diagram of a handbag with a U-shaped symbol and a warning icon, no readable text or labels present.

Abstract symmetrical pattern with concentric rings and a black arrow pointing left (no text or symbols)

Mechanical gear assembly diagram showing interlocking gears and a directional arrow (no text or labels)

Mechanical gear assembly diagram showing a shaft and housing with an upward arrow (no text or symbols)

Diagram showing a hand holding a mechanical component with arrows indicating direction (no text or symbols)

Illustration of a hand holding a circular object with an upward arrow, next to a separate abstract shape (no text or symbols)

RQ11

- RQ1160

Diagram showing a device with two connected buttons and a brush-like device (no text or symbols)

- RQ1150

Diagram illustrating a spray gun with labeled parts and an inset showing the tip area

Diagram showing a hand operating a device with an upward arrow and a cross symbol, no text or labels present.

Diagram illustrating spray application process with labeled steps 1 and 2, showing spray bottle and nozzle setup

Illustration of a hand holding a device with a magnified view below showing internal components (no text or symbols)

Diagram of a device with a sun symbol and control panel, no text or labels present

Illustration of a handbag with decorative patterns and a small inset showing a U-shaped symbol (no text or labels)

Abstract symmetrical pattern with concentric rings and a central arrow (no text or symbols)

Mechanical assembly diagram showing gears and shafts with an upward arrow (no text or symbols)

Mechanical gear assembly diagram showing a central shaft and surrounding gears with an upward arrow (no text or symbols)

Diagram showing a hand holding a car tire with arrows indicating motion or force (no text or symbols)

Illustration of a hand holding a circular object with concentric rings, being pointed at by an arrow (no text or symbols present)

RQ11

- RQ1160

Diagram showing a device with two connected buttons and a brush-like device (no text or symbols)

- RQ1150

Opladen

Diagram showing a hairdryer with labeled parts and an inset magnified view of the tip area

Diagram showing a hand using a tool to press a device with an X symbol, no text or labels present

Diagram illustrating spray application process with labeled steps 1 and 2, showing spray bottle and nozzle components

Illustration of a hand holding a device with a downward arrow indicating process (no text or symbols)

Illustration of a vacuum cleaner with a cylindrical component and a flat blade (no text or symbols)

Diagram showing two mechanical components with arrows indicating motion, no text or symbols present

Diagram showing a finger pressing a button with icons for power, battery, and switch symbols

Diagram of a device with a sun symbol and control panel, no readable text or symbols present

Diagram of a handbag with a U-shaped symbol and a decorative pattern, no readable text or symbols present.

Abstract symmetrical pattern with concentric rings and a black arrow pointing left (no text or symbols)

Mechanical assembly diagram showing gear and shaft components with an upward arrow (no text or labels)

Mechanical assembly diagram showing a gear-like component with an upward arrow indicating motion (no text or symbols present)

Illustration of a hand turning a gear with arrows indicating motion (no text or symbols)

Illustration of a hand holding a circular object with concentric rings, next to a separate view of a frog-like creature (no text or symbols)

RQ11

- RQ1160

Diagram showing a device with two buttons connected to a handheld device (no text or symbols present)

- RQ1150

Lading

- Ladingen tar ca. én time.

RQ1180

- Når barbermaskinen lades, blinker den nederste ladelampen. Deretter lyser den andre ladelampen, og så videre inntil barbermaskinen er fulladet.

Transportlås

Ladingen tar ca. én time.

RQ1180/RQ1160: En fulladet barbermaskin har en barberingstid på opptil 50 minutter eller 15 dager.

RQ1150: En fulladet barbermaskin har en barberingstid på opptil 40 minutter eller 12 dager.

1 Sett den lille kontakten i laderen.
2 Slå ut laderen (du skal høre et klikk).
3 Sett adapteren i stikkontakten.

Diagram illustrating a medical procedure with labeled steps 1 and 2 showing fluid flow from a device to an electrical outlet.

4 Sett barbermaskinen i laderen (1), og trykk den bakover til den låses på plass (2).
- Displayet viser at barbermaskinen lades (se under Lading i avsnittet Displayet).

Lade i Jet Clean-systemet (kun bestemte modeller)

Line drawing of a vacuum cleaner and a cylindrical device (no text or symbols)

1 Koble den lille kontakten til Jet Clean-systemet.

2 Sett adapteren i stikkontakten.

Diagram showing a spray gun with labeled parts and an inset magnified view of the tip area

Diagram showing a hand holding a tool above a device with an X symbol, indicating no change or failure (no text or labels present)

Diagram illustrating a spray gun with labeled parts and an inset showing the tip area

Line drawing of a device with a top view and a base, no text or symbols present

Diagram showing two mechanical components with arrows indicating motion, no text or symbols present

Diagram showing a finger pressing a button with icons for power, thermal, and current control buttons

Simple line drawing of a container with liquid and a wavy pattern inside, no text or symbols present.

2 Skyv den grønne holderammen i pilens retning, som står på holderammen.
Mechanical assembly diagram showing gear and shaft components with an upward arrow (no text or labels)

4 Fjern kniven fra barberlamelltoppen.

Diagram illustrating hairpin insertion process with labeled parts 1 and 2, showing electric shock and power outlet connections.

1 Introduza a ficha pequena no carregador.
2 Abra o carregador (ouve-se um estalido).
3 Ligue o adaptador à tomada eléctrica.

Diagram illustrating a hairdryer with labeled parts and directional arrows, showing spray effect and magnified detail.

Diagram showing a robotic arm performing a manual press operation with an arrow indicating upward motion (no text or symbols present)

Diagram illustrating a spray gun with labeled parts and an inset showing the tip area

Illustration of a hand holding a three-layered device with a downward arrow indicating process (no text or symbols)

Illustration of a vacuum cleaner and a mechanical device (no text or symbols)

Diagram showing two mechanical components with arrows indicating motion or force, no text or symbols present

Diagram showing a finger pressing a button with icons for power, battery, and switch symbols

3 Prima o botão ligar/desligar no sistema Jet Clean para iniciar o programa de limpeza.

Diagram showing a device with labeled components and a sun symbol, likely illustrating a physical or mechanical setup.

Diagram of a 3D printer with a U-shaped logo and control panel, no readable text or symbols present

Abstract symmetrical pattern with concentric rings and a black arrow pointing left (no text or symbols)

Mechanical assembly diagram showing gear and shaft components with an upward arrow (no text or labels)

Mechanical assembly diagram showing a gear and shaft assembly with an upward arrow (no text or symbols)

Illustration of a hand turning a gear with arrows indicating motion (no text or symbols)

Illustration of a hand holding a circular object with concentric rings, next to a separate abstract shape with internal patterns (no text or symbols)

RQ11

Diagram showing a hairdryer with labeled parts and an inset magnified view of the tip area

Diagram showing a hand using a tool to press or install a component, with an upward arrow and cross symbol indicating process (no text or labels present)

Diagram illustrating spray application process with labeled steps 1 and 2, showing spray bottle and nozzle setup

Illustration of a hand holding a device with a downward arrow indicating process (no text or symbols)

Diagram showing two mechanical components with arrows indicating motion or force, no text or symbols present

Diagram of a device with a sun symbol and a warning sign, no readable text or symbols present

Illustration of a handbag with a decorative emblem and a small inset showing a U-shaped symbol (no text or labels)

Abstract symmetrical pattern with concentric rings and a black arrow pointing left (no text or symbols)

Mechanical assembly diagram showing gears and shafts with an upward arrow (no text or symbols)

Mechanical assembly diagram showing a gear-like component with an upward arrow indicating motion (no text or symbols present)

Diagram showing a hand holding a gear-like object with arrows indicating motion or force (no text or symbols)

Illustration of a hand holding a circular object with concentric rings, next to a separate abstract shape with arrows indicating motion (no text or symbols)

RQ11

- RQ1160

Diagram showing a device with two buttons connected to a handheld device (no text or symbols present)

- RQ1150

Şarj etme

Temizlik ve bakım

Illustration of a hand holding a device with a magnified view below showing internal components (no text or symbols)

Illustration of a showerhead and a device (no text or symbols)

Diagram illustrating seatbelt usage with numbered steps and visual cues for stress or wear

Diagram showing a finger pressing a button with icons for power, thermal, and current control buttons

Simple line drawing of a person inside a container with water and a wavy line above, no text or symbols present.

Diagram of a device with a U-shaped symbol and a warning label, likely indicating a hazard or hazard.

Illustration of a hand holding a circular object with concentric rings, and a separate view of a device with three circular features (no text or symbols)

RQ11

Manual assistant
Powered by Anthropic
Waiting for your message
Product information

Brand : PHILIPS

Model : SensoTouch 2D SensoTouch

Category : Razor