BF5A (1989) - Outboard motor Honda - Free user manual and instructions
Find the device manual for free BF5A (1989) Honda in PDF.


| Product Type | Outboard Motor |
| Brand | Honda |
| Model | BF5A (1989) |
| Engine Power | 5 HP (3.7 kW) |
| Engine Type | 4-stroke, single cylinder |
| Displacement | 127 cc |
| Starting System | Manual recoil start |
| Fuel Type | Unleaded gasoline |
| Fuel Tank Capacity | 2.6 L (integral) |
| Cooling System | Water-cooled |
| Lubrication | Wet sump, 4-stroke oil |
| Gear Ratio | 2.08:1 |
| Propeller RPM (at WOT) | 5000-6000 rpm |
| Shaft Length | Short (381 mm) |
| Weight | 25 kg (55 lbs) |
| Dimensions (L x W x H) | 790 x 310 x 1050 mm |
| Transom Height | 432 mm |
| Steering | Tiller handle |
| Control Type | Manual throttle and gear shift |
| Trim System | Manual tilt pin |
| Ignition System | Transistorized |
| Spark Plug | BPR6HS (NGK) or equivalent |
| Fuel Consumption | Approx. 2.5 L/h at full throttle |
| Noise Level | 75 dB(A) at 1 m |
| Recommended Maintenance | Oil change every 50 hours, spark plug annually |
| Safety Features | Kill switch lanyard, propeller guard (optional) |
Frequently Asked Questions - BF5A (1989) Honda
User questions about BF5A (1989) Honda
0 question about this device. Answer the ones you know or ask your own.
Ask a new question about this device
Download the instructions for your Outboard motor in PDF format for free! Find your manual BF5A (1989) - Honda and take your electronic device back in hand. On this page are published all the documents necessary for the use of your device. BF5A (1989) by Honda.
USER MANUAL BF5A (1989) Honda
Owner's Manual Outboard Motor BF5A
natural_image
Silhouette of a Honda motor on a grid background (no text or symbols)Thank you for purchasing a Honda Outboard Motor.
This manual covers operation and maintenance of the Honda BF5A Outboard Motor. All information in this publication is based on the latest product information available at the time of approval for printing.
Honda Motor Co., Ltd. reserves the right to make changes at any time without notice and without incurring any obligation.
No part of this publication may be reproduced without written permission.
This manual should be considered a permanent part of the Outboard Motor and should remain with the Outboard Motor when it is sold.
Pay special attention to statements preceded by the following words:
⚠️ DANGER: Indicates severe personal injury or death will result if instructions are not followed.
▲WARNING Indicates a strong possibility of severe personal injury or death if instructions are not followed.
CAUTION: Indicates a possibility of personal injury or equipment damage if instructions are not followed.
NOTE: Gives helpful information.
If a problem should arise, or if you have any questions about the Outboard Motor, consult an authorized Honda dealer.
- SAFETY 3
- COMPONENT IDENTIFICATION 6
- INSTALLATION 8
- PRE-OPERATION CHECKS 10
- STARTING THE ENGINE 13
- OPERATION 18
- STOPPING THE ENGINE 24
- MAINTENANCE 25
- TRANSPORTING/STORAGE 36
- TROUBLESHOOTING 38
- SPECIFICATIONS 39
- WIRING DIAGRAM 40
- OPTIONAL PARTS 41
- WARRANTY 42
SAFETY LABEL LOCATIONS
Read all safety instructions before using the outboard motor.
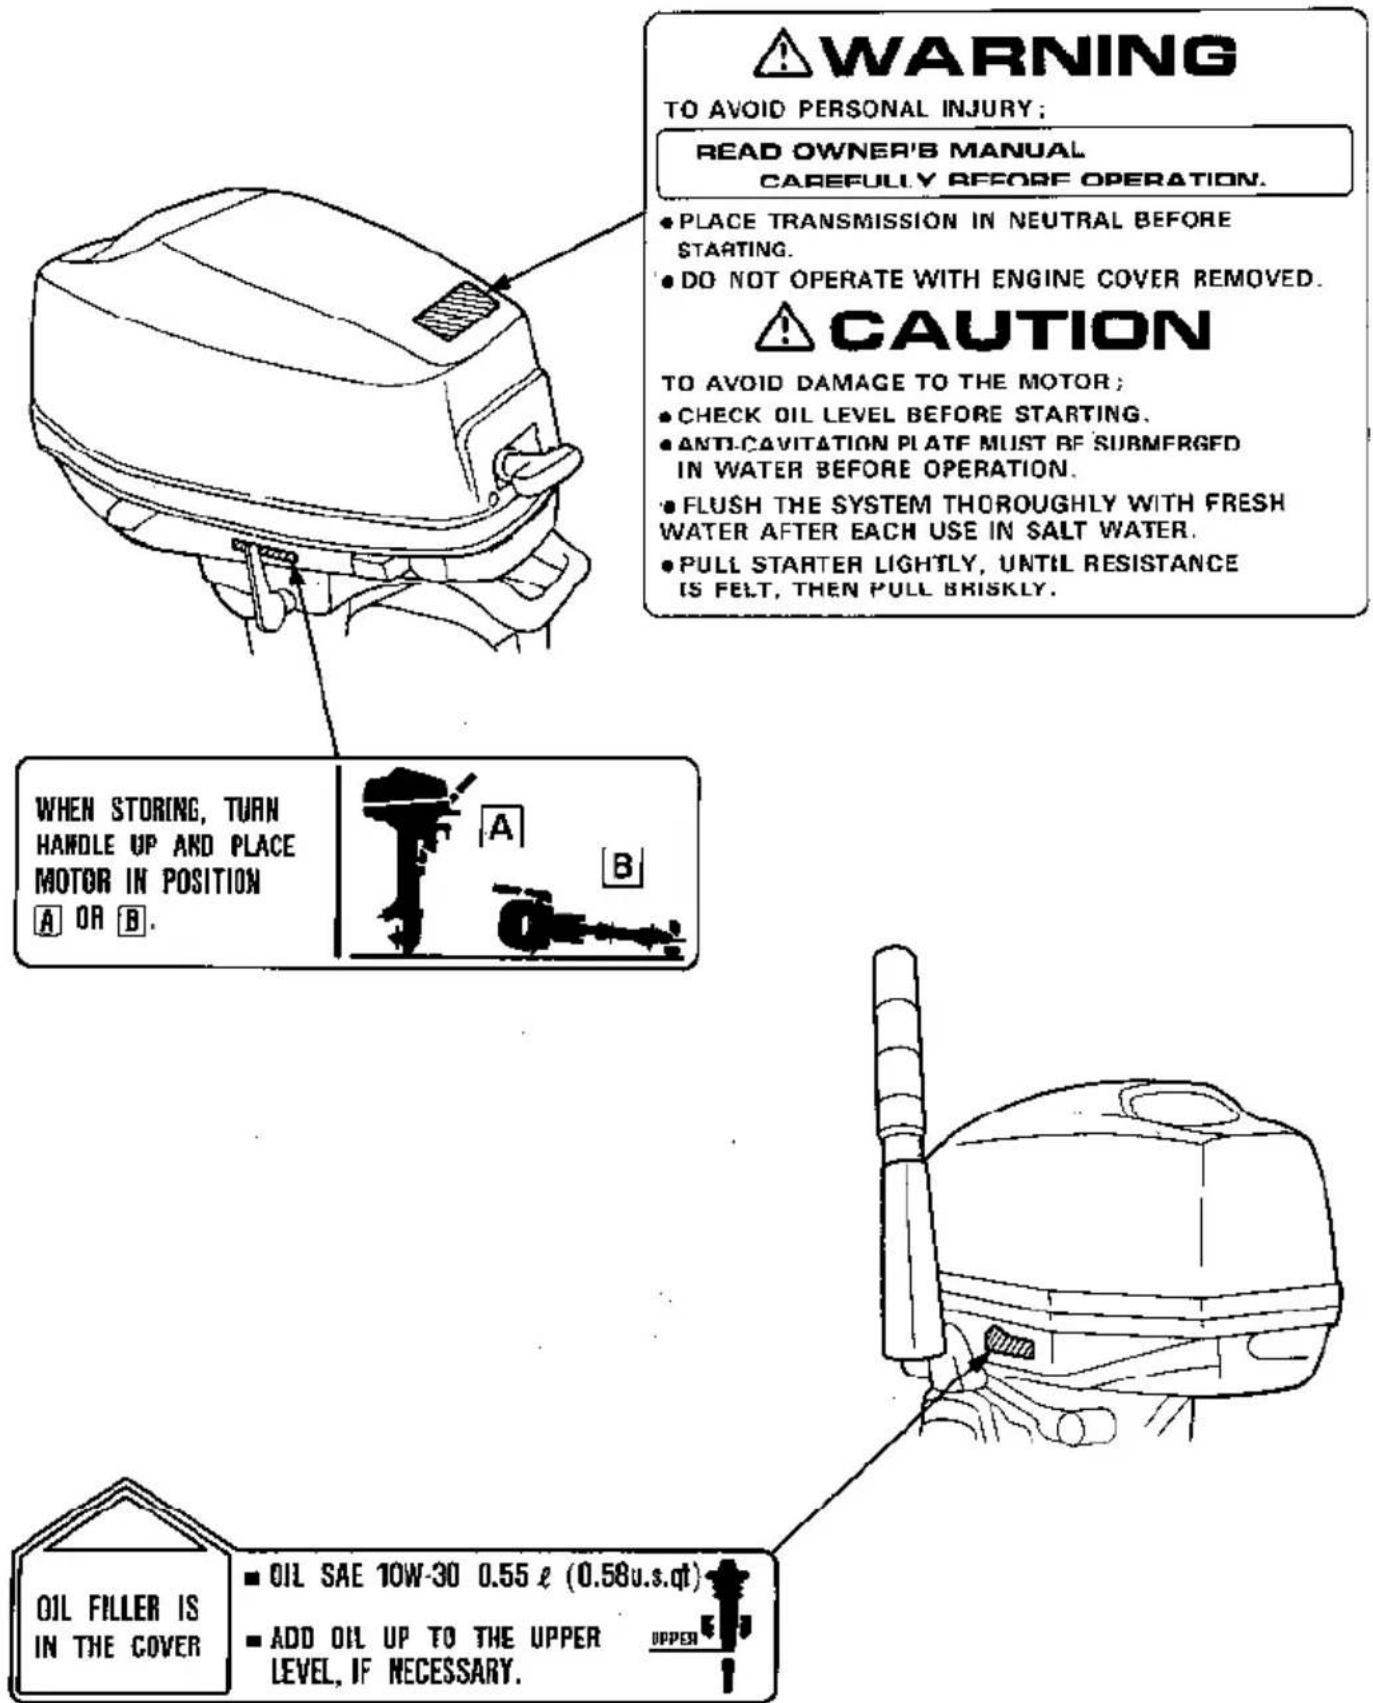

■WIPE OFF SPILLED GASOLINE COMPLETELY.
GASOLINE ONLY
ESSENCE SEULEMENT
natural_image
Technical line drawing of a portable toaster oven with handle and vent (no text or symbols)WARNING • FLAMMABLE
G A S O L I N E
HONDA
USE LOW LEAD OR REGULAR GASOLINE. (86PUMP OCTANE)
DO NOT USE FUEL/OIL MIXTURE.
CAPACITY : 13 LITERS 2.9 IMP.GALLONS 3.4 U.S.GALLONS
SAFE FILLING LEVEL : 2.5cm/1inch BELOW BOTTOM OF NECK.
■WARNING
—HARMFUL OR FATAL IF SWALLOWED.
IF SWALLOWED.. DO NOT INDUCE VOMITING. CALL PHYSICIAN IMMEDIATELY.
AVOID REPEATED OR PROLONGED CONTACT WITH SKIN OR BREATHING OF VAPOR.
—DO NOT USE OR STORE NEAR HEAT, SPARKS, OR OPEN FLAME.
REMOVE FROM BOAT FOR FILLING
WARNING Honda Outboard Motors are designed to give safe and dependable service if operated according to instructions. Read and understand the Owner's Manual before operating the Outboard Motor. Failure to do so could result in personal injury or equipment damage.
To ensure safe operation—
- Understand the operation of all controls, and know how to stop the engine quickly—READ THIS OWNER'S MANUAL CAREFULLY.
- Do not exceed the boat manufacturer's power recommendation, and be sure the outboard motor is properly mounted.
- Never permit anyone to operate the outboard motor without proper instruction.
- Stop the engine immediately if anyone falls overboard.
- Do not run the motor while the boat is near anyone in the water.
- Exhaust contains poisonous carbon monoxide which can cause unconsciousness and may lead to death. Never run the outboard in a closed garage or confined area.
- Gasoline is extremely flammable and is explosive under certain conditions. Refuel in a well-ventilated area with the engine stopped.
- Do not smoke or allow flames or sparks where the engine is refueled or where gasoline is stored.
- Do not overfill the fuel tank. After refueling make sure that the fuel tank cap is closed properly and securely.
- Be careful not to spill any fuel while refueling. Spilled fuel or fuel vapor may ignite. If any fuel is spilled, make sure that the area is dry before starting the engine.
- Do not remove any guards, labels, shields, covers or safety devices; they are installed for your safety.
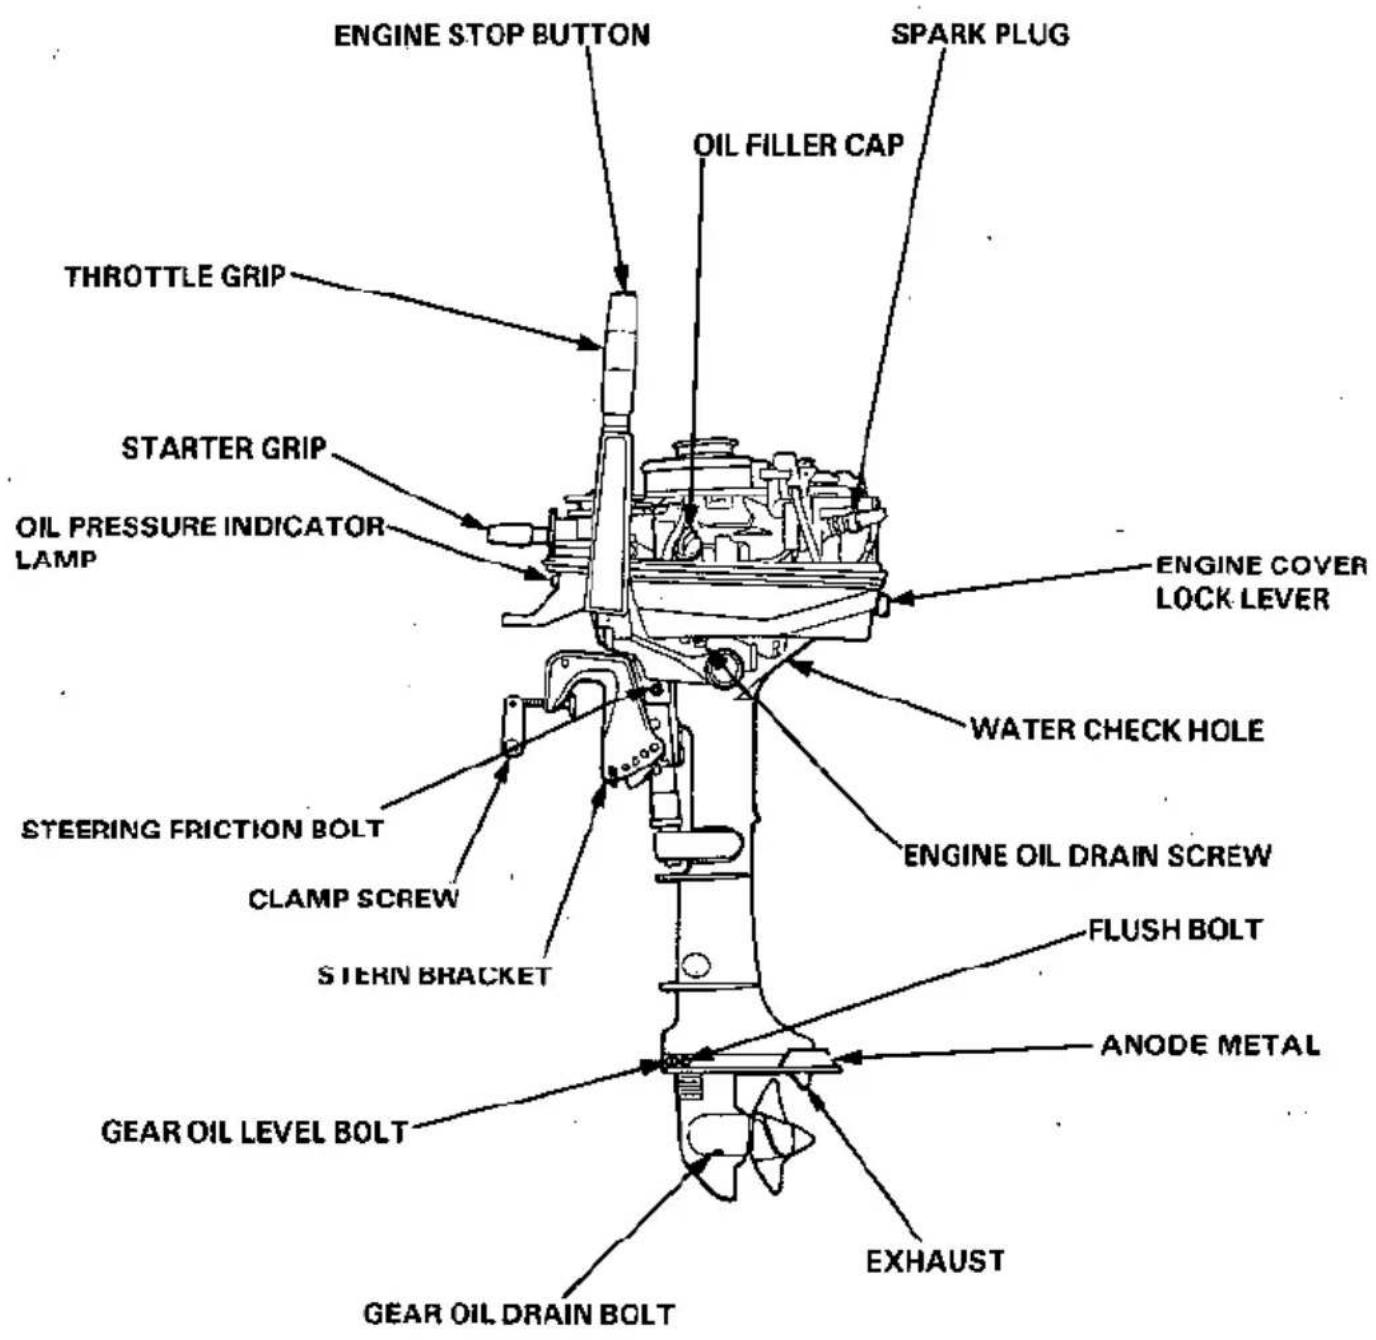
2. COMPONENT IDENTIFICATION
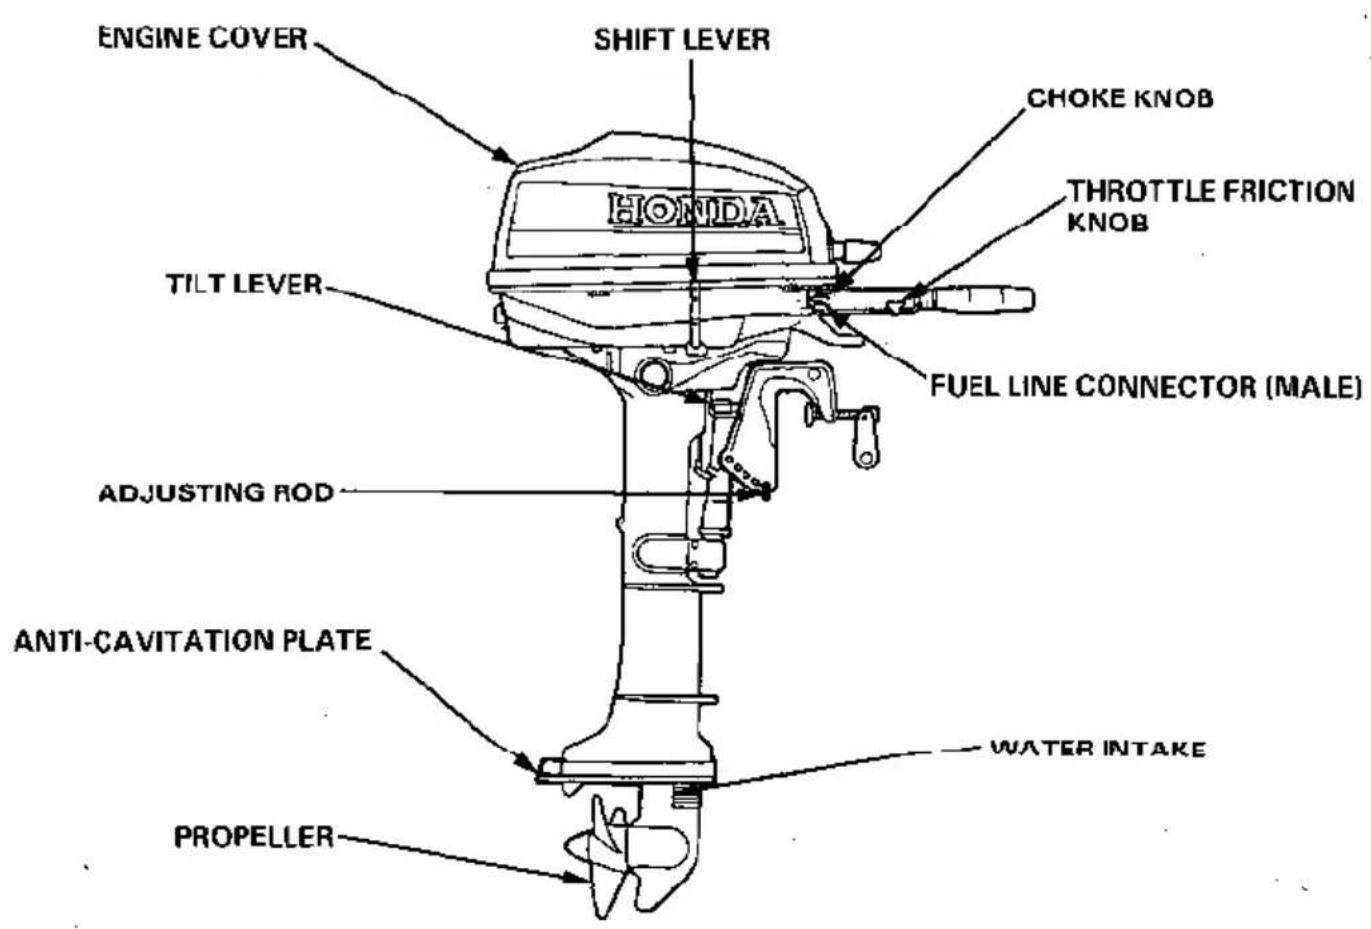
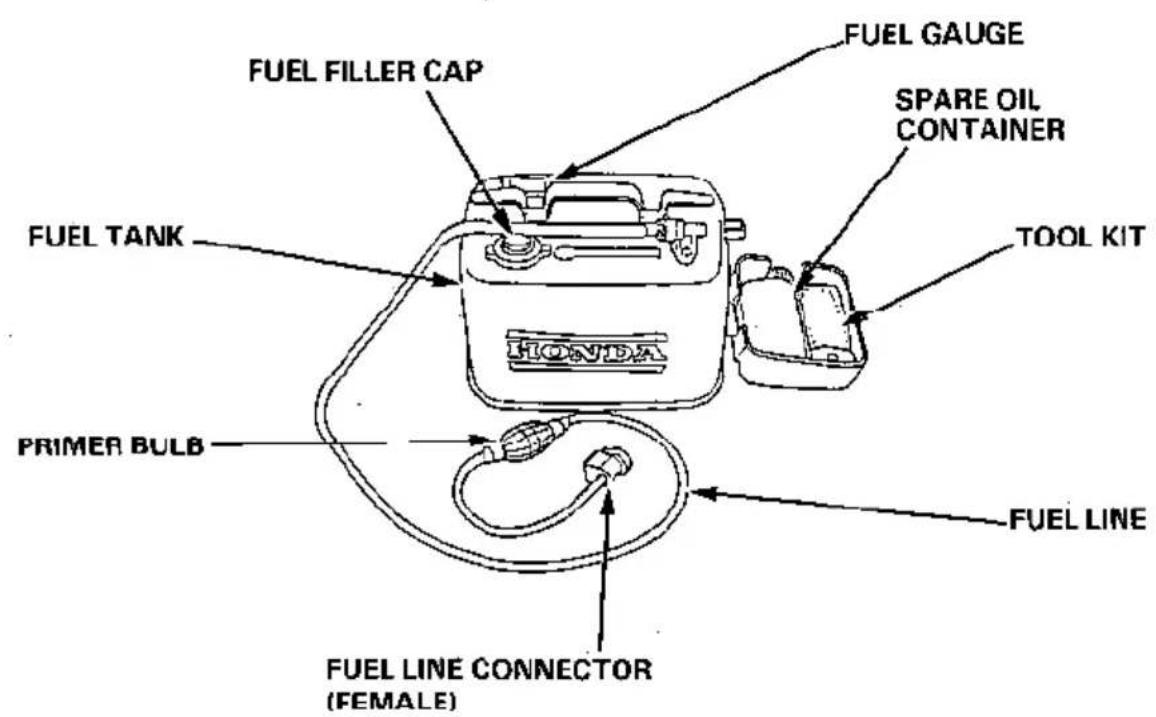
(BF5A S)
It is your responsibility to choose a boat suitable for the engine (5 horsepower).
⚠ WARNING Do not exceed the boat manufacturer's power recommendation. Damage and injury may result.
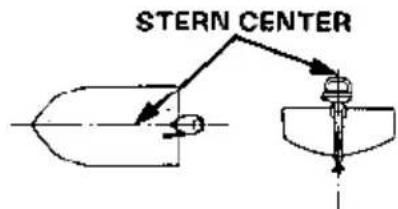
1. Installation Position
Install at the stern at the center line of the boat.
2. Installation Height
For proper propeller depth and engine cooling, the boat's transom height must match the motor's shaft length. The short shaft motor requires a transom height of about 15 in. The long shaft motor requires a transom height of about 20 in. Once the boat is in the water and loaded, check proper motor depth by looking at the anti-cavitation plate: with the motor not running, the plate should be about 100 mm (4 in.) below the surface of the water.
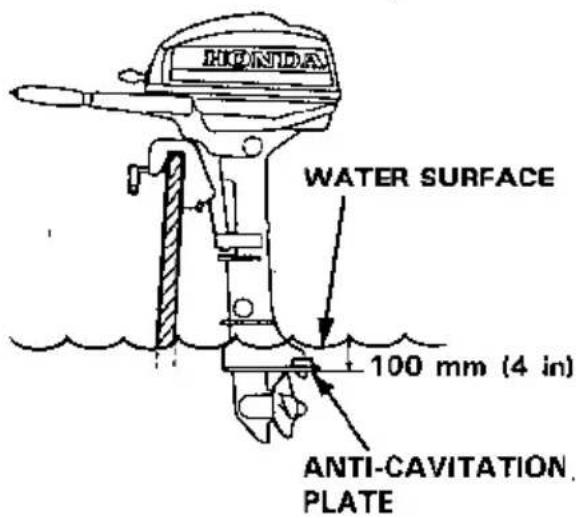
During operation, check to be sure the anticavitation plate remains under water at all times and that water flows from the water check hole.
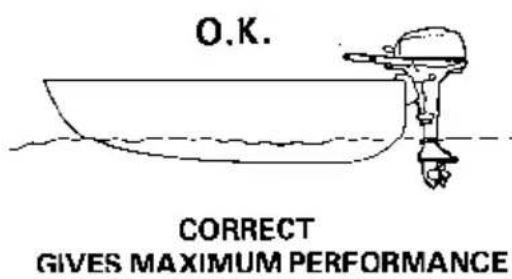
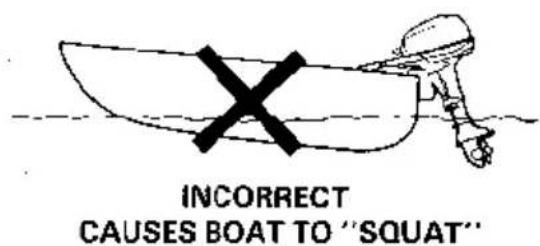
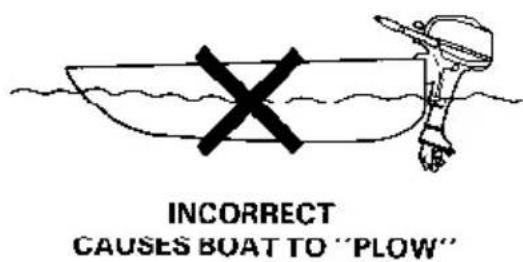
Excessive or imbalanced loading will affect the motor's water depth. Loading too far forward will raise the motor out of the water, reducing engine cooling. Loading too much or too far rearward will push the motor deeper, reducing performance.
CAUTION: Insufficient water supply (anticavitation plate out of the water) may cause overheating that will damage the outboard motor.
3. Motor Attachment
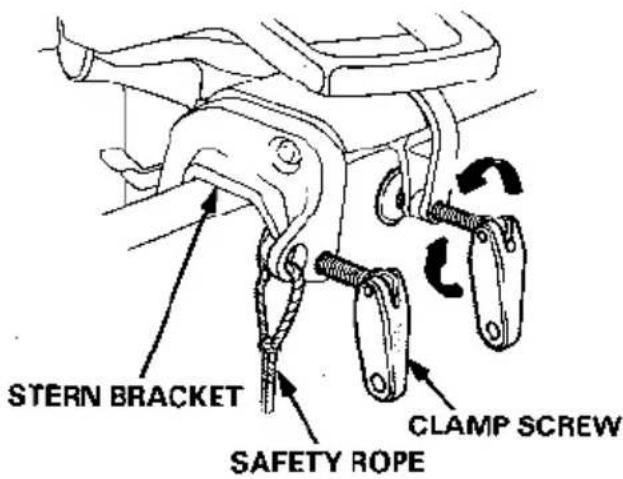
Attach the stern bracket to the transom and tighten the clamp screws.
CAUTION:
- While operating the boat, check the tightness of the clamp screws occasionally.
- Tie a rope through the hole in the stern bracket and secure the other end of the rope to the boat. This will prevent accidental loss of the motor.
4. Motor Angle (cruising)
Adjust the motor so the axis of the propeller is parallel with the water surface.
5. Motor Angle Adjustment
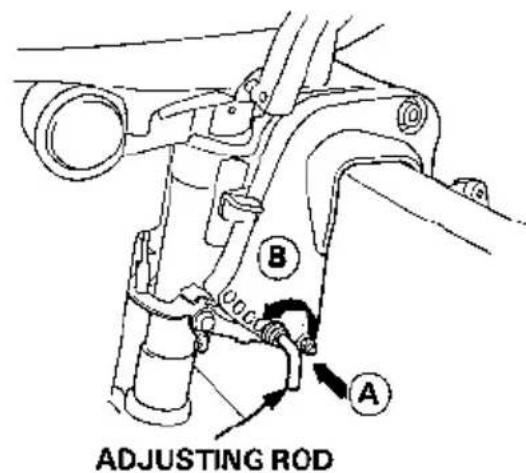
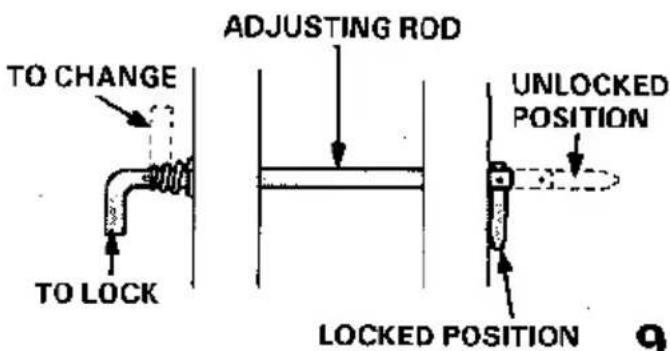
If the propeller axis is not parallel with the water surface, adjust by changing the adjusting rod position. There are four adjusting stages.
- Push the adjusting rod in (A), twist upwards in (B) and pull out to remove.
- Inserting the rod in the proper hole, twist it down to lock.
CAUTION: To prevent damage to the motor or boat, make sure the adjusting rod is locked.
1. Check the engine oil level.
CAUTION:
• Engine oil is a major factor affecting engine performance and service life. Nondetergent and low quality oils are not recommended, because they have inadequate lubricating properties.
- Running the engine with insufficient oil can cause serious engine damage.
Use Honda 4-stroke oil or an equivalent high detergent, premium quality motor oil certified to meet or exceed U.S. automobile manufacturers requirements for Service Classification SF CC/CD or SG. Motor oils classified SF CC/CD or SG will show this designation on the container.
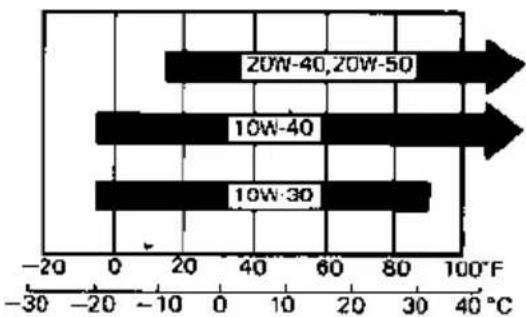
bar
| Latitude Range | Temperature (°C) | | :--- | :--- | | 20W-40, 20W-50 | 80 | | 10W-40 | 60 | | 10W-30 | 90 |SAE 10W-30 is recommended for general, all-temperature use. Other viscosities shown in the chart may be used when the average temperature in your area is within the indicated range.
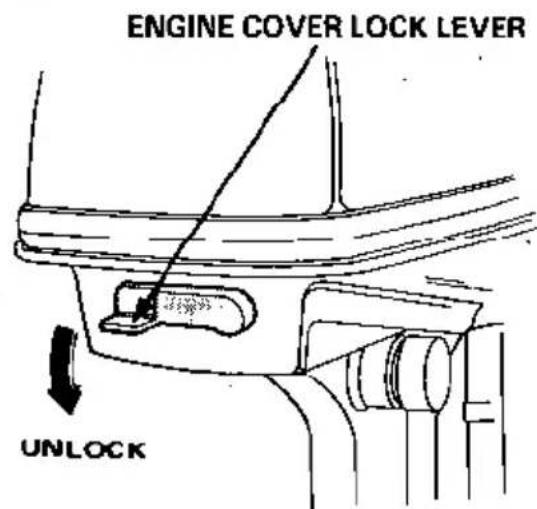
- Position the outboard motor vertically, and remove the engine cover.
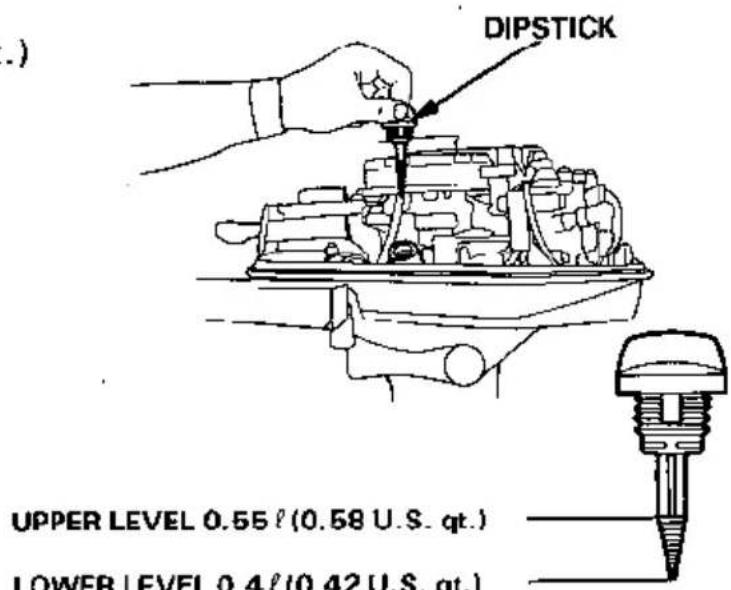
- Remove the dipstick and wipe with a clean rag.
- Reinsert the dipstick, and check the oil level with the dipstick resting on the filler opening (do not screw in). If the oil level is low, fill to the upper level mark.
Oil capacity: 0.55 ℓ (0.58 U.S. qt.)
2. Fuel Level
Check the fuel gauge and refill the tank if the fuel level is low.
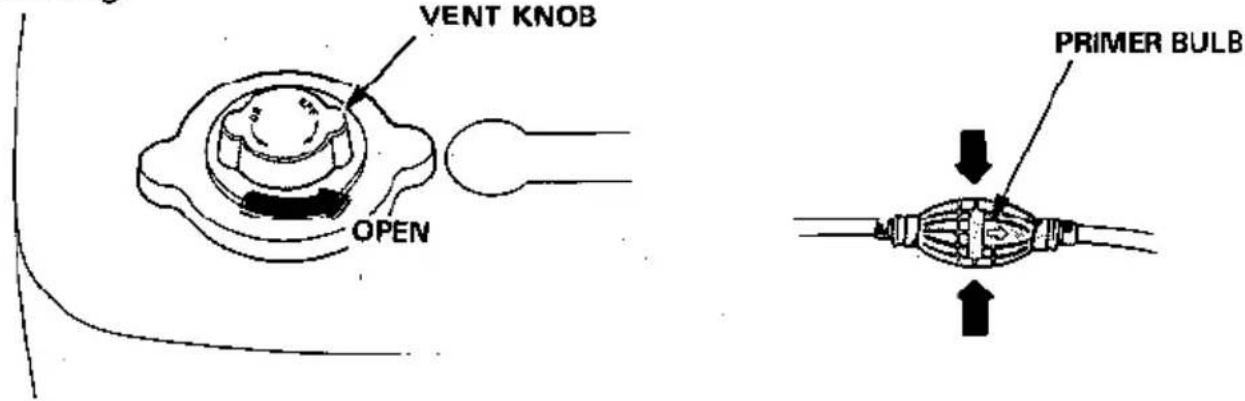
NOTE: Open the vent knob before removing the fuel filler cap. When the vent knob is firmly closed, the cap will be difficult to remove.
Your engine is designed to use any gasoline that has a pump octane number (+M2) of 86 or higher, or that has a research octane number of 91 or higher. Gasoline pumps at service stations normally display the pump octane number.
We recommend that you use unleaded fuel because it produces fewer engine and spark plug deposits and extends the life of exhaust system components.
Never use stale or contaminated gasoline or an oil/gasoline mixture. Avoid getting dirt, dust or water in the fuel tank. Use of a lower octane gasoline can cause persistent "pinging" or heavy "spark knock" (a metallic rapping noise) which, if severe, can lead to engine damage.
CAUTION: If "spark knock" or "pinging" occurs at a steady engine speed under normal load, change brands of gasoline. If spark knock or pinging persists, consult your authorized Honda dealer. Failure to do so is considered misuse, and damage caused by misuse is not covered by Honda's Limited Warranty.
Occasionally, you may experience light spark knock while operating under heavy loads. This is no cause for concern, it simply means your engine is operating efficiently.
Fuel tank capacity: 13 ℓ (3.4 U.S. gal.)
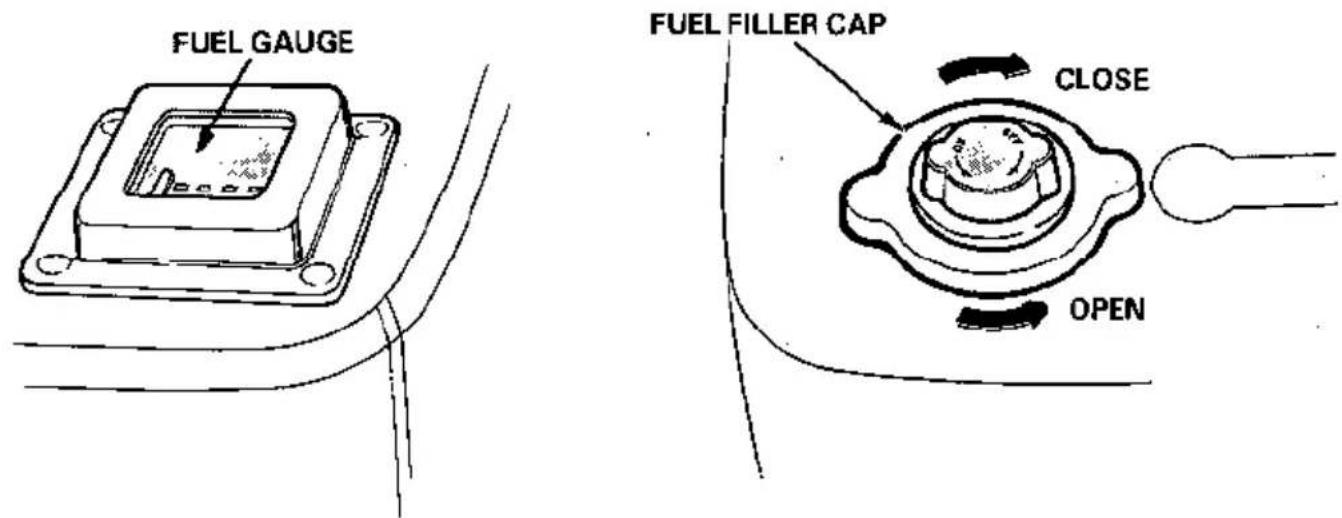
After refueling, be sure to tighten the fuel tank cap firmly.
⚠ WARNING Gasoline is extremely flammable and is explosive under certain conditions.
WARNING
- Refuel in a well-ventilated area with the engine stopped. Do not smoke or allow flames or sparks in the area where the engine is refueled or where gasoline is stored.
- Do not overfill the tank (there should be no fuel in the filler neck). After refueling, make sure the tank cap is closed properly and securely.
- Be careful not to spill fuel when refueling. Spilled fuel or fuel vapor may ignite. If any fuel is spilled, make sure the area is dry before starting the engine.
- Avoid repeated or prolonged contact with skin or breathing of vapor. KEEP OUT OF REACH OF CHILDREN.
GASOLINES CONTAINING ALCOHOL
If you decide to use a gasoline containing alcohol (gasohol), be sure its octane rating is at least as high as that recommended by Honda. There are two types of “gasohol”: one containing ethanol, and the other containing methanol. Do not use gasohol that contains more than 10% ethanol. Do not use gasoline containing methanol (methyl or wood alcohol) that does not also contain cosolvents and corrosion inhibitors for methanol. Never use gasoline containing more than 5% methanol, even if it has cosolvents and corrosion inhibitors.
NOTE:
- Fuel system damage or engine performance problems resulting from the use of fuels that contain alcohol is not covered under the warranty. Honda cannot endorse the use of fuels containing methanol since evidence of their suitability is as yet incomplete.
- Before buying fuel from an unfamiliar station, try to find out if the fuel contains alcohol; if it does, confirm the type and percentage of alcohol used. If you notice any undesirable operating symptoms while, using a gasoline that contains alcohol, or one that you think contains alcohol, switch to a gasoline that you know does not contain alcohol.
3. Check the following items.
- Check the propeller, the shear pin, and the cotter pin to be sure they are secure and undamaged.
- Check the stern bracket to be sure the motor is securely installed.
- Check steering handle operation.
• Make sure you have the tool kit and spare parts with you (p. 26). - The anode metal for damage, looseness or excessive corrosion.
The anode metal helps to protect the outboard motor form corrosion damage; it must be exposed directly to the water whenever the motor is in use. Replace the anode metal when it has been reduced to approximately one half of its original size.
CAUTION: The possibility of corrosion damage is Increased if the anode metal is painted over or allowed to deteriorate.
Fuel Line Connection
CAUTION: To prevent damage to the outboard from overheating, never run the engine with the propeller out of the water.
- Connect the fuel line to the tank and outboard motor, as shown. Be sure the connectors are securely latched.
NOTE:
- Position the fuel tank so the tank fuel line connector is no more than 1 meter (3.3 ft) below the motor fuel line connector.
- Do not place the fuel tank more than 2 meters (6.6 ft) away from the motor.
- Be sure that the fuel line is not kinked.
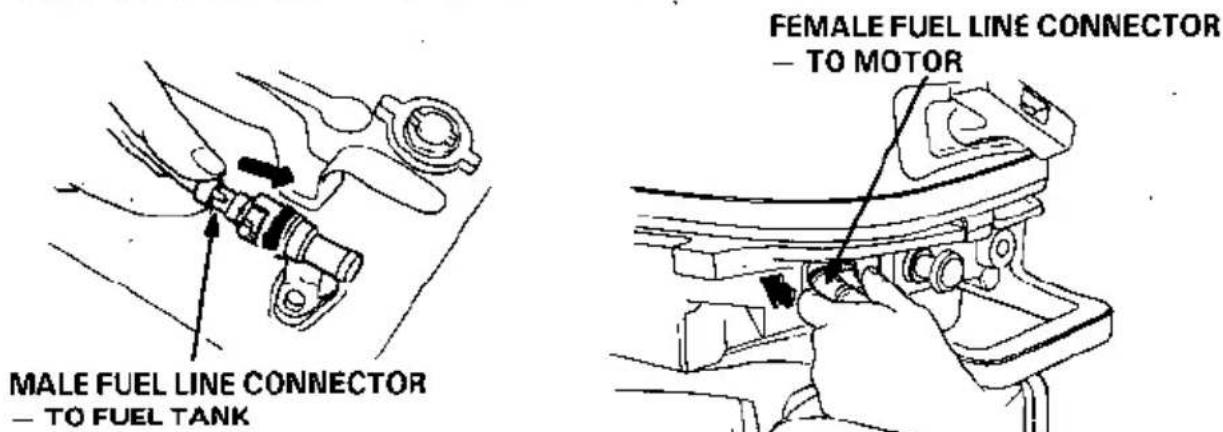
- Open the fuel cap vent knob 2 to 3 turns.
- Squeeze and release the primer bulb until it feels firm, indicating that fuel has reached the motor. Check for leaks.
WARNING: Be careful not to spill any fuel. Spilled fuel or fuel vapor may ignite. If any fuel is spilled, make sure the area is dry before starting the engine.
NOTE: It is not necessary to use the primer bulb while the engine is running.
Starting
A WARNING Exhaust contains poisonous carbon monoxide gas; exposure can cause loss of consciousness and may lead to death. Never run the engine in an enclosed area. Be sure to provide adequate ventilation.
CAUTION: Damage to the water pump, engine components and exhaust system may occur if the motor is operated while the propeller is out of the water.
- Put the shift lever in NEUTRAL.
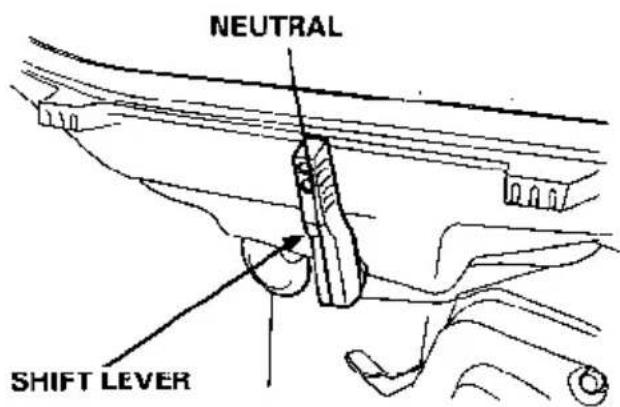
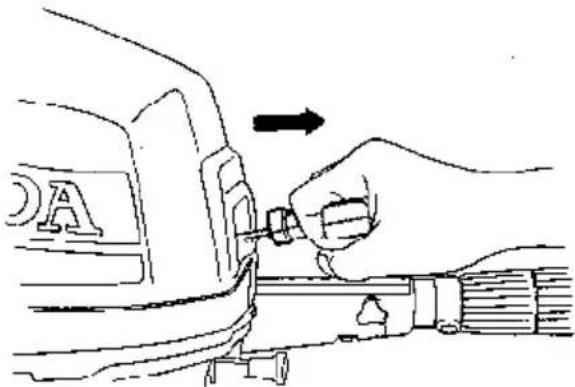
- In temperatures below 20^ C ( 68^ F), pull the choke knob out.
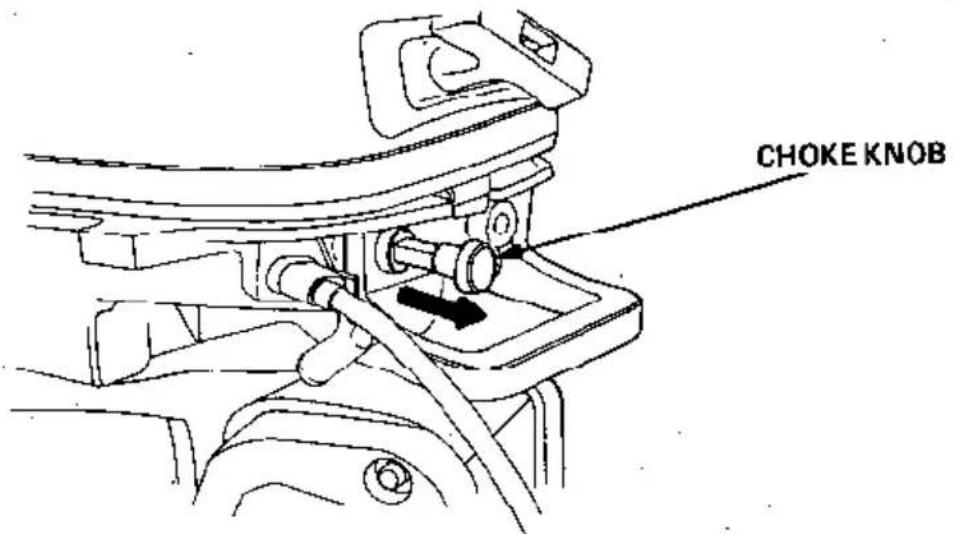
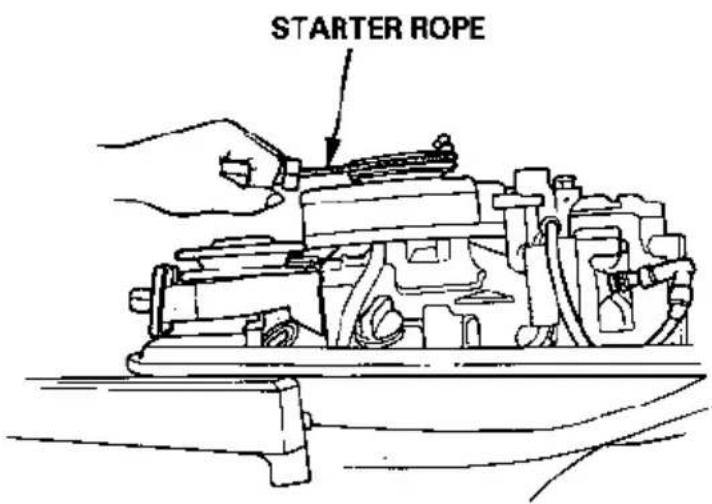
- Pull the starter rope slowly until resistance is felt, then pull briskly.
CAUTION:
- Do not allow the starter grip to snap back against the housing; return it gently by hand to prevent damage to the starter.
- Do not pull the starter grip while the engine is running, as that may damage the starter.
natural_image
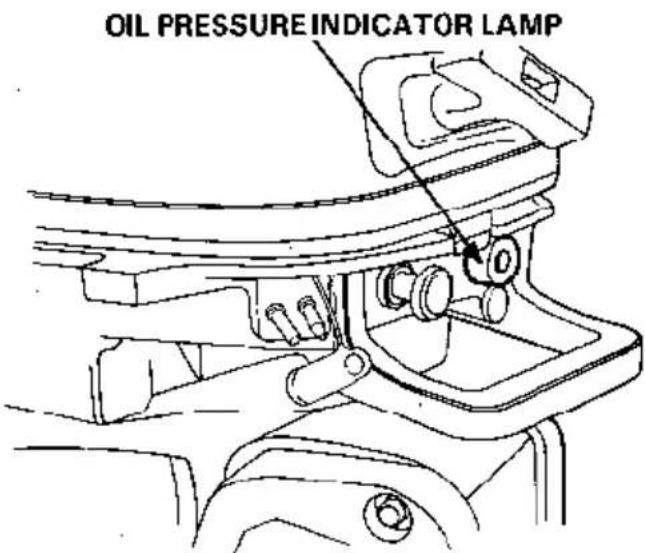
Line drawing of a hand adjusting a component with an arrow indicating direction (no text or symbols)- The oil pressure indicator lamp should be on while the engine is running. If the lamp goes off, stop the engine immediately, check the engine oil level and inspect the engine for oil leaks.
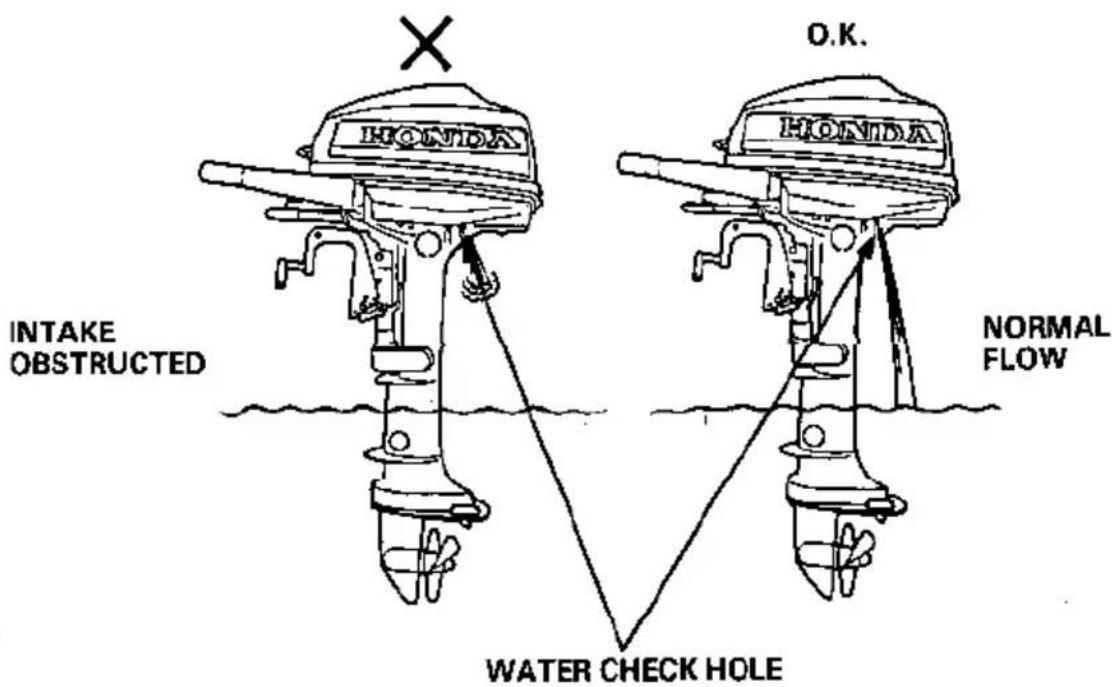
- After starting, be sure water is flowing out of the water check hole.
CAUTION: If water does not flow out, or if steam comes out, stop the engine. Check to see if the cooling water inlet is obstructed. Do not operate the engine until the problem has been corrected.
- If the choke was used, push it in gradually as the engine warms up:
WARNING
- Exhaust contains poisonous carbon monoxide gas; exposure can cause loss of consciousness and may lead to death. Never run the engine in an enclosed area. Be sure to provide adequate ventilation.
- Be careful not to spill any fuel when refueling. Spilled fuel or fuel vapor may ignite. If any fuel is spilled, make sure the area is dry before starting the engine.
Emergency Starting
If the recoil starter is not working properly, the engine can be started with the spare starter rope in the tool kit.
- Remove the engine cover.
- Wind the spare rope clockwise around the pulley, and then pull it to start the engine.
CAUTION: Keep clear of moving parts.
- Reinstall the engine cover.
CAUTION: Do not operate without the engine cover. Exposed moving parts could cause injury, and water may damage the engine.
6. OPERATION
CAUTION: For the first 10 hours of operation, run the outboard motor at low speed, and avoid abrupt operation of the throttle.
1. Gear Shifting
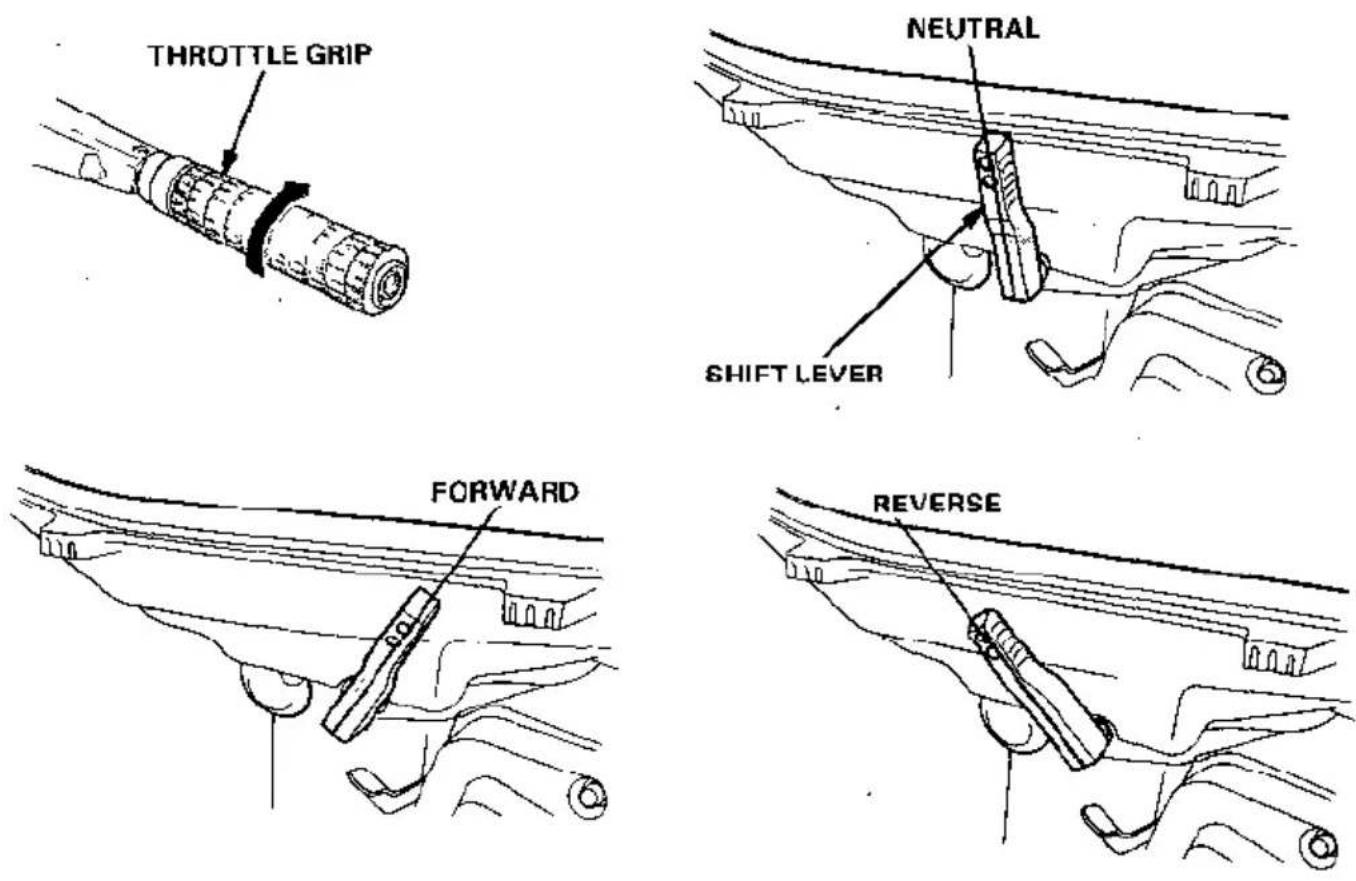
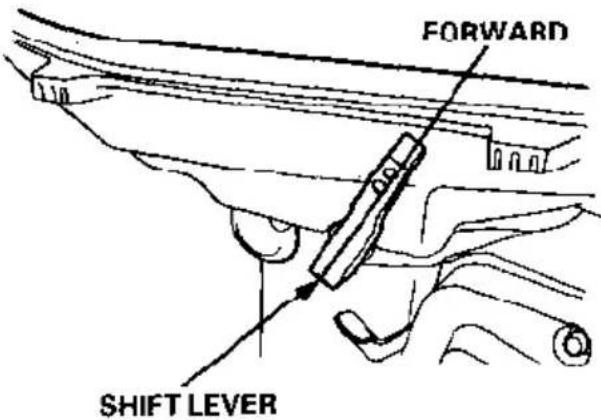
The engine has 3 gears: FORWARD, NEUTRAL, and REVERSE. An indicator at the base of the gear shift lever aligns with the letter F, N, or R on the engine case to show the gear that has been selected.
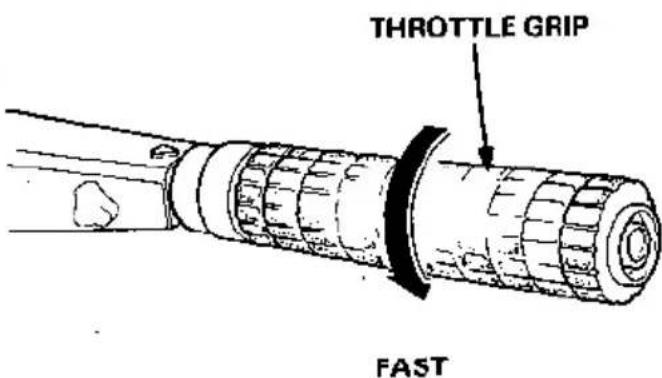
Turn the throttle grip to SLOW to decrease engine speed before moving the gear shift lever.
CAUTION: When operating in reverse, proceed with caution to avoid hitting any underwater obstruction with the propeller.
NOTE: The throttle mechanism is designed to limit throttle opening in REVERSE and NEUTRAL. The throttle can be opened to FAST only in FORWARD gear.
2. Steering
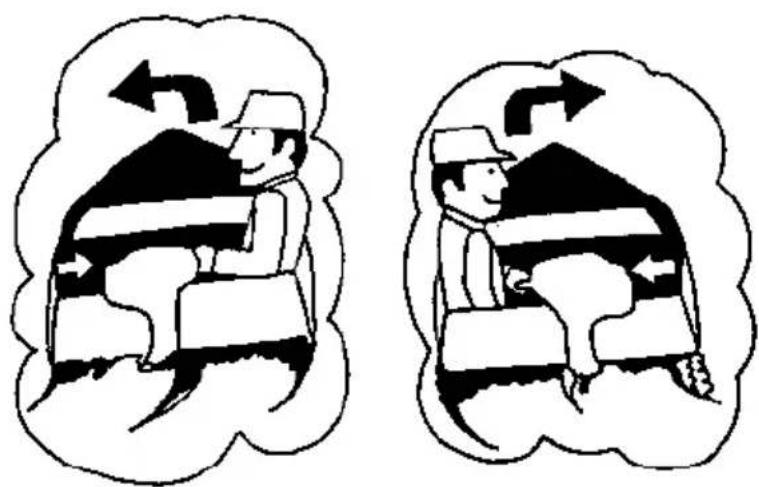
To turn to the right, swing the steering handle to the left. To turn to the left, swing the handle to the right.
natural_image
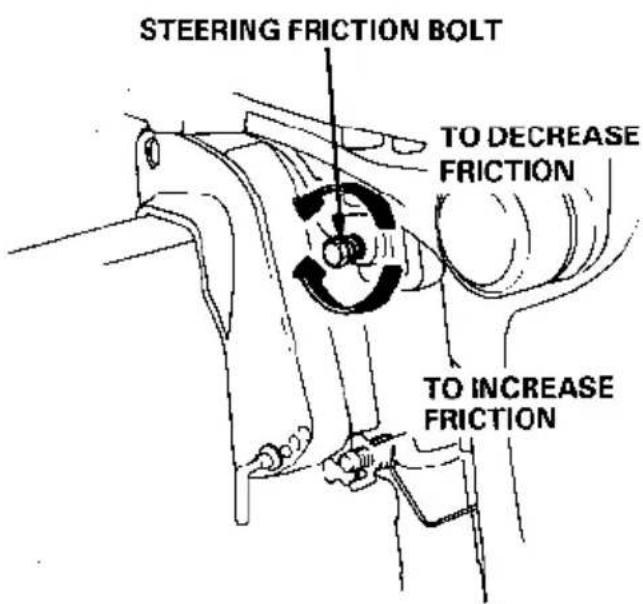
Two identical cartoon illustrations of a person sitting on a platform, each with a thought bubble containing arrows (no text or symbols)For smooth steering, adjust the steering friction bolt so that a slight drag is felt when turning.
3. Cruising
With the shift lever in the forward position F, turn the throttle grip toward FAST to increase speed. For normal cruising, open the throttle about 3/4.
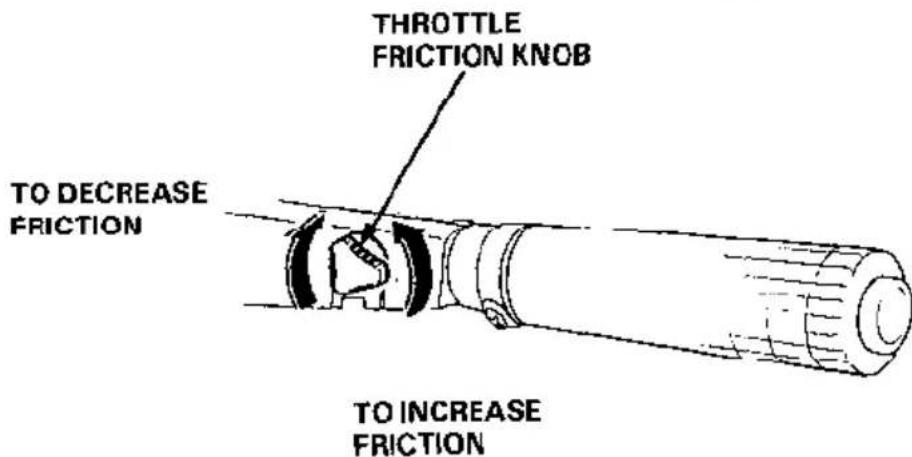
To hold the throttle at a steady setting, turn the throttle friction knob clockwise. To free the throttle grip for manual speed control, turn the friction knob counterclockwise.
NOTE: For best performance, passengers and equipment should be distributed evenly to balance the boat.
4. Tilting the Motor
Tilt the motor to prevent the propeller and gear case from hitting bottom when the boat is beached or stopped in shallow water.
- Stop the engine and put the shift lever into NEUTRAL.
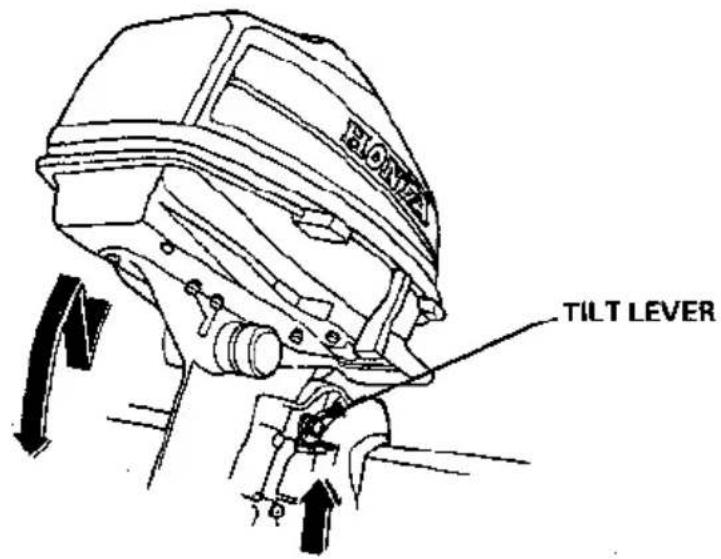
- Raise the engine to either the 30^ , 45^ , or 70^ tilt position.
CAUTION: Do not use the throttle grip to tilt the outboard motor.
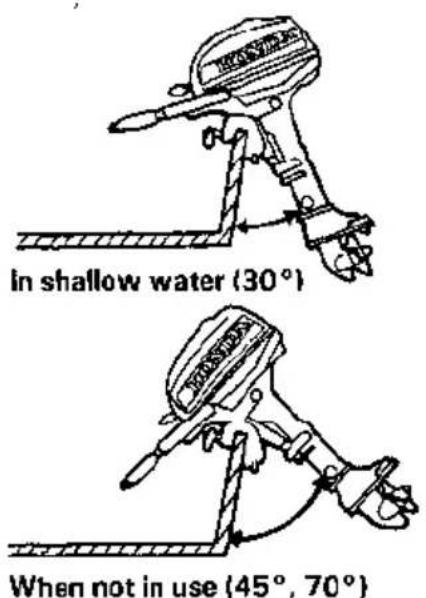
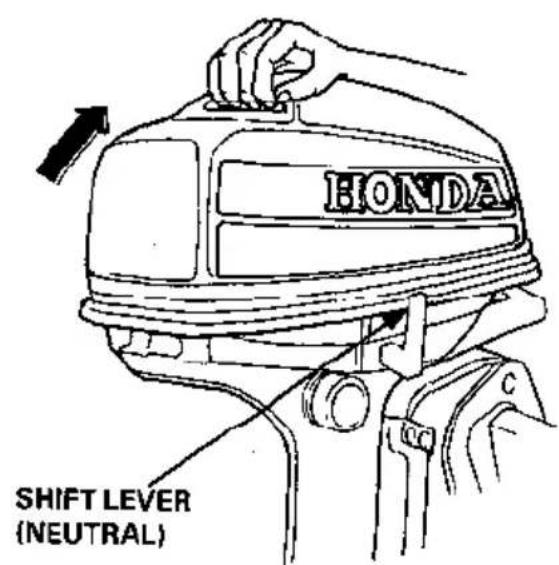
- To return the engine to the normal RUN position, pull the tilt lever toward you until it stops, tilt the engine up slightly, then lower the engine slowly.
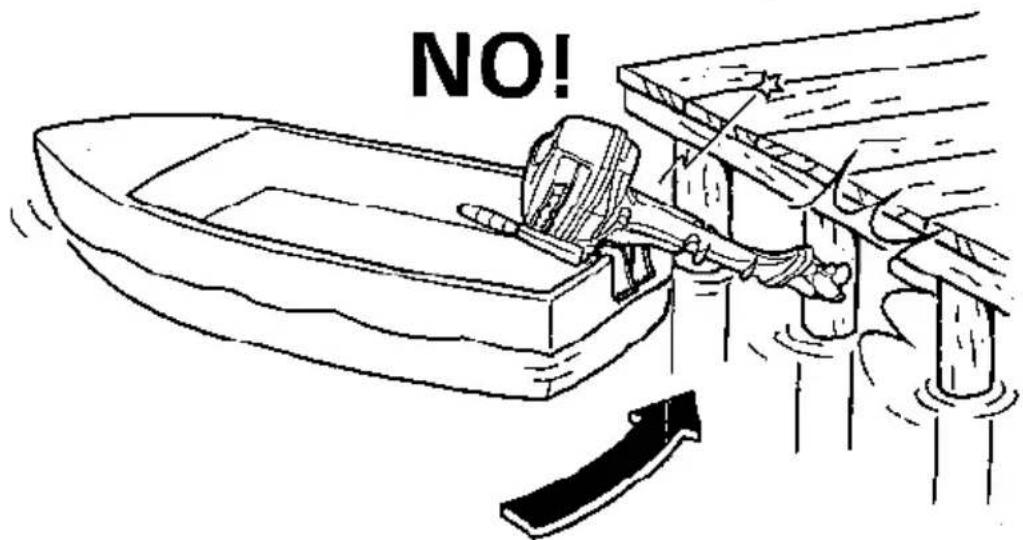
CAUTION: To avoid damaging the motor, use the utmost care when mooring the boat especially when its motor is tilted up. Don't allow the motor to strike against the pier or other boats.
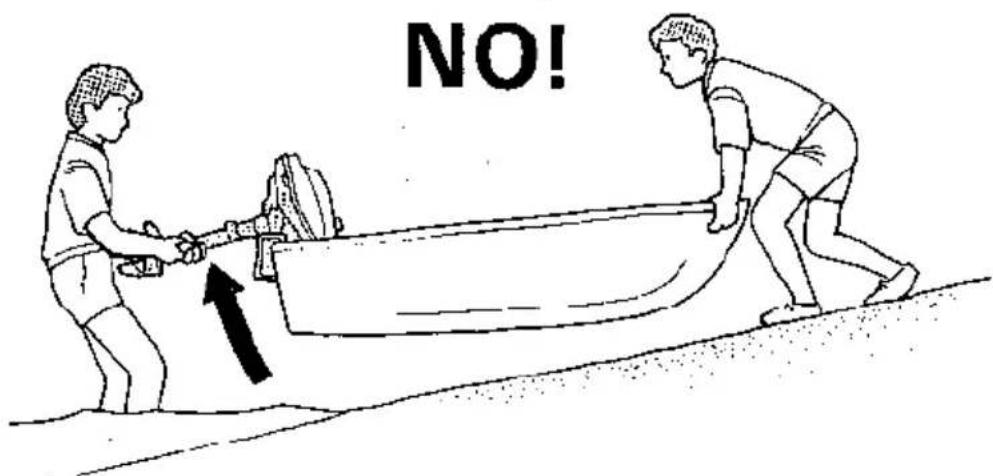
CAUTION: To avoid damaging the motor, never use it as a handle for lifting or moving the boat.
Trailering
When trailering or transporting the boat with the motor attached, it is recommended that the motor remain in normal running position with the steering friction bolt tightened securely.
CAUTION: Do not trailer or transport the boat with the motor in the tilted position. The boat or motor could be severely damaged if the motor drops.
The motor should be trailed in the normal running position. If there is insufficient road clearance in this position, then trailer the motor in the tilted position using a motor support device such as a transom saver bar, or remove the motor from the boat.
5. Battery Charging and Lighting (Optional parts)
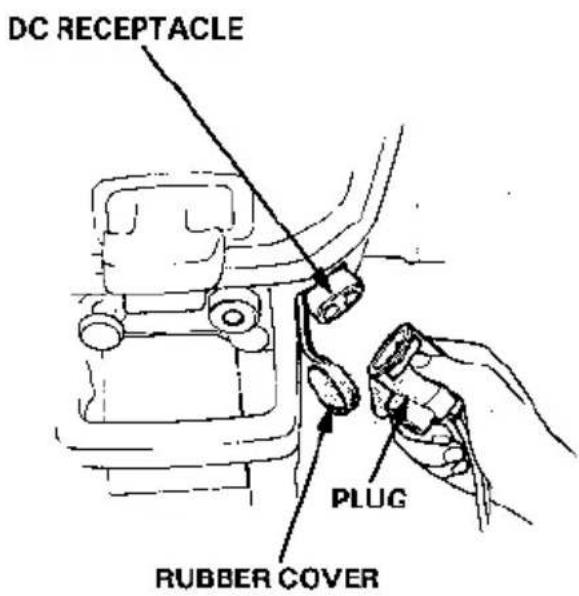
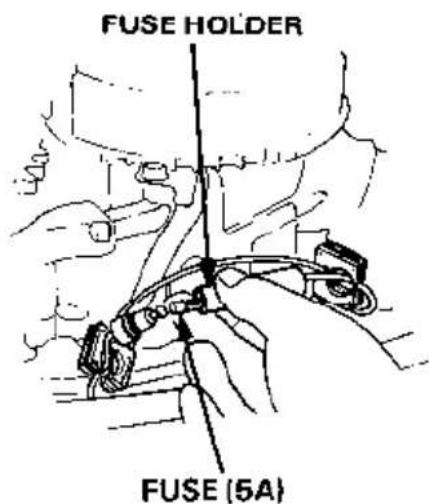
The DC receptacle provides 12V, 40W current for 12V battery charging and lighting. The circuit is protected by a 5A fuse that is accessible by removing the engine cover.
An electrical plug for the DC receptacle is supplied with your motor. Wire your charging or lighting cord to this plug.
⚠ WARNING Batteries produce explosive gases. Keep sparks, flames, and cigarettes away. To prevent the possibility of creating a spark near the battery, connect the charging cords first to the battery, then to the outboard motor, and disconnect the charging cords first at the outboard motor.
CAUTION:
- Connect the positive battery terminal to the positive charging cord. Do not reverse the charging cords, or serious damage to the outboard motor's charging circuit and/or battery may occur.
- When not in use, cover the DC receptacle with the rubber cover to keep it dry and clean.
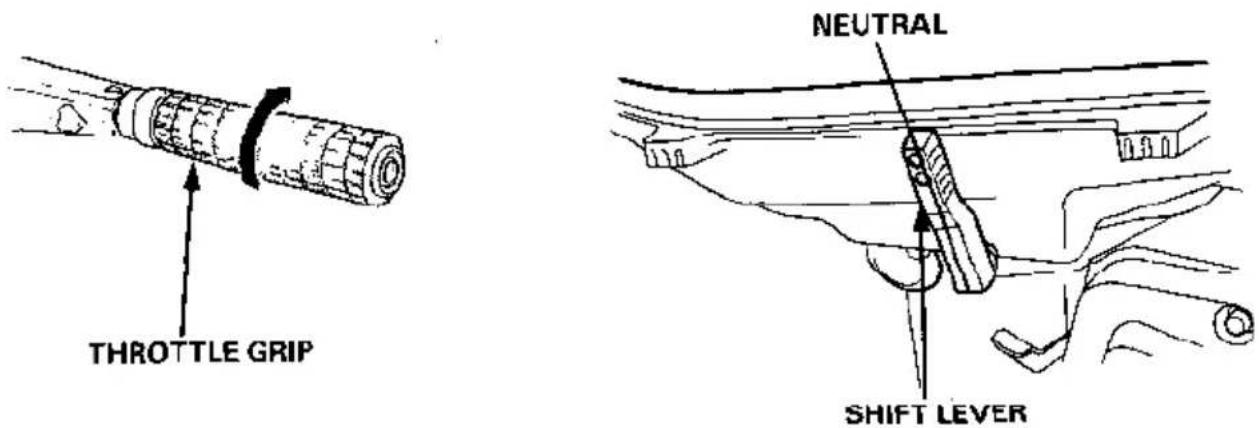
- Turn the throttle grip to slow and move the shift lever to NEUTRAL.
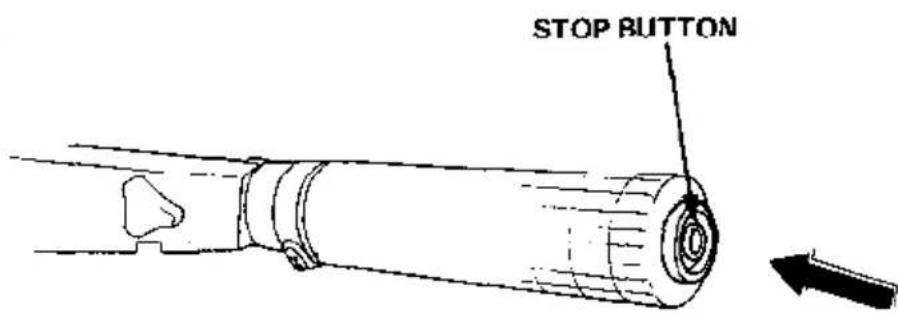
- Push the stop button until the engine stops running.
• High altitude operation
At high altitude, the standard carburetor air-fuel mixture will be excessively rich. Performance will decrease, and fuel consumption will increase.
High altitude performance can be improved by installing a smaller diameter main fuel jet in the carburetor and readjusting the pilot screw. If you always operate the outboard motor at altitudes higher than 6,000 feet above sea level, have your authorized Honda Outboard Motor dealer perform these carburetor modifications.
Even with suitable carburetor jetting, engine horsepower will decrease approximately 3.5% for each 1,000 foot increase in altitude. The effect of altitude on horsepower will be greater than this if no carburetor modification is made.
CAUTION: Operation of the outboard motor at an altitude lower than the carburetor is jetted for may result in reduced performance, overheating, and serious engine damage caused by an excessively lean air/fuel mixture.
Periodic maintenance and adjustment are important to keep the motor in the best operating condition. Inspect or service as scheduled below.
WARNING Shut off the engine before performing any maintenance. If the engine must be run, make sure the area is well ventilated. Never run the engine in an enclosed or confined area. Exhaust contains poisonous carbon monoxide gas; exposure can cause loss of consciousness and may lead to death.
CAUTION:
- If the engine must be run, make sure there is water at least 4 inches above the anti-cavitation plate, otherwise the water pump may not receive sufficient cooling water, and the extension case will overheat.
- To maintain cooling system efficiency, flush the outboard motor with fresh water after each use in salt water or dirty water.
- Use only genuine HONDA parts or their equivalent. The use of replacement parts which are not of equivalent quality may damage the motor.
| REGULAR SERVICE PERIODITEM Performed at every indicated month or operating hour intervals, whichever comes first. | EACH USE | FIRST MONTH OR 20 HRS (3) | EVERY 6 MONTHS OR 100 HRS (3) | EVERY YEAR OR 200 HRS (3) | |
| Engine oil | Check level | ○ | |||
| Change | ○ | ○ | |||
| Gear case oil | Check level | ○ | |||
| Change | ○ | ○ | |||
| Check for water contamination | ○ | ||||
| Starter rope | Check | ○ | |||
| Carburetor linkage | Check | ○(2) | |||
| Valve clearance | Check-Readjust | ○(2) | ○(2) | ||
| Spark plug | Clean-Readjust | ○ | |||
| Shear pin | Check | ○ | |||
| Lubrication | Grease | ○(1) | |||
| Fuel tank and filter | Clean | ○ | |||
| Thermostat | Check | ○(2) | |||
| Fuel strainer | Change | ○ | |||
| Fuel line | Check (Replace if necessary) | Every 3 years (2) | |||
NOTE: (1) Lubricate more frequently when used in salt water.
(2) These items should be serviced by an authorized Honda outboard motor dealer, unless the owner has the proper tools and is mechanically proficient. See the Honda Shop Manual.
(3) For professional commercial use, log hours of operation to determine proper maintenance intervals.
Tool Kit and Spare Parts
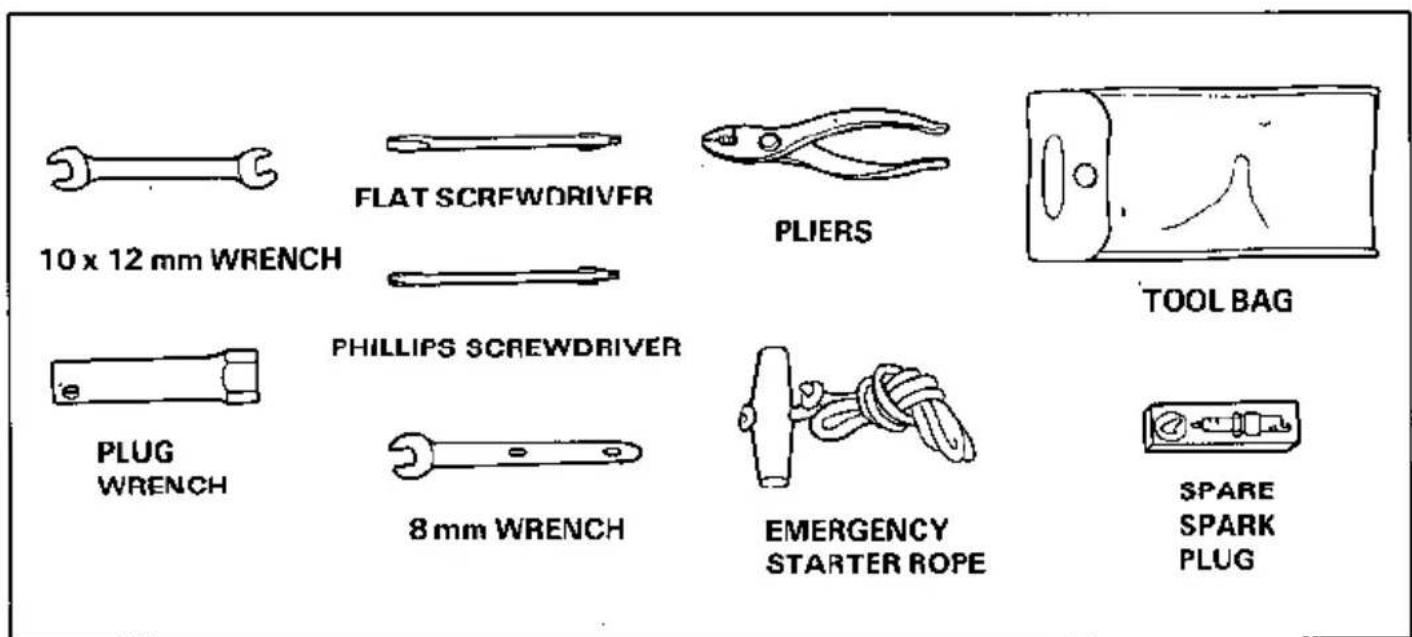
The following tools and spare parts are supplied with the outboard motor for maintenance, adjustment, and emergency repairs.
The tool kit and oil bottle are located in a compartment on the fuel tank. Spare shear pins and cotter pins are located inside the engine compartment above the stern bracket.
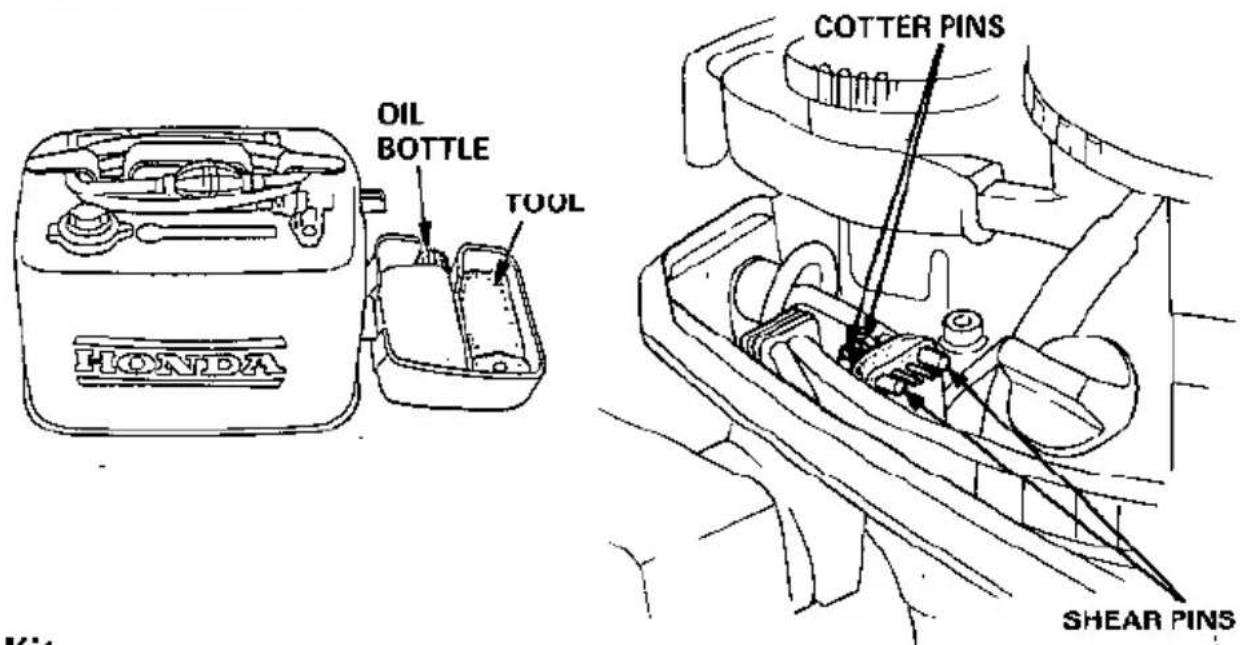
Tool Kit
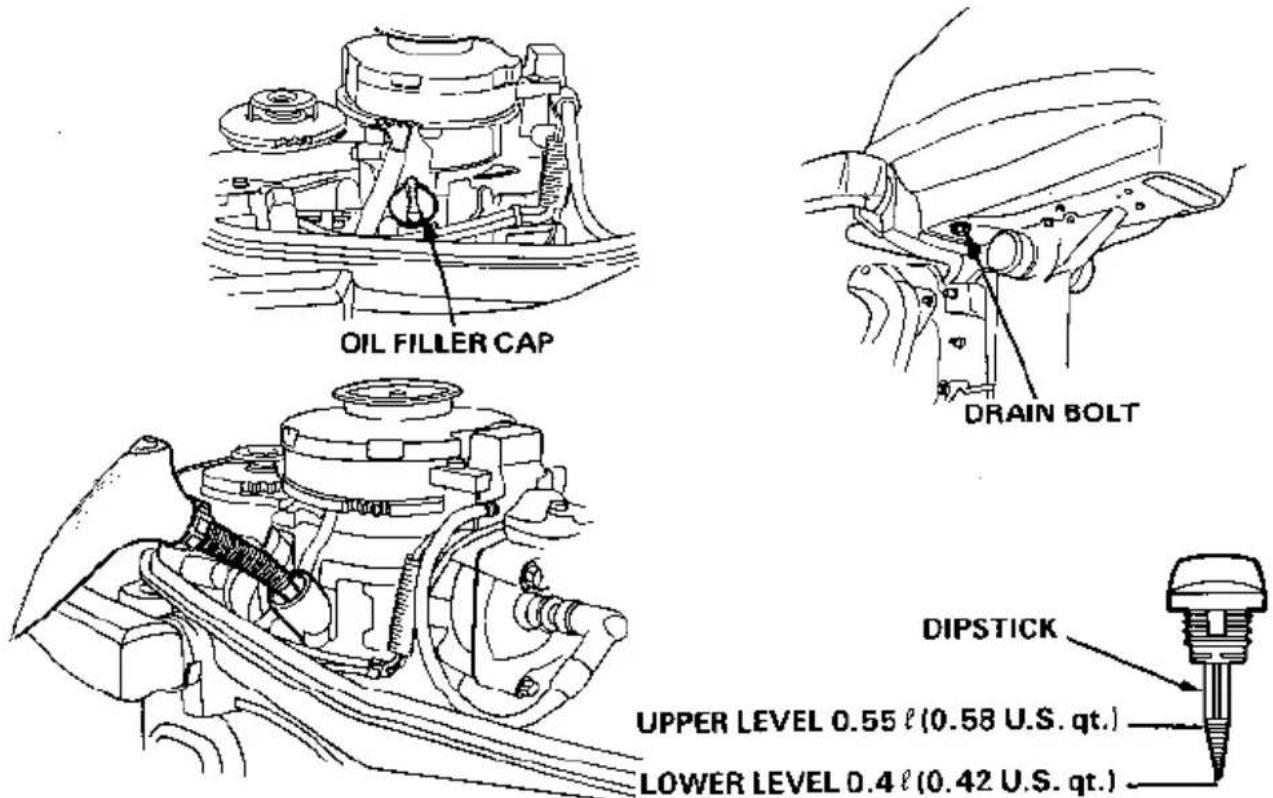
Engine Oil Change
Drain the oil while the engine is still warm to assure rapid and complete draining.
- Remove the engine cover. Remove the drain bolt and filler cap, and drain the oil. Reinstall the drain bolt.
- Fill the crankcase with the recommended oil (see page 10) and check the oil level with the dipstick resting on the filler opening (do not screw in). Fill to the upper level mark.
- Reinstall the filler cap/dipstick
CAUTION: Engine oil is a major factor affecting engine performance and service life. Nondetergent oils and low quality engine oils are not recommended because they have inadequate lubricating characteristics.
Oil capacity: 0.55 l (0.58 U.S. qt.)
CAUTION: Used motor oil may cause skin cancer if repeatedly left in contact with the skin for prolonged periods. Although this is unlikely unless you handle used oil on a daily basis, it is still advisable to thoroughly wash your hands with soap and water as soon as possible after handling used oil.
NOTE: Please dispose of used motor oil in a manner that is compatible with the environment. We suggest you take it in a sealed container to your local service station for reclamation. Do not throw it in the trash or pour it on the ground.
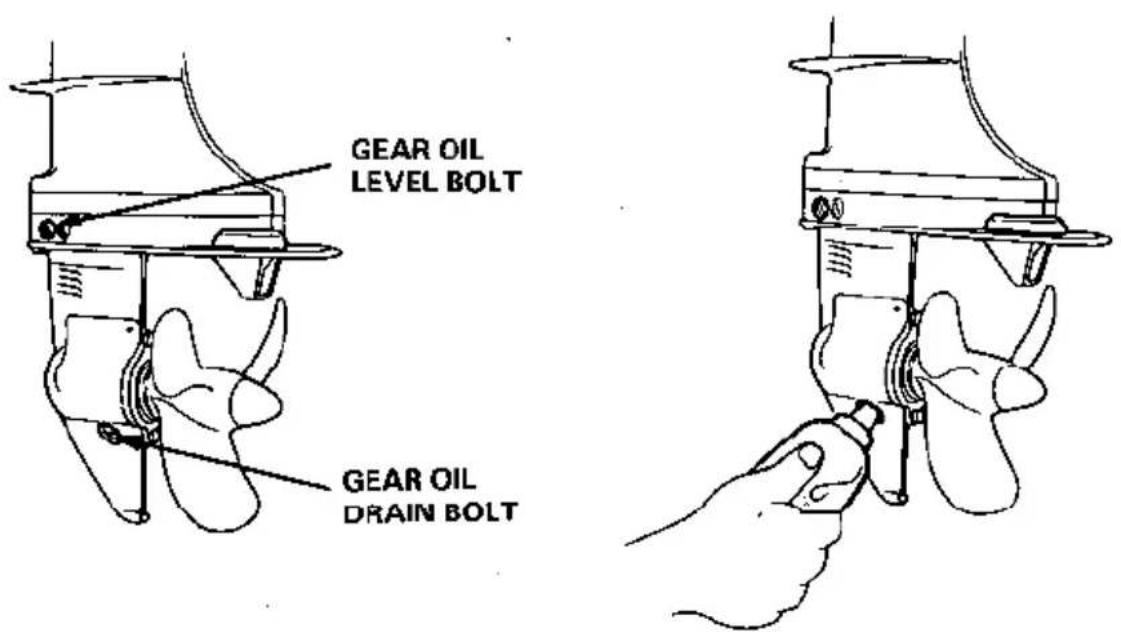
Gear Oil Check/Change
Oil level check
Check the oil level when the engine is in the vertical position. Remove the level bolt and see if oil flows out. If no oil comes out, fill through the drain bolt hole until the oil starts to flow out through the level bolt hole. If there is water in the oil, the water will flow out first when the drain bolt is removed, or the oil will be a milky color.
Oil change
Remove the level bolt and drain bolt to drain the oil. Inject oil through the drain bolt hole until it starts flowing out through the level bolt hole. Reinstall and tighten the level bolt and drain bolt securely.
CAUTION: If water is detected in the oil, the unit should be inspected by an authorized Honda outboard motor dealer.
Recommended Oil: API standard (GL-4 or GL-5) SAE 90 outboard motor gear oil Oil capacity: 0.1 ℓ (0.11 U.S. qt.)
Starter Rope Check
Check the starter rope every 6 months or after every 100 hours of outboard motor operation. Replace the rope if it is frayed.
Spark Plug Service
Recommended spark plug: BPR5ES (NGK); W16EPR-U
- Remove the engine cover.
- Remove the spark plug cap.
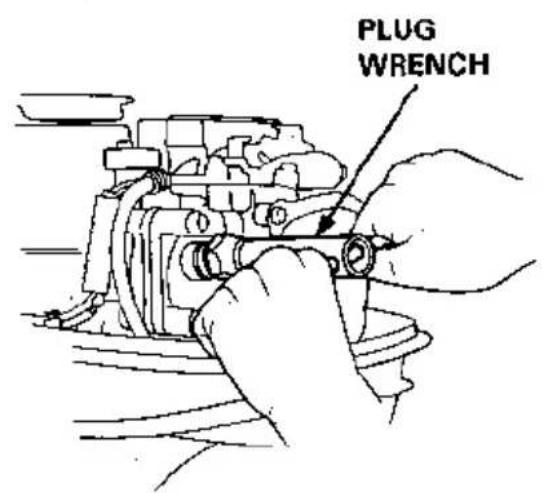
- Use the wrench supplied in the tool kit to remove the spark plug.
- Visually inspect the spark plug. Discard it if the insulator is cracked or chipped.
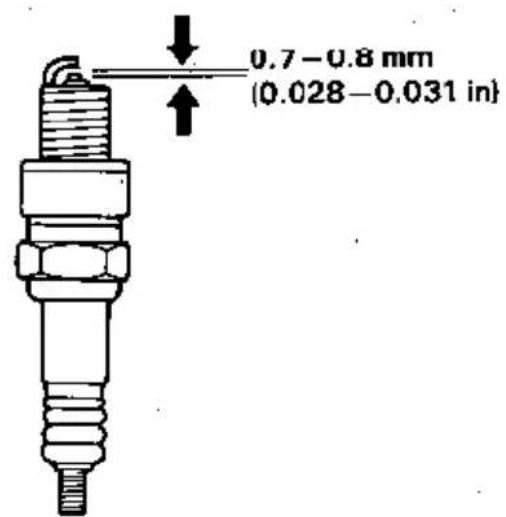
- Measure the plug gap with a feeler gauge.
The gap should be 0.7–0.8 mm (0.028–0.031 in). Correct as necessary by bending the side electrode. - Check that the spark plug washer is in good condition, and thread the spark plug in by hand to prevent cross-threading.
- After the spark plug is seated, tighten with a spark plug wrench to compress the washer.
NOTE: If installing a new spark plug, tighten 1/2 turn after the spark plug seats to compress the washer. If reinstalling a used spark plug, tighten 1/8—1/4 turn after the spark plug seats to compress the washer.
- Reinstall the engine cover.
CAUTION:
- The spark plug must be securely tightened. An improperly tightened plug can become very hot and may cause engine damage.
- Use only the recommended spark plugs or equivalent. Spark plugs which have an improper heat range may cause engine damage.
Cleaning and Flushing
After each use in salt water or dirty water, thoroughly clean and flush the outboard motor.
(With Water Hose Joint)
-
Wash the outside of the outboard motor with clean, fresh water.
-
Remove the flush bolt.
-
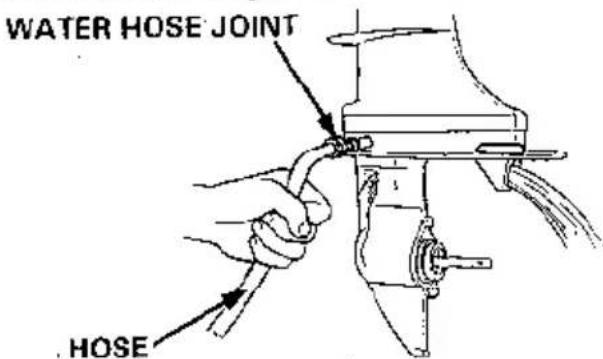
Flush the cooling system, using the water hose joint.
a. Attach a hose from a fresh water faucet to the hose joint.
b. Remove the propeller.
c. Turn on the fresh water supply to the hose.
d. Start the engine and run in neutral for at least 5 minutes.
(Without Water Hose Joint)
-
Wash the outside of the outboard motor with clean, fresh water.
-
Remove the propeller.
-
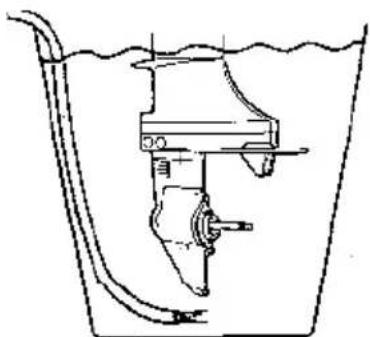
Stand the motor in a suitable container of water. The water level must be at least 4 inches above the anti-cavitation plate.
-
Start the engine and run slowly for at least 5 minutes.
natural_image
Simple line drawing of a boat being lowered into a container (no text or symbols)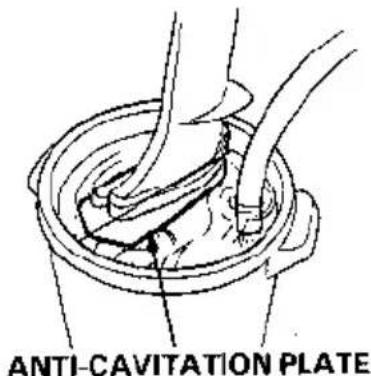
WARNING
- For safety, the propeller must be removed.
- Be sure the outboard motor is securely mounted, and do not leave it unattended while running.
- Keep children and pets away from the area, and stay clear of moving parts during this procedure.
CAUTION: Running the engine without water can cause serious engine damage due to overheating. Be sure that water flows from the water check hole while the engine is running. If not, stop the engine and determine the cause of the problem.
Lubrication
Wipe the outside of the engine with a cloth dipped in oil. Apply marine anti-corrosion grease to the following areas:
NOTE: Apply anti-corrosion oil to pivot surfaces where grease cannot penetrate.
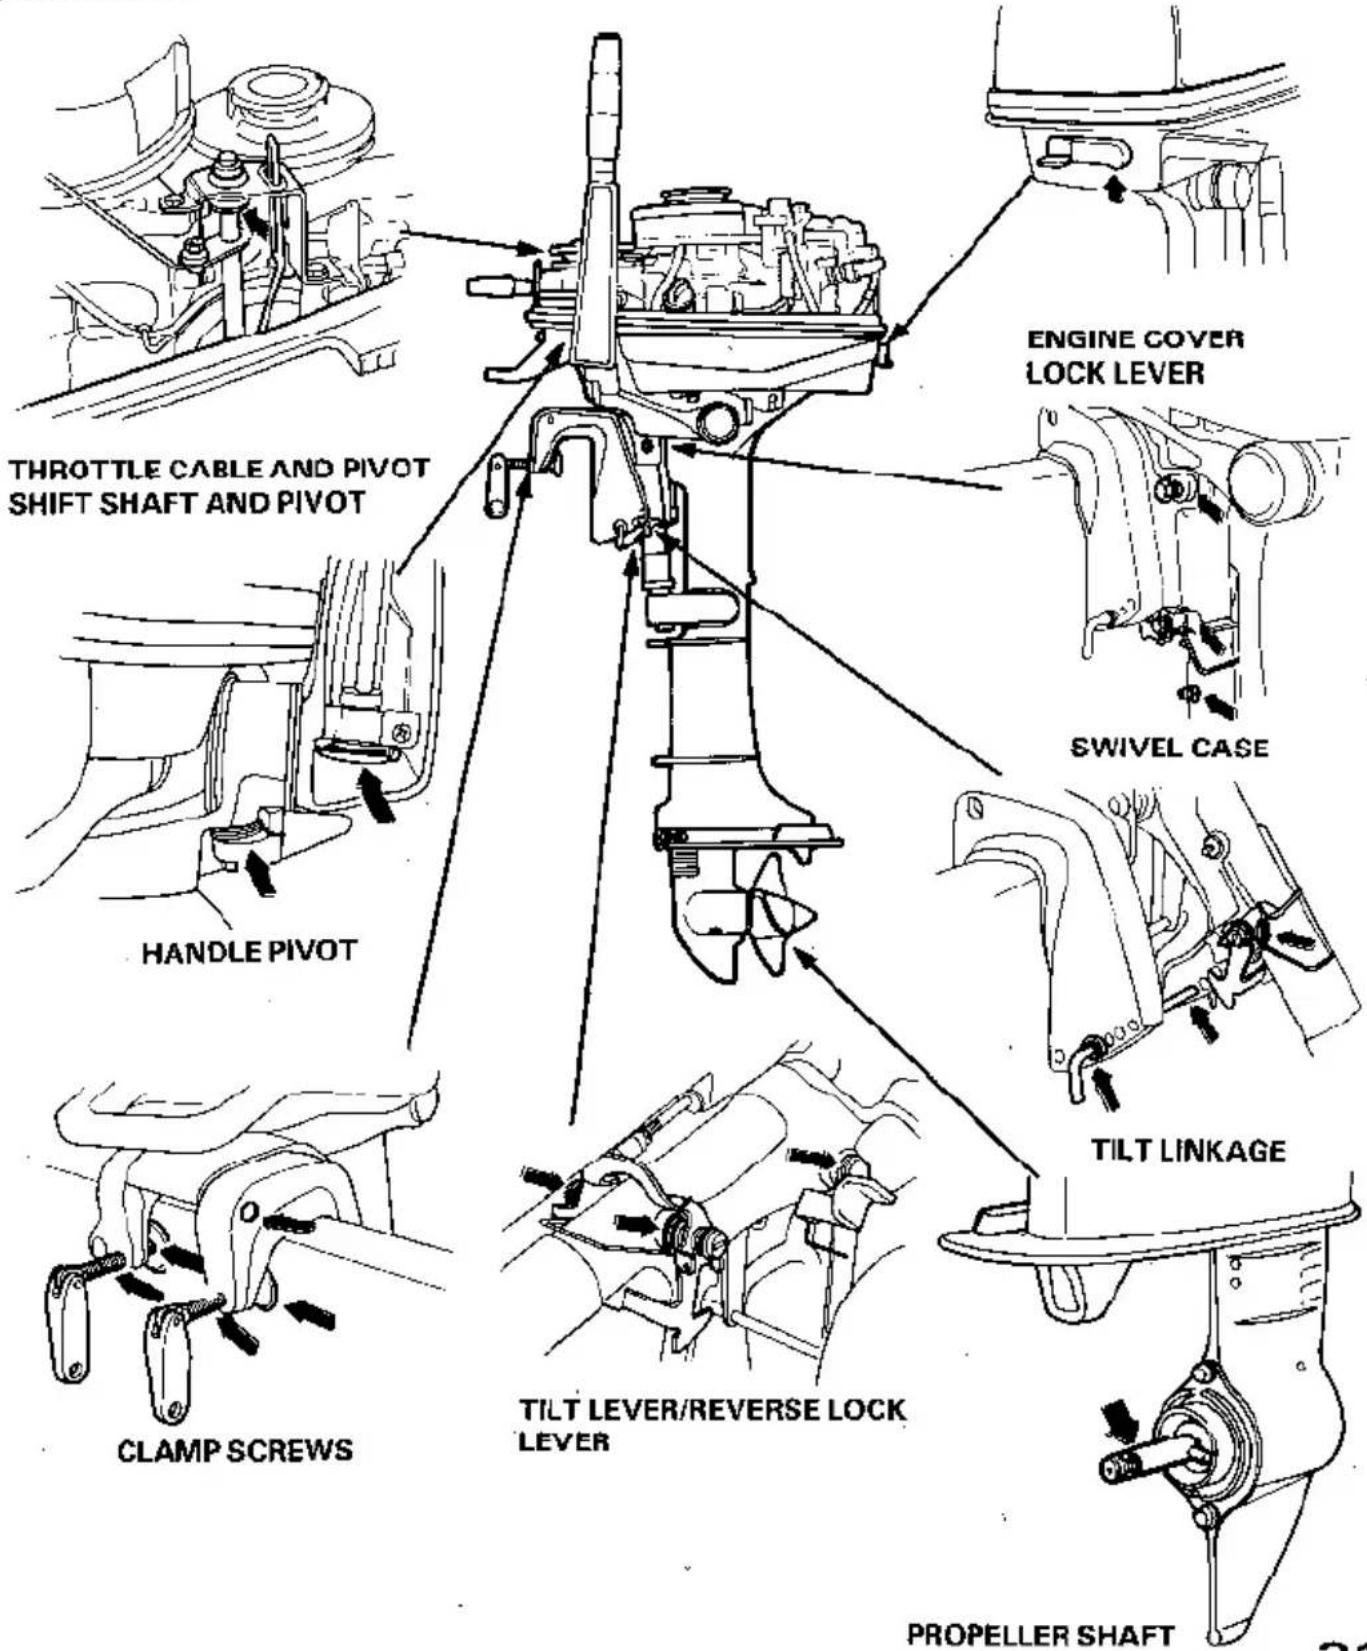
Shear Pin Change
A shear pin is used to protect the propeller and drive mechanism from damage when the propeller strikes an obstruction.
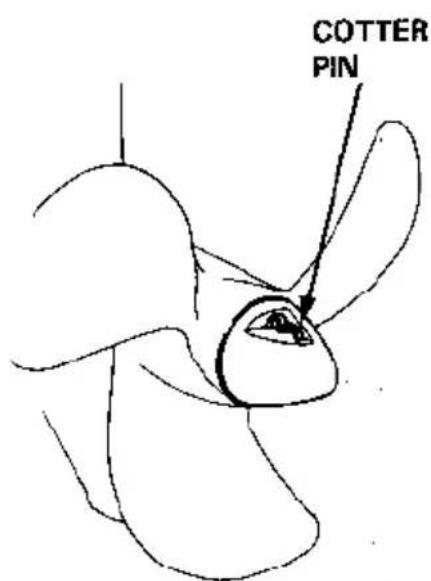
- Remove the cotter pin, the propeller cap, and the propeller.
- Remove the broken shear pin and replace it with a new one.
- Install the propeller, then install the propeller cap finger tight.
- Install a new cotter pin, and spread the ends as shown in the illustration.
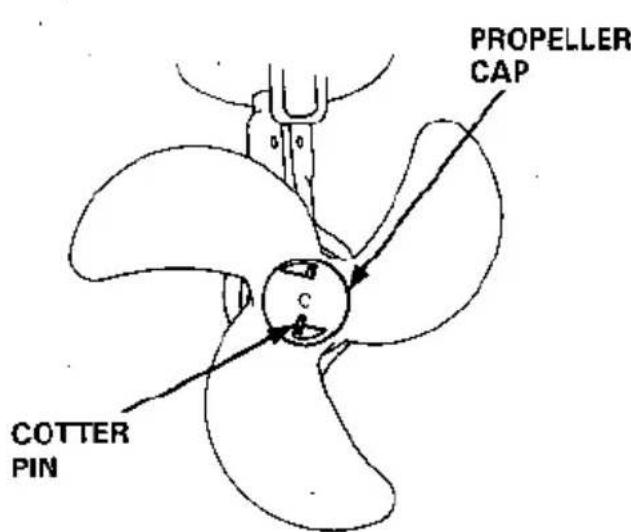
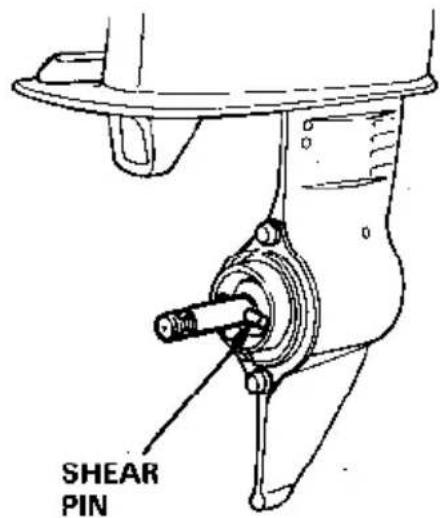
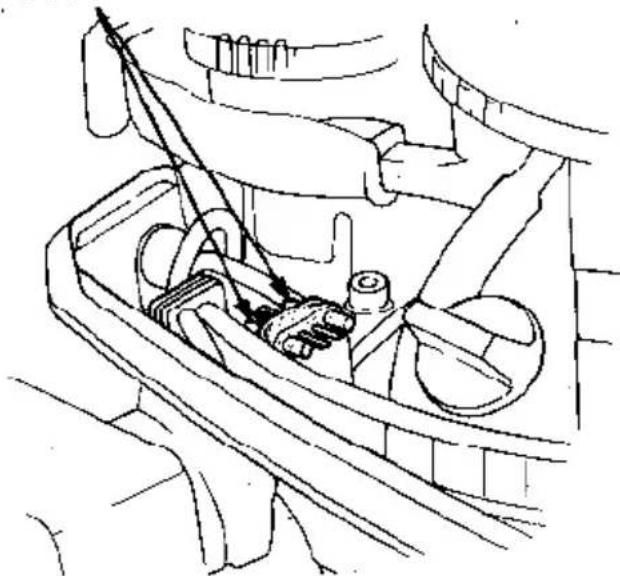
SPARE SHEAR PINS AND COTTER PINS
natural_image
Technical line drawing of a car interior showing steering wheel, dashboard, and gear mechanism (no text or labels)Servicing a Submerged Motor
A submerged motor must be serviced immediately after it is recovered from the water in order to minimize corrosion.
If there is a Honda outboard motor dealership nearby, take the motor immediately to the dealer. If you are far from a dealership, proceed as follows:
- Remove the engine cover, and rinse the motor with fresh water to remove salt water, sand, mud, etc.
- Loosen the carburetor drain screw (p. 36), drain the contents of the carburetor into a suitable container, then retighten the drain screw.
- Change the engine oil (p. 27). If there was water in the engine crankcase, or the used engine oil showed signs of water contamination, then a second engine oil change should be performed after running the engine for 1/2 hour.
- Remove the spark plug. While pressing the engine stop button, pull the recoil starter several times to completely expel water from the cylinder.
CAUTION:
- When cranking the engine with an open ignition circuit (spark plug removed from the ignition circuit), keep the engine stop button depressed to prevent electrical damage to the ignition system.
-
If the motor was running when it submerged, there may be mechanical damage, such as bent connecting rods. If the engine binds when cranked, do not attempt to run the motor until it has been repaired.
-
Pour a teaspoon of engine oil into the spark plug hole, then pull the recoil starter several times to lubricate the inside of the cylinder. Reinstall the spark plug.
-
Attempt to start the engine.
-
If the engine fails to start, remove the spark plug, clean and dry the electrode, then reinstall the spark plug and attempt to start the engine again.
-
If the engine starts, and no mechanical damage is evident, continue to run the engine for 1/2 hour or longer (be sure the water level is at least 4 inches above the anti-cavitation plate).
-
As soon as possible, take the motor to a Honda outboard motor dealer for inspection and service.
natural_image
Technical line drawings of two mechanical assembly setups, showing hands operating components (no text or symbols)Fuel Filter Replacement
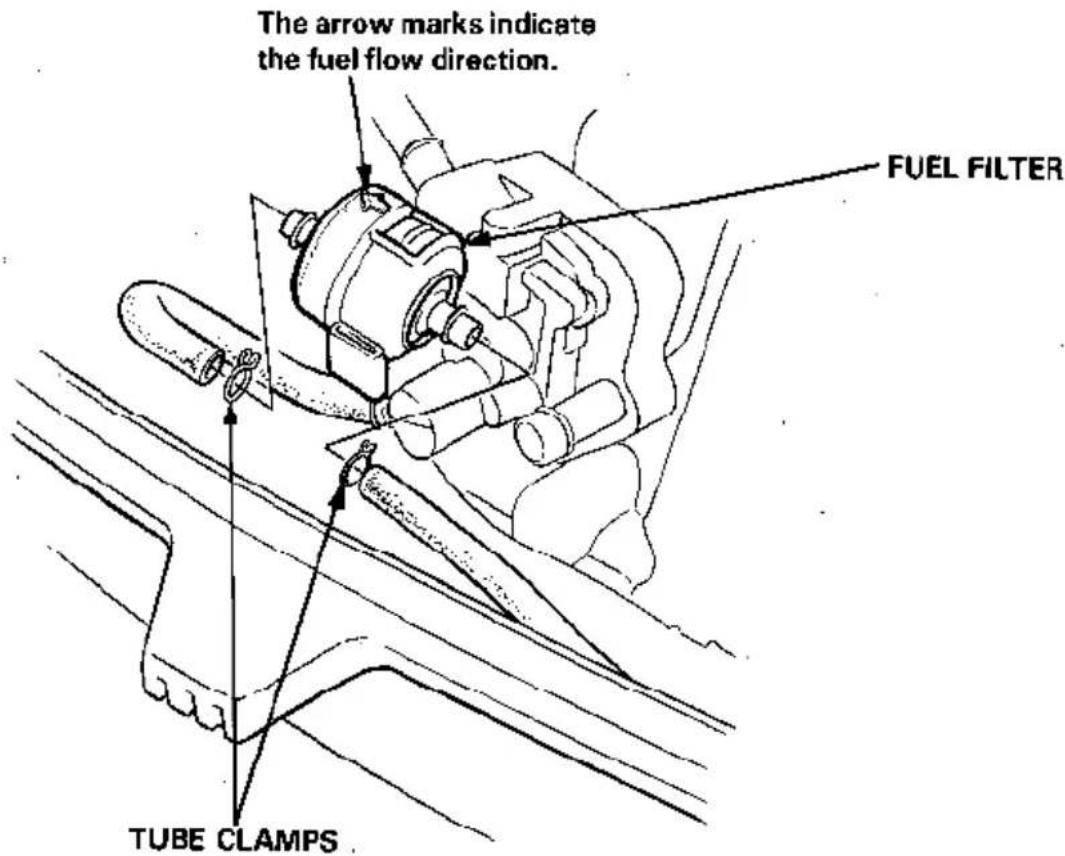
The fuel filter is located between the fuel pump and the carburetor. Water or sediment accumulated in the fuel filter can cause loss of power or hard starting. To prevent engine malfunction, replace the fuel filter regularly.
((SERVICE PERIOD)) Every 200 operating hours or every one year.
▲WARNING
- Gasoline is flammable and is explosive under certain conditions. Do not smoke or allow flames or sparks near the outboard motor while draining fuel.
• Always work in a well-ventilated area. - Be sure that any fuel drained from the outboard motor is stored in a safe container.
-
Wipe up any spilled gasoline at once.
-
Disconnect the fuel tank line from the motor.
-
Remove the engine cover, and remove the fuel filter.
NOTE: Before removing the filter, place clamps on the fuel tubes on each side of the filter to prevent fuel leakage.
- Install the new fuel filter with the arrow mark pointing toward the carburetor.
NOTE: Fuel flow will be impeded if the filter is installed backward.
- Remove the clamps used to close the fuel tubes. Connect the fuel tank line to the motor. Turn the fuel tank vent knob to the ON position, pump the primer bulb, and check for leaks.
NOTE: If you find excessive water or sediment accumulated in the fuel filter, inspect the fuel tank. Clean the fuel tank if necessary.
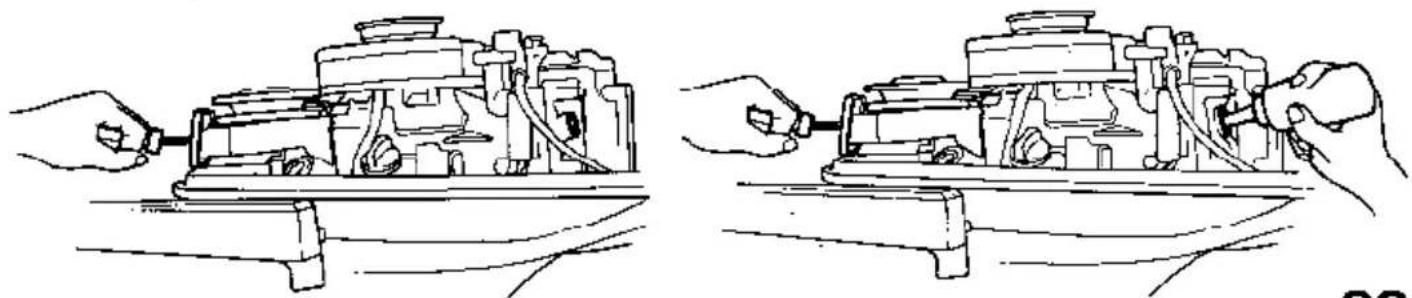
- Disconnect the fuel line and install the cap on the engine fuel inlet. Firmly close the fuel cap vent knob.
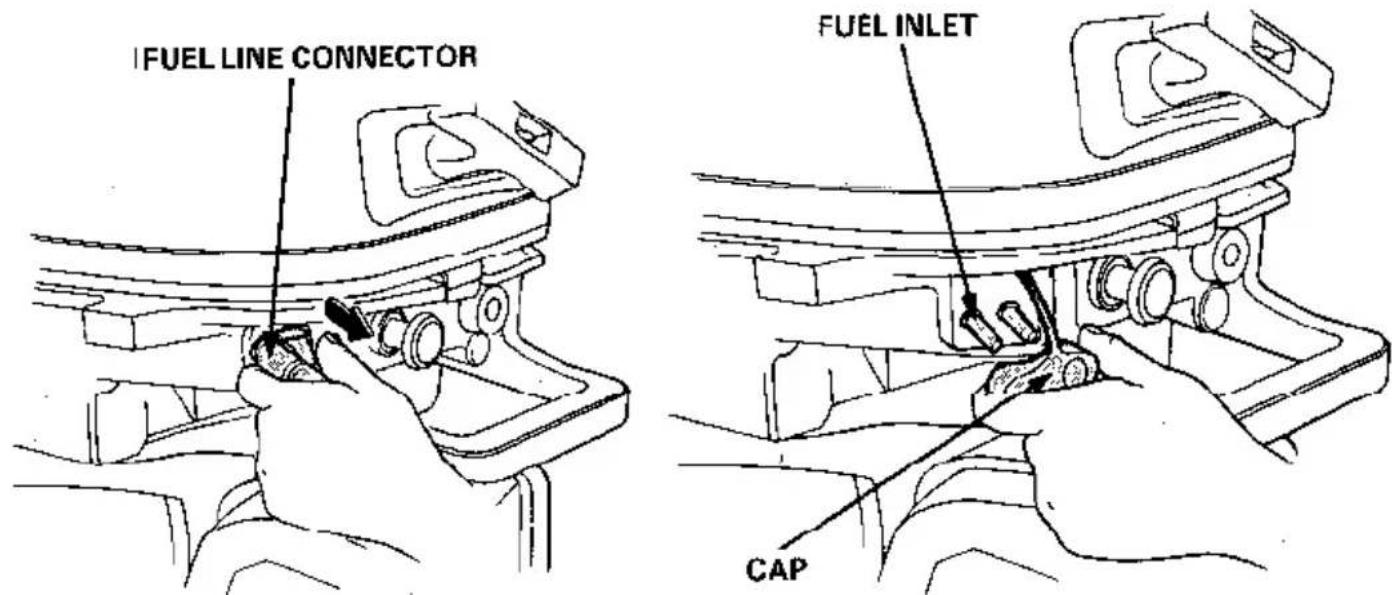
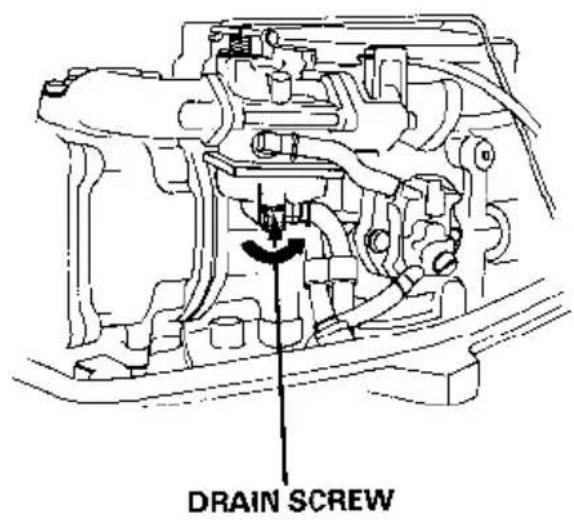
- Loosen the carburetor drain screw, and drain the gasoline into a suitable container. After draining, retighten the drain screw.
A WARNING
- Be careful not to spill fuel. Spilled fuel or fuel vapor may ignite. If any fuel is spilled, make sure the area is dry before storing or transporting the motor.
- Do not smoke or allow flames or sparks where fuel is drained or stored.
CAUTION: In cold weather, to prevent ice from forming inside the water pump, pull the recoil starter several times to flush the water out.
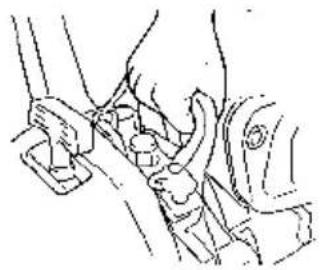
- To carry, hold the motor by the carrying handle, or hold by the carrying handle and engine cover lock lever as shown here. Do not carry by the engine cover.
natural_image
Line drawing of a hand using a tool to adjust or install a mechanical component (no text or symbols visible)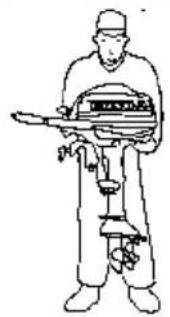
natural_image
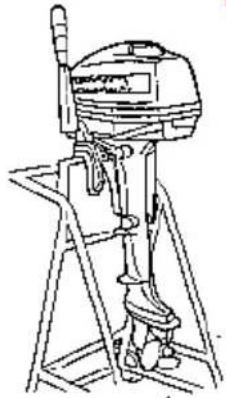
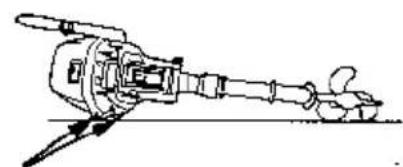
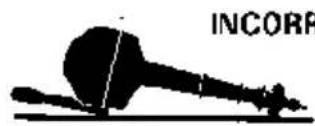
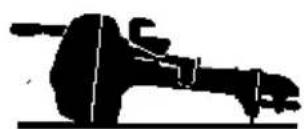
Line drawing of a person holding a tool or device (no text or symbols present)- Transport and store the motor either vertically or horizontally, as shown below, with the steering handle raised.
Vertical transport or storage: Attach the stern bracket to a stand.
CAUTION: Any other transport or storage position may cause damage or oil leakage.
- Tilt up the outboard motor, remove the plug cap, pull the recoil starter several times, and completely drain the cooling water.
CAUTION:
- If the outboard motor is placed on its side without completely draining the cooling water immediately after operation, water may enter the engine through the exhaust port. Be sure to drain the cooling water before placing the outboard motor on its side.
- Be careful not to touch the spark plug wire while pulling the starter grip.
- Change the engine oil.
- Remove the spark plug, and pour about a tablespoon of clean engine oil into the cylinder. Crank the engine several revolutions to distribute the oil, then reinstall the spark plug.
- Slowly pull the starter grip until resistance is felt. At this point, the piston is coming up on its compression stroke and both the intake and exhaust valves are closed. Storing the engine in this position will help to protect it from internal corrosion.
- Store the outboard motor in a clean, dry area.
NOTE: Before storing, clean, flush, and lubricate the outboard motor as described on pages 30 and 31.
natural_image
Line drawing of a portable electric motor on a stand (no text or symbols)CORRECT
natural_image
Technical line drawing of a mechanical device with no visible text or symbolsCASE PROTECTOR
natural_image
Silhouette of a mechanical device with lever and base (no text or symbols)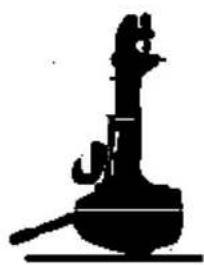
natural_image
Silhouette of a vintage telephone receiver with antenna and base (no text or symbols)INCORRECT
Engine Will Not Start:
- Is the shift lever in neutral?
- Is there fuel in the fuel tank?
- Is the fuel cap knob turned to ON?
- Is the fuel system primed by squeezing the primer bulb?
- Is fuel reaching the carburetor?
Loosen the carburetor drain screw to see if there is fuel in the carburetor float bowl.
▲WARNING
If any fuel is spilled, make sure the area is dry before testing the spark plug or starting the engine. Spilled fuel or fuel vapor may ignite.
- Is the spark plug firing?
a. Remove and inspect the spark plug. Clean and dry the plug, and check the electrode gap (p. 29).
b. Install the spark plug in cap, and ground the side electrode to any engine ground.
c. Pull the recoil starter briskly, and see if the plug sparks.
d. If the spark plug is OK, reinstall it, and try to start the engine.
Engine Overheats:
- Are the water intake holes clogged?
- Is the thermostat faulty?
| MODEL | BF5A |
| Description Code | S Model BADSL Model BADL |
| Output | 5.0 horsepower (Maximum) |
| Recommended full throttle range | 4,000 - 5,000 rpm |
| Engine type | 4-stroke, vertical, single cylinder, OHV type |
| Displacement | 127 cc (7.7 cu in) |
| Valve tappet clearance | IN: 0.06-0.14 mm (0.002-0.006 in), EX: 0.11-0.19 mm (0.004-0.007in) |
| Spark plug gap | 0.7-0.8 mm (0.028-0.031 in) |
| Starter system | Recoil starter |
| Ignition system | Transisterized magneto |
| Lubrication system | Forced feeding of oil under pressure with trochoid pump |
| Specified oil | Engine: API Standard SF CC/CD or SG 10W-30Gear case: API Standard GL-4/5SAE 90 outboard motor gear oil |
| Oil capacity | Engine: 0.55 ℓ (0.58 U.S. qt.)Gear case: 0.1 ℓ (0.11 U.S. qt.) |
| Cooling system | Water cooling |
| Exhaust system | Underwater exhaust |
| Spark plugFuel | BPR5ES (NGK); W16EPR-U, W14EPR-U (ND)Automotive gasoline (91 research octane, 86 pump octane) |
| Tank capacity | 13 ℓ (3.4 US gal) |
| Steering equipment | Bar handle |
| Tilt angle | 3-stage adjustment (30°, 45° and 70°) |
| Angle of rotation | 45° (both sides) |
| Dimensions,Length X Height X Width | S Model 525 x 1,005 x 340 mm (20.7 x 39.6 x 13.4 in)L Model 525 x 1,135 x 340 mm (20.7 x 44.7 x 13.4 in) |
| Height from stem bracket to anti-cavitation plate | S Model 445 mm (17.5 in)L Model 572 mm (22.5 in) |
| Standard propeller(No. of blades-diameter X pitch) | 3-200 x 190 mm (7-25/32 X 7-31/64 in) |
| Dry weight | S Model 27 kg (59.5 lb)L Model 27.5 kg (60.6 lb) |
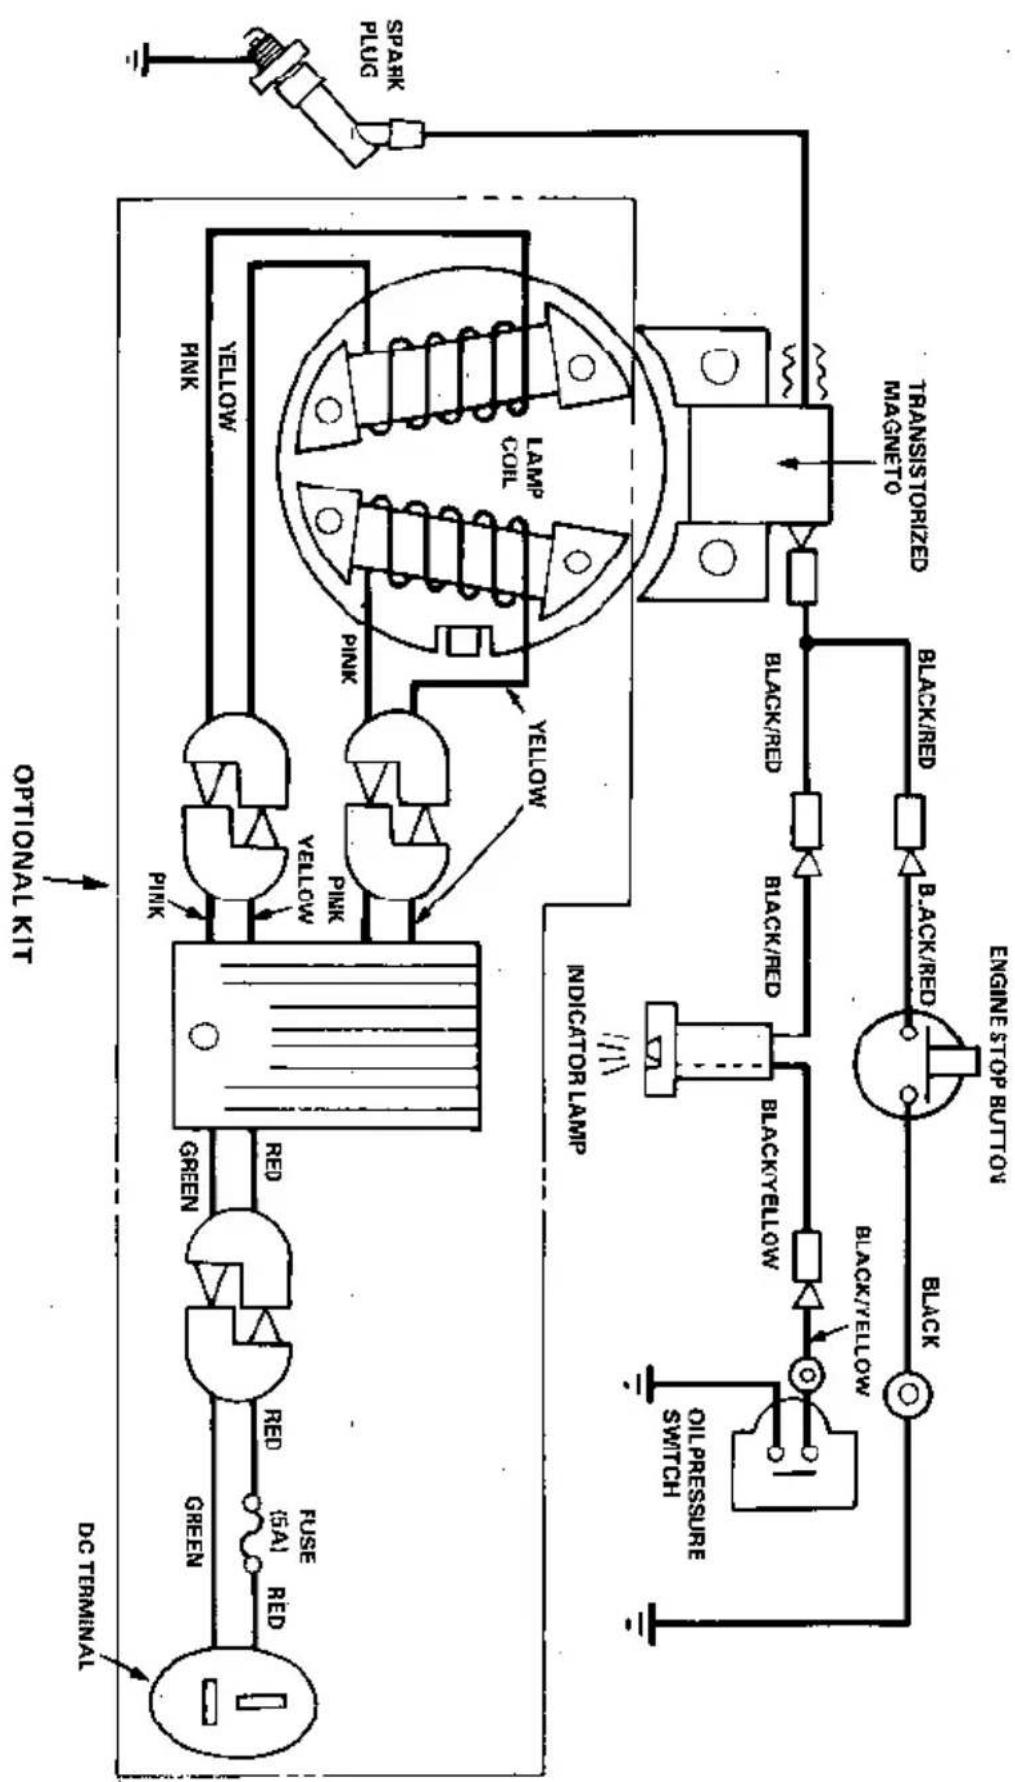
flowchart
graph TD
    A["DC TERMINAL"] --> B["GREEN"]
    B --> C["FUSE (5A) RED"]
    C --> D["RED"]
    D --> E["GREEN"]
    E --> F["PINK"]
    F --> G["YELLOW"]
    G --> H["PINK"]
    H --> I["YELLOW COIL"]
    I --> J["SPARK PLUG"]
    J --> K["TRANSISTORIZED MAGNETO"]
    K --> L["BLACK/RED"]
    L --> M["BLACK/RED"]
    M --> N["BLACK/YELLOW"]
    N --> O["BLACK/YELLOW"]
    O --> P["INDICATOR/LAMP"]
    P --> Q["Oil PRESSURE SWITCH"]
    P --> R["DECANTONAL KIT"]
    P --> S["STATIONAL PLUG"]
GEAR OIL
natural_image
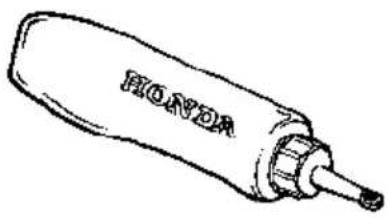
Line drawing of a Honda oil shaver with nozzle (no text or symbols on body)CHARGING AND LIGHTING
COIL KIT
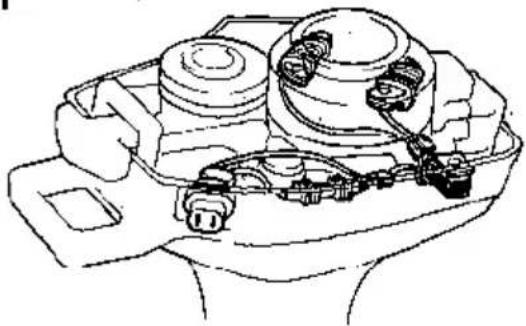
natural_image
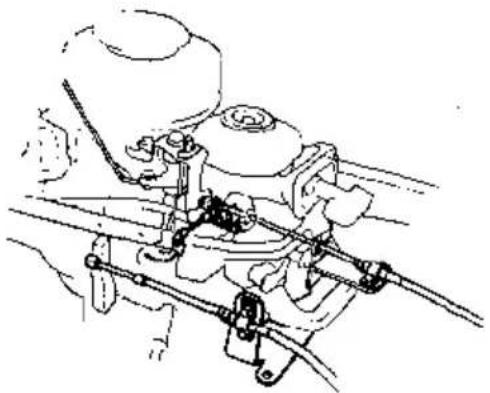
Technical line drawing of a mechanical assembly with gears and housing (no text or symbols)REMOTE CONTROL BRACKET
KIT
natural_image
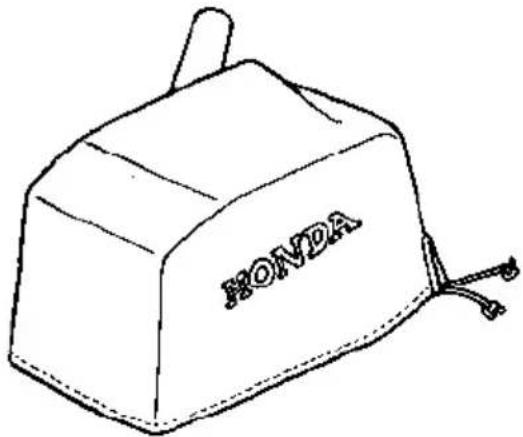
Technical line drawing of a mechanical assembly with hoses and components (no text or symbols)ENGINE COVER
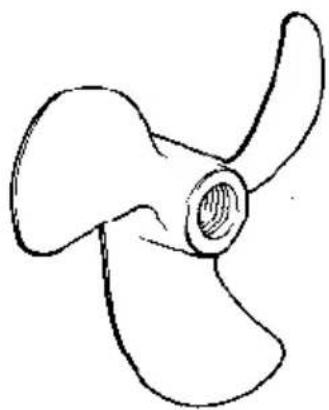
POWER PROPELLER FOR HEAVY LOAD
natural_image
Simple line drawing of a three-blade propeller (no text or symbols)Number of blades-diameter x pitch
3-200×170mm(7-25/32×6-11/16in)
Owner Satisfaction
Your satisfaction and goodwill are important to your dealer and to us. All Honda warranty details are explained in the Distributor's Limited Warranty. Normally, any problems concerning the product will be handled by your dealer's service department. If you have a warranty problem that has not been handled to your satisfaction, we suggest you take the following action:
- Discuss your problem with a member of dealership management. Often complaints can be quickly resolved at that level. If the problem has already been reviewed with the Service Manager, contact the owner of the dealership or the General Manager.
• If your problem still has not been resolved to your satisfaction, contact:
American Honda Motor Co., Inc.
P.O. Box 50
Gardena, California 90247-0805
Telephone: (213) 604-2400
We will need the following information in order to assist you:
— Your name, address, and telephone number
— Product model and serial number
- Date of purchase
— Dealer name and address
— Nature of the problem
After reviewing all the facts involved, you will be advised of what action can be taken. Please bear in mind that your problem will likely be resolved at the dealership, using the dealer's facilities, equipment, and personnel, so it is very important that your initial contact be with the dealer.
Your purchase of a Honda product is greatly appreciated by both your dealer and American Honda Motor Co., Inc. We want to assist you in every way possible to assure your complete satisfaction with your purchase.
Current customer service contact information:
Your owner's manual was written to cover most of the questions you might ask about your Honda. Any questions not answered in the owner's manual can be answered by your Honda dealer. If your dealer doesn't have an immediate answer, they should be able to get it for you.
If you have a difference of opinion with your dealer, please remember that each dealership is independently owned and operated. That's why it's important to work to resolve any differences at the dealership level. If the service personnel are unable to assist you, please discuss your concerns with the dealer management such as the Service Manager or the dealership's owner.
If you need to contact American Honda regarding your experiences with your Honda product or with your dealer, please send your comments to the following address:
American Honda Motor Co., Inc.
Marine Division
Customer Relations Office
4900 Marconi Drive
Alpharetta, GA 30005-8847
Or telephone: (770) 497-6400 M-F, 8:30 am - 7:00 pm EST
When you write or call, please provide the following information:
- Your name, address and telephone number (complete with area code)
- Model and complete serial number
- Date of purchase
• Name and location of the selling dealer - Name and location of the servicing dealer (if different)
• A detailed description of your concerns
MEMO
MEMO
HONDA
- Owner's Manual Outboard Motor BF5A
- SAFETY LABEL LOCATIONS
- HONDA
- ■WARNING
- To ensure safe operation—
- COMPONENT IDENTIFICATION
- Installation Position
- Installation Height
- Motor Attachment
- CAUTION:
- Motor Angle (cruising)
- Motor Angle Adjustment
- Check the engine oil level.
- Fuel Level
- WARNING
- GASOLINES CONTAINING ALCOHOL
- NOTE:
- Check the following items.
- Fuel Line Connection
- Starting
- Emergency Starting
- OPERATION
- Gear Shifting
- Steering
- Cruising
- Tilting the Motor
- Trailering
- Battery Charging and Lighting (Optional parts)
- • High altitude operation
- Tool Kit and Spare Parts
- Engine Oil Change
- Gear Oil Check/Change
- Oil level check
- Oil change
- Starter Rope Check
- Spark Plug Service
- Cleaning and Flushing
- (With Water Hose Joint)
- (Without Water Hose Joint)
- Lubrication
- Shear Pin Change
- Servicing a Submerged Motor
- Fuel Filter Replacement
- ▲WARNING
- A WARNING
- Engine Will Not Start:
- Engine Overheats:
- Owner Satisfaction
- Current customer service contact information:
Brand : Honda
Model : BF5A (1989)
Category : Outboard motor