
515 Big Wheeler - Lawn mower GUDE - Free user manual and instructions
Find the device manual for free 515 Big Wheeler GUDE in PDF.


| Product type | Manual reel lawn mower |
| Brand | Güde |
| Model | 515 Big Wheeler |
| Cutting width | 40 cm |
| Adjustable cutting height | Yes, from 12 to 42 mm |
| Number of blades | 5 helical blades |
| Power source | Manual (push) |
| Weight | 9.5 kg |
| Dimensions (L × W × H) | 110 × 45 × 40 cm |
| Chassis material | Lacquered steel |
| Wheels | Large rubber wheels (28 cm) |
| Grass catcher | Not included |
| Recommended maintenance | Cleaning after each use, oiling the blades |
| Noise level | Low (below 70 dB) |
| Warranty | 2 years |
| Spare parts available | Blades, wheels, handle |
| Repairability | Easy, standard tools |
| Usage | Medium-sized lawns |
Frequently Asked Questions - 515 Big Wheeler GUDE
User questions about 515 Big Wheeler GUDE
0 question about this device. Answer the ones you know or ask your own.
Ask a new question about this device
Download the instructions for your Lawn mower in PDF format for free! Find your manual 515 Big Wheeler - GUDE and take your electronic device back in hand. On this page are published all the documents necessary for the use of your device. 515 Big Wheeler by GUDE.
USER MANUAL 515 Big Wheeler GUDE
natural_image
Black and white photo of a lawn mower with visible tire, wheels, and attached cover (no text or symbols)Big Wheeler
515 4 IN 1
95385

natural_image
Black-and-white photo of a lawn mower with visible blades and mounting bracket (no text or symbols)515 BS 4 IN 1
95390

ENGLISH Please read the instructions carefully before starting the machine.
English TECHNICAL DATA | SPECIFIED CONDITIONS OF USE | SAFETY INSTRUCTIONS | MAINTENANCE | GUARANTEE | EC-DECLARATION OF CONFORMITY 23
Français CARACTÉRISTIQUES TECHNIQUES | UTILISATION CONFORME À LA DESTINATION | CONSIGNES DE SÉCURITÉ | ENTRETIEN | GARANTIE | DÉCLARATION DE CONFORMITÉ CE \_\_\_\_ 28
natural_image
Simple line drawing of a T-shaped object with a label '4' on the left (no other text or symbols)

natural_image
Illustration of a small robotic lawn mower with a box underneath, no text or symbols present
natural_image
Diagram of a lawn mower with motion arrows indicating rotational motion (no text or symbols)
DE montage
SI Montaža
GB Assembly
HR Montaža
FR Montage
BG Монтаж
IT Montaggio
RO Montaj
NL Montage
BA Montaža
CZ Montáž
SK Montáž
HU Szerelés
515 4 IN 1 #95385 | 515 BS 4 IN 1 #95390


natural_image
Black-and-white photo of a lawn mower with attached hardware and a close-up inset showing a pair of metal clips (no text or symbols visible)| 2 | DE Ölstand kontrollierenGB Oil level inspectionFR Contrôle du niveau d'huileIT Controllo livello d'olioNL Oliepeil controlerenCZ Kontrola stavu olejeSK Kontrola stavu olejaHU Olajszint ellenőrzése | SI Kontrola stanja oljaHR Kontrola razine uljaBG Контрол на състоянието на маслотоRO Verifi carea stării uleiuluiBA Kontrola nivoa ulja |




5154 IN 1 #95385

10W-40
natural_image
Simple line drawing of a lawn mower with wheels and handle (no text or symbols)
2

natural_image
Mechanical assembly diagram showing a piston and crankshaft inserted into a vehicle chassis (no text or labels)DE Ölstand kontrollieren
GB Oil level inspection
natural_image
Line drawing of a hand holding a piece of material with a pipette inserted (no text or symbols)
natural_image
Mechanical assembly diagram showing a component being inserted into a vehicle (no text or symbols visible)


see B&S motor manual
FR 515 BS 4 IN 1 #95390
natural_image
Mechanical device with a lock and rotating arrow, no visible text or symbols

 | DE 515 BS 4 IN 1 #95390siehe Motoranleitung B&SGB 515 BS 4 IN 1 #95390see B&S motor manualFR 515 BS 4 IN 1 #95390voir le mode d'emploi du moteur B&SIIT 515 BS 4 IN 1 #95390vedi manuale d'uso per il motore B&SNL 515 BS 4 IN 1 #95390zie motorhandleiding B&SCZ 515 BS 4 IN 1 #95390viz návod k motoru B&S | SK 515 BS 4 IN 1 #95390pozrite návod k motoru B&SHU 515 BS 4 IN 1 #95390lásd a B&S motor használati útmutatójátSI 515 BS 4 IN 1 #95390glej navodila za motor B&SHR 515 BS 4 IN 1 #95390vidi uputstva za motor B&SBG 515 BS 4 IN 1 #95390виж инструкцията за двигателя B&SRO 515 BS 4 IN 1 #95390v. manualul referitor la motor B&SBA 515 BS 4 IN 1 #95390vidi uputstva za motor B&S |
GB Cutting height setting
natural_image
Close-up of a lawn mower with visible tire and mechanical components (no text or symbols)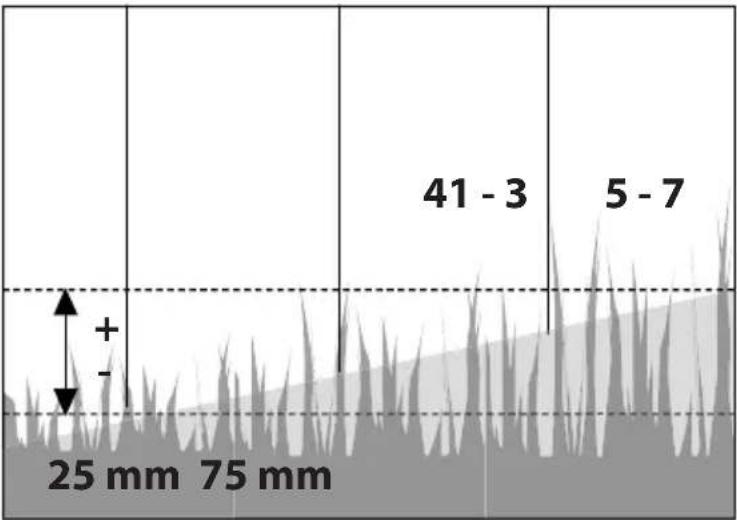
| DE mähen - mulchenGB mow - mulchingFR tondre - paillageIT falciare - pacciamaturaNL maaien - mulchingCZ sekat - mulčováníSK kosiť - mulčovanieHU szénaboglya - talajtakarás | SI kosite - mulčenjeHR kositi - zagrtanje biljakaBG koся - наторяванeRO cosi - mulcireBA kositi - zagrtanje biljaka |
STOP
515 4 IN 1 #95385 | 515 BS 4 IN 1 #95390


natural_image
Side view of a Big Wheeler 150 #401 lawn mower with a hand tool inserted, showing blade and wheel assembly (no text or symbols on the main body)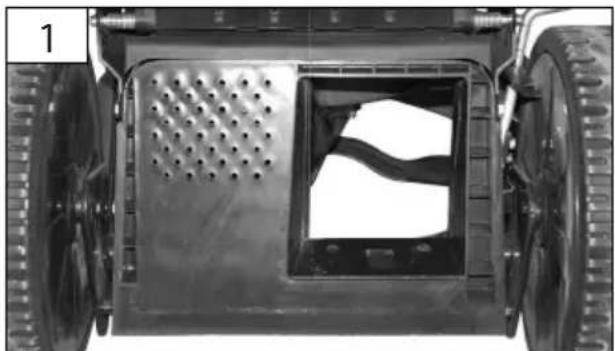
natural_image
Top-down view of a tracked vehicle chassis showing front wheel, rear wheels, and internal structural components (no text or symbols visible)
DE Mähen - Sammeln
GB mow - collect
FR tondre - collecter
natural_image
Close-up of a mechanical component with a visible 'bude' label and a circular arrow indicating rotation or motion (no text or symbols on the main subject)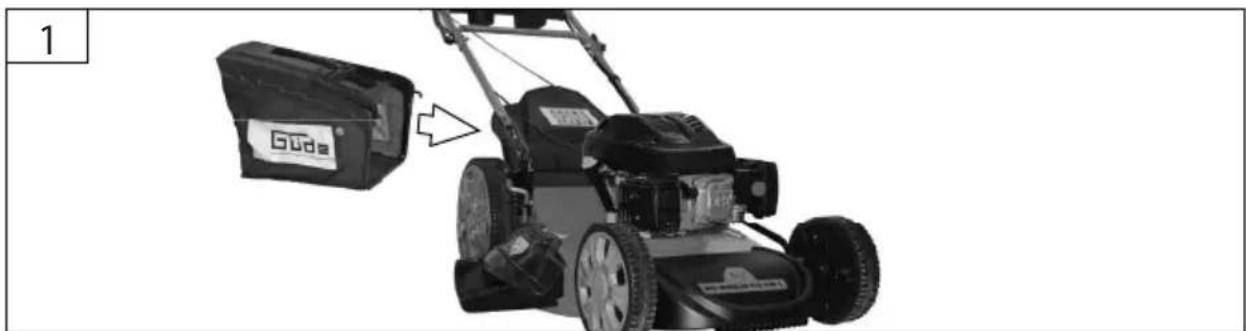
natural_image
Lhouette of a grass lawn mower with a Guide box attached, showing mechanical components and a close-up of the blade (no text or symbols on the main image)
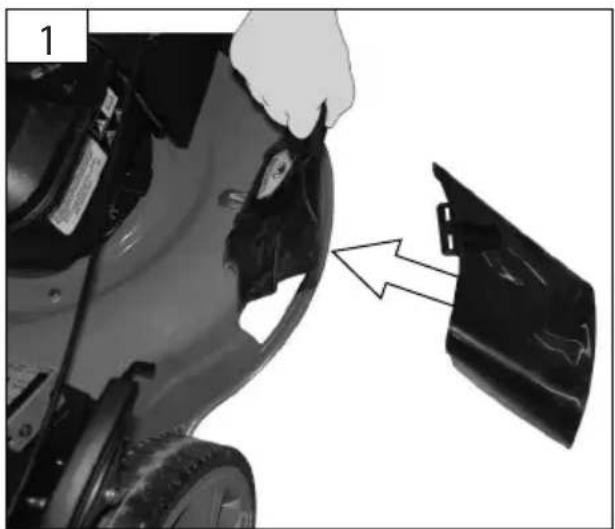
| 2 | DE mähen - AuswerfenGB mow - ejectFR tondre - éjecterIT falciare - espellereNL maaien - uitwerpenCZ sekat - vyhnatSK kosit' - vyhnat'HU szénaboglya - kiadása | SI kosite - izmetHR kositi - izbacitiBG koся - изхвърлямRO cosi - evacuaBA kositi - izbaciti |

515 4 IN 1 #95385 | 515 BS 4 IN 1 #95390

natural_image
Illustration of a tractor pulling crops with arrows indicating motion (no text or symbols)
natural_image
Close-up of a hand adjusting a black plastic component with an arrow pointing to a cutout (no text or symbols visible)
natural_image
Close-up of a car's hood and wheel assembly, showing mechanical components and a checkmark (no text or symbols)DE mähanweisungen
SI Napotki za košnjo
GB Cutting instructions

natural_image
Illustration of a grass law mower with motion capture icons below (no text or symbols)
natural_image
Illustration of a person crossing a road with a traffic cone and a robot, no text or symbols present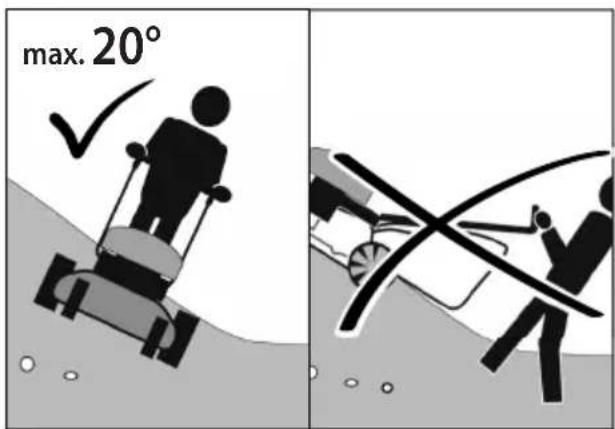

natural_image
Silhouette of a person using a power tool to cut a machine, with warning sign and hazard symbol (no text or labels) | DE | Betrieb | SI | Delovanje |
| GB | Operation | HR | Rad | |
| FR | Fonctionnement | BG | Páboṭa | |
| IT | Esercizio | RO | Functionare | |
| NL | Gebruik | BA | Rad | |
| CZ | Provoz | |||
| SK | Prevádzka | |||
| HU | Üzemeltetés |


515 4 IN 1 #95385

1

natural_image
Simple diagram of a tool with a curved handle and arrow indicating direction (no text or symbols)2
natural_image
Top-down view of a tractor's front wheel and suspension system (no text or symbols visible)3

natural_image
Illustration of a lawn mower being pulled down, with an inset showing the blade motion (no text or symbols)4


natural_image
Black and white photo of a Guide-shaped object with a pile of green leaves, no visible text or symbols on the object itself.


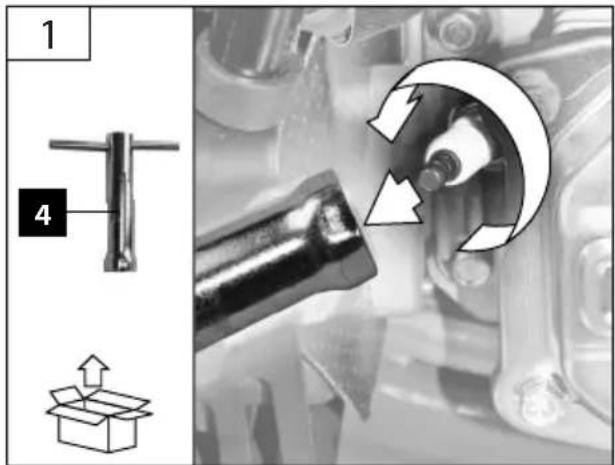
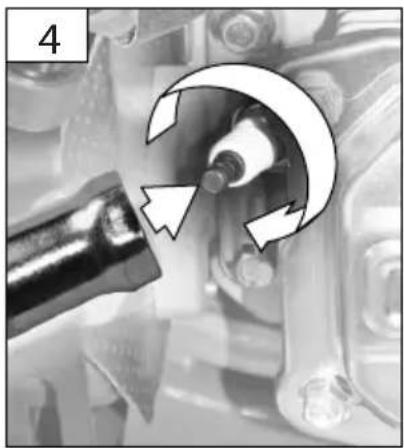
DE Zündkerze
GB Spark plug
515 4 IN 1 #95385

natural_image
Close-up of a spark plug and its side profile, showing its threaded body and textured surface (no text or symbols visible)
natural_image
Mechanical assembly diagram showing a rotating component with arrows indicating motion (no text or symbols)
515 4 IN 1 #95385 | 515 BS 4 IN 1 #95390


natural_image
Close-up of a mechanical component with visible gears and a pointed tip, no text or symbols present
natural_image
Close-up of a mechanical component with a hexagonal nut and directional arrows indicating motion (no text or symbols)
natural_image
Black-and-white photo of a vertical rod inserted into a circular container, with industrial equipment in the background (no visible text or symbols)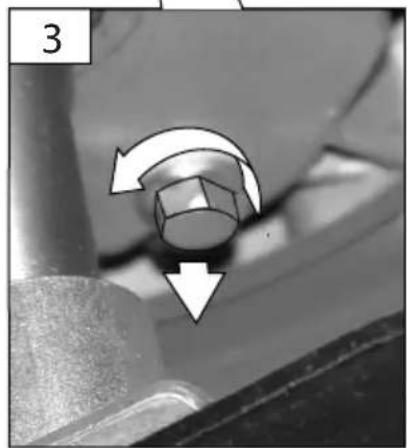
natural_image
Close-up of a mechanical component with a hexagonal nut and directional arrows indicating rotation (no text or symbols)
5154 IN 1 #95385

natural_image
Close-up of a lawn mower with visible tire, blade, and head (no text or symbols)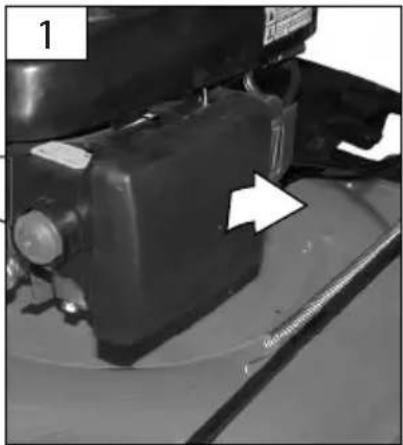
natural_image
Close-up of a mechanical device with a white arrow pointing to a component, no visible text or symbols.
natural_image
Close-up of a mechanical device with a grid-patterned component and an arrow pointing to it (no visible text or symbols)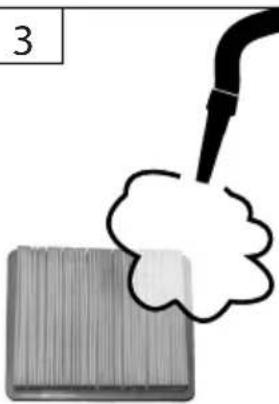
GB Paper filter to be cleaned with compressed air only! Never use water!
natural_image
Close-up of a mechanical assembly with a white arrow pointing to a textured component (no visible text or symbols)
natural_image
Close-up of a mechanical component with a white arrow pointing to a specific area (no visible text or symbols)

GB The motor does not start
natural_image
Diagram of a small wheeled cart with wheels and a curved ramp, no text or symbols present1
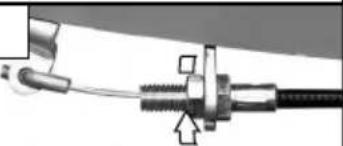
natural_image
Close-up of a mechanical cable with threaded connector and wire (no visible text or symbols)2
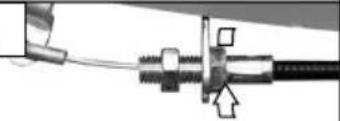
natural_image
Mechanical assembly diagram showing a shaft connected to a spring and cable (no text or symbols visible)3

GB Automatic feed is not working
natural_image
Simple line drawing of a manual lawn mower with wheels and a curved blade (no text or symbols)1
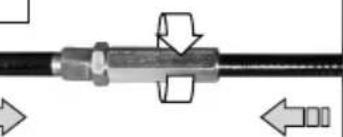
natural_image
Mechanical component diagram showing a shaft with flanges and directional arrows indicating movement (no text or symbols)2

Technische Daten
Fuel......Unleaded petrol/E10......Unleaded petrol/E10

Weight....42 kg....40 kg
Dimensions.... 1650 x 560 x 1000 mm.... 1650 x 560 x 1000 mm
Noise and Vibration Information

Sound pressure level L_nA^1) 84,1 dB (A) 84,1 dB (A)

nd power level L WA ^1) 98 dB (A) 96 dB (A)
Wear ear protectors!
Vibration emission value a_h^21 ..... 5,8 m/s ^2 ..... 5,8 m/s ^2
^1) Uncertainty K=3 dB (A), ^2) Uncertainty K=1,5 m/s ^2
Warning: The vibration emission level will vary because of the ways in which a power tool can be used and may increase above the level given in this information sheet.
The vibration emission level may be used to compare one tool with another.
It may be used for a preliminary assessment of exposure.
An accurate estimate of the vibratory load should also take into account the times when the tool is shut down or when it is running but not actually in use. This may significantly reduce the vibratory load over the total working period.
Identify additional safety measures to protect the operator from the effects of vibration such as: maintain the tool and the accessories, keep the hands warm, organisation of work patterns.


Read and understand the operating instructions before using the appliance. Familiarise with the
control elements and how to use the appliance properly. Abide by all the safety measures stated in the service manual. Act responsibly toward third parties.
The operator is responsible for accidents or risks to third parties.
In case of any doubts about connection and operation refer please to our customer center
delivered items
1
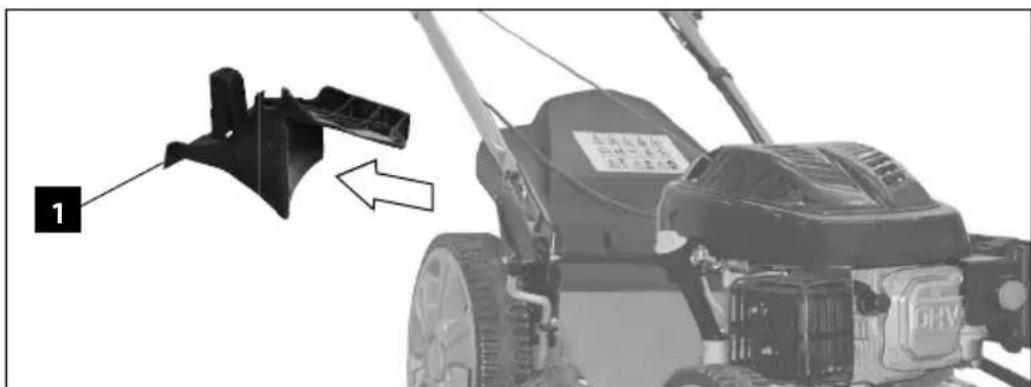
Mulching wedge
2
Side ejection
3
Collection bag
4
Spark plug wrench
5
Bowden clamps
6
Wheels
7
Screws
8
panel
Specified Conditions Of Use
The mower has been designed for cutting grass and grass areas with a maximum climb of 20^ in private gardens around the house and in garden colonies.
Do not use this product in any other way as stated for normal use. Not observing general regulations in force and instructions from this manual does not make the manufacturer liable for damages.
⚠️ Use the appliance only outside, never use it in confined and bad ventilated areas.
The mower must not be used for cutting bushes, hedges and thickets, for cutting and mulching creepers or lawns on roofs or in balcony boxes. The mower must also not be used as a crusher for mulching tree cuttings and hedges or levelling any terrain roughness.
Requirements for operating staff
The operating staff must carefully read the Operating Instructions before using the appliance.
This device is not intended for use by persons (including children) with limited physical, sensory or mental capabilities or without the necessary lack experience or knowledge unless they are supervised by a person who is responsible for their safety or were instructed by that person in how to use the device.
Qualifi cation: Apart from the detailed instructions by a professional, no special qualifi cation is necessary for appliance using.
Minimum age: Persons over 16 years of age can only work on the appliance. An exception includes youngsters trained in order to reach knowledge under supervision of the trainer during occupational education.
Local regulations may stipulate the minimum age of the user.
Training: Using the appliance only requires corresponding training by a professional or the Operating Instructions. No special training is necessary.
Emergency procedure

Danger of injury!
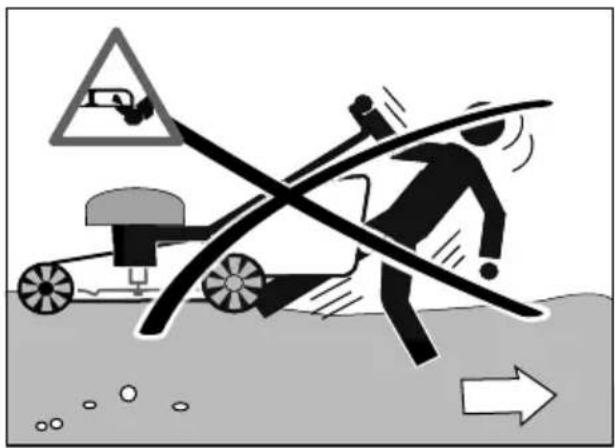
Never put your hands and feet near the rotating parts. Keep a distance from the ejection opening at all times.

Danger of burns!
Some parts of the appliance get too hot when the appliance is operated. Do not touch any hot parts, e.g. engine and muffler.
Conduct a fi rst-aid procedure adequate to the injury and summon qualified medical attendance as quickly as possible. Protect the injured person from further harm and calm them down. For the sake of eventual accident, in accordance with DIN 13164, a workplace has to be fitted with a fi rst-aid kit. It is essential to replace any used material in the fi rst-aid kit immediately after it has been used. If you seek help, state the following pieces of information:
- Accident site
- Accident type
- Number of injured persons
- Injury type(s)
Symbols

Caution!

Read the Operating Instructions

Wear ear protectors!
Wear eye protective goggles!

Caution - hot surface!
Danger of burns!

Warning against bounced subjects

Keep distance of persons!
Observe to keep out of dangerous zone

Switch the engine off and remove the socket plug before any work on the engine.

Keep a sufficient distance from the cutting knife when operating the appliance.

Caution, risk of drawing-in

Risk of explosion

Refuel the engine only when switched off.

Risk of poisoning!

Use the appliance only outside, never use it in confined and bad ventilated areas.

Prohibited smoking and open fire using.


Do not use the machine in wet or moist conditions. Do not expose the machine to rain.


Warning against dangerous voltage

Protect against humidity

This side up
Safety Instructions

WARNING
Read all safety warnings and all instructions, including those given in the accompanying brochure.
Failure to follow the warnings and instructions may result in electric shock, fire and/or serious injury. Save all warnings and instructions for future reference.
Keep children and other persons including animals in a safe distance when using the appliance. Minimum safe distance is 5 m.
Wear personal protective equipment.
Wear solid shoes and long trousers. Never use the appliance when barefooted or in light sandals.
Wear protective gloves if necessary.
Use the appliance in broad daylight or in a well-lit environment.
Check carefully the terrain where the appliance is being used and remove any items that could get caught and be thrown away.

Fuel is highly flammable.
Keep the fuel in suitable containers only.
The appliance may only be refuelled outdoors and not near open fire or burning cigarettes.
Refuel before starting the appliance. If the engine is running or still hot, it must not be refuelled or the tank cover opened.
Make sure the fuel does not overflow. If the fuel overflows, the engine must not be started. Remove any dirt from the appliance and prevent any attempt at ignition until fuel fumes have evaporated.
The engine must necessarily be filled with engine oil before being put into operation for the first time.
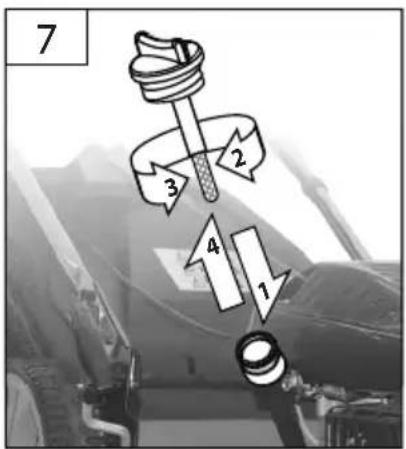
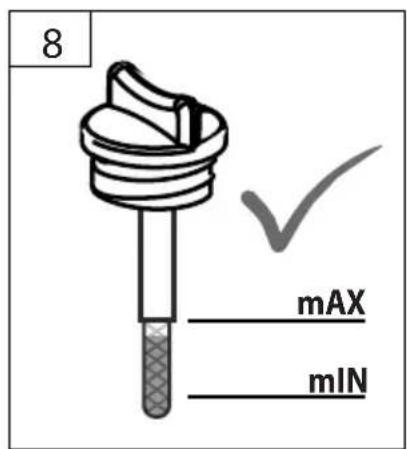
Check the oil level whenever the appliance is to be put into operation. Add engine oil if necessary.
Carry out a visual inspection before any use to make sure the appliance, especially the cutting tools, fastening parts and the entire cutting unit are not damaged.
⚠️ Check all screw and plug-in connections and protective equipment if firm and tightened properly and whether all moving parts are running smooth whenever the appliance is to be put into operation.
The protective equipment on the appliance is strictly prohibited to be disassembled, changed, used in conflict with the designation and it is prohibited to attach any protective equipment of other manufacturers.
The appliance must not be used if damaged or safety equipment is defective. Replace any worn-out and damaged parts.
Do not start the engine before your feet are in a safe distance from the cutting tools.
Do not incline the appliance when being started.
Do not start the appliance when you are standing in front of the ejection opening.
Make sure your posture is safe, especially on slopes. Do not cut on too steep slopes. Be particularly careful when changing travelling direction on slopes.
Pay maximum attention when turning around and pulling the appliance to you.
Switch the mower off whenever carrying or inclining it or when being outside a grass area. Wait until all rotating parts have stopped.
If an undesirable item is encountered or the appliance starts vibrating, the appliance must be switched off and the socket plug removed. Check whether the appliance is not damaged. Repair any damage.
Switch the appliance immediately off after finishing your work.
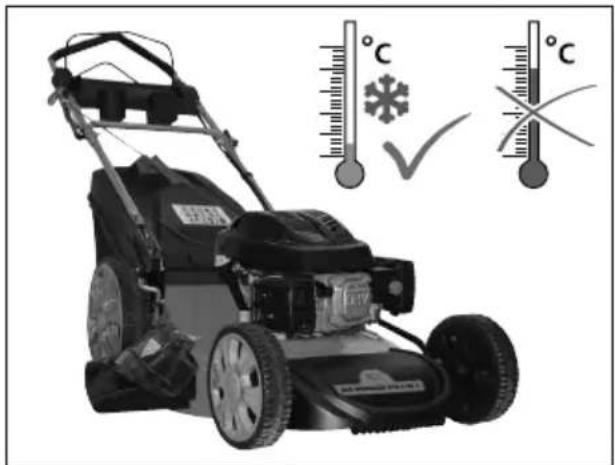
Do not store the appliance in enclosed places just after being switched off but let it cool down outdoors instead.
Never store the appliance with petrol in the tank inside a building where petrol fumes may potentially get in touch with open fire or sparks.
When the appliance is not going to be used for a long time, store it with an empty tank.
Replace any defective muffler.
Do not change the controlled engine setting and do not rev the engine up.
maintenance

Switch the engine off and remove the socket plug before any work on the engine. Wait until all rotating parts have stopped and ambiance has cooled down.
Keep the appliance, especially the tank and engine, clean at all times. Clean the ejection opening and cover at regular intervals.
Apply environment-friendly oil to all moving parts.
Check the collection bag at regular intervals for any wear and aging.
Refer all servicing to qualified service personnel.
Use only original accessories and original spare parts.
Only a regularly maintained and treated appliance can serve as a satisfactory aid. Insufficient maintenance and care can lead to unforeseen accidents and injuries.
Service
Do you have any technical questions? Any claim? Do you need any spare parts or operating instructions? We will quickly help you and without needles bureaucracy at our web pages at www.guede.com in the Servicing part. Please help us be able to help you. In order to identify your device in case of claim we need the serial No., product No. and year of production. All this data can be found on the type label. Please enter it here for future reference:
Serial No.:
Art. No:
Year of production:
Guarantee
The guarantee solely covers inadequacies caused by material defect or manufacturing defect. Original payment voucher with the sales date needs to be submitted for any claim in the guarantee period.
The guarantee does not cover any unauthorised use such as appliance overloading, use of violence, damage as a result of any unauthorised interference or caused by foreign items. Failing to follow the operating and assembly instructions and common wear are also not included in the guarantee.
Inspection and maintenance plan
| Regular servicing period Before | any start-up | After 1 month | After 3 months | After 6 months | After 12 months | After 24 months | |
| 5 Hours of operation | 25 Hours of operation | 50 Hours of operation | 100 Hours of operation | 250 Hours of operation | |||
| Engine oil (10W-40) | Inspection | √ | |||||
| Change | √ | √ | |||||
| Air filter Inspection | √ | ||||||
| Spark plug | Inspection Clean | √ | |||||
| Change | √ | ||||||
Provide appropriate servicing upon the earlier of the following: in the given month or after the specified hours of operation have expired.
Defects searching
| Defect | Causes | Measure |
| The motor does not start | Start-Stop lever has not been pressed Press the Start-Stop lever | |
| Primary pump has not been used Use the primary pump | ||
| Lack of fuel Add some fuel | ||
| Bowden cables are too long Adjust the Bowden cables using the coupling nut. | ||
| Wrong fuel, storing without petrol tank being drained | Drain the fuel tank and carburettor.Add fresh petrol. | |
| Sooted spark plug (carbon residues on electrodes), electrodes distance too big | Clean the spark plug, check the plug thermal value, possibly change the plug, set the electrodes distance to 0.6-0.7 mm | |
| The spark plug is wet from petrol (oversaturated engine). | Dry the spark plug out and refit it. | |
| Grass is not collected | Blocked channelFull collection bagToo wet grass | Clean the ejection channelEmpty the collection bagCut in dry weather |
| Automatic feed is not working | Bowden cables are too long Adjust the Bowden cables using the coupling nut. | |
Brandstof......Loodvrije benzine/E10......Loodvrije benzine/E10

Gewicht 42 kg 40 kg
Afmeting....1650 x 560 x 1000 mm....1650 x 560 x 1000 mm
EC-Declaration of Conformity
We, hereby declare the conception and construction of the below mentioned appliances correspond - at the type of construction being launched - to appropriate basic safety and hygienic requirements of EC Directives.
In case of any change to the appliance not discussed with us the Declaration expires.


- English TECHNICAL DATA | SPECIFIED CONDITIONS OF USE | SAFETY INSTRUCTIONS | MAINTENANCE | GUARANTEE | EC-DECLARATION OF CONFORMITY 23
- Français CARACTÉRISTIQUES TECHNIQUES | UTILISATION CONFORME À LA DESTINATION | CONSIGNES DE SÉCURITÉ | ENTRETIEN | GARANTIE | DÉCLARATION DE CONFORMITÉ CE \_\_\_\_ 28
- IN 1 #95385
- 10W-40
- STOP
- Technische Daten
- Noise and Vibration Information
- Wear ear protectors!
- delivered items
- Specified Conditions Of Use
- Requirements for operating staff
- Emergency procedure
- Danger of injury!
- Danger of burns!
- Symbols
- Safety Instructions
- WARNING
- Fuel is highly flammable.
- maintenance
- Service
- Guarantee
- EC-Declaration of Conformity
Brand : GUDE
Model : 515 Big Wheeler
Category : Lawn mower