
HW-K650 - Soundbar SAMSUNG - Free user manual and instructions
Find the device manual for free HW-K650 SAMSUNG in PDF.


| Product Type | Soundbar with wireless subwoofer |
| Brand | Samsung |
| Model | HW-K650 |
| Dimensions (W x H x D) | 1060 x 60 x 80 mm |
| Soundbar weight | 2.5 kg |
| Subwoofer dimensions (W x H x D) | 200 x 360 x 300 mm |
| Subwoofer weight | 5.8 kg |
| Power supply | 100-240 V, 50/60 Hz |
| Power consumption (soundbar) | 30 W |
| Standby power consumption | Less than 0.5 W |
| Speakers | 2.1 channels (2 x full-range speaker + subwoofer) |
| Total power | 300 W |
| Wireless connectivity | Bluetooth 4.0, wireless connection for subwoofer |
| Audio inputs | 1 x HDMI ARC, 1 x optical, 1 x USB (audio playback) |
| Outputs | HDMI (TV ARC), wireless subwoofer |
| Supported audio formats | Dolby Digital, DTS, PCM |
| Sound modes | Standard, Surround, Game, Bass Boost, Night |
| Additional features | Bluetooth Power on, TV SoundConnect, USB Host, Automatic speaker cleaning |
| Maintenance and cleaning | Wipe with a soft, dry cloth. Do not use chemical products. |
| Safety | Maintain adequate ventilation. Do not block openings. Disconnect during thunderstorms. |
| Spare parts and repairability | Parts available through Samsung after-sales service. Repair possible by a professional. |
| Warranty | 2 years (according to local legislation) |
| Package contents | Soundbar, subwoofer, remote control, batteries, HDMI cable, optical cable, user manual |
Frequently Asked Questions - HW-K650 SAMSUNG
User questions about HW-K650 SAMSUNG
0 question about this device. Answer the ones you know or ask your own.
Ask a new question about this device
Download the instructions for your Soundbar in PDF format for free! Find your manual HW-K650 - SAMSUNG and take your electronic device back in hand. On this page are published all the documents necessary for the use of your device. HW-K650 by SAMSUNG.
USER MANUAL HW-K650 SAMSUNG
Thank you for purchasing this Samsung product. To receive more complete service, please register your product at www.samsung.com/register
SAFETY INFORMATION
Safety Warnings
TO REDUCE THE RISK OF ELECTRIC SHOCK, DO NOT REMOVE THE COVER (OR BACK).
NO USER-SERVICEABLE PARTS ARE INSIDE. REFER SERVICING TO QUALIFIED SERVICE PERSONNEL.
| CaUtiOnriSK Of eLeCtriC SHOCK.DO nOt OPen. | This symbol indicates that high voltage is present inside. It is dangerous to make any kind of contact with any internal part of this product. | |||
| This symbol indicates that important literature concerning operation and maintenance has been included with this product. |
 | Class II product : This symbol indicates that it does not require a safety connection to electrical earth (ground). |
 | AC voltage : This symbol indicates that the rated voltage marked with the symbol is AC voltage. |
 | DC voltage : This symbol indicates that the rated voltage marked with the symbol is DC voltage. |
 | Caution, Consult instructions for use : This symbol instructs the user to consult the user manual for further safety related information. |
Warning: To reduce the risk of fire or electric shock, do not expose this appliance to rain or moisture.
Caution: TO PREVENT ELECTRIC SHOCK, MATCH WIDE BLADE OF PLUG TO WIDE SLOT, FULLY INSERT.
- This apparatus shall always be connected to an AC outlet with a protective grounding connection.
- To disconnect the apparatus from the mains, the plug must be pulled out from the mains socket, therefore the mains plug shall be readily operable.
Caution
- Do not expose this apparatus to dripping or splashing. Do not put objects filled with liquids, such as vases, on the apparatus.
- To turn this apparatus off completely, you must pull the power plug out of the wall socket. Consequently, the power plug must be easily and readily accessible at all times.
Precautions

Ensure that the AC power supply in your house complies with the power requirements listed on the identification sticker located on the back of your product. Install your product horizontally, on a suitable base (furniture), with enough space around it for ventilation (7~10 cm). Make sure the ventilation slots are not covered. Do not place the unit on amplifiers or other equipment which may become hot. This unit is designed for continuous use. To fully turn off the unit, disconnect the AC plug from the wall outlet. Unplug the unit if you intend to leave it unused for a long period of time.

During thunderstorms, disconnect the AC plug from the wall outlet. Voltage peaks due to lightning could damage the unit.
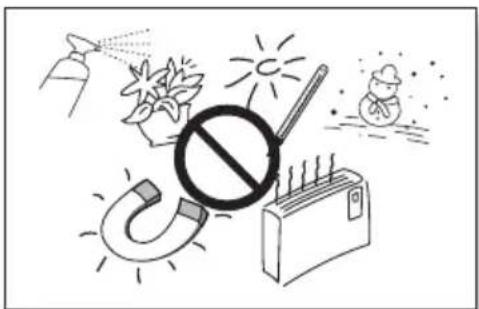
Protect the product from moisture (e.g., vases) and excess heat (e.g., a fireplace) or equipment creating strong magnetic or electric fields. Disconnect the power cable from the AC supply if the unit malfunctions. Your product is not intended for industrial use. It is for personal use only. Condensation may occur if your product has been stored in cold temperatures. If transporting the unit during the winter, wait approximately 2 hours until the unit has reached room temperature before using.

Do not expose the unit to direct sunlight or other heat sources. This could lead to overheating and cause the unit to malfunction.

The batteries used with this product contain chemicals that are harmful to the environment. Do not dispose of batteries in the general household trash. Do not dispose of batteries in a fire. Do not short circuit, disassemble, or overheat the batteries. There is a danger of explosion if the battery is incorrectly replaced. Replace only with the same or equivalent type.

WARNING: DO NOT INGEST BATTERY. CHEMICAL BURN HAZARD. The remote control supplied with this product contains a coin/button cell battery. If the coin/button cell battery is swallowed, it can cause severe internal burns in just 2 hours and can lead to death. Keep new and used batteries away from children. If the battery compartment does not close securely, stop using the product and keep it
away from children. If you think batteries might have been swallowed or placed inside any part of the body, seek immediate medical attention.
CONTENTS
2 GETTING STARTED
2 Safety Information
5 What's Included
6 DESCRIPTIONS
6 Front / Right Side Panel
7 Rear / Bottom Panel
8 Remote Control
11 INSTALLATION
11 Installing the Soundbar
11 Installing the Wall Mount
15 Detaching the Soundbar from the Wall
16 CONNECTIONS
16 Connecting the Subwoofer
18 Connecting to a TV
18 Connecting to a TV Using a Digital Optical Cable
19 Connecting to a TV Using an HDMI (Digital) Cable
19 TV SoundConnect
21 Connecting to External Devices
21 Optical or Analogue Audio Cable
22 HDMI Cable
23 FUNCTIONS
23 Input Mode
24 Bluetooth
27 Using the Multiroom App
29 Using the Network Standby On Function
30 Software Update
32 TROUBLESHOOTING
32 Troubleshooting
33 APPENDIX
33 Specifications
- Figures and illustrations in this User Manual are provided for reference only and may differ from actual product appearance.
- An administration fee may be charged if either (a) an engineer is called out at your request and there is no defect with the product (i.e. where the user manual has not been read). (b) you bring the unit to a repair centre and there is no defect with the product (i.e. where the user manual has not been read).
- You will be informed of the administration fee amount before a technician visits.
WHAT'S INCLUDED
BEFORE READING THE USER'S MANUAL
Note the following terms before reading the user manual.
▶Icons used in this manual
| Icon Term Definition | ||
 | Caution | Indicates a situation where a function does not operate or settings may be cancelled. |
 | Note | Indicates tips or instructions on the page that help you operate a function. |
Check for the supplied accessories shown below.
Remote Control / Lithium Battery (3V : CR2032)

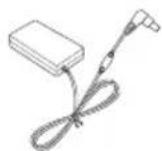
Power Cord: 2 EA, AC/DC Adapter, Optical Cable


Wall Mount Guide, Holder-Screw: 2 EA, Screw: 2 EA
Bracket-Wall Mount L, Bracket-Wall Mount R

- The appearance of the accessories may differ slightly from the illustrations above.
- Micro USB to USB adapter and HDMI cables are sold separately. To purchase, contact a Samsung Service Centre or Samsung Customer Care.
Controls the volume level.
The numeric value of the volume level appears in the front panel display.
② (Source) Button
Selects the D.IN, AUX, HDMI, BT, or TV input.
- While the unit is powered on, pressing the button for more than 3 seconds sets the button to act as the (Mute) button. To cancel the (Mute) button setup, press the button for more than 3 seconds again.
③ (Power) Button
Turns the power on and off.

Displays the current mode.
- When you plug in the AC cord, the power button will begin working in 4 to 6 seconds.
- When you turn on this unit, there will be a 4 to 5 second delay before it produces sound.
- If you want to enjoy sound only from the Soundbar, you must turn off the TV's speakers in the Audio Setup menu of your TV. Refer to the owner's manual supplied with your TV.
REAR / BOTTOM PANEL


- When disconnecting the power cable of the AC power adaptor from a wall outlet, pull the plug. Do not pull the cable.
- Do not connect this unit or other components to an AC outlet until all connections between components are complete.
- Make sure to rest the AC/DC Adapter flat on a table or the floor. If you place the AC/DC Adapter so that it is hanging with the AC cord input facing upwards, water or other foreign substances could enter the Adapter and cause the Adapter to malfunction.
REMOTE CONTROL

SOURCE
Press to select a source connected to the Soundbar.
Mute
You can turn the volume down to 0 with the push of a button. Press again to restore the sound to the previous volume level.
Repeat
The Repeat function is available only when playing back music from Songs on phone or DMS of Samsung Multiroom app.
OFF - REPEAT : Cancels Repeat Playback.
TRACK - REPEAT : Plays a track repeatedly.
ALL - REPEAT : Plays all tracks repeatedly.
Skip Forward
If there is more than one file on the device you are playing, and you press the ▶ button, the next file is selected.
Bluetooth POWER
Press the Bluetooth POWER button on the remote to turn the Bluetooth POWER On function on and off. See pages 20 and 25 for details.
((o)) SOUND
Surround Sound adds depth and spaciousness to the sound. Pressing the ((o)) SOUND button repeatedly cycles through the Surround Sound settings: ON - SURROUND SOUND, OFF - SURROUND SOUND
Press and hold the ▶ button for about 5 seconds to turn the Anynet+ function on or off.
OFF - ANYNET+, ON - ANYNET+
The Anynet+ function lets you control the Soundbar with the remote from an Anynet+ compatible Samsung TV. The Soundbar must be connected to the TV via an HDMI cable.
Press and hold the ◀ button for about 5 seconds to turn the Auto Power Link function on or off.
OFF - POWER LINK, ON - POWER LINK
* Auto Power Link Synchronizes the Soundbar to a connected Optical source via the Optical jack so it turns on automatically when you turn on your TV. (See page 18) Auto Power Link function is only available in the D.IN mode.
SOUND EFFECT
You can select from 6 sound modes - STANDARD (Original Sound), MUSIC, CLEAR VOICE, SPORTS, MOVIE, and NIGHT - depending on the content you want to listen to.
Select the STANDARD mode if you want to enjoy the original sound.
* DRC (Dynamic Range Control)
Lets you apply dynamic range control to Dolby Digital. Press and hold the SOUND EFFECT button for about 5 seconds in STANDBY mode to turn the DRC (Dynamic Range Control) function on or off.
Power
Turns the Soundbar on and off.
Volume
Adjusts the volume level of the unit.
Play / Pause
Press the ▶II button to pause a file temporarily. Press the ▶II button again to play the selected file.
Skip Back
If there is more than one file on the device you are playing, and you press the ◀◀ button, the previous file is selected.
SOUND CONTROL
Press to select TREBLE, BASS, SUBWOOFER LEVEL or AUDIO SYNC.
Then, use the ◀, ▶ buttons to adjust the TREBLE or BASS volume from -3 ~ +3, SUBWOOFER LEVEL volume from -12, -6 ~ +6. Press and hold the SOUND CONTROL button for about 5 seconds to adjust the sound for each frequency band. 150Hz, 300Hz, 600Hz, 1.2KHz, 2.5KHz, 5KHz, and 10KHz are selectable and each can be adjusted to a setting between -6 ~ +6.
If the Soundbar is connected to a digital TV and the video appears out of sync with the audio, press the SOUND CONTROL button to sync the audio with the video. Use the ◀, ▶ buttons to set the audio delay between 0 ms ~ 300 ms. In TV mode, and BT mode, the Audio Sync function may not be available.


- Operate the TV using the TV's remote control.
Controlling the Soundbar Using Your TV Remote Control
- Press and hold the (o) SOUND button for more than 5 seconds while the Soundbar is turned on.
- "ON - TV REMOTE" appears on the Soundbar's display.
- In the TV's menu, set the TV speaker to external speaker.

- Not available if the TV ARC function or HDMI mode is in use.
- All buttons are not available except the VOL +/- and the ✗ buttons in this function.
- TV menus differ by manufacturer and model. Refer to the TV's user manual for further information. • Manufacturers supporting this function:
- VIZIO, LG, Sony, Sharp, PHILIPS, PANASONIC, TOSHIBA, GRUNDIG, Hisense, RCA
- This function may not be compatible with your TV's remote depending on the remote control's manufacturer.
- To turn off this function, press the SOUND button for 5 seconds.
"OFF - TV REMOTE" appears on the Soundbar's display.
INSTALLING THE BATTERY IN THE REMOTE CONTROL


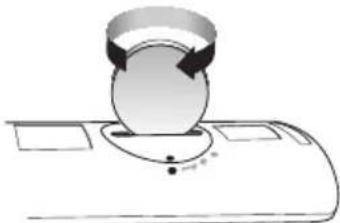
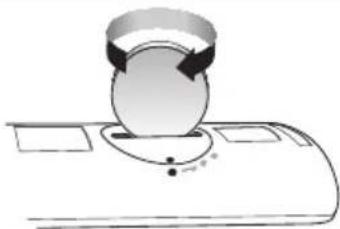
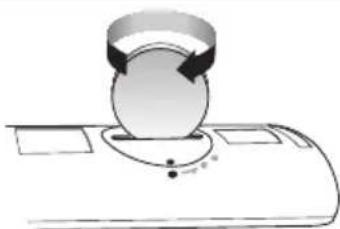
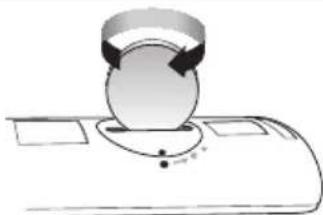
- Use a suitable coin to turn the remote control's battery cover counterclockwise to remove it as shown in the figure above.
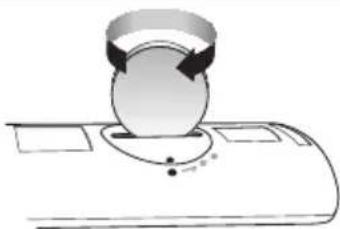
- Insert a 3V lithium battery. Keep the positive (+) pole facing up when inserting the battery. Put the battery cover on and align the '•' marks side by side as shown in the figure above.
- Use a suitable coin to turn the remote control battery cover clockwise as far as it will go to fix it in place.
INSTALLING THE SOUNDBAR
INSTALLING THE WALL MOUNT
▶ Installation Precautions
• Install on a vertical wall only.
- For the installation, avoid a location with high temperature or humidity, or a wall that cannot sustain the weight of the set.
- Check the strength of the wall. If the wall is not strong enough to support the unit, reinforce the wall or install the unit on a different wall that can support the unit's weight.
- Purchase and use the fixing screws or anchors appropriate for the kind of wall you have (plaster board, iron board, wood, etc.). If possible, fix the support screws into wall studs. ● Purchase wall mounting screws according to the type and thickness of the wall you will mount the Soundbar on.
-Diameter: M5
-Length: 35 mm or longer recommended.
- Connect cables from the unit to external devices before you install it on the wall.
- Make sure the unit is turned off and unplugged before you install it. Otherwise, it may cause an electric shock.
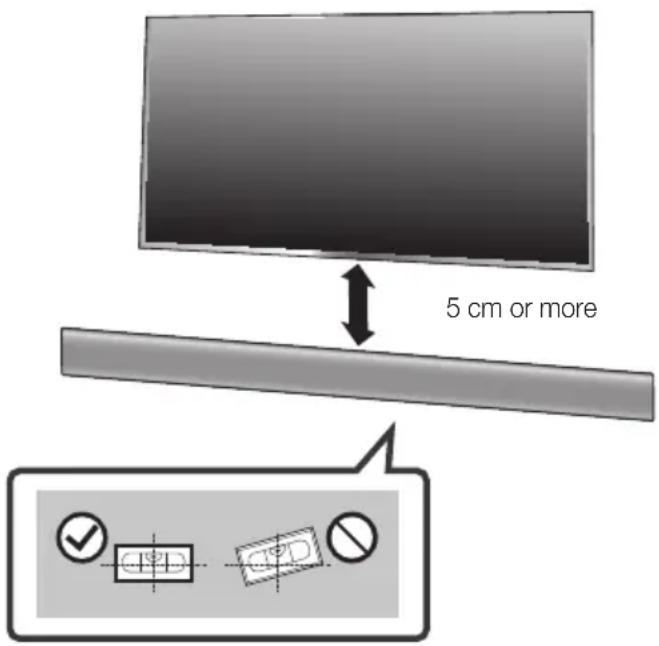
- Place the Wall Mount Guide against the wall surface.
• The Wall Mount Guide must be level. - If the TV is mounted on the wall, install the Soundbar at least 5 cm below the TV.
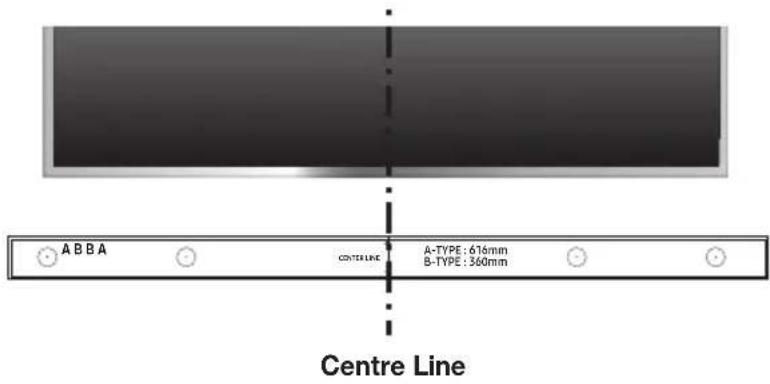
- Align the Paper Template's Centre Line with the centre of your TV (if you are mounting the Soundbar below your TV), and then fix the Wall Mount Guide to the wall using tape.

- If you are not mounting below a TV, place the Centre Line in the centre of the installation area.

- Push a pen tip or sharpened pencil tip through the centre of the A-TYPE images on each end of the Guide to mark the holes for the supporting screws, and then remove the Wall Mount Guide.
- Using an appropriately sized drill bit, drill a hole in the wall at each marking.

- If the markings do not correspond to the positions of studs, make sure you insert appropriate anchors or mollies into the holes before you insert the support screws. If you use anchors or mollies, make sure the holes you drill are large enough for the anchors or mollies you use.

- Push a screw (not supplied) through each Holder-Screw, and then screw each screw firmly into a support screw hole.

- Use the two Screws (M4 x L12) to attach both Bracket-Wall Mount L and R to the Soundbar's bottom. For a proper fit, make sure to align the bumps on the Soundbar to the holes on the brackets.


Rear side of Soundbar
Right end of Soundbar
- When assembling, make sure the hanger part of Bracket-Wall Mounts faces backwards.

Wall Mount LWall Mount R
- The left and right mounts are different shapes. Make sure to position them correctly.
![graph TD A["Component 1: Linear assembly with dashed lines indicating alignment"] --> B["Component 2: Reformed assembly with arrows indicating movement"] B --> C["Assembly of two parts: one with a camera icon, the other with a mouse icon"] C --> D["Final assembly with circular icons for each part"]](/content/2026/06/1273757/images/2bf91ab0171e98bef33edb7db5bcae3d4770acd2baab260eaf264cca67f366d9.jpg)
- Install the Soundbar with the attached Bracket-Wall Mounts by hanging the Bracket-Wall Mounts on the Holder-Screws on the wall.

- Slightly tilt the Soundbar to insert both Holder-Screw heads into Bracket-Wall Mount holes. Push the Soundbar in the direction of the arrow to make sure both sides are firmly fixed.
Detaching the Soundbar from the Wall
- To separate the Soundbar from the wall mount, push it in the direction of the arrow, and then pull it away from the wall as shown.


- Do not hang onto the installed unit and avoid striking or dropping the unit.
- Secure the unit firmly to the wall so that it does not fall off. If the unit falls off, it may cause an injury or damage the product.
- When the unit is installed on a wall, please make sure that children do not pull any of the connecting cables, as this may cause it to fall.
- For the optimal performance of a wall mount installation, install the speaker system at least 5 cm below the TV, if the TV is mounted on the wall.
- For your safety, if you do not mount the unit on the wall, install it on a secure, flat surface where it is unlikely to fall.

- Do not connect the power cord of this product or your TV to a wall outlet until all connections between components are complete.
- Before moving or installing this product, be sure to turn off the power and disconnect the power cord.
CONNECTING THE SUBWOOFER
Connecting to the Subwoofer Automatically
The Subwoofer's linking ID is preset at the factory and the main unit and subwoofer should link (connect wirelessly) automatically when the main unit and subwoofer are turned on.
- When the subwoofer is completely connected, the blue LED Link Indicator on the subwoofer stops blinking and glows continuously.
Connecting to the Subwoofer Manually
If the blue LED light does not stop blinking when the main unit and subwoofer are turned on, please set the ID by following the steps below.

- Important: Before you begin, put the battery into the remote. See page 10 for instructions.

- Plug the power cords of the main unit and subwoofer into an AC wall outlet.
- Press the ID Set button on the back of the subwoofer with a small, pointed object for 5 seconds.
- The STANDBY indicator turns off and the LINK indicator (Blue LED) blinks quickly.
- While the main unit is powered off (in STANDBY mode), press and hold the Mute button on the remote control for 5 seconds.
- The ID Set message appears on the Soundbar's display.
- To finalise the link, turn the main unit's power on while the subwoofer's Blue LED blinks.
• The main unit and the subwoofer should now be linked (connected). - The LINK indicator (Blue LED) on the subwoofer should be glowing continuously and not blinking. - If the LINK indicator is not solid blue, the linking process has failed. Turn off the main unit and start again from Step 2. • You can enjoy better sound from the wireless subwoofer by selecting a Sound Effect. (See page 8)

- Before moving or installing the product, be sure to turn off the power and disconnect the power cord.
- If the main unit is powered off, the wireless subwoofer will be in standby mode and the STANDBY LED on the front will blink Red directly. (no blue LED).
- If you use a device that uses the same frequency (2.4GHz) as the Soundbar near the Soundbar, interference may cause some sound interruption.
- The maximum transmission distance of the wireless signal between the main unit and subwoofer is about 10 meters, but may vary depending on your operating environment. If a steel-concrete or metallic wall is between the main unit and the wireless subwoofer, the system may not operate at all, because the wireless signal cannot penetrate metal.
- If the main unit doesn't make a wireless connection, follow steps 1-5 on the previous page to re-set the connection between the main unit and wireless subwoofer.

- The wireless receiving antenna is built into the wireless subwoofer. Keep the unit away from water and moisture.
- For optimal listening performance, make sure that the area around the wireless subwoofer location is clear of any obstructions.
LED INDICATOR LAMP STATUS ON SUBWOOFER
| LED Status | Description Resolution | ||
| Red On | Standby (with the Soundbar main unit turned off) | Check the power supply to the Soundbar main unit | |
| Connection failed | Connect again (refer to the instructions on manual connection in the user manual) | ||
| Blue | On | Successfully connected (normal operation) | - |
| Blinking | Standby (with the Soundbar main unit turned off) | Check the power supply to the Soundbar main unit | |
| Connection failed | Connect again (refer to the instructions on manual connection in the user manual) | ||
| Red and blue Blinking Malfunction | Contact the service center. | ||
CONNECTING TO A TV

- Important: Before you begin, put the battery into the remote. See page 10 for instructions.
CONNECTING TO A TV USING A DIGITAL OPTICAL CABLE
![graph LR TV["TV"] --> OpticalCable["Optical Cable"] OpticalCable --> OpticalOUT["OPTICAL OUT"] OpticalCable --> DigitalAudioIn["Digital Audio In (OPTICAL)"] DigitalAudioIn --> DigitalAudioInIn["Digital Audio In (OPTICAL)"]](/content/2026/06/1273757/images/2b8ebc9c787cd7f9dc9f114bb9eafb05b39c464e7b0c66ac230768f4a7165d87.jpg)

- Connect the DIGITAL AUDIO IN (OPTICAL) jack on the Soundbar to the OPTICAL OUT jack of the TV with a digital optical cable.
- Press the → button on the right side of the Soundbar or the SOURCE button on the remote control to select the D.IN mode.
▶ Auto Power Link
If you have connected the main unit to a TV with a digital optical cable, you can set the Auto Power function ON to have the Soundbar turn on automatically when you turn the TV on.
- Connect the Soundbar and a TV with a digital optical cable.
- Press the ➕ button on the main unit's right side or the SOURCE button on the remote control to select the D.IN mode.
- Press the ◀ button on the remote control for 5 seconds to turn Auto Power Link on or off.

• Auto Power Link is set to ON by default. - Depending on the connected device, Auto Power Link may not function.
CONNECTING TO A TV USING AN HDMI (DIGITAL) CABLE
![graph LR TV["TV"] --> HDMI_IN["HDMI IN"] HDMI_IN --> HDMI_Cable["HDMI Cable (not supplied)"] HDMI_Cable --> HDMI_OUT["HDMI OUT (TV-ARC)"] HDMI_OUT --> HDMI_OUTOUT["HDMI OUT (TV-ARC)"] HDMI_OUTOUT --> SOURCE["SOURCE"] SOURCE --> VOL["VOL"]](/content/2026/06/1273757/images/6c9091ebb68811c3b6c5f5c5862fbf0064e4b57baf7a985f18870bd06cbb4a00.jpg)

- Connect an HDMI cable (not supplied) from the HDMI OUT (TV-ARC) jack on the bottom of the product to the HDMI IN jack on your TV.
- Press the → button on the right side of the Soundbar or the SOURCE button on the remote control to select the D.IN mode.

- HDMI is an interface that enables the digital transmission of video and audio data with just a single connector.
- If the TV provides an ARC port, connect the HDMI cable to the HDMI IN (ARC) port.
- We recommend you use a coreless HDMI cable if possible. If you use a cored HDMI cable, use one whose diameter is less than 14 mm.
• Anynet+ must be turned on.
- This function is not available if the HDMI cable does not support ARC.
TV SOUNDCONNECT
You can enjoy TV sound through your Soundbar when it is connected to a Samsung TV that supports the TV SoundConnect function.

- Turn on the TV and Soundbar.
- Press the ➕ button on the main unit's right side or the SOURCE button on the remote control to select the TV mode.
- On the TV, a message asking whether to enable the TV SoundConnect function appears.
- Select using the TV's remote control to finish connecting the TV and Soundbar.

- If the TV SoundConnect linking process fails, navigate to SoundConnect in the TV's Sound menu, select Add New Device, and set Add New Device to ON. Then, try again.
Switching the Soundbar's mode from TV to another mode automatically terminates TV SoundConnect.
To connect the Soundbar to another TV, the existing connection must be terminated.
To terminate the existing connection, press and hold the button on the remote for 5 seconds or switch to another mode. To connect to the other TV, follow Steps 1 through 4 above.

The TV SoundConnect (SoundShare) function is supported by some Samsung TVs released from 2012 on. Check whether your TV supports the TV SoundConnect (SoundShare) function before you begin. (For further information, refer to the TV's user manual.)
If your Samsung TV was released before 2014, check the SoundShare setting menu.
If the distance between the TV and Soundbar exceeds 10 meters, the connection may not be stable or the audio may stutter. If this occurs, relocate the TV or Soundbar so that they are within operational range, and then re-establish the TV SoundConnect connection.
TV SoundConnect Operational Ranges:
Recommended pairing range: within 2 meters.
Recommended operational range: within 10 meters.
The Play/Pause, Next, and Prev buttons on the Soundbar or Soundbar's remote do not control the TV.
Using the Bluetooth POWER On function
The Bluetooth POWER On function is available after you have successfully connected the Soundbar to a Bluetooth compatible TV using TV SoundConnect. When the Bluetooth POWER On function is ON, turning the connected TV on or off will turn the Soundbar's power on and off as well.
- Connect the TV to your Soundbar using the TV SoundConnect function.
- Press the Bluetooth POWER button on the Soundbar remote. ON - BLUETOOTH POWER appears on the Soundbar's display.
• ON - BLUETOOTH POWER : The Soundbar turns on and off when you turn the TV on or off.
• OFF - BLUETOOTH POWER : The Soundbar only turns off when you turn the TV off.

- This function is supported by some Samsung TVs released from 2013 on.
CONNECTING TO EXTERNAL DEVICES
OPTICAL OR ANALOGUE AUDIO CABLE
This unit comes equipped with one digital optical in jack and one analogue audio (AUX) in jack, giving you two ways to connect it to external devices.
![graph TD A["BD / DVD player / Set-top box / Game console"] --> B["AUX OUT"] B --> C["Optical Cable (not supplied)"] C --> D["AUX IN"] D --> E["DIGITAL AUDIO IN (OPTICAL)"] E --> F["DIGITAL AUDIO IN (OPTICAL)"] F --> G["AUX IN"] G --> H["SOURCE"]](/content/2026/06/1273757/images/ca2754516bfcb19b26d930e70d746647363a0094fbb7c7bfe37e9e877dfdd102.jpg)
▶ AUX Cable
- Connect AUX IN (Audio) on the main unit to the AUDIO OUT jack of the Source Device using an audio cable.
- Press the → button on the right side of the Soundbar or the SOURCE button on the remote control to select the AUX mode.
▶Optical Cable
- Connect DIGITAL AUDIO IN (OPTICAL) on the main unit to the OPTICAL OUT jack of the Source Device using a digital optical cable.
- Press the → button on the right side of the Soundbar or the SOURCE button on the remote control to select the D.IN mode.
HDMI CABLE
HDMI is the standard digital interface for connecting to TVs, projectors, DVD players, Blu-ray players, set top boxes, and more.
HDMI prevents any degradation to the signal due to conversion to analogue and maintains the video and audio quality of the original digital source.
![graph LR A["Digital Devices"] --> B["HDMI OUT"] B --> C["HDMI Cable (not supplied)"] C --> D["HDMI IN"] D --> E["HDMI IN"] E --> F["SOURCE"]](/content/2026/06/1273757/images/19dfd3a3ea018bbcb27087ef5b486f83d596a63ca7db2838d489056bc7a7036d.jpg)
- Connect an HDMI cable (not supplied) from the HDMI IN jack on the bottom of the product to the HDMI OUT jack on your digital device.
- Press the ➕ button on the right side of the Soundbar or the SOURCE button on the remote control to select the HDMI mode.
INPUT MODE
Press the button on the main unit's you want.
right side or the SOURCE button on the remote control to select the mode

Right end of Soundbar

| Input mode Display | |
| Optical Digital inputARC (HDMI OUT) input | D.IN |
| AUX input | AUX |
| HDMI input | HDMI |
| BLUETOOTH mode | BT |
| TV SoundConnect | TV |
The unit turns off automatically in the following situations.
• D.IN / HDMI / BT / TV Mode - If there is no audio signal for 5 minutes.
- AUX Mode
- If the AUX cable is disconnected for 5 minutes.
- If there is no KEY input for 8 hours when the AUX cable is connected. (Auto Power Down function can be turned off only in that case.)
To turn off Auto Power Down function, while in AUX mode, press and hold the ▶II button for 5 seconds.
ON - AUTO POWER DOWN / OFF - AUTO POWER DOWN appears on the display.
BLUETOOTH
You can connect a Bluetooth device to the Soundbar and enjoy music with stereo sound, all without wires!
TO CONNECT THE SOUNDBAR TO A BLUETOOTH DEVICE
Check if the Bluetooth device supports the Bluetooth compliant stereo headset function.
![graph LR A["BT Signal"] --> B["Mobile Device"] B --> C["Connect"] C --> D["Bluetooth Device"]](/content/2026/06/1273757/images/364c8cda858e02d974b02b489707db2966cd07494c8d0d056dec82b027d241ad.jpg)
- Press the → button on the main unit's right side or the SOURCE button on the remote control to select the BT mode.
• You will see BT READY on the front display of the Soundbar.
- Select the Bluetooth menu on the Bluetooth device you want to connect. (Refer to the Bluetooth device's user manual.)
- Select "[AV] Samsung Soundbar Kxxx" from the list.
- When the Soundbar is connected to the Bluetooth device, it will display [Bluetooth device name] → BT on the front display.
- The device name can only be displayed in English. An underline " _ " will be displayed if the name is not in English.
- If the Bluetooth device has failed to pair with the Soundbar, delete the previous "[AV] Samsung Soundbar Kxxx" found by the Bluetooth device and have it search for the Soundbar again.
- Play music on the connected device.
• You can listen to the music playing on the connected Bluetooth device over the Soundbar. - In BT mode, the Play / Pause / Next / Prev functions are not available. However, these functions are available on Bluetooth devices supporting AVRCP.

- If asked for a PIN code when connecting a Bluetooth device, enter <0000>.
• Only one Bluetooth device can be paired at a time.
- The Bluetooth connection will be terminated when you turn the Soundbar off.
- The Soundbar may not perform Bluetooth search or connection correctly under the following circumstances:
- If there is a strong electrical field around the Soundbar.
- If several Bluetooth devices are simultaneously paired with the Soundbar.
- If the Bluetooth device is turned off, not in place, or malfunctions.
- Note that such devices as microwave ovens, wireless LAN adaptors, fluorescent lights, and gas stoves use the same frequency range as the Bluetooth device, which can cause electric interference.
• The Soundbar supports SBC data (44.1kHz, 48kHz).
- Connect only to a Bluetooth device that supports the A2DP (AV) function.
- You cannot connect the Soundbar to a Bluetooth device that supports only the HF (Hands Free) function.
- Once you have paired the Soundbar to a Bluetooth device, selecting "[AV] Samsung Soundbar Kxxx" from the device's scanned devices list will automatically change the Soundbar to BT mode.
- Available only if the Soundbar is listed among the Bluetooth device's paired devices. (The Bluetooth device and the Soundbar must have been previously paired at least once.)
- Soundbar will appear in the Bluetooth device's searched devices list only when the Soundbar is displaying BT READY.
- In the TV SoundConnect mode, the Soundbar cannot be paired to another Bluetooth device.
BLUETOOTH POWER ON (BLUETOOTH POWER)
If a previously paired Bluetooth device tries to pair with the Soundbar when the Bluetooth POWER On function is on and the Soundbar is turned off, the Soundbar turns on automatically.
- Press the Bluetooth POWER button on the remote while the Soundbar is turned on.
- ON - BLUETOOTH POWER appears on the Soundbar's display.
TO DISCONNECT THE BLUETOOTH DEVICE FROM A SOUNDBAR
You can disconnect a Bluetooth device from the Soundbar. For instructions, see the Bluetooth device's user manual.
• The Soundbar will be disconnected.
- When the Soundbar is disconnected from the Bluetooth device, the Soundbar will display BT DISCONNECTED on the front display.
TO DISCONNECT THE SOUNDBAR FROM A BLUETOOTH DEVICE
Press the SOURCE button on the remote control or the button on the product's right side to switch from BT to another mode or turn off the Soundbar.
- The connected Bluetooth device will wait a certain amount of time for a response from the Soundbar before terminating the connection. (Disconnection time may differ, depending on the Bluetooth device)

- In Bluetooth connection mode, the Bluetooth connection will be lost if the distance between the Soundbar and the Bluetooth device exceeds 10 meters.
- The Soundbar automatically turns off after 5 minutes in the Ready state.
▶More about Bluetooth
Bluetooth is a technology that enables Bluetooth-compliant devices to interconnect easily with each other using a short wireless connection.
- A Bluetooth device may cause noise or malfunction, depending on usage, if:
- A part of your body is in contact with the receiving/transmitting system of the Bluetooth device or the Soundbar.
- It is subject to electrical variation from obstructions caused by a wall, corner, or office partition.
- It is exposed to electrical interference from same frequency-band devices including medical equipment, microwave ovens, and wireless LANs.
- Pair the Soundbar with the Bluetooth device while they are close together.
- The further the distance between the Soundbar and Bluetooth device, the worse the quality is. If the distance exceeds the Bluetooth operational range, the connection is lost.
- In poor reception areas, the Bluetooth connection may not work properly.
- The Bluetooth connection only works when it is close to the unit. The connection will be automatically cut off if the Bluetooth device is out of range. Even within range, the sound quality may be degraded by obstacles such as walls or doors.
- This wireless device may cause electric interference during its operation.
USING THE MULTIROOM APP
The Samsung Multiroom app lets you connect the Soundbar to a smart device, your network, and the Internet. Once the Soundbar is connected to a smart device that has the Multiroom App installed, you can also connect the Soundbar and multiple Samsung Multiroom devices together wirelessly and play audio through them.
BEFORE YOU BEGIN
▶ Communication Basics![graph LR A["Internet Wireless Router"] <--> B["Router"] B <--> C["Smart Device: Android or iOS (App Control)"]](/content/2026/06/1273757/images/296da4e083f182d8132bad845f9bb4c7044e4ae12c123ece1d3169bee5882436.jpg)
Requirements:
- A Wireless Router and a Smart Device.
- The wireless router must be connected to the Internet.
- The smart device must be connected to the router via a Wi-Fi connection.
INSTALLING THE SAMSUNG MULTIROOM APP
To use the Soundbar with the Samsung Multiroom App, you must download and then install the Samsung Multiroom App on your smart device. You can download the app from Google Play or the App Store. With the Samsung Multiroom App installed, you can play music on your Soundbar that is stored on your smart device, located on other connected devices, provided by other content providers, or streamed from Internet radio stations.
▶Android or iOS
Download the Samsung Multiroom app from Google Play or the App Store of your smart device.
* Market search: Samsung Multiroom

or

▶ Launching the Samsung Multiroom App
To launch the Samsung Multiroom app, tap the Multiroom app icon on your smart device.

CONNECTING THE SOUNDBAR TO YOUR NETWORK
On your smart device, select the Samsung Multiroom app. Follow the directions on your smart device's screen. You can use the following music sources with the Samsung Multiroom app.
- Music files stored in your mobile phone, various music sources, and Internet radio.
![[AV] Samsung Soundbar Kxxx Music in mobile phone My Phone Internet radio Music service ALBUMS Album A Album B Album C Album D Album E More ARTISTS](/content/2026/06/1273757/images/e437e8268bec91a27f4cd8f04aaac26faf4540e92027f20fe2cdc931dd9c05f8.jpg)
USING THE NETWORK STANDBY ON FUNCTION
The Network Standby On function becomes available if a wireless connection has been properly established between a smart device and the Soundbar. This function turns on the Soundbar automatically when a smart device attempts to connect to the Soundbar via Bluetooth or Wi-Fi. If you turn the Soundbar on via a Bluetooth connection, its input mode is set to BT automatically. To turn the Soundbar on via Wi-Fi, you must have the Samsung Multiroom App installed on your smart device.
- Connect the smart device to your Soundbar.
- Turn the Network Standby On function on by pressing the ▶▶I button on the Soundbar remote for more than 5 seconds. You can turn the function off by pressing the ▶▶I button again for more than 5 seconds.

- Network Standby On is available only if the Soundbar is listed among the smart device's paired devices. (The Smart device and the Soundbar must have been previously paired at least once.)
- Soundbar will appear in the smart device's searched devices list only when the Soundbar is displaying [BT READY] or [WiFi READY].
- In the TV SoundConnect mode, the Soundbar cannot be paired to another smart device.
- If the Network Standby On function did not work:
-The Network Standby On is set to Off. Set it to ON.
- The Wi-Fi connection to the Soundbar will be terminated if the Soundbar's power cord is disconnected or the power is cut off. If the power is cut off, turn on the Soundbar and reconnect it.
- If the Network Standby is set to Off, the Soundbar cannot be turned on by Bluetooth connection.
SOFTWARE UPDATE

UPDATING WITH USB
Samsung may offer updates for the Soundbar's system firmware in the future.
If an update is offered, you can update the firmware by connecting a USB device with the firmware update stored on it to the USB port on your Soundbar.
Note that if there are multiple update files, you must load them onto the USB device singly and use them to update the firmware one file at a time.
Please visit samsung.com or contact the Samsung call centre to receive more information about downloading update files.
▶ Updating Procedure
- Connect a Micro USB to USB adapter cable with a male USB 2.0 Micro USB plug (Type B) on one end and a standard female 2.0 USB jack (Type A) on the other end to the micro USB jack on your Soundbar.

- The Micro USB to USB adapter cable is sold separately. To purchase, contact a Samsung Service Centre or Samsung Customer Care.
- Follow the steps below to download the product software: Go to the Samsung website at (samsung.com/sec) → search for the model name - select the customer support option (the option name is subject to change)
- Save the downloaded software to a USB stick and select "Extract to the folder name" to unzip the folder.
- Turn off the Soundbar and connect the USB stick containing the software update to the female port on a Micro USB adapter cable.
- Turn on the Soundbar. Within 3 minutes, UPDATE is displayed and updating begins.
- After the update is complete, the Soundbar turns off and on again.
▶If UPDATE was not displayed
- Turn off the Soundbar, connect the USB storage device that contains update files to the Soundbar's USB port.
- Disconnect the power cord, reconnect it, and then turn on the Soundbar.

- Insert a USB device containing the firmware update into the USB port on the main unit.
- Updating firmware may not work properly if audio files supported by the Soundbar are stored in the USB storage device.
- Do not disconnect the power or remove the USB device while updates are being applied. The main unit will turn off automatically after completing the firmware update.
- After update is completed, the user setup in Soundbar is initialised. We recommend you write down your settings so that you can easily reset them after the update. Note that updating firmware resets the subwoofer connection too.
If the connection to the subwoofer is not re-established automatically after the update, refer to page 16. If the software update fails, check that the USB stick is not defective.
• Mac OS users should use MS-DOS (FAT) as the USB format. - Depending on the manufacturer, some USB devices may not be supported.
AUTO UPDATE
If the Soundbar is connected to the Internet, it will automatically check for the latest firmware and update when new firmware becomes available, even if it is turned off.

- The Soundbar is configured to run Auto Update by default.
- To use the Auto Update function, the Soundbar must be connected to the Internet.
- The Wi-Fi connection to the Soundbar will be terminated if its power cord is disconnected or the power is cut off. If the power is cut off, turn on the Soundbar and reconnect it.
TROUBLESHOOTING
Before requesting service, please check the following.
| The unit will not turn on. | |
| • Is the power cord plugged into the outlet? | → Connect the power plug to the outlet. |
| A function does not work when the button is pressed. | |
| • Is there static electricity in the air? | → Disconnect the power plug and connect it again. |
| Sound is not produced. | |
| Is the Mute function on?Is the volume set to minimum? | → Press the(Mute) button to cancel the Mute function.→ Adjust the volume. |
| The remote control does not work. | |
| Are the batteries drained?Is the distance between the remote control and main unit too far? | → Replace with new batteries.→ Move closer to the unit. |
| The TV SoundConnect (TV pairing) failed. | |
| Does your TV support TV SoundConnect?Is your TV firmware the latest version?Does an error occur when connecting? | → TV SoundConnect is supported by some Samsun TVs released from 2012 on. Check your TV to see if it supports TV SoundConnect.→ Update your TV with the latest firmware.→ Contact the Samsung Call Centre.→ Reset TV SoundConnect and connect again.To reset the TV SoundConnect connection, press and hold the ▶II button for 5 seconds. |
| The red LED on the subwoofer blinks and the subwoofer is not producing sound. | |
| • Your subwoofer may not be connected to the main unit of the product. | → Try to connect your subwoofer again.(See Page 16) |
| Soundbar is not turned on by Bluetooth or Multiroom App. | |
| • Check the Network Standby option is OFF. | → If it's true, BT and Wifi functions are not allowed in power off state. Press and hold the ▶▶I button for 5 seconds to turn on the Network Standby in power on state. |
SPECIFICATIONS
| GENERAL | Weight | Main Unit | 2.6 kg |
| Subwoofer (PS-WK650, PS-WK651) | 6.8 kg | ||
| Dimensions(W x H x D) | Main Unit | 1010.5 x 54.0 x 87.5 mm | |
| Subwoofer (PS-WK650, PS-WK651) | 452.0 x 335.0 x 154.0 mm | ||
| Operating Temperature Range | +5°C to +35°C | ||
| Operating Humidity Range | 10 % to 75 % | ||
| AMPLIFIER | Rated Output Power | Main Unit | 30W x 6, 6 ohm, THD≤10% |
| Subwoofer (PS-WK650, PS-WK651) | 160W, 3 ohm, THD≤10% | ||
* Design, specifications and App screen are subject to change without prior notice. * Nominal specification
Samsung Electronics Co., Ltd reserves the right to change the specifications without notice.
-Weight and dimensions are approximate.
- For more information about the power supply and power consumption, refer to the label attached to the product.
※ Precaution : The product will restart automatically if you turn on/off Wi-Fi/Ethernet.
| Overall Standby Power Consumption (W)(All the network ports are “ON” condition) | 2.8W | |
| Wi-Fi/Ethernet Port deactivation method | Press Wi-Fi SETUP button on the product for 30 seconds or press the ▶▶I button on the Soundbar remote for more than 5 seconds to turn Wi-Fi/Ethernet On / Off. | |
| Bluetooth Port deactivation method | Press SPK ADD button on the product for 30 seconds or press the ▶▶I button on the Soundbar remote for more than 5 seconds to turn Bluetooth On / Off. | |
※ Open Source Licence Notice
- For further information on Open Sources used in this product, please visit the website: http://opensource.samsung.com

Spotify® Licence
- The Spotify Software is subject to third party licences found here: www.spotify.com/connect/third-party-licenses.
- For more information about Spotify Connect, please visit www.spotify.com/connect
LICENSES

Manufactured under license from Dolby Laboratories. Dolby, Dolby Audio, and the double-D symbol are trademarks of Dolby Laboratories.


For DTS patents, see http://patents.dts.com. Manufactured under license from DTS Licensing Limited. DTS, the Symbol, & DTS and the Symbol together are registered trademarks, and DTS 2.0 Channel is a trademark of DTS, Inc. © DTS, Inc. All Rights Reserved.
HDMI
The terms HDMI and HDMI High-Definition Multimedia Interface, and the HDMI Logo are trademarks or registered trademarks of HDMI Licensing LLC in the United States and other countries.
Wireless Models (including the frequency of 5.15GHz-5.35GHz)
Hereby, Samsung Electronics, declares that this equipment is in compliance with the essential requirements and other relevant provisions of Directive 1999/5/EC.
The original Declaration of Conformity may be found at http://www.samsung.com, go to Support > Search Product Support and enter the model name.
This equipment may be operated in all EU countries.
This equipment may only be used indoors.

Wireless Models (excluding the frequency of 5.15GHz-5.35GHz)
Hereby, Samsung Electronics, declares that this equipment is in compliance with the essential requirements and other relevant provisions of Directive 1999/5/EC.
The original Declaration of Conformity may be found at http://www.samsung.com, go to Support > Search Product Support and enter the model name.
This equipment may be operated in all EU countries.

Contact SAMSUNG WORLD WIDE
If you have any questions or comments relating to Samsung products, please contact the SAMSUNG customer care Centre.
| Country | Contact Centre | Web Site |
| ■Europe | ||
| U.K 0330 SAMSUNG (7267864) www.samsung.com/uk/support | ||
| EIRE 0818 7171 | 00 www.samsung.com/ie/support | |
| GERMANY | 0180 6 SAMSUNG bzw.0180 6 7267864*(0,20 €/Anruf aus dem dt. Festnetz, aus dem Mobilfunk max. 0,60 €/Anruf) | www.samsung.com/de/support |
| FRANCE 01 48 63 00 00 www.samsung.com/fr/support | ||
| ITALIA 800-SAMSUNG (800.7267864) www.samsung.com/it/support | ||
| SPAIN 3490217 | 2678 www.samsung.com/es/support | |
| PORTUGAL 808 | 20 7267 www.samsung.com/pt/support | |
| LUXEMBURG | 261 03 710 | www.samsung.com/be_fr/support |
| NETHERLANDS | 0900-SAMSUNG (0900-7267864)(€ 0,10/Min) | www.samsung.com/nl/support |
| BELGIUM | 02-201-24-18 | www.samsung.com/be/support(Dutch)www.samsung.com/be_fr/support (French) |
| NORWAY | 815 56480 | www.samsung.com/no/support |
| DENMARK | 70 70 19 70 | www.samsung.com/dk/support |
| FINLAND | 030-6227 515 www.samsung.com/fi/support | |
| SWEDEN | 0771 726 7864 (0771-SAMSUNG) | www.samsung.com/se/support |
| POLAND | 801-172-678* lub +48 22 607-93-33 * *(koszt połączeria weclug taryfy operatora) | www.samsung.com/pl/support |
| HUNGARY | 0680SAMSUNG (0680-726-786)0680PREMIUM (0680-773-648) | www.samsung.com/hu/support |
| Country Contact Centre | Web Site | |
| AUSTRIA | 0800-SAMSUNG (0800-7267864) [Only for Premium HA] 0800-366661 [Only for Dealers] 0810-112233 | www.samsung.com/at/support |
| SWITZERLAND | 0800 726 78 64 (0800-SAMSUNG) | www.samsung.com/ch/support (German) www.samsung.com/ch_fr/ support (French) |
| CZECH | 800 - SAMSUNG (800-726786) | www.samsung.com/cz/support |
| SLOVAKIA | 0800 - SAMSUNG (0800-726 786) | www.samsung.com/sk/support |
| CROATIA | 072 726 786 www.samsung.com/hr/support | |
| BOSNIA | 055 233 999 www.samsung.com/support | |
| MONTENEGRO | 020 405 888 www.samsung.com/support | |
| SLOVENIA | 080 697 267 (brezplačna številka) www.samsung.com/si | |
| SERBIA | 011 321 6899 www.samsung.com/rs/support | |
| BULGARIA | *3000 Цена в мрежата 0800 111 31 , Безплатна телефонна линия | www.samsung.com/bg/support |
| ROMANIA | *8000 (apel in retea) 08008-726-78-64 (08008-SAMSUNG) Apel GRATUIT | www.samsung.com/ro/support |
| CYPRUS 8009 | 4000 only from landline, toll free | www.samsung.com/gr/support |
| GREECE | 80111-SAMSUNG (80111 726 7864) only from land line (+30) 210 6897691 from mobile and land line | |
| LITHUANIA | 8-800-77777 | www.samsung.com/lt/support |
| LATVIA | 8000-7267 | www.samsung.com/lv/support |
| ESTONIA | 800-7267 | www.samsung.com/ee/support |

[Correct disposal of batteries in this product]
(Applicable in countries with separate collection systems)
This marking on the battery, manual or packaging indicates that the batteries in this product should not be disposed of with other household waste at the end of their working life. Where marked, the chemical symbols Hg, Cd or Pb indicate that the battery contains mercury, cadmium or lead above the reference levels in EC Directive 2006/66. If batteries are not properly disposed of, these substances can cause harm to human health or the environment.
To protect natural resources and to promote material reuse, please separate batteries from other types of waste and recycle them through your local, free battery return system.

Correct Disposal of This Product (Waste Electrical & Electronic Equipment)
(Applicable in countries with separate collection systems)
This marking on the product, accessories or literature indicates that the product and its electronic accessories (e.g. charger, headset, USB cable) should not be disposed of with other household waste at the end of their working life. To prevent possible harm to the environment or human health from uncontrolled waste disposal, please separate these items from other types of waste and recycle them responsibly to promote the sustainable reuse of material resources.
Household users should contact either the retailer where they purchased this product, or their local government office, for details of where and how they can take these items for environmentally safe recycling.
Business users should contact their supplier and check the terms and conditions of the purchase contract. This product and its electronic accessories should not be mixed with other commercial wastes for disposal.
For information on Samsung's environmental commitments and product specific regulatory obligations e.g. REACH visit: samsung.com/uk/aboutsamsung/samsungelectronics/corporate citizenship/data_corner.html

BUL
Back of the Soundbar


CONNECTING THE SOUNDBAR TO YOUR NETWORK
Manufactured under licence from Dolby Laboratories. Dolby, Dolby Audio and the double-D symbol are trademarks of Dolby Laboratories.

DTS
2.0 Channel
CRO
Ensure that the AC power supply in your household matches the identification label on the back of the product. Place the product horizontally on a suitable surface (furniture) with enough space for ventilation 7~10 cm. Make sure the ventilation openings are not covered. Do not place the unit on amplifiers or other equipment that heats up. This unit is designed for continuous use. To completely turn off the unit, unplug the power plug from the wall outlet. If you do not intend to use the unit for a long time, unplug it.

During a thunderstorm, unplug the AC power plug from the wall outlet. Voltage spikes due to lightning can damage the device.

Do not expose the device to direct sunlight or other heat sources. This can lead to overheating and malfunction of the device.

Batteries used with this product contain chemicals that are harmful to the environment. Do not dispose of batteries with household waste. Do not throw batteries into fire. Do not short-circuit, disassemble, or overheat batteries. There is a risk of explosion if replaced with an incorrect type of battery. Replace batteries only with the same or equivalent type.

WARNING: DO NOT SWALLOW BATTERY, CHEMICAL BURN HAZARD
[Supplied with the remote control] This product contains a coin/button cell battery.
If the coin/button cell battery is swallowed, it can cause severe internal burns in just
Selects inputs D.IN, AUX, HDMI, BT, or TV.
- When the unit is on, pressing and holding the button for more than 3 seconds sets the button to perform the function (mute). To cancel the button setting (mute), press and hold the button again for more than 3 seconds.
③ (Power) Button


- To remove the battery cover of the remote control, insert a coin into the slot on the cover and turn it to the left as shown above, then remove the cover.
- Insert the 3 V lithium battery. When inserting the battery, the positive pole (+) must face upward. Replace the battery cover and align the '•' marks with each other as shown above.
- To replace the remote control battery cover, place a coin in its slot and turn it to the right as far as it will go.
SOUNDBAR INSTALLATION
WALL MOUNT BRACKET INSTALLATION
CRO
- Push a screw (not supplied) through each holder screw, then firmly tighten each screw into the support screw hole.

- Use two screws (M4 x L12) to attach the wall mount brackets L and D to the bottom of the Soundbar. For proper placement, ensure that the recesses on the Soundbar are aligned with the holes on the bracket.


Rear of the Soundbar
- Mount the Soundbar with the attached wall mount bracket by hanging the wall mount bracket on the holder screws on the wall.

- Slightly tilt the Soundbar to insert the heads of both holder screws into the openings of the wall mount bracket. Push the Soundbar in the direction of the arrow to ensure that both sides are firmly attached.

- Do not hang anything on the mounted unit and prevent it from being subjected to impacts or falling.
- Securely attach the unit to the wall to prevent it from falling. If the unit falls, it may cause injury or damage to the product.
- After mounting the unit on the wall, ensure that a child cannot pull any of the connecting cables, as the unit could fall.
- For the best wall-mount installation performance, install the speaker system at least 5 cm below the TV if the TV is mounted on the wall.
- If you do not mount the unit on the wall, for your own safety, mount it on a secure, flat surface from which it cannot fall.

- Do not connect the power cable of this product or the TV to a wall outlet until you have connected all components to each other.
- Before moving or installing the product, make sure the power is off and the power cable is unplugged from the outlet.
CONNECTING THE SUBWOOFER
Auto Power Link
The ID for the subwoofer is preset at the factory, and the main unit and subwoofer should automatically network (wirelessly connect) when both are turned on.
- Plug the power cables of the main unit and subwoofer into an AC wall outlet.
- Using a small pointed object, press and hold the ID SET button on the back of the subwoofer for 5 seconds.
- The STANDBY indicator turns off, and the LINK indicator (blue LED) blinks rapidly.
- Connect the DIGITAL AUDIO IN (OPTICAL) jack on the Soundbar to the OPTICAL OUT jack on the TV using a digital optical cable.
- Press the → button on the right side of the Soundbar or the SOURCE button on the remote control to select the D.IN mode.
▶ Auto Power Link
If you connect the main unit to the TV using a digital optical cable, set the Auto Power function to ON so that the Soundbar turns on automatically when you turn on the TV.
- Connect the Soundbar and TV using a digital optical cable.
- Press the → button on the right side of the main unit or the SOURCE button on the remote control to select the D.IN mode.
- Press the ◀ button on the remote control for 5 seconds to turn the Auto Power Link on or off.

• Auto Power Link is set to ON by default.
CONNECTING THE SOUNDBAR TO A NETWORK
On your smart device, select the Samsung Multiroom app. Follow the on-screen instructions on your smart device.
With the Samsung Multiroom app, you have the following functions available.
Manufactured under licence from Dolby Laboratories. Dolby, Dolby Audio and the double-D symbol are trademarks of Dolby Laboratories.



INSTALLING THE SOUNDBAR
INSTALLING THE WALL MOUNT

CONNECTING THE SOUNDBAR TO YOUR NETWORK
Manufactured under licence from Dolby Laboratories. Dolby, Dolby Audio and the double-D symbol are trademarks of Dolby Laboratories.

dts
2.0 Channel


CONNECTING THE SOUNDBAR TO YOUR NETWORK
Manufactured under licence from Dolby Laboratories. Dolby, Dolby Audio and the double-D symbol are trademarks of Dolby Laboratories.

dts
2.0 Channel
EST


Wall mount LWall mount R
- Install the Soundbar with the attached Wall Mount Bracket by hanging the Wall Mount Bracket on the wall's Holding Screws.

- Tilt the soundbar slightly to insert the heads of both Holding Screws into the holes of the Wall Mount Bracket. Push the Soundbar in the direction of the arrow to check that both sides are firmly attached.
REMOVING THE SOUNDBAR FROM THE WALL

CONNECTING THE SOUNDBAR TO YOUR NETWORK
Manufactured under licence from Dolby Laboratories. Dolby, Dolby Audio and the double-D symbol are trademarks of Dolby Laboratories.


2.0 Channel
③ (Power) button
Wall mount GWall mount D


CONNECTING THE SOUNDBAR TO YOUR NETWORK
Manufactured under licence from Dolby Laboratories. Dolby, Dolby Audio and the double-D symbol are trademarks of Dolby Laboratories.


2.0 Channel


www.spotify.com/connect/third-party-licenses.
Manufactured under licence from Dolby Laboratories. Dolby, Dolby Audio and the double-D symbol are trademarks of Dolby Laboratories.


Left wall bracketRight wall bracket

CONNECTING THE SOUNDBAR TO THE NETWORK
Manufactured under licence from Dolby Laboratories. Dolby, Dolby Audio and the double-D symbol are trademarks of Dolby Laboratories.

dts
2.0 Channel
ITA


ITA
ITA


Manufactured under licence from Dolby Laboratories. Dolby, Dolby Audio and the double-D symbol are trademarks of Dolby Laboratories.

dts
2.0 Channel


LAT

Right edge of the soundbar

SETTING UP THE SOUNDBAR'S NETWORK CONNECTION
Manufactured under licence from Dolby Laboratories. Dolby, Dolby Audio and the double-D symbol are trademarks of Dolby Laboratories.


2.0 Channel

L


CONNECTING THE SOUNDBAR TO THE NETWORK
Manufactured under licence from Dolby Laboratories. Dolby, Dolby Audio and the double-D symbol are trademarks of Dolby Laboratories.


2.0 Channel


POL

CONNECTING THE SOUNDBAR TO THE MAINS
Manufactured under licence from Dolby Laboratories. Dolby, Dolby Audio and the double-D symbol are trademarks of Dolby Laboratories.

dts
2.0 Channel
Right wall bracket
Left wall bracket


| Mod intrare Afişaj | |
| Intrarea digitală opticăIntrare ARC (HDMI OUT) | D.IN |
| Intrare AUX AUX | |
| Intrarea HDMI HDMI | |
| Modul BLUETOOTH BT | |
| TV SoundConnect TV |
AUTO POWER DOWN FUNCTION
CONNECTING THE SOUNDBAR TO THE NETWORK
Manufactured under licence from Dolby Laboratories. Dolby, Dolby Audio and the double-D symbol are trademarks of Dolby Laboratories.


2.0 Channel
Make sure that the AC mains voltage in your home matches the label on the rear panel of the product. Install the product horizontally on a suitable surface (furniture) with enough space around it for ventilation (7~10 cm). Make sure the ventilation openings are not covered. Do not place the device on amplifiers or other equipment that may heat up. This device is intended for continuous use. To completely switch off the device, disconnect the AC plug from the wall outlet. Disconnect the device if you do not intend to use it for an extended period.

During thunderstorms, unplug the mains plug from the outlet. Voltage spikes caused by lightning can damage the device.

Do not expose the device to direct sunlight or other heat sources. This may cause overheating and malfunction.

Batteries used with this product contain chemicals that are harmful to the environment. Do not dispose of batteries in household waste. Do not dispose of batteries in fire. Do not short-circuit, disassemble, or overheat batteries. There is a risk of explosion if batteries are replaced incorrectly. Replace batteries only with new batteries of the same type.

WARNING: DO NOT SWALLOW BATTERY, DANGER OF CHEMICAL BURNS.
[Remote control supplied with] This product contains a button cell battery.
If the button cell battery is swallowed, it can cause severe internal burns in as little as 2 hours and can lead to death. Keep new and used batteries out of reach of children. If the battery compartment
does not close securely, stop using the product and keep it out of reach of children. If you think batteries might have been swallowed or placed inside any part of the body, seek immediate medical attention.
CONTENTS
2 GETTING STARTED
2 Safety Information 5 What's in the Box
6 DESCRIPTIONS
6 Front / Right Panel 7 Rear / Bottom Panel 8 Remote Control
11 INSTALLATION
11 Installing the Soundbar 11 Installing the Wall Mount 15 Removing the Soundbar from the Wall
16 CONNECTIONS

- Use a coin to turn the battery compartment cover of the remote control counterclockwise to remove it, as shown in the figure above.
- Insert the 3 V lithium battery. When inserting the battery, keep the positive (+) pole facing up. Place the battery cover and align the '•' marks with each other, as shown in the figure above.
- Use a coin to turn the battery compartment cover clockwise to the end to secure it.
INSTALLING THE SOUNDBAR
INSTALLING THE WALL MOUNT
▶Precautions for installation
- Using two Screws (M4 x L12), attach the Left wall mount bracket and the right one to the bottom of the Soundbar. For proper installation, be sure to align the protrusions on the Soundbar with the holes on the brackets.


Rear of the Soundbar
Right wall mount bracket
Left wall mount bracket
- The left and right brackets are different in shape. Position them correctly.
![graph TD A["Component 1: Linear assembly with dashed lines indicating alignment"] --> B["Component 2: Reformed assembly with solid lines indicating assembly"] B --> C["Assembly of two parts with circular insets showing close-ups of mechanical components"]](/content/2026/06/1273757/images/9fdfc7a2f129dbc7a977233556dc5f4cea86bbc1bdb6c0e0e159f0ac2901d36f.jpg)
- Place the Soundbar with the Wall Mount Brackets attached by hanging the Wall Mount Brackets on the Screws of the holder on the wall.

- Tilt the Soundbar slightly to place the heads of both Screws of the holder into the holes on the Wall Mount Brackets. Push the Soundbar in the direction of the arrow to check that both sides are securely attached.
Removing the Soundbar from the wall
- To detach the Soundbar device from the wall mount, push it in the direction of the arrow, and then pull it away from the wall as shown.


- Connect the power cords of the main unit and the subwoofer speaker to an AC wall outlet.
- Using a small pointed object, press the iD SET button on the back of the subwoofer and hold it for 5 seconds.
- The STANDBY indicator is off, and the LINK indicator (blue LED) blinks rapidly.
- While the main unit is off (in STANDBY mode), press the (Sound Control) button on the remote control and hold it for 5 seconds.
- The message iD SET appears on the Soundbar display.
- To complete the connection, turn on the power of the main unit while the blue LED of the subwoofer speaker is blinking.
- The main unit and the subwoofer are now connected (paired).
- The connection indicator (blue LED) on the subwoofer should be lit continuously, not blinking.
- If the blue connection indicator does not light continuously, the connection was not successful. Turn off the main unit and start again from step 2.
- You can enjoy better sound from the wireless subwoofer speaker by selecting a sound effect. (See page 8.)

- Before moving or installing this product, make sure the power is off and unplug the power cord.
- If the main unit is off, the wireless subwoofer will be in standby mode, and the red STANDBY LED on the front will start blinking immediately. (No blue LED.)
- If you use a device that uses the same frequency (2.4GHz) as the Soundbar near the Soundbar, interference may cause some audio interruptions.
- The radio wave transmission range is about 10 m, but this may vary depending on your working environment. If there is a reinforced or metal wall between the main unit and the wireless receiving module, the system may not work at all because radio waves cannot penetrate metal.
- If the main unit does not establish a wireless connection, follow steps 1 to 5 on the previous page to re-pair the connection between the main unit and the wireless subwoofer.

- The wireless subwoofer has a built-in wireless receiving antenna. Keep the device away from water and moisture.
- To ensure optimal listening, make sure the area around the wireless subwoofer is clear of any obstacles.
STATUS LED INDICATOR ON THE SUBWOOFER
| LED Status | Opis Razrešenje | ||
| Crvena Uključena | Stanje pripravnosti (sa glavnom jedinicom uređaja Soundbar isključenom) | Proverite napajanje glavne jedinice uređaja Soundbar | |
| Veza nije uspostavljena | Povežite ponovo (pogledajte uputstva za ručno povezivanje u korisničkom uputstvu) | ||
| Plava | Uključena Uspešno povezano (normalan rad) - | ||
| Treperi | Stanje pripravnosti (sa glavnom jedinicom uređaja Soundbar isključenom) | Proverite napajanje glavne jedinice uređaja Soundbar | |
| Veza nije uspostavljena | Povežite ponovo (pogledajte uputstva za ručno povezivanje u korisničkom uputstvu) | ||
| Crvena i plava Treperi Kvar Obratite se korisničkom centru. | |||
CONNECTING TO A TV

- Important: Before you begin, insert batteries into the remote control. Instructions are on page 10.
CONNECTING TO A TV USING A DIGITAL OPTICAL CABLE
![graph LR TV["TV"] -->|Optical OUT| OpticalOut["Optical OUT"] OpticalOut -->|Optički Kabl| DigitalAudioIn["Digital Audio In (OPTICAL)"] DigitalAudioIn --> Output["Output"]](/content/2026/06/1273757/images/bedff0b48389e928be8b4669b0a641ae50cd2915e41d88d6c4a8bc26d998460a.jpg)

- Connect the DIGITAL AUDIO IN (OPTICAL) connector on the Soundbar to the OPTICAL OUT connector on the TV using a digital optical cable.
- Press the → button on the right side of the Soundbar or the SOURCE button on the remote control to select the D.IN mode.
▶ Auto Power Link
If you have connected the main unit to the TV using a digital optical cable, set the auto power link function to ON so that the Soundbar turns on automatically when you turn on the TV.
- Connect the Soundbar to the TV using a digital optical cable.
- Press the → button on the right side of the Soundbar or the SOURCE button on the remote control to select the D.IN mode.
- Press the ◀ button on the remote control for 5 seconds to turn the Auto Power Link function on or off.

| Mod ulaza Displej | |
| Optički digitalni ulazARC (HDMI IZLAZ) ulaz | D.IN |
| AUX ulaz | AUX |
| HDMI ulaz | HDMI |
| BLUETOOTH režim | BT |
| TV SoundConnect | TV |
AUTO POWER DOWN FUNCTION
CONNECTING THE SOUNDBAR TO THE NETWORK
On your smart device, select the Samsung Multiroom app. Follow the instructions on your smart device's screen.
Manufactured under license from Dolby Laboratories. Dolby, Dolby Audio and the double-D symbol are trademarks of Dolby Laboratories.

DTS
2.0 Channel
For DTS patents, see http://patents.dts.com. Manufactured under license from DTS Licensing Limited. DTS, the Symbol, and DTS and the Symbol together are registered trademarks, and DTS 2.0 Channel is a trademark of DTS, Inc. © DTS, Inc. All rights reserved.
HDMI
The terms HDMI, High-Definition Multimedia Interface, and the HDMI logo are trademarks or registered trademarks of HDMI Licensing LLC in the United States and other countries.
Wireless models (including frequency 5.15 GHz – 5.35 GHz)
Samsung Electronics hereby declares that this equipment complies with the essential requirements and other relevant provisions of Directive 1999/5/EC.
The official Declaration of Conformity can be found at http://www.samsung.com. Go to Support > Search Product Support and enter the model name.


- Use a suitable coin to turn the battery compartment cover of the remote control counterclockwise and detach it as shown in the figure above.
- Insert a 3V lithium battery. When inserting the battery, make sure the positive (+) terminal faces up. Place the battery cover and align the '•' marks with each other as shown in the illustration.
- Secure the remote control battery compartment cover in place by turning it with a suitable coin until it reaches the end position.
SOUNDBAR INSTALLATION
INSTALLATION OF THE WALL MOUNTING KIT

CONNECTING THE SOUNDBAR TO THE NETWORK
Manufactured under licence from Dolby Laboratories. Dolby, Dolby Audio and the double-D symbol are trademarks of Dolby Laboratories.


2.0 Channel
① +/ button (Volume)
BACK/BOTTOM PANEL


SLV
- Push the screw (not supplied) through the bracket screw and then firmly tighten both screws into the support screw hole.

- Use two screws (M4 x L12) to attach both wall brackets L and D to the bottom of the Soundbar speaker. For proper fit, make sure to align the protrusions on the Soundbar speaker with the holes on the brackets.


Back side of the Soundbar speaker
Wall bracket L Wall bracket D
- The left and right brackets are different shapes. Make sure they are correctly oriented.
![graph TD A["Component 1: Linear assembly with dashed lines indicating alignment"] --> B["Component 2: Reformed assembly with solid lines indicating assembly"] B --> C["Assembly of two parts with circular insets showing mechanical components"]](/content/2026/06/1273757/images/943ec38d4397ddb3869c684b681c26dd875a3fee3d4dfaf87865bc9a88a43834.jpg)
- Install the Soundbar with the supplied wall brackets by hanging the wall bracket on the bracket screw on the wall.

- Tilt the Soundbar slightly to insert both bracket screw heads into the holes of the wall bracket. Push the Soundbar in the direction of the arrow to ensure both sides are firmly attached.
REMOVING THE SOUNDBAR FROM THE WALL


CONNECTING THE SOUNDBAR TO THE NETWORK
On your smart device, select the Samsung Multiroom app. Follow the on-screen instructions on your smart device.
The following functions are available in the Samsung Multiroom app.
Manufactured under licence from Dolby Laboratories. Dolby, Dolby Audio and the double-D symbol are trademarks of Dolby Laboratories.

dts
2.0 Channel
Patents for DTS technology can be found at http://patents.dts.com. Manufactured under license from DTS Licensing Limited. The DTS name and logo, whether used alone or in combination, are registered trademarks, and DTS 2.0 Channel is a trademark of DTS, Inc. © DTS, Inc. All rights reserved.
HDMI
- SAFETY INFORMATION
- SAFETY WARNINGS
- CAUTION
- PRECAUTIONS
- CONTENTS
- GETTING STARTED
- DESCRIPTIONS
- INSTALLATION
- CONNECTIONS
- FUNCTIONS
- TROUBLESHOOTING
- APPENDIX
- WHAT'S INCLUDED
- BEFORE READING THE USER'S MANUAL
- ICONS USED IN THIS MANUAL
- ② (SOURCE) BUTTON
- ③ (POWER) BUTTON
- REAR / BOTTOM PANEL
- REMOTE CONTROL
- SOURCE
- MUTE
- REPEAT
- SKIP FORWARD
- BLUETOOTH POWER
- ((O)) SOUND
- OFF - ANYNET+, ON - ANYNET
- OFF - POWER LINK, ON - POWER LINK
- SOUND EFFECT
- DRC (DYNAMIC RANGE CONTROL)
- POWER
- VOLUME
- PLAY / PAUSE
- SKIP BACK
- SOUND CONTROL
- CONTROLLING THE SOUNDBAR USING YOUR TV REMOTE CONTROL
- INSTALLING THE BATTERY IN THE REMOTE CONTROL
- INSTALLING THE SOUNDBAR
- INSTALLING THE WALL MOUNT
- INSTALLATION PRECAUTIONS
- RIGHT END OF SOUNDBAR
- DETACHING THE SOUNDBAR FROM THE WALL
- CONNECTING THE SUBWOOFER
- CONNECTING TO THE SUBWOOFER AUTOMATICALLY
- CONNECTING TO THE SUBWOOFER MANUALLY
- CONNECTING TO A TV
- CONNECTING TO A TV USING A DIGITAL OPTICAL CABLE
- AUTO POWER LINK
- CONNECTING TO A TV USING AN HDMI (DIGITAL) CABLE
- TV SOUNDCONNECT
- USING THE BLUETOOTH POWER ON FUNCTION
- CONNECTING TO EXTERNAL DEVICES
- OPTICAL OR ANALOGUE AUDIO CABLE
- AUX CABLE
- OPTICAL CABLE
- HDMI CABLE
- INPUT MODE
- BLUETOOTH
- TO CONNECT THE SOUNDBAR TO A BLUETOOTH DEVICE
- BLUETOOTH POWER ON (BLUETOOTH POWER)
- TO DISCONNECT THE BLUETOOTH DEVICE FROM A SOUNDBAR
- TO DISCONNECT THE SOUNDBAR FROM A BLUETOOTH DEVICE
- MORE ABOUT BLUETOOTH
- USING THE MULTIROOM APP
- BEFORE YOU BEGIN
- REQUIREMENTS
- INSTALLING THE SAMSUNG MULTIROOM APP
- ANDROID OR IOS
- LAUNCHING THE SAMSUNG MULTIROOM APP
- CONNECTING THE SOUNDBAR TO YOUR NETWORK
- USING THE NETWORK STANDBY ON FUNCTION
- SOFTWARE UPDATE
- UPDATING WITH USB
- UPDATING PROCEDURE
- IF UPDATE WAS NOT DISPLAYED
- AUTO UPDATE
- SPECIFICATIONS
- ※ OPEN SOURCE LICENCE NOTICE
- SPOTIFY® LICENCE
- LICENSES
- HDMI
- WIRELESS MODELS (INCLUDING THE FREQUENCY OF 5.15GHZ-5.35GHZ)
- WIRELESS MODELS (EXCLUDING THE FREQUENCY OF 5.15GHZ-5.35GHZ)
- CONTACT SAMSUNG WORLD WIDE
- [CORRECT DISPOSAL OF BATTERIES IN THIS PRODUCT]
- (APPLICABLE IN COUNTRIES WITH SEPARATE COLLECTION SYSTEMS)
- CORRECT DISPOSAL OF THIS PRODUCT (WASTE ELECTRICAL & ELECTRONIC EQUIPMENT)
- SOUNDBAR INSTALLATION
- WALL MOUNT BRACKET INSTALLATION
- CONNECTING THE SOUNDBAR TO A NETWORK
- REMOVING THE SOUNDBAR FROM THE WALL
- CONNECTING THE SOUNDBAR TO THE NETWORK
- SETTING UP THE SOUNDBAR'S NETWORK CONNECTION
- CONNECTING THE SOUNDBAR TO THE MAINS
- AUTO POWER DOWN FUNCTION
- PRECAUTIONS FOR INSTALLATION
- WIRELESS MODELS (INCLUDING FREQUENCY 5.15 GHZ – 5.35 GHZ)
- INSTALLATION OF THE WALL MOUNTING KIT
- ① +/ BUTTON (VOLUME)
- BACK/BOTTOM PANEL
Brand : SAMSUNG
Model : HW-K650
Category : Soundbar