
RI9403 - Coffee machine GAGGIA - Free user manual and instructions
Find the device manual for free RI9403 GAGGIA in PDF.


| Product type | Super-automatic coffee machine |
| Brand | Gaggia |
| Model | RI9403 |
| Dimensions (W x H x D) | 24 x 38 x 28 cm |
| Weight | 7.5 kg |
| Power supply | 220-240 V, 50/60 Hz, 1450 W |
| Water tank capacity | 1.5 L |
| Bean hopper capacity | 250 g |
| Maximum pressure | 15 bar |
| Built-in grinder | Stainless steel, adjustable |
| Main functions | Espresso, long coffee, cappuccino, latte macchiato, hot water, steam |
| Milk frothing system | Integrated milk carafe (LatteCrema) |
| Settings | Coffee dose, temperature, cup length, pre-infusion |
| Maintenance and cleaning | Descaling program, automatic rinsing, coffee group cleaning |
| Safety | Automatic shut-off, child safety (lock) |
| Spare parts and repairability | Available on Gaggia website and authorized dealers |
| Energy class | A (estimation) |
| Noise | ~65 dB(A) |
| Warranty | 2 years (parts and labor) |
Frequently Asked Questions - RI9403 GAGGIA
User questions about RI9403 GAGGIA
0 question about this device. Answer the ones you know or ask your own.
Ask a new question about this device
Download the instructions for your Coffee machine in PDF format for free! Find your manual RI9403 - GAGGIA and take your electronic device back in hand. On this page are published all the documents necessary for the use of your device. RI9403 by GAGGIA.
USER MANUAL RI9403 GAGGIA
Sede Legale/Registered Office
Piazza Eleonora Duse, 2
20122 MILANO
Sede Amministrativa/Administrative Office
Via Torretta, 240
40041 Gaggio Montano (BO)
+39 0534 771111
www.gaggia.com
GAGGIA
MILANO
A
ONATIW
mod. CLASSIC

natural_image
Exterior view of a Gaggia glass washing machine with two cups filled with orange liquid, no visible text or symbols on the main device.ISTRUZIONI PER L'USO OPERATING INSTRUCTIONS GEBRAUCHSANWEISUNG MODE D'EMPLOI INSTRUCCIONES DE USO GEBRUIKSAANWIJZING INSTRUCÇÕES E MODO DE EMPREGO
CE
GAGGIA
MILANO
mod. CLASSIC
FIG.01

FIG.02FIG.


natural_image
Line drawing of a kitchen appliance assembly showing faucet, drain tray, and cleaning steps (no text or symbols)FIG.03
The first time you use the frother, you must ...
- Place the pannarello on the steam wand support.
PT
- Inserir o painel no suporte do tubo do vapor.
ITALIANO
Congratulations on your wise choice!
As the proud owner of the Gaggia machine, you can now experience the taste of a delicious cup of espresso or cappuccino in the comfort of your own home. Espresso coffee, originally created in Italy, is made by rapidly forcing water that has been heated to the correct brewing temperature, through a special finely ground coffee. The heart of the espresso machine is a precision engineered pump. The pump and water flow is easily controlled with just a flick of the switch.
Safety Instructions
This machine is equipped with safety devices. Nevertheless, read and follow the safety instructions carefully and only use the machine properly as described in these instructions to avoid accidental injury or damage. Keep this user manual for future reference.

The term WARNING and this icon warn against possible severe injuries, danger to/or damage to the machine.
This symbol indicates the necessity to read the manual carefully before carrying out any operation or maintenance.
Warning
- Connect the machine to a wall socket with a voltage matching the technical specifications of the machine.
- Plug the machine into an earthed wall socket.
- Do not let the power cord hang over the edge of a table or counter, or touch hot surfaces.
- Never immerse the machine, the mains plug or power cord in water: Danger of electrical shock!
- Do not pour liquids on the connector of the power cord.
-
Never direct the hot water jet towards body parts: Danger of burning!
-
Do not touch hot surfaces. Use handles and knobs. The brew unit may stay hot for a brief period of time after the machine has been switched off.
- Remove the mains plug from the wall socket:
- If a malfunction occurs;
- If the machine will not be used for a long time;
- Before cleaning the machine.
Pull on the mains plug, not on the power cord. Do not touch the mains plug with wet hands. - Do not use the machine if the mains plug, the power cord or the machine itself is damaged.
- Do not make any modifications to the machine or its power cord. Only have repairs carried out by a service centre authorised by Philips to avoid a hazard.
- The machine should not be used by children younger than 8 years old.
- The machine can be used by children of 8 years and upwards if they have previously been instructed on the correct use of the machine and made aware of the associated dangers or if they are supervised by an adult.
- Cleaning and maintenance should not be carried out by children unless they are more than 8 years old and supervised by an adult.
- Keep the machine and its power cord out of reach of children under 8 years old.
- The machine may be used by persons with reduced physical, sensory or mental capabilities or lacking sufficient experience and/or skills if they have previously been instructed on the correct use of the machine and made aware of the associated dangers or if they are supervised by an adult.
- Children should be supervised to ensure that they do not play with the machine.
Cautions
• The machine is for household use only. It is
ENGLISH
not intended for use in environments such as canteens, staff kitchens of shops, offices, farms or other work environments.
- Always put the machine on a flat and stable surface.
- Do not place the machine on hot surfaces, directly next to a hot oven, heater units or similar sources of heat.
- Let the machine cool down before inserting or removing any parts.
- Never use warm or hot water to fill the water tank. Use cold water only.
- Never clean with scrubbing powders or harsh cleaners. Simply use a soft cloth dampened with water.
- Descale your machine regularly. Not doing this will make your appliance stop working properly. In this case repair is not covered under your warranty!
- Do not keep the machine at temperature below 0 °C. Residue water in the heating system may freeze and damage the machine.
- Do not leave water in the water tank when the machine is not used over a long period of time. The water can be contaminated. Use fresh water every time you use the machine.
- Never disconnect (remove) the pressurised filter holder while dispensing coffee. While the coffee dispensing unit is heating up, hot water may drip.
- Be careful when cleaning the sheet metal of the machine. Avoid touching the sheet metal with bare hands and always use a soft cloth.
- When dispensing coffee always use the frothing jet device inserted into the filter holder.
"Implementation of the Directives 2005/95/EC, 2002/96/EC and 2003/108/EC on the restriction of the use of certain hazardous substances in electrical and electronic equipment, as well as waste disposal".
This machine complies with EU Directive 2002/96/EC.
This appliance complies with all the standards and regulations applicable regarding exposure to electromagnetic fields.
Compliance with Standards
The machine complies with art.13 of the Italian Legislative Decree dated 25 July 2005, no. 151
ENGLISH
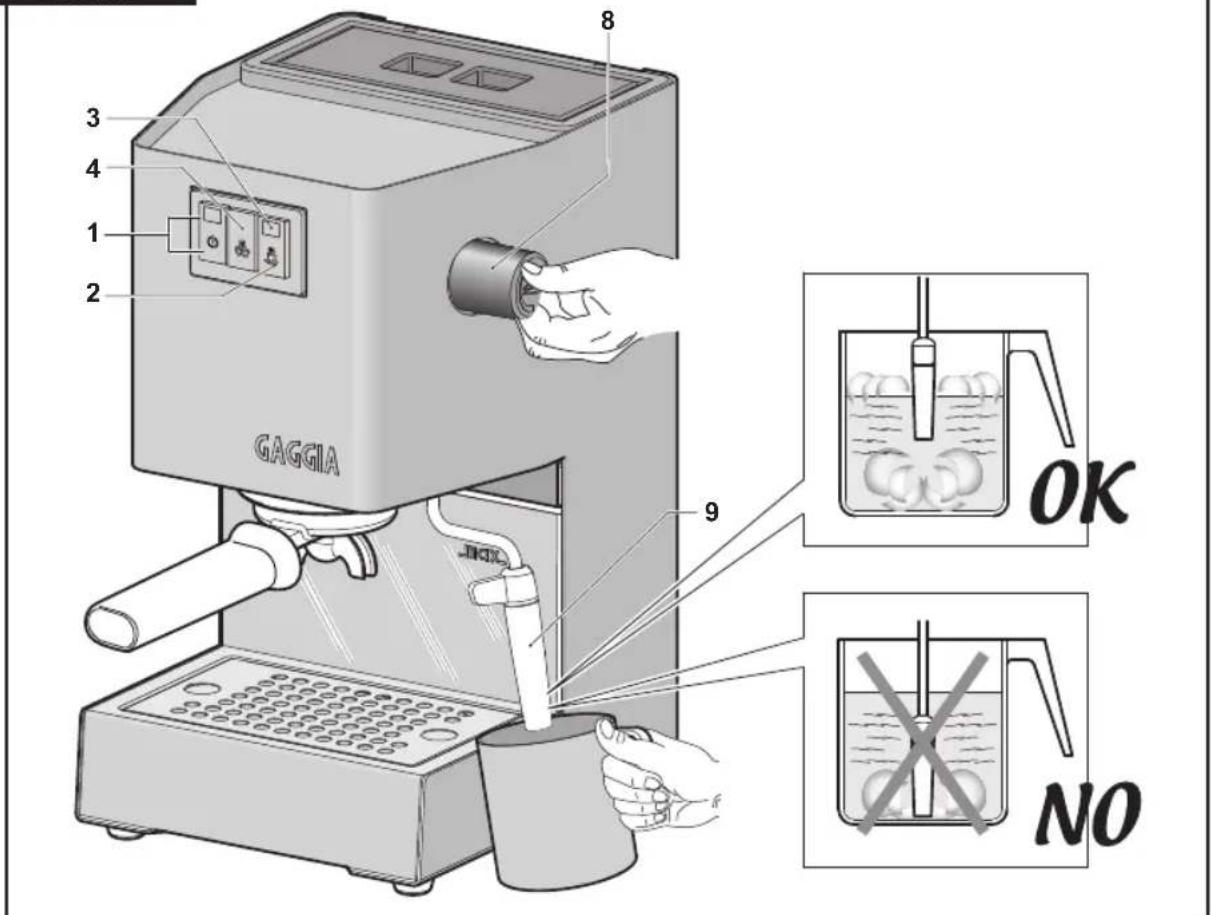
Description of parts:
FIG. 01
1 Main button / Power-on light
2 Hot water button/brew switch (pump)
3 LED indicating the operating temperature has been reached
4 Steam button
5 Drip plate
6 Cup grille
7 Removable water tank (removeable)
8 Steam/hot water knob
9 Pannarello (removeable)
10 Filterholder
11 "Perfect crema" pod filter
12 "Perfect crema" filter for ground coffee
13 Drip tray
14 Frothing jet device
15 Tamper
16 Power cable and plug
17 Measuring spoon
18 Tank cover
Instructions for the power supply cord Electricity can be dangerous! Therefore, always follow the safety regulations carefully. Never use faulty cables! Faulty cables and plugs must be replaced immediately by an Authorised Service Centre.
The voltage of the appliance has been factory-set. Check that the mains voltage corresponds to the specifications on the identification plate fixed on the appliance.
- Insert the plug into a wall socket with suitable voltage.
Preparation:
- Remove the water tank cover (18) and fill with cold water to the MAX line indicated on tank (7). See FIG. 2. You can remove the water tank by pulling it after having removed the grille (5) and the drip tray (13).
IMPORTANT: When inserting the reservoir again, make sure that the silicone pipes are inside it. Check that they are not kinked or blocked.
2 Insert plug (16) into a suitable wall outlet.
3 Press the main button (1). The power-on indicator light will light up.
Make sure the hot water/coffee button (2) and the steam button (4) are not pressed.
This machine has a power saving function. The machine switches off after 9 minutes of inactivity. Press the main button (1) to switch it back on.
Circuit Priming
N.B.: Upon first use, after dispensing steam or when the water tank is empty, the machine's water circuit must always be primed.
This machine, featuring a pump to brew coffee, is equipped with a self-priming system. Place an empty cup under the dispensing unit without inserting the filter holder and press the hot water/coffee button.
You will hear the sound of the operating pump and after few seconds, water will start to escape from the brewing head. After filling the cup, press the hot water/coffee button again.
NOTE: It may happen that the self-priming feature of the pump fails to work temporarily due to an air lock.
In this case water does not flow from brewing head, and the following procedure should be followed:
a) Place a small frothing pitcher or mug under the steam nozzle (9).
b) Turn the knob (8) anti-clockwise to open the steam/hot water dispensing valve and press the hot water/coffee button to activate the pump.
c) After a few seconds, water will flow out of the steam wand. Drain about a cup of water. Turn off the steam/hot water dispensing valve and press the hot water/coffee button.
d) Note: The LED (3) lights to reach the correct temperature. After switching the machine on for the first coffee, wait a few minutes for it to warm up, whereas it will always be ready for the subsequent coffees.

Caution! Never operate pump without water in machine as damage to the pump may occur. Damage of pump run without water is not covered by warranty.
Using the machine for the first time or after a period of inactivity
This simple operation ensures an optimum brewing and must be performed:
- at first start-up;
- when the machine remains inactive for a long time (more than 2 weeks).
NOTE: Dispensed water must be emptied into an adequate drain. It is not suitable for food use. If the container fills up, stop dispensing water during the cycle and empty it before resuming the operation.
A (Fig.02) - Rinse the tank and fill it with fresh drinking water.
B (Fig.03) - Place a container under the steam wand (Pannarello). Open the knob (8) slowly by turning it counter-clockwise. Press the hot water/coffee button (2) and the steam button (4).
C Dispense the whole water tank from the steam/hot water wand. To stop dispensing, press the hot water/brew button (2) and the steam button (4) again. Then close the knob (8) by turning it clockwise.
D (Fig.02) - Fill the water tank with fresh drinking water.
E Insert the filter holder into the brew unit from the bottom and turn it from left to right until it locks into place.
F Place a suitable container under the filter holder.
G Press the brew button (2) and dispense all the water in the water tank. Once the tank is empty, stop dispensing by pressing the brew button again (2). At the end, empty the container.
H Remove the filter holder from the unit by turning it from right to left and rinse it with fresh drinking water.
I The machine is ready for use.
For further information on how to dispense hot water, please refer to sections "How to brew a good Espresso Coffee" and "Making Hot Water".
Important to know
- The taste of your coffee depends on the characteristics of the beans from which it is made, the type of bean, where it was grown and processed. The coffee beans that are roasted for a longer period of time and at higher temperatures will be much darker in colour. Darker beans will produce a richer cup of coffee than the lightly-roasted beans.
- A variety of dark roasts are available from which you can choose to brew your espresso. Each of these roasts is a blend of coffee beans that are roasted at a specific temperature producing a specific type of flavour.
There are decaffeinated beans that have up to 98% of the caffeine content removed.
The next time you purchase coffee for your espresso maker, experiment with one of the many kinds of coffee being sold. You may just find that it tastes better than the blend you have been using. - A fine "espresso grind" for pump-driven machines must be used. Be sure to ask for this when buying coffee or when having beans ground. Do not use a blade-type grinder because it makes too much coffee dust and produces an irregular grind.
- The mark of real espresso is its dark color, rich taste and the light brown, natural froth called "crema" in Italian.
- Cappuccino is simply a combination of espresso and hot, frothy milk. Cappuccino is usually topped with cinnamon, nutmeg or cocoa powder.
- Espresso Coffee should be served immediately after it is made.
- Espresso is served in 2 to 2 ½ oz. demitasse cups. A 4 or 6 oz. cup or glass is used for cappuccino
- Ideally, coffee beans should be ground immediately before using. Remember, it must be an "espresso grind" for pump-driven espresso machines.
- It's best to store ground coffee or beans in an airtight container in the freezer of your refrigerator. Ground coffee tends to absorb food odours.

Warning! Never brew coffee when the steam function is on, as the temperature is too high and there is a risk of burns.
ENGLISH
How to make a good Espresso coffee:
1 Follow the procedure described under "Preparation".
IMPORTANT NOTE: If the frothing jet device (14) is not inserted, the filter holder does not brew coffee correctly. For this reason, make sure that the device is always inserted in the filter holder before placing the Perfect crema filter.
Insert the "Perfect crema" filter for ground coffee (12) into the filter holder, both for brewing 1 or 2 coffee cups. Insert the filter holder (10) into the brew unit from the bottom and wait for it to heat up.
2 Place a container under the filter holder (10). Preheat the filter holder by pressing the hot water/coffee button (2) (this is only required for the first coffee).
Water will start coming out.
3 After having dispensed 150cc of water, press the hot water/coffee button (2) again.
4 Wait until the machine has reached the correct temperature with filter holder inserted (the heating time lasts a few minutes). Use this time to set table, prepare cups, coffee, milk, etc.
5 After the warm-up period, remove the warm filter-holder (10) from the brewing head and fill with correctly ground espresso coffee using the measuring spoon provided.
Place one level measure of coffee in basket for each cup of espresso.
Do not overfill.
Gently tamp down coffee with the tamper (15) provided. Do not compress too firmly.
6 Clean any excess coffee from the rim of filter holder (10). Insert filter holder into brew head by holding handle approximately 45 degrees to the left as you face machine.
When properly aligned, move handle firmly to the right to lock into position. The handle should point to the front of the machine or slightly to the right.
7 Place one or two espresso cups on the drip plate to line up with the spouts of the filter holder. Press the hot water/coffee button.
Espresso will start to flow into cups.
8 When the cups are 3/4 full, press the hot water/coffee button.
The more water you allow to flow, the weaker the coffee. When properly made, the espresso will have a light brown foam "crema" floating on the top.
If not, refer to "In the event of faulty function".
9 Remove cups and serve.
10 To make more espresso, carefully and slowly remove the filter holder by moving handle to the left. Be careful as hot water will be on top of the coffee grinds in the holder. Some water will continue to drip from brewing head as filter holder is removed. That is normal and due to the pump pressure in the system. Knock out used coffee grinds from filter. For more espresso repeat steps 5 to 9 above.
Using Coffee Pods
To use coffee pods, remember to only use the "Perfect crema" pod filter (11).
Note: If present, remove the "Perfect crema" filter for ground coffee (11).
1 Follow the procedure described under "Preparation".
2 Insert the "perfect cream" filter for pods (11).
IMPORTANT NOTE: If the frothing jet device (14) is not inserted, the filter holder does not brew coffee correctly. For this reason, make sure that the device is always inserted in the filter holder before placing the Perfect crema filter.
3 Insert the filter holder (10) into the brew unit from the bottom and wait for it to heat up.
4 Place a container under the filter holder (10). Preheat the filter holder by pressing the hot water/coffee button (this is only required for the first coffee).
Water will start coming out.
5 After having dispensed 150cc of water, press the hot water/coffee button again.
6 After the warm-up, remove the filter holder (10) and insert the pod. Make sure the paper of the pod does not overhang the filter holder.
7 Insert the filter holder into the machine with a 45irc movement towards the left.
8 Rotate it to the right to tighten it into position. The filter holder handle shall be perpendicular to the machine or slightly tilted towards the right.
9 Place a cup under the filter holder. Press the hot water/coffee button.
Coffee will start coming out.
10 When the cup is 3/4 full, press the hot water/coffee button again. Remove the cup and serve.
11 To brew more coffee, slowly remove the filter holder with caution, moving it towards the left.
Make sure not to get burnt with water from coffee grounds. Once the filter holder has been removed, some water will still drop.
This is due to the water pressure in the system. Remove the coffee grounds from the filter. To brew more coffee, repeat the procedure from step 6 to 10.
Important note: Filters should be kept clean to guarantee perfect results. Clean daily after use.
If you experience a malfunction in the coffee brewing process, leave the Filters in a metal container of hot boiling water for 10 minutes, then rinse them in running water and perform another brewing.
For a deeper cleaning of the filters, we recommend using the cleaning tablets specifically designed to maintain the efficiency of the machine.

When preparing to make a cappuccino, have all of the ingredients at hand as well as a frothing pitcher (or mug) halffilled with skimmed or low-fat milk and cups that are larger (6 oz.) than those used for espresso.
Frothing Milk
The density of frothed milk will depend on milk fat content. The pannarello (9) will produce all the necessary emulsion without bringing the milk to a boil.
It may require two or three attempts to "become an expert" but you will be successful at frothing milk if you give it a chance Move the pannarello slightly outward so as to insert the jug without hitting the base of the espresso machine.
Version with pannarello:
Warning! Danger of scalding! Dispensing may be preceded by small jets of hot water. The steam wand may reach high temperatures: Never touch it with bare hands.
1 Make espresso (in a large cups) as described above.
2 Press the steam button (4).
3 After 15-20 seconds, and when the LED indicating the correct temperature has been reached (3) goes on, place the half-filled jug with cold milk under the pannarello. See Fig.03.
4 Slowly turn steam valve knob (8) counter clockwise to release steam.
IMPORTANT: The more you turn the knob, the greater the steam pressure for frothing.
N.B.: Dispensing should not exceed 60 seconds.
5 Move pitcher in circular motion keeping the tip of steam nozzle just under surface of milk as it begins to froth. Do not let milk come to a boil since it will not froth.
6 When you have made enough froth, turn steam knob clockwise to shut off steam and remove pitcher. Press the steam button (4).
7 Spoon the froth onto the espresso in each cup and gently pour the hot milk along the side of the cup. Garnish with cinnamon, cocoa or nutmeg. Serve.
8 NOTE: If you want to make more espresso immediately after steaming milk, the machine boiler must be refilled with water and temperature brought down to a brewing temperature. Otherwise, espresso may taste "burned".

Warning! If coffee is brewed without reducing the temperature through water dispensing, you may get burnt!
Place an empty cup on drip plate.
Do not insert filter holder.
Press the hot water/coffee button to fill the cup with water.
Press the hot water/coffee button again.
You many now proceed to make more espresso.
ENGLISH
Making hot water
1 Follow the procedure described under "Preparation".
2 Press the main button (1).
3 Wait a few minutes to allow the espresso machine to reach the correct temperature.
4 Place a pitcher under the steam nozzle (9).
5 Slowly turn the steam knob (8) anticlockwise so that the hot water and put the hot water/brew switches (2) and the steam switch (4) to "1" can be released.
N.B.: Dispensing should not exceed 60 seconds.
6 Once the desired quantity of hot water is obtained, turn the steam knob clockwise and put the hot water/brew switches (2) and the steam switch (4) to "0" to stop the water release.
7 NOTE: If you want to make espresso immediately after making hot water, the temperature of the machine boiler must be brought down to a brewing temperature. Otherwise, espresso may taste "burned".
To do this: place an empty cup on drip plate. Do not insert filter holder.
Press the hot water/coffee (2) and the steam (4) buttons.
Fill the cup with water. Press the hot water/coffee (2) and the steam (4) buttons again.
You may now proceed to make espresso.
Keeping it clean:
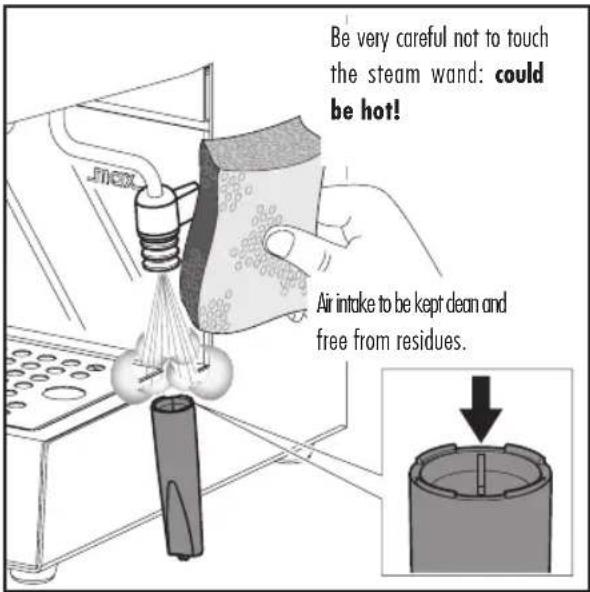
1 IMPORTANT: the steam nozzle should be cleaned after each use in order to avoid build up of milk deposits that are very difficult to clean.
As described in the "DESCRIPTION" section, cleaning is facilitated thanks to the pannarello being completely removed by pulling it down.
The outer part of nozzle can be removed by pulling downward.
The outside of the steam pipe can be cleaned with a damp cloth.
The steam jet is cleaned by running a shot of steam through it.
The hole in the steam nozzle must be kept open. A needle may be used.
2 Clean filter holder and filter in warm water after use.
3 Wipe body of machine with a damp cloth as required.
4 Remove drip tray and plate (5-13) and wash in warm soapy water. Do not use abrasive substances.
5 If the machine is not used for long periods, remove the water from the boiler by pressing the hot water/coffee button and letting an amount of water flow from the pannarello equal to two cups of cappuccino.
However, do this only after you have filled tank with fresh water. Never operate pump unless there is water in tank.
6 NOTE: It is very normal for an espresso machine to emit steam and drip occasionally as the water pressure changes during use.
Be certain to empty drip tray (13) as required.
Descaling
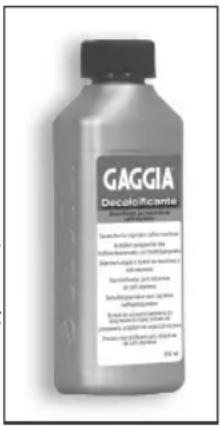
Limescale normally builds up with the use of the appliance. The machine needs descaling every 1-2 months (if used) and/or whenever a reduction in water flow is noticed. Use the GAGGIA descaling product only.
NOTE: In case of conflict, priority must be given to what is indicated in the operation and maintenance manual over the instructions provided on separately sold accessories and materials.
NOTE: Use the GAGGIA descaling product only. Its formula has been designed to ensure better machine performance and operation for its whole operating life. If correctly used, it also avoids alterations in the brewed product. The descaling solution is to be disposed of according to the manufacturer's instructions and/or regulations in force in the country of use.
NOTE: Never drink the descaling solution or any products dispensed until the cycle has finished. Never use vinegar as a descaling solution.
1 Insert the filter holder into the brew unit from the bottom and turn it from left to right until it locks into place.
2 Remove and empty the water tank.
3 (Fig.02) - Pour HALF the content of the GAGGIA concentrated descaling solution into the water tank, and then fill the tank with fresh drinking water up to the MAX level.
4 Remove the Pannarello (or Cappuccinatore) installed on the steam wand, if any.
5 Switch on the machine by pressing the ON/OFF button (1).
(Fig.03) - Fill up (as described in the Section "Making hot water" of the manual) two cups of water (about 150 ml each) from the steam/hot water wand and turn off the machine by pressing the ON/OFF button (1).
6 Leave the descaling solution to descale for approx.15-20 minutes with the machine turned off.
7 Switch on the machine by pressing the ON/OFF button (1).
(Fig.03) - Fill up (as described in the Section "Making hot water" of the manual) two cups of water (about 150ml each) from the steam/hot water wand. Then turn the machine off by means of the ON/OFF button (1) and leave it off for 3 minutes.
8 Repeat the operations as described in step 7 until the water tank is completely empty.
9 (Fig.02) - Rinse the tank and fill it again with fresh drinking water.
10 (Fig.03) - Place a container under the steam wand (Pannarello). Open the knob (7) slowly by turning it counter-clockwise. Press the hot water/brew button (2) and steam button (4).
ENGLISH
11 Dispense the whole water tank from the steam/hot water wand. To stop dispensing, press the hot water/brew button (2) and the steam button (4) again. Then close the knob (8) by turning it clockwise.
12 (Fig.02) - Fill the water tank with fresh drinking water.
13 Place a suitable container under the filter holder.
14 Press the brew button (2) and dispense all the water in the water tank. Once the tank is empty, stop dispensing by pressing the brew button again (2). At the end, empty the container.
15 Remove the filter holder from the unit by turning it from right to left and rinse it with fresh drinking water.
16 Repeat the operations once again from point (9) for a total of 4 tanks. The machine is now ready to be used.
The descaling cycle is now complete.
(Fig.03) - Fill the tank again with fresh water.
If necessary, prime the circuit as described in Section "Starting up" of the manual.
Once finished, reposition the Pannarello (or Cappuccinatore) on the steam wand.
In the event of faulty function
| Problem: Check to ensure against the following: | |
| Coffee does not flow. Water is in tank. | Filter basket clogged because coffee is too fine or compressed too firmly.Shower disc requires cleaning. |
| Coffee flows too quickly. Coffee is ground too coarsely.Coffee is not pressed down with tamper.Coffee is ground too coarsely. | |
| Pump makes loud noise. No water in tank.Pump not primed. | |
| Water leaking excessively from filter holder. | Filter holder not properly inserted in brew head.Gasket in brewing head dirty or worn.Coffee grinds not cleaned off the rim of filter holder. |
| Espresso has little creamy froth. Coffee is ground too coarsely.Coffee is not pressed down with tamper.Coffee is too old or dried out. | |
| Espresso is too cold. Machine is not warmed up.Coffee is ground too coarsely.Coffee has been brewed in cold cups. It is recommended to always brew coffee in warm cups. | |
| Not enough milk froth. Steam nozzle and/or air intake hole clogged.Milk is too hot. | |
ENGLISH
DEUTSCH
9 Tirar as xicaras e servir.
Instructions for end-of-life disposal treatment
This product complies with EU Directive 2002/96/EC.
The symbol on the product or on its packaging
indicates that this product may not be treated as household waste. Instead it shall be handed over to the applicable collection point for the recycling of electrical and electronic equipment.
By ensuring this product is disposed of correctly, you will help prevent potential negative consequences for the environment and human health, which could otherwise be caused by inappropriate waste handling of this product. For more detailed information about recycling of this product, please contact your local city office, your household waste disposal service or the shop where you purchased the product.


- A
- ONATIW
- GAGGIA
- MILANO
- mod. CLASSIC
- PT
- ITALIANO
- Congratulations on your wise choice!
- Safety Instructions
- Warning
- Cautions
- ENGLISH
- Compliance with Standards
- Description of parts:
- 01
- Instructions for the power supply cord Electricity can be dangerous! Therefore, always follow the safety regulations carefully. Never use faulty cables! Faulty cables and plugs must be replaced immediately by an Authorised Service Centre.
- Preparation:
- Circuit Priming
- Using the machine for the first time or after a period of inactivity
- Important to know
- How to make a good Espresso coffee:
- Using Coffee Pods
- Important note: Filters should be kept clean to guarantee perfect results. Clean daily after use.
- Frothing Milk
- Version with pannarello:
- IMPORTANT: The more you turn the knob, the greater the steam pressure for frothing.
- N.B.: Dispensing should not exceed 60 seconds.
- Making hot water
- Keeping it clean:
- Descaling
- DEUTSCH
Brand : GAGGIA
Model : RI9403
Category : Coffee machine