
CP9239 - Shaving accessory PHILIPS - Free user manual and instructions
Find the device manual for free CP9239 PHILIPS in PDF.


| Product type | Replacement razor head |
| Compatible brand | Philips Series 9000 |
| Model | CP9239 |
| Number of heads | 3 rotary heads |
| Blade material | Stainless steel |
| Frame material | ABS plastic |
| Dimensions of each head | 2.5 x 2.5 x 1.5 cm |
| Total weight | 10 g |
| Power source | Cordless (mechanical part) |
| Main function | Close and comfortable shave |
| Cutting technology | Multi-directional blades |
| Maintenance | Rinse under running water |
| Recommended replacement | Every 12 months |
| Safety | Use only on compatible models |
| Spare parts available | Yes, sold separately |
| Repairability | Easy tool-free replacement |
| Package contents | 1 set of 3 heads |
| Warranty | 2 years |
| Country of manufacture | Netherlands |
| Packaging | Blister pack |
| Protection rating | IPX7 (waterproof) |
Frequently Asked Questions - CP9239 PHILIPS
User questions about CP9239 PHILIPS
0 question about this device. Answer the ones you know or ask your own.
Ask a new question about this device
Download the instructions for your Shaving accessory in PDF format for free! Find your manual CP9239 - PHILIPS and take your electronic device back in hand. On this page are published all the documents necessary for the use of your device. CP9239 by PHILIPS.
USER MANUAL CP9239 PHILIPS
Always here to help you
Register your product and get support at
www.philips.com/welcome

HQ6900 series

natural_image
Close-up of a Philips MORELCO electric shaver with three rotary dials (no visible text or symbols on body)User manual
PHILIPS

ENGLISH 4
DANSK 13
DEUTSCH 21
ΕΛΛΗΝΙΚΑ 30
ESPAÑOL 39
SUOMI 48
FRANÇAIS 57
ITALIANO 66
NEDERLANDS 75
NORSK 84
PORTUGUÊS 93
SVENSKA 102
TÜRKÇE 111
Introduction
Congratulations on your purchase and welcome to Philips!
To fully benefit from the support that Philips offers, register your product at www.philips.com/welcome.
The Close Cut system ensures a close and easy shave every day.
For the best result, move the shaving heads over your skin in both straight and circular movements.
Important
Read this important information carefully before you use the shaver and save it for future reference.
Danger
- Keep the shaver and the mains cord dry.
Warning
- This appliance is not intended for use by persons (including children) with reduced physical, sensory or mental capabilities, or lack of experience and knowledge, unless they have been given supervision or instruction concerning use of the appliance by a person responsible for their safety.
- Children should be supervised to ensure that they do not play with the appliance.
Caution
- This appliance is not washable. Never immerse the appliance in water, nor rinse it under the tap.
- Do not use the shaver, the mains cord or any other part if it is damaged, as this may cause injury. Always replace a damaged mains cord or part with one of the original type.
- Never use compressed air, scouring pads, abrasive cleaning agents or aggressive liquids such as petrol or acetone to clean the appliance.
Electromagnetic fields (EMF)
This Philips appliance complies with all applicable standards and regulations regarding exposure to electromagnetic fields.
General
- The shaver is equipped with an automatic voltage selector and is suitable for mains voltages ranging from 100 to 240 volts.
- Maximum noise level: Lc = 69dB(A)
General description (Fig. 2)
1 Protection cap
2 Shaving unit
3 Shaver on/off slide
4 Charging light (HQ6996, HQ6990, HQ6986, HQ6976, HQ6950, HQ6947, HQ6927, HQ6926, HQ6925, HQ6923 only)
5 Trimmer (HQ6996, HQ6990, HQ6976, HQ6950, HQ6946 only)
6 Trimmer slide (HQ6996, HQ6990, HQ6976, HQ6950, HQ6946 only)
7 Cleaning brush
8 Mains cord with plug
9 Appliance plug
Charging
Charge the appliance:
- before first use and when you have not used the appliance for a long time
- when the motor stops or starts running slower
When you have charged the shaver for the first time and after a long period of disuse, optimise the battery capacity in the following way:
1 Fully charge the shaver and then use it normally until the battery is completely empty. Repeat this process two more times. If you optimise the battery capacity in this way, you can also charge the shaver in between shaves, even if the battery is not completely empty yet.
Charging the shaver (HQ6996, HQ6990, HQ6986, HQ6976, HQ6950, HQ6947, HQ6927, HQ6926, HQ6925, HQ6923 only)

natural_image
Simple line drawing of a tube with a small inset showing a dot and a black arrow pointing upward (no text or symbols)Quick charge (HQ6996, HQ6990, HQ6986 only)
After the shaver has charged for 3 minutes, it contains enough energy for one cordless shave.
1 Put the appliance plug in the shaver.
2 Put the mains plug in the wall socket.
Note: Make sure the shaver is switched off.

The charging light goes on.
DHQ6996, HQ6990, HQ6986: Charge the shaver for at least 1 hour, but not more than 24 hours.
When the battery is fully charged, the charging light starts flashing.
HQ6976, HQ6950, HQ6947, HQ6927, HQ6926, HQ6925, HQ6923: Charge the shaver for at least 8 hours, but not more than 24 hours.
Note: Do not leave the shaver connected to the mains continuously.
Note: You can also shave without charging. Simply connect the shaver to the mains.
3 Remove the mains plug from the wall socket and pull the appliance plug out of the shaver when the battery is fully charged.
Using the appliance
HQ6946, HQ6906, HQ6902 only:
1 Put the appliance plug in the shaver.
2 Put the mains plug in the wall socket.
Shaving

natural_image
Illustration of a person applying a circular massage or pressure technique to their face (no text or symbols present)1 Push the on/off slide upwards to switch on the shaver.
2 Move the shaving heads over your skin. Make circular movements.
Shaving on a dry face gives the best results.
Your skin may need 2 or 3 weeks to get accustomed to the Philips shaving system.
3 Push the on/off slide downwards to switch off the shaver.

natural_image
Diagram of a device's top view with a downward arrow indicating compression or disassembly (no text or symbols present)4 Put the protection cap on the shaver every time you have used it, to prevent damage.
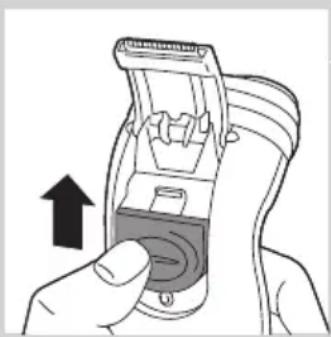
Trimming (HQ6996, HQ6990, HQ6976, HQ6950, HQ6946 only)
natural_image
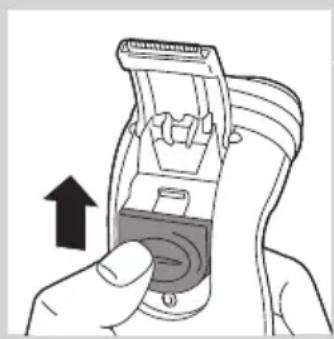
Illustration of a hand inserting a device into a plastic component, with an upward arrow indicating action (no text or symbols present)You can use the trimmer to trim your sideburns and moustache.
1 Push the trimmer slide upwards to open the trimmer.
The trimmer can be activated while the motor is running.
Cleaning and maintenance
Regular cleaning guarantees better shaving performance.
This appliance is not washable. Never immerse the appliance in water, nor rinse it under the tap.
Never use scouring pads, abrasive cleaning agents or aggressive liquids such as petrol or acetone to clean the appliance.
- For easy and optimal cleaning, Philips Shaving Head Cleaning Spray (type no. HQ110) is available. Ask your Philips dealer for information.
Note: Philips Shaving Head Cleaning Spray may not be available in all countries. Contact the Consumer Care Centre in your country about the availability of this accessory.
You can also clean the shaver in the following way:
Every week: shaving unit and hair chamber
natural_image
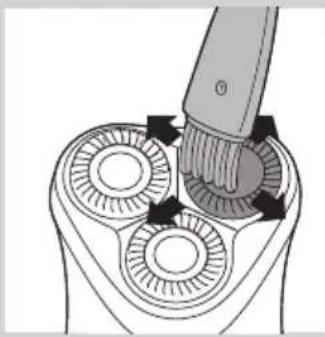
Diagram of a hairbrush working on a circular mechanical component with three blades (no text or symbols)1 Switch off the shaver. Remove the mains plug from the wall socket and pull the appliance plug out of the shaver.
2 Clean the top of the appliance first. Use the cleaning brush supplied.
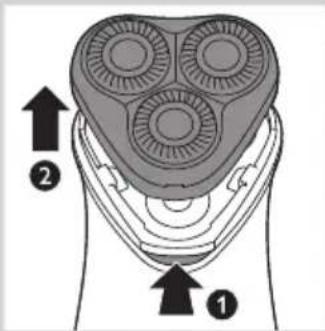
3 Press the release button (1) and remove the shaving unit (2).

natural_image
Diagram of a plug inserted into a socket with three pins, showing internal wiring (no text or symbols)4 Clean the inside of the shaving unit and the hair chamber with the cleaning brush.
ENGLISH8

natural_image
Diagram of a hand holding a three-pin electric shaver with a downward arrow indicating compression (no text or symbols present)5 Put the shaving unit back onto the shaver.
Every month: shaving heads

1 Switch off the shaver. Remove the mains plug from the wall socket and pull the appliance plug out of the shaver.
2 Press the release button (1) and remove the shaving unit (2).
3 Turn the wheel anticlockwise (1) and remove the retaining frame (2).
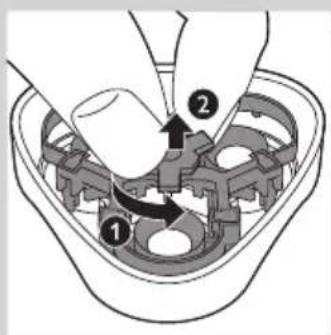
4 Remove the shaving heads (cutters and guards) one by one and clean them with the cleaning brush supplied.
Note: Do not clean more than one cutter and guard at a time, since they are all matching sets. If you accidentally mix up the cutters and guards, it may take several weeks before optimal shaving performance is restored.

natural_image
Mechanical gear assembly diagram showing a central shaft and three meshed gears (no text or labels)5 Clean the cutter with the short-bristled side of the cleaning brush. Brush carefully in the direction of the arrow.

natural_image
Illustration of a hand holding a tool interacting with a mechanical component (no text or symbols visible)
natural_image
Illustration of a hand stirring a bowl with liquid, no text or symbols present
6 Brush the guard.
7 Put the shaving heads back into the shaving unit. Put the retaining frame back into the shaving unit, push it down (1) and turn the wheel clockwise (2).
8 Put the shaving unit back onto the shaver.
Extra-thorough cleaning
For extra-thorough cleaning, put the shaving heads in a degreasing liquid (e.g. alcohol) every six months. To remove the shaving heads, follow steps 1 to 4 described above. After cleaning, lubricate the central point on the inside of the guards with a drop of sewing machine oil to prevent wear of the shaving heads.
Trimmer (HQ6996, HQ6990, HQ6976, HQ6950, HQ6946 only)

natural_image
Line drawing of a hand using a hairpin to press down a clip (no text or symbols)Clean the trimmer every time you have used it.
1 Switch off the shaver. Remove the mains plug from the wall socket and pull the appliance plug out of the shaver.
1 Switch off the shaver. Remove the mains plug from the wall socket and pull the appliance plug out of the shaver.
2 Clean the trimmer with the cleaning brush supplied.

Tip: Lubricate the trimmer teeth with a drop of sewing machine oil every six months.
Storage

natural_image
Diagram of a device with a circular top and arrow indicating downward motion (no text or symbols)1 Put the protection cap on the shaver to prevent damage.
Replacement
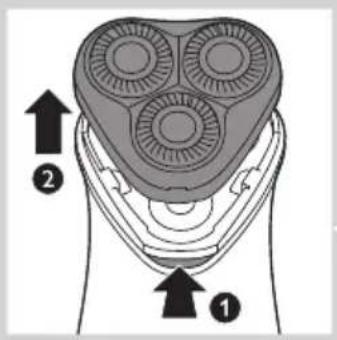
Replace the shaving heads every two years for optimal shaving results. Replace damaged or worn shaving heads with HQ56 Philips Shaving Heads only.
1 Switch off the shaver. Remove the mains plug from the wall socket and pull the appliance plug out of the shaver.
2 Press the release button (1) and remove the shaving unit (2).
3 Turn the wheel anticlockwise (1) and remove the retaining frame (2).


natural_image
Mechanical gear assembly diagram showing a central shaft and three meshed gears with an arrow indicating direction (no text or labels)4 Remove the shaving heads and place new ones in the shaving unit.
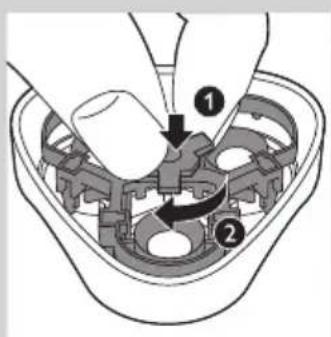
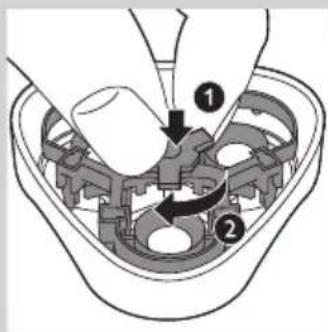
5 Put the retaining frame back into the shaving unit, push it down (1) and turn the wheel clockwise (2).
6 Put the shaving unit back onto the shaver.
Ordering accessories
To buy accessories or spare parts, visit www.shop.philips.com/service or go to your Philips dealer. You can also contact the Philips Consumer Care Centre in your country (see the worldwide guarantee leaflet for contact details).
The following accessories are available:
- HQ56 Philips Shaving Heads
- HQ110 Philips Shaving Head Cleaning Spray
Environment

natural_image
Symbol of a trash bin crossed with a diagonal line and a horizontal bar below (no text or numbers present)- Do not throw away the appliance with the normal household waste at the end of its life, but hand it in at an official collection point for recycling. By doing this, you help to preserve the environment.
- The built-in rechargeable battery contains substances that may pollute the environment. Always remove the battery before you discard and hand in the appliance at an official collection point. Dispose of the battery at an official collection point for batteries. If you have trouble removing the battery, you can also take the appliance to a Philips service centre. The staff of this centre will remove the battery for you and will dispose of it in an environmentally safe way.
Removing the rechargeable battery

natural_image
Top-down line drawing of a mobile phone receiver with no text or symbolsOnly remove the rechargeable battery when you discard the shaver. Make sure the battery is completely empty when you remove it.
1 Switch off the shaver. Remove the mains plug from the wall socket and pull the appliance plug out of the shaver.
2 Let the shaver run until it stops.
3 Undo the screws at the back of the shaver and open it.
4 Cut the battery strips with a cutter and pull the battery loose from the glued strip.
The metal battery strips are very sharp.
Do not connect the shaver to the mains again after you have removed the battery.
Guarantee and support
If you need information or support, please visit www.philips.com/support or read the separate worldwide guarantee leaflet.
Guarantee restrictions
The shaving heads (cutters and guards) are not covered by the terms of the international guarantee because they are subject to wear.
Troubleshooting
This chapter summarises the most common problems you could encounter with the appliance. If you are unable to solve the problem with the information below, visit www.philips.com/support for a list of frequently asked questions or contact the Consumer Care Centre in your country.
Problem Possible cause Solution
| Reduced shaving performance. | The shaving heads are dirty. You have not cleaned the shaver well enough or you have not cleaned it for a long time. | Clean the shaver thoroughly before you continue shaving. See chapter ‘Cleaning and maintenance’. |
| Long hairs obstruct the shaving heads. | Clean the cutters and guards with the cleaning brush supplied. See chapter ‘Cleaning and maintenance’, section ‘Every month: shaving heads’. | |
| The shaving heads are damaged or worn. | Replace the shaving heads every 2 years for optimal shaving results. See chapter ‘Replacement’. | |
| The shaver does not work when I push the on/off slide upwards. | The rechargeable battery is empty. | Charge the battery. See chapter ‘Charging’. |
| The shaver is not connected to the mains. | Put the mains plug in the wall socket. | |
| Skin irritation. Your skin needs time to get used to the Philips shaving system. | Skin irritation during the first 2-3 weeks of use is normal. After this period, the skin irritation usually disappears. | |
Introduktion
natural_image
Prohibition sign showing a faucet crossed out by a diagonal line, indicating no fire or water discharge (no text present)
natural_image
Prohibition sign showing a faucet without a shower, enclosed in a circle (no text or symbols)Forsigtig
natural_image
Simple line drawing of a U-shaped object with a small circular mark and an upward arrow below it (no text or symbols)natural_image
Illustration of a person applying a circular massage or pressure technique to their face (no text or symbols present)natural_image
Diagram of a device with a downward arrow indicating compression or disassembly (no text or symbols present)natural_image
Illustration of a hand holding a hairdryer with an upward arrow indicating action (no text or symbols present)natural_image
Diagram of a hairbrush working on a circular mechanical component with three teeth (no text or symbols)1 Sluk for shaveren. Tag netstikket ud af stikkontakten og apparatstikket ud af shaveren.
natural_image
Illustration of a plug inserted into a socket with three pins (no text or symbols)natural_image
Diagram of a hand holding a three-pin electric shaver with a downward arrow indicating compression (no text or symbols present)Hver måned: Skærene

1 Sluk for shaveren. Tag netstikket ud af stikkontakten og apparatstikket ud af shaveren.
3 Drej hjulet venstre om (1), og fjern samlerammen (2).

natural_image
Mechanical gear assembly diagram showing a central gear with three teeth and an upper gear (no text or labels)natural_image
Illustration of a hand holding a tool interacting with a mechanical component, showing a black arrow indicating motion (no text or symbols present)natural_image
Illustration of a hand brushing a bowl with liquid, no text or symbols present6 Børst lamellen.

natural_image
Line drawing of a hand using a tool to adjust or install a component, showing arrows indicating movement (no text or symbols present)natural_image
Diagram of a device with a black arrow pointing to a circular component (no text or symbols)
natural_image
Mechanical gear assembly diagram showing a central shaft and three meshed gears (no text or labels)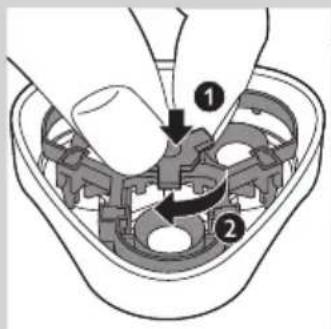
natural_image
Symbol of a waste bin with crossed lines indicating no waste, above a solid black rectangle (no text or labels)natural_image
Diagram of a handheld device with directional arrows indicating movement or force (no text or symbols)"World-Wide Guarantee".
natural_image
Prohibition sign showing a faucet without a shower, enclosed in a circle (no text or symbols)
natural_image
Prohibition sign showing a faucet without raindrops, enclosed in a circle (no text)Achtung
natural_image
Simple line drawing of a tube with a small inset showing a droplet and a black arrow pointing upward (no text or symbols)natural_image
Illustration of a person applying a circular massage or pressure technique to their ear (no text or symbols present)natural_image
Diagram of a device with a downward arrow indicating compression or disassembly (no text or symbols present)Trimmen (nur HQ6996, HQ6990, HQ6976, HQ6950, HQ6946)

natural_image
Illustration of a hand holding a handheld device with an upward arrow indicating motion (no text or symbols present)natural_image
Diagram of a hairbrush working on a three-blade circular object with arrows indicating rotation direction (no text or symbols)natural_image
Illustration of a hand inserting plug into a socket with three pins (no text or symbols)natural_image
Diagram of a hand holding a three-pin shaver with a downward arrow indicating compression (no text or symbols)natural_image
Diagram of a mechanical gear assembly with a central shaft and three meshed gears, no text or symbols present.natural_image
Illustration of a hand holding a tool interacting with a textured object, no text or symbols presentnatural_image
Illustration of a hand brushing a tooth in a circular basin (no text or symbols)natural_image
Illustration of a hand using a handheld tool to adjust or install a device (no text or symbols visible)natural_image
Diagram of a device with a black arrow indicating downward motion (no text or symbols present)
natural_image
Mechanical gear assembly diagram showing a central shaft and three meshed gears (no text or labels)Zubehör bestellen
natural_image
Symbol of a trash bin crossed with a diagonal line, no text or numbers presentnatural_image
Top-down schematic of a mobile phone receiver with directional arrows indicating signal flow (no text or labels)natural_image
Prohibition sign showing a faucet without shower, enclosed in a circle (no text or symbols)
natural_image
Prohibition sign showing a faucet crossed out by a diagonal line, indicating no pollution or water release.Προσοχή
natural_image
Simple line drawing of a U-shaped object with a small circular mark and an upward arrow below it (no text or symbols)natural_image
Illustration of a person applying a circular massage or pressure technique with directional arrows (no text or symbols)natural_image
Diagram of a device with a downward arrow indicating compression or disassembly (no text or symbols present)natural_image
Illustration of a hand inserting a hair into a device with an upward arrow (no text or symbols)natural_image
Mechanical gear assembly diagram showing a central shaft and three meshed gears (no text or labels)natural_image
Illustration of a hand holding a tool interacting with a textured mechanical component (no text or symbols visible)natural_image
Illustration of a hand brushing a tooth in a circular basin (no text or symbols)natural_image
Illustration of a hand using a hairpin to press down a component (no text or symbols visible)natural_image
Diagram of a device's top view showing a black arrow pointing to a circular component (no text or symbols present)natural_image
Symbol of a trash bin with crossed lines indicating no waste or restriction, accompanied by a solid black rectangle below (no text or symbols)natural_image
Line drawing of a handheld device with directional arrows indicating movement or force (no text or symbols)natural_image
Simple line drawing of a U-shaped object with a small circular mark and an upward arrow below it (no text or symbols)natural_image
Illustration of a person applying a circular massage or pressure technique to their ear (no text or symbols present)natural_image
Diagram of a device with a downward arrow indicating compression or disassembly (no text or symbols present)natural_image
Illustration of a hand holding a small mechanical device with an upward arrow indicating motion (no text or symbols present)natural_image
Diagram of a hairbrush applying force to a circular mechanical component (no text or symbols)natural_image
Diagram of a plug inserted into a socket with three pins (no text or symbols)natural_image
Diagram of a person's face with three circular blades, showing a downward arrow indicating compression or disassembly (no text or symbols present)natural_image
Diagram of a mechanical gear assembly with a central shaft and three meshed gears, no text or symbols present.natural_image
Illustration of a hand holding a tool interacting with a textured object, no text or symbols presentnatural_image
Illustration of a hand brushing a tooth in a circular basin (no text or symbols)natural_image
Illustration of a hand using a handheld tool to adjust or install a device (no text or symbols visible)natural_image
Diagram of a device's top view showing a black arrow pointing to a circular component (no text or symbols present)natural_image
Mechanical gear assembly diagram showing a central shaft and three meshed gears (no text or labels)natural_image
Symbol of a trash bin crossed with a diagonal line and a horizontal bar below (no text or numbers present)natural_image
Line drawing of a mobile phone receiver with directional arrows indicating sound waves (no text or symbols)natural_image
Prohibition sign showing a faucet crossed out by a diagonal line, indicating no fire or water discharge (no text present)
natural_image
Prohibition sign showing a faucet without a shower, enclosed in a circle (no text or symbols)Lataaminen
Lataa laite
natural_image
Simple line drawing of a tube with an arrow pointing upward, no text or symbols presentPikalataus (vain HQ6996, HQ6990, HQ6986)
natural_image
Line drawing of a three-pin electric shaver (no text or symbols)natural_image
Illustration of a person applying a circular massage or pressure technique to their face (no text or symbols present)natural_image
Diagram of a device with a downward arrow indicating compression or disassembly (no text or symbols present)natural_image
Hand holding a hairbrush with a button, showing mechanical components and an upward arrow (no text or symbols)natural_image
Diagram of a hairbrush applying force to a circular mechanical component with three blades (no text or symbols)natural_image
Diagram of a plug inserted into a socket with three pins (no text or symbols)
natural_image
Diagram of a hand holding a three-pin electric shaver with a downward arrow indicating compression (no text or symbols present)natural_image
Mechanical gear assembly diagram showing a central shaft and three meshed gears (no text or labels)natural_image
Illustration of a hand stirring a bowl with liquid, no text or symbols present
natural_image
Illustration of a hand using a hairpin to adjust a component (no text or symbols visible)
natural_image
Diagram of a device with a downward arrow indicating compression or disassembly (no text or symbols present)
natural_image
Mechanical gear assembly diagram showing a central shaft and three meshed gears (no text or labels)
natural_image
Symbol of a waste bin with no text or numbers presentnatural_image
Top-down schematic of a mobile phone with directional arrows indicating movement or control (no text or symbols)natural_image
Prohibition sign showing a faucet without a shower, enclosed in a circle (no text or symbols)
natural_image
No smoking sign with faucet symbol (no text)natural_image
Simple line drawing of a U-shaped object with a small circular mark and an upward arrow below it (no text or symbols)Charge rapide (HQ6996, HQ6990, HQ6986 uniquement)
natural_image
Line drawing of a pushpin with three buttons and a circular button (no text or symbols)natural_image
Illustration of a person applying a circular massage or pressure technique with directional arrows (no text or symbols)natural_image
Diagram of a device's top view showing a circular component with a downward arrow indicating compression or disassembly (no text or symbols present)natural_image
Illustration of a hand inserting a hair clip into a device, with an upward arrow indicating the process (no text or symbols present)natural_image
Diagram of a hairbrush working on a circular mechanical component with three blades (no text or symbols)natural_image
Diagram of a plug inserted into a socket with three pins, showing wiring (no text or symbols)natural_image
Diagram of a hand holding a three-pin electric shaver with a downward arrow indicating compression (no text or symbols present)natural_image
Diagram of a mechanical gear assembly with a central shaft and three meshed gears, no text or symbols present.natural_image
Illustration of a hand holding a tool interacting with a textured mechanical component (no text or symbols visible)natural_image
Illustration of a hand brushing a bowl with liquid (no text or symbols)
natural_image
Illustration of a hand using a hairpin to press down a clip (no text or symbols visible)
natural_image
Diagram of a device with a circular head and a downward arrow indicating motion or change (no text or symbols)natural_image
Diagram of a mechanical gear assembly with a central rotating component and directional arrow (no text or labels)natural_image
Symbol of a trash bin crossed with no text or labels, representing waste sorting or disposal (no text present)natural_image
Line drawing of a handheld device with directional arrows indicating movement or force (no text or symbols)natural_image
Prohibition sign showing a faucet crossed out by a diagonal line, indicating no fire or water discharge (no text present)
natural_image
Prohibition sign showing a faucet crossed out by a diagonal line, indicating no fire or water discharge (no text present)natural_image
Simple line drawing of a tube with a small object below, no text or symbols presentCarica veloce (solo HQ6996, HQ6990, HQ6986)
natural_image
Illustration of a person applying a circular massage or pressure technique to their ear (no text or symbols present)natural_image
Diagram of a device with a downward arrow indicating compression or disassembly (no text or symbols present)natural_image
Illustration of a hand holding a small device with an upward arrow indicating motion (no text or symbols present)natural_image
Diagram of a brush applying material to a circular mechanical component with three blades (no text or symbols)natural_image
Diagram of a plug inserted into a socket with three circular components (no text or symbols)natural_image
Diagram of a hand holding a three-pin electric shaver, showing blade structure and head (no text or symbols)natural_image
Diagram of a mechanical gear assembly with a central shaft and three meshed gears, no text or symbols present.natural_image
Illustration of a hand holding a tool interacting with a mechanical component (no text or symbols visible)natural_image
Illustration of a hand brushing a bowl with liquid (no text or symbols)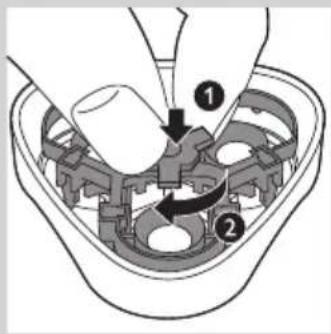
natural_image
Line drawing of a hand using a hairpin to adjust a component (no text or symbols)
natural_image
Diagram of a device component with a downward arrow indicating compression or disassembly (no text or symbols present)
natural_image
Mechanical gear assembly diagram showing a central shaft and three meshed gears (no text or labels)natural_image
Symbol of a trash bin crossed with a diagonal line and a horizontal bar below (no text or numbers present)natural_image
Top-down schematic of a mobile phone with directional arrows indicating movement or control (no text or symbols)natural_image
Prohibition sign showing a faucet crossed out by a diagonal line, indicating no leakage or anti-poaching (no text present)
natural_image
Prohibition sign showing a faucet without a shower, enclosed in a circle (no text or symbols)natural_image
Simple line drawing of a tube with a small object below and an upward arrow, no text or symbols present.Snelladen (alleen HQ6996, HQ6990, HQ6986)
natural_image
Illustration of a person applying a circular massage or pressure technique to their ear (no text or symbols present)
natural_image
Diagram of a device with a downward arrow indicating compression or disassembly (no text or symbols present)natural_image
Illustration of a hand inserting a device into a device with an upward arrow (no text or symbols)natural_image
Diagram of a hairbrush applying force to a circular mechanical component with three blades (no text or symbols)natural_image
Diagram of a plug inserted into a socket with three pins, showing internal wiring (no text or symbols)
natural_image
Diagram of a hand holding a three-pin shaver with a downward arrow indicating compression (no text or symbols)natural_image
Mechanical gear assembly diagram showing a central shaft and three meshed gears (no text or labels)natural_image
Illustration of a hand holding a tool interacting with a textured object, showing a black arrow indicating direction (no text or symbols present)natural_image
Illustration of a hand brushing a bowl with a brush (no text or symbols)
natural_image
Close-up of a hand using a power tool to adjust or install a component (no text or symbols visible)
natural_image
Diagram of a device with a circular head and a downward arrow indicating motion or force (no text or symbols)natural_image
Mechanical gear assembly diagram showing a central gear with an upward arrow indicating motion (no text or labels)natural_image
Symbol of a trash bin with crossed lines indicating no waste or restriction, and a solid black rectangle below (no text or labels)natural_image
Line drawing of a handheld device with directional arrows indicating movement or force (no text or symbols)natural_image
Simple line drawing of a tube with a small object below, no text or symbols presentHurtiglading (kun HQ6996, HQ6990, HQ6986)
natural_image
Line drawing of a three-pin electric shaver (no text or symbols)▶Ladelampen tennes.
HQ6996, HQ6990, HQ6986: Lad barbermaskinen i minst én time, men ikke mer enn 24 timer.
natural_image
Illustration of a person applying a circular massage or pressure technique to their face (no text or symbols present)natural_image
Diagram of a device with a downward arrow indicating compression or disassembly (no text or symbols present)natural_image
Illustration of a hand using a hairdryer to clean a small object, with an upward arrow indicating motion (no text or symbols present)natural_image
Diagram of a brush applying material to a circular mechanical component with three blades (no text or symbols)natural_image
Diagram of a plug inserted into a socket with three pins, showing wiring (no text or symbols)natural_image
Diagram of a hand holding a three-pin electric shaver with a downward arrow indicating compression (no text or symbols present)
natural_image
Mechanical gear assembly diagram showing a central gear with an attached circular component (no text or labels)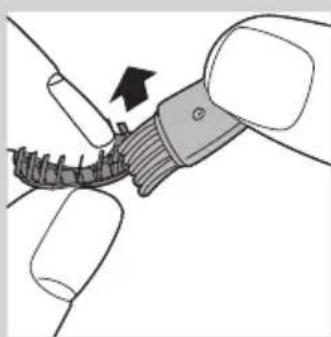
natural_image
Illustration of a hand holding a tool interacting with a textured mechanical component (no text or symbols visible)
natural_image
Illustration of a hand brushing a bowl with liquid (no text or symbols)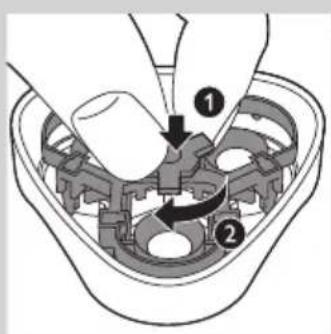
natural_image
Close-up of a hand using a handheld tool to press or install a component, showing mechanical parts and arrows indicating motion (no text or symbols)natural_image
Diagram of a device's top-down view showing a mechanical component with a downward arrow indicating compression or disassembly (no text or symbols present)natural_image
Mechanical gear assembly diagram showing a central gear with three teeth and an upper gear (no text or labels)natural_image
Symbol of a trash bin crossed with a diagonal line, no text or numbers presentnatural_image
Top-down schematic of a handheld device with no visible text or symbolsDet oppladbare batteriet skal bare tas ut när du avhender barbermaskinen. Kontroller at batteriet er helt utladet när du fjerner det.
natural_image
Prohibition sign showing a faucet crossed out by a diagonal line, indicating no fire or water discharge (no text present)
natural_image
No smoking sign with faucet symbol (no text)Carregamento
Carregue o aparelho:
natural_image
Simple line drawing of a U-shaped object with a small circular mark and an upward arrow below it (no text or symbols)Carga rápida (apenas HQ6996, HQ6990, HQ6986)
natural_image
Illustration of a person applying a circular massage or pressure technique to their ear (no text or symbols present)natural_image
Diagram of a device with a black arrow pointing to a circular component (no text or symbols)Aparar (apenas HQ6996, HQ6990, HQ6976, HQ6950, HQ6946)
natural_image
Illustration of a hand holding a handheld device with an upward arrow indicating motion (no text or symbols present)natural_image
Diagram of a hairbrush applying force to a circular mechanical component with three blades (no text or symbols)natural_image
Illustration of a plug inserted into a socket with three pins (no text or symbols)natural_image
Diagram of a hand holding a three-pin electric shaver with a downward arrow indicating compression (no text or symbols present)natural_image
Diagram of a mechanical gear assembly with a central shaft and three meshed gears, no text or symbols present.natural_image
Illustration of a hand holding a tool interacting with a textured object, no text or symbols presentnatural_image
Illustration of a hand brushing a tooth in a circular basin (no text or symbols)6 Escove a guarda.
natural_image
Illustration of a hand using a handheld device to press or install a component, showing mechanical parts and arrows indicating motion (no text or symbols present)natural_image
Diagram of a device with a black arrow indicating downward motion (no text or symbols present)natural_image
Mechanical gear assembly diagram showing a central shaft and three meshed gears (no text or labels)Encomendar acessórios
natural_image
Symbol of a trash bin crossed with no visible text or labelsnatural_image
Line drawing of a handheld device with directional arrows indicating movement or force (no text or symbols)natural_image
Simple line drawing of a tube with a small object below and an upward arrow, no text or symbols present.natural_image
Line drawing of a three-pin electric shaver (no text or symbols)natural_image
Illustration of a person applying a circular massage or pressure technique to their face (no text or symbols present)natural_image
Diagram of a device's top view showing a black arrow pointing to a circular component (no text or symbols present)natural_image
Illustration of a hand inserting a hair into a device (no text or symbols visible)natural_image
Diagram of a brush applying material to a circular mechanical component with three blades (no text or symbols)natural_image
Diagram of a plug inserted into a socket with three pins, showing wiring (no text or symbols)natural_image
Diagram of a hand holding a three-pin electric shaver with a downward arrow indicating compression (no text or symbols present)
natural_image
Diagram of a mechanical gear assembly with a central rotating component and three meshed gears (no text or labels)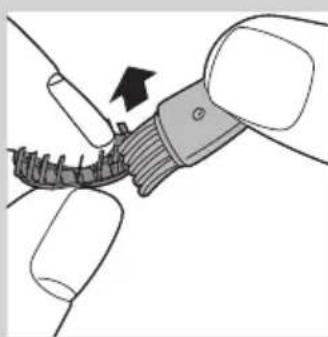
natural_image
Illustration of a hand holding a wristband with a tool, showing mechanical components and a black arrow indicating motion (no text or symbols)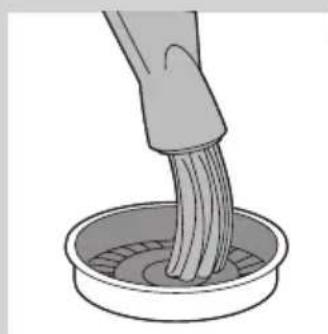
natural_image
Illustration of a hand brushing a tooth in a circular basin (no text or symbols)
natural_image
Illustration of a hand using a power tool to adjust or install a component (no text or symbols visible)natural_image
Diagram of a device with a circular top and arrow indicating downward motion (no text or symbols)natural_image
Mechanical gear assembly diagram showing a central gear with three teeth and an upper gear (no text or labels)natural_image
Symbol of a trash bin with crossed lines indicating no waste or restriction, and a solid black rectangle below (no text or labels)natural_image
Top-down schematic of a mobile phone with directional arrows indicating signal flow (no text or symbols)natural_image
Prohibition sign showing a faucet crossed out by a diagonal line, indicating no fire or water discharge (no text present)
natural_image
No smoking sign with faucet symbol (no text)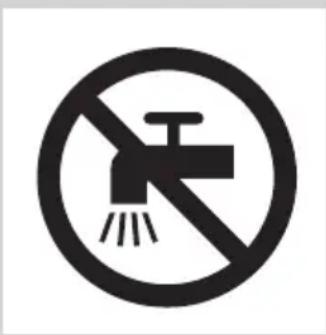
natural_image
No smoking sign with faucet symbol (no text or numbers)Şarj etme
natural_image
Simple line drawing of a U-shaped object with a small circular mark and an upward arrow below it (no text or symbols)natural_image
Illustration of a person applying a circular massage or pressure technique to their face (no text or symbols present)natural_image
Diagram of a device with a black arrow pointing to a circular component (no text or symbols)natural_image
Illustration of a hand inserting a hair into a device (no text or symbols visible)natural_image
Diagram of a brush applying material to a circular mechanical component with three blades (no text or symbols)natural_image
Illustration of a plug inserted into a socket with three pins (no text or symbols)natural_image
Diagram of a hand holding a three-pin shaver with a downward arrow indicating compression (no text or symbols present)natural_image
Mechanical gear assembly diagram showing a central shaft and three meshed gears with an upward arrow indicating motion (no text or labels)natural_image
Illustration of a hand holding a tool interacting with a mechanical component, showing a black arrow indicating motion (no text or symbols present)natural_image
Illustration of a hand brushing a bowl with liquid (no text or symbols)
natural_image
Illustration of a hand using a handheld device to press or install a cable, showing mechanical components and arrows indicating motion (no text or symbols present)natural_image
Diagram of a device's top-down view showing a black arrow pointing to the bottom section (no text or symbols present)- Always here to help you
- User manual
- PHILIPS
- Introduction
- Important
- Danger
- Warning
- Caution
- Electromagnetic fields (EMF)
- General
- General description (Fig. 2)
- Charging
- Quick charge (HQ6996, HQ6990, HQ6986 only)
- Using the appliance
- HQ6946, HQ6906, HQ6902 only:
- Shaving
- Trimming (HQ6996, HQ6990, HQ6976, HQ6950, HQ6946 only)
- Cleaning and maintenance
- Every week: shaving unit and hair chamber
- ENGLISH8
- Every month: shaving heads
- Extra-thorough cleaning
- Trimmer (HQ6996, HQ6990, HQ6976, HQ6950, HQ6946 only)
- Storage
- Replacement
- Ordering accessories
- Environment
- Removing the rechargeable battery
- Guarantee and support
- Guarantee restrictions
- Troubleshooting
- Introduktion
- Forsigtig
- Hver måned: Skærene
- Achtung
- Trimmen (nur HQ6996, HQ6990, HQ6976, HQ6950, HQ6946)
- Zubehör bestellen
- Προσοχή
- Lataaminen
- Lataa laite
- Pikalataus (vain HQ6996, HQ6990, HQ6986)
- Charge rapide (HQ6996, HQ6990, HQ6986 uniquement)
- Carica veloce (solo HQ6996, HQ6990, HQ6986)
- Snelladen (alleen HQ6996, HQ6990, HQ6986)
- Hurtiglading (kun HQ6996, HQ6990, HQ6986)
- Carregamento
- Carregue o aparelho:
- Carga rápida (apenas HQ6996, HQ6990, HQ6986)
- Aparar (apenas HQ6996, HQ6990, HQ6976, HQ6950, HQ6946)
- Encomendar acessórios
- Şarj etme
Brand : PHILIPS
Model : CP9239
Category : Shaving accessory