
ROG CG8580 - Desktop computer ASUS - Free user manual and instructions
Find the device manual for free ROG CG8580 ASUS in PDF.


| Product Type | Desktop Computer |
| Brand | ASUS |
| Model | ROG CG8580 |
| Series | Republic of Gamers (ROG) |
| Form Factor | Mid-Tower |
| Processor | Intel Core i7-4770K (4th Gen) up to 3.9 GHz |
| Graphics | NVIDIA GeForce GTX 780 / AMD Radeon R9 280X |
| Memory | 16 GB DDR3 1600 MHz (expandable to 32 GB) |
| Storage | 1 TB HDD 7200 RPM + 128 GB SSD |
| Optical Drive | Blu-ray reader/DVD-RW combo |
| Connectivity | WiFi 802.11 a/b/g/n/ac, Bluetooth 4.0, Gigabit Ethernet |
| Ports | 4x USB 3.0, 4x USB 2.0, 1x HDMI, 1x DisplayPort, 1x DVI, audio jacks |
| Audio | High Definition Audio 7.1 channel |
| Power Supply | 600W 80 PLUS Bronze |
| Dimensions (W x D x H) | 220 x 490 x 510 mm (8.66 x 19.29 x 20.08 in) |
| Weight | Approximately 15 kg (33 lb) |
| Operating System | Windows 8.1 (upgradable to Windows 10) |
| Warranty | 2 years limited parts and labor |
| Maintenance | Dust filter on front and PSU; easy access panels |
| Security | Kensington lock slot, TPM 2.0, BIOS password |
| Spare Parts & Repairability | Standardized components: RAM, HDD, PSU, GPU easily replaceable |
Frequently Asked Questions - ROG CG8580 ASUS
User questions about ROG CG8580 ASUS
0 question about this device. Answer the ones you know or ask your own.
Ask a new question about this device
Download the instructions for your Desktop computer in PDF format for free! Find your manual ROG CG8580 - ASUS and take your electronic device back in hand. On this page are published all the documents necessary for the use of your device. ROG CG8580 by ASUS.
USER MANUAL ROG CG8580 ASUS
E7279
First Edition
March 2012
Copyright © 2012 ASUSTeK Computer Inc. All Rights Reserved.
No part of this manual, including the products and software described in it, may be reproduced, transmitted, transcribed, stored in a retrieval system, or translated into any language in any form or by any means, except documentation kept by the purchaser for backup purposes, without the express written permission of ASUSTeK Computer Inc. ("ASUS").
Product warranty or service will not be extended if: (1) the product is repaired, modified or altered, unless such repair, modification of alteration is authorized in writing by ASUS; or (2) the serial number of the product is defaced or missing.
ASUS PROVIDES THIS MANUAL "AS IS" WITHOUT WARRANTY OF ANY KIND, EITHER EXPRESS OR IMPLIED, INCLUDING BUT NOT LIMITED TO THE IMPLIED WARRANTIES OR CONDITIONS OF MERCHANTABILITY OR FITNESS FOR A PARTICULAR PURPOSE. IN NO EVENT SHALL ASUS, ITS DIRECTORS, OFFICERS, EMPLOYEES OR AGENTS BE LIABLE FOR ANY INDIRECT, SPECIAL, INCIDENTAL, OR CONSEQUENTIAL DAMAGES (INCLUDING DAMAGES FOR LOSS OF PROFITS, LOSS OF BUSINESS, LOSS OF USE OR DATA, INTERRUPTION OF BUSINESS AND THE LIKE), EVEN IF ASUS HAS BEEN ADVISED OF THE POSSIBILITY OF SUCH DAMAGES ARISING FROM ANY DEFECT OR ERROR IN THIS MANUAL OR PRODUCT.
SPECIFICATIONS AND INFORMATION CONTAINED IN THIS MANUAL ARE FURNISHED FOR INFORMATIONAL USE ONLY, AND ARE SUBJECT TO CHANGE AT ANY TIME WITHOUT NOTICE, AND SHOULD NOT BE CONSTRUED AS A COMMITMENT BY ASUS. ASUS ASSUMES NO RESPONSIBILITY OR LIABILITY FOR ANY ERRORS OR INACCURACIES THAT MAY APPEAR IN THIS MANUAL, INCLUDING THE PRODUCTS AND SOFTWARE DESCRIBED IN IT.
Products and corporate names appearing in this manual may or may not be registered trademarks or copyrights of their respective companies, and are used only for identification or explanation and to the owners' benefit, without intent to infringe.
Contents
Notices 5
Safety information 7
Conventions used in this guide....8
Where to find more information 8
Package contents 9
Chapter 1: Getting started
Welcome! 11
Getting to know your computer ....11
Setting up your computer.... 16
Turning your computer ON/OFF 19
Chapter 2: Using Windows® 7
Starting for the first time.... 21
Using Windows® 7 desktop 22
Managing your files and folders.... 24
Restoring your system settings.... 26
Protecting your computer.... 27
Getting Windows® Help and Support 28
Chapter 3: Connecting devices to your computer
Connecting a USB storage device.... 29
Connecting microphone and speakers 30
Connecting multiple external displays 33
Connecting an HDTV 35
Chapter 4: Using your computer
Proper posture when using your Desktop PC.... 37
Using the memory card reader 38
Using the optical drive 39
Using the ASUS ROG U9N Gaming Keyboard 40
Using the ASUS GX900 Gaming Mouse 41
Chapter 5: Connecting to the Internet
Wired connection 49
Wireless connection (on selected models only) 51
Contents
Chapter 6: Using the utilities
ASUS AI Suite II 53
ASUS AI Manager 63
Nero 9 68
Recovering your system....73
Introduction to Intel® 2012 Desktop responsiveness technologies ...... 75
Chapter 7: Troubleshooting
Troubleshooting 87
ASUS contact information....94
Notices
REACH
Complying with the REACH (Registration, Evaluation, Authorisation, and Restriction of Chemicals) regulatory framework, we published the chemical substances in our products at ASUS REACH website at http://csr.asus.com/english/REACH.htm.
Federal Communications Commission Statement
This device complies with Part 15 of the FCC Rules. Operation is subject to the following two conditions:
- This device may not cause harmful interference; and
- This device must accept any interference received including interference that may cause undesired operation.
This equipment has been tested and found to comply with the limits for a Class B digital device, pursuant to Part 15 of the FCC Rules. These limits are designed to provide reasonable protection against harmful interference in a residential installation. This equipment generates, uses and can radiate radio frequency energy and, if not installed and used in accordance with manufacturer's instructions, may cause harmful interference to radio communications. However, there is no guarantee that interference will not occur in a particular installation. If this equipment does cause harmful interference to radio or television reception, which can be determined by turning the equipment off and on, the user is encouraged to try to correct the interference by one or more of the following measures:
- Reorient or relocate the receiving antenna.
- Increase the separation between the equipment and receiver.
- Connect the equipment to an outlet on a circuit different from that to which the receiver is connected.
- Consult the dealer or an experienced radio/TV technician for help.

The use of shielded cables for connection of the monitor to the graphics card is required to assure compliance with FCC regulations. Changes or modifications to this unit not expressly approved by the party responsible for compliance could void the user's authority to operate this equipment.
RF exposure warning
This equipment must be installed and operated in accordance with provided instructions and the antenna(s) used for this transmitter must be installed to provide a separation distance of at least 20 cm from all persons and must not be co-located or operating in conjunction with any other antenna or transmitter. End-users and installers must be provided with antenna installation instructions and transmitter operating conditions for satisfying RF exposure compliance.
Canadian Department of Communications Statement
This digital apparatus does not exceed the Class B limits for radio noise emissions from digital apparatus set out in the Radio Interference Regulations of the Canadian Department of Communications.
This class B digital apparatus complies with Canadian ICES-003.
Macrovision Corporation Product Notice
This product incorporates copyright protection technology that is protected by method claims of certain U.S. patents and other intellectual property rights owned by Macrovision Corporation and other rights owners. Use of this copyright protection technology must be authorized by Macrovision Corporation, and is intended for home and other limited viewing uses only unless otherwise authorized by Macrovision Corporation. Reverse engineering or disassembly is prohibited.
Lithium-Ion Battery Warning
CAUTION: Danger of explosion if battery is incorrectly replaced. Replace only with the same or equivalent type recommended by the manufacturer. Dispose of used batteries according to the manufacturer's instructions.
ASUS Recycling/Takeback Services
ASUS recycling and takeback programs come from our commitment to the highest standards for protecting our environment. We believe in providing solutions for you to be able to responsibly recycle our products, batteries, other components as well as the packaging materials. Please go to http://csr.asus.com/english/Takeback.htm for the detailed recycling information in different regions.
Safety information

Disconnect the AC power and peripherals before cleaning. Wipe the Desktop PC using a clean cellulose sponge or chamois cloth dampened with a solution of nonabrasive detergent and a few drops of warm water, then remove any extra moisture with a dry cloth.
- DO NOT place on uneven or unstable work surfaces. Seek servicing if the casing has been damaged. DO NOT expose to dirty or dusty environments. DO NOT operate during a gas leak.
- DO NOT place or drop objects on top and do not shove any foreign objects into the Desktop PC.
- DO NOT expose to strong magnetic or electrical fields.
- DO NOT expose to or use near liquids, rain, or moisture. DO NOT use the modem during electrical storms.
- Battery safety warning: DO NOT throw the battery in fire. DO NOT short circuit the contacts. DO NOT disassemble the battery.
- Use this product in environments with ambient temperatures between 0°C (32°F) and 35°C (95°F).
- DO NOT cover the vents on the Desktop PC to prevent the system from getting overheated.
- DO NOT use damaged power cords, accessories, or other peripherals.
- To prevent electrical shock hazard, disconnect the power cable from the electrical outlet before relocating the system.
- Seek professional assistance before using an adapter or extension cord. These devices could interrupt the grounding circuit.
- Ensure that your power supply is set to the correct voltage in your area. If you are not sure about the voltage of the electrical outlet you are using, contact your local power company.
- If the power supply is broken, do not try to fix it by yourself. Contact a qualified service technician or your retailer.
Conventions used in this guide
To ensure that you perform certain tasks properly, take note of the following symbols used throughout this manual.

DANGER/WARNING: Information to prevent injury to yourself when trying to complete a task.

CAUTION: Information to prevent damage to the components when trying to complete a task.

IMPORTANT: Instructions that you MUST follow to complete a task.

NOTE: Tips and additional information to help you complete a task.
Where to find more information
Refer to the following sources for additional information and for product and software updates.
ASUS websites
The ASUS website provides updated information on ASUS hardware and software products. Refer to the ASUS website www.asus.com.
ASUS Local Technical Support
Visit ASUS website at http://support.asus.com/contact for the contact information of local Technical Support Engineer.
Package contents
 |  |  | ||
| ASUS Essentio Desktop PC | ASUS ROG U9N Gaming Keyboard package x1 | ASUS GX900 Gaming Mouse x1 | ||
 |  |  | ||
| Power cord x1 Nero 9 | burning software DVD x1 | Installation Guide x1 | ||
 |  |  | ||
| Warranty card x1 Support DVD x1 Recovery DVD x1 | (optional) | |||
 | OR |  | ||
| Wi-Fi Ring moving antenna x1 Ante | optional)(optional) | |||

- If any of the above items is damaged or missing, contact your retailer.
- The illustrated items above are for reference only. Actual product specifications may vary with different models.
- For details on using the bundled gaming keyboard and mouse, refer to sections Using the ASUS ROG Gaming Keyboard and Using the ASUS GX900 Gaming Mouse.
Chapter 1
Getting started
Welcome!
Thank you for purchasing the ASUS Essentio CG8580 Desktop PC!
The ASUS Essentio CG8580 Desktop PC provides cutting-edge performance,
uncompromised reliability, and user-centric utilities. All these values are encapsulated in a stunningly futuristic and stylish system casing.

Read the ASUS Warranty Card before setting up your ASUS Desktop PC.
Getting to know your computer

Illustrations are for reference only. The ports and their locations, and the chassis color vary with different models.
Front panel
- Power button. Press this button to turn on your computer.
- Secure Digital™ / MultiMediaCard slot. Insert a Secure Digital™ card or MultiMediaCard into this slot.
- Optical disk drive bay. There is an optical disk drive in this bay.
- Hot Swap Bay (empty). Allows you to install an additional HDD in this bay.
- Power LED. This LED lights up when you turn on your computer.
- Memory Stick™ / Memory Stick Pro™ card slot. Insert a Memory Stick™ / Memory Stick Pro™ card into this slot.
- CompactFlash® / Microdrive™ card slot. Insert a CompactFlash® / Microdrive™ card into this slot.
- OC Button. This button adjusts the System Level Up profile of your computer.
- USB 3.0 ports. These Universal Serial Bus 3.0 (USB 3.0) ports connect to USB 3.0 devices such as a mouse, printer, scanner, camera, PDA, and others.

- DO NOT connect a keyboard / mouse to any USB 3.0 port when installing Windows® operating system.
- Due to USB 3.0 controller limitation, USB 3.0 devices can only be used under Windows® OS environment and after the USB 3.0 driver installation.
- USB 3.0 devices can only be used as data storage only.
- We strongly recommend that you connect USB 3.0 devices to USB 3.0 ports for faster and better performance for your USB 3.0 devices.
- USB 2.0 ports. These Universal Serial Bus 2.0 (USB 2.0) ports connect to USB 2.0 devices such as a mouse, printer, scanner, camera, PDA, and others.
- Microphone port. This port connects to a microphone.
- Headphone port. This port connects to a headphone or speaker.
Rear panel
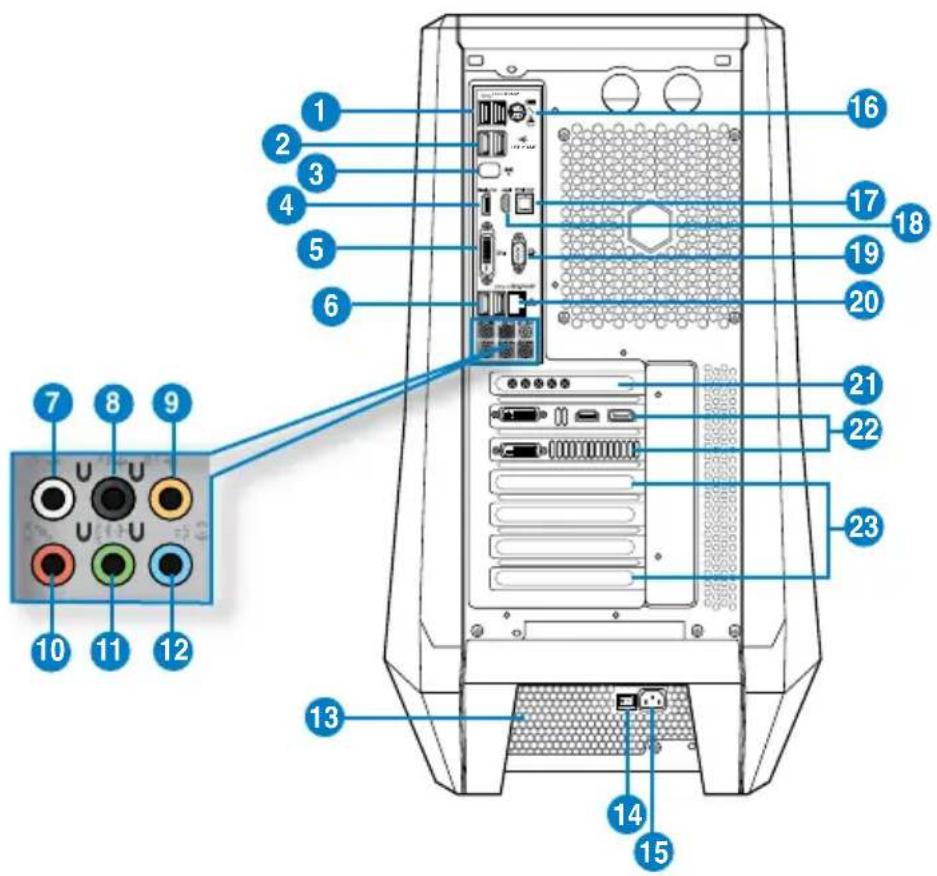
- USB 3.0 ports, support ASUS USB 3.0 Boost UASP Mode. These Universal Serial Bus 3.0 (USB 3.0) ports connect to USB 3.0 devices such as a mouse, printer, scanner, camera, PDA, and others.

- The USB 3.0 ports only support Windows 7 or later versions. UASP standard only supports Windows 8.
- DO NOT connect a keyboard / mouse to any USB 3.0 port when installing Windows operating system.
- Due to USB 3.0 controller limitation, USB 3.0 devices can only be used under Windows OS environment and after the USB 3.0 driver installation.
- USB 3.0 devices can only be used as data storage only.
- We strongly recommend that you connect USB 3.0 devices to USB 3.0 ports for faster and better performance for your USB 3.0 devices.
- USB 2.0 ports. These Universal Serial Bus 2.0 (USB 2.0) ports connect to USB 2.0 devices such as a mouse, printer, scanner, camera, PDA, and others.
- ASUS Wi-Fi GO! card (Wi-Fi 802.11). Connect the Wi-Fi Ring moving antenna to this port.
* Wi-Fi LED indications
| Status | Description |
| Off | No link |
| Green | Linked |

ASUS Wi-Fi GO! card automatically sets itself to the country's available Wi-Fi channels.
- DisplayPort. This port connects a display monitor or a home-theater system.
- DVI-D port. This port is for any DVI-D compatible device and is HDCP compliant, allowing playback of HD DVD, Blu-ray, and other protected content.
- USB 3.0 ports, support ASUS USB 3.0 Boost UASP Mode. The bottom port supports USB BIOS Flashback.
- Side Speaker Out port (gray). This port connects to the side speakers in an 8-channel audio configuration.
- Rear Speaker Out port (black). This port connects to the rear speakers in a 4, 6, and 8-channel audio configuration.
- Center/Subwoofer port (orange). This port connects to the center/subwoofer speakers.
- Microphone port (pink). This port connects to a microphone.
- Line Out port (lime). This port connects to a headphone or speaker. In a 4, 6, or 8-channel configuration, the function of this port becomes Front Speaker Out.
- Line In port (light blue). This port connects to a tape, CD, DVD player, or other audio sources.

Refer to the audio configuration table below for the function of the audio ports in a 2, 4, 6, or 8-channel configuration.
Audio 2, 4, 6, or 8-channel configuration
| Port | Headset2-channel | 4-channel 6-channel 8-channel | ||
| Light Blue Line In Line In Line In | Line In | |||
| Lime | Line Out | Front Speaker Out | Front Speaker Out | Front Speaker Out |
| Pink | Mic In | Mic In | Mic In | Mic In |
| Orange | - | - | Center/Subwoofer | Center/Subwoofer |
| Black | - | Rear Speaker Out | Rear Speaker Out | Rear Speaker Out |
| Gray | - | - | - | Side Speaker Out |
- Air vents. These vents allow air ventilation.

DO NOT block the air vents on the chassis. Always provide proper ventilation for your computer.
- Power switch. Switch to turn ON/OFF the power supply to your computer.
- Power connector (input rated: 100\~120/200\~240Vac, 60/50Hz, 10/5A). Plug the power cord to this connector.
- PS/2 Keyboard / Mouse combo port. This port is for a PS/2 keyboard or mouse.
- Optical S/PDIF_OUT port. This port connects to an external audio output device via an optical S/PDIF cable.
- HDMI port. This port is for a High-Definition Multimedia Interface (HDMI) connector, and is HDCP compliant allowing playback of HD DVD, Blu-ray, and other protected content.
- VGA port. This port is for VGA-compatible devices such as a VGA monitor.
- LAN (RJ-45) port. This port allows Gigabit connection to a Local Area Network (LAN) through a network hub.
LAN port LED indications
| Activity/Link LED | Speed LED | |
| Status Description Status Description | ||
| OFF No link OFF 10Mbps connection | ||
| ORANGE Linked ORANGE 100Mbps connection | ||
| BLINKING Data activity GREEN 1Gbps connection | ||
ACT/LINK SPEED LAN port
- Sound card ports (removable). These ports connect to your output devices such as microphone, headset and speakers.
- ASUS Graphics Card (optional). The display output ports on this optional ASUS Graphics Card may vary with different models.
- Expansion slot bracket. Remove the expansion slot bracket when installing an expansion card.
Setting up your computer
This section guides you through connecting the main hardware devices, such as the external monitor, keyboard, mouse, and power cord, to your computer.
Connecting an external monitor
Using the ASUS Graphics Card (on selected models only)
Connect your monitor to the display output port on the discrete ASUS Graphics Card.
To connect an external monitor using the ASUS Graphics Card:
- Connect a monitor to a display output port on the ASUS Graphics Card.
- Plug the monitor to a power source.

The display output ports on the ASUS Graphics Card may vary with different models.

Using the onboard display output ports
Connect your monitor to the onboard display output port.
To connect an external monitor using the onboard display output ports:
- Connect a VGA monitor to the VGA port, or a DVI-D monitor to the DVI-D port, or an HDMI monitor to the HDMI port on the rear panel of your computer.
- Plug the monitor to a power source.


- If your computer comes with an ASUS Graphics Card, the graphics card is set as the primary display device in the BIOS. Hence, connect your monitor to a display output port on the graphics card.
- To connect multiple external monitors to your computer, refer to Connecting multiple external monitors in Chapter 3 of this user manual for details.
Connecting a USB keyboard and a USB mouse
Connect a USB keyboard and a USB mouse to the USB ports on the rear panel of your computer.

The pre-installed setup utility for the bundled ASUS GX900 Gaming Mouse can be accessed only when connecting the mouse to your computer before starting Windows 7 for the first time. Otherwise, you will have to manually install the setup utility from the bundled Support DVD. Refer to section Using the ASUS GX900 Gaming Mouse of Chapter 4 for details.

Connecting the power cord
Connect one end of the power cord to the power connector on the rear panel of your computer and the other end to a power source.

Turning your computer ON/OFF
This section describes how to turn on/off your computer after setting up your computer.
Turning your computer ON
To turn your computer ON:
- Turn your monitor ON.
- Turn the power switch ON, then press the power button on your computer.

- Wait until the operating system loads automatically.
Turning your computer OFF
To turn your computer OFF:
- Close all running applications.
- Click on the Windows desktop.
- Click to shut down the operating system.
Chapter 2
Using Windows® 7
Starting for the first time
When you start your computer for the first time, a series of screens appear to guide you in configuring the basic settings of your Windows® 7 operating system.
To start for the first time:
- Turn your computer on. Wait for a few minutes until the Set Up Windows screen appears.
- From the dropdown list, select your language, then click Next.
- From the dropdown lists, select your Country or region, Time and currency, and Keyboard layout, then click Next.
- Key in unique names for the user name and computer name, then click Next.
- Key in the necessary information to set up your password, then click Next. You may also click Next to skip this step without entering any information.

If you want to set up a password for your account later, refer to the section "Setting up a user account and password" in this chapter.
- Carefully read the license terms. Tick "I accept the license terms" and click Next.
- Select "Use recommended settings" or "Install important updates only" to set up the security settings for your computer. To skip this step, select "Ask me later."
- Review your date and time settings. Click Next. The system loads the new settings and restarts. You may now start using your computer.
Using Windows® 7 desktop

Click the Start icon > Help and Support to obtain more information about Windows
7.
Using the Start menu
The Start menu gives you access to programs, utilities, and other useful items on your computer. It also provides you with more information about Windows 7 through its Help and Support feature.
Launching items from the Start menu
To launch items from the Start menu:
- From the Windows taskbar, click the Start icon.
- From the Start menu, select the item that you want to launch.


You may pin programs that you want constantly displayed on the Start menu. For more details, refer to the section "Pinning programs on the Start menu or taskbar" in this chapter.
Using the Getting Started item
The Getting Started item on the Start menu contains information about some basic tasks such as personalizing Windows, adding new users, and transferring files to help you familiarize yourself with using Windows 7.
To use the Getting Started item:
- From the Windows taskbar, click the Start icon to launch the Start menu.
- Select Getting Started. The list of available tasks appears.
- Select the task that you want to do.
Using the taskbar
The taskbar allows you to launch and manage programs or items installed on your computer.
Launching a program from the taskbar
To launch a program from the taskbar:
- From the Windows® taskbar, click an icon to launch it. Click the icon again to hide the

You may pin programs that you want constantly displayed on the taskbar. For more details, refer to the section Pinning programs on the Start menu or taskbar on this chapter.
Pinning items on the jumplists
When you right-click an icon on the taskbar, a jumplist launches to provide you with quick-access to the program's or item's related links. You may pin items on the jumplist such as favorite websites, often-visited folders or drives, or recently played media files.
To pin items to the jumplist:
- From the taskbar, right-click an icon.
- From the jumplist, right-click the item that you want to pin, then select Pin to this list.
Unpinning items from the jumplist
To unpin items from the jumplist:
- From the taskbar, right-click an icon.
- From the jumplist, right-click the item that you want to remove from the jumplist, then select Unpin from this list.
Pinning programs on the Start menu or taskbar
To pin programs on the Start menu or taskbar:
- From the Windows® taskbar, click the Start icon to launch the Start menu.
- Right-click the item that you want to pin on the Start menu or taskbar.
- Select Pin to Taskbar or Pin to Start menu.

You may also right-click on the icon of a running program on the taskbar, then select Pin this program to taskbar.
Unpinning programs from the Start menu
To unpin programs from the Start menu:
- From the Windows® taskbar, click the Start icon to launch the Start menu.
- From the Start menu, right-click the program that you want to unpin, then select Remove from this list.
Unpinning programs from the taskbar
To unpin programs from the taskbar:
- From the taskbar, right-click the program that you want to remove from the taskbar, then select Unpin this program from taskbar.
Using the notification area
By default, the notification area shows these three icons:
 | Action Center notificationClick this icon to display all the alert messages/notifications and launch the Windows®Action Center. |
 | Network connectionThis icon displays the connection status and signal strength of the wired or wireless network connection. |
 | VolumeClick this icon to adjust the volume. |
Displaying an alert notification
To display an alert notification:
- Click the Notification icon, then click the message to open it.

For more details, refer to the section Using Windows® Action Center in this chapter.
Customizing icons and notifications
You may choose to display or hide the icons and notifications on the taskbar or on the notification area.
To customize icons and notifications:
- From the notification area, click on the arrow icon .

- Click Customize.
- From the dropdown list, select the behaviors for the icons or items that you want to customize.
Managing your files and folders
Using Windows® Explorer
Windows® Explorer allows you to view, manage, and organize your files and folders.
Launching Windows® Explorer
To launch Windows Explorer:
- From the Windows® taskbar, click the Start icon to launch the Start menu.
- Click Computer to launch Windows Explorer.
Exploring files and folders
To explore files and folders:
- Launch Windows® Explorer.
- From the navigation or view pane, browse for the location of your data.
- From the breadcrumb bar, click the arrow to display the contents of the drive or folder.
Customizing the file/folder view
To customize the file/folder view:
- Launch Windows Explorer.
- From the navigation pane, select the location of your data.
- From the toolbar, click the View icon.

- From the View menu, move the slider to select how you want to view the file/folder.

You may also right-click anywhere on the View pane, click View, and select the view type that you want.
Arranging your files
To arrange your files:
- Launch Windows Explorer.
- From the Arrange by field, click to display the dropdown list.
- Select your preferred arrangement type.
Sorting your files
To sort your files:
- Launch Windows Explorer.
- Right-click anywhere on the View pane.
- From the menu that appears, select Sort by, then select your preferred sorting type.
Grouping your files
To group your files:
- Launch Windows Explorer.
- Right-click anywhere on the View pane.
- From the menu that appears, select Group by, then select your preferred grouping type.
Adding a new folder
To add a new folder:
- Launch Windows Explorer.
- From the toolbar, click New folder.
- Key in a name for the new folder.

You may also right-click anywhere on the View pane, click New > Folder.
Backing up your files
Setting up a backup
To set up a backup:
- Click > All Programs > Maintenance > Backup and Restore.
- Click Set up backup. Click Next.
- Select your backup destination. Click Next.
- Select Let Windows choose (recommended) or Let me choose as your backup mode.

If you select Let Windows choose, Windows will not back up your programs, FAT-formatted files, Recycle Bin files, or temporary files that are 1GB or more.
- Follow the onscreen instructions to finish the process.
Restoring your system settings
The Windows® System Restore feature creates a restore point where the computer's system settings are stored at certain time and date. It allows you to restore or undo changes to your computer's system settings without affecting your personal data.
To restore your system:
- Close all running applications.
- Click > All Programs > Accessories > System Tools > System Restore.
- Follow the onscreen instructions to complete the process.
Protecting your computer
Using Windows® 7 Action Center
Windows® 7 Action Center provides you with alert notifications, security information, system maintenance information, and the option to automatically troubleshoot and fix some common computer problems.

You may customize the notifications. For more details, refer to the previous section Customizing icons and notifications in this chapter.
Launching Windows® 7 Action Center
To launch Windows® 7 Action Center:
- To launch Windows 7 Action Center, click the Notification icon, then click Open Action Center.
- From Windows 7 Action Center, click the task that you want to do.
Using Windows® Update
Windows Update allows you to check and install the latest updates to enhance the security and performance of your computer.
Launching Windows® Update
To launch Windows® Update:
- From the Windows® taskbar, click the Start icon to launch the Start menu.
- Select All Programs > Windows Update.
- From the Windows Update screen, click the task that you want to do.
Setting up a user account and password
You may create user accounts and passwords for people who will use your computer.
Setting up a user account
To set up a user account:
- From the Windows taskbar, click Getting Started > Add new users.
- Select Manage another account.
- Select Create a new account.
- Key in the name of the new user.
- Select either Standard user or Administrator as the user type.
- When done, click Create Account.
Setting up a user's password
To set up a user's password:
- Select the user that you would like to set a password.
- Select Create a password.
- Key in a password and confirm it. Key in your password's hint.
- When done, click Create password.
Activating the anti-virus software
Trend Micro Internet Security is pre-installed on your computer. It is a third-party anti-virus software protecting your computer from virus. It is purchased separately. You have a 30-day trial period after activating it.
To activate Trend Micro Internet Security:
- Run the Trend Micro Internet Security application.
- Carefully read the license terms. Click Agree & Activate.
- Input your e-mail address and select your location. Click Next.
- Click Finish to complete the activation.
Getting Windows® Help and Support
Windows® Help and Support provides you with guides and answers in using the applications in Windows® 7 platform.
To launch Windows® Help and Support, click > Help and Support.

Ensure that you are connected to the Internet to obtain the latest Windows® online help.
Chapter 3
Connecting devices to your computer
Connecting a USB storage device
This desktop PC provides USB 2.0/1.1 and USB 3.0 ports on both the front and rear panels. These USB ports allow you to connect USB devices such as storage devices.
To connect a USB storage device:
- Insert the USB storage device to your computer.


Front panel


Rear panel
To remove a USB storage device:
- Click the icon in the Windows notification area on your computer, then click Eject USB2.0 FlashDisk or Eject USB3.0 FlashDisk if you are using a USB3.0 flash drive or USB3.0-compatible devices.
- When the Safe to Remove Hardware message pops up, remove the USB storage device from your computer.


DO NOT remove a USB storage device when data transfer is in progress. Doing so may cause data loss or damage the USB storage device.
Connecting microphone and speakers
This desktop PC comes with microphone ports and speaker ports on both the front and rear panels. The audio I/O ports located on the rear panel allow you to connect 2-channel, 4-channel, 6-channel, and 8-channel stereo speakers.
Connecting Headphone and Mic

Connecting 2-channel Speakers
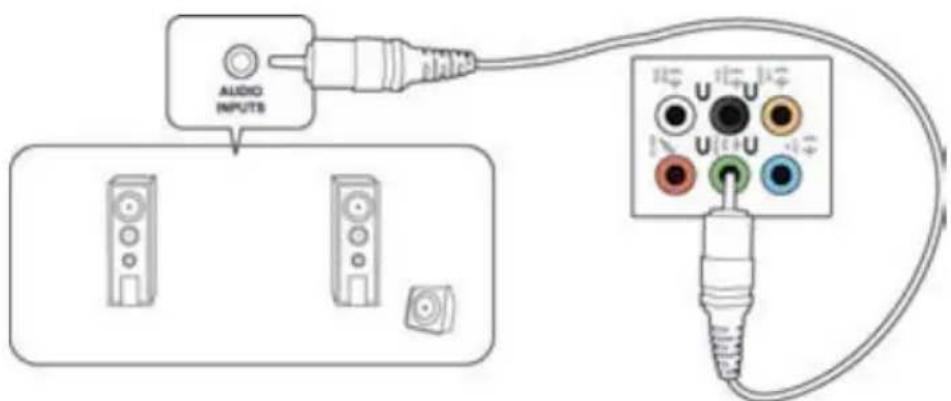
Connecting 4-channel Speakers
Connecting 6-channel Speakers
Connecting 8-channel Speakers

Connecting multiple external displays
Your desktop PC may come with VGA, HDMI, or DVI ports and allows you to connect multiple external displays.

When a graphics card is installed in your computer, connect the monitors to the output ports of the graphics card.
Setting up multiple displays
When using multiple monitors, you are allowed to set display modes. You can use the additional monitor as a duplicate of your main display, or as an extension to enlarge your Windows desktop.
To set up multiple displays:
- Turn off your computer.
- Connect the two monitors to your computer and connect the power cords to the monitors. Refer to the "Setting up your computer" section in Chapter 1 for details on how to connect a monitor to your computer.


For some graphics cards, only the monitor that is set to be the primary display has display during POST. The dual display function works only under Windows.
- Turn on your computer.
- Do any of the following to open the Screen Resolution setting screen:
- Click > Control Panel > Appearance and Personalization > Display > Change display settings.
- Right-click anywhere on your Windows desktop. When the pop-up menu appears, click Personalize > Display > Change display settings.
- Select the display mode from the "Multiple displays:" drop-down list.
- Duplicate these displays: Select this option to use the additional monitor as a duplicate of your main display.
- Extend these displays: Select this option to use the additional monitor as an extension display. This increases your desktop space. • Show desktop only on 1 / 2: Select this option to show desktop only on monitor 1 or monitor 2.
- Remove this display: Select this option to remove the selected display.

- Click Apply or OK. Then click Keep Changes on the confirmation message.

Connecting an HDTV
Connect a High Definition TV (HDTV) to the HDMI port of your computer.

- You need an HDMI cable to connect the HDTV and the computer. The HDMI cable is purchased separately.
- To get the best display performance, ensure that your HDMI cable is less than 15 meters.

Chapter 4
Using your computer
Proper posture when using your Desktop PC
When using your Desktop PC, maintaining the proper posture is necessary to prevent strain to your wrists, hands, and other joints or muscles. This section provides you with tips on avoiding physical discomfort and possible injury while using and fully enjoying your Desktop PC.
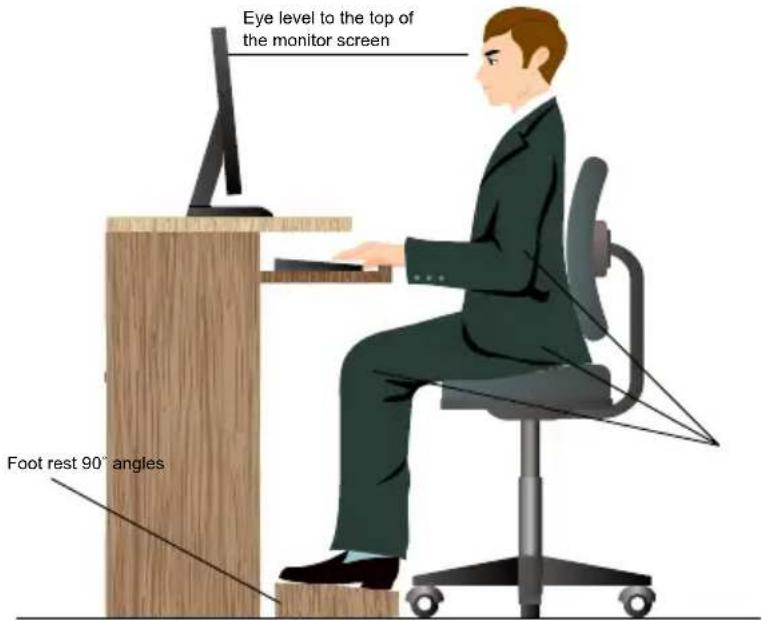
To maintain the proper posture:
- Position your computer chair to make sure that your elbows are at or slightly above the keyboard to get a comfortable typing position.
- Adjust the height of your chair to make sure that your knees are slightly higher than your hips to relax the backs of your thighs. If necessary, use a footrest to raise the level of your knees.
- Adjust the back of your chair so that the base of your spine is firmly supported and angled slightly backward.
- Sit upright with your knees, elbows and hips at an approximately 90-degree angle when you are at the PC.
- Place the monitor directly in front of you, and turn the top of the monitor screen even with your eye level so that your eyes look slightly downward.
- Keep the mouse close to the keyboard, and if necessary, use a wrist rest for support to reduce the pressure on your wrists while typing.
- Use your Desktop PC in a comfortably-lit area, and keep it away from sources of glare such as windows and straight sunlight. Take regular mini-breaks from using your Desktop PC.
Using the memory card reader
Digital cameras and other digital imaging devices use memory cards to store digital picture or media files. The built-in memory card reader on the front panel of your system allows you to read from and write to different memory card drives.

To use the memory card:
- Insert the memory card into the card slot.

- A memory card is keyed so that it fits in only one direction. DO NOT force a card into a slot to avoid damaging the card.
- You can place media in one or more of the card slots and use each media independently. Place only one memory card in a slot at one time.
- Select a program from the AutoPlay window to access your files.

- If AutoPlay is NOT enabled in your computer, click Windows 7 Start button on the taskbar, click Computer, and then double-click the memory card icon to access the data on it. Each card slot has its own drive icon which is displayed on the Computer screen.
- The memory card reader LED lights up and blinks when data is being read from or written to the memory card.
- When finished, right-click the memory card drive icon on the Computer screen, click Eject, and then remove the card.

Never remove cards while or immediately after reading, copying, formatting, or deleting data on the card or else data loss may occur.

To prevent data loss, use "Safely Remove Hardware and Eject Media" in the Windows notification area before removing the memory card.
Using the optical drive

Inserting an optical disc
To insert an optical disc:
- While your system is on, press the PUSH button.
- Press the eject button below the drive bay cover to open the tray.
- Place the disc to the optical drive with the label side facing up.
- Push the tray to close it.
- Select a program from the AutoPlay window to access your files.

If AutoPlay is NOT enabled in your computer, click Windows® 7 Start button on the taskbar, click Computer, and then double-click the CD/DVD drive icon to access the data on it.
Removing an optical disc
To remove an optical disc:
- While the system is on, do either of the following to eject the tray:
- Press the eject button below the drive bay cover.
- Right-click the CD/DVD drive icon on the Computer screen, and then click Eject.
- Remove the disc from the disc tray.
Using the ASUS ROG U9N Gaming Keyboard
Your CG8580 Essentio Desktop PC comes with the bundled ASUS ROG U9N Gaming Keyboard for an optimal gaming experience.

Check the section Package contents for the package contents of the ASUS ROG U9N Gaming Keyboard.
Installing the ASUS ROG U9N Gaming Keyboard
- Use the bundled PS/2 to USB adaptor to connect your gaming keyboard to your computer's USB 2.0 port.

- Align and insert the wrist pad into the gaming keyboard's wrist pad slots (A). Using both thumbs, push down the wrist pad until it snaps in place (B).


- Restart your computer. Windows® automatically installs all necessary drivers for your keyboard.
Using the ASUS GX900 Gaming Mouse
Your CG8580 Essentio Desktop PC comes with the bundled ASUS GX900 Gaming Mouse for your full-blast game control.

Check the section Package contents for the package contents of the ASUS GX900 Gaming Mouse.
The ASUS GX900 Gaming Mouse comes with a left button, a right button, a scroll wheel, two side buttons, a DPI button, and a specially designed Profile Switch button.

| Keys Description Keys Description | |||
| 1 | Left button | 7 | GX900 logo |
| 2 | Right button | 8 | IE Forward button |
| 3 | Scroll wheel | 9 | IE Backward button |
| 4 | DPI switch | 10 | Mouse feet |
| 5 | Profile switch button/Profile indicator* | 11 | Mouse feet and Twin-Eye Laser sensor |
| 6 | LED DPI indicator** | 12 | Weight base (5 x 4.5g blocks)*** |
*** To adjust the mouse weight, add or remove the weight blocks.
| *Profile switch LED indications | |
| LED colors | Indications |
| None | Normal Profile |
| Green | Profile 1 |
| Red | Profile 2 |
| Orange | Profile 3 |
| **DPI switch LED indications | |
| LED colors | Indications |
| 2 | DPI Level 1 |
| 4 | DPI Level 2 |
Launching the program
A specially designed program is pre-installed on your computer, which allows you to set up your ASUS GX900 Gaming Mouse to avail all its features.
When you connect ASUS GX900 Gaming Mouse to your computer before starting Windows® 7 for the first time, the program automatically detected the mouse and can be accessed directly. Otherwise, you will have to manually install the setup utility from the bundled Support DVD.
To install the program from Support DVD, place the support DVD into the optical drive and follow the onscreen instructions to launch the program.

If Autorun is NOT enabled in your computer, browse the contents of the support DVD to locate the GX900.exe file. Double-click the GX900.exe file to launch the program.
Setting your ASUS GX900 Gaming Mouse

Ensure that your gaming mouse is connected to your computer's USB port. The program automatically detects the mouse and displays the main menu.
Main Menu

Items Description
1. Click each tab to display the selected profile menu. 2. Displays the profile icon to configure profile 1-3 menus. 3. Click to reset the DPI configuration to the previously saved settings. 4. Drag the slider to adjust the DPI value for each level. 5. Click to reset the button settings to the previous settings. 6. Click to display the different profile color indicators and their status. 7. Click to load the saved profile to your mouse. 8. Click to save the current profile settings to your hard disk drive. 9. Click to reset all the mouse settings to the factory default settings. 10. Click to save the settings you have made. 11. Click to save the settings you have made and exit the program.
* Each profile provides two DPI levels. Two DPI switch LEDs light up indicating that you are using Level 1, and four LEDs light up indicating that you are using Level 2.
Profile 1 menu
| Items Description | |
| 1 Click to open the Edit menu and change the profile name and profile icon. | |
| 2 Enter the desired profile name. | |
| 3 Click to locate the image file you want to use as the profile icon. | |
| 4 | Select the function for each button/action from the drop down list.* Refer to the table below for more details. |
| Functions Description | |
| L-Button Left mouse | button function |
| R-Button Right mouse | button function |
| M-Button Middle mouse | button function |
| IE Backward | IE Backward button function. If selected, press the button to go back to the previous page. |
| IE Forward | IE Forward button function. If selected, press the button to go to the next page. |
| Keyboard Press the | button to perform a keystroke or keystroke sequence. |
| Macro | Press the button to run a command or series of commands that you can edit via the Edit Macro menu. SeeMacro menufor details. |
| Script #1-6 | Press the button to run a script that you can edit via the Edit Script menu. SeeEdit Script menufor details. |
| DPI [+] Press the button to increase the DPI value. | |
| DPI [-] Press the button to decrease the DPI value. | |
| DPI Level 1/2 Press the button to use the DPI Level 1/2. | |
| Profile Switch Profile Switch button function. | |
| Normal Profile Press the button to use the normal profile. | |
| User Profile 1/2/3 Press the button to use the customized profile 1/2/3. | |
| Wheel (left/right) | Press the button to scroll leftward/rightward as a tilt wheel does. This function only works for Microsoft®Office applications under the Windows®7/Vista operating systems. This function only works for Microsoft®Office applications under the Windows®7/Vista operating systems. |
| Rapid Fire (mouse) | Press the button to do a rapid fire in a click-to-attack game, which is the same as triple clicking the left mouse button. |
| Rapid Fire (key) | Press the button to do a rapid fire in a game using the spacebar to attack, which is the same as pressing the keyboard's spacebar thrice. |
| Web Browser Press the button to launch your default web browser. | |
| E-mail Press the button to launch your default e-mail application. | |
| Media Player Press the button to launch your default media player. | |
| Play/Pause | These buttons become playback control buttons in an active media player. |
| Stop | |
| Next Track | |
| Prev Track | |
| Volume Up/Down Press the button to increase/decrease the system volume. | |
| Mute Press the button to turn the volume's mute mode on/off. | |
| Calculator Press the button to launch the Calculator application. | |
| My Computer Press the button to open My Computer window. | |
| Disabled Select this item to deactivate the mouse's selected button. | |
Edit Macro menu

| Items Description | |
| Edit Macro Click | to open the Edit Macro menu. |
| Timing | Check this item to record the time between pressing down and releasing a button. (Default: 12 milliseconds) |
| Insert | When checked, the new instruction will be inserted before the selected instruction. Otherwise, any new instruction will be given the first priority. |
| Start* Click to start recording the keystrokes and/or mouse actions. | |
| Stop Click to stop recording the keystrokes and/or mouse actions. | |
| Clear Click to clear all saved instructions. | |
| Move up/down Click to move up/down the selected instruction. | |
| Instructioncycle time | When Timing is unchecked, all the actions' delay time will be the value you chose from the drop down list. |
| Loop Sets the macro to run at a click and stop when clicked again. | |
| Fire Sets the macro to run once in one click. | |
| Keeping fire | Sets the macro to run when you hold down the button and stop when you release the button. |
| Export Click to save the current macro to your hard disk drive. | |
| Import Click to load a macro from your hard disk drive. | |
Edit Script menu
| Items Description | |
| Edit Script Click | to open the Edit Script menu. |
| Timing | Check this item to record the time between pressing down and releasing a button. (Default: 12 milliseconds) |
| Insert | When checked, the new instruction will be inserted before the selected instruction. Otherwise, any new instruction will be given the first priority. |
| Start Click to start recording the keystrokes and/or mouse actions. | |
| Stop Click to stop recording the keystrokes and/or mouse actions. | |
| Clear Click to clear all saved instructions. | |
| Move up/down Click to move up/down the selected instruction. | |
| Instruction cycle time | When Timing is unchecked, all the actions' delay time will be the value you chose from the drop down list. |
| Loop Sets the script to run at a click and stop when clicked again. | |
| Fire Sets the script to run once in one click. | |
| Keeping fire | Sets the script to run when you hold down the button and stop when you release the button. |
| Export Click to save the current script to your hard disk drive. | |
| Import Click to load a script from your hard disk drive. | |
Chapter 5
Connecting to the Internet
Wired connection
Use an RJ-45 cable to connect your computer to a DSL/cable modem or a local area network (LAN).
Connecting via a DSL/cable modem
To connect via a DSL/cable modem:
- Set up your DSL/cable modem.

Refer to the documentation that came with your DSL/cable modem.
- Connect one end of an RJ-45 cable to the LAN (RJ-45) port on the rear panel of your computer and the other end to a DSL/cable modem.

- Turn on the DSL/cable modem and your computer.
- Configure the necessary Internet connection settings.

Contact your Internet Service Provider (ISP) for details or assistance in setting up your Internet connection.
Connecting via a local area network (LAN)
To connect via a LAN:
- Connect one end of an RJ-45 cable to the LAN (RJ-45) port on the rear panel of your computer and the other end to your LAN.

- Turn on your computer.
- Configure the necessary Internet connection settings.

Contact your network administrator for details or assistance in setting up your Internet connection.
Wireless connection (on selected models only)
Connect your computer to the Internet through a wireless connection.

To establish a wireless connection, you need to connect to a wireless access point (AP).
To establish a wireless connection, use either of the following method:


- To increase the range and sensitivity of the wireless radio signal, connect the external antennas to the antenna connectors on the ASUS WLAN Card.
- Place the antennas on the top of your computer for the best wireless performance.
- The external antennas are optional items.
To connect to a wireless network:
- Click the network icon in the notification area to display the available wireless networks.
- Select the wireless network that you want to connect to, then click Connect.
- You may need to key in the network security key for a secured wireless network, then click OK.
- Wait while your computer is connecting to the wireless network.
- The wireless connection is established successfully. The connection status is displayed and the network icon displays the connected status.
Chapter 6
Using the utilities

The Support DVD and Recovery DVD may not be included in the package. You may use the Recovery Partition feature to create the Support DVD and Recovery DVD. For details, refer to Recovering your system in this chapter.
ASUS AI Suite II
ASUS AI Suite II is an all-in-one interface that integrates several ASUS utilities and allows users to launch and operate these utilities simultaneously.
Using AI Suite II
AI Suite II automatically starts when you enter the Windows® operating system. The AI Suite II icon appears in the Windows® notification area. Click the icon to open the AI Suite II main menu bar.
Click each button to select and launch a utility, to monitor the system, to update the motherboard BIOS, to display the system information, and to customize the settings of AI Suite II.


- The applications in the Tool menu vary with models.
- The screenshots of AI Suite II in this user manual are for reference only. The actual screenshots vary with models.
The Tool menu
The Tool menu includes the System Level Up, Probe II, Sensor Recorder, and Ai Charger+.
System Level Up
System Level Up allows you to overclock the system in Windows® environment using the profile settings.
To launch System Level up, click Tool > System Level Up on the AI Suite II menu bar.

In setting the function, assign the hot keys for the system level up profile exchange. You can adjust the hot key settings manually. See figure below for details.
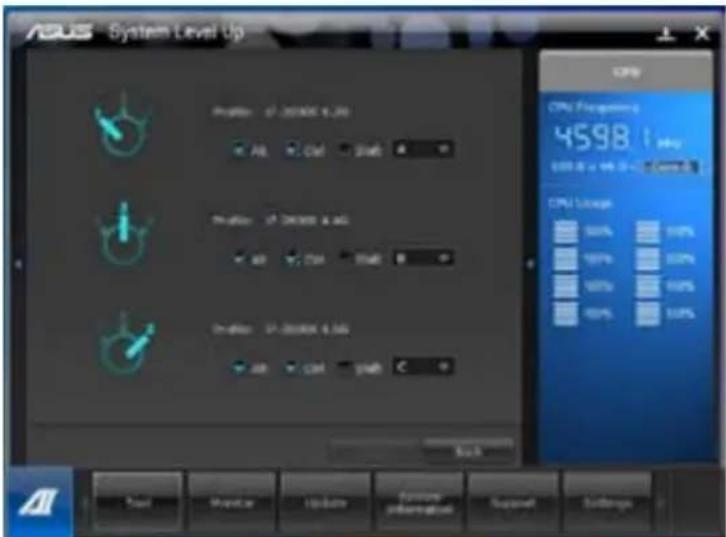
Adjust the System Level Up via two methods:
BIOS
In the BIOS Setup program, click AI Tweaker > System Level Up, and select your desired option.
OC Button
Press the OC button on the upper left side corner of the front panel.
Launching and configuring Probe II
Probe II is a utility that monitors the computer's vital components, and detects and alerts you of any problem with these components. Probe II senses fan rotations, CPU temperature, and system voltages, among others. With this utility, you are assured that your computer is always at a healthy operating condition.
To launch Probe II:
- Click Tool > Probe II on the AI Suite II main menu bar.
To configure Probe II:
- Click the Voltage/Temperature/Fan Speed tabs to activate the sensors or to adjust the sensor threshold values.
- The Preference tab allows you to customize the time interval of sensor alerts, or change the temperature unit.

Launching and configuring Sensor Recorder
Sensor Recorder allows you to monitor the changes in the system voltage, temperature, and fan speed, as well as recording the changes.
To launch Sensor Recorder:
- Click Tool > Sensor Recorder on the AI Suite II main menu bar.
To configure Sensor Recorder:
- Click the Voltage/Temperature/Fan Speed tabs and select the sensors that you want to monitor.
- The History Record tab allows you to record the changes in the sensors that you enable.
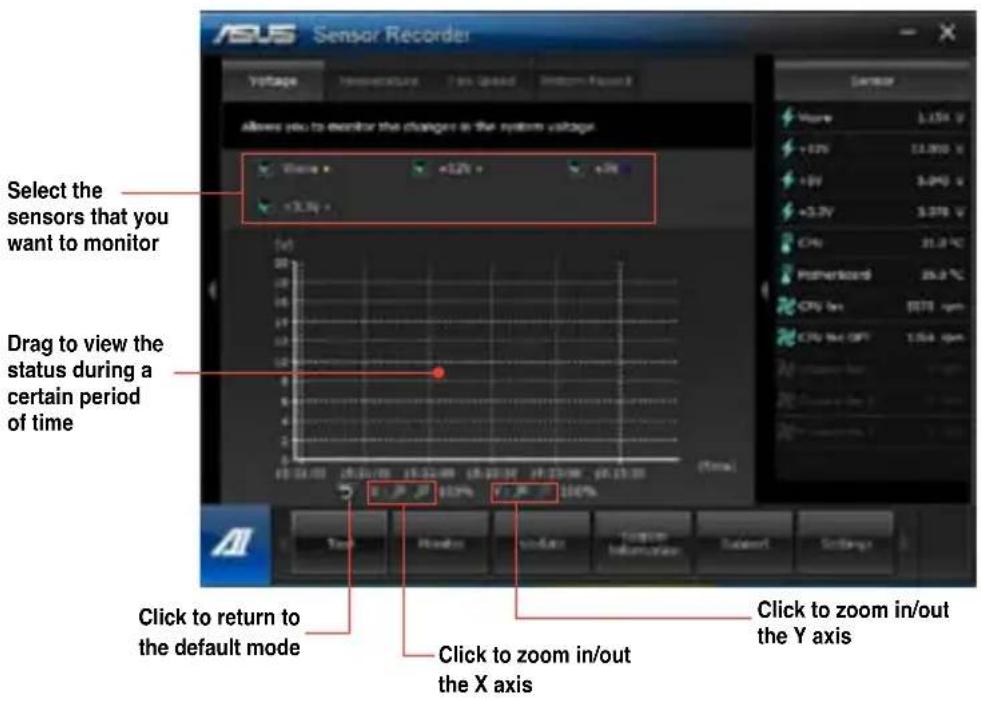
Launching and configuring Ai Charger+
Ai Charger+, a unique and fast-charging software, allows you to charge your BC 1.1* mobile devices on your computer's USB port three times faster than the standard USB devices**.

- Ai Charger+ is available only on USB 3.0 ports and starts when your PC is in S0 State.
- Ai Charger+ helps charge the connected USB devices even when your PC is in S3/S4/S5 States after it starts in S0 State.

- * Check your USB device manufacturer if it fully supports the BC 1.1 function.
- ** The actual charging speed may vary with your USB device's conditions.
- Ensure to remove and reconnect your USB device after enabling or disabling Ai Charger+ to ensure normal charging function.
To launch Ai Charger+, click Tool > Ai Charger+ on the AI Suite II main menu bar.

The Monitor menu
The Monitor menu includes the Sensor and CPU Frequency panels.

Launching Sensor
The Sensor panel displays the current value of a system sensor such as fan rotation, CPU temperature, and voltages.
To launch Sensor:
- Click Monitor > Sensor on the AI Suite II main menu bar.
Launching CPU Frequency
The CPU Frequency panel displays the current CPU frequency and CPU usage.
To launch CPU frequency:
- Click Monitor > CPU Frequency on the AI Suite II main menu bar.
Resident in the right pane (system information area)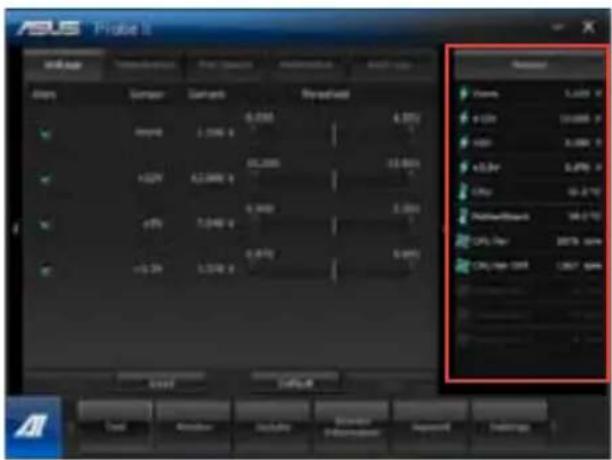
Sensor panel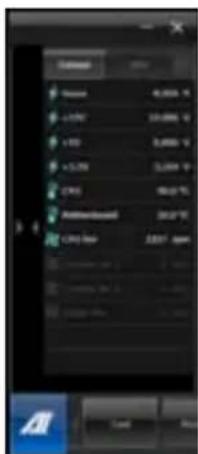
CPU Frequency panel
The Update menu
The Update menu allows you to update the motherboard BIOS and the BIOS boot logo with the ASUS designed update utilities

ASUS Update
The ASUS Update is a utility that allows you to manage, save, and update the motherboard BIOS in Windows® OS. The ASUS Update utility allows you to update the BIOS directly from the Internet, download the latest BIOS file from the Internet, update the BIOS from an updated BIOS file, save the current BIOS file or view the BIOS version information.
Updating the BIOS through the Internet To update the BIOS through the Internet:
- From the ASUS Update screen, select Update BIOS from file, then click Next.

- Select the ASUS FTP site nearest you to avoid network traffic.
Tick the two items if you want to enable the BIOS downgradable and Auto-BIOS backup functions.

- Select the BIOS version that you want to download, then click Next.
When no updated version is detected, a message is displayed informing you that there is no new BIOS file from the BIOS server.

- Click Yes if you want to change the boot logo, which is the image appearing on screen during the Power-On Self-Tests (POST). Otherwise, click No.
- Follow the onscreen instructions to complete the update process.

Updating the BIOS through a BIOS file To update the BIOS through a BIOS file:
- From the ASUS Update screen, select Update BIOS from file, then click Next.
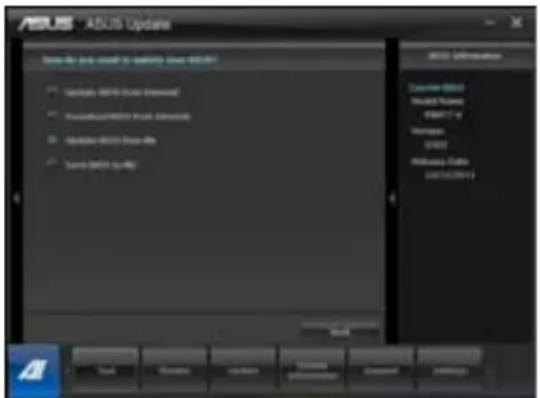
- Locate the BIOS file from the Open window, click Open, and click Next.

- Click Yes if you want to change the boot logo, which is the image appearing on screen during the Power-On Self-Tests (POST). Otherwise, click No.
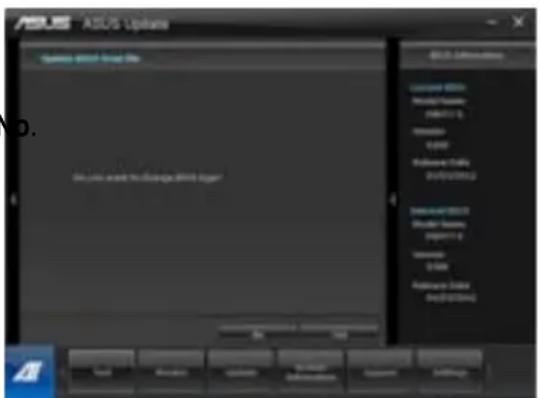
- Follow the onscreen instructions to complete the update process.
The System Information screen
The System Information screen displays the information about the motherboard, CPU, and memory slots.

- Click the MB tab to see the details on the motherboard manufacturer, product name, version, and BIOS.

- Click the CPU tab to see the details on the processor and the Cache.

- Click the Memory tab and then select the memory slot to see the details on the memory module installed on the corresponding slot.

- Click the Disk tab and then select each disk to see the details on it.

The Support screen
The Support screen displays information about the ASUS website, technical support website, download support website, or contact.

The Settings screen
The Settings screen allows you to customize the main menu bar settings and the interface's skin.

- Application allows you to select the application that you want to enable. • Bar allows you to modify the bar setting.
- Skin allows you to customize the interface's contrast, brightness, saturation, hue, and gamma.
ASUS AI Manager
ASUS AI Manager is a utility which gives you quick and easy access to frequently-used applications.
Launching AI Manager
To launch the AI Manager from the Windows® desktop, click Start > All Programs > ASUS > AI Manager > AI Manager 1.xx.xx. The AI Manager quick bar appears on the desktop.

After launching the application, the AI Manager icon appears in the Windows® taskbar.
Right-click this icon to switch between the quick bar and the main window, and to launch the AI Manager either from the quick bar or taskbar.


AI Manager quick bar
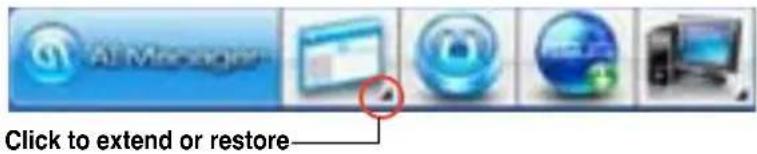
The AI Manager quick bar saves the desktop space and allows you to launch the ASUS utilities or display system information easily. Click any of the Main, My Favorites, Support or Information tab to display the menu's contents.

Click the Maximize/restore button to switch between full window and quick bar. Click the Minimize button to keep the AI Manager on the taskbar. Click the Close button to quit the AI Manager.
Main
The Main menu contains three utilities: AI Disk, AI Security, and AI Booting. Click the arrow on the Main menu icon to browse through the utilities in the main menu.
AI Disk
AI Disk allows you to easily clear temporary IE files, IE cookies, IE URLs, IE history, or the Recycle Bin. Click the AI Disk icon on the quick bar to display the full AI Disk window and select the items you want to clear. Click Apply when done.

AI Security
AI Security enables you to set a password to secure your devices, such as USB flash disks and CD/DVD disks, from unauthorized access.
To lock a device:
- When using AI Security for the first time, you are asked to set a password. Key in a password with at most 20 alphanumeric characters.
- Confirm the password.
- Key in the password hint (recommended).
- When done, click Ok.

- Select the device you want to lock, then click Apply.
- Key in the password you have set previously, then click Ok.

To unlock the device:
- Deselect the locked device, then click Apply.
- Key in the password you have set previously, then click Ok.
To change the password:
- Click Change Password, then follow the onscreen instructions to change the password.
AI Booting
AI Booting allows you to specify the boot device priority sequence.

To specify the boot sequence:
- Select a device, then click the left/right button to specify the boot sequence.
- When done, press Apply.
My Favorites
My Favorites allows you to add applications that you frequently use, saving you from searching for the applications throughout your computer.

To add an application:
- Click Add, then locate the application you want to add to My Favorites.
- Click Open on the file location window. The application is added to the My Favorites list.
Right-click on the application icon to launch, delete, or rename the selected application. You can also double-click to launch the selected application.
Support
Click any links on the Support window to go to the ASUS website, technical support website, download support website, or contact information.

Information
Click the tab on the Information window to see detailed information about your system, motherboard, CPU, BIOS, installed device(s), and memory.

Nero 9
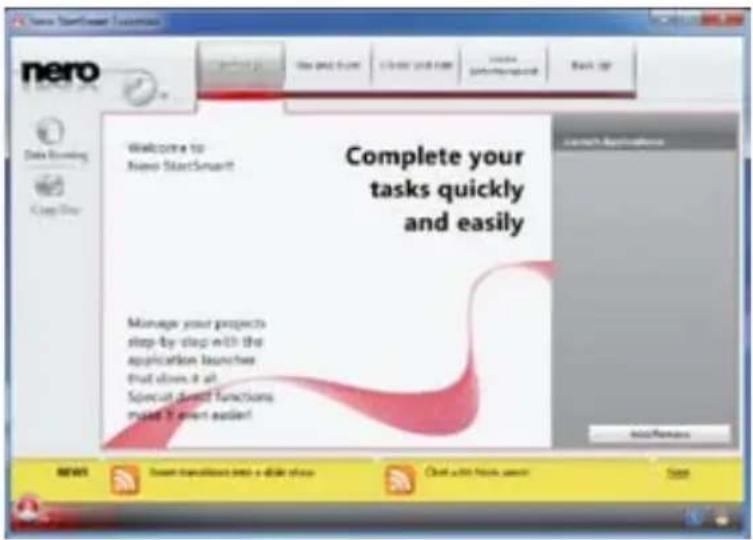
Nero 9 allows you to create, copy, burn, edit, share, and update different kinds of data.
Installing Nero 9
To install Nero 9:
- Insert the Nero 9 DVD into your optical drive.
- If Autorun is enabled, the main menu appears automatically.

If Autorun is disabled, double-click the SetupX.exe file from the main directory of your Nero 9 DVD.
- From the main menu, click Nero 9 Essentials.
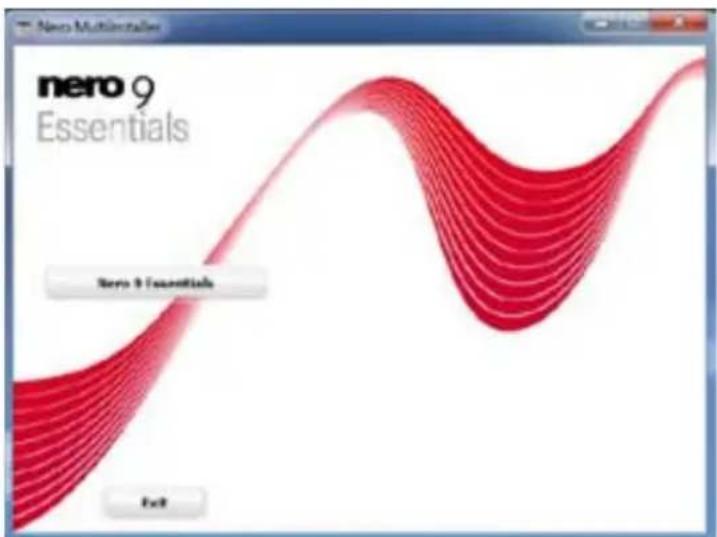
- Select the language you want to use for the Installation Wizard. Click Next.

- Click Next to continue.

- Tick 'I accept the License Conditions'. When done, click Next.

- Select Typical, then click Next.

- Tick 'Yes, I want to help by sending anonymous application data to Nero', then click Next.

- When done, click Exit.

Burning files
To burn files:
- From the main menu, click Data Burning > Add.

- Select the files that you want to burn. When done, click Add.

- After selecting files that you want to burn, click Burn to burn the files to a disc.


For more details about using Nero 9, refer to the Nero website at www.nero.com
Recovering your system
Using the Recovery Partition
The Recovery Partition quickly restores your Desktop PC's software to its original working state. Before using the Recovery Partition, copy your data files (such as Outlook PST files) to USB storage devices or to a network drive and make note of any customized configuration settings (such as network settings).
About the Recovery Partition
The Recovery Partition is a reserved space on your hard disk drive used to restore the operating system, drivers, and utilities installed on your Desktop PC at the factory.

DO NOT delete the partition named RECOVERY. The Recovery Partition is created at the factory and cannot be restored if deleted. Take your Desktop PC to an authorized ASUS service center if you have problems with the recovery process.

Using the Recovery Partition:
- Press during bootup.
- Press to select Windows Setup [EMS Enabled].
- Select one of the following recovery options.
System Recovery:
This feature allows you to restore the system to the factory default settings.
System Image Backup:
This feature allows you to burn the system image backup to DVD discs, which you can use later to restore the system to its default settings.
System DVD Backup:
This feature allows you to make a backup copy of the support DVD.
- Follow the onscreen instructions to complete the recovery process.

Visit the ASUS website at www.asus.com for updated drivers and utilities.
Using the Recovery DVD (on selected models)

Prepare 1 to 3 blank writable DVDs as instructed to create the Recovery DVD.
Remove the external hard disk drive before performing system recovery on your Desktop PC. According to Microsoft, you may lose important data because of setting up Windows on the wrong disk drive or formatting the incorrect drive partition.
To use the Recovery DVD:
- Insert the Recovery DVD into the optical drive. Your Desktop PC needs to be powered ON.
- Restart the Desktop PC and press on bootup and select the optical drive (may be labeled as "CD/DVD") and press to boot from the Recovery DVD.
- Select OK to start to restore the image.
- Select OK to confirm the system recovery.

Restoring will overwrite your hard drive. Ensure to back up all your important data before the system recovery.
- Follow the onscreen instructions to complete the recovery process.

DO NOT remove the Recovery disc, unless instructed to do so, during the recovery process or else your partitions will be unusable.

Visit the ASUS website at www.asus.com for updated drivers and utilities.
Introduction to Intel® 2012 Desktop responsiveness technologies
This document details the overview of the installation and configuration procedures of the Intel® 2012 Desktop responsiveness technologies.
Intel® 2012 Desktop responsiveness technologies feature the three technologies:
• Intel® Smart Response Technology • Intel® Rapid Start Technology • Intel® Smart Connect Technology
System Requirements for Intel® 2012 Desktop responsiveness technologies
In order for the system to run smoothly for the Intel® 2012 Desktop responsiveness, you must meet the following requirements:
- CPU: Intel® 3rd/2nd generation Core Processor family
- OS: Windows® 7 operating systems
- SSD: One dedicated SSD (Solid State Disk) to support Intel® Smart Response and Intel® Rapid Start Technology is necessary.

Refer to the SSD Capacity Requirements table for the information of SSD size, partition capacity, and system memory requirements.
- HDD: At least one HDD (Hard Disk Drive) for the system OS drive.
- DRAM: To enable Intel® Rapid Start Technology, DRAM size smaller than 8GB is required.

Ensure to enable the acceleration of Intel® Smart Response Technology before creating the partition for the Intel® Rapid Start Technology.
SSD Capacity Requirements
| SSD Partition Capacity Requirements | System DRAM2GB 4GB 8GB | |||
| Intel® storage combinations | Intel® Rapid Start 2GB 4GB 8GB | |||
| Intel® Smart Response 20GB 20GB 20GB | ||||
| Intel® Smart Response and Intel® Rapid Start | Separate 20GB and 2GB partition (SSD size > 22GB) | Separate 20GB and 4GB partition (SSD size > 24GB) | Separate 20GB and 8GB partition (SSD size > 28GB) | |
| Intel® Smart Response, Intel® Rapid Start, and Intel® Smart Connect | Separate 20GB and 2GB partition (SSD size > 22GB) | Separate 20GB and 4GB partition (SSD size > 24GB) | Separate 20GB and 8GB partition (SSD size > 28GB) | |

- The SSD used for Intel® Rapid Start and Intel® Smart Response is not allowed for creating RAID.
- Due to OS behavior, Intel® Rapid Start Technology works inefficiently with over 4G system memory under Windows® 7 32-bit operating system.
- Only Intel® internal SATA ports (gray and blue) support Intel® 2012 Desktop responsiveness technologies.
- The performance of Intel® Smart Response Technology and Intel® Rapid Storage Technology vary by the installed SSD.
Intel® Smart Response Technology
Intel® Smart Response Technology boosts overall system performance. It uses an installed fast SSD (min. 20GB available) as a cache for frequently accessed operations, speeding up hard drive/main memory interaction. Key benefits are expedited hard drive speeds, reduced load and wait times, and maximized storage utilization. Power consumption also goes down by reducing unnecessary hard drive spin.

Before applying Intel® Smart Response Technology, setting the SATA Mode BIOS item to [RAID mode] in BIOS setup is necessary.
Installing Intel® Smart Response Technology
- Place the support DVD into the optical drive. The Drivers installation tab appears if your computer has enabled the Autorun feature.
- Click the Drivers tab, then click Intel® Rapid Storage Technology Driver software.
- Follow the onscreen instructions to complete the installation.
Using the Intel® Smart Response Technology
- Click Accelerate to launch Smart Response Technology settings.

- a. Select the SSD you want to use to accelerate your storage system. b. Select the size allocated for SSD caching. c. Select which HDD for caching. d. Enhanced mode: WRITE THROUGH, write to SSD and HDD at the same time.
Maximized mode: WRITE BACK, write to SSD and write back to HDD at a later time.

- Select Disable Acceleration to disable this function, and select Change Mode to switch acceleration mode to Enhanced/Maximized.


- To enable Intel® Smart Response Technology, you need at least one SSD (20GB) and a HDD, and only one SSD can be assigned for caching.
- If you want to restore the OS, go to BIOS Option ROM > Acceleration Options and remove the Disks/Volume Acceleration to disable Intel® Smart Response Technology. Refer to Chapter 4, section Installing Serial ATA hard disk for the entry of BIOS Option ROM.
- The maximum caching size on the SSD is 64GB. If it exceeds, the storage capacity left out for caching can still be identified by the system for normal storage.
Intel® Rapid Start Technology
Intel® Rapid Start Technology allows you to quickly resume your computer from sleeping mode. Saving your computer's system memory to the configured SSD provides a faster wake-up response time, but keeps the energy in a low profile.

- Before applying Intel® Rapid Start Technology, go to Advanced Mode > Advanced > PCH Configuration in BIOS item, and enable Intel® Rapid Start Technology.
- Ensure to follow the procedure Creating a partition precisely to enable the Intel Rapid Start function. An error message appears if you install the Intel® Rapid Start Utility before creating a partition.
Creating a partition

- Ensure to backup your data before using the Microsoft partition tool. Incorrect partitioning process will result in data loss.
- Adjusting the DRAM to a high frequency will result in unstable system performance.
- Go to Start, right-click Computer > Manage > Disk Management.
- Select the SSD that you want to create the partition.
- Right-click the New Volume that you want to shrink from, and select Shrink Volume.


- If your SSD is not initialized and unformatted:
a. Right-click the disk that you want to create the partition, and select Initialize. b. Right-click the unallocated volume, select New Simple Volume, and follow the remaining steps.


If your SSD is smaller than 64GB, and is set to Full disk capacity caching option for Intel® Smart Response, you cannot see any volume in the Disk Management. Ensure to set your cache memory value of 18.6GB in Intel® Smart Response to allow enough capacity for the Intel® Rapid Start partition.
- Key in the required partition size, and it must be equal to the system DRAM memory (1GB = 1024MB). Click Shrink.
Go to Start > Control Panel > System and Security > System, and check the DRAM size information.
The unallocated volume is allocated to the selected disk.


- To launch the disk partitioning tool, click Start > Programs > Accessories > Command Prompt.
- Type diskpart and press Enter.
- In the diskpart prompt, type list disk after DISKPART, and press Enter. Select the disk with the unallocated volume by typing select disk x (x = disk number), and press Enter.
| Disk ### Status Size Free Dyn Gpt | |||||
| Disk 8 Online 2794 GB 1024 KB Disk 1 Online 59 GB 8 GB | |||||
| DISKPART> select disk 1 | |||||
| Disk 1 is now the selected disk. |

- The value "x" refers to a disk number where you created the unallocated partition.
- Refer to step 5 for details about the unallocated disk space in the SSD.
- Type create partition primary, and press Enter.

- After creating a primary partition, type detail disk, and press Enter to view the details of the partitioned disk.

- Select the RAW volume which has the same size as the shrinked volume, type select volume x (x = number), and press Enter to store the Intel® Rapid Start partition.


- The value "x" refers to a disk number where you want to create the store partition.
- Type set id=84 override, press Enter, and wait for the "shrinking process" until the Disk Management utility identifies a new partition called Hibernation Partition.


The Hibernation Partition does not appear when you choose "GPT (GUID Partition Table store type)". Ensure the "Unallocated" disappears from the volume, and a new partition is identified.
- Reboot the system after creating the partition.

The partition for Intel® Rapid Start Technology is incomplete if the computer is not rebooted, and this results in function failure of Intel® Rapid Start Technology.
Enabling and disabling the Intel® Rapid Start Technology under the OS

Install the Intel® Rapid Start Technology first from your support DVD in order to launch the Intel® Rapid Start Manager.
After creating the partition, launch the Intel® Rapid Start Manager to enable or disable the Intel® Rapid Start Technology.
- Click the Show hidden icons arrow from the right side of the task bar, and click Intel® Rapid Start Technology Manager icon.

- Tick On in the Status field to enable the function, and click Save.

Click to enable or disable the timer. When enabled, move the scroll bar to the desired time. When the system is idle for more than the time period you set, the system automatically goes into the Intel® Rapid Start mode. Default time is 10 minutes.
Click to save the settings made. Click to cancel the settings made.
Recovering the partition
This procedure allows you to delete the Intel® Rapid Start Technology from your system, and recover the partition you made for the Intel® Rapid Start Technology installation.
- Run the Command Prompt tool.
- Type diskpart and press Enter.
- At the diskpart prompt, type list disk after DISKPART, and press Enter.
- Select the disk (SSD) where the Intel® Rapid Start Technology is installed for volume recovery, type select disk x (x = number), and press Enter.
| DISKPART > list disk | |||||
| Disk #BB | Status | Size | Free | Dyn | Cpt |
| Disk 0 | Online | 2794 GB | 1824 KB | * | |
| Disk 1 | Online | 59 GB | 0 B | ||
| DISKPART > | |||||


The value "x" refers to a disk number where you want to delete the store partition.
- Type list partition, press Enter, and select the partition where the Intel® Rapid Start Technology is installed by typing select partition x (x = number), and press Enter.


The value "x" refers to a disk number where you want to delete the store partition.
- Type delete partition override, and press Enter. The diskpart utility deletes the selected partition.


- In the desktop, click Start, right-click Computer, and click Manage.
- In the Computer Management window, click Disk Management, right-click the shrinked new volume, and select Extend Volume.

- As the Extend Volume Wizard appears, click Next.

- Click Next after selecting the default selected disk.

- Extend volume setup is completed. Click Finish to recover the Intel® Rapid Start Technology partition.
- Reboot the system after deleting the partition.
- Go to Start > Control Panel > Programs > Programs and Features to remove the Intel® Rapid Start Manager for the complete deletion of Intel® Rapid Start Technology.
Intel® Smart Connect Technology
Intel® Smart Connect Technology is a feature that provides the latest content updates and energy efficiency to your computer's platform.
Once installed and activated, Intel® Smart Connect Technology periodically wakes up the system from sleeping mode, performs user state gathering, and initiates re-entry to sleeping mode to wake up after a set time interval.

- Intel® Smart Connect Technology supports Windows® Live Mail, Microsoft Outlook, and Seesmic applications.
- It is necessary to enable the items of the PCH Configuration in the BIOS before applying Intel® Smart Connect Technology. Go to Advanced Mode > Advanced > PCH Configuration, and enable Intel® Smart Connect Technology.
Installing Intel® Smart Connect Technology
- Place the support DVD into the optical drive.
- Go to Utilities, and click Intel® Smart Connect Technology.
- When the setup wizard appears, click Next to begin the setup.
- Tick "I accept the terms in the License Agreement," and click Next.
- Select all and click Next for Custom Setup.

- Click Install to proceed with the installation.
- Click Yes to restart your system for the newly installed Intel® Smart Connect Technology to take effect.
Using Intel® Smart Connect Technology

- Before the system goes to sleep mode, ensure that your applications are on the desktop and that you have entered the application passwords.
- Ensure that the internet is connected when enabling Intel® Smart Connect Technology.
- Click Start > All Programs > Intel > Intel® Smart Connect Technology.
- In the Basic tab, click Enable Updating. When enabled, the Advanced tab becomes available for advanced function settings.

- To disable the updating function, click Disable Updating. Clicking this button automatically disables the configuration in the Advanced tab. To reset to defaults, click Reset All to Defaults.

- In the Advanced tab, set up the schedule during low power usage time periods for power saving. This setting only applies to the assigned time period.

- In the Help tab, click About to view the feature's version. Click Topics to learn more about Intel® Smart Connect Technology and its configuration.
Chapter 7
Troubleshooting
Troubleshooting
This chapter presents some problems you might encounter and the possible solutions.
My computer cannot be powered on and the power LED on the front panel does not light up.
- Check if your computer is properly connected.
- Check if the wall outlet is functioning.
- Check if the Power Supply Unit is switched on. Refer to the section Turning your computer ON/OFF in Chapter 1.
My computer hangs.
Do the following to close the programs that are not responding:
- Simultaneously press Ctrl+Alt+Delete keys on the keyboard, then click Start Task Manager.
- Click the Applications tab.
- Select the program that is not responding, then click End Task.
If the keyboard is not responding, press and hold the Power button on the top of your chassis until the computer shuts down. Then press the Power button to turn it on.
I cannot connect to a wireless network using the ASUS WLAN Card (on selected models only).
- Ensure that you enter the correct network security key for the wireless network you want to connect to.
- Connect the external antennas (optional) to the antenna connectors on the ASUS WLAN Card and place the antennas on the top of your computer chassis for the best wireless performance.
The arrow keys on the number key pad are not working.
Check if the Number Lock LED is off. When the Number Lock LED is on, the keys on the number keypad are used to input numbers only. Press the Number Lock key to turn the LED off if you want to use the arrow keys on the number keypad.
No display on the monitor.
- Check if the monitor is powered on.
- Ensure that your monitor is properly connected to the video output port on your computer.
- If your computer comes with a discrete graphics card, ensure that you connect your monitor to a video output port on the discrete graphics card.
- Check if any of the pins on the monitor video connector is bent. If you discover bent pins, replace the monitor video connector cable.
- Check if your monitor is plugged to a power source properly.
- Refer to the documentation that came with your monitor for more troubleshooting information.
When using multiple monitors, only one monitor has display.
- Ensure that both monitors are powered on.
- During POST, only the monitor connected to the VGA port has display. The dual display function works only under Windows.
- When a graphics card is installed on your computer, ensure that you connect the monitors to the output port on the graphics card.
- Check if the multiple displays settings are correct. Refer to section Connecting multiple external displays in Chapter 3 for details.
My computer cannot detect my USB storage device.
- The first time you connect your USB storage device to your computer, Windows automatically installs a driver for it. Wait for a while and go to My Computer to check if the USB storage device is detected.
- Connect your USB storage device to another computer to test if the USB storage device is broken or malfunctions.
I want to restore or undo changes to my computer's system settings without affecting my personal files or data.
The Windows System Restore feature allows you to restore or undo changes to your computer's system settings without affecting your personal data such as documents or photos. For more details, refer to the section Restoring your system in Chapter 2.
? The picture on the HDTV is distorted.
- It is caused by the different resolutions of your monitor and your HDTV. Adjust the screen resolution to fit your HDTV. To change the screen resolution:
- Do any of the following to open the Screen Resolution setting screen:
- Click > Control Panel > Appearance and Personalization > Display > Change display settings.
- Right click anywhere on your Windows desktop. When the pop-up menu appears, click Personalize > Display > Change display settings.
- Adjust the resolution. Refer to the documentation came with your HDTV for the resolution.
- Click Apply or OK. Then click Keep Changes on the confirmation message.
? My speakers produce no sound.
- Ensure that you connect your speakers to the Line out port (lime) on the front panel or the rear panel.
- Check if your speak is connected to a electrical source and turned on.
- Adjust your speakers' volume.
- Ensure that your computer's system sounds are not muted.
- If it is muted, the volume icon is displayed as . To enable the system sounds, click from the Windows notification area, then click .
- If it is not muted, click and drag the slider to adjust the volume.
- Connect your speakers to another computer to test if the speakers are working properly.
? The DVD drive cannot read a disc.
- Check if the disc is placed with the label side facing up.
- Check if the disc is centered in the tray, especially for the discs with non-standard size or shape.
- Check if the disc is scratched or damaged.
? The DVD drive eject button is not responding.
- Click > Computer.
- Right-click, then click Eject from the menu.
Power
| Problem Possible Cause Action | ||
| No power(The power indicator is off) | Incorrect power voltage | ·If your computer has a power voltage switch, set it to your area's power requirements.·Adjust the voltage settings. Ensure that the power cord is unplugged from the power outlet. |
| Your computer is not turned on. | Press the power key on the front panel to ensure that your computer is turned on. | |
| Your computer's power cord is not properly connected. | ·Ensure that the power cord is properly connected.·Use other compatible power cord. | |
| PSU (Power supply unit) problems | Please call our Call Center for repair. | |
Display
| Problem Possible Cause Action | ||
| No display output after turning the computer on (Black screen) | The signal cable is not connected to the correct VGA port on your computer. | Connect the signal cable to the correct display port (onboard VGA or discrete VGA port).If you are using a discrete VGA card, connect the signal cable to the discrete VGA port. |
| Signal cable problems Try connecting to another monitor. | ||
LAN
| Problem Possible Cause Action | ||
| Cannot access the Internet | The LAN cable is not connected. | Connect the LAN cable to your computer. |
| LAN cable problems | Ensure the LAN LED is on. If not, try another LAN cable. If it still does not work, contact the ASUS service center. | |
| Your computer is not properly connected to a router or hub. | Ensure that your computer is properly connected to a router or hub. | |
| Network settings | Contact your Internet Service Provider (ISP) for the correct LAN settings. | |
| Problems caused by the anti-virus software | Close the anti-virus software. | |
| Driver problems Reinstall the | LAN driver | |
Audio
| Problem Possible Cause Action | ||
| No Audio | Speaker or headphone is connected to the wrong port. | Refer to your computer's user manual for the correct port.Disconnect and reconnect the speaker to your computer. |
| Speaker or headphone does not work. | Try using another speaker or headphone. | |
| The front and back audio ports do not work. | Try both the front and back audio ports. If one port failed, check if the port is set to multi-channel. | |
| Driver problems Reinstall the audio driver | ||
System
| Problem Possible Cause Action | ||
| System speed is too slow | Too many programs are running. | Close some of the programs. |
| Computer virus attack | ·Use an anti-virus software to scan for viruses and repair your computer. ·Reinstall the operating system. | |
| The system often hangs or freezes. | Hard disk drive failure | ·Send the damaged hard disk drive to ASUS Service Center for servicing. ·Replace with a new hard disk drive. |
| Memory module problems | ·Replace with compatible memory modules. ·Remove the extra memory modules that you have installed, then try again. | |
| There is not enough air ventilation for your computer. | Move your computer to an area with better air flow. | |
| Incompatible softwares are installed. | Reinstall the OS and reinstall compatible softwares. | |
CPU
| Problem Possible Cause Action | ||
| Too noisy right after turning on the computer. | Your computer is booting up. | It is normal. The fan runs on its full speed when the computer is powering on. The fan slows down after entering the OS. |
| The BIOS settings have been changed. | Restore the BIOS to its default settings. | |
| Old BIOS version | Update the BIOS to the latest version. Visit the ASUS Support site at http://support.asus.com to download the latest BIOS versions. | |
| Computer is too noisy when in use. | The CPU fan has been replaced. | Ensure that you are using a compatible or ASUS-recommended CPU fan. |
| There is not enough air ventilation for the computer. | Ensure that your computer is working in an area with good air flow. | |
| The system temperature is too high. | Update the BIOS.If you know how to reinstall the motherboard, try to clean the inner space of the chassis. | |

If the problem still persists, refer to your Desktop PC's warranty card and contact the ASUS Service Center. Visit the ASUS Support site at http://support.asus.com for the service center information.
ASUS contact information
ASUSTeK COMPUTER INC.
Address 15 Li-Te Road, Peitou, Taipei, Taiwan 11259
Telephone +886-2-2894-3447
Fax +886-2-2890-7798
E-mail info@asus.com.tw
Online support support.asus.com
ASUS COMPUTER INTERNATIONAL (America)
Address 800 Corporate Way, Fremont, CA 94539, USA
Telephone +1-510-739-3777
Fax +1-510-608-4555
Web site usa.asus.com
Technical Support
Telephone +1-812-282-2787
Support fax +1-812-284-0883
Online support support.asus.com
ASUS COMPUTER GmbH (Germany and Austria)
Address Harkort Str. 21-23, D-40880 Ratingen, Germany
Fax +49-2102-959911
Web site www.asus.de
Online support support.asus.com
* EUR 0.14/minute from a German fixed landline; EUR 0.42/minute from a mobile phone.
| Manufacturer: | ASUSTeK Computer Inc. |
| Address: | No.150, LI-TE RD., PEITOU, TAIPEI 112, TAIWAN |
| Authorised representative in Europe: | ASUS Computer GmbH |
| Address: | HARKORT STR. 21-23, 40880 RATINGEN, GERMANY |
ASUS Essentio Desktop PC
CG8580
User Manual

G7279
Second edition
March 2012
CAUTION: Danger of explosion if battery is incorrectly replaced. Replace only with the same or equivalent type recommended by the manufacturer. Dispose of used batteries according to the manufacturer's instructions.


Chapter 4
Using the computer

OR

Sensor
ASUS Update
System Information
Settings
AI Security


Online support support.asus.com
ASUS COMPUTER INTERNATIONAL (America)
Address 800 Corporate Way, Fremont, CA 94539, USA
Telephone +1-510-739-3777
Fax +1-510-608-4555
Online Support: support.asus.com
Address: Harkort Str. 21-23, D-40880 Ratingen, Germany
Fax +49-2102-959911
Online Support: support.asus.com
F7279
First Edition
March 2012
Local ASUS Technical Support

Run Windows® Update

Front Panel

Rear Panel

Chapter 4

Sensor (Probes)
ASUS Update


AI Security
Information
System Image Backup:


17306
First Edition
March 2012
Copyright © 2012 ASUSTeK Computer Inc. All Rights Reserved.
FCC (Federal Communications Commission) Declaration

Front panel

Rear panel


- Click > Control Panel > Appearance and Personalization > Display > Change display settings.
Chapter 4

Items Descriptions
OR


II Monitor Menu
Starting Sensor

The Update menu
ASUS Update
AI Security
To unlock a device:
- Select I accept the License Conditions. When done, click Next.

- Select Yes, I want to help by sending anonymous application data to Nero and click Next.

- When finished, click Exit.


System Image Backup:


disk x (x = disk number), then press Enter.


15 Li-Te Road, Peitou, Taipei, Taiwan 11259
Phone +886-2-2894-3447
+886-2-2894-3447
Fax +886-2-2890-7798
E-mail info@asus.com.tw
Second Edition V2
March 2012

Front panel

Rear panel


Chapter 4
Using the equipment

To establish a wireless connection, you need to connect to a wireless access point (AP).
OR

Monitor

Update
AI Manager quick bar
AI Security
Nero 9

| New Volume (D:) 51.62 GB NTFS. Healthy (Primary Partition) | 8.00 GB Unallocated |

Second edition
April 2012
ACT/
LINK LED SPEED LED LAN port

Connecting the power cable
Turning your computer ON/OFF
Turning your computer ON

Front panel

Back panel


Connecting an HDTV
Chapter 4

OR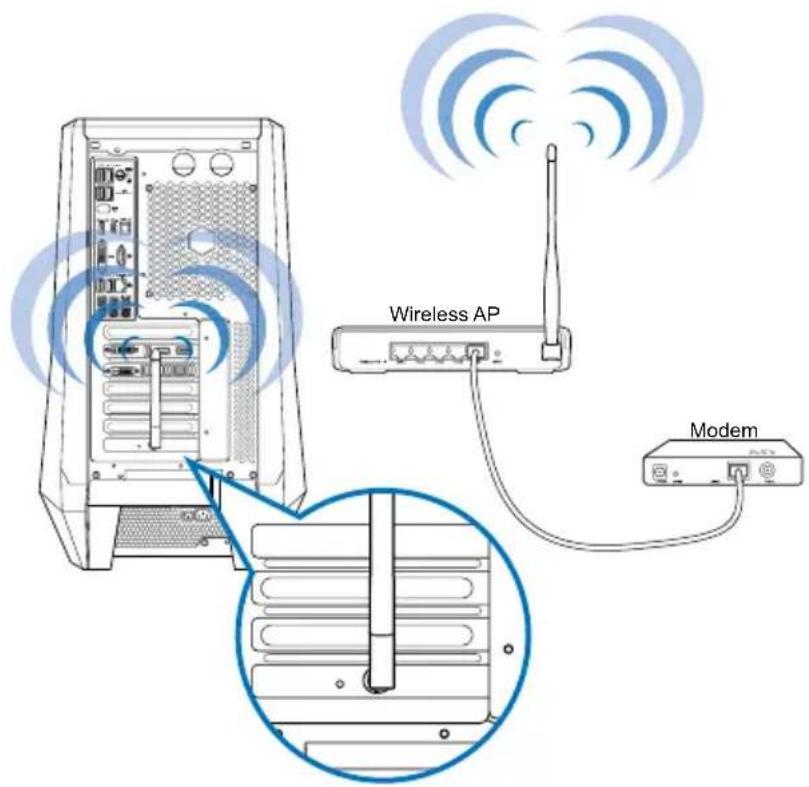

Screen
Sensor panel
CPU frequency panel
Update
- Select the BIOS version you want to download. Click Next.
System information
AI Manager quick bar
AI security
Information
Install Nero 9
- Select Typical and then click Next.

Burn files
- Select Disable Acceleration to disable this function, and select Change Mode to switch acceleration mode to Enhanced/Maximized.


- Set on the
Online support support.asus.com
ASUS COMPUTER GmbH (Germany and Austria)
Address Harkort Str. 21-23, D-40880 Ratingen, Germany
Fax +49-2102-959911
Web site www.asus.de
PG7279
Revised Edition V2


Front panel

Rear panel


Connecting 2-channel speakers

Connecting 4-channel speakers
Connecting 6-channel speakers
Connecting 8-channel speakers


Connecting an HD TV
Chapter 4


Adjust the System Level Up using two methods:
BIOS
Monitor
Sensor

Update

Update the BIOS via the Internet
To update the BIOS via the Internet:
Settings
AI Security
Nero 9
Install Nero 9
To install Nero 9:
Burn files

3. Select Disable Acceleration

| New Volume (D:) 51.62 GB NTFS Healthy (Primary Partition) | 8.00 GB Unallocated |


default.
- COPYRIGHT © 2012 ASUSTEK COMPUTER INC. ALL RIGHTS RESERVED
- CONTENTS
- CHAPTER 1: GETTING STARTED
- CHAPTER 2: USING WINDOWS®
- CHAPTER 3: CONNECTING DEVICES TO YOUR COMPUTER
- CHAPTER 4: USING YOUR COMPUTER
- CHAPTER 5: CONNECTING TO THE INTERNET
- CHAPTER 6: USING THE UTILITIES
- CHAPTER 7: TROUBLESHOOTING
- NOTICES
- REACH
- FEDERAL COMMUNICATIONS COMMISSION STATEMENT
- RF EXPOSURE WARNING
- CANADIAN DEPARTMENT OF COMMUNICATIONS STATEMENT
- MACROVISION CORPORATION PRODUCT NOTICE
- LITHIUM-ION BATTERY WARNING
- ASUS RECYCLING/TAKEBACK SERVICES
- SAFETY INFORMATION
- CONVENTIONS USED IN THIS GUIDE
- WHERE TO FIND MORE INFORMATION
- ASUS WEBSITES
- ASUS LOCAL TECHNICAL SUPPORT
- PACKAGE CONTENTS
- CHAPTER
- GETTING STARTED
- WELCOME
- GETTING TO KNOW YOUR COMPUTER
- REAR PANEL
- SETTING UP YOUR COMPUTER
- CONNECTING AN EXTERNAL MONITOR
- USING THE ASUS GRAPHICS CARD (ON SELECTED MODELS ONLY)
- TO CONNECT AN EXTERNAL MONITOR USING THE ASUS GRAPHICS CARD
- USING THE ONBOARD DISPLAY OUTPUT PORTS
- TO CONNECT AN EXTERNAL MONITOR USING THE ONBOARD DISPLAY OUTPUT PORTS
- CONNECTING A USB KEYBOARD AND A USB MOUSE
- CONNECTING THE POWER CORD
- TURNING YOUR COMPUTER ON/OFF
- TURNING YOUR COMPUTER ON
- TO TURN YOUR COMPUTER ON
- TURNING YOUR COMPUTER OFF
- TO TURN YOUR COMPUTER OFF
- USING WINDOWS®
- STARTING FOR THE FIRST TIME
- TO START FOR THE FIRST TIME
- USING WINDOWS® 7 DESKTOP
- USING THE START MENU
- LAUNCHING ITEMS FROM THE START MENU
- TO LAUNCH ITEMS FROM THE START MENU
- USING THE GETTING STARTED ITEM
- TO USE THE GETTING STARTED ITEM
- USING THE TASKBAR
- LAUNCHING A PROGRAM FROM THE TASKBAR
- TO LAUNCH A PROGRAM FROM THE TASKBAR
- PINNING ITEMS ON THE JUMPLISTS
- TO PIN ITEMS TO THE JUMPLIST
- UNPINNING ITEMS FROM THE JUMPLIST
- TO UNPIN ITEMS FROM THE JUMPLIST
- PINNING PROGRAMS ON THE START MENU OR TASKBAR
- TO PIN PROGRAMS ON THE START MENU OR TASKBAR
- UNPINNING PROGRAMS FROM THE START MENU
- TO UNPIN PROGRAMS FROM THE START MENU
- UNPINNING PROGRAMS FROM THE TASKBAR
- TO UNPIN PROGRAMS FROM THE TASKBAR
- USING THE NOTIFICATION AREA
- DISPLAYING AN ALERT NOTIFICATION
- TO DISPLAY AN ALERT NOTIFICATION
- CUSTOMIZING ICONS AND NOTIFICATIONS
- TO CUSTOMIZE ICONS AND NOTIFICATIONS
- MANAGING YOUR FILES AND FOLDERS
- USING WINDOWS® EXPLORER
- LAUNCHING WINDOWS® EXPLORER
- TO LAUNCH WINDOWS EXPLORER
- EXPLORING FILES AND FOLDERS
- TO EXPLORE FILES AND FOLDERS
- CUSTOMIZING THE FILE/FOLDER VIEW
- TO CUSTOMIZE THE FILE/FOLDER VIEW
- ARRANGING YOUR FILES
- TO ARRANGE YOUR FILES
- SORTING YOUR FILES
- TO SORT YOUR FILES
- GROUPING YOUR FILES
- TO GROUP YOUR FILES
- ADDING A NEW FOLDER
- TO ADD A NEW FOLDER
- BACKING UP YOUR FILES
- SETTING UP A BACKUP
- TO SET UP A BACKUP
- RESTORING YOUR SYSTEM SETTINGS
- TO RESTORE YOUR SYSTEM
- PROTECTING YOUR COMPUTER
- USING WINDOWS® 7 ACTION CENTER
- LAUNCHING WINDOWS® 7 ACTION CENTER
- TO LAUNCH WINDOWS® 7 ACTION CENTER
- USING WINDOWS® UPDATE
- LAUNCHING WINDOWS® UPDATE
- TO LAUNCH WINDOWS® UPDATE
- SETTING UP A USER ACCOUNT AND PASSWORD
- SETTING UP A USER ACCOUNT
- TO SET UP A USER ACCOUNT
- SETTING UP A USER'S PASSWORD
- TO SET UP A USER'S PASSWORD
- ACTIVATING THE ANTI-VIRUS SOFTWARE
- TO ACTIVATE TREND MICRO INTERNET SECURITY
- GETTING WINDOWS® HELP AND SUPPORT
- CONNECTING DEVICES TO YOUR COMPUTER
- CONNECTING A USB STORAGE DEVICE
- TO CONNECT A USB STORAGE DEVICE
- TO REMOVE A USB STORAGE DEVICE
- CONNECTING MICROPHONE AND SPEAKERS
- CONNECTING HEADPHONE AND MIC
- CONNECTING 2-CHANNEL SPEAKERS
- CONNECTING 8-CHANNEL SPEAKERS
- CONNECTING MULTIPLE EXTERNAL DISPLAYS
- SETTING UP MULTIPLE DISPLAYS
- TO SET UP MULTIPLE DISPLAYS
- CONNECTING AN HDTV
- USING YOUR COMPUTER
- PROPER POSTURE WHEN USING YOUR DESKTOP PC
- TO MAINTAIN THE PROPER POSTURE
- USING THE MEMORY CARD READER
- TO USE THE MEMORY CARD
- USING THE OPTICAL DRIVE
- INSERTING AN OPTICAL DISC
- TO INSERT AN OPTICAL DISC
- REMOVING AN OPTICAL DISC
- TO REMOVE AN OPTICAL DISC
- USING THE ASUS ROG U9N GAMING KEYBOARD
- INSTALLING THE ASUS ROG U9N GAMING KEYBOARD
- USING THE ASUS GX900 GAMING MOUSE
- LAUNCHING THE PROGRAM
- SETTING YOUR ASUS GX900 GAMING MOUSE
- MAIN MENU
- ITEMS DESCRIPTION
- EDIT MACRO MENU
- CONNECTING TO THE INTERNET
- WIRED CONNECTION
- CONNECTING VIA A DSL/CABLE MODEM
- CONNECTING VIA A LOCAL AREA NETWORK (LAN)
- TO CONNECT VIA A LAN
- WIRELESS CONNECTION (ON SELECTED MODELS ONLY)
- TO CONNECT TO A WIRELESS NETWORK
- USING THE UTILITIES
- ASUS AI SUITE II
- USING AI SUITE II
- THE TOOL MENU
- SYSTEM LEVEL UP
- BIOS
- OC BUTTON
- LAUNCHING AND CONFIGURING PROBE II
- TO LAUNCH PROBE II
- TO CONFIGURE PROBE II
- LAUNCHING AND CONFIGURING SENSOR RECORDER
- TO LAUNCH SENSOR RECORDER
- TO CONFIGURE SENSOR RECORDER
- LAUNCHING AND CONFIGURING AI CHARGER
- THE MONITOR MENU
- LAUNCHING SENSOR
- TO LAUNCH SENSOR
- LAUNCHING CPU FREQUENCY
- TO LAUNCH CPU FREQUENCY
- THE UPDATE MENU
- ASUS UPDATE
- UPDATING THE BIOS THROUGH THE INTERNET TO UPDATE THE BIOS THROUGH THE INTERNET
- UPDATING THE BIOS THROUGH A BIOS FILE TO UPDATE THE BIOS THROUGH A BIOS FILE
- THE SYSTEM INFORMATION SCREEN
- THE SUPPORT SCREEN
- THE SETTINGS SCREEN
- ASUS AI MANAGER
- LAUNCHING AI MANAGER
- AI MANAGER QUICK BAR
- MAIN
- AI DISK
- AI SECURITY
- TO LOCK A DEVICE
- TO UNLOCK THE DEVICE
- TO CHANGE THE PASSWORD
- TO SPECIFY THE BOOT SEQUENCE
- MY FAVORITES
- TO ADD AN APPLICATION
- SUPPORT
- INFORMATION
- NERO
- INSTALLING NERO
- TO INSTALL NERO
- BURNING FILES
- TO BURN FILES
- RECOVERING YOUR SYSTEM
- USING THE RECOVERY PARTITION
- ABOUT THE RECOVERY PARTITION
- SYSTEM RECOVERY
- SYSTEM IMAGE BACKUP
- SYSTEM DVD BACKUP
- USING THE RECOVERY DVD (ON SELECTED MODELS)
- TO USE THE RECOVERY DVD
- INTRODUCTION TO INTEL® 2012 DESKTOP RESPONSIVENESS TECHNOLOGIES
- SYSTEM REQUIREMENTS FOR INTEL® 2012 DESKTOP RESPONSIVENESS TECHNOLOGIES
- INTEL® SMART RESPONSE TECHNOLOGY
- INSTALLING INTEL® SMART RESPONSE TECHNOLOGY
- USING THE INTEL® SMART RESPONSE TECHNOLOGY
- INTEL® RAPID START TECHNOLOGY
- CREATING A PARTITION
- ENABLING AND DISABLING THE INTEL® RAPID START TECHNOLOGY UNDER THE OS
- RECOVERING THE PARTITION
- INTEL® SMART CONNECT TECHNOLOGY
- INSTALLING INTEL® SMART CONNECT TECHNOLOGY
- USING INTEL® SMART CONNECT TECHNOLOGY
- TROUBLESHOOTING
- MY COMPUTER CANNOT BE POWERED ON AND THE POWER LED ON THE FRONT PANEL DOES NOT LIGHT UP
- MY COMPUTER HANGS
- I CANNOT CONNECT TO A WIRELESS NETWORK USING THE ASUS WLAN CARD (ON SELECTED MODELS ONLY)
- THE ARROW KEYS ON THE NUMBER KEY PAD ARE NOT WORKING
- NO DISPLAY ON THE MONITOR
- WHEN USING MULTIPLE MONITORS, ONLY ONE MONITOR HAS DISPLAY
- MY COMPUTER CANNOT DETECT MY USB STORAGE DEVICE
- I WANT TO RESTORE OR UNDO CHANGES TO MY COMPUTER'S SYSTEM SETTINGS WITHOUT AFFECTING MY PERSONAL FILES OR DATA
- THE PICTURE ON THE HDTV IS DISTORTED
- MY SPEAKERS PRODUCE NO SOUND
- THE DVD DRIVE CANNOT READ A DISC
- THE DVD DRIVE EJECT BUTTON IS NOT RESPONDING
- LAN
- AUDIO
- CPU
- ASUS CONTACT INFORMATION
- ASUSTEK COMPUTER INC
- ASUS COMPUTER INTERNATIONAL (AMERICA)
- TECHNICAL SUPPORT
- ASUS COMPUTER GMBH (GERMANY AND AUSTRIA)
- ASUS ESSENTIO DESKTOP PC
- CG
- USER MANUAL
- USING THE COMPUTER
- SENSOR
- SYSTEM INFORMATION
- SETTINGS
- LOCAL ASUS TECHNICAL SUPPORT
- RUN WINDOWS® UPDATE
- SENSOR (PROBES)
- FCC (FEDERAL COMMUNICATIONS COMMISSION) DECLARATION
- II MONITOR MENU
- STARTING SENSOR
- TO UNLOCK A DEVICE
- USING THE EQUIPMENT
- MONITOR
- UPDATE
- CONNECTING THE POWER CABLE
- SCREEN
- INSTALL NERO
- BURN FILES
- CONNECTING AN HD TV
- UPDATE THE BIOS VIA THE INTERNET
- SELECT DISABLE ACCELERATION
Brand : ASUS
Model : ROG CG8580
Category : Desktop computer