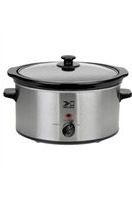
SC 24572 - Rice cooker KALORIK - Free user manual and instructions
Find the device manual for free SC 24572 KALORIK in PDF.


| Product type | Rice cooker |
| Brand | Kalorik |
| Model | SC 24572 |
| Capacity | 1 liter (about 5 cups of uncooked rice) |
| Power supply | 230 V, 50 Hz |
| Power | 400-600 W |
| Dimensions (WxDxH) | Approximately 25 × 25 × 20 cm |
| Weight | Approximately 1.5 kg |
| Body material | Heat-resistant plastic |
| Inner bowl material | Stainless steel with non-stick coating |
| Main functions | Rice cooking, automatic keep warm |
| Indicator light | Operation and keep warm indicator |
| Included accessories | Inner bowl, rice spatula, measuring cup |
| Care and cleaning | Clean the bowl and lid after each use with a soft sponge; wipe the body with a damp cloth |
| Safety | Automatic shut-off in case of overheating; insulated handles |
| Spare parts available | Inner bowl, lid, spatula (on request) |
| Repairability | Repairability index not communicated; parts available via after-sales service |
| Warranty | 1 year |
| Country of manufacture | China |
Frequently Asked Questions - SC 24572 KALORIK
User questions about SC 24572 KALORIK
0 question about this device. Answer the ones you know or ask your own.
Ask a new question about this device
Download the instructions for your Rice cooker in PDF format for free! Find your manual SC 24572 - KALORIK and take your electronic device back in hand. On this page are published all the documents necessary for the use of your device. SC 24572 by KALORIK.
USER MANUAL SC 24572 KALORIK
When using electrical appliances, basic safety precautions should always be followed, including the following
1. READ ALL INSTRUCTIONS
-
Check that your mains voltage corresponds to that stated on the rating plate of the appliance before using the appliance.
-
Do not touch hot surfaces. Use handles or knobs.
-
To protect against electric shock do not immerse cord, plugs, the appliance or its control panel in water or other liquid.
-
Close supervision is necessary when the appliance is used by or near children.
-
Do not operate any appliance with a damaged cord or plug or after the appliance malfunctions or has been damaged in any manner. Return appliance to the nearest authorized service facility for examination, repair, or adjustment.
-
Unplug from outlet when not in use and before cleaning. Allow to cool before putting on or taking off parts, and before cleaning the appliance.
-
The use of accessory attachments not recommended by the appliance manufacturer may cause injuries.
-
Do not use outdoors.
-
Do not let cord hang over edge of table or counter or touch hot surfaces.
-
Do not place on or near a hot gas or electric burner, or in a heated oven. This also for the ceramic crock pot
-
Extreme caution must be used when moving an appliance containing hot oil or other hot liquids.
-
Always attach plug to appliance first, then plug cord in the wall outlet. To disconnect, remove plug from wall outlet.
-
CAUTION: To prevent damage or shock hazard, do not cook in base. Cook only in removable crock.
-
Avoid sudden temperature changes, such as adding refrigerated foods into a heated pot.
-
Do not use appliance for other than intended use.
SAVE THESE INSTRUCTIONS HOUSEHOLD USE ONLY
POLARIZED PLUG INSTRUCTIONS
This appliance is equipped with a polarized plug (one blade is wider than the other). To reduce the risk of electric shock, this plug will fit into the polarized outlet only one way. If the plug does not properly fit into the outlet at first, reverse it. If it still does not fit, contact a competent qualified electrician. Do not attempt to modify the plug in any way.
SHORT CORD INSTRUCTIONS
A short power supply cord is provided to reduce the hazards resulting from becoming entangled in, or tripping over a longer cord. Extension cords may be used if care is exercised in their use.
- The electrical rating of the extension cord should be at least that of the appliance. If the electrical rating of the extension cord is too low, it could overheat and burn.
- The resulting extended cord should be arranged so that it will not hung over the counter top or tabletop where it can be pulled on by children or tripped over.
PART DESCRIPTION

- Lid
- Crock
- Heating base
-
Pilot light
-
Temperature control knob with 4 positions (from Left to Right) : OFF, LOW; HIGH and KEEP WARM
OPERATION
- After having unpacked the appliance, clean the crock pot and the lid in soapy water, rinse and dry thoroughly.
- When it is first switched on, the heating parts may smell and emit some smoke. This is normal; the grease that may have adhered to the element during manufacture is burning off. We therefore recommend for the first time that you heat up the appliance for about 10 minutes without any food (ventilate the room during this period) and shut the appliance down for it to cool.
• Prepare your recipes directly in the crock. - Put the lid on the crock.
• Always make sure the temperature knob is in "0" position. - Insert the plug in an earthed power socket, 120V, UL type.
- Select the desired temperature and let the preparation cook slowly.
- If you use an extension cord, compare its characteristics with the ones of the appliance (see rating plate) and check its compatibility.
- You can either serve the preparation in the crock or transfer it in another receptacle. When taking the crock out of the aluminum pan, use potholders or a cloth to grasp the handles, particularly if you are sensitive to heat.
• Always let the appliance cool down before cleaning or storing it.
WARNING:
According to U.S. Department of Agriculture, Food Safety and Inspection Service, to avoid food-borne illnesses, foods such as meat, fish, and poultry should be thoroughly cooked before consuming them. Before consuming, determine the temperature of the foods using a food thermometer (not included). Refer to the USDA web site for information on food temperature rules.
TEMPERATURE SELECTOR
- According to the preparation you can select position LOW (Low cooking setting) or position HIGH (High cooking setting).
- The LOW heat setting gently simmers food for an extended period of time without overcooking or burning. No stirring is required when using this setting. Ideal for vegetable dishes and re-heating.
- Although the fast cooking setting accelerates the preparation, it remains slow compared to a classical cooking mode and your preparation may simmer gently to allow the ingredients to give off their flavor. The HIGH heat setting will cook food in half the time required for the LOW heat setting. As food will boil when cooked on the HIGH heat setting. It may be necessary to add extra liquid, depending on the recipe and the amount of time in which it is cooked. Occasional stirring of stews and casseroles will improve the flavor distribution. Food should be monitored when using the high setting, just like cooking in a pot with a lid on.
- You can also use the HIGH settings for the first couple of hours and then switch back to the LOW setting for the remainder of the cooking.
- Using the KEEP WARM position, the slow cooker will keep the food at serving temperature after cooking, at approx. 150°F. Do not use this setting to cook food.
PRACTICAL ADVICE
- In order to prolong the appliance's lifespan and to protect the crock, we advise you not to create thermal shocks during use. For example, never pour boiling liquid on cold ingredients or on the contrary, never put frozen food in a hot preparation.
- Never fill the crock to the brim as the preparation might flow over during the cooking process (leave up minimum 2 inches space to the rim)
- Do not use for more than 8 hours consecutively.
- Defrost any frozen content before cooking into the slow cooker.
COOKING WITH YOUR SLOW COOKER
Contrary to classical cooking modes, your appliance does not heat the food from below but only the sides of the appliance are heating and the heat is spread over the whole recipient. This way the food does not stick to the bottom of the receptacle and may thus cook for a long time.
All preparations that need slow cooking, i.e. to "simmer", can be made with the slow cooker, but other preparations may be adapted to this cooking mode.
As most food is cooked over period of 6-9 hours, it can be prepared in advance the evening before, refrigerated in the removable crockery pot, placed in the slow cooker and switched on in the morning and left to cook all day. When you arrive home a delicious, hot meal will await you.
The guide below will help simplify the process of slow cooker, allowing you to obtain ultimate satisfaction from your slow cooker.
It's all in the timing!
Always allow sufficient time for the food to cook. It is almost impossible to overcook in the slow cooker, particularly when using the LOW setting. Most recipes can be cooked on any one of the temperature settings, however the cooking times will vary accordingly.
Adapting cooking times
Your favorite traditional recipes can be adapted easily, by halving the amount of liquid and increasing the cooking time considerably. See the guide that follows for suggested cooking times and settings when adjusting your favorite recipes.
Traditional Recipe Time: Slow Cooker Recipe Time:
15-30 minutes 4-6 hours on LOW heat setting
60 minutes 6-8 hours on LOW heat setting
1-3 hours 8-12 hours on LOW heat setting
NOTE! These times are approximate. Times can vary depending on ingredients and quantities in recipes.
All food should be cooked with the glass lid well in place. Each time the lid is lifted, both the heat and moisture are decreasing. Cooking times should be adjusted by to accommodate this factor.
Liquid amounts
When food is cooking in your slow cooker, very little moisture boils away. To compensate this, it is advisable to halve the liquid content of traditional recipes.
However, if after cooking the liquid content is excessive remove the lid and operate the slow cooker on the High heat setting for 30-45 minutes or until the liquid reduces by the desirable amount.
Stirring the food
Little or no stirring is required when using the LOW or KEEP WARM setting. When using the HIGH heat setting stirring ensures even flavor distribution.
REFERENCE TEMPERATURES
Please use the following table as a reference for the temperature reached.
| Operating time Approx. temperatureon HIGH setting | Approx. temperatureon LOW setting | ||
| 1 hour 61°F / 16°C | |||
| 2 hours 117 °F / 47°C | |||
| 3 hours 165 °F / 74°C | |||
| 4 hours 212 °F / 100°C | |||
| 5 hours 212 °F / 100°C | |||
| 6 hours 212 °F / 100°C | |||
| 7 hours 212 °F / 100°C | |||
| 8 hours 212 °F / 100°C | |||
CLEANING AND CARE
- Always put in off position, unplug the appliance and wait for it to cool down before cleaning it.
- Remove the lid and take out the crock using their handles and clean them in hot, soapy water. You can also immerse them in water, but never use scouring pads to clean them. Rinse thoroughly.
- The crockery pot and glass lid can also be washed in the dishwater. However care should be taken not to chip or crack the crock-pot or lid.
- Wipe the inside of the aluminum pan and the body of the appliance with a damp sponge. Never immerse in water. Never put it in the dishwasher.
- Never immerse the appliance in water or any other liquid. Never fill the crock with water to clean it when it is still in the aluminum pan.
WARRANTY
We suggest that you complete and return the enclosed Product Registration Card promptly to facilitate verification of the date of original purchase. However, return of the Product Registration Card is not a condition of these warranties. You can also fill this warranty card online, at the following address: www.KALORIK.com
This KALORIK product is warranted in the U.S.A. for 1 year from the date of purchase against defects in material and workmanship. This warranty is not transferable. Keep the original sales receipt. Proof of purchase is required to obtain warranty performance.
During this period, the KALORIK product that, upon inspection by KALORIK, is proved defective, will be repaired or replaced, at Kalorik's option, without charge to the customer. If a replacement product is sent, it will carry the remaining warranty of the original product.
This warranty does not apply to any defect arising from a buyer's or user's misuse of the product, negligence, failure to follow KALORIK instructions noted in the user's manual, use on current or voltage other than that stamped on the product, wear and tear, alteration or repair not authorized by KALORIK, or use for commercial purposes. There is no warranty for glass parts, glass containers, filter basket, blades and agitators, and accessories in general. There is also no warranty for parts lost by the user.
ANY WARRANTY OF MERCHANTABILITY OR FITNESS WITH RESPECT TO THIS PRODUCT IS ALSO LIMITED TO THE ONE YEAR LIMITED WARRANTY PERIOD.
Some states do not allow limitation on how long an implied warranty lasts or do not allow the exclusion of incidental or consequential damages, so the above limitations may not apply to you. This warranty gives you specific legal rights, and you may also have other rights which vary from state to state.
If the appliance should become defective within the warranty period and more than 30 days after date of purchase, do not return the appliance to the store: often, our Consumer Service Representatives can help solve the problem without having the product serviced. If servicing is needed, a Representative can confirm whether the product is under warranty and direct you to the nearest service location.
If this is the case, bring the product, or send it, postage prepaid by the user (all Kalorik customers are responsible for the initial shipment back to the warranty center), along with proof of purchase and indicating a return authorization number given by our Consumer Service Representatives, to the authorized KALORIK Service Center (please visit our website at www.KALORIK.com or call our Customer Service Department for the address of our authorized KALORIK Service Center).
If you send the product, please include a letter explaining the nature of the claimed defect.
If you have additional questions, please call our Consumer Service Department (please see below for complete contact information), Monday through Friday from 9:00am - 6:00pm (EST). Please note hours are subject to change.
If you would like to write, please send your letter to:
KALORIK Consumer Service Department
Team International Group of America Inc.
1400 N.W 159th Street, Suite 102
Miami Gardens, FL 33169 USA
Or call:
Toll Free: +1 888-521-TEAM / +1 888-KALORIK
Only letters can be accepted at this address above. Shipments and packages that do not have a return authorization number will be refused.
11 USK SC 24572 / SC 25581 110127
SP MANUAL DE INSTRUCCIONES
Team International Group of America Inc. 1400 N.W 159th Street, Suite 102 Miami Gardens, FL 33169 USA
O llame gratuitamente (U.S.A.) al +1 888-521-TEAM / +1 888-KALORIK
Team International Group of America Inc.
1400 N.W 159th Street, Suite 102
Miami Gardens, FL 33169 USA
Copies of the I/B. Please reproduce them without any changes except under special instruction from Team International BELGIUM. The pages must be reproduced and folded in order to obtain a booklet A5 (+/- 148.5 mm width x 210 mm height). When folding, make sure you keep the good numbering when you turn the pages of the I/B. Don't change the page numbering. Keep the language integrity. Print only what is inside the frame.
K110127
www.KALORIK.com


- READ ALL INSTRUCTIONS
- SAVE THESE INSTRUCTIONS HOUSEHOLD USE ONLY
- POLARIZED PLUG INSTRUCTIONS
- SHORT CORD INSTRUCTIONS
- OPERATION
- WARNING:
- TEMPERATURE SELECTOR
- PRACTICAL ADVICE
- COOKING WITH YOUR SLOW COOKER
- It's all in the timing!
- Adapting cooking times
- Liquid amounts
- Stirring the food
- REFERENCE TEMPERATURES
- CLEANING AND CARE
- WARRANTY
- KALORIK Consumer Service Department
- SP MANUAL DE INSTRUCCIONES
Brand : KALORIK
Model : SC 24572
Category : Rice cooker