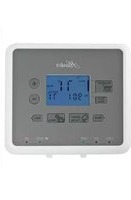
44272 - Thermostat HUNTER - Free user manual and instructions
Find the device manual for free 44272 HUNTER in PDF.


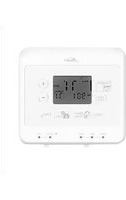
| Product Type | Programmable Thermostat |
| Brand | Hunter |
| Model | 44272 |
| Dimensions (W x H x D) | 4.5 x 4.5 x 1.2 inches |
| Weight | 0.5 lbs |
| Power Source | Hardwired (24 VAC) or Battery (2 AA) |
| Display Type | Digital LCD with backlight |
| Temperature Range | 45°F to 90°F (7°C to 32°C) |
| Control Method | Touch buttons |
| Compatibility | Most 24V HVAC systems (gas, oil, electric, heat pump) |
| Programmable | 7-day programmable with 4 periods per day |
| Fan Control | Auto/On modes |
| System Modes | Heat, Cool, Off |
| Filter Reminder | Yes, adjustable |
| Backlight | Adjustable time and brightness |
| Battery Backup | Yes (2 AA) |
| Warranty | Limited 1 year |
| Cleanability | Wipe with dry cloth; do not use water or solvents |
| Installation | Wall mount with included hardware; compatible with standard junction box |
Frequently Asked Questions - 44272 HUNTER
User questions about 44272 HUNTER
0 question about this device. Answer the ones you know or ask your own.
Ask a new question about this device
Download the instructions for your Thermostat in PDF format for free! Find your manual 44272 - HUNTER and take your electronic device back in hand. On this page are published all the documents necessary for the use of your device. 44272 by HUNTER.
USER MANUAL 44272 HUNTER
Hunter Owner's Manual

5 MINUTE
INSTALLATION
natural_image
Abstract circular design with segmented dark and light segments, no text or symbols present5-1-1 Programmable
Weekdays-Saturday-Sunday
Models
44272
44277
Form# 44033-01
20100511
©2010 Hunter Fan Co.
Table Of Contents
At A Glance
Know Your Thermostat 3
Setup
Setting Day and Time 10
Scheduling
Scheduling Introduction....12
Setting Your Schedule....14
Temporary Temperature Change....18
Turning Off Scheduling 20
Save Away....22
Features
Alerts 24
Menu Options....28
Additional Features ....32
Thermostat Assistance
Troubleshooting and Support....33
Technical Support....35
Warranty
1 Year Guarantee....36
At A Glance
Know Your Thermostat
Your thermostat has been pre-programmed from the factory with no programming necessary. We recommend using these pre-programmed settings for a few days before altering them as they offer maximum energy saving benefits. If you do decide to alter your programs, use the charts on page 13 to write out your scheduled times and temperatures. After you have recorded your preferences, follow the instructions on page 14 to alter your temperature settings.
There is no need to program the thermostat at the wall where it is mounted to! Remove the thermostat from the backplate by gripping the sides firmly and pulling it straight off. This allows you to program the thermostat in comfort.
After you have programmed your thermostat, no other setting changes are necessary unless you wish to browse through the menu to see how you may further adjust the independent settings of your thermostat to meet your lifestyle. The features section starting on page 28 of this manual will describe these settings. Most settings have been preset for optimal performance.
If you need any assistance with installation or setup of your new Hunter Thermostat, please call us, our technical support staff is ready to help!
USA: 1-888-830-1326
Canada: 1-866-268-1936
Hours of operation are from 7:00 am to 7:00 pm Monday - Friday and 8:00 am to 5:00 pm on Saturday, Central Time. You may also contact us over the Internet at:
www.hunterfan.com
At A Glance
Know Your Thermostat
- Enters Schedule Setup for altering scheduled programs.
- Sets the Save Away feature for when you will not be home during a regularly programmed time.
- Confirms completion of an action or returns you to the Home screen.
- Allows access to the advanced features of the thermostat.
- Moves you forward or backward while setting up features or schedules.
- Adjusts time and temperature settings as well as moving up or down menu lists.
- Indicates whether the system is set to Heat, Cool, or Off.
- Shows if the fan is set to Auto or On modes.
- Allows you to switch between Heat, Cool, and Off modes.
- Allows you to switch between fan Auto and On modes.

At A Glance
Know Your Thermostat
- Holds 2 "AA" Batteries.
- HE/HG Switch - allows you to set your furnace to Gas/Oil or Electric, based on the type of system you have.
- Allows your thermostat to operate your HVAC system* properly by indicating the system type that you have.
*Conventional System: Uses a condensing unit for cooling and a separate furnace system for heating.
*Heat Pump System: Uses the condensing unit for both heating and cooling.
NOTE: If you are unsure of your system type it may be necessary to contact our technical support department at 1-888-830-1326, your HVAC manufacturer, or a local HVAC technician to determine this. Improper selection of your system type could cause the thermostat to not operate your system properly.

At A Glance
Know Your Thermostat
- Shows the current day of the week or weekend.
- Indicates the thermostat is running in schedule mode.
- Will show when your heat pump or system is reporting a problem to the thermostat.
- Indicates the current room temperature.
- C will display when in Celsius mode. Nothing will display when set to Fahrenheit.
- Flashes when the furnace filter should be checked for replacement.
- On when the current schedule period is running.
- Indicates the current active schedule period.
- Low battery warning, replace the batteries in the thermostat.
- Indicates the fan is running when displayed.
- Shows the current mode of the fan, Auto or On.
- Indicates the current time in am(A) or pm (P).
- On when the current operating mode, heat or cool, is running.
- Current operating mode, heat or cool.
- Indicates the thermostat is running in save away mode.
- Current Set temperature the thermostat is scheduled to run.

Setup
Setting Day and Time
4
Once you install the batteries, the thermostat will prompt you to set the current day and time.
- You will notice that "Mon" will be flashing at the top left of your screen. Use the +or buttons to move to your current day of the week and press the Next button to advance to the next step.
- Use the +or button to change between am(A) and pm(P). Choose Next to advance.
- Next you will select your current hour by using the or buttons. The Next button advances you to the next step.
- Set your minutes using the or and press Done! Home to finish or Back if you need to make a correction to a previous step.
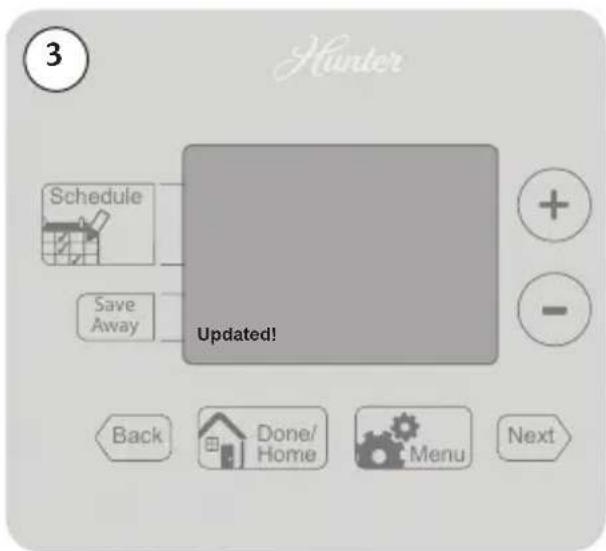
- When finished, the thermostat will show "Updated!" to confirm your settings are saved.
- Your thermostat will next prompt you to set your programming, see page 14 step 2 if you wish to alter your programs at this time.
Setup
Setting Day and Time


Scheduling
Scheduling Introduction
5
Read the scheduling section thoroughly to ensure you understand your scheduling options and which will best fit with your lifestyle. The following notes should help you with scheduling:
- The schedule time can be set in 15 minute increments, and remains the same for both Heat and Cool programs.
- The scheduled temperature can be set in increments of 1^ (1°C).
• After 15 minutes without a key press, the thermostat will return to the home display screen and save any changes you have made. - When setting the schedule time, note the AM / PM indicator.
- At any stage during your scheduling, you can use the Back or Next buttons to move forward or backwards through the steps. Done/ Home will also save any changes, even if you have not scheduled or altered all settings.
- Arrows beside each schedule mode and beside heat/cool modes will indicate which is active.
This thermostat has been pre-programmed to provide optimal energy savings. No programming is necessary. We recommend you run these programs for a few days before adjusting your programming. If it is necessary to change these settings, use the scheduling table on the next page to record your new settings. You will also find the default schedule there as well.
Default Schedule
| Day Away Asleep Home | |||
| Monday-Friday | Start Time: 8:00amEnd Time: 6:00pmHeat Temp: 63°F (17°C)Cool Temp: 82°F (27°C) | Start Time: 10:00pmEnd Time: 6:00amHeat Temp: 67°F (19°C)Cool Temp: 76°F (24°C) | Heat Temp: 71°F (21°C)Cool Temp: 74°F (23°C) |
| Saturday | Start Time: 8:00amEnd Time: 6:00pmHeat Temp: 63°F (17°C)Cool Temp: 82°F (27°C) | Start Time: 10:00pmEnd Time: 6:00amHeat Temp: 67°F (19°C)Cool Temp: 76°F (24°C) | Heat Temp: 71°F (21°C )Cool Temp: 74°F (23°C) |
| Sunday | Start Time: 8:00amEnd Time: 6:00pmHeat Temp: 63°F (17°C)Cool Temp: 82°F (27°C) | Start Time: 10:00pmEnd Time: 6:00amHeat Temp: 67°F (19°C)Cool Temp: 76°F (24°C) | Heat Temp: 71°F (21°C)cool Temp: 74°F (23°C) |
- The Home schedule automatically calculates the remaining times from Away and Asleep and assigns them the Home temperature.
Alternate Schedule
| Day Away Asleep Home | |||
| Monday-Friday | Start Time:End Time:Heat Temp:Cool Temp: | Start Time:End Time:Heat Temp:Cool Temp: | Heat Temp:Cool Temp: |
| Saturday | Start Time:End Time:Heat Temp:Cool Temp: | Start Time:End Time:Heat Temp:Cool Temp: | Heat Temp:Cool Temp: |
| Sunday | Start Time:End Time:Heat Temp:Cool Temp: | Start Time:End Time:Heat Temp:Cool Temp: | Heat Temp:Cool Temp: |
Note: Use a pencil so these records may be changed at a later time if necessary.
Scheduling
Setting Your Schedule
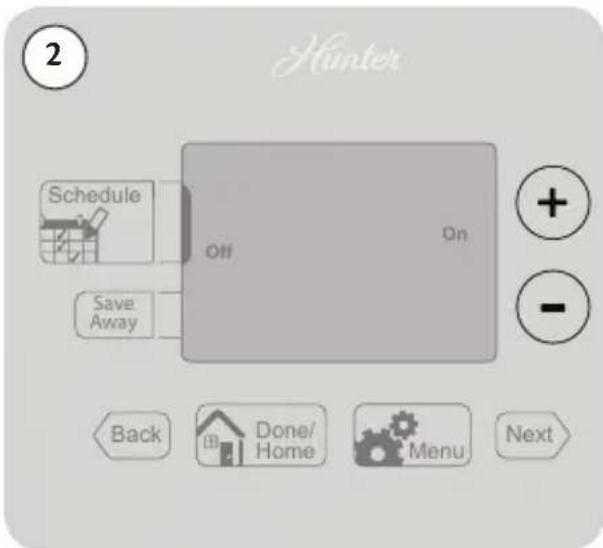
- Press the Schedule Button to enter Scheduling mode.
- Use the + or buttons to select "On" and then Next to move forward to Scheduling.
Note: If you do not wish to use the scheduling option on your thermostat, refer to page 20, step 2.
-
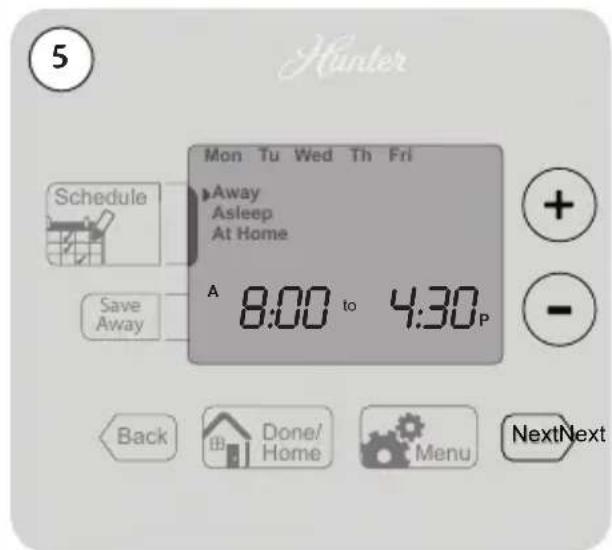
Monday thru Friday will be flashing on the screen. To proceed scheduling your weekdays, press Next. If you wish to start programming Saturday or Sunday, press the + or - button until the day you want to schedule is flashing at the top of the screen and press Next.
-
By default, "Away" will be flashing on screen to start your scheduling. Use the Next button to proceed to the next step.
Scheduling
Setting Your Schedule



Scheduling
Setting Your Schedule
- Use the +or buttons to adjust the start time on the left of the screen for the period and press Next. Again you will use the or buttons to adjust the end time on the right of the screen for this scheduled period. Press Next again.
- Set the temperature for your heating cycle as indicated by the flashing heat to arrow on your screen. Use the + and - buttons to change the temperature and press Next. You will be asked to set your cooling cycle, indicated by the flashing the cool to arrow. Set this temperature with your + or - buttons and hit Next.
- The thermostat will start this process again for "Asleep". Repeat steps 1-5 to schedule the time and set the temperature for your sleep period. When finished pressed Next to get to "At Home".
- When setting "At Home", you will only be asked to set a temperature. The thermostat calculates your "At Home" time by what remains unscheduled from your "Away" and "Asleep" periods. Set your "Heat To" temperature first and press Next, then Set your "Cool To" temp and press Next To finish Scheduling.
- If you are scheduling the day periods in order (Weekdays, Saturday, then Sunday), the screen will flash "Updated!" and take you to the next period.
- When you have completed all scheduling, press Done/ Home to finish.
- If you skipped a section, or are only programming a weekend day, the Thermostat will show "Updated!" and return you to the Home screen.
Scheduling
Setting Your Schedule


Scheduling
Temporary Temperature Change
5
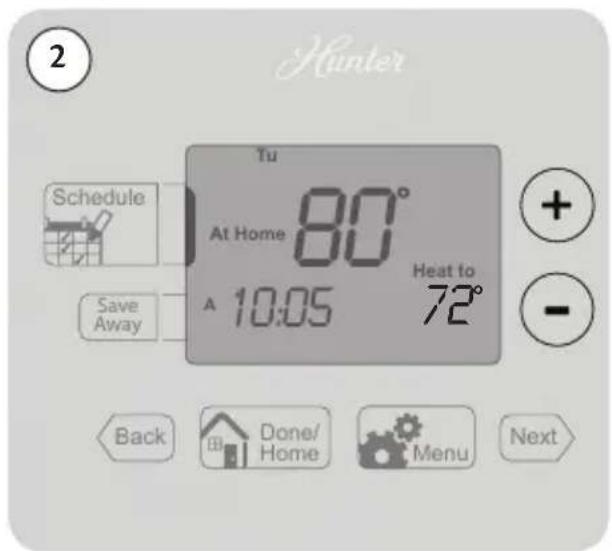
With Temporary Temperature Change you have the ability to alter the temperature for only the current running schedule for one day.
- Press the +or button once to activate the screen, the backlight will come on.
- Use the +or buttons again to select a new temperature.
- Press the Done/Home button to save changes.
Note: Temporary Temperature Change is not a permanent setting. Your thermostat will only run the new temperature until the next scheduled period change. After your thermostat changes to a new schedule set, your thermostat will forget the temporary setting and resume your existing schedule.
Scheduling
Temporary Schedule Change


Scheduling
Turning Off Scheduling
5
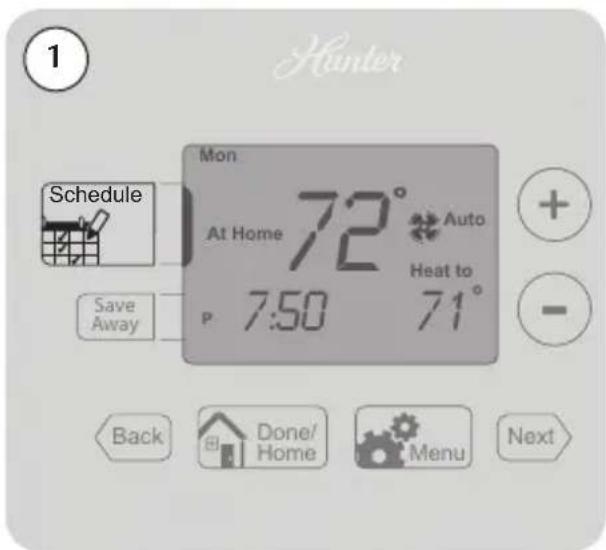
To turn off your schedule and have the thermostat permanently set to one temperature:
- Press the Schedule button once.
- Use the +or button to switch to Off and select Done/ Home
- The screen will show "Updated!" and return you to the home screen.
Note: You will notice the black bar on the screen beside the Schedule button is not displayed anymore. This indicates, no schedule is set to run. You can see the difference between figure 1 and 4.
- From the home screen, use the ⊕ or ⊖ buttons to adjust your temperature.
The system will now ignore all schedules and run at the temperature set by you on the home screen.
If at anytime you wish to change the temperature, just use the on buttons.
If you wish to reactivate your schedules, refer back to "Setting Your Schedule" on page 14.
Scheduling
Turning Off Scheduling


Scheduling
Save Away
5
The Save Away feature allows you to set a lower or higher temperature for time you will be away from your home outside of your normal Away schedule. This can include days you will be away for vacation, or a few hours away from your home.
The Save Away feature can be set for as little as 1 hour or as much as 30 days. To set the save away feature:
-
Press the Save Away button.
-
You will see the number of hours or days flashing on the screen, use the +or to adjust the amount of time you will be away. Press the Next button to advance to your temperature setting. By default, the "Away" temperature will be selected. You can use the or- to adjust the degrees if you do not want to run this temperature.
Note: Up to 12 hours can be set before changing over to day increments.
-
Press the Done/ Home button to finish Save Away settings. The screen will show "Update!" and return to the home screen.
-
You will notice the bar will be on beside the Save Away button to indicate it is active. Also, the screen displays the number of hours or days the Save Away feature is set for. See figure 4.
Note: To escape Save Away mode, press Done/ Home to resume your schedule.
5
Scheduling
Save Away


Features
Alerts
6
This chapter will outline the various alerts the thermostat will report to you and how to respond to them.
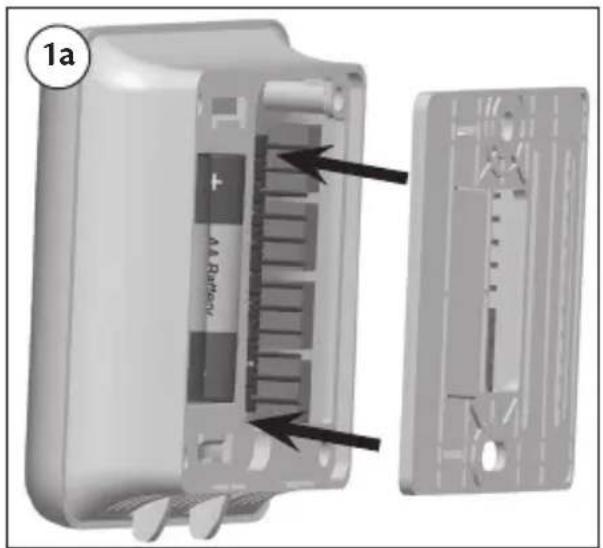
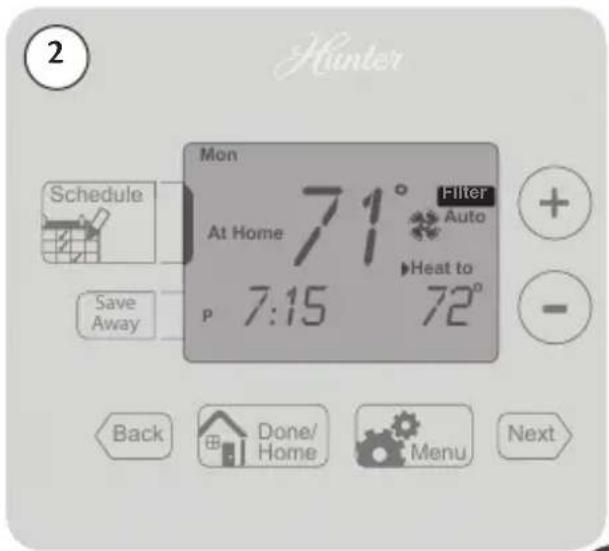
- Low Battery: This icon will appear when your batteries are starting to run low on power and should be changed to avoid system interruptions, (Figure 1) Change the batteries by gripping the sides of the thermostat firmly and pulling straight back, (Figure 1a). The batteries are located on the backside of the thermostat. The thermostat requires 2 (AA) batteries to operate. If you do not replace the batteries in a timely manner, the screen will go blank except for the low battery warning, (Figure 1b). Your system will shut down and will not operate until you replace the batteries. Replacing the batteries will clear this alert.
Note: Settings will not be lost while replacing the batteries. They are stored in the thermostat's memory.
- Filter Change: When this icon appears on the screen, it indicates you should check your furnace filter to see if it needs to be replaced. To reset this counter see page 28.
Features
Alerts


Features
Alerts
6
- Auxiliary Heat: On multi-stage heat pumps this alert indicates your second stage heat is running.
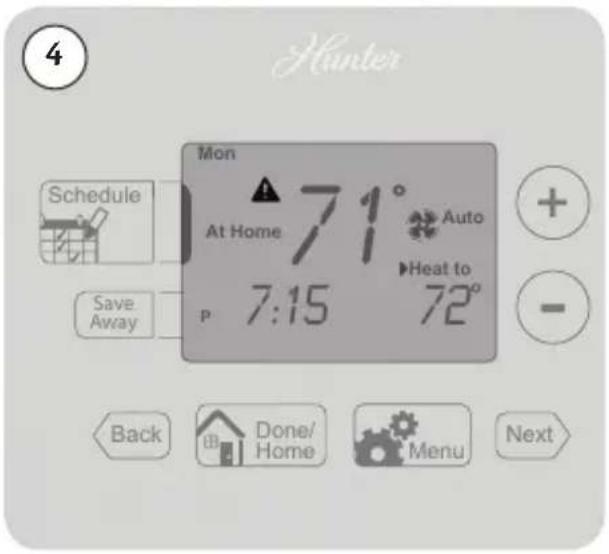
- Check System: Some heat pump systems are equipped with the ability to check system performance, indicated by the presence of an "L" wire attached to the backplate. This icon will flash on screen to alert the user that the heat pump is reporting a problem with the system. It may be necessary to have the heat pump checked or serviced by an HVAC technician.
Features
Alerts

Features
Menu Options
Under your Menu options you have the ability to reset your filter counter, change your day/time settings, and change first and second stage spans. To change each setting, you will need to hit the next button to move through each feature.
To access these options:
-
Press the Menu button.
-
If you need to reset your filter indicator on the screen use the or+ buttons to select "Y". If you need to make no other changes press to return to the home screen, otherwise press Next. The Next button will advance you through this option if you do not need to reset the filter counter. If you select "N" then the filter counter will not be reset and may continue to flash "Filter" on the screen if it was active before entering this menu.
-
Next you are given the option of changing your day/time. You will use the same instructions as on 10 to change these settings. The + and - buttons change the day of week, am/pm, hour, and minutes. The Next or Back buttons browse through each option. Press Next to advance to your next feature from the minutes adjustment.
Note: If you do not need to change your time/day, just use the button until the screen shows updated and advances you to the next option.
Features
Menu Options


Features
Menu Options
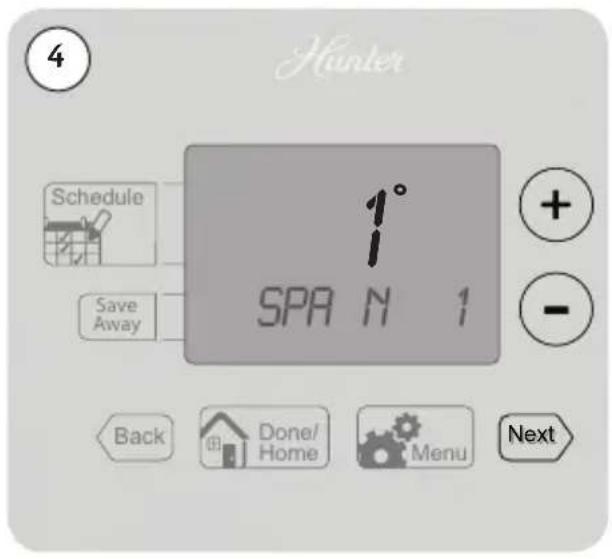
- The next Menu option is to set your thermostat's primary span. Use the +or buttons to adjust between 1, 2, or, 3 degrees. Press after this has been changed or if no changes are necessary. The span setting regulates when and how long your system will run. The span has been set at the factory to 1 which will allow the system to turn on.5°F (.05°C) above or below the set temperature and run for .5°F (.05°C) above or below the set temperature.
Example: If your thermostat is set to turn on at 72° in heat mode, with a span setting of 2, your thermostat will activate your furnace at 71° and shut it down when it reaches 73°. For cooling at 72° with a span of 2, your air conditioner will activate at 73° and shut down at 71°. This setting can be changed to 1, 2, or 3. 1 will shorten your running time while 3 will lengthen it. - Unless you have a multi-stage conventional or heat pump system, there is no need to change the second stage span. If you do, use the + or -buttons to adjust between 1, 2, or, 3 degrees. Press Next once this has been changed or if no changes are necessary. Secondary span acts the same as your primary, but it determines when and how long your second stage heat runs.
- The last menu option changes your temperature readings between Fahrenheit and Celsius. Use the or buttons to switch between them and hit Next if you need to go back and make a change to a different menu item, or Done/ Home to be returned to the home screen.
6
Features
Menu Options


Features
Additional Features
Armchair Programming
There is no need to stand at the wall where the thermostat is mounted while programming or changing settings. Simply remove the thermostat from the wall and make the necessary changes in the comfort of a chair. You can also set your programming and settings before you even install the thermostat.
Power Failure Protection
In the event that power is lost, the batteries will act as backup, saving your settings and programs.
Blue Backlight
Your thermostat has a blue LED lamp that backlights the display for easy viewing in the dark. When any key is pressed, the backlight will activated. The display will stay illuminated for 15 seconds after the last key is pressed.
System Protection
To protect your system from cycling, system turning on and off rapidly, your thermostat will prevent your system from turning back on for up to 3 minutes after it has been shut down.
Reset
In situations where your thermostat may not seem to be operating properly or if you just want to reset and start over, press and hold the + and -buttons for 5 seconds until the screen flashes "Updated!". This will restore the thermostat to factory condition.
Thermostat Assistance
Troubleshooting and Support
Problem:
No display.
Solution:
- Check battery position and battery life.
Problem:
Program does not change at desired setting.
Solution:
- Check the time in all programs for proper am/pm time.
- Ensure thermostat is not in "Save Away" mode.
- Make sure the thermostat is set to the proper day.
Problem:
Auto / Fan does not turn on.
Solution:
- Move HG/HE switch to opposite position.
- Check the fan setting and make sure that it is not set to off.
Thermostat Assistance
Troubleshooting and Support
7
Problem:
Fan runs continuously.
Solution:
- Check fan setting to see if it is set to on.
- Move HG/HE switch to opposite position.
Problem:
Heating or cooling does not turn on or off.
Solution:
- Check the system is in the right mode (heat or cool).
- Be sure to wait up to 4 minutes for system protection if your system was just on.
- Check breakers to make sure power is getting to your system
- Replace the batteries.
Problem:
Backlight does not come on.
Solution:
- Replace the batteries.
Technical Support
If you need any assistance with installation or setup of your new Hunter thermostat, please call us. Our technical support staff is ready to help!
USA: 1-888-830-1326
Canada: 1-866-268-1936
Hours of operation are from 7:00 am to 7:00 pm Monday - Friday and 8:00 am to 5:00 pm on Saturday, Central Time. You may also contact us over the Internet at www.hunterfan.com.
Warranty
1 Year Guarantee
8
Hunter Fan Company
Thermostats
LIMITED WARRANTY
The Hunter Fan Company warrants your Hunter Thermostat to be free from defects in material or workmanship for a period of one year from the date of sale to the original user or consumer purchaser. If your Hunter Thermostat malfunctions or fails within the warranty period because of a defect in material or workmanship, we will replace it.
THIS WARRANTY IS IN LIEU OF ALL OTHER EXPRESS WARRANTIES. THE DURATION OF ANY IMPLIED WARRANTY, INCLUDING, BUT NOT LIMITED TO, ANY IMPLIED WARRANTY OF MERCHANTABILITY OR FITNESS FOR A PARTICULAR PURPOSE, IN RESPECT TO YOUR HUNTER THERMOSTAT IS LIMITED TO THE PERIOD OF THE EXPRESS WARRANTY SET FORTH ABOVE.
This warranty is voided if your Hunter Thermostat is not purchased and used in the USA. This warranty excludes and does not cover defects, malfunctions or failures or your Hunter Thermostat which were caused by repairs by persons not authorized by us, mishandling, improper installation, modifications or damage to the Hunter Thermostat while in your possession, or unreasonable use, including failure to provide reasonable and necessary maintenance.
Warranty
1 Year Guarantee
This warranty neither applies to batteries nor to deterioration of, nor damage to the product caused by the use of faulty batteries. Return your product, along with proof of purchase to Hunter Fan Company Service Department, 7130 Goodlett Farms Pkwy Suite 400, Memphis, TN 38016. You will be responsible for all insurance and freight or other transportation charges to our factory. We will return your Hunter Thermostat freight prepaid. Your Hunter Thermostat should be properly packed to avoid damage in transit since we will not be responsible for any such damage. Proof of purchase is required when requesting warranty service.
IN NO EVENT SHALL HUNTER FAN COMPANY BE LIABLE FOR CONSEQUENTIAL OR INCIDENTAL DAMAGES.
SOME STATES DO NOT ALLOW LIMITATIONS ON HOW LONG AN IMPLIED WARRANTY LASTS OR THE EXCLUSION OR LIMITATION OF INCIDENTAL OR CONSEQUENTIAL DAMAGES SO THE ABOVE LIMITATION MAY NOT APPLY TO YOU.
THE WARRANTY GIVES YOU SPECIFIC LEGAL RIGHTS AND YOU MAY ALSO HAVE OTHER RIGHTS WHICH VARY FROM STATE TO STATE.



- Hunter Owner's Manual
- MINUTE
- Table Of Contents
- At A Glance
- Setup
- Scheduling
- Features
- Thermostat Assistance
- Warranty
- Know Your Thermostat
- If you need any assistance with installation or setup of your new Hunter Thermostat, please call us, our technical support staff is ready to help!
- Setting Day and Time
- Scheduling Introduction
- Setting Your Schedule
- Temporary Temperature Change
- Temporary Schedule Change
- Turning Off Scheduling
- Save Away
- 5
- Alerts
- Menu Options
- 6
- Additional Features
- Armchair Programming
- Power Failure Protection
- Blue Backlight
- System Protection
- Reset
- Troubleshooting and Support
- Problem:
- Solution:
- Technical Support
- Year Guarantee
- Hunter Fan Company
- Thermostats
- LIMITED WARRANTY
Brand : HUNTER
Model : 44272
Category : Thermostat