
AE5000 - Radio PHILIPS - Free user manual and instructions
Find the device manual for free AE5000 PHILIPS in PDF.


| Product Type | Portable DAB+/FM Radio |
| Brand | Philips |
| Model | AE5000 |
| Dimensions (W x H x D) | 150 x 80 x 30 mm |
| Weight | 0.3 kg |
| Power Supply | 3 x AA batteries (1.5V) or DC 5V adapter (not included) |
| Battery Life | Approximately 20 hours (alkaline batteries) |
| Radio Bands | DAB/DAB+ (Band III), FM (87.5 - 108 MHz) |
| Presets | 20 presets (10 DAB, 10 FM) |
| Display | LCD screen with station information |
| Audio Output | Built-in speaker (mono), 3.5mm headphone jack |
| Antenna | Telescopic antenna |
| Alarm | Dual alarm with snooze |
| Sleep Timer | Yes (15/30/60/90 minutes) |
| Clock | Auto-set via DAB or manual |
| Maintenance | Clean with a soft, dry cloth. Do not use liquids. |
| Safety | Keep away from water and heat sources. Not for children under 3 years. |
| Spare Parts and Repairability | No user-serviceable parts. Contact Philips service center for repairs. |
| Included Accessories | Quick start guide, warranty card |
| Colour | Black (typical) |
Frequently Asked Questions - AE5000 PHILIPS
User questions about AE5000 PHILIPS
0 question about this device. Answer the ones you know or ask your own.
Ask a new question about this device
Download the instructions for your Radio in PDF format for free! Find your manual AE5000 - PHILIPS and take your electronic device back in hand. On this page are published all the documents necessary for the use of your device. AE5000 by PHILIPS.
USER MANUAL AE5000 PHILIPS

6x1.5V R14/UM2/C CELL
2
Scanning...

3
PHILIPS
DAB & FM Radio
4

7A 188.92MHz
5
88.10MHz
St
FN
FM
6
88.10MHz
FH
90.10MHz
F
7
1
BBC Radio 5 Live DLS Scrolling...
7
BBC Radio 5 Live Signal error 7
6
BBC Radio 5 Live 80kPbPs Mono
②
BBC Radio 5 Live News

3
BBC Radio 5 Live BBC National DAB
4

8

Congratulations on your purchase and welcome to Philips!
To fully benefit from the support that Philips offers, register your product at www.philips.com/welcome.
Supplied Accessory
- AC power cord
Top & front panels (see 1)
① POWER – switches on/off the set
② PRESET
– stores and recalls 5 DAB/FM stations
SELECT
– in DAB mode, selects a selection – in DAB/FM mode, select a preset station
TUNING +/- /▶
TUNING +/- has not any auto search station function.
– in DAB mode, selects DAB stations, or selects menu options – in FM mode, fine tunes a station
SOURCE
– selects DAB (on Band 3), or FM mode
③ MENU
– in DAB mode, enables access to advance setup options - activates resetting mode (press and hold for 2 seconds)
④ DISPLAY
– in DAB mode, selects station information in seven types - switches DIM on or off (press and hold for 2 seconds)
⑤ SCAN
DAB:
- press briefly SCAN to perform a search of wider range (full scan) for DAB stations
FM: – tunes to a station
⑥ VOLUME +/- – adjusts volume level ⑦ LCD display – displays DAB and FM radio information
Back panel (see 1)
⑧ Telescopic antenna – improves DAB and FM reception ⑨ - 3.5 mm stereo headphone socket Helpful hints: The speakers will be muted when headphones are connected to the set. ⑩ AC MAINS ⑪ Battery door – opens to insert 6 x 1.5V R-14/ UM-2/ C-cells
CAUTION
High voltage! Do not open. You run the risk of getting an electric shock. The machine does not contain any user-serviceable parts.
Modification of the product could result in hazardous radiation, EMC issues, or other unsafe operation.
This set complies with the radio interference requirements of the European Union.
Power Supply
Whenever convenient, use the mains supply cord if you want to conserve battery life. Make sure you remove the plug from the set and wall outlet before inserting batteries.
Batteries (not included)
1. Open the battery door and insert 6 batteries, type R-14, UM-2, or C-cells (preferably alkaline) with the correct polarity as indicated by the "+" and "-" symbols inside the compartment (See 1). 2. Replace the battery door, making sure the batteries are firmly and correctly in place. The set is now ready to operate.
- Incorrect use of batteries can cause electrolyte leakage and will corrode the compartment or cause the batteries to burst:
- Do not mix battery types: e.g., alkaline with carbon zinc. Only use batteries of the same type for the set.
- When inserting new batteries, do not try to mix old batteries with the new ones.
- Remove the batteries if the set is not to be used for a long time.
Batteries contain chemical substances, so they should be disposed of properly.
Using AC power
1. Check if the power voltage, as shown on the type plate located on the rear of the set, corresponds to your local power supply. If it does not, consult your dealer or service center.
2. Connect the supplied power cord to the AC MAINS (located on the rear panel) and the wall socket. The set is now connected and ready for use.
3. To switch the set off completely, withdraw the power cord from the wall socket.
• Install the unit near the AC outlet and where the power plug can be easily reached.
- Disconnect the power cord from the wall socket to protect your set during heavy thunderstorms.
- The AC power cord is used as the disconnect device. It shall remain readily operable and should not be obstructed during intended use. To completely disconnect the apparatus from the supply mains, the power cord of the apparatus shall be disconnected from the mains socket outlet completely.
The type plate is located on the rear of the set.
General information
About Digital Audio Broadcasting (DAB)
DAB digital radio is a new way of broadcasting radio via a network of terrestrial transmitters. It provides listeners with more choice and information delivered in crystal clear, crackle-free sound quality.
- The technology allows the receiver to lock on to the strongest signal it can find.
- With DAB digital stations, there are no frequencies to remember, and sets are tuned by station name, so there is no re-tuning on the move.
What is a multiplex?
Digital radio operation is made up of a single block of frequencies called a multiplex. Each multiplex works within a frequency spectrum, such as Band III for DAB broadcasts.
Helpful hints:
- You will receive DAB stations only within your DAB transmission area.
DAB Broadcasters and DLS
Each DAB broadcaster (or multiplex operator) also provides text and audio data services. Some programmes are supported by Dynamic Label Segments (DLS). This is data which you can read as scrolling text on your DAB radio display. Some stations transmit the latest news, travel, and weather, what's on now and next, website addresses and phone numbers.
For more information on digital radio coverage and services, please visit www.drdb.org
Basic operation
1 Press POWER to power on the set.
→ The LCD lights up.
2 Press SOURCE to select DAB or FM mode.
→ The radio will tune to a DAB station if DAB mode is selected. → The radio will tune to a FM station if FM mode is selected.
3 To adjust volume, press VOLUME +/- 4 To improve DAB/FM reception, extend and turn the telescopic antenna. Reduce its length if the signal is too strong. - To further improve DAB reception, you may also perform manual tuning (See Manual Tune)
Helpful hints:
- If there is no DAB coverage currently available, or DAB signal is too weak, in your area, no DAB station will be found, and information like "No station available" will be displayed.
Dimming LCD brightness
1 Press and hold DISPLAY for 2 seconds to switch Dim on or off.
→ Auto dim on will be activated if dim function is off in the last setting. → Auto dim off will be activated if dim function is on in the last setting.
2 If Dim function is activated and there is 15 seconds of button inactivity, the LCD brightness will be decreased to save power.
Pressing any button will resume the original LCD brightness.
Switching on DAB radio
For the first time when DAB mode is switched on, AE5000 will perform an auto scan (see 2). Then all the available DAB stations will be stored on the set, and the radio will tune to the first available station.
1 Press POWER to power on the set.
→ The LCD lights up.
2 Press SOURCE to select DAB mode if "FM" is displayed.
→ "Philips DAB & FM Radio" is displayed briefly (see 3), then the radio auto tunes to a station.
Changing DAB stations
1 In DAB mode, press ◀/▶ repeatedly until your desired station name is displayed.
→ The selected station name appears on the second line of the display.
2 Press SELECT to confirm.
→ The radio will immediately tune to the selected station.
About station display symbols
You may see some symbols displayed before the station names as follows:
?: The symbol indicates that the station is not currently available, or not active.
: This symbol indicates that the station is a primary station with secondary service. <<: This symbol indicates that the station is a secondary station.
Scanning for DAB stations
New stations and services will be regularly added in the DAB broadcast. To make new DAB stations and services available on your DAB radio, a search is needed.
DAB Scanning:
- In DAB mode, press SCAN briefly to perform a full scan for DAB stations.
Storing DAB presets
You can preset up to 5 DAB stations on the preset button for easy access.
1 In DAB mode, press ◀/▶ repeatedly until your desired station name is displayed.
• To select the desired DAB station, you may also perform manual tuning (see Manual Tune).
2 Press PRESET once, and then press ◀ /▶ to select preset numbers.
3 Press and hold PRESET on the top of the set to store the preset station.
→ "Preset × Saved" (× indicates preset numbers) is displayed briefly on the second line of the display.
Helpful hints:
- If you have already saved a DAB station in that preset location, it will be overwritten by a new station.
- When you store DAB stations, these do not overwrite your FM presets.
Selecting a preset DAB station
1 In DAB mode, press PRESET on the top of the set.
2 Press ◀ /▶ to select presets 1-5.
3 Press SELECT to confirm the selection.
Resetting to the factory setting (also available in FM mode)
Resetting to the factory setting will delete all of the preset stations.
1 In DAB or FM mode, press and hold MENU.
→ "Press SELECT to confirm reset" is displayed.
2 To reset, press SELECT.
→ All the presets will be deleted, and "Philips DAB & FM Radio" is displayed.
- To not reset, wait a few seconds until "Press SELECT to confirm reset" disappears.
→ The radio will revert to the previous operating status.
Changing the DAB station information
In DAB broadcasting, on the display, the first line shows a station name, and the second line shows the service information for the current station. You are offered with 7 types of information.
- Press DISPLAY repeatedly to cycle through the display information in the sequence as follow (See 7, take "BBC Radio 5 Live" as an example of a station name):
①: Dynamic Label Segment (DLS): This is scrolling text information supplied by the DAB station, such as music titles or details of the programme. ②: Program Type (PTY): This is a description of the type of programme, provided by the DAB station and the broadcaster. ③: Multiplex Name: This will show the multiplex that is broadcasting the programme you are listening to. ④: Time and Date: This displays the time and date, provided by the broadcaster. ⑤: Channel and Frequency: This displays the channel number and the transmission frequency. ⑥: Signal information: This shows the digital bit-rate and the signal mode. ⑦: Signal Error Rate: If the transmission signal contains errors, the system can apply correction. The amount of signal correction can be displayed as a numerical value between 0 and 99. As the value increases, the signal will be degraded. To improve reception, try adjusting the position of the antenna.
Using the MENU control
The menu control lets you access the DAB radio setup options.
1 In DAB mode, press MENU to enter the menu options.
→ The first setup option "Manual tune" is displayed.
2 Press ◀ /▶ to scroll up and down the menu options:
Manual tune -> Autoscan local -> Autoscan full -> DRC value -> Sw version
3 To select an option, press SELECT. 4 Repeat steps 2-3 if sub-option is available under one option.
Manual tune
By using this feature, it is possible to manually tune to a specific channel/frequency. In addition to antenna orienting for better radio reception, the optimum reception can also be obtained by using this feature.
1 In DAB mode, press MENU to display "Manual tune" option. 2 Press SELECT to make a selection.
→ Display shows a channel and its frequency.
3 Press ◀/▶ repeatedly until desired channel/frequency appears. 4 Press SELECT to confirm the selection.
→ The second line of the display shows the selected channel and its frequency. The first line of the display shows a rectangle. The position of the rectangle indicates the degree of signal strength (The further towards the right, the greater the signal strength. See 4).
5 Adjust the position of the antenna to obtain the optimum signal strength. 6 Press SELECT to return to normal display.
→ You may press DISPLAY to change the service information on the display.
Dynamic Range Control (DRC)
DRC adds or removes a degree of compensation for the differences in the dynamic range between radio stations. For example, a station broadcasting popular music may have a high level of compensation applied since the emphasis is on a constant high listening level, whereas a station broadcasting classical music will have little or no compensation as the listener requires all of the highs and lows in the music to define the detail.
There are three levels of compensation:
DRC 0: No compensation applied.
DRC 1: Maximum compensation applied (This is the default.).
DRC1/2: Medium compensation applied.
1 In DAB mode, press MENU to enter menu options. 2 Press ◀/▶ repeatedly until "DRC value" is displayed. 3 Press SELECT to enter the sub-menu. → The current DRC level will be displayed on the first line. 4 Press ◀/▶ to select a DRC value (DRC 0, DRC 1 and DRC1/2) displayed on the second line. 5 Press SELECT to confirm the selection when the required value is displayed. → You should be able to hear the difference in compression immediately.
Helpful hints:
- The best way to determine which of these DRC value settings suits you best is to experiment with them on a variety of source material.
Autoscan local
1 In DAB mode, press MENU to enter menu options. 2 Press ◀/▶ repeatedly until "Autoscan local" is displayed. 3 Press SELECT to confirm the selection.
→ The local search for DAB station(s) will be performed.
Autoscan full
1 In DAB mode, press MENU to enter menu options. 2 Press ◀ / ▶ repeatedly until "Autoscan full" is displayed. 3 Press SELECT to confirm the selection.
→ The wide range (full scan) search for DAB station(s) will be performed.
Helpful hints:
- Performing a DAB scan will restore the cancelled station(s) to the selection list if the station(s) become(s) activated again.
Software version
This is only provided as the version number for this product.
Switching on FM radio
1 Press POWER to power on the set.
→ The LCD lights up.
2 Press SOURCE to select FM mode if "FM" is not displayed.
→ Waveband and radio frequency are displayed (see 5).
Tuning to radio stations
1 In FM mode, press SCAN until frequency number starts running. → The radio will auto tune to a station of strong signal strength, and search will stop. 2 To tune to a weak station, press ◀/▶ until an optimum reception is found. 3 Repeat the steps above until you find the desired station.
Helpful hints:
- Before pressing SCAN, you may first press ▶ to select a scan up, or press ◀ to select a scan down.
Storing FM presets
You can store up to 5 FM stations on PRE-SET for easy access.
1 In FM mode, tune to your desired radio station (Refer to "Tuning to radio stations").
2 Press PRESET once, and then press ◀ /▶ to select preset numbers.
3 Press and hold PRESET on the top of the set to store the preset station.
→ "Preset × Saved" (× indicates preset numbers) is displayed briefly on the second line of the display, and the stored preset number is displayed (see 6).
Helpful hints:
- If you have already saved a FM station in that preset location, it will be overwritten by a new station.
- When you store FM stations, these do not overwrite your DAB presets.
Selecting a preset FM station
1 In FM mode, press PRESET on the top of the set. 2 Press ◀ /▶ to select presets 1-5. 3 Press SELECT to confirm the selection.
Safety & maintenance information
- Place the set on a flat, hard and stable surface so that the system does not tilt.
- Where the MAINS plug or an appliance coupler is used as the disconnect device, the disconnect device shall remain readily operable.
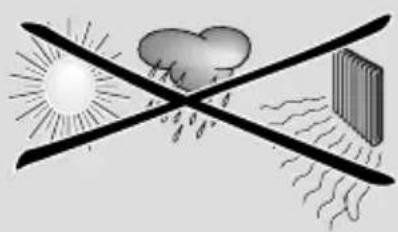
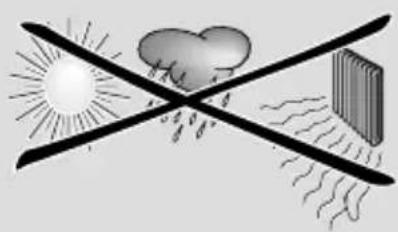
- Do not expose the set, batteries, CDs to humidity, rain, sand or excessive heat caused by heating equipment or direct sunlight.
- The apparatus shall not be exposed to dripping or splashing.
- Adequate ventilation with a minimum gap of 15cm (6 inches) between the ventilation holes and surrounding surfaces is necessary to prevent heat build-up.
- Do not cover the ventilation openings with items such as newspapers, table-cloths, curtains, etc.
- No objects filled with liquids, such as vases, shall be placed on the apparatus.
- No naked flame sources, such as lighted candles, should be placed on the apparatus.
- The mechanical parts of the set contain self-lubricating bearings and must not be oiled or lubricated.
- To clean the set, use a dry cloth. Do not use any cleaning agents containing alcohol, ammonia, benzene or abrasives as these may harm the housing.
If a fault occurs, first check the points listed below before taking the set for repair.
If you are unable to remedy a problem by following these hints, consult your dealer or service centre.
WARNING:
Do not open the set as there is a risk of electric shock. Under no circumstances should you try to repair the set yourself, as this will invalidate the guarantee.
Problem
— Possible cause
- Remedy
The radio has no power.
— Power cord not securely connected.
- Connect the power cord properly.
- Batteries dead or incorrectly inserted.
- Insert (fresh) batteries correctly.
No sound is heard.
- Volume not adjusted.
- Adjust the VOLUME.
- Headphones connected to the set.
- Disconnect headphones.
- The station is currently out of service.
- Wait until the service resumes, or tune to a new station.
The indication “No station available” is displayed.
- DAB coverage is currently not available in your area.
- Wait until the coverage resumes.
- DAB signal is weak.
- Re-locate the radio, or adjust the position of the telescopic antenna.
The indication "Station off air" is displayed.
— The station is currently out of service.
- Wait until the service resumes. Or, perform a scan by pressing SCAN in DAB mode.
Poor reception
- Signal strength is weak.
- Re-locate the radio, or adjust the position of the telescopic antenna. For DAB, you may also perform manual tuning. See Manual tune.
I cannot hear the DAB station I have selected.
- SELECT button was not pressed after changing a station by pressing ◀ / ▶.
- Press SELECT button to tune to the selected station.
Note:
In case of malfunction due to electrostatic discharge, just reset the product (Reconnect of power source may be required.) to resume normal operation.
Hearing Safety
Listen at a moderate volume.
- Using headphones at a high volume can impair your hearing. This product can produce sounds in decibel ranges that may cause hearing loss for a normal person, even for exposure less than a minute. The higher decibel ranges are offered for those that may have already experienced some hearing loss.
- Sound can be deceiving. Over time your hearing "comfort level" adapts to higher volumes of sound. So after prolonged listening, what sounds "normal" can actually be loud and harmful to your hearing. To guard against this, set your volume to a safe level before your hearing adapts and leave it there.
To establish a safe volume level:
- Set your volume control at a low setting.
- Slowly increase the sound until you can hear it comfortably and clearly, without distortion.
Listen for reasonable periods of time:
- Prolonged exposure to sound, even at normally "safe" levels, can also cause hearing loss.
- Be sure to use your equipment reasonably and take appropriate breaks.
Be sure to observe the following guidelines when using your headphones.
- Listen at reasonable volumes for reasonable periods of time.
- Be careful not to adjust the volume as your hearing adapts.
- Do not turn up the volume so high that you can't hear what's around you.
- You should use caution or temporarily discontinue use in potentially hazardous situations.
- Do not use headphones while operating a motorized vehicle, cycling, skateboarding, etc.; it may create a traffic hazard and is illegal in many areas.
Environmental information
All unnecessary packaging material has been omitted. The packaging can be easily separated into three materials: cardboard, polystyrene and plastic.
Your set consists of materials which can be recycled if disassembled by a specialized company. Please observe the local regulations regarding the disposal of packaging, dead batteries and old equipment.
Disposal of your old product
Your product is designed and manufactured with high quality materials and components, which can be recycled and reused.
When this crossed-out wheeled bin symbol is attached to a product it means the product is covered by the European Directive 2002/96/EC.

Please inform yourself about the local separate collection system for electrical and electronic products.
Please act according to your local rules and do not dispose of your old products with your normal household waste. The correct disposal of your old product will help prevent potential negative consequences for the environment and human health.

Meet Philips at the Internet http://www.philips.com

AE5000

Register your product and get support at www.philips.com/welcome
Brukerhåndbok
1

6x1.5V R14/UM2/C CELL
2
Scanning...

3
PHILIPS
DAB & FM Radio
4

7A 188.92MHz
5
88.10MHz
St
FN
FM
6
88.10MHz
FH
90.10MHz
F
7
1
BBC Radio 5 Live DLS Scrolling...
7
BBC Radio 5 Live Signal error 7
6
BBC Radio 5 Live 80kbps Mono
②
BBC Radio 5 Live News

3
BBC Radio 5 Live BBC National DAB
4
BBC Radio 5 Live 10:32 07-08-2003

8

→ The LCD lights up.
①: Dynamic Label Segments (DLS):
⑦: Signal Error Rate (Signal Feil Rate):
AE5000
Register your product and get support at www.philips.com/welcome
User manual

1

6x1.5V R14/UM2/C CELL
2
Scanning...

3
PHILIPS
DAB & FM Radio
4

7A 188.92MHz
5
88.10MHz
St
FN
FM
6
88.10MHz
FH
90.10MHz
F
7
1
BBC Radio 5 Live DLS Scrolling...
7
BBC Radio 5 Live Signal error 7
6
BBC Radio 5 Live 80kbps Mono
②
BBC Radio 5 Live News
3
BBC Radio 5 Live BBC National DAB
4
BBC Radio 5 Live 10:32 07-88-2003

8


Dynamic Range Control (DRC)
AE5000

- CONGRATULATIONS ON YOUR PURCHASE AND WELCOME TO PHILIPS
- SUPPLIED ACCESSORY
- TOP & FRONT PANELS (SEE 1)
- SELECT
- SOURCE
- DAB
- BACK PANEL (SEE 1)
- CAUTION
- POWER SUPPLY
- BATTERIES (NOT INCLUDED)
- USING AC POWER
- GENERAL INFORMATION
- ABOUT DIGITAL AUDIO BROADCASTING (DAB)
- WHAT IS A MULTIPLEX
- HELPFUL HINTS
- DAB BROADCASTERS AND DLS
- BASIC OPERATION
- DIMMING LCD BRIGHTNESS
- SWITCHING ON DAB RADIO
- CHANGING DAB STATIONS
- ABOUT STATION DISPLAY SYMBOLS
- SCANNING FOR DAB STATIONS
- DAB SCANNING
- STORING DAB PRESETS
- SELECTING A PRESET DAB STATION
- RESETTING TO THE FACTORY SETTING (ALSO AVAILABLE IN FM MODE)
- CHANGING THE DAB STATION INFORMATION
- USING THE MENU CONTROL
- MANUAL TUNE
- DYNAMIC RANGE CONTROL (DRC)
- AUTOSCAN LOCAL
- AUTOSCAN FULL
- SOFTWARE VERSION
- SWITCHING ON FM RADIO
- TUNING TO RADIO STATIONS
- STORING FM PRESETS
- SELECTING A PRESET FM STATION
- SAFETY & MAINTENANCE INFORMATION
- WARNING
- PROBLEM
- THE RADIO HAS NO POWER
- NO SOUND IS HEARD
- THE INDICATION “NO STATION AVAILABLE” IS DISPLAYED
- THE INDICATION "STATION OFF AIR" IS DISPLAYED
- POOR RECEPTION
- I CANNOT HEAR THE DAB STATION I HAVE SELECTED
- NOTE
- HEARING SAFETY
- LISTEN AT A MODERATE VOLUME
- TO ESTABLISH A SAFE VOLUME LEVEL
- LISTEN FOR REASONABLE PERIODS OF TIME
- BE SURE TO OBSERVE THE FOLLOWING GUIDELINES WHEN USING YOUR HEADPHONES
- ENVIRONMENTAL INFORMATION
- DISPOSAL OF YOUR OLD PRODUCT
- MEET PHILIPS AT THE INTERNET HTTP://WWW.PHILIPS.COM
Brand : PHILIPS
Model : AE5000
Category : Radio