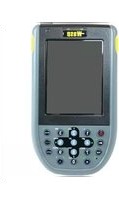
WPA1200 - Barcode Reader Wasp - Free user manual and instructions
Find the device manual for free WPA1200 Wasp in PDF.


| Product Type | Barcode Reader |
| Model | WPA1200 |
| Brand | Wasp |
| Scan Technology | Laser |
| Scan Speed | 100 scans per second |
| Supported Barcodes | 1D (UPC, EAN, Code 39, Code 128, etc.) |
| Interface | USB |
| Dimensions (L x W x H) | 16.5 x 6.5 x 8.5 cm |
| Weight | 140 g |
| Power Source | USB (5V DC) |
| Operating Temperature | 0°C to 40°C |
| Storage Temperature | -20°C to 60°C |
| Humidity | 5% to 90% non-condensing |
| Drop Resistance | 1.5 m onto concrete |
| Maintenance | Clean lens with soft dry cloth; avoid liquids |
| Included Accessories | USB cable, quick start guide |
| Compatibility | Windows, Mac, Linux |
| Warranty | 1 year limited |
Frequently Asked Questions - WPA1200 Wasp
User questions about WPA1200 Wasp
0 question about this device. Answer the ones you know or ask your own.
Ask a new question about this device
Download the instructions for your Barcode Reader in PDF format for free! Find your manual WPA1200 - Wasp and take your electronic device back in hand. On this page are published all the documents necessary for the use of your device. WPA1200 by Wasp.
USER MANUAL WPA1200 Wasp
The WPA1200 series is certified in the U.S. to conform to the requirements of DHHS/CDRH 21CFR Subchapter J and to the requirements of IEC 825-1. Class II and Class 2 products are not considered to be hazardous. The WPA1200 series contains an internal Visible Laser Diode (VLD) The VLD emissions do not exceed the maximum limits set forth in the above regulations. The scanner is designed so that there is no human access to harmful laser light during normal operation, user maintenance or during prescribed service operations.
The laser safety warning label required by the DHHS/IEC for the WPA1200 series' optional laser scanner module is located on the memory compartment cover, on the back of the unit.
Caution:
Use of controls or adjustments or performance of procedures other than those specified herein may result in hazardous laser light. Use of optical instruments with the scanner will increase eye hazard. Optical instruments include binoculars, microscopes and magnifying glasses. This does not include eyeglasses worn by the user.
Notices
This unit is equipped with a battery pack and backup battery. It is possible that the WPA1200 may not power-on due to battery discharge as a result of storage.
In the above situation, plug the WPA1200 to the USB charging cable that is with DC in port or put the unit into the WPA1200 Cradle (with 5V/3A AC-DC adapter), and recharge the unit for 16 hours in order to fully charge its backup battery.
The backup battery will charge from external power or the main battery (if the main battery still has enough power to turn on). In the event the main battery is fully charged, refrain from using the WPA1200 for 16 hours in order for the main battery to fully charge the backup battery.
Backing-up data by backup battery only without the main battery installed in battery compartment may take as long as 2 hours. Therefore, in order to prevent data protection failure due to backup battery failure, do not leave the WPA1200 without the rechargeable battery pack installed, or without connection to AC power for an extended period of time.
Battery charge notice
It is important to consider the atmospheric temperature whenever you are charging the Lithium-Ion battery pack. The process is most efficient at normal room temperature or slightly cooler. It is essential that you charge batteries within the stated range of -5ircC to 50ircC . Charging batteries outside of the specified range could damage the batteries and shorten their charging life cycle.
Storage and safety notice
Although charged Lithium-Ion batteries may be left unused for several months, their capacity may be depleted due to build up of internal resistance. If this happens they will require recharging prior to use. Lithium-Ion batteries may be stored at temperatures between-20°C to 60°C; however, they may be depleted more rapidly at the high end of this range. It is recommended to store batteries within normal room temperature ranges.
Table of Contents
Chapter 1: Getting Started .... 1
Introducing the WPA1200....1
Features....1
Package Contents 2
A Tour of the WPA1200 3
Getting Started....5
Charging the Battery....7
LED Status....7
Checking the Battery Status 8
Connecting the WPA1200 to a PC 8
Turning On the WPA1200 For the First Time 8
Calibrating the WPA1200 Screen....9
Chapter 2: Using the Hardware ....11
Keypads and Key Functions....11
Adjusting the Screen Brightness....13
Using the Stylus....13
Using the SD/MMC Memory Card 13
Using the Laser Scanner 14
Chapter 3: Getting Connected ....16
Establishing Device-PC Connection....16
Connecting the Device to Your Computer 19
Synchronization with your Computer 20
Connection Options 20
USB Connection 20
Infrared Connection 21
Bluetooth Connection 23
WiFi Connection....27
Synchronizing Information 28
Synchronization Options....29
Using ActiveSync to Exchange Files 29
Chapter 4: Barcode Scanner ....31
Scan2Key....31
Scanner Setting 31
Barcode Symbologies....32
Chapter 5: Advanced Settings ....33
Checking the Main and Backup Battery Status 34
Extending Battery Life....35
Viewing Flash Memory Files 38
Performing a hardware reset 38
Appendix 41
Chapter 1: Getting Started
Introducing the WPA1200
Thank you for purchasing the WPA1200 PDA Barcode Scanner. Your WPA1200 was designed for users who need a compact and durable PDA for data collection and real time transactions.
The WPA1200 is a rugged, compact and lightweight palm-sized computer using the Windows Mobile 5.0 / Windows CE 5.0 operating system, and incorporating a barcode scanning laser device, color LCD with touchscreen, keypad, IrDA interface, and wireless communication capability. It provides users with a standard Windows-based environment for customizing and operating the device.
To reduce TCO, the WPA1200 is sealed to meet IP54 standards and has undergone multiple drop tests to prevent downtime.
Features
Powerful system
Microsoft Windows Mobile 5.0 / Windows CE 5.0 operating system Intel PXA270 processor with speed of up to 520 MHz
System memory
64 MB SDRAM 128 MB Flash ROM
Display
3.5-inch QVGA LCD touch-sensitive screen 320 x 240 resolution
Barcode scanner
Built-in Bar Code Scan Engine Built-in vibrator for scanning indication Symbol SE950 support unitech HAMSTER barcode decoder
Communication
USB Host & Client IrDA 1.2 (SIR) GPRS (Data Only) VOIP support 802.11b/g for power saving
Bluetooth Modem, Bluetooth Active Sync)
Bluetooth version 1.2 (supports Bluetooth Printer,
Audio
Voice recording and playback MIC Speaker Headset Connector Receiver
Wireless connectivity
802.11b/g with diversity antenna Bluetooth wireless technology Serial infrared port
Expansion slot
SDIO slot
Battery life
Normal usage: 6 hours Charging time: 3.5 hours Embedded backup battery cell
User-friendly interface
Quick launch hot keys for enabling backlight, calibration, software keyboard, and other device management tasks Trigger keys for barcode scanning
Package Contents
After opening the box, ensure the following accessories for the WPA1200 are present:
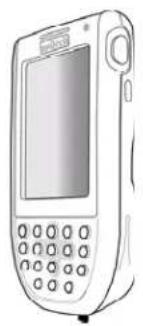
natural_image
Line drawing of a mobile phone with keypad and control panel (no text or symbols)WPA1200
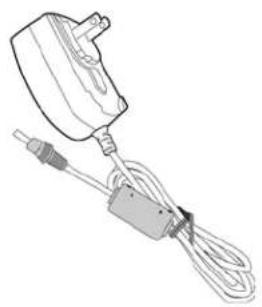
natural_image
Illustration of a portable electrical plug connected to a cord with a cable (no text or symbols visible)AC Adaptor with Universal Plug

Battery Pack

Stylus

USB Charging
Cables

natural_image
Simple line drawing of a coiled cable or wire with two connectors (no text or symbols)Elastic Stylus String

CD-ROM

Quick Start Guide
If an item is missing or appears damaged, please contact your dealer.
A Tour of the WPA1200
The following sections describe the main components and features of the WPA1200.
Front Left View
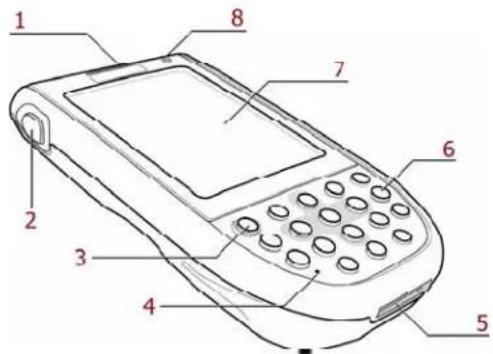
| No. | Component | Description |
| 1 Status Indicator | Indicates the battery charging and barcode scanning status.Green - Battery is fully charged, or barcode ED scanning process is completed without error.Red - Battery is charging, barcode scanner is activated and processing. | |
| 2 Left Scan Trigger Button | Press to activate the barcode laser scanner. | |
| 3 | Power Button | If the device is off, press this button to turn it on.Alternatively, when the unit is on, this key must be pressed and held down for about two seconds in order to turn the device off. |
| 4 | Microphone | Enables you to record voice audio. |
| 5 | Universal Connector | Connects your device to a USB charging cable, which in turn connects to the computer's USB port and through the AC adapter to an electrical outlet.This allows you to recharge your device and perform an ActiveSync operation.You can also use it to connect peripheral hardware, such as a docking station, to your device. |
| 6 | Keypad | Keypad interface for controlling the WPA1200. See Keyboards and Functions for more information. |
| 7 LCD Touch | Screen | Displays the applications and data stored on your device. It is touch-sensitive and responds to the stylus orfinger. |
| 8 | Speaker | Enables you to hear audio from the WPA1200. |
Back View

| No. | Component | Description |
| 9 | Battery | Houses the removable and rechargeable 3.7 V, 1950 mAH battery pack. |
| 10 Battery Compartment Release Latch | Opens the battery compartment. | |
| 11 | Reset | Press the end of the stylus into the button to reset your device. |
| 12 | Handstrap | Enables you to securely hold the WPA1200 while using it. |
| 13 | Speaker | Enables you to hear. |
| 14 | Strap | Attachment location for holding hand strap, carrying strap, and stylus. |
| 15 Memory Card Slot | Accommodates Secure Digital memory cards. | |
| 16 | Barcode | Window to scan barcodes. This is the window through which the laser light passes. |
| 17 | Earphone | Connects to audio line-out devices (earphones or headphones) for use in noisy environments. |
| 18 | Stylus | Enables you to interact with the operating system. To use the stylus, remove it from its holder and hold it the same way you hold a pen or pencil. |
| 19 Right Scanner Trigger Button | Press to activate the barcode laser scanner. | |
| 20 Infrared (IR) Ports | Uses infrared technology to transmit and receive data from other IR-enabled devices. | |
Getting Started
This section explains how to install and charge the battery, how to check battery status, how to turn on the WPA1200, and how to calibrate the screen.
Installing the Battery
Warning: There is a risk of fire and burns if the battery pack is handled improperly. DO NOT disassemble, crush, puncture, short external contacts, or dispose of the battery pack in fire or water. DO NOT attempt to open or service the battery pack. Dispose of used batteries according to local recycling guidelines in your area.
A backup battery cell is embedded into your device to prevent data loss in instances when the removable battery pack is removed or completely discharged. This backup battery cell will only support the system for a maximum of 2 hours.
Note: To enable the internal battery cell to provide backup power supply, charge your device with the main battery pack for at least 16 hours.
- Open the battery compartment by pushing the latch in the direction of the arrow and lift up.

natural_image
Side view line drawing of a car with a directional arrow indicating flow or movement (no text or symbols)The battery compartment is displayed below:
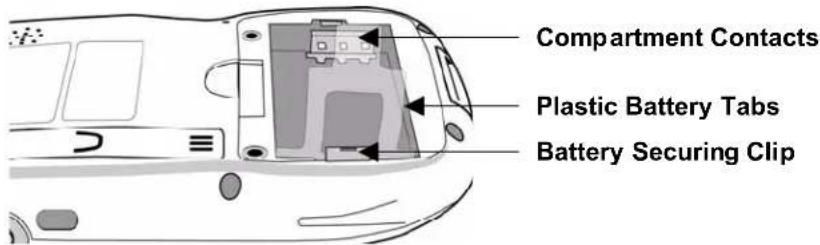
Note: The plastic battery tab makes it easy to remove the battery.
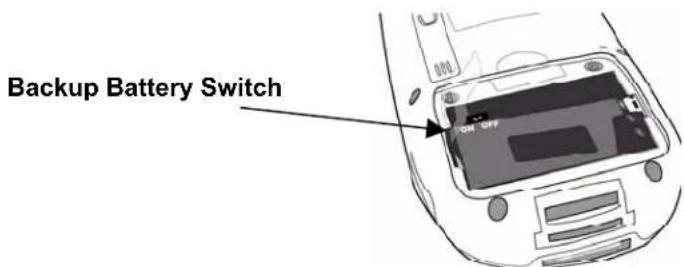
- Locate the backup battery switch and turn it on.
- Position the battery pack, making sure the battery contacts are aligned with the contacts in the compartment and the battery is placed on top of the plastic tab, as shown in the following illustration.
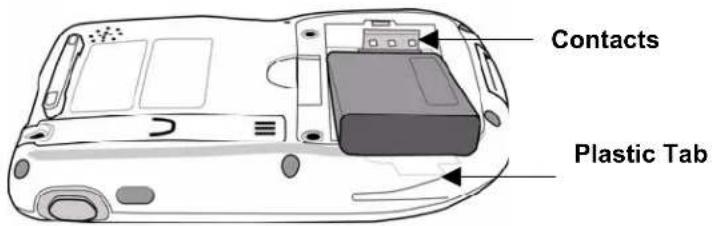
- Slide the battery pack into the battery bay while simultaneously pulling the securing clip until the battery clicks into place.

- Replace the battery compartment cover
Charging the Battery
Before using the WPA1200 for the first time, you need to charge it for about 16 hours. After that, you can charge the WPA1200 daily for 4 hours to recharge the battery to full capacity. Charge the WPA1200 using the USB charging cable.
Caution:
Operating the WPA1200 for the first time without the AC adapter, and without fully charging the backup battery may result in loss of data stored in RAM memory. When the main battery is removed, the backup battery retains RAM data in memory for 2 hours, please charge the battery to avoid the data loss in RAM memory.
Note:
Data you entered may not be properly stored until the built-in backup battery has been adequately charged.
Charging the Battery using the USB Cable
- Press and hold the connector button on the USB charging cable and connect it to the WPA1200 (1).
- Plug the AC adapter cable into the power jack on the USB charging cable (2).
- Connect the AC adapter into an electrical outlet (3).

LED Status
| LED | Meaning | |
| WPA1200 | Solid Red Charging | |
| Solid Green Charging Complete | ||
Checking the Battery Status
If the battery level becomes low in the course of normal use, a status icon appears on the device screen indicating low or very low battery status. In both cases, perform an ActiveSync operation to back up your data, then recharge your device as soon as possible.
If the battery level reaches low status, the device will enter sleep mode; if the battery level reaches very low status, the device will enter deep sleep mode. In this case, you have about 72 hours to recharge your device after which you risk losing all data on your device's internal memory.
Connecting the WPA1200 to a PC
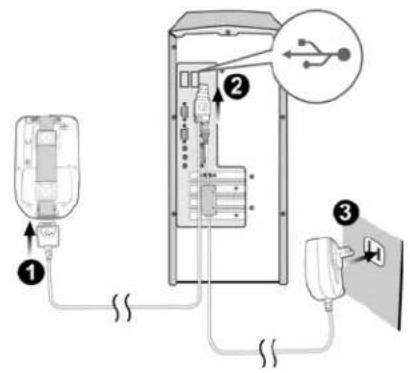
Use the USB cable to connect the WPA1200 to a PC, in order to use with ActiveSync.
-
Press and hold the connector button on the USB charging cable and connect it to the WPA1200 (1).
-
Plug the USB connector into the USB port on the PC and connect the AC adapter into the USB connector (2).
-
Connect the AC adapter into an electrical outlet (3).
Turning On the WPA1200 For the First Time
After you have initially charged your device for about 16 hours, the device is ready to be used. When you start your device for the first time, you will be given the opportunity to calibrate the display, learn some basic stylus usage, and set up the system time zone, date and time.
Powering On
- Turn on your device by pressing the power button on the front panel.
- The WPA1200 screen ships with a protective plastic film. You may remove this if desired by peeling from one corner. The screen will be more susceptible to scratching without the film, but will be more readable.
- The WPA1200 welcome screen appears for a moment followed by the Windows CE .Net 5 or Windows Mobile 5 screen.
Calibrating the WPA1200 Screen
The calibrate screen automatically appears when the unit is powered-on for the first time or after the system is reset.
To calibrate the screen at any time, follow these instructions.
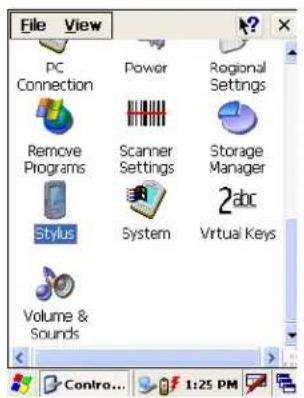
- Tap Start → Settings, and then click the Control Panel tab.
- Tap the Stylus icon on a CE .Net 5 device or the Screen icon on a Windows Mobile 5 device.
CE .Net 5

Windows Mobile 5
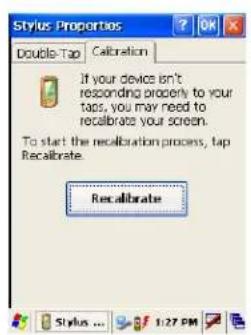
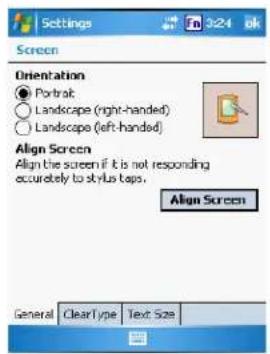
- The Stylus Properties window appears on the CE .Net 5 device. This window enables you to calibrate the screen. Tap Recalibrate to calibrate the screen. The Screen Settings window appears on the Windows Mobile 5 device. Click Align Screen to calibrate the screen.
CE .Net 5
Windows Mobile 5
- Tap the cross hair firmly and accurately. The cross hair moves to the next location.

CE .Net 5

Windows Mobile 5

CE .Net 5

Windows Mobile 5
- Continue tapping the cross hairs until the screen has been calibrated.
Chapter 2: Using the Hardware
Keypads and Key Functions
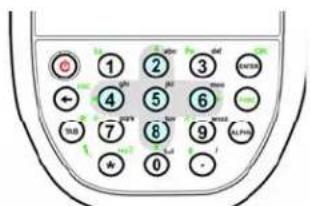
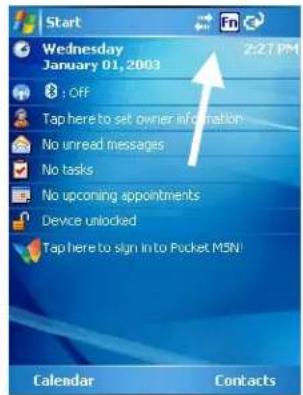
The keypad enables you to enter information and interact with the PDA operating system and also to operate secondary functions using the function button. When the green function button is pressed, the green icon options on the keypad become available.
When the Function button is pressed, an icon appears in the operating system:

CE .Net 5
Windows Mobile 5
The following table describes the keypad keys:
| Key Main | Function Secondary Function | |
 | Turns the WPA1200 on and off. | None |
 | Number 1 None | |
 | Alphanumeric 2, a,b,c Up Navigation Key | |
 | Alphanumeric 3, d,e,f None | |
 | Enter Key OK | |
 | Back Space Escape Key | |
 | Alphanumeric 4, g,h,i Left Navigation Key | |
| 5 | Alphanumeric 5, j,k,l None | |
| 6 | Alphanumeric 6, m,n,o Right Navigation Key | |
| FUNC | — | Enables/DisablesKey Functions |
| TAB | Tab Windows Key Opens Start | Menu |
| 7 | Alphanumeric 7, p,q,r,s Decreases | Screen Brightness |
| 8 | Alphanumeric 8, t,u,v Down Navigation Key | |
| 9 | Alphanumeric 9, w,x,y,z Increases | Screen Brightness |
| ALPHA | Alpha | None |
| * | Asterisk | Illuminates |
| 0 | Number 0, Spaces None | |
| · | Period | Pound |
Secoi
Keypad
Adjusting the Screen Brightness
Adjust the screen brightness by pressing the Function button to enable the soft keys and pressing the 7 (decrease brightness) or 9 (increase brightness) buttons.

Using the Stylus
CAUTION: Never use anything other than the WPA1200 stylus on the screen as it could cause permanent damage.
- Remove the stylus from its holder. Hold the stylus as you would a pencil.
- To make a choice from a menu, lightly tap the tip of the stylus on that choice.
- To write data into a field on a form, use the stylus to print the letters or numbers. Use very light pressure.

natural_image
Diagram of a device with cable and connector, showing internal components and wiring (no text or symbols)Using the SD/MMC Memory Card
Your device has an expansion slot compatible with a range of SD and MMC storage cards, which are primarily used to back up or transfer files and data. The slot also supports SDIO cards for added connectivity options.
Inserting a Storage Card
- Remove the two screws from the SD compartment cover and remove the cover.

- Insert the SD card with the notched corner as shown by the icon on the case.

natural_image
Diagram of a device with cable and connector, showing internal components (no text or symbols)- Push the card into the slot until you hear an audible system sound; this will signal that the card is already properly seated within the slot.
The card is secured when it is not protruding from the slot.
Removing a Storage Card
- Remove the two screws from the SD compartment cover and remove the cover.
- Press the card in and release.
- The card pops out. An audible system sound will signal that the card has been released.
- Remove the card from the slot.
Using the Laser Scanner
The WPA1200 has an integrated laser scanner that reads all major bar code labels.
Note: Scanning software must be enabled in order to operate the scanner. This can be a user-loaded application or a pre-loaded utility such as Scanner Setting.
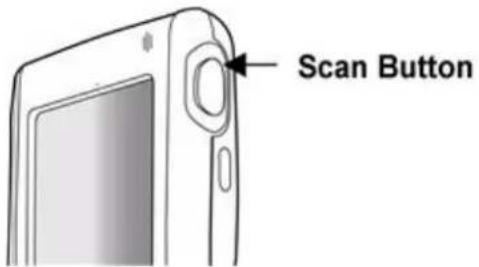
Activate the laser scanner by pressing either one of the trigger keys located on the left and right side of the unit. The WPA1200 has a built-in Scanner Setting utility that allows you to test the device's barcode scan function.
- To launch Scanner Settings, tap Start → Settings → System → Scanner Settings.

CE .Net 5

Windows Mobile 5
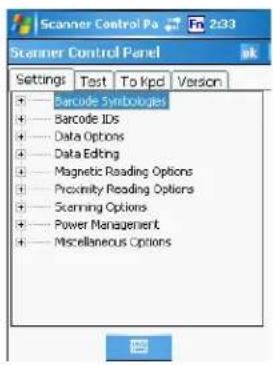
2. The Scanner Control Panel opens.

CE .Net 5
Windows Mobile 5
From here you can configure barcode scanner parameters such as enabling or disabling barcode symbologies, setting data transmission options, configuring magnetic and proximity reading options, and setting power management options.
3. For CE .Net 5: To test the barcode scanner, tap the Test tab.
a. Tap Tools
b. Tap Enable Scan
c. To perform auto scan, Tap Tools → Auto Scan → Start Auto-Scan
d. Choose Interval : 3 secs
e. Tap : Start
f. Laser scans every 3 seconds and barcode is scanned automatically.
g. Tap Tools → Auto-Scan → Stop Auto-Scan.
For Windows Mobile 5: To test the barcode scanner, tap the Test tab and press one of the scanner buttons on a barcode. The screen will display the results of the scan.

CE .Net 5

Windows Mobile 5
Chapter 3: Getting Connected
Establishing Device-PC Connection
Installing Microsoft ActiveSync
In order to exchange data between your computer and the WPA1200, Microsoft ActiveSync must be installed on your computer. Use the USB charging cable that comes with your device to connect the device to your computer. If you have a previous version of Microsoft ActiveSync installed in your computer, uninstall it first before installing the latest version of Microsoft ActiveSync.
Note: You do not need to install ActiveSync if you are running Windows Vista. The ActiveSync application in Vista is called Windows Mobile Device Center. You can skip the Install Microsoft ActiveSync section below, but you must complete the setup steps. The Vista setup process is similar to that described below (beginning with Connecting the Device to Your Computer). Keep in mind that the screen shots may differ slightly.
To install Microsoft ActiveSync on your computer:
-
Close any open programs, including those that run at startup, and disable any virus-scanning software.
-
Download the ActiveSync software from the Microsoft ActiveSync Download page at http://www.microsoft.com/windowsmobile/downloads/activesync42.mspx.
-
Browse the location of the downloaded file, and double-click it.
The installation wizard begins.

4. Click Next.
You are prompted to read the End User License Agreement (EULA).

- Accept the license agreement terms and click Next.
You are prompted for user information.
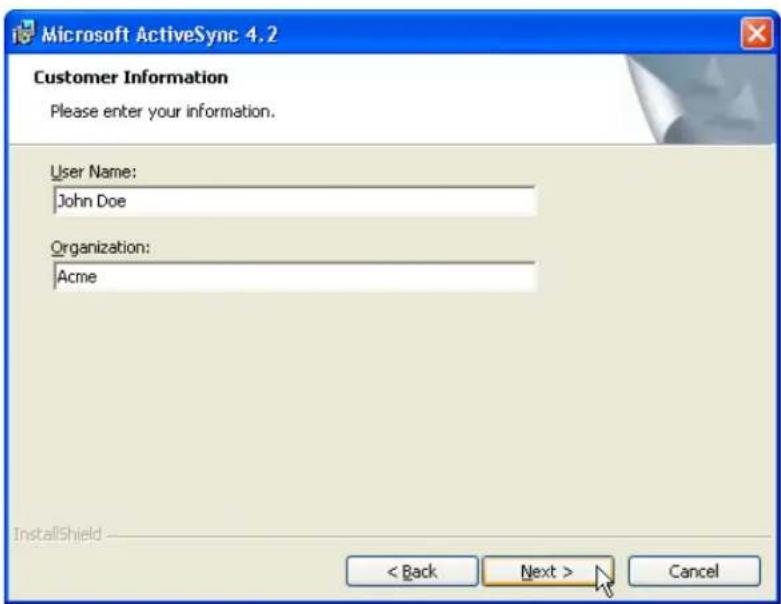
- Type the user name and organization and click Next.
You are prompted for the destination folder.

- Select a drive to install the program and click Next.
The installation wizard has gathered the information it needs to install ActiveSync and prompts you to begin the installation.
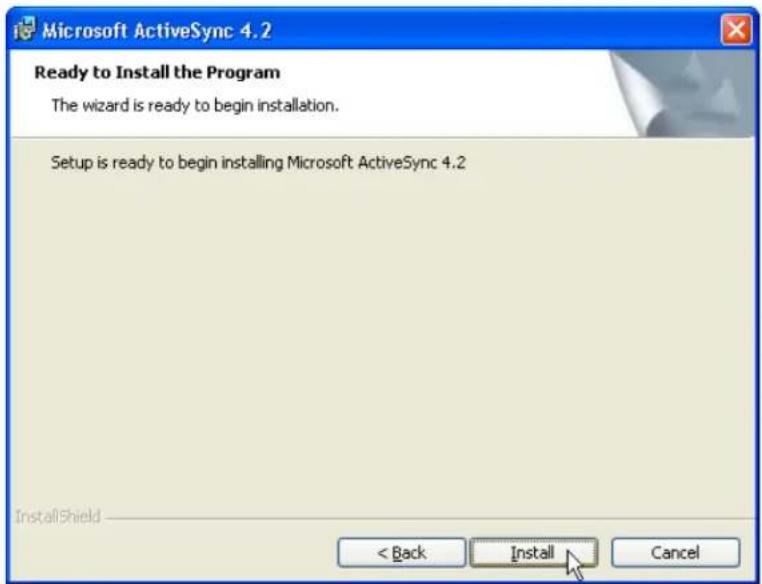
- Click Install. The program begins installing.

A confirmation screen will appear when the installation is complete.
9. Click Finish.
You may be prompted to restart your computer.
After you have installed ActiveSync and restarted your computer, the ActiveSync icon appears in your computer's system tray and the ActiveSync Connection Wizard starts. For detailed information on how to use ActiveSync on your computer, start ActiveSync then click Help → Microsoft ActiveSync Help.
Connecting the Device to Your Computer
- After ActiveSync has been installed, connect the USB charging cable to the universal connector on the bottom of your device.
- Plug the other end of the USB charging cable into a USB port on your computer.
- Turn the device on.
ActiveSync starts automatically and configures the USB port to work with the WPA1200. The New Partnership setup wizard will automatically start.
If ActiveSync doesn't start automatically, click Start → Programs → Microsoft ActiveSync.
If a message appears indicating that it is unable to detect a connection, click the Cancel button and manually configure the communication settings.
-
Follow the onscreen instructions.
-
When the configuration process is complete, the ActiveSync window appears.
-
Synchronization will be initialized and will take place if you've chosen to synchronize periodically or upon connection.
Your computer can create a partnership with multiple WPA1200s. Also, a WPA1200 can create a partnership with up to two computers.
Synchronization with your Computer
Synchronization takes place according to the options you choose while setting up ActiveSync on your computer. If you accept the default (On Connect) synchronization option in the Microsoft ActiveSync Setup Wizard, you'll be able to simply connect your WPA1200 to your desktop computer and synchronization will take place.
If you have not enabled the On Connect feature in ActiveSync, you can start ActiveSync in either of the following ways:
• On your computer, double-click My Computer → Mobile Devices folder.
- Connect the USB cable between the computer and WPA1200.
- Execute "Rellpog" from the WPA1200 Windows directory.
Connection Options
You can set remote synchronization with your computer using the following connection options:
- USB connection
- Infrared connection
- Bluetooth connection
- WiFi connection
USB Connection
To synchronize with your computer using a USB connection on a CE .Net 5 device:
- Connect your device to your computer using the USB charging cable.
- Initiate connection by tapping Start → Settings → Control Panel → PC Connection.
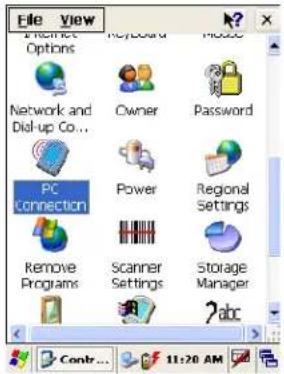
- Select Enable direct connections to the desktop computer using this check box.

- Tap OK.
To synchronize with your computer using a USB connection on a Windows Mobile 5 device:
- Open ActiveSync.
- Connect your device to your computer using the USB charging cable.
- Initiate connection by tapping Start → Programs → ActiveSync.

- Tap Menu → Connections.
- Select Synchronize all PCs using this connection check box.
- Select a baud rate or cable type connection.
- Tap OK.
Infrared Connection
The infrared port allows you to synchronize information with an infrared enabled computer. Align the infrared port of your device with the infrared port on the computer.
This method is ideal for quickly switching between multiple devices since there are no cables or adapters to change.
- Perform the steps below on your computer:
a. Configure an infrared port on your computer following the manufacturer's instructions.
b. Once your computer's IR port is ready, open ActiveSync.
c. Click File → Connection Settings.

d. Check Allow connections to one of the following and select Infrared Port (IR) from the drop-down list.

e. Click OK.
2. Perform the steps below on your CE .Net 5 device.
a. Align the IR port of your WPA1200 with that on your computer so that they are unblocked and within close range.
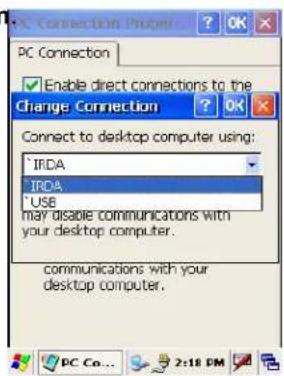
b. Initiate connection by tapping Start → Settings → Control Panel → PC Connection.
c. Select Enable direct connections to the desktop computer using this check box.
d. Tap the Change Connection
e. Select IRDA.
f. Tap OK.
Perform the steps below on your Windows Mobile 5 device:
a. Align the IR port of your WPA1200 with that on your computer so that they are unobstructed and within close range.
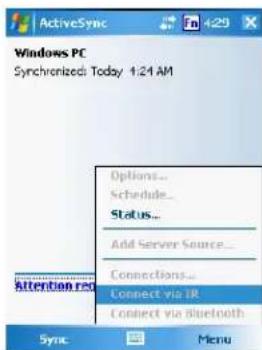
b. Initiate connection by tapping Start → ActiveSync → Menu → Connect via IR.
c. Tap Sync.
Bluetooth Connection
Your device is equipped with Bluetooth wireless technology that you can use to synchronize information with a computer equipped with a Bluetooth adapter or access point. Bluetooth wireless technology allows you to communicate with the computer whenever it is within range.
Follow these instructions to set up a Bluetooth connection on a CE .Net 5 device.
- Tap Start → Programs → Bluetooth → BTPowerON and check Turn on Bluetooth module. Tab OK.


Tap Start → Settings → Control Panel → Bluetooth Device Properties.

- Tap Scan Device.
- Select a device from the list and select Trusted.
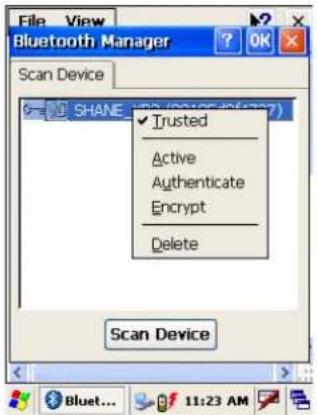
- You are prompted for a pin. Enter the pin in the box provided.
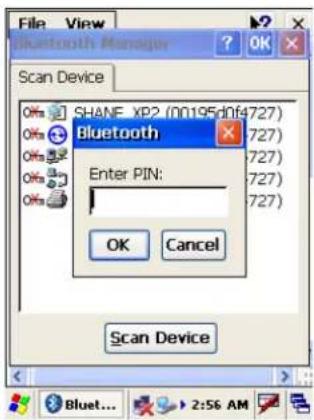
- On the PC screen, you are prompted to enter the Bluetooth PIN Code.

- Enter the same pin as you entered in step 4.
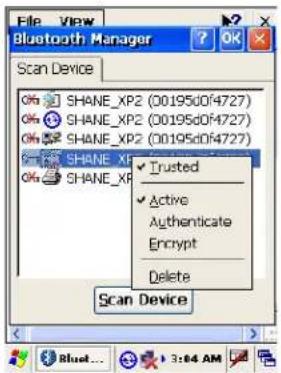
On the WPA1200 select a device from the list and select Active.
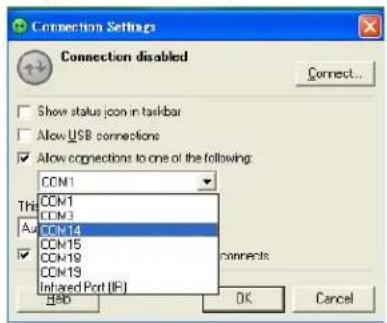
- On your PC, click ActiveSync → Connection Setting → Select your BT COM Port → OK.

When you installed your Bluetooth dongle or setup your integrated Bluetooth, a COM port was selected. Select the same COM port here. If you are not sure which COM port was selected look in your BT dongle or integrated BT settings.
- On the WPA1200 tap Start → Programs → ActiveSync → Menu → Connect via Bluetooth.
Follow these instructions to set up a Bluetooth connection on a Windows Mobile 5 device.
- Tap Start → Settings → Connections → Bluetooth → Mode and check Turn on Bluetooth.

- Tap Devices → New Partnership...

- Select a device from the list and tap Next.

- You are prompted for a passkey. Enter the Passkey.
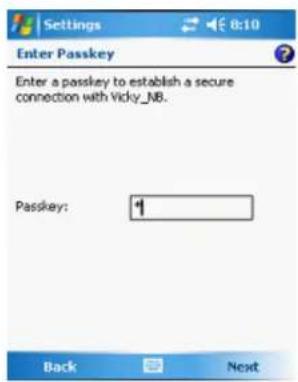
- On the PC screen, you are prompted to enter the Bluetooth PIN Code. Enter the same passkey you entered in step 4.

- On the WPA1200 tap Partnership Settings → Check Serial Port → Finish.
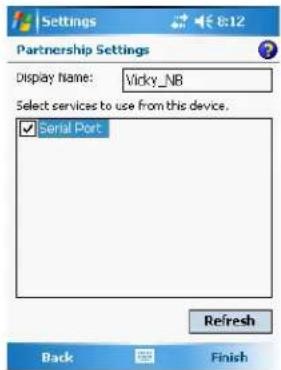
- On your PC, click ActiveSync → Connection Setting → Select COM Port → OK. When you installed your Bluetooth dongle or setup your integrated Bluetooth a COM port was selected. Select the same COM port here. If you are not sure which COM port was selected look in your BT dongle or integrated BT settings.
- On the WPA1200 tap Start → Programs → ActiveSync → Menu → Connect via Bluetooth.
WiFi Connection
With the device's embedded WLAN module, you can send and receive signals to a WiFi network.
Note: WiFi access requires a separate purchase of a service contract with a wireless service provider. Contact a wireless service provider for more information.
A wireless network can be added either when the network is detected or by manually entering settings information. Before doing these steps, determine if authentication information is needed.
For CE .Net 5 Devices:
- If the WIFI icon appears on the device, double-tap the icon to bring the WIFI Properties screen.

- Select the Wireless Information Tag.

-
If there are networks already detected, double-tap the network name, then config the Wireless Properties, tap OK.
-
Tap and hold network name, then select Co_nnect.
-
When finished, tap OK.
For more information on how to configure the wireless network settings, tap Start → Help.
For Windows Mobile 5 Devices:
-
Tap Start → Settings, then tap the Connections tab.
-
Tap Network Cards. The Configure Network Adapters screen appears.

-
Select whether the network card connects to the Internet or your work LAN from the drop-down list.
-
If there are networks already detected, tap and hold network name, then select Connect.
![Configure Network Adapters My network card connects to: The Internet The Internet Work NE2000 Compatible Ethernet Driver AsyncMac NDISWAN Miniport Bluetooth PAN Driver Remote-NDIS Host Virtual Ethernet Intermediate Minipor 123 1 2 3 4 5 6 7 8 9 0 - = + Tab q w e r t y u i o p [ ] CAP a s d f g h j k l ; * Shift z x c v b n m , . / CtI áü ' \ ↓ ↑ ← →](/content/2026/06/1268468/images/b2cba1d1d177a2f9bbb834a06d8b249c44ed2c720bc443e9fd64dac8d91b8274.jpg)
- Under the Network to access, select from the following network connection options:
All available
Only access points
Only computer-to-computer
- When finished, tap OK.
For more information on how to configure the wireless network settings, tap Start → Help.
Synchronizing Information
All files created on the device are stored in My Document/WPA1200 My Document folder (if the designated device name is WPA1200). You can view files by double-clicking the WPA1200 My Documents icon on your computer.
If you have enabled file synchronization, your WPA1200 files are automatically synchronized in the My Documents folder on your computer, unless a different name was chosen for WPA1200.
Synchronization Options
Synchronization options can be modified, including when you synchronize and what gets synchronized. In the Mobile Device window, click Tools → Sync Options.
For each type of information, the synchronization process can be hastened by limiting the amount of data to be synchronized. To do this, select a service and click the Settings button. After enabling a service, you must close and reopen the ActiveSync.
Using ActiveSync to Exchange Files
You can use ActiveSync to exchange information from your device to your computer and vice versa. Changes you make to the information on one location will not affect the information on the other one. If you want to automatically update information on both your device and computer, synchronize the information instead.
You can copy two types of information to your device: files and Pocket Access Windows CE Store information.
The procedure below only applies to copying files. Refer to the ActiveSync Help on your computer for instructions on how to copy Pocket Access Windows CE Store information.
Note: Files created on your computer may need to be converted by ActiveSync so that they can be viewed and edited on your device, and vice versa.
To copy files:
-
Connect your device to your computer.
-
In ActiveSync on your computer, click Explore. Windows Explorer opens the Mobile Device window for your device.

- Locate the file that you want to copy on your device or computer.

4. Do either one of the following:
To copy the file to your device, right-click the file and click Copy. Place the cursor in the desired folder for your device, right-click, then click Paste.
To copy the file to your computer, right-click the file and click Copy. Place the cursor in the desired folder for your computer, right click, then click Paste.
Chapter 4: Barcode Scanner Programs
Scan2Key
The Scan2Key application routes input from a scanner port to a keypad buffer, making all input from the scanner emulate input from the keypad. Using Scan2Key, scanned data will be directed from the scanner port to any aware (active/focused) text editor such as MS Pocket Word.
Scanner Setting
When it is necessary for the user to change the default barcode symbology for a different application, the Scanner Control Panel provides the ability to change default symbology, place delimiter characters behind scanned data, and save the settings.
CE .Net 5 Windows Mobile 5
Tap Start → Settings → Control Panel → Scanner.

Tap Start → Settings → System → Scanner Settings to display the Scanner Control Panel.

Barcode Symbologies Defaults
Please refer to the previous page for instructions on changing the default settings.
| Barcode Symbology | Enable/Disable | Check Char/Digit Verification | Transmit Check Char/Digit | Max/Min Length | Transmit Leading Digit | Other |
| Lookland EAN | Yes | |||||
| Codabar | Yes | Yes | Yes | Transmit Start/Stop bits, CLSI format, *data length | ||
| Code 11 Yes | Yes | * check digits, *data length | ||||
| Code | 128 | Yes | *data length | |||
| Code | 32 | Yes | Transmit TrailMgsdigit | |||
| Code 39 | Yes | Yes | For ASCII, Transmit Start/Stop bits, Function Code, Double label decoding,*data length, *double labels separator | |||
| Code 93 Yes | Yes | *data length | ||||
| Deta Code | Yes Yes | Yes | ||||
| EAN128 | Yes | Yes | Transmit Code ID, *Field separator | |||
| EAN13 | Yes | Yes | Yes | |||
| EAN8 | Yes | Yes | Yes | * Not suppress first or last digit, *data length | ||
| Interleaved 2 of 5 | Yes | Yes | Yes | Fixed Length, *Not suppress first or last digit, *data length | ||
| Label Code IV & V | Yes | Yes | ||||
| MIS/Plessey | Yes | Yes | * Check digit double module 10, * data length | |||
| Standard 2 of 5 | Yes | Yes | Yes | Fixed Length, *Data Length | ||
| UPC A | Yes Yes | Yes | *Standard Character Set | |||
| UPC E | Yes Yes | Yes | Zero Expension,NSC | |||
| UPC/EAN Group | Supplement 2, Supplement 5,Insert Space before supplement, most have supplement, *Add-on code try level |
Note: *Value Adjustable Scanner Control Panel V3.0
Chapter 5: Advanced Settings
This section describes how to adjust the settings of your device to accommodate your work habits.
- CE .Net 5 Device: To access Settings, tap Start → Settings → Control Panel.
Windows Mobile 5 Device: To access Settings, tap Start → Settings.

CE .Net 5
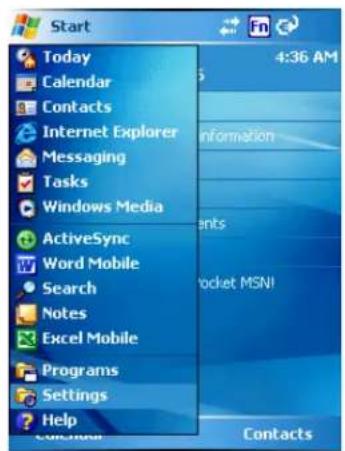
Windows Mobile 5
The Control Panel screen appears.
From here you can adjust such user configurable items as the backlight, auto power off timer, system volume, and processor speed. You can also assign functions to buttons, configure menus, enter owner information, and set up connections.

CE .Net 5
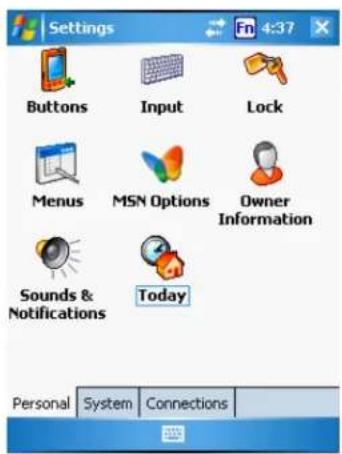
Windows Mobile 5
Checking the Main and Backup Battery Status
This section describes how to view the power level for both the main and backup battery. To minimize power consumption, you can define settings for the auto-off function and the processor's operation speed.
To check the main and backup battery status:
1. Open Power Properties.
If the Plug or Battery icon appears on your device, double-tap the icon to bring the Power Properties screen.
On CE .Net 5 Devices: Tap Start → Settings → Control Panel → Power. On Windows Mobile 5 Devices: Tap Start → Settings → System → Power.

CE .Net 5

Windows Mobile 5
Note: Press Fn key and "8" button
- The battery menu item displays the status of the main and backup batteries. On the screen shown here, both batteries are Good on the CE .Net 5 example and almost 100% on the Windows Mobile 5 example.
Note: It is necessary to charge the battery when the battery charge is Low or Very Low (below 10%). If the battery does not accept a charge, contact Technical Support.

CE .Net 5

Windows Mobile 5
Extending Battery Life
You can extend the WPA1200 battery life by doing either of the following:
Change the automatic power settings
Minimize the use of backlight
Changing the Automatic Power Settings
The WPA1200 will enter idle mode when there is no task, or all tasks are waiting for input. In default setting, the WPA1200 automatically turns itself off if it remains idle for 3 minutes and when there is no external charging power connected. Pressing the power button returns the WPA1200 to the same point as it was at the time of the automatic shutdown.
To change the automatic power settings on a CE .Net 5 device:
- In the Power screen tap the Schemes tab.

- Tap the Switch state to User Idle, Switch state to System Idle or Switch state to Suspend option to select from a list of time periods. The available time periods are 1, 2, 5, 10, 15, 30 minutes and never.
This function can also be activated when the WPA1200 is plugged into the power adapter or placed in its docking station by tapping Power Scheme → AC Power and then tapping the arrow to select from a list of time periods. The available time periods are 1, 2, 5, 10, 15, 30 minutes and never.
To change the automatic power settings on a Windows Mobile 5 device:
- In the Power screen tap the Advanced tab.

- Tap the automatic shut off time arrow to select from a list of time periods. The available time periods are 1, 2, 3, 4, and 5 minutes.
This function can also be activated when the WPA1200 is plugged into the power adapter or placed in its docking station by tapping the On external power check box and then tapping the arrow to select from a list of time periods. The available time periods are 1, 2, 5, 10, 15 and 30 minutes.
Adjusting Backlight Setting
The power consumption of the LCD backlight is high. You can turn off the backlight function if it is not necessary. If a backlight is required, set the "automatically turn off the backlight" function.
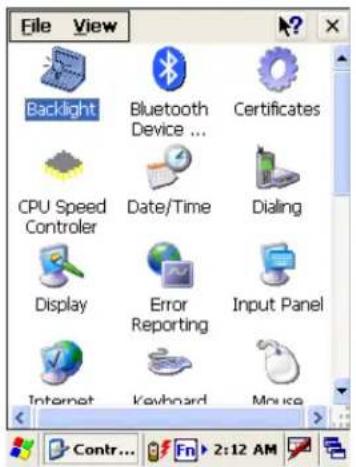
To change backlight settings:
-
CE .Net 5: Tap Start → Settings → Control Panel. Windows Mobile 5: Tap Start → Settings → System
-
Tap Backlight.

CE .Net 5
Windows Mobile 5
-
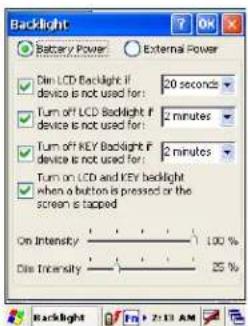
Do any of the following:
-
In the Battery Power tab, tap the Dim LCD Backlight if device is not used for: check box and select the amount of time before the unit turns off the backlight while running in battery power mode from the drop-down list.
- In the External Power tab, tap the Dim LCD Backlight if device is not used for: check box and select the amount of time before the unit turns off the backlight while running in battery power mode from the drop-down list.
- Tap the Turn on the LCD and key... checkbox to activate the backlight when the software keyboard is enabled.
CE .Net 5

Windows Mobile 5
- CE .Net 5: To set the Intensity (brightness), tap and drag the slider to choose a dimmer backlight when operating on battery power.

CE .Net 5
Windows Mobile 5: To set the Intensity (brightness), in the Brightness tab, tap and drag the slider to choose a dimmer backlight when operating on battery power.

Windows Mobile 5
Viewing Flash Memory Files
Flash memory is a rewritable location for programs and data files. The benefit of this feature is that files and programs saved in Flash Memory are unaffected by the WPA1200 power status.
To access the Flash Memory files:
- Connect the device to your computer.
- In ActiveSync on your computer, click Explore.
- Double-click Storage Card folder. Click My Device, Double-click Flash Disk.
To transfer files to Device's Flash Memory:
- Connect the device to your computer.
- In ActiveSync on your computer, click Explore.
a. To copy the file to your device, right-click the file and click Copy. Place the cursor in the desired folder for the flash disk folder of your device, right-click, then click Paste.
Performing a hardware reset
You may have to perform a reset if the device freezes (i.e., device no longer responds to the buttons or tapping on the screen).
A soft reset, or Warm Boot, allows your device to get a fresh start, similar to rebooting a computer. This will restart your device and adjust memory allocation. All records and entries are retained after a soft reset. Unsaved data in open programs may in some cases be lost.
Performing a Warm Boot
- Remove the stylus from its holder.
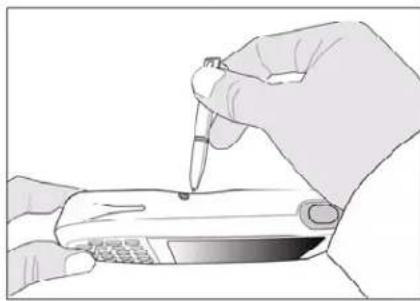
- Lightly press the tip of the stylus to the reset button located on the rear of the WPA1200.

Performing a Cold Boot on a CE .Net 5 Device
A cold boot cuts off power to your device, erasing all records and entries, deleting all programs you have added, and restoring the device to default factory settings.
Never perform a cold boot unless a soft reset does not solve your problem. When you perform your next ActiveSync operation, you can restore any data that you previously synchronized to your computer or you can restore data that you backed up to a storage card.
- Tap Start → Programs → Utilities → Boot Mode.
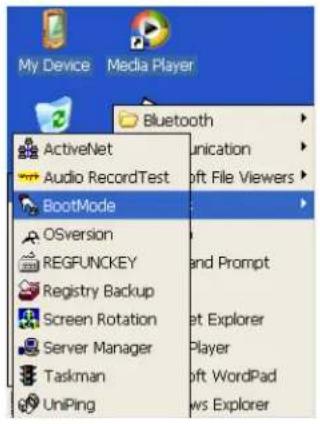

- Tap Cold Boot. The system is reset and you will lose all data including all files in the RAM memory.
Note: When you perform a cold boot, the date and time settings will not be retained. Formats, preferences, and other settings are restored to their default factory settings.
Performing a Cold Boot on a Windows Mobile 5 Device
A hard reset cuts off power to your device, erasing all records and entries, deleting all programs you have added, and restoring the device to default factory settings.
Never perform a hard reset unless a soft reset does not correct your problem. When you perform your next ActiveSync operation, you can restore any data that you previously synchronized to your computer or you can restore data that you backed up to a storage card.
Note: When you perform a hard reset, the date and time settings are not be retained. Formats, preferences, and other settings are restored to their default factory settings.
Method 1
Follow these instructions to perform a cool boot.
- Press and hold the Backspace key.

- While holding the Backspace key, insert the tip of the stylus into the reset hole on the back of the WPA1200 and press and hold the reset button until you see the splash logo screen appear and then release the Backspace and reset buttons.
natural_image
Illustration of a hand using a pipette to apply liquid onto a handheld device (no text or symbols visible)Note: The system is returned to the default settings. All registry settings and all files (including any hidden files) are returned to their original factory defaults.
Method 2
- Press and hold the TAB key.
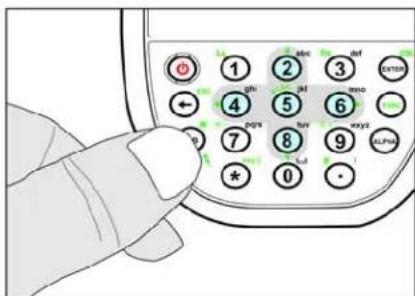
- While holding the TAB key, insert the tip of the stylus into the reset hole on the back of the WPA1200 and press and hold the reset button until you see the splash logo screen appear and then release the TAB and reset buttons.

natural_image
Illustration of a hand using a pipette to apply liquid onto a mobile phone (no text or symbols visible)Note: All registry settings are returned to default settings. You must reinstall all software. All files in flash memory are retained.
Appendix
| Processing/Memory | CPU | Intel PXA270 520MHz |
| Memory | SDRAM:64MBFlash ROM:128MB | |
| OS | Window Mobile 5.0 / Windows CE 5.0 | |
| Keypad | 18-Key, including numeric key, alpha key and function key | |
| Display | 240x320 QVGA, Color Transflective TFT, with Touch Screen & backlight | |
| Scanner | Laser Scan Engine, CCD ScanEngine as optional | |
| Indicator | Led, Vibrator | |
| Communication | USB Host & ClientIrDA 1.2(SIR)GPRS (Data Only)802.11b/g for power savingBluetoothBluetooth supports Bluetooth Printer,Bluetooth Modem,Bluetooth ActiveSync | |
| Audio | MICSpeakerHeadset ConnectorReceiver | |
| Power Source | Main 3.7V 1950mAh Li-ion battery pack | |
| Backup One rechargeable Ni-MH backupbattery | ||
| Enclosure | Weight Under 300g with battery & scanengine | |
| Dimensions | Approximately L149.5 X H26.6 X W85mm | |
| Environmental | Operating Temperature 0 C~ 50 C | |
| Storage Temperature -20 C~ 60 C | ||
| Relative Humidity 5% ~ 95%(non-condensing) | ||
| Drop Test to Concrete 4 feet | ||
| Environmental Sealing IP54 | ||
| Models | GPRS + BT | |
| 802.11b/g + BT | ||
| BT Only | ||
| Certification | CE, FCC, BSMI, VCCI, RoHS compliant | |
| Accessories | Desktop Cradle4 slot Battery Charger | Vehicle Quick Charging CableHolster |
| Software | Microsoft Visual Studio 2005Microsoft Windows CE 5.0 SDKWPA1200 SDKVOIP (via 3rd party) |




- Notices
- Battery charge notice
- Storage and safety notice
- Table of Contents
- Chapter 1: Getting Started
- Introducing the WPA1200
- Features
- Powerful system
- System memory
- Display
- Barcode scanner
- Communication
- Audio
- Wireless connectivity
- Expansion slot
- Battery life
- User-friendly interface
- Package Contents
- A Tour of the WPA1200
- Getting Started
- Installing the Battery
- Charging the Battery
- Caution:
- Note:
- Charging the Battery using the USB Cable
- Checking the Battery Status
- Connecting the WPA1200 to a PC
- Turning On the WPA1200 For the First Time
- Powering On
- Calibrating the WPA1200 Screen
- Chapter 2: Using the Hardware
- Keypads and Key Functions
- Adjusting the Screen Brightness
- Using the Stylus
- Using the SD/MMC Memory Card
- Inserting a Storage Card
- Removing a Storage Card
- Using the Laser Scanner
- The Scanner Control Panel opens.
- For CE .Net 5: To test the barcode scanner, tap the Test tab.
- Chapter 3: Getting Connected
- Establishing Device-PC Connection
- Installing Microsoft ActiveSync
- To install Microsoft ActiveSync on your computer:
- Click Next.
- Click Finish.
- Connecting the Device to Your Computer
- Synchronization with your Computer
- Connection Options
- USB Connection
- To synchronize with your computer using a USB connection on a Windows Mobile 5 device:
- Infrared Connection
- Perform the steps below on your CE .Net 5 device.
- Perform the steps below on your Windows Mobile 5 device:
- Bluetooth Connection
- WiFi Connection
- For CE .Net 5 Devices:
- For Windows Mobile 5 Devices:
- Synchronizing Information
- Synchronization Options
- Using ActiveSync to Exchange Files
- To copy files:
- Do either one of the following:
- Chapter 4: Barcode Scanner Programs
- Scan2Key
- Scanner Setting
- Chapter 5: Advanced Settings
- Checking the Main and Backup Battery Status
- Open Power Properties.
- Extending Battery Life
- Changing the Automatic Power Settings
- To change the automatic power settings on a CE .Net 5 device:
- To change the automatic power settings on a Windows Mobile 5 device:
- Adjusting Backlight Setting
- Viewing Flash Memory Files
- Performing a hardware reset
- Performing a Warm Boot
- Performing a Cold Boot on a CE .Net 5 Device
- Performing a Cold Boot on a Windows Mobile 5 Device
- Method 1
- Method 2
Brand : Wasp
Model : WPA1200
Category : Barcode Reader