
HD2386 - Sandwich Maker PHILIPS - Free user manual and instructions
Find the device manual for free HD2386 PHILIPS in PDF.


| Product type | Sandwich maker (panini grill) |
| Brand | Philips |
| Model | HD2386 |
| Dimensions (L x W x H) | 25 x 20 x 10 cm |
| Weight | 1.2 kg |
| Power supply | 220-240 V, 50-60 Hz |
| Power | 750 W |
| Plate material | Non-stick coating |
| Number of sandwiches at once | 2 |
| Closure | Locking clip |
| Indicator light | Ready to use |
| Defrost function | No |
| Adjustable thermostat | No, fixed temperature |
| Maintenance | Clean with a damp cloth after cooling |
| Removable plates | Yes, for easy cleaning |
| Safety | Automatic shut-off in case of overheating |
| Non-slip feet | Yes |
| Spare parts available | Replacement plates, power cord |
| Color | White and gray |
Frequently Asked Questions - HD2386 PHILIPS
User questions about HD2386 PHILIPS
0 question about this device. Answer the ones you know or ask your own.
Ask a new question about this device
Download the instructions for your Sandwich Maker in PDF format for free! Find your manual HD2386 - PHILIPS and take your electronic device back in hand. On this page are published all the documents necessary for the use of your device. HD2386 by PHILIPS.
USER MANUAL HD2386 PHILIPS
natural_image
Black Philips-branded smartwatch with glossy surface and control buttons (no visible text or symbols on body)
ENGLISH 6
DANSK 10
DEUTSCH 14
ΕΛΛΗΝΙΚΑ 18
ESPAÑOL 22
SUOMI 26
FRANÇAIS 30
ITALIANO 34
NEDERLANDS 38
NORSK 42
PORTUGUÊS 46
SVENSKA 50
TÜRKÇE 54
60 فارسی
63 العربية
Introduction
Congratulations on your purchase and welcome to Philips! To fully benefit from the support that Philips offers, register your product at www.philips.com.
Grilling with this appliance is safe and easy. The panini maker has two grilling plates connected with a hinge to prevent spillage of ingredients and to facilitate cleaning after use. Your new panini maker allows you to prepare all kinds of tasty paninis. Enjoy!
General description (Fig. 1)
A Red power-on light
B Green heating-up light
C Cool-touch handgrips
D Auto-lock mechanism
E On/off switch
F Cord storage facility
G Grilling plates
Important
Read this user manual carefully before you use the appliance and save it for future reference.
Danger
- Do not immerse the appliance or the mains cord in water or any other liquid.
Warning
- Check if the voltage indicated on the bottom of the appliance corresponds to the local mains voltage before you connect the appliance.
- Do not use the appliance if the mains cord, the plug or the appliance itself is damaged.
- If the mains cord is damaged, you must have it replaced by Philips, a service centre authorised by Philips in order to avoid a hazard.
- Only connect the appliance to an earthed wall socket.
- Keep the mains cord away from hot surfaces.
- Do not let the mains cord hang over the edge of the table or worktop on which the appliance stands.
- This appliance is not intended for use by persons (including children) with reduced physical, sensory or mental capabilities, or lack of experience and knowledge, unless they have been given supervision or instruction concerning use of the appliance by a person responsible for their safety.
- Children should be supervised to ensure that they do not play with the appliance.
- Never let the appliance operate unattended.
- Never connect this appliance to an external timer switch in order to avoid a hazardous situation.
Caution
- Put the appliance on a flat, stable surface with sufficient free space around it.
- Always preheat the grilling plates before you put any food between them.
- The temperature of accessible surfaces may be high when the appliance operates.
- Let the appliance cool down completely before you clean it or put it away.
- Never touch the grilling plates with sharp or abrasive items, as this damages the non-stick surface.
- The appliance is intended for household use only.
- This appliance is not intended for preparing other foods than paninis.
- Always switch off and unplug the appliance after use.
- Always clean the appliance after use.
Electromagnetic fields (EMF)
This Philips appliance complies with all standards regarding electromagnetic fields (EMF). If handled properly and according to the instructions in this user manual, the appliance is safe to use based on scientific evidence available today.
Before first use
1 Remove any stickers and wipe the body of the panini maker with a damp cloth.
2 Pull the locking tab (1) upwards and open the panini maker (2) (Fig. 2).
3 Clean the grilling plates with a damp cloth or sponge. (Fig. 3)
Using the appliance
Note: The appliance may produce some smoke when you use it for the first time. This is normal.
1 Lightly grease the grilling plates with a little butter or oil.
2 To adjust the length of the cord, wind part of it round the cord storage facility.
3 Put the plug in the wall socket and set the on/off switch to 'l' (Fig. 4).
The power-on light and the heating-up light go on (Fig. 5).
4 Prepare the ingredients.
Note: For each panini, you need two slices of bread and a suitable filling. Read chapter 'Recipes' for suggestions.
Note: Lightly butter the sides of the bread that come into contact with the grilling plates to obtain an even, golden brown result.
The panini maker is ready for use when the heating-up light goes out.
5 Open the panini maker (Fig. 2).
6 Place the paninis on the lower grilling plate (Fig. 6).
7 Close the panini maker (Fig. 7).
The panini maker is equipped with a clamping mechanism. Lower the upper grilling plate carefully onto the bread until the auto-lock mechanism clamps it onto the lower grilling plate.
Note: During the grilling process, the green heating-up light goes on and goes out from time to time. This indicates that the heating elements switch on and off to maintain the correct temperature.
8 Open the panini maker after 3-4 minutes to check whether the paninis are golden brown.
Note: The grilling time depends on the type of bread, the filling and your personal taste.
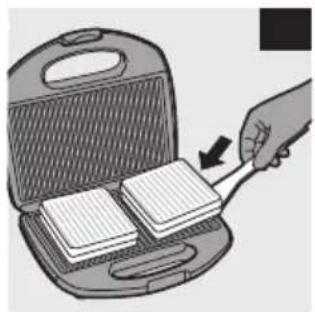
9 Remove the paninis with a wooden or plastic utensil (e.g. a spatula) (Fig. 8).
Do not use metal, sharp or abrasive kitchen utensils, as they damage the non-stick coating.
10 If you want to grill more paninis, place the next panini on the grilling plate when the green heating-up light goes out.
11 Set the on/off switch to 'O' and unplug the panini maker after use (Fig. 9).
Cleaning
Never immerse the appliance in water nor rinse it under the tap.
Never use aggressive or abrasive cleaning agents and materials, as they damage the non-stick coating of the grilling plates.
ENGLISH8
1 Switch off the appliance, unplug it and let it cool down.
2 Remove excess oil from the grilling plates with a piece of kitchen paper before you clean them.
3 Clean the grilling plates with a damp cloth or sponge (Fig. 3).
4 Clean the outside of the appliance with a damp cloth.
Storage
1 Wind the mains cord round the storage facility (Fig. 10).
2 You can store the appliance in vertical or horizontal position (Fig. 11).
Environment
- Do not throw away the appliance with the normal household waste at the end of its life, but hand it in at an official collection point for recycling. By doing this, you help to preserve the environment (Fig. 12).
Guarantee and service
If you need service or information or if you have a problem, please visit the Philips website at www.philips.com or contact the Philips Consumer Care Centre in your country (you find its phone number in the worldwide guarantee leaflet). If there is no Consumer Care Centre in your country, go to your local Philips dealer.
Recipes
Ham cheese and pineapple paninis
- 4 slices of bread
- 2 slices of cheese
- 2 slices of pineapple
- 2 thin slices of ham
- curry powder
1 Preheat the panini maker.
2 Put the cheese, the pineapple and finally the ham on two slices of bread. Sprinkle the ham with some curry powder and put the other two slices of bread on top.
3 Follow the instructions in chapter 'Using the appliance'.
Tomato, cheese and anchovy paninis
- 4 slices of bread
- 1 or 2 tomatoes (cut into slices)
- 2 tablespoons of grated Parmesan cheese
- 6 anchovies
- paprika powder
- marjoram
1 Preheat the panini maker.
2 Put the slices of tomato, the anchovies and the grated cheese on two slices of bread. Sprinkle with some paprika powder and marjoram and put the other two slices of bread on top.
3 Follow the instructions in chapter 'Using the appliance'.
Salami, banana and cheese paninis
- 4 slices of bread
- 2-4 slices of salami
- 1 banana (cut into slices)
- 2 slices of cheese
- cayenne pepper
1 Preheat the panini maker.
2 Put the slices of salami, slices of banana and finally the slices of cheese on two slices of bread. Sprinkle with some cayenne pepper and put the two other slices of bread on top.
3 Follow the instructions in chapter 'Using the appliance'.
Introduktion
natural_image
Illustration of a hand using a tool to clean or adjust a grid-patterned device (no text or symbols visible)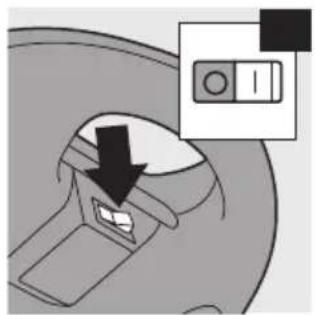
natural_image
Diagram showing a device with a black arrow pointing to a button, next to an icon representing a battery (no text or symbols present)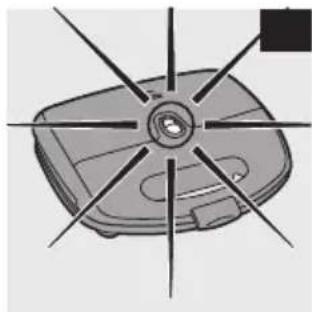
natural_image
Top-down view of a mechanical component with radial lines and central hub (no text or symbols)
natural_image
Illustration of a hand placing two blocks into a gridded appliance (no text or symbols visible)
natural_image
Illustration of a hand using a tool to press open a rectangular object with two blank sheets, no text or symbols present.
natural_image
Diagram of a device with a control panel and directional arrow, no readable text or symbols present
natural_image
Mechanical component diagram showing a pulley and cable assembly (no text or symbols)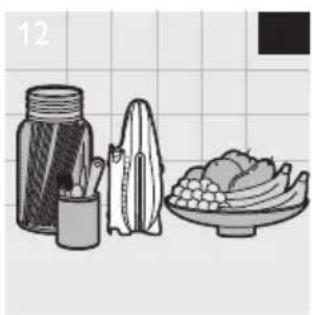
natural_image
Illustration of a kitchen utensil, a jar, and a plate with food items (no text or symbols)
natural_image
Symbol of a trash bin crossed with no text or numbers, representing waste sorting or disposal (no text present)

- Introduction
- General description (Fig. 1)
- Important
- Danger
- Warning
- Caution
- Electromagnetic fields (EMF)
- Before first use
- Using the appliance
- Cleaning
- ENGLISH8
- Storage
- Environment
- Guarantee and service
- Recipes
- Ham cheese and pineapple paninis
- Tomato, cheese and anchovy paninis
- Salami, banana and cheese paninis
- Introduktion
Brand : PHILIPS
Model : HD2386
Category : Sandwich Maker