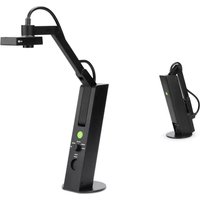
VZ-1 HD - Document camera Ipevo - Free user manual and instructions
Find the device manual for free VZ-1 HD Ipevo in PDF.


| Product Type | Document Camera |
| Model | VZ-1 HD |
| Brand | Ipevo |
| Image Sensor | 8 MP CMOS |
| Video Resolution | Full HD 1080p (1920 x 1080) |
| Frame Rate | 30 fps |
| Digital Zoom | 8x |
| Maximum Document Size | Letter (8.5 x 11 in) / A4 |
| Lighting | Built-in LED light |
| Microphone | Built-in omnidirectional |
| Connectivity | USB 2.0 (Micro-B) |
| Compatibility | Windows, macOS, Chrome OS |
| Dimensions (Open) | 10.2 x 10.2 x 15.7 in (26 x 26 x 40 cm) |
| Dimensions (Folded) | 10.2 x 3.9 x 1.5 in (26 x 10 x 3.8 cm) |
| Weight | 1.4 lb (635 g) |
| Power Source | USB powered (5V, 500mA) |
| Warranty | 1 year limited |
| Cleaning | Use a dry, soft cloth; avoid solvents |
| Safety | Keep away from water and excessive heat |
| Included Accessories | USB cable, quick start guide, carry pouch |
Frequently Asked Questions - VZ-1 HD Ipevo
User questions about VZ-1 HD Ipevo
0 question about this device. Answer the ones you know or ask your own.
Ask a new question about this device
Download the instructions for your Document camera in PDF format for free! Find your manual VZ-1 HD - Ipevo and take your electronic device back in hand. On this page are published all the documents necessary for the use of your device. VZ-1 HD by Ipevo.
USER MANUAL VZ-1 HD Ipevo
VZ-1 HD VGA/USB Document Camera User Manual

natural_image
Illustration of a desktop desk lamp with IPEVO branding and adjustable arm (no text or symbols on the device itself)TABLE OF CONTENTS
Introduction 4
What Makes VZ-1 HD Different? 4
Two Modes
Versatility
High-Definition Capture
Effortless Autofocus
Feature-Rich Presenter Software
Contents 5
About the Packaging 5
Getting Help 6
Version Information 7
System Requirements 8
Highest Resolutions Requirements
Installation 9-10
PC or Mac Installation
Projector or Monitor Installation
Getting to Know VZ-1 HD (Key Features) 11-12
IPEVO Presenter Software Introduction 13
Switching between software modes
Basics of the Presenter Software 14
Camera mode
Full Screen mode
Basics of the Presenter Software (cont'd) 15
Review mode
Getting a Great Image – Five Considerations 16
Image Size 17
Changing Image Size
Image Size (cont'd) 18
Zoom function
Capturing a Standard Sheet of Paper
Image Orientation 19
Landscape versus Portrait
Camera lens orientation
Changing Orientation 20
Swivel head
Mirroring function
Exposure 21
Exposure Value (EXP) toggle
Exposure tab
Light button
Stop-motion animation
TABLE OF CONTENTS
Focus 23
Autofocus switch
Continuous and Single focus modes
Focus button
Resolution 24
Changing PC or Mac resolution
High-definition versus standard-definition
VGA Resolution 25
Automatic Resolution
Resolution and Frame Rate 26
Snapshots 27
Snapshots (PC or Mac only)
Taking a snapshot
Timer function
Evernote 28
Evernote (PC or Mac only)
Logging in to Evernote
Evernote (cont'd) 29
Using VZ-1 HD for Evernote
Projecting Your Image 30
Full Screen mode
Preparing for Projection (PC or Mac) 31
Mirroring your desktop
Advanced Settings 32
Instant Preview
Changing sound effects
Photo library location
Photo name format
Keep camera mode settings
Advanced Settings (cont'd) 33
Image adjustment customizations
About VZ-1 HD
Setting a language
Starting Presenter when computer starts
Closing and Exiting the Presenter Software 34
Keyboard Shortcuts
Troubleshooting and FAQ 35-36
Safety Information 37
Acknowledgments
INTRODUCTION
Thank you for your purchase of the VZ-1 HD VGA/USB Document Camera. The VZ-1 HD is a dual-mode document camera that can be used with either PC or Mac (Computer mode), or connected directly to a monitor or projector via VGA (Projector mode). VZ-1 HD provides real-time video capture in stunning high-definition clarity for documents as well as devices with digital screens such as smartphones and Apple's iPad. In addition to its effortless document alignment, VZ-1 HD offers features and functionality similar to document cameras costing hundreds or even thousands more, all in a compact and easy-to-use device.
WHAT MAKES VZ-1 HD DIFFERENT?
Two Modes – VZ-1 HD has both USB and VGA connections. Use the USB port with PC or Mac (Computer mode), or use the VGA port to connect directly to a projector or monitor (Projector mode). It's your choice.
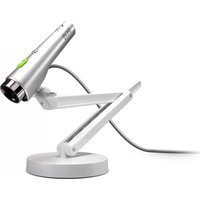
Versatility – VZ-1 HD's unique multi-jointed stand and swiveling head give you the freedom to place the camera in a wide variety of positions without the hassle of tightening knobs or otherwise locking the stand. At all positions, VZ-1 HD will remain secure and stable because of its weighted base, offering you on-the-fly customization of your image.
High-Definition Capture – VZ-1 HD features a 5 Megapixel camera and can achieve a resolution of up to 2592 x 1944 pixels. This high-definition video capture provides an exceptionally crisp and brilliant image. Additionally, VZ-1 HD features a powerful zoom (up to 6x magnification) as well as a Macro mode which allows for sharp focus on very close subjects up to 2 inches (5 cm) away. For these reasons, VZ-1 HD is ideal for capturing fine details of documents and pictures.
Effortless Autofocus – VZ-1 HD has a smart focusing system that gives you manual control when you need it and convenient automatic control when you don't. VZ-1 HD can be set to either of two focus settings:
- Continuous Focus – in which VZ-1 HD automatically and constantly determines the best focus. In this mode, you are free to move the subject around, and the focus will continue to stay sharp.
- Single Focus – in which you set focus once, with VZ-1 HD staying with that focus setting. This mode is best for a subject that will remain at the same distance from the camera, such as a static sheet of paper. This mode is also ideal for VZ-1 HD's higher resolutions.
Feature-Rich Presenter Software – Included software for PC or Mac provides a number of functions and customizations to get the most out of your VZ-1 HD experience. Organizing snapshots, setting exposure levels, image mirroring, Full Screen mode and integrated Evernote support are just some of the features of this software.
CONTENTS
Your package should contain the following:
• VZ-1 HD Document Camera, including multi-jointed stand
- USB A-to-B cable
- USB power adapter
- CD-ROM with IPEVO Presenter software and user manual (in .pdf format)
- Quick Start Guide

natural_image
Line drawing of a mechanical clamp or bracket (no text or symbols)VZ-1 HD Document Camera


Quick Start Guide and CD-ROM
ABOUT THE PACKAGING
IPEVO has a longstanding commitment to green business practices, and this extends to our product packaging. We like our products to do the talking, not fancy packaging! Your VZ-1 HD has been shipped with a minimum of packaging materials, particularly a minimum of plastic. The plain craft paper box (which does not contain high-resolution graphics or wasteful multi-color printing) is recyclable, as are the cardboard cut-outs keeping the VZ-1 HD in place.
GETTING HELP
We want to help you enjoy your VZ-1 HD, and we are always available to answer any questions or offer technical and troubleshooting assistance. Consider using one or more of these resources:
- IPEVO.com – The latest versions of the VZ-1 HD software, user manual, FAQ, and other downloads are available at this link: http://support.ipevo.com/
- Email – Send us an email at cs@ipevo.com with your question or concern. For the best and most prompt service, include the version of your operating system with any inquiry, as well as a detailed explanation of the issue you are experiencing.
- Live Chat – Live Chat is available through our website, www.ipevo.com. A link in the top middle section of the main page will take you to an Instant Messaging session in which you can correspond with a customer service representative directly. This feature is available during the same hours and days as our telephone support.
- Help Link – Help, within the Presenter software, will bring you to IPEVO's website for the latest version of the software and other support and information. To access Help:
Windows - Click on Help (the question mark icon) in the upper right-hand corner of the software.

Macintosh - Select Help > VZ-1 HD Help.
VIEWING YOUR SOFTWARE'S VERSION
We recommend periodically checking IPEVO.com for the latest version of the Presenter software. To determine the software version you are currently running, do one of the following:
Windows - Right-click the VZ-1 HD icon in the system taskbar, and click About.

Macintosh - Select About > About VZ-1 HD.
You can also view the version information from the Advanced Settings window:
Windows - Click Settings (the wrench icon) in the upper right-hand corner of the software screen, and select the System tab.

Macintosh - Select VZ-1 HD > Preferences, and select the System tab.
SYSTEM REQUIREMENTS
When using VZ-1 HD with a PC or Mac, the following minimum specifications are required:
PC
Microsoft Window7, Window8, Vista or XP
• 1.4Ghz CPU or higher (2.4Ghz recommended)
• 512MB RAM (1GB recommended)
• 200MB free hard disk space
- 64MB of dedicated video memory
Mac
• Mac OS X 10.5 or higher
• 1.4Ghz CPU or higher (2.4Ghz recommended)
• 512MB RAM (1GB recommended)
• 200MB free hard disk space
• 256MB of dedicated video memory
HIGHEST RESOLUTIONS REQUIREMENTS (PC OR Mac)
To operate VZ-1 HD at the two highest resolutions, there are additional system requirements. To operate at 2048x1536 (3 Megapixel) resolution, a minimum video RAM (associated with your graphics card) of 144MB is required. To operate at 2592x1944 (5 Megapixel) resolution, a minimum video RAM of 256MB is required. Operating at these resolutions without the required minimum video RAM will result in a black screen instead of an image.
INSTALLATION
Your VZ-1 HD document camera has two modes and can be connected to a computer (PC or Mac) via USB or directly to a projector or monitor via VGA.
PC or Mac Installation
- Insert the CD-ROM into your computer's drive. Follow the prompts to complete the installation of the IPEVO Presenter software.*
- Connect the USB cable (B-Type) to the port marked "DC 5V" on the back of VZ-1 HD.
- Connect the other end of the USB cable (A-Type) to any open USB port on your computer.
- Power on VZ-1 HD by pressing the power button in the front center of the unit.
- Launch the IPEVO Presenter software. A window containing a live video image from your VZ-1 HD should appear. VZ-1 HD is now ready to use.
*If the installation program does not automatically appear:
PC
- navigate to the CD-ROM drive through Windows Explorer (often the D drive), open the VZ-1 HD CD-ROM, and double-click "setup.exe" to run the installation.
Mac
- navigate to the CD-ROM drive and click the “***.dmg” file to run the installation.
Note to Point 2 View and Ziggi owners: If you have previously purchased IPEVO's Point 2 View or Ziggi/Ziggi-HD USB Document Camera, you may have the P2V software installed on your system. You will need to uninstall this software prior to successful installation of the latest version of the Presenter software.
MONITOR OR PROJECTOR INSTALLATION
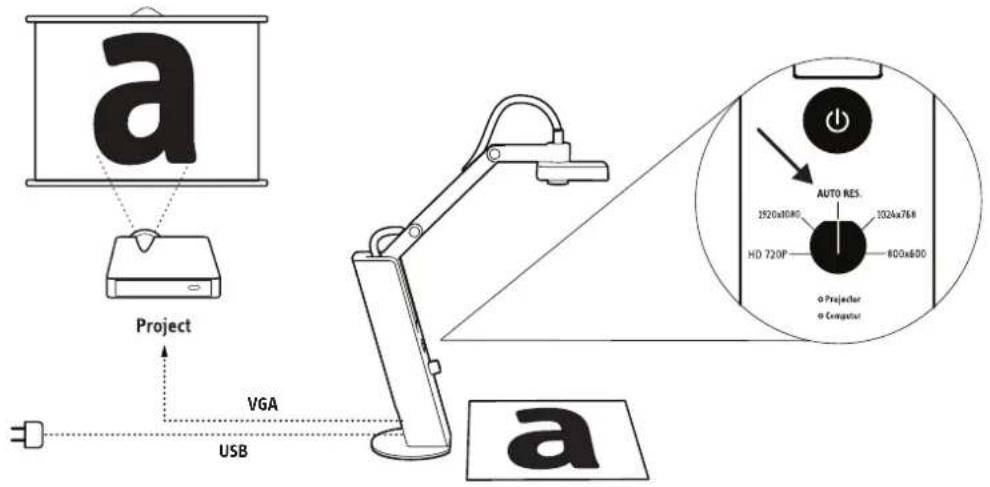
VZ-1 HD can also be connected directly to a monitor or projector for large-screen projection.
- Connect the USB power adapter to the port marked "DC 5V" on the back of VZ-1 HD. Plug the adapter into the wall.
- Connect a VGA cable (not included) to the VGA port on the back of VZ-1 HD.
- Connect the other end of the VGA cable into your monitor or projector's VGA port.
- Power on the VZ-1 HD by pressing the power button in the front center of the unit.
- Turn the resolution selector below the power button to "Auto Res." if it is not already there. VZ-1 HD will determine the best resolution for your monitor or projector. See Page 25 for more about VGA resolution.
- The live video image will appear. VZ-1 HD is now ready to use.
*Note: If an image does not appear while on "Auto Res.," please turn the selector to other resolutions and try again.
GETTING TO KNOW VZ-1 HD
Take some time to familiarize yourself with the key features of VZ-1 HD:
A-Stand
VZ-1 HD's stand has three points of articulation with generous degrees of freedom, allowing you to place the camera by hand in any position, depending on subject and desired image size. Collapse the stand for compact portability.
B - Base
The weighted base provides a sturdy foundation for placing the camera in any position.
C - USB port
Use this port USB Type-B when connecting to PC or Mac via USB cable (included).
D - VGA port
Use this port when connecting directly to a VGA-compatible monitor or projector (VGA cable not included).
E - Power
This button powers VZ-1 HD. Press once when beginning to use VZ-1 HD, and press again to turn the unit off.
F - Resolution selector
This allows you to select a resolution when connecting directly to a monitor or projector via VGA. See Page 25 for more about VGA resolution.
G - LED indicators
Indicates whether the device VZ-1 HD is connected to (computer or monitor/projector) is on.

H - Camera lens
VZ-1 HD features a 5.0 Megapixel lens for detailed and vibrant images, allowing for a maximum resolution of 2592 x 1944 (PC or Mac only). VZ-1 HD has an automatic Macro mode for maintaining sharp focus on objects as close as 2 inches (5 cm) away.
I - Swivel head
In addition to the joints of the stand, you can further customize your image by swiveling the camera. 270^ of swivel is possible – 180^ clockwise and 90^ counterclockwise. See Pages 19 and 20 for more on orientation.
J - EXP +/- (Exposure Value)
This toggle allows you to increase or decrease artificial exposure of the image, making it brighter (+) or darker (-). See Pages 21 and 22 for more on exposure.
K - Autofocus (AF) switch
Set your focus to one of two modes. Continuous (C) causes VZ-1 HD to constantly determine the best focus for your image. Single (S) causes VZ-1 HD to stay at a single focus. See Page 23 for more on focus.
L - Focus button
In Single focus mode, press this button for sharp focus of your subject. It takes a few seconds for VZ-1 HD to determine and set proper focus.
M - Light
This button operates a strong white LED light on the underside of the camera body. Consider using the light to illuminate your subject if necessary.


IPEVO PRESENTER SOFTWARE
Specially-designed IPEVO Presenter software is included on your CD-ROM and provides a rich suite of features to maximize your VZ-1 HD use. Note that Presenter is only available on PC or Mac.
VZ-1 HD operates in one of four modes:
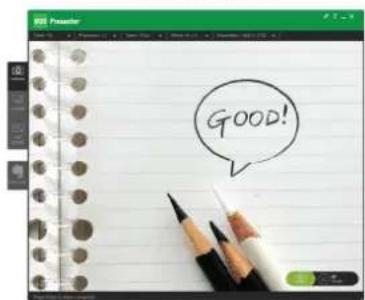
- Camera mode – This is the default mode upon software startup. This mode shows the current video capture coming from the VZ-1 HD camera. In this mode, you are also able to change aspects of the image such as exposure, mirroring, and resolution. See Page 16 to get started with capturing your image.
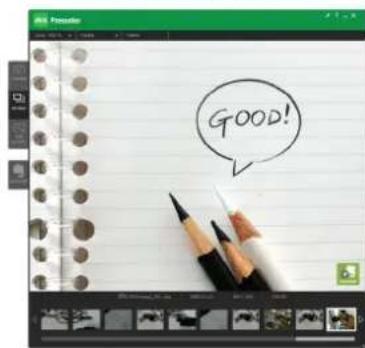
- Review mode – This mode gives you an easy way to review snapshots taken with your VZ-1 HD. Snapshots are presented as thumbnail images in a row at the bottom of the screen. See Page 27 for more on taking snapshots.
- Full Screen mode – In this mode, the image fills up the entire computer screen. Full screen is particularly useful when you need to project the VZ-1 HD's video for presentations. See Pages 30 and 31 for more on projecting your image.
- Evernote – The software features integrated support for the Evernote notetaking application, giving you an easy way to upload snapshots to an Evernote notebook. See Pages 28 and 29 for more about using VZ-1 HD for Evernote.
To switch between modes, click on the Mode Tab on the left-hand side of the capture window.
Camera mode
Review mode
Full Screen mode

Evernote

The size of the window for Camera, Review and Evernote modes can be changed by clicking and dragging on the edges of the window.

BASICS OF THE PRESENTER SOFTWARE
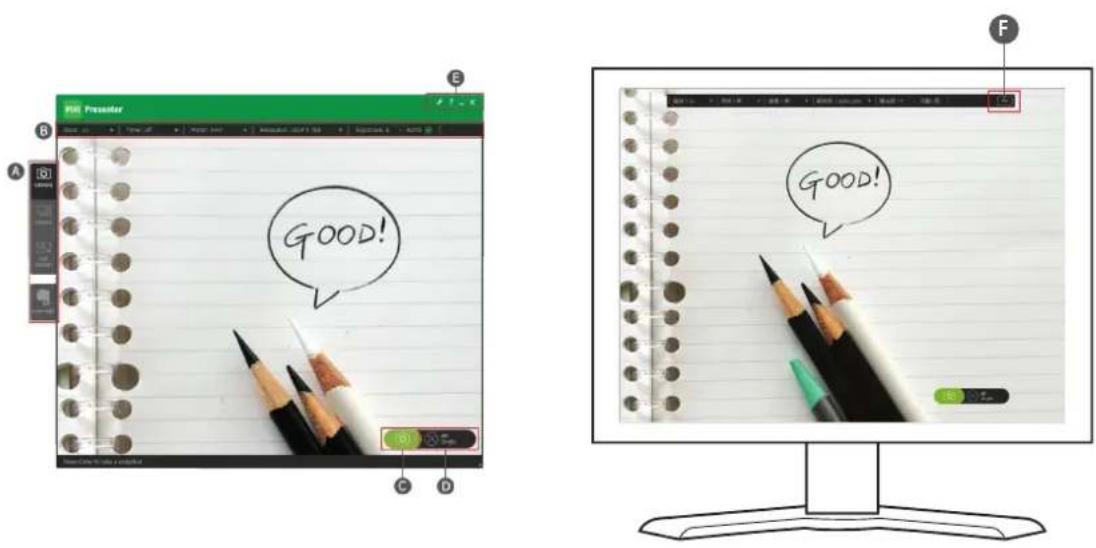
Please review the basic elements of the four modes of the Presenter software:
A - Mode Tab
One of four modes can be selected by clicking on the appropriate button in the Mode Tab.
B - Camera Menu Tab
Several camera functions can be changed using the pulldown menus. These include: Zoom, Timer, Mirroring Mode, Resolution, and Exposure. This tab will also communicate the current settings of these functions.
C - Snapshot Button
Click the green camera icon to take a snapshot. See Page 27 for more on taking snapshots.
D - Focus Button
Click the rectangular crosshairs icon to focus the image. To the right of this icon, the software will tell you whether you are in Single or Continuous focus mode.
E - Operations (Windows only)
Here, you can access Advanced Settings (the Wrench icon), get Help (the Question Mark icon), minimize the capture window, or exit the capture window.
F - ESC Button
In Full Screen mode, hit "Esc" or click the ESC Button to exit Full Screen mode and return to Camera mode.
Camera mode Full Screen mode
To review snapshots you've taken (see Page 27), enter Review mode by clicking on the "review" tab on the left-hand side of the software.
A - Image Pane
This shows the currently selected snapshot.
B - Menu
This gives you some basic tools to manipulate the selected snapshot.
Zoom - Digitally zoom the image from 100% (normal, or 1x zoom) to 600% (or 6x) zoom in 100% increments.
Rotate - Rotate the image left or right.
Delete – Delete the selected image from your hard drive. The system will prompt you to ensure you want to delete the image.
C - Folder Icon
Clicking on the folder icon will take you to the location on your computer where your snapshots are stored.
D - Image Information
Provides information about the image, including file name, date taken, resolution taken at, and file size (in kilobytes).
E - Thumbnail Timeline
The snapshots you've taken are presented in a horizontal timeline of thumbnails. You can click on a thumbnail to select that snapshot, or you can use the arrow buttons to cycle through the snapshots. By right-clicking on a thumbnail, you can choose to Copy or Delete that snapshot, or open the folder it is contained in.
F - Upload to Evernote
Clicking on this button will bring you to the Evernote tab. It will also automatically attach the picture or pictures you've selected to prepare them for upload to an Evernote notebook. See Pages 28 and 29 for more about Evernote.
Review mode

GETTING A GREAT IMAGE - FIVE CONSIDERATIONS
When configuring the camera for your desired image, you will be chiefly concerned with the following five elements:
- Image size - How large or small the subject appears in the frame (the window or screen). When dealing with text, it is essential the text appears large enough for its intended audience to read. See Pages 17 and 18.
- Orientation – How the image is oriented relative to the frame. Naturally, it is necessary to present text in an upright, readable orientation. See Pages 19 and 20.
- Exposure – Exposure is a measure of how much light is allowed to affect the image. Normally, you are seeking a medium exposure in which all the important details in the image can be viewed. Too little light will render a dark image that loses crucial details. On the other hand, too much light will result in a “blown-out” image that also loses detail. See Pages 21 and 22.
- Focus – You will normally want your image to be sharp as opposed to blurry, which concerns focus. See Page 23.
- Resolution – Resolution describes the amount of detail (information) an image holds. Higher resolutions communicate more detail, and are often necessary for large-screen projections. See Pages 24 through 26.
We will examine each of these five elements in turn.
IMAGE SIZE
For documents, your video capture is a balance between capturing as much of the document as possible, and making the text large enough on screen for your intended audience to read. Text size needs to be particularly large when the image is projected onto a screen for a group.
There are a few ways to change the image size:
- Change the position of the camera – VZ-1 HD's multi-jointed stand gives you a high degree of flexibility in camera placement. Alter any or all of the stand's three points of articulation in order to optimally position the camera.

natural_image
Illustration of a hand using a robotic arm to lift a lamp onto a square base, with an upward arrow indicating motion (no text or symbols present)
natural_image
Illustration of a hand using a desk lamp to lift a surface, with a downward arrow indicating force or direction (no text or symbols present)Stand's articulations presented in a couple positions
- Change the position of the subject – When capturing a document, you will likely position it on the tabletop, on the same plane as your VZ-1 HD base. When capturing close-up details or text passages from a document, you may find it handy to shift the document as you move from detail to detail, essentially scrolling through the text as necessary.

natural_image
Line drawing of a desk lamp with adjustable arm and screen, no text or symbols present
natural_image
Line drawing of a desk lamp with a screen and pointer, no text or symbols presentText document in one position under VZ-1 HD with camera lens capturing top half of document, then moved "up" so that the camera lens is capturing the bottom half of document
- Zoom – In the Camera mode of the Presenter software, the Zoom tab allows you to digitally “zoom in” to your subject to make it appear bigger, anywhere from 1x (default, or no zoom) to 6x (or 6 times normal) in whole number increments.
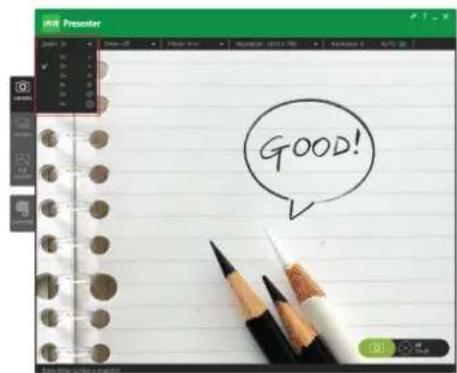
- Zoom Box – When zoomed in, a gray box appears in the lower-left of the capture window with a smaller box inside it. The large box represents the original field of vision (the 1x zoom), while the smaller box represents the zoomed-in area you are currently viewing. You can click and drag the smaller box to selectively zoom to different portions within the original field of vision.
Note: Focusing while zoomed in will focus according to the center of the original full image, and not the partial zoomed-in area.

- Capturing a Standard Sheet of Paper – At full extension, VZ-1 HD is designed to be high enough to capture an entire standard (A4) sheet of paper. However, you might elect to bring the camera closer to capture details from a particular document. Note that while the VZ-1 HD has ample resolution to capture larger A3-sized documents, VZ-1 HD would need to be placed on something (such as a stack of books) to make the camera high enough to completely capture an A3 document.
IMAGE ORIENTATION
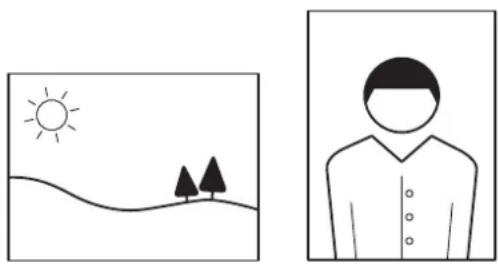
Two ways to describe page orientation come from the tradition of painting. Landscape refers to an image oriented so that its width is greater than its height, such as a classic landscape painting. Portrait orientation, on the other hand, features a height greater than its width, such as would be appropriate for a portrait painting. When deciding upon orientation, keep in mind whether the document to be captured is in landscape or portrait. You will need to control the orientation of your subject relative to the computer screen so that the text is presented in a readable fashion.
natural_image
Two simple line drawings: one depicting a sun and hills with trees, the other showing a person in uniform (no text or symbols)Landscape versus Portrait
CAMERA LENS ORIENTATION
The top of the VZ-1 HD camera lens is located 90° counterclockwise from the square top of the camera body. With the camera head in its fully-extended position, documents will need to be placed perpendicular to the camera stand (as opposed to parallel) for text to be rendered “right side up” and readable on screen.

Changing Orientation
There are several ways to change the orientation of your image:
- Change the orientation of the document/subject – You may find it easiest to simply change the orientation of the subject you are capturing: 90° in either direction or turning 180° “upside down.”
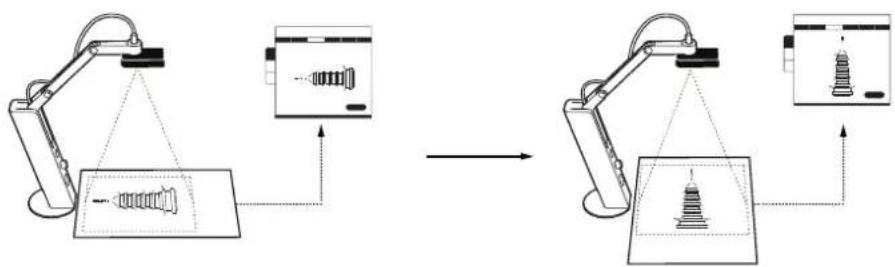
flowchart
graph TD
    A["Beam"] --> B["Beam Splitter"]
    B --> C["Displacement to Beam"]
    C --> D["Arrow from Beam Splitter to Arm"]
    D --> E["Beam Splitter with Beam"]
    E --> F["Displacement to Beam"]
    F --> G["Arrow from Beam Splitter to Arm"]
- Use the Swivel Head – VZ-1 HD's camera head is expressly designed to give you an easy way to alter orientation. From its fully-extended position, VZ-1 HD can be swiveled 180^ clockwise and 90^ counterclockwise. Find the position that works best for yourself and your subject. For example, if you are giving a presentation and need access to the subject for a hands-on demonstration or to frequently change its position, you might consider moving the stand to one side of the subject—and changing orientation through the swivel head accordingly—so that the stand does not get in your way.

natural_image
Diagram showing two robotic arms performing a manual operation with tools and a device (no text or symbols present)- Mirroring –in the Camera mode, the Mirror tab allows you to flip the image horizontally, vertically, or both. Mirroring defaults to Off (no mirroring). “Horizontal” flips the image on a vertical axis going through the center of the image, while “Vertical” flips the image on a horizontal axis going through the center of the image. The tab will indicate H (Horizontal), V (Vertical), or H + V if both types of mirroring are being applied.

flowchart
graph TD
    A["Set-up item to be captured Select the Mirror tab"] --> B["Laptop with 'a' icon"]
    B --> C["No Mirror Horizontal Mirror (H)"]
    B --> D["Vertical Mirror (V)"]
    B --> E["Horizontal + Vertical (H+V)"]
EXPOSURE
Exposure refers to the amount of light allowed to hit the photographic medium—in this case, the sensor of the camera lens. In most circumstances, you will require a medium exposure allowing for the maximum amount of detail.
Consider the following methods to achieve optimal exposure for your image:
- Change the exposure in the room: This could include using a desk lamp near the VZ-1 HD to shine additional light on the subject, turning on room lights, opening or closing curtains, etc.
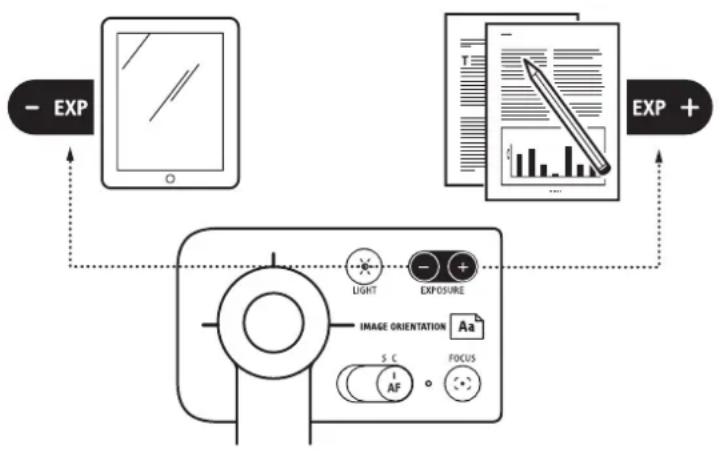
- Change the EXP (Exposure Value): VZ-1 HD is able to artificially alter exposure on a fifteen-point scale, with 1 being the lowest (darkest) exposure value, and 15 being the highest (brightest) exposure value. 8 is the default value. If your image is too dark, consider increasing the EXP. Or, if your image is too bright, decrease the EXP. The EXP may be changed on either the camera body itself or via the software.
Camera body: Use the EXP +/- toggle for on-the-fly exposure adjustments. The software will briefly indicate the change with an EXP number at the bottom of the image capture window, and your exposure will instantly change.
Software (PC or Mac only): Click on the Exposure tab. You may either click on areas within the grayscale bar to change EXP, or drag the pointer to a value. Hitting “Default” will bring the exposure back to the default value of 8.
- Press the Light button: An LED on the underside of the camera will cast light onto your subject. Press the button again to turn off the light
flowchart
graph TD
    A["EXP"] --> B["Device with screen"]
    C["EXP +"] --> D["Display with bar chart and pencil"]
    B --> E["Image Orientation"]
    D --> E
    E --> F["Light"]
    E --> G["Exposure"]
    E --> H["S C AF"]
    E --> I["FOCUS"]
- Use Auto Exposure: As the name implies, auto exposure automatically changes exposure in order to maintain a medium, optimum exposure in which the maximum amount of details are shown. If lighting conditions in the room or on the subject are changing, or if the subject emits its own varying amount of light (as with an LCD screen), you might consider auto exposure.
Automatic exposure adjustment depends upon two things: the EXP (Exposure Value, from 1 to 15), and the actual brightness/darkness of the subject.
Exposure Value - Auto exposure with an EXP setting of 10 will always be brighter than auto exposure with an EXP setting of 4, for one example.
Actual brightness/darkness – Auto exposure will react to changes in actual brightness/darkness. With auto exposure on, if you are capturing a bright iPad screen and it dims, the VZ-1 HD will adjust exposure to brighten the image. If the screen brightens again, VZ-1 HD will adjust exposure to darken the image.
- To Turn on Auto Exposure: Click the Auto tab in the Presenter software, and select "On." The sun icon next to Auto will turn green. VZ-1 HD will now constantly determine the optimal exposure for your image, and may adjust exposure at any time.
Note: Auto exposure should be turned to “Off” for stop-motion animation projects, which rely upon uniform, consistent exposure.
Focus
Focus refers to the convergence of light in your image. If your subject is “in focus,” light is properly converged at the right point. If your subject is “out of focus,” light has not properly converged at the right point. In most circumstances, you want your image to be sharp and in focus.
VZ-1 HD gives you a few tools to achieve proper focus, including the ability to automate focus for convenience.
- Focus modes: VZ-1 HD can be set to one of two focus modes using the Autofocus (AF) switch on the camera body. When using PC or Mac, the software will indicate which focus mode you are in with either "Single" or "Continuous" under "AF" in the lower right-hand corner of the screen.
Continuous (C) mode: In Continuous mode, VZ-1 HD will constantly determine the best focus for your image and change its focal length accordingly. This is ideal for “set it and forget it” convenience, and also if the distance between the camera and the subject will be changing. For example, if you are showing the parts of a phone and are flipping the phone around in a hands-on demonstration, setting the VZ-1 HD in Continuous mode will ensure your image is always in sharp focus.
Single (S) mode: In Single mode, VZ-1 HD will stay at a single focal length, and will not try to constantly adjust itself. This mode is ideal for manual control of focus. If you are capturing a text document laid on the table which is not moving, single mode will be sufficient for sharp focus. This mode is also best for the highest resolutions when frame rate drops significantly. See Page 26.
- Focus button: While the focus button is best for Single mode manual focus control, it will also work in Continuous mode. There are two focus buttons: the physical button on the camera body, and the four-cornered "crosshair" icon in the lower right-hand corner of the software. In either case, VZ-1 HD will find the optimum focus.

FOCUSING
When focusing, four corners of a red box will appear in the center of the screen and a beep will sound, letting you know VZ-1 HD is attempting to focus. The image may appear to slightly zoom in and out. When VZ-1 HD is done focusing, the red corners will change to green corners, and there will be two quick beeps. For disabling the beep sound effects, see Page 32, Advanced Settings.


RESOLUTION
Resolution describes the amount of detail (information) an image holds. High resolutions relay more information (and therefore more detail), and also consume more computing power. Low resolutions communicate less detail but are also less demanding of computer resources. Resolution is measured in pixels, the smallest part of a picture element. VZ-1 HD is capable of several high-definition resolutions.
CHANGING RESOLUTION (PC OR MAC)
To change resolution, click on the Resolution tab in Camera mode. There are eight different resolutions to choose from, ranging from 2592 x 1944 pixels (the highest resolution) to 640x480 pixels (the lowest resolution). As 1280 x 720 resolution (and above) is commonly accepted to be “high-definition” (HD), the top five resolutions are HD resolutions, while the three lower resolutions are standard-definition (SD) resolutions.

VGA RESOLUTION
When connecting directly to a monitor or projector via VGA, use the resolution selector on the front of the stand to change resolution. Please note that VZ-1 HD supports fewer resolutions in Projector mode than it does in Computer mode.
Auto. Res. (recommended): When Automatic Resolution is selected, VZ-1 HD will find the best resolution for your device, cycling from 1920x1080 pixels down to 640 x 480 pixels. If a resolution is not determined, VZ-1 HD will default to 1024 x 768 pixels.*
You may also manually select a resolution. 16:9 aspect ratio resolutions (1920 x 1080 and 720p) are on the left-hand side of the selector, while 4:3 aspect ratio resolutions (1024 x 768 and 800 x 600) are on the right.
*Note: If 1024 x 768 pixels resolution is not supported by your device (which would be unusual), the screen will appear black. In this case, turn the resolution selector to alternate resolutions.


flowchart
graph TD
    A[" "] --> B["800x600"]
    A --> C["1024x768"]
    A --> D["HD 720P"]
    A --> E["1920x1080"]
RESOLUTION AND FRAME RATE
Generally, as resolution increases, frame rate decreases. Frame rate is a measure of how many distinct images are captured in a single second to make up the full-motion video perceived.
Because the top resolutions contain an extraordinary amount of information, frame rate will significantly drop with these resolutions. You may experience a “stuttering,” “blurring,” or “strobing” of moving subjects, such as with a hands-on demonstration. As such, the top three resolutions are best reserved for static objects (such as a stationary piece of paper or LCD screen).
If you find the amount of strobing to be unacceptable on your current resolution, consider lowering the resolution, which will increase frame rate and reduce or eliminate strobing.
Focus Note: For the higher resolutions, Single Focus mode (rather than Continuous) is highly recommended.
Note on Highest Resolutions: See Page 8 for minimum system requirements for the two highest resolutions.
SNAPSHOTS (PC OR MAC ONLY)
VZ-1 HD has the ability to take snapshots, still images extracted from the current video capture. VZ-1 HD saves these snapshots in .jpg format onto your computer's hard drive.
Taking a snapshot is simple, and can be done in one of two ways:
-
Hit the "Enter" (Windows) or "Return" (Macintosh) key while using the Presenter software in Camera mode.
-
Click the green camera icon in the lower right-hand corner of Camera mode.

TAKING A SNAPSHOT
Once you take a snapshot, the screen will briefly go black, accompanied by a classic shutter sound effect, and then your snapshot will appear on screen in an Instant Preview. After another brief period of black, the video capture function will resume. For changing or disabling Instant Preview, and for disabling the shutter sound effect, see Page 32, Advanced Settings.
USING THE TIMER FUNCTION
The Timer provides a delay (in seconds) between the time you press the Snapshot button and the time when VZ-1 HD actually takes the snapshot. You might find this delay necessary to avoid any shake in the camera body that could result in a blurry image. Using the Timer eliminates this possibility.
When using the timer, a countdown will appear on screen, with beeps for each second.
The Timer, located in the Camera mode tab, can be set to either 3 seconds or 10 seconds. By default, the Timer is set to Off.

To review snapshots, enter Review mode. See Page 15.
EVERNOTE (PC OR MAC ONLY)
The Presenter software offers integrated support for Evernote, a useful notetaking application for PC, Mac, tablet computers and mobile devices. Evernote archives notes, web pages, images and more. Evernote is free to download and use, though there is a paid upgrade available for additional features.
Press the bottom Evernote tab on the left-hand side of the capture window to enter Evernote mode.
LOGGING IN TO EVERNOTE
If you do not have an Evernote account, you can create one through the Presenter software. Click the "Login" link in the upper-right of the Evernote mode window. You will be taken to an Evernote login screen where you can either create a new account or log in to your existing account. Enter username and password information.
Alternately, you can click on the green Evernote elephant icon button, which will open your browser and take you to the Evernote home page where you may sign up for an account.
After successful account creation or login, you will be asked if you wish to allow IPEVO access to your Evernote account. Click the Authorize button.
Once the Presenter software is successfully linked to your Evernote account, your username will appear in the upper-right, along with a Logout option.
Note: If you are using a public computer, please ensure you click Logout prior to shutting down the Presenter software. If you do not click Logout and you exit the software, you will still be logged in to Evernote the next time you (or someone else) runs the Presenter software on that computer. Also be sure to close out your browser.

Using VZ-1 HD FOR EVERNOTE
The Presenter software allows you to capture snapshots and then upload them (along with other files) to a notebook on your Evernote account. To do so:
-
Take a snapshot – Hit the "Take a Snapshot" button. You'll be taken to a window where you can take a snapshot that will save as a .jpg file to your hard drive. Taking a snapshot with "Take a snapshot" will automatically attach the snapshot and prep it for upload to Evernote.See Page 27for more on taking snapshots.
-
Attach your snapshots – Another way of attaching snapshots is to hit "Attach an Image." You will be taken to the folder where the software saves your snapshots. Select one or more files and press OK. In addition to your snapshots, other image files like .jpgs and .pngs can be conveniently attached for upload.
Clicking the delete button (the trash can icon on the right of the viewing window) will detach any selected picture(s) from your Attached Files grouping. Note that the delete button will not permanently delete the snapshots from your hard drive.
-
Review your snapshots – Selected snapshots appear in the thumbnail timeline in the upper-right of the Evernote mode window. Below the timeline is data about the selected snapshot including name, date taken, resolution and size. You can press Shift-Click (Windows) or CTRL-Click (Mac) to select snapshots from the thumbnails. Right-click on the selected thumbnails, and you will be given the option to Delete them, Copy them, or Go to Image Folder (the folder where the .jpgs are located).
-
Identify your note – In the lower-left, name your Note by entering text into the "Note Title" box. The default note title will contain the current date and time. Next, Specify the notebook destination using the Notebook drop-down box. Pressing the "+" New Notebook button will create a new Notebook in Evernote. This button will be grayed out if you are not logged in.
Clicking on the Go to Notebook button will open your browser and take you to the Evernote Notebook indicated in the Notebook text box. 2 3

- Upload to Evernote – A message in the lower-right will inform you how many files you have attached. To upload your selected files to Evernote, click the "Send to Evernote" button. The button will turn gray while your files are uploading. When the button returns to a green color, your files have been completely uploaded. A pop-up window will appear indicating how many files were successfully uploaded. These files will now appear in your Evernote application.
Note: Clicking the "View" button in the pop-up window will open a new tab in your browser and take you to the Evernote page of your notebook.and take you to the Evernote page of your notebook.
PROJECTING YOUR IMAGE (PC OR MAC)
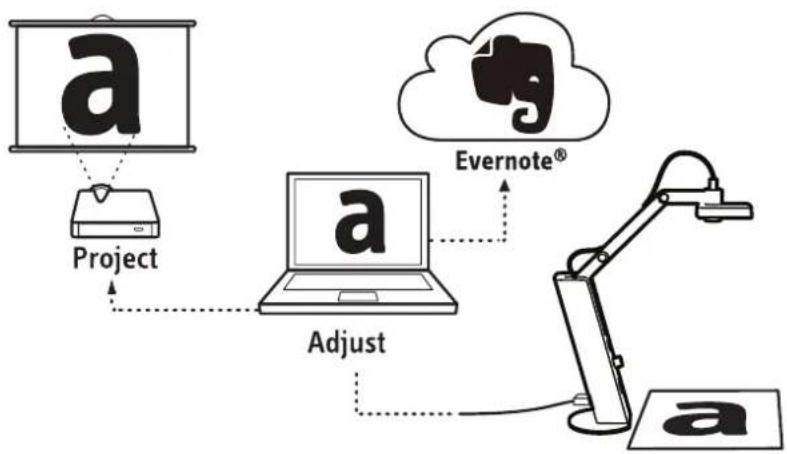
VZ-1 HD's image quality and high resolution are perfect for large-screen projections in the classroom or conference room. You may connect VZ-1 HD directly to a projector or monitor for this purpose as previous described (See Page 1d).
For projection when using PC or Mac, a separate projector device (not included, sold separately) is required.
In most cases, Full Screen mode is preferred for projection. To enter Full Screen mode, click on the “full screen” tab on the left-hand side of the software. Full Screen mode will give you the same functions available in Camera mode. To exit Full Screen mode, press the Esc key, or click the “Esc” button in the upper right-hand section of the screen.
flowchart
graph TD
    A["Project"] --> B["Adjust"]
    B --> C["Evernote®"]
    C --> D["Output"]
PREPARING FOR PROJECTION (PC OR Mac)
You'll need to mirror the content on your desktop (that is, the full screen of VZ-1 HD's video capture) and redirect it to your projector device. Please refer to your projector documentation for information specific to your projector.
The process of mirroring depends upon your operating system. Here are general guidelines for how to accomplish desktop mirroring in each operating system:
Mac OS
- Open "System Preferences."
- Click "Display." Set both displays to the same resolution.
- Click the "Arrangement" tab to click mirroring mode on or off.
- On MacBooks and some other Macs, mirroring mode can be toggled simply with the F7 key.
Windows XP
- Right-click the desktop, and click "Properties."
- In the dialog box, click the "Settings" tab.
- Click the "Display" list, and you should see the Projector model listed as an alternate display option.
- Select the projector, then click the option to "Extend my Windows desktop onto this monitor."
Windows Vista
Windows Vista will often automatically detect the projector and default into mirroring mode. If Windows can't identify the monitor, you can use Windows Mobility Center (available on mobile PCs) to connect the display:
- Click the "Start" button.
- Click "Control Panel."
- Click "Mobile PC," and then click "Windows Mobility Center."
- On the "External Display" tile, you can click "Connect display." There will be a "New Display Detected" dialog box. Press "OK" to connect the display.
Windows 7
- Windows 7 will pop up a display dialog box when you plug in the projector, with the title “Change the appearance of your displays.”
- The second set of options from the bottom is called "Multiple displays." Select "Duplicate these displays" to make the projector show your desktop.
Note: Many classrooms and conference rooms have dedicated consoles for facilitating projection. Please refer to your IT department for specific instructions.
ADVANCED SETTINGS (PC OR MAC ONLY)
There are a number of advanced settings available to you to further customize the VZ-1 HD experience. PC: In the upper right-hand corner of the Presenter software screen, along with the usual minimize and exit functions, there is a Help link (the question mark), which leads to the IPEVO.com website, and a settings link (the wrench), which leads to advanced settings.
IPEVD Presenter

Mac: Select VZ-1 HD > Preferences.
GENERAL TAB
- Select Video Device - This should be set to "IPEVO VZ-1 HD."
- Instant Preview – This sets the preview for snapshots taken. The default value is 2 seconds – that is, after taking a snapshot, the software shows the snapshot you have taken for 2 seconds before reverting back to video. You can set this value to 4 seconds, 2 seconds, or Off.
- Sound Effect on – By default, there are beep sounds associated with focusing VZ-1 HD, and shutter sounds associated with taking snapshots. To disable either or both of these sounds, uncheck the boxes.
- Photo Library Location – This controls where your snapshots are stored on your hard drive. Click “Change” to locate a new location where you’d like to store your snapshots.
- Photo Name Format – By default, your snapshots are saved in a "YYYY-MM-DD_4-digit" format: year, month, day, and then a unique four-digit number. You can change the prefix before the unique four digits by clicking the second option and entering in your desired prefix.
- Keep Camera Mode Settings – Each time the Presenter software starts up, it will use the default configuration. To disable this, click "Yes." The Presenter software will now keep your custom settings between uses.

Note: Regardless of the selections in "Keep Camera Mode Settings," the Presenter software will memorize all advanced settings.
IMAGE ADJUSTMENT TAB
The image adjustment tab provides a number of customizations relating to video image quality.
Brightness (0 to 255) - controls lightness or darkness
Contrast (0 to 31) - controls difference in color and brightness between different parts of the image
Gamma (0 to 127) - Gamma correction, affects gray levels and how the image is reproduced on the screen
Saturation (0 to 31) – controls the color saturation. Setting this value to 0 will result in a black and white image, while a value of 31 will result in very saturated, rich colors
Hue (-180 to 180) - affects reproduction of color information
Sharpness (0 to 15) - controls perceived sharpness/blurriness
The Default button changes the above customizations to their default values.

Note: Image qualities of snapshots cannot be altered (at least not in the Presenter software). You must change these settings prior to taking snapshots.
SYSTEM TAB
- About IPEVO Presenter – This section displays the software version currently in use. A “Check for updates” link is available, which will take you to the IPEVO website in order to check for the latest version.
- Language – Switch between English, Traditional Chinese, Japanese, French.
- Start Presenter when computer starts – If you click “Yes,” the Presenter software will start upon system startup. If “No,” you will need to manually start the software.

CLOSING AND EXITING THE PRESENTER SOFTWARE
To close the Presenter software:
Windows - Click the Close button at the top right-hand corner of the window, or press Alt + F4 while the software is active.
Macintosh - Click the Close button at the top left-hand corner of the window, or press Command + W.
Closing the software does not exit it entirely. To exit the Presenter application:
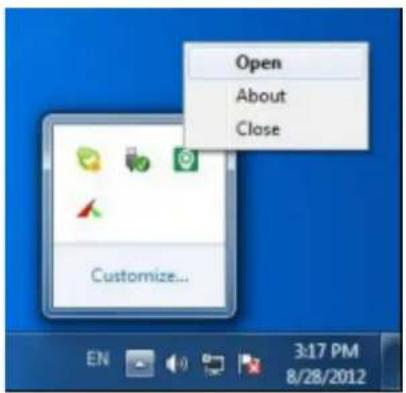
Windows - Right-click the VZ-1 HD taskbar icon, and select Close.
Macintosh - Select VZ-1 HD > Quit VZ-1 HD, or press the Command + Q quit shortcut.
KEYBOARD SHORTCUTS
Here is a list of keyboard shortcuts which may facilitate your use of VZ-1 HD:
| Function | Mode | Windows | Mac |
| Take snapshot | All | Enter | Return |
| Close window | Camera/Review | Alt + F4 | Command+ W |
| Close application | All | ---- | Command+ Q |
| Cancel Full Screen mode | Full Screen | Esc | Esc |
| Zoom in | Review | + / forward scroll | + / forward scroll |
| Zoom out | Review | - / backward scroll | - / backward scroll |
| Copy photo | Review | Ctrl + C | Command + C |
| Delete photo | Review | Del | Del / Command + Del |
| Switch to previous photo | Review | ← | ← |
| Switch to next photo | Review | → | → |
| Select all photos | Review | Ctrl + A | Command + A |
TROUBLESHOOTING AND FAQ
VZ-1 HD will not turn on (PC or Mac).
Ensure VZ-1 HD is plugged in to your computer with the USB cord.
Ensure the Presenter software from the CD-ROM is installed and running.
Ensure you have pressed the power button on the front of the stand.
Unplug the camera, exit the software, restart the software, and replug in the camera. Press the power button.
VZ-1 HD will not turn on (VGA monitor or projector).
Ensure VZ-1 HD is plugged in to your device with a VGA cable (not included).
Ensure the USB power adapter is connected and plugged into the wall.
Ensure you have pressed the power button on the front of the stand.
Unplug and replug in the camera. Press the power button.
No image shows up/the screen is dark (VGA monitor or projector).
Ensure VZ-1 HD is plugged in to your device with a VGA cable (not included).
Ensure the USB power adapter is connected and plugged into the wall.
Ensure you have pressed the power button on the front of the stand.
Select "Auto. Res." with the resolution selector on the front of the stand.
If still no image, select other choices with the resolution selector.
Unplug and replug in the camera. Press the power button.
There is a setting change I don't want that I can't get rid of.
Access the Advanced Settings, and click No on “Keep Camera Mode Settings.” Then, exit and restart the application.
The image is too dark/too bright.
Adjust the exposure. See Pages 21 and 22 for techniques.
The image is out of focus or pixelated.
Press the focus button to bring the subject into sharp focus. See Page 23 for focus techniques. Increase resolution for an image with more picture information. See Page 24.
The brightness of the image constantly seems to fluctuate.
Automatic exposure might be on, in which VZ-1 HD constantly adjusts for optimum brightness level.
Disable Automatic exposure. See Page 22.
Anything that moves on screen is very blurry and choppy.
Decrease resolution so that frame rate increases for smoother movement. See Page 24.
Can I record video with VZ-1 HD?
VZ-1 HD does not have the capability to record video. There are several third-party applications that may be used in conjunction with VZ-1 HD to record video. IPEVO cannot offer technical assistance for these third-party applications.
Does VZ-1 HD capture audio?
No, VZ-1 HD does not have a microphone.
All my snapshots come out blurry.
Enable Continuous mode to ensure the image is in sharp focus.
Hit the Focus button to achieve sharp focus.
Turn the Timer on so that camera shake does not contribute to a blurry image. See Page 27.
The focus beeps are annoying!
Disable sound effects in Advanced Settings under "Sound Effect on." See Page 32.
I can't upload to Evernote.
You must log in to Evernote using the "Login" link in the upper-right of the Evernote mode window.
You must further allow IPEVO access to your Evernote account. See Page 28.
Ensure you have attached files, and that the message in the lower-right indicates that you have more than 0 files attached. Then, press "Send to Evernote" to upload. See Page 29.
Ziggi-HD can't focus or is slow to focus when in HD resolutions(2048x1536 / 2592x1944).
Center the object or text in the central "crosshair" to help Ziggi-HD find a better focus.
SAFETY INFORMATION
For your safety and for the best performance of your VZ-1 HD USB/VGA Document Camera:
- Keep VZ-1 HD from coming into contact with heat sources such as radiators, stoves, and hot laptops.
- Do not immerse VZ-1 HD in liquids, and protect it from moisture.
• Supervise children using VZ-1 HD.
This device complies with Part 15 of the FCC Rules. Operation is subject to the following two conditions: (1) this device may not cause harmful interference, and (2) this device must accept any interference received, including interference that may cause undesired operation.
ACKNOWLEDGMENTS
- “Windows” is a registered trademark of Microsoft Corporation, registered in the US and other countries.
- “Mac” and “Macintosh” are registered trademarks of Apple Computer, Inc., registered in the US and other countries.
© 2013 IPEVO Inc. All rights reserved. IPEVO, IPEVO Presenter,VZ-1 HD,the IPEVO logo,and other IPEVO marks are owned by IPEVO Inc. and may be registered. All other trademarks are the property of their respective owners. All screen images are either simulated or properties of IPEVO Inc.

- VZ-1 HD VGA/USB Document Camera User Manual
- TABLE OF CONTENTS
- Focus 23
- Resolution 24
- VGA Resolution 25
- Resolution and Frame Rate 26
- Snapshots 27
- Evernote 28
- Evernote (cont'd) 29
- Projecting Your Image 30
- Preparing for Projection (PC or Mac) 31
- Advanced Settings 32
- Advanced Settings (cont'd) 33
- Closing and Exiting the Presenter Software 34
- Troubleshooting and FAQ 35-36
- Safety Information 37
- INTRODUCTION
- WHAT MAKES VZ-1 HD DIFFERENT?
- CONTENTS
- ABOUT THE PACKAGING
- GETTING HELP
- VIEWING YOUR SOFTWARE'S VERSION
- SYSTEM REQUIREMENTS
- Mac
- HIGHEST RESOLUTIONS REQUIREMENTS (PC OR Mac)
- INSTALLATION
- PC or Mac Installation
- PC
- MONITOR OR PROJECTOR INSTALLATION
- GETTING TO KNOW VZ-1 HD
- A-Stand
- B - Base
- C - USB port
- D - VGA port
- E - Power
- F - Resolution selector
- G - LED indicators
- H - Camera lens
- I - Swivel head
- J - EXP +/- (Exposure Value)
- K - Autofocus (AF) switch
- L - Focus button
- M - Light
- IPEVO PRESENTER SOFTWARE
- BASICS OF THE PRESENTER SOFTWARE
- A - Image Pane
- B - Menu
- C - Folder Icon
- D - Image Information
- E - Thumbnail Timeline
- F - Upload to Evernote
- GETTING A GREAT IMAGE - FIVE CONSIDERATIONS
- IMAGE SIZE
- IMAGE ORIENTATION
- CAMERA LENS ORIENTATION
- Changing Orientation
- EXPOSURE
- Focus
- FOCUSING
- RESOLUTION
- CHANGING RESOLUTION (PC OR MAC)
- VGA RESOLUTION
- RESOLUTION AND FRAME RATE
- SNAPSHOTS (PC OR MAC ONLY)
- TAKING A SNAPSHOT
- USING THE TIMER FUNCTION
- EVERNOTE (PC OR MAC ONLY)
- LOGGING IN TO EVERNOTE
- Using VZ-1 HD FOR EVERNOTE
- PROJECTING YOUR IMAGE (PC OR MAC)
- PREPARING FOR PROJECTION (PC OR Mac)
- Mac OS
- Windows XP
- Windows Vista
- Windows 7
- ADVANCED SETTINGS (PC OR MAC ONLY)
- GENERAL TAB
- IMAGE ADJUSTMENT TAB
- SYSTEM TAB
- CLOSING AND EXITING THE PRESENTER SOFTWARE
- KEYBOARD SHORTCUTS
- TROUBLESHOOTING AND FAQ
- VZ-1 HD will not turn on (PC or Mac).
- VZ-1 HD will not turn on (VGA monitor or projector).
- No image shows up/the screen is dark (VGA monitor or projector).
- There is a setting change I don't want that I can't get rid of.
- The image is too dark/too bright.
- The image is out of focus or pixelated.
- SAFETY INFORMATION
- ACKNOWLEDGMENTS
Brand : Ipevo
Model : VZ-1 HD
Category : Document camera