
FUSG50000 - Alarm bell ABUS - Free user manual and instructions
Find the device manual for free FUSG50000 ABUS in PDF.


| Product type | Alarm bell |
| Brand | ABUS |
| Model | FUSG50000 |
| Power supply | 2 AAA batteries (not included) |
| Dimensions (L x W x H) | 80 x 80 x 30 mm |
| Weight | 150 g |
| Sound range | Approx. 85 dB |
| Adjustable volume | Yes, 3 levels |
| Number of ringtones | 8 different melodies |
| Alarm function | Door opening detection |
| Installation | Screwed or adhesive (bracket included) |
| Use | Indoor and outdoor (IP44) |
| Material | ABS plastic |
| Color | White |
| Maintenance | Clean with a soft, dry cloth |
| Security | Audible alarm in case of intrusion |
| Spare parts | Batteries, wall bracket, screws |
| Warranty | 2 years |
Frequently Asked Questions - FUSG50000 ABUS
User questions about FUSG50000 ABUS
0 question about this device. Answer the ones you know or ask your own.
Ask a new question about this device
Download the instructions for your Alarm bell in PDF format for free! Find your manual FUSG50000 - ABUS and take your electronic device back in hand. On this page are published all the documents necessary for the use of your device. FUSG50000 by ABUS.
USER MANUAL FUSG50000 ABUS
Wireless external siren 2WAY (Installation instructions) ...6


Einlernen
Dear customers, many thanks for your purchase of this wireless external siren. In choosing our product, you now have a piece of equipment that is built according to state-of-the-art technology.
This product complies with current domestic and European regulations. Conformity has been proven, and all related certifications are available from the manufacturer on request.
To maintain this status and to guarantee safe operation, it is your obligation to observe these operating instructions! In the event of questions, please contact your local specialist dealer.

Pay attention to the notes and instructions in these operating instructions! If you do not follow these instructions, your guarantee claim becomes invalid! No liability can be accepted for resulting damages!
No part of the product may be changed or modified in any way.
Please take local regulations into consideration. In some European countries, the use of external sirens is forbidden or the maximum alarm duration is restricted. Contact your local authorities for more information.
When inserting the battery into the siren, a loud tone may be emitted by the signal transmitter. This may startle the operator. Ensure that you do not lose your balance or drop the siren.
Introduction
The FUSG50000 wireless external siren is an optional accessory for the Secvest 2WAY, Secvest-IP or Terxon 2WAY module. It is battery-driven and is used for visual and acoustic alarms.
Battery warning!
The device is supplied with direct current from a battery back. To guarantee a long working life and avoid fire and injury, please note the following:
- Do not dispose of the battery in domestic waste.
- The battery must not be burned.
- The battery must not come into contact with water.
- The battery must not be dismantled, pierced or otherwise damaged.
- The battery contacts must not be short-circuited.
- The battery must be kept away from small children.
• The battery cannot be recharged.
- The battery must not be directly exposed to heat or sunlight, and must not be stored in a place with a very high temperature.
Technical data
Sound pressure 105 dB (A) @ 1 m
Visual alarm Flashing LED bar (can be positioned at top or bottom)
Flash frequency 1 Hz
Sounds Alarm, Fire, Perimeter Warning, Conf-Beep
Radio frequency 868.6625 MHz
Range Up to 100 m (depending on the surrounding conditions)
Power supply 2 X 3 V alkaline battery pack or 1 X 7.2 V lithium battery pack* (*recommended if the siren is regularly exposed to sub-zero temperatures)
Battery service life Approx. 2 years
Dimensions 300 mm x 210 mm x 60 mm (HxWxD)
Weight 1200 g (without batteries)
Security level 2
Environment class IV
Operating temperature -25 °C to +60 °C
Ingress Protection Rating IP42
Housing material Polycarbonate (weatherproof)
Device diagram

1 Wall plate 2 Piezo emitter
3 Jumpers 4 Mainboard
5 Battery connection 6 Cover tamper contact
7 Battery pack 8 Spirit level
9 Housing screws 10 Cover
11 Housing screw holder 12 Wall break contact
13 Lens 14 Flashing LED bar
Installation
Using the wireless testing box, determine a suitable location for the wireless external siren. Make sure that the siren is mounted out of arm's reach (at least 3 metres above ground level). The siren should also be visible and audible from a long distance.
In order to guarantee problem-free operation, the siren must NOT be mounted in the following locations:
- Next to large metal structures (e.g. metal doors and frames, water tanks, vehicles and refrigerators).
- Next to the main power, water or gas lines.
- Within a metallic housing.
- Next to electronic devices, especially computers, photocopiers and radios.
Opening the housing and inserting the batteries
-
Remove the covers on the two housing screws. Loosen the screws until the siren can be opened.
-
Hinge the cover to the side and remove it.
-
Insert both alkaline battery packs from the side into the battery holders. Use the attached clip to feed the battery cable.
-
Connect the battery cable to the connections on the siren mainboard, paying attention to the correct polarity. Incorrect polarity can damage the battery or the siren.
-
When replacing the battery, first remove the cable from the connection on the mainboard. Pull the cable through the clip. Press the movable part of the battery holder downwards and remove the battery packs.
Pre-drilled holes for wall assembly are found on all four corners of the siren wall plate. Only use the enclosed screws and wall plugs for assembly. The built-in spirit level above the battery compartment facilitates the alignment of the siren. The length of the wall tamper contact can be set individually. This is made by trimming the pin.
Settings on the siren

- Jamming
The siren monitors jamming independently, but does not activate itself if jamming occurs.
Jumper inserted: Jamming on – The siren informs the control unit (default setting)
Jumper removed: Jamming off – No action
• Self-set under tampering (SAB mode)
Jumper inserted: SAB on – Self-set of the siren when tamper contact is open – information sent to the control unit. The siren switches off when the tamper contact is closed again or a response is received from the control unit (default setting).
Jumper removed: SAB off – No self-set when tamper contact is open, but the control unit is still informed. Depending on the settings, the control unit then gives the order for siren set (or not).
- Siren unset period: The acoustic siren switches off after the defined unset period or when a unset command is received from the control unit. The unset period changes according to the jumper position.
Jumper removed: 5 sec.
Jumper inserted to the left: 3 min.
Jumper inserted to the right: 15 min. (default setting)
These settings do not affect the flashing LED. This switches off after 15 minutes, at the latest.
Positioning of the flashing LED bar
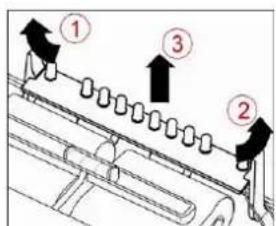
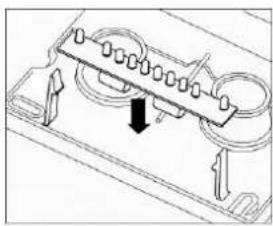
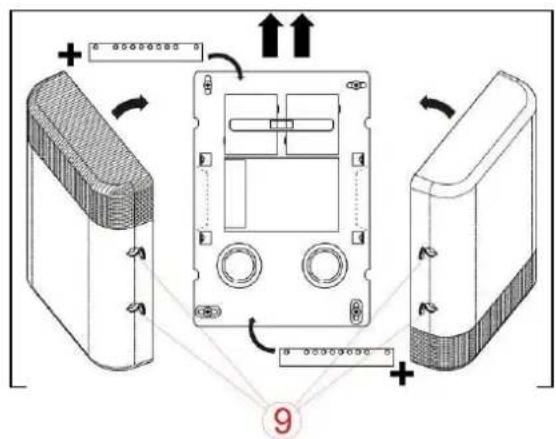
The flashing LED bar can be attached on the top or bottom inside the siren.
To reposition the flashing bar, first loosen the battery connections. Bend the holder clamps outwards and lift out the flashing bar. Pay attention to cable guidance of the flashing bar in the base plate and reattach the bar into the new position. Ensure that it is latched into place completely. Reattach the battery and close the housing. Make sure that the lens is aligned correctly.


Learning
- Set the Secvest wireless control unit into learning mode. Consult the instructions of the control unit for more details.
- Activate one of the two tamper contacts of the external wireless siren to send a tamper message to the wireless alarm system.
- Make sure that the siren is recognised by your wireless control unit, then close the housing. In doing this, ensure that the spring of the tamper contact sits correctly.
Settings on the control unit
The external wireless siren can acknowledge the set and unset of the alarm centre using the flashing LED bar or piezo. Consult the relevant chapter of the Secvest 2WAY, Secvest-IP or Terxon 2WAY Module installation manual for more details.
Maintenance
The flashing bar and siren should be checked on a regular basis. Both tamper contacts should be checked during maintenance. Check whether water or insects have entered through the housing. If necessary, clean the equipment accordingly and carry out preventative measures to stop future infiltration.
The batteries should be replaced every two years, or when a corresponding message is shown on the Secvest display.
ABUS Security-Center GmbH & Co. KG, hereby declares that the device with item number FUSG50000 complies with the essenal requirements and other relevant provisions of Direcve 1999/5/EG. The declaraon of conformity can be obtained from the following address:
Sounds Alarm, Fire, Perimeter Warning, Conf-Beep
Fréquence radio 868,6625 MHz
Poids 1 200g (sans batteries)
Ingress Protection Rating IP42


Apprentissage
Sounds Alarm, Fire, Perimeter Warning, Conf-Beep
Frequenza radio 868,6625 MHz
Ingress Protection Rating IP42

Apprendimento
Sounds Alarm, Fire, Perimeter Warning, Conf-Beep
Frequentie 868,6625 MHz
Ingress Protection Rating IP42
1 wandplaat 2 piëzo

Inlezen
Sounds Alarm, Fire, Perimeter Warning, Conf-Beep
Radiofrekvens 868,6625 MHz
Ingress Protection Rating IP42
Kabinetmateriale Polycarbonat (vejrfast)
Tegning


Indlæring


Programowanie

- EINLERNEN
- INTRODUCTION
- BATTERY WARNING
- TECHNICAL DATA
- DEVICE DIAGRAM
- INSTALLATION
- OPENING THE HOUSING AND INSERTING THE BATTERIES
- SETTINGS ON THE SIREN
- POSITIONING OF THE FLASHING LED BAR
- LEARNING
- SETTINGS ON THE CONTROL UNIT
- MAINTENANCE
- APPRENTISSAGE
- APPRENDIMENTO
- INLEZEN
- TEGNING
- INDLÆRING
- PROGRAMOWANIE
Brand : ABUS
Model : FUSG50000
Category : Alarm bell