
PI5000 - Chopper UFESA - Free user manual and instructions
Find the device manual for free PI5000 UFESA in PDF.


| Product type | Electric chopper |
| Brand | Ufesa |
| Model | PI5000 |
| Power | 500 W |
| Bowl capacity | 1.5 L |
| Bowl material | Tempered glass |
| Blades | Removable stainless steel blades |
| Number of speeds | 2 speeds + pulse |
| Ice crushing function | Yes |
| Cord length | 1 m |
| Dimensions (W x D x H) | 20 x 20 x 30 cm |
| Net weight | 1.2 kg |
| Power supply | 220-240 V, 50/60 Hz |
| Safety lock | Yes, if bowl not positioned correctly |
| Dishwasher safe | Bowl and lid compatible |
| Included accessories | Bowl, lid, chopping blade, pusher |
| Warranty | 2 years |
| Country of manufacture | China |
Frequently Asked Questions - PI5000 UFESA
User questions about PI5000 UFESA
0 question about this device. Answer the ones you know or ask your own.
Ask a new question about this device
Download the instructions for your Chopper in PDF format for free! Find your manual PI5000 - UFESA and take your electronic device back in hand. On this page are published all the documents necessary for the use of your device. PI5000 by UFESA.
USER MANUAL PI5000 UFESA
natural_image
White UzbekUFESA microgrid kitchen tool with control panel and branding (no visible text or symbols on device body)manual de instrucciones instructions manual mode d'emploi manual de instruções تعليمات التشفيل
ES EN FR PT AR
fse S
natural_image
White Ufesa brand hairdryer with a red background (no visible text or symbols on the device body)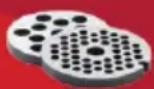


B

natural_image
Diagram of a mechanical component with labeled parts (no text or symbols present)


60° max




natural_image
Close-up of hands using a tool to adjust a metallic mechanical component (no text or symbols visible)
natural_image
Close-up of a hand turning a mechanical component with a circular housing (no text or symbols visible)
natural_image
Close-up of a kitchen tool with a magnified inset showing internal components (no text or symbols visible)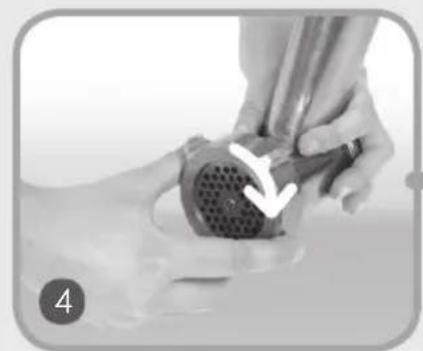
natural_image
Close-up of hands holding a mechanical component with a circular vent, no visible text or symbols

natural_image
Person assembling a white rectangular object on a metal kitchen grater, with a downward arrow indicating the process (no text or symbols visible)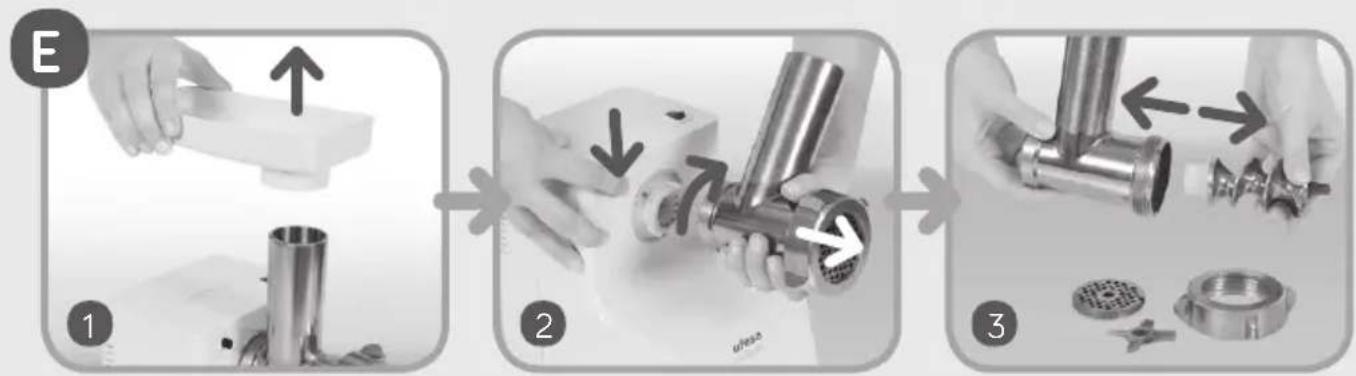

natural_image
Close-up of hands using a mechanical tool to adjust a component, with arrows indicating direction (no text or symbols visible)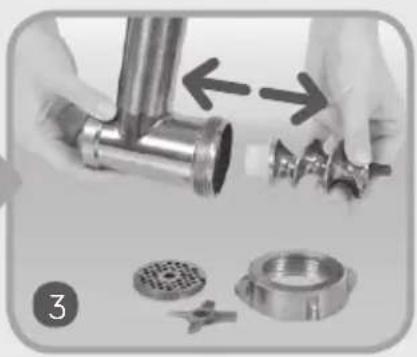
natural_image
Close-up of hands assembling a metal pipe fitting with mechanical components (no text or symbols visible)
H

natural_image
Close-up of hands handling a cylindrical device with a dotted patterned body, no visible text or symbols
natural_image
Close-up of a hand holding a small white object with a black arrow pointing to it, no visible text or symbols.
¡Estimado cliente!
Congratulations on your choice of our appliance, and welcome among the users of ufesa products. Please read these instructions carefully. Pay your special attention to important safety instructions. Keep this User's Guide for future reference.
Appliance features
The meat mincer is to be used within the household. It is a multifunctional appliance, which can be used for quick and effortless mincing of: meat, cheese, vegetables, poppy, as well as for manufacturing sausages and meat products. When an additional appliance of the meat mincer is used – that is the shredder, it is possible to slice vegetables into: salads, fresh vegetable salads and preserves.
Safety precautions and instructions for proper use of the appliance
Before starting to use the appliance, become familiar with the whole content of this user manual.
DANGER! / WARNING!
Risk of injury

- Do not actuate the meat mincer, if the power cord is damaged or the encapsulation is visibly damaged.
- If the non-detachable part of the cord is damaged, it should be replaced by the producer or at a proper service point or by a qualified person in order to avoid any hazards.
- The appliance can only be repaired by qualified service personnel. Improper servicing
may cause a serious hazard to the user. In case of defects please contact a qualified service center.
- Be extremely careful when operating the appliance in the presence of children.
- This appliance shall not be used by children. Keep the appliance and its cord out of reach of children.
• Appliances can be used by persons with reduced physical, sensory or mental capabilities or lack of experience and knowledge if they have been given supervision or instruction concerning use of the appliance in a safe way and if they understand the hazards involved.
• Children shall not play with the appliance.
- Turn off the device and unplug it from an outlet before replacing the equipment or approaching moving parts during use.
• Always disconnect the appliance from the supply if it is left unattended and before assembling, disassembling or clearing.
- The appliance must only be used with the feeder tray.
• Use the pusher only when pushing the food.
• Only use the appliance indoors at room temperature and up to 2000 m above sea level.
WARNING!
Risk of property damage

Do not pull the plug out from the network supply socket by pulling the cord.
Always plug the appliance to the mains (AC only) with voltage corresponding to that indicated on the rating plate.
Do not expose the meat mincer or its equipment to the temperature over 60^ C. By doing that you can damage the meat mincer.
In order to push use the pusher. Using other staffs may result in damaging the meat mincer and its drive. Do not overload the appliance with excessive amount of the product, or by pushing the product too hard (with the use of the pusher).
Assemble the mincing set accurately, as the improperly screwed mincing set can result in poor mincing quality, as well as it can cause blunting of the cutter knife and the screen. Blunt cutter knife and blunt screen should be replaced with a new one. When the meat mincer is operating, do not cover the ventilation holes in the casing.
Never immerse the drive unit of the meat mincer in water. Never wash it under the running water. Do not wash the equipment assembled within the drive unit.
Do not use aggressive detergents in the form of emulsion, milk, paste, etc. in order to wash the casing. Among others, they can remove the informative graphic symbols placed on the meat mincer, such as: scales, marks, warning signs, etc.
HINT
Information on the product and hints on its use

This appliance is intended for domestic use only. When the work is finished, pull the power cord out from the network supply socket.
When the machine does not start – contact the service point and leave the machine for servicing. Separate the meat, which is to be minced, from bones, tendons, cartilages and veins.
Before mincing, cut bigger parts into smaller elements. Do not mince dry poppy. Before mincing, the poppy needs to be washed with hot water and soaked in water – up to several hours (a dozen or so).
Use a soft brush in order to wash the metal parts. Do not wash the metal parts in the dishwasher.
Aggressive cleaning agents used in these appliances can cause darkening of the above-mentioned parts. Wash them manually, with the means of traditional dishwashing liquids.
Technical data
Technical parameters are given on the product's data plate.
Allowed time of continuous work of the meat mincer 10 minutes.
Required break before following use of the meat mincer 30 minutes.
Noise of the meat mincer (LWA) 80 dB/A.
Description

The meat mincer consists of:
1 Drive unit (there are some ventilation inlets in rear casing of the drives)
1a Switch
1b Lock button
Mincing set, which consists of:
2 Mincing chamber
3 Feed screw with assembled coupling
4 Double-side cutter
5 Screen with 4mm holes
6 Ring collar
7 Food tray
8 Pusher
Equipment, which includes:
9 Screen with 8 mm holes
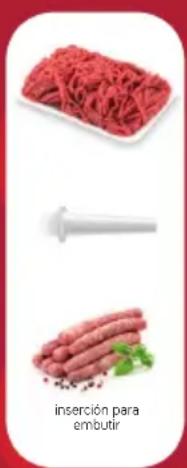
10 Sausage stuffer
11 Separator
Mechanical safety device for the motor

1 Scroll
2 Clutch
3 Screw M5x20
The meat mincer is equipped with mechanical protection, which secures the motor against any damage - teeth of the coupling break, when the meat mincer is overloaded (f. ex. when bones have entered into the mincing chamber).
The broken coupling should be replaced with a new one:
- unscrew the coupling from the feed screw (3),
- remove the broken coupling (2),
- put on the new coupling (2) and screw it (3).
Preparing the meat mincer to work and the actuation of the appliance

1 Place the drive (1) unit close to the power network socket, on a firm surface so as not to cover the ventilation holes within the casing.
- Before the first use of the meat mincer, wash the equipment elements.
- Assemble the appropriate equipment and join it with the drive unit.
2 Plug in the unit.
3 Turn the meat mincer on with the main switch (1a).
Operating the mincing set

Insert the following parts into the mincer body (2):
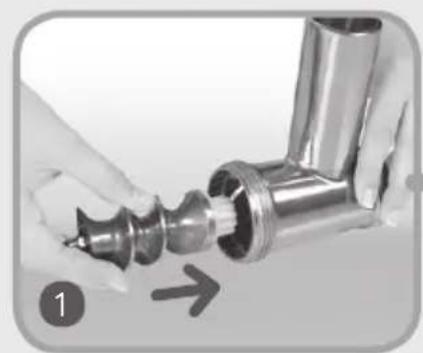
1 Insert the scroll (3) with the coupling facing inside.
2 Fit the knife (4) onto the pin of the scroll (3).
3 Place the screen (e.g. 5) over the knife so that the protrusion in the mincer body will fit into the groove in the circumference of the screen.
4 Tightly fit all the elements of the mincer unit.
5 Fit the assembled mincer unit onto the drive unit (1) and turn it until you hear a click of the lock. It means that the body has been properly installed.
6 Place the tray (7) on the mincer body (2).
Use only the pusher (8) to push products.

Operating the sausage stuffer

Insert the following parts into the mincer body (2):
1 Insert the scroll (3) with the coupling facing inside.
2 Fit the insert (11) onto the pin of the scroll (3).
3 Fit the sausage stuffing tube (10).
4 Tightly fit all the elements with the threaded ring (6).
5 Fit the assembled mincer unit onto the drive unit (1) and turn it until you hear a click of the lock.
6 Place the tray (7) on the mincer body (2).
Soak the casing for about 10 minutes before fitting.
• Fit the wet casing on the sausage filler nozzle.
Make sure the not to block the ventilation openings on the nozzle.

The meat cannot be „too thin”. A large liquid content may cause its leakage to the inside of the mincer.

Shredder

1 Fine grating disc
2 Coarse grating disc
3 Slicing disc
4 Pureeing disc
5 Locking tab
6 Body
7 Tray
8 Pusher
The shredder is equipped with two drums to grate into small and bigger chips (cheese, carrot, celery, baked beetroots, etc.). The third grating drum (slicing drum) is used to grate vegetables (potatoes, onion, cucumbers, etc.). The fourth grating drum (pulping drum) is used to mash vegetables (potatoes, beetroots, etc) and fruit.
Operating the shredder

1 Recline the catch (5) and put one of the drums with the clutch facing the middle of the chamber.
2 Snap the catch (5).
3 Assemble the chamber of the shredder (6) just as like mincing chamber.
- Cut large products into smaller elements, which you can easily put into the mincing chamber.
- Do not mash soft fruits containing stones.
- When the work is finished pull the power cord out from the network supply socket.
- Remove the food remaining in the shredder chamber or on the grater with a wooden spoon.
Blades of the drums do not require any regeneration.

After the work has been finished

- Turn off the unit and unplug it.
1 Remove the pusher (8) and remove the food tray off the mincing chamber (2) or the shredder chamber.
2 Press the safety lock (1b) and turn the mincing set or the grating chamber into right and take it off.
3 Take apart all the elements of the mincing set, the chamber with the sausage stuffer or the shredder.
Cleaning and maintenance

Always unplug the appliance before cleaning.

- Clean the drive with a wet cloth, with an addition of dishwashing liquid.
- Wash the plastic parts in warm water, with addition of the dishwashing liquid.
- Wash the metal parts in hot water, with addition of the dishwashing liquid.
- Carefully dry the washed elements.
- Grease the screens and the cutter knife with edible oil in order to secure them against rusting.
- Assemble the dry parts of the mincing chamber or the shredder.
Meat, vegetable and fruit dishes

In order to maintain the most of the nutrition value of the vegetable and fruit dishes, familiarise yourself with the methods of preparing them. Do not hold vegetables or fruits in water and mash them just before serving and eating.
Minced pork chops
50 dag of pork meat, 6 dag of stale bread, 5 dag of onion, 2 dag of fat, 1 egg, 4 dag of crumbs, oil for frying, salt and pepper.
Soak the bread in water and drain. Cut the onion in slices, fry until it reaches a golden colour. Rinse the meat with water, cut into pieces. Mince bread, onion and meat twice in the meat mincer, using the screen with 4 mm holes. Add the egg, salt, pepper and carefully mix into unified mass. Form 8 oval pork chops, 1,5 cm thick, which then cover with crumbs. Fry on hot oil.
Pâté made of mixed meat
50 dag of pork meat, 50 dag of veal, 40 dag of pork fat, 50 dag of liver, 30 dag of onion, 20 dag of wheat bun, 4 eggs, salt and pepper, nutmeg.
Braise the meat with pork fat and onion. Clean the liver, peel the membranes off, dice. When the meat is soft, add the liver, bun and braise together for a short time. Let the ingredients cool down and mince them twice in the meat mincer, using the strainer with 4 mm holes. To the prepared mass add eggs, salt, peppr, nutmeg and carefully mix.
Grease the form with lard, put the pâté into the form and bake for abour 40 minutes.
Homemade sausage
Semi fat pork meat 4,5 kg, pork fat 0,5 kg, bone stock - 1 glass, salt 6-7 teaspoons, saltpetre 1 flat teaspoon, pepper 1 teaspoon (ground pepper), allspice 12-15 grains (grind), garlic 5-6 cloves (mince), sausage intestine 7 m.
Mince the meat using the strainer with 8 mm holes. Mix the salt with the saltpetre and spices, and add them to the minced meat, and mix them, gradually adding the bone stock. Put it in a cool place for 24 hours. Place the sausage stuffer on the mincing chamber. Fill in the intestine, about 1 m long, forming segments, which are 30–40 cm long. Pay special attention not to cover the venting holes within the attachment.
Dry the sausage for about 6 hours. Smoke with warm smoke for about 14 hours or hot smoke for about 2,5 hours.
Red cabbage fresh salad
40 dag of red cabbage, 20 dag of apples, 2 teaspoons of oil, lemon juice, salt and sugar.
Clean the red cabbage and slice it in a shredder, using the drum for slicing or thick chips. Mix the sliced cabbage with mashed apples, adding oil lemon juice, salt and sugar, according to one's own taste.
Celery salad
40 dag of celery, 20 dag of apples, 2 spoons of oil or cream, lemon juice, salt, pepper.
Slice the celery into small chips. Add cream or oil according to one's own taste. Add sugar, lemon juice and salt.
Disposal

Dispose of packaging in an environmentally-friendly manner. Our goods come in optimised packaging. This basically consists in using non-contaminating materials which should be handed over to the local waste disposal service as secondary raw materials.

This appliance is labelled in accordance with European Directive 2012/19/EU concerning used electrical and electronic appliances (waste electrical and electronic equipment
- WEEE). The guideline determines the framework for the return and recycling of used appliances as applicable throughout the EU. Please ask your specialist retailer about current disposal facilities.
The manufacturer does not accept any liability for any damages resulting from unintended use or improper handling.
The manufacturer reserves his rights to modify the product any time in order to adjust it to law regulations, norms, directives, or due to construction, trade, aesthetic or other reasons, without notifying in advance.
Cher client!
Estufar as carnes com o toucinho e a cebola.
.(waste electrical and electronic equipment - WEEE)
E
بعد انتهاء العمل
● ● ● ● ● ● ● ● ●
• من التيار.
1

- fse S
- Appliance features
- Safety precautions and instructions for proper use of the appliance
- DANGER! / WARNING!
- Risk of injury
- WARNING!
- Risk of property damage
- HINT
- Information on the product and hints on its use
- Technical data
- Description
- Mechanical safety device for the motor
- Preparing the meat mincer to work and the actuation of the appliance
- Operating the mincing set
- Operating the sausage stuffer
- Shredder
- Operating the shredder
- After the work has been finished
- Cleaning and maintenance
- Always unplug the appliance before cleaning.
- Meat, vegetable and fruit dishes
- Minced pork chops
- Pâté made of mixed meat
- Homemade sausage
- Red cabbage fresh salad
- Celery salad
- Disposal
Brand : UFESA
Model : PI5000
Category : Chopper