
TN20350 - Ironing board SIEMENS - Free user manual and instructions
Find the device manual for free TN20350 SIEMENS in PDF.


| Product type | Ironing board |
| Brand | Siemens |
| Model | TN20350 |
| Dimensions (L x W x H) | 120 x 38 x 75-95 cm |
| Weight | 5.5 kg |
| Board material | Coated steel, foam and cotton |
| Adjustable height | Yes, 5 positions |
| Folding legs | Yes, with locking system |
| Iron hook | Yes, removable |
| Cord holder | Yes, integrated |
| Maximum load | 10 kg |
| Care and cleaning | Clean the cover with a damp cloth, do not use abrasive products |
| Safety | Safety lock in folded position, non-slip pads |
| Spare parts and repairability | Replacement cover available, board and legs not removable |
| Warranty | 2 years |
Frequently Asked Questions - TN20350 SIEMENS
User questions about TN20350 SIEMENS
0 question about this device. Answer the ones you know or ask your own.
Ask a new question about this device
Download the instructions for your Ironing board in PDF format for free! Find your manual TN20350 - SIEMENS and take your electronic device back in hand. On this page are published all the documents necessary for the use of your device. TN20350 by SIEMENS.
USER MANUAL TN20350 SIEMENS
Operating instructions
natural_image
Black folding table with metal frame and support legs, no visible text or symbols on the device itselfactive ironing board TN20
Index
DEUTSCH 4
ENGLISH 9
FRANÇAISE 14
ITALIANO 19
NEDERLANDS 24
DANSK 29
NORSK 34
SVENSKA 39
SUOMI 44
ESPAÑOL 49
PORTUGUÊS 54
ΕΛΛΗΝΙΚΑ 59
TÜRK 64
POLSKI 69
MAGYAR 74
УКРАЇНСЬКА 79
РУССКИЙ 84
ROMÂN 90
العربية 99
natural_image
Illustration of a rocket inside a box with an upward arrow indicating airflow or motion (no text or symbols)natural_image
Diagram showing a mechanical component with a hook and a downward arrow, no text or symbols presentBEDIENUNGSANLEITUNG
Thank you for buying the active ironing board TN20 ironing board from Siemens.
Carefully read through the operating instructions for the appliance and safeguard them for future reference.
When using your steam station/iron for the first time, it is essential to read the instructions for use which came with the steam station and iron.
This appliance complies with international safety standards.
General safety instructions
- The steam station/iron must be used and placed on a stable surface. When using the stand make sure that the surface it is placed on is stable.
- Do not use the steam station/iron it has been dropped, there is visible damage, or it is leaking water. In these cases, have it checked by an authorized Technical Service Centre before using it again.
- Unplug the appliance from the mains supply before leaving it unattended.
- This appliance should only be used by children over 8 years old and persons with reduced physical, sensory, or mental capacities, or who lack experience and knowledge, under supervision and after they have been taught how to use the appliance safely and understand the dangers involved. Children should not be allowed to play with the appliance. Children should not be allowed to clean or practice user maintenance without supervision.
- Keep the iron and its cord out of reach of children younger than 8 years old when it is plugged in or cooling down.
-
To avoid dangerous situations, any work or repair that the appliance may need, e.g. replacing a faulty mains cable, should only be carried out by qualified personnel from an authorized technical service centre.
-
The ironing board should only be used for its intended purpose and not as a rest support, stool, etc.
- Packaging materials (plastic bags, polystyrene, etc.,) are a potential source of danger and must be kept out of reach of children.
- Check the condition of the appliance when it is unpacked. If in doubt, do not use the appliance and consult a qualified technician.
- This appliance has been designed exclusively for domestic use and should not be used for industrial purposes.
- This appliance should be connected to the mains supply and used in accordance with the information stated on its specifications plate. This appliance must be earthed.
- The electric socket should be earthed and equipped with a suitable automatic circuit breaker.
- The auxiliary power outlet should only be used for ironing systems with power consumption no higher than marked on the marking plate and the power outlet of the ironing board.
- This appliance must be connected to an earthed socket. If it is absolutely necessary to use an extension cable, make sure that it is suitable for 16A or more, and the socket has an earth connection. The extension cable must be completely unrolled prior to use.
- Do not switch on the appliance if the power cable is damaged or if there is a possibility it has been damaged, even if not visible (e.g. the appliance has been dropped, etc.).
- Do not touch the appliance with wet or damp hands.
- Keep live parts (switch, plug, electronic components, etc.) from coming in contact with water.
-
Only dry or damp cloths should be ironed, never wet ones.
-
Unplug the appliance from the mains supply after each use, before cleaning, or if a malfunction is suspected.
- Do not let the mains cord hang down.
- Always loop the ironing board's cord loosely. Avoid kinks in the cord.
- Keep the power cord away from sharp edges.
- Do not pull on the cable when removing the electrical plug from the socket.
- Do not allow any moisture to come into contact with electrical components.
- Do not insert any objects into openings on the appliance or use the appliance if an opening is blocked.
- Make sure there is nothing blocking the air outlet underneath the iron rest.
- Do not use the appliance if there are flammable and / or explosive gasses or fumes present.
- The ironing board must always be used in a dry environment and not outdoors. It must always be set up in a safe location on a level surface. The height adjustment setting of the ironing board must always be in the locked position.
- Do not leave the appliance exposed to the elements (rain, sun, frost, etc.).
- Do not move the ironing board or adjust the height level while in use, so that the steam station or iron does not fall off or the ironing board close up.
- Disconnect the appliance from the electrical socket after use and before any maintenance or cleaning.
- Store the appliance in a dry place. After use store the appliance in a safe place out of the reach of children.
- Only manufacturer recommended accessories should be used.
Electrical connection
For your safety please read the following information.
Warning: This appliance must be earthed.
The appliance must be connected to a 220-240 volts 50 cycle AC supply by means of a three pin socket, suitably earthed and should be protected by a 13A fuse in the plug.
The appliance is supplied with a rewireable 13A 3 pin plug fitted with a 13A fuse. Should the fuse require replacement, it must be replaced with a fuse rated at 13A and approved to BS1362. If the mains plug is unsuitable for the socket outlet in your home or is removed for any other reason, then the cut off plug should be disposed of safely to prevent the hazard of electric shock. There is a danger of electric shock if the cut off plug is inserted into any 13A socket outlet.
Unpacking
Keep these operating instruction safe and pass them on to other users.

natural_image
Illustration of a missile inside a box with an upward arrow indicating motion (no text or symbols)- Remove the ironing board from the box.
- Check that the following items are included in the box:
- Ironing board.
- Iron cord support.
- Iron rest mat.
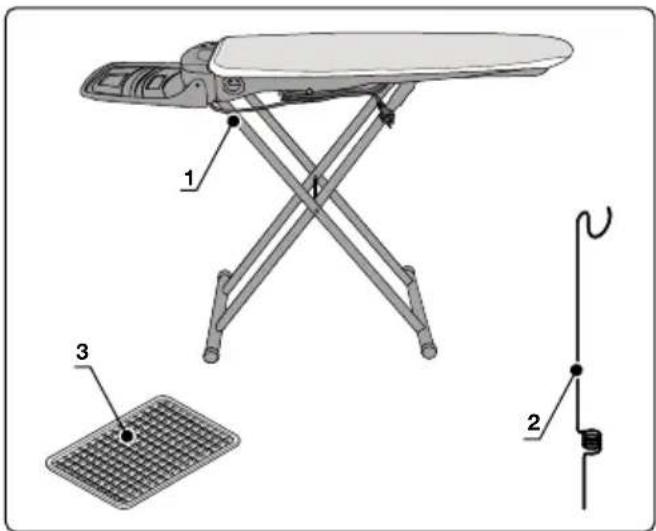
Dispose of all plastic bags included in the packaging, they may become a dangerous toy for children!.
Note: Retain the rest of the packaging for future use. (e.g. house moving, servicing, repair etc.).
List of parts and controls

- Auxiliary power supply socket Max 2760W.
- Iron cord support.
- Selector switch.
- Power indicator light.
- Power ON-OFF switch.
- Iron rest mat.
- Power supply cable.
- Board height adjustment lever.
- Iron storage shelf.
Instructions for use
POSITIONING
When setting up the ironing board please note the following:
- Place the ironing board on a flat, even, dry surface, near an earthed mains socket.
- Position the ironing board securely so that nobody can knock it over or get hurt.
- Never put the appliance on or near warm surfaces or near flames.
- Use the appliance in dry rooms only.
- To avoid scalding, keep the appliance away from children.
- Use only the correct extension cables; be careful not to trip over the cord.
Put up the ironing board as follows:
- Place the ironing board upright on the floor (iron storage shelf end downward).
- Hold the end of the ironing board with one hand.
- With the other hand hold the upper part of the ironing board legs.
- Firmly pull the ironing board wide apart ①, until the adjustment height device locks in place ②.
- Place the ironing board in a horizontal position ③.
- To adjust the height, take hold of the ironing board with both hands. Lift the ironing board up slightly and pull the lever with one hand.
(The ironing board has to be slightly raised for safety reasons, i.e. to prevent the lever from being activated accidentally.) Only when you hear the ironing board lock into place is it secure.
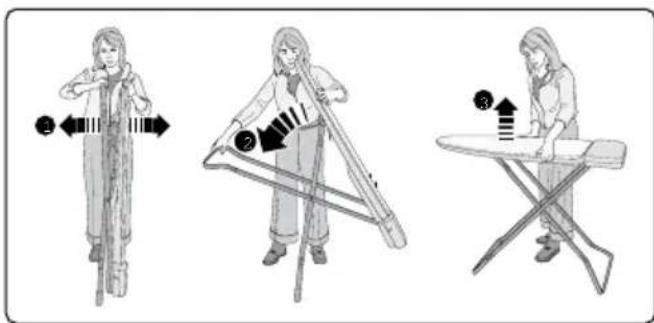
Note: Be careful that the feet of the ironing board don't slip on smooth floors while opening/closing the ironing board.
- Insert the iron cord support in one of the small holes each side of the ironing board and hang the steam power cord. The iron cord support prevents unwanted movement by cord drag of the garment being ironed as well as the wear of the steam power cord.
There are two holes one each side at the rear end of the ironing board so that the cord support can be positioned for right or left handed use.

natural_image
Diagram showing a mechanical component with a spring and hook, no text or symbols presentSTART UP
If you are using a steam generator:
- Place the iron/steam generator on the shelf.
- Place the iron (soleplate down) on the iron rest mat which should be positioned at the rear end of the ironing surface.
- Plug the power supply cord from your iron/steam generator into the auxiliary socket built-in to the ironing board.
- Plug the power supply cord from your ironing board into a 13amp wall socket and switch the socket on.
- Switch the equipment on using the power on/off switch. The power on/off switch activates the ironing board and the steam generator or steam iron plugged into the auxiliary socket. An integrated thermostat constantly controls the board heating temperature. During the heating phase the equipment may emit noises. This is a normal phenomenon, which is nothing to worry about.
If you are using a steam iron:

SUCTION FUNCTION AND HEATING OF BOARD
The suction absorbs the superfluous steam, which is no longer used after the ironing process. The suction helps hold the garment on the ironing surface and helps to dry the garment. Clean ,dry clothes are obtained, ready to be placed straight in the wardrobe without further airing. The heated ironing surface stays dry, and keeps the steam
hot so that it passes through the cover and board to be expelled without condensing.
Recommendation:
- Through the suction function, light fabrics (silk etc.) can be held in place on the ironing board, preventing them from slipping.
- The suction function cools the fabric and fixes the results of the ironing, guaranteeing. perfect folds
BLOWING FUNCTION
The blowing allows you to iron without downward pressure on a cushion of air. This makes ironing of delicate items, or difficult areas (trousers folds, pockets, seams, difficult areas to reach), much easier and avoids the false ceases that seam crushing can produce.
- For continuous suction function set the selector switch on position "I".
- For continuous blowing function set the selector switch on position "II".
- With the switch in position "0" suction and blowing functions are switched off.

Important: Do not rest the warm iron directly on the iron storage shelf, always use the iron rest mat included.
After ironing
- Leave the board on for 10 minutes to dry the cover and remove any possible condensed water from the board.
- Turn off the ironing board using the power on/off switch.
- Remove the plug from the socket.
- Let the equipment cool completely.
- Remove the iron cord support.
- Place the iron on the iron rest pad.
- Unplug the iron/steam generator from the auxiliary socket and remove it from the board.
- Fold the shelf back over the ironing surface.
- Wind the power supply cord on to the cord winder lugs beneath the board.
-
Hold the board leg with your foot to stop it skidding.
-
Operate the height adjustment lever and close the board.
Note: do not entangle the power cord. - Store the closed board in a vertical position with the folded shelf end towards the floor.
- Always ensure that the board does not skid and tilt. Store the equipment in a dry place and out of reach of the children.
Maintenance
Changing the cover
For safety reasons (heated board surface) and to guarantee a perfect operation of the product we recommend that you use only Siemens ironing board covers.
Metalised heat reflective covers and covers with thick lining are not suitable for this equipment and may cause overheating of the suction motor.
Original covers and other accessories are available from authorised technical service centres.
Accessory code
(After-sales)
576007
Warning:
In case of failure, of faulty equipment or if damage due to falling over is suspected, immediately remove the plug from the socket. Repairs should be exclusively performed at the authorised Service Centre. Repairs performed by unskilled personnel may cause serious dangers for users. Responsibility is declined for damages caused by repairs performed by unskilled personnel. In these cases the warranty right is also cancelled.
Advice on disposal
Our goods come in optimised packaging. This basically consists in using non-contaminating materials which should be handed over to the local waste disposal service as secondary raw materials. Your local town council can give you information about how to dispose of obsolete appliances.

This appliance is labelled in accordance with European Directive 2012/19/EU concerning used electrical and electronic appliances (waste electrical and electronic equipment - WEEE).
The guideline determines the framework for the return and recycling of used appliances as applicable throughout the EU.
You can download this manual from the local homepages of Siemens.
natural_image
Illustration of a device inside a box with an upward arrow indicating motion or flow (no text or symbols)natural_image
Technical line drawing of a mechanical component with a hook and threaded rod (no text or symbols)MISE EN MARCHE
natural_image
Illustration of a missile inside a box with an upward arrow indicating motion (no text or symbols)natural_image
Diagram showing a mechanical component with a spring and hook, no text or symbols presentINIZIARE A UTILIZZARE L'APPARECCHIO
natural_image
Illustration of a missile inside a box with an upward arrow indicating motion (no text or symbols)natural_image
Diagram showing a hook being inserted into a curved mechanical component with a downward arrow indicating force or direction (no text or symbols present)OPSTARTEN
natural_image
Illustration of a missile inside a box with an upward arrow indicating motion (no text or symbols)natural_image
Diagram showing a mechanical component with a hook and spring, no text or symbols presentKOM GODT I GANG
natural_image
Illustration of a missile inside a box with an upward arrow indicating motion (no text or symbols)natural_image
Diagram showing a mechanical component with a hook and spring, no text or symbols presentTA STRYKEBRETTET I BRUK
natural_image
Illustration of a missile inside a box with an upward arrow indicating motion (no text or symbols)natural_image
Diagram showing a mechanical component with a spring and hook, no text or symbols presentKOMMA IGÅNG
natural_image
Illustration of a missile inside a box with an upward arrow indicating motion (no text or symbols)natural_image
Diagram showing a hook being inserted into a curved mechanical component with a downward arrow indicating force or direction (no text or symbols present)PÄÄLLE KYTKEMINEN
natural_image
Illustration of a missile inside a box with an upward arrow indicating motion (no text or symbols)natural_image
Diagram showing a mechanical component with a hook and a downward arrow, no text or symbols presentPUESTA EN MARCHA
natural_image
Illustration of a missile inside a box with an upward arrow indicating motion (no text or symbols)natural_image
Diagram showing a mechanical component with a hook and a downward arrow, no text or symbols presentLIGAR O APARELHO
Se estiver a utilizar um gerador de vapor:
- Coloque o ferro/gerador de vapor na prateleira.
natural_image
Illustration of a missile inside a box with an upward arrow indicating motion (no text or symbols)natural_image
Technical line drawing of a mechanical component with a hook and threaded rod (no text or symbols)ENAPEH
natural_image
Illustration of a missile inside a box with an upward arrow indicating motion (no text or symbols)natural_image
Diagram showing a mechanical component with a hook and directional arrow, no text or symbols presentÇALIŞTIRMA
natural_image
Illustration of a rocket inside a box with an upward arrow indicating airflow or motion (no text or symbols)natural_image
Diagram showing a mechanical component with a hook and a downward arrow, no text or symbols presentURUCHAMIANIE
natural_image
Illustration of a missile inside a box with an upward arrow indicating motion (no text or symbols)natural_image
Diagram showing a mechanical component with a spring and hook, no text or symbols presentVASALÁSI ELŐKÉSZÜLETEK
natural_image
Illustration of a missile inside a box with an upward arrow indicating motion (no text or symbols)natural_image
Technical line drawing of a mechanical component with a hook and downward arrow indicating motion (no text or symbols)ПОЧАТОК РОБОТИ
natural_image
Illustration of a rocket inside a box with an upward arrow indicating flight direction (no text or symbols)natural_image
Technical line drawing of a mechanical component with a hook and spring, no text or symbols presentНАЧАЛО РАБОТЫ
natural_image
Illustration of a missile inside a box with an upward arrow indicating motion (no text or symbols)natural_image
Diagram showing a mechanical component with a hook and spring, no text or symbols presentPORNIRE
natural_image
Technical line drawing of a mechanical component with a hook and spring, showing internal structure (no text or symbols)
natural_image
Illustration of a device inside a box with an upward arrow indicating motion or flow (no text or symbols)
- Index
- BEDIENUNGSANLEITUNG
- General safety instructions
- Electrical connection
- Warning: This appliance must be earthed.
- Unpacking
- List of parts and controls
- Instructions for use
- POSITIONING
- When setting up the ironing board please note the following:
- Put up the ironing board as follows:
- START UP
- If you are using a steam generator:
- If you are using a steam iron:
- SUCTION FUNCTION AND HEATING OF BOARD
- Recommendation:
- BLOWING FUNCTION
- After ironing
- Maintenance
- Changing the cover
- Warning:
- Advice on disposal
- MISE EN MARCHE
- INIZIARE A UTILIZZARE L'APPARECCHIO
- OPSTARTEN
- KOM GODT I GANG
- TA STRYKEBRETTET I BRUK
- KOMMA IGÅNG
- PÄÄLLE KYTKEMINEN
- PUESTA EN MARCHA
- LIGAR O APARELHO
- ENAPEH
- ÇALIŞTIRMA
- URUCHAMIANIE
- VASALÁSI ELŐKÉSZÜLETEK
- ПОЧАТОК РОБОТИ
- НАЧАЛО РАБОТЫ
- PORNIRE
Brand : SIEMENS
Model : TN20350
Category : Ironing board