
9950 MA - Floor cleaner SKIL - Free user manual and instructions
Find the device manual for free 9950 MA SKIL in PDF.


| Brand | Skil |
| Model | 9950 MA |
| Product type | Floor cleaner (electric mop) |
| Dimensions (L x W x H) | Approx. 30 x 20 x 110 cm |
| Weight | Approx. 4 kg |
| Power source | Rechargeable lithium-ion battery 18 V |
| Run time | Approx. 30 minutes |
| Charging time | Approx. 4 hours |
| Battery type | Lithium-ion, removable |
| Clean water tank capacity | 500 ml |
| Dirty water tank capacity | 400 ml |
| Compatible surfaces | Tile, hardwood, linoleum, laminate |
| Main functions | Simultaneous wet cleaning and vacuuming |
| Settings | Adjustable water flow (2 levels) |
| Maintenance and cleaning | Clean tanks after each use, rinse the brush |
| Safety | Automatic shut-off in case of tipping, short-circuit protection |
| Spare parts and repairability | Main brush, tanks, battery, HEPA filter available online |
| Noise level | Approx. 75 dB(A) |
| Warranty | 2 years |
| Included accessories | 1 main brush, 1 clean water tank, 1 dirty water tank, charger |
Frequently Asked Questions - 9950 MA SKIL
User questions about 9950 MA SKIL
0 question about this device. Answer the ones you know or ask your own.
Ask a new question about this device
Download the instructions for your Floor cleaner in PDF format for free! Find your manual 9950 MA - SKIL and take your electronic device back in hand. On this page are published all the documents necessary for the use of your device. 9950 MA by SKIL.
USER MANUAL 9950 MA SKIL
PROFESSIONAL POWER TOOLS

natural_image
Illustration of a power tool with meshing base and circular base (no text or symbols)
GB ORIGINAL INSTRUCTIONS 4
F NOTICE ORIGINALE 8
D ORIGINALBETRIEBSANLEITUNG 12
NL ORIGINELE GEBRUIKSAANWIJZING 17
S BRUKSANVISNING I ORIGINAL 22
DK ORIGINAL BRUGSANVISNING 26
N ORIGINAL BRUKSANVISNING 30
FIN ALKUPERÄISET OHJEET 35
E MANUAL ORIGINAL 39
P MANUAL ORIGINAL 44
I ISTRUZIONI ORIGINALI 48
H EREDETI HASZNÁLATI UTASÍTÁS 53
CZ PŮVODNÍM NÁVODEM K POUŽÍVÁNÍ 58
TR ORİJINAL İŞLETME TALİMATI 63
PL INSTRUKCJA ORYGINALNA 67
RU ПОДЛИННИК РУКОВОДСТВА
ПО ЭКСПЛУАТАЦИИ


GB
Polisher
9950
INTRODUCTION
- This tool is intended for polishing metal, plastic and coated surfaces as well as for the polishing of stone materials without the use of water
- Read and save this instruction manual ②
TECHNICAL SPECIFICATIONS ①
TOOL ELEMENTS ③
A Auxiliary handle
B Auxiliary handle (type D)
C Hex key
D Spindle
E Rubber plate
F Clamping fl ange
G Spanner
H Spindle-lock button
J Wool bonnet
K On/off switch
L Knob for locking on/off switch
M Wheel for maximum speed control
N Ventilation slots
SAFETY
GENERAL SAFETY INSTRUCTIONS
WARNING! Read all safety warnings and all
instructions. Failure to follow the warnings and instructions may result in electric shock, fire and/or serious injury. Save all warnings and instructions for future reference. The term "power tool" in the warnings refers to your mains-operated (corded) power tool or battery-operated (cordless) power tool.
1) WORK AREA SAFETY
a) Keep work area clean and well lit.
Cluttered or dark areas invite accidents.
b) Do not operate power tools in explosive atmospheres, such as in the presence of flammable liquids, gases or dust. Power tools create sparks which may ignite the dust or fumes.
c) Keep children and bystanders away while operating a power tool. Distractions can cause you to lose control.
2) ELECTRICAL SAFETY
a) Power tool plugs must match the outlet.
Never modify the plug in any way. Do not use any adapter plugs with earthed (grounded) power tools.
Unmodified plugs and matching outlets will reduce risk of electric shock.
b) Avoid body contact with earthed or grounded surfaces such as pipes, radiators, ranges and refrigerators. There is an increased risk of electric shock if your body is earthed or grounded.
c) Do not expose power tools to rain or wet conditions. Water entering a power tool will increase the risk of electric shock.
d) Do not abuse the cord. Never use the cord for carrying, pulling or unplugging the power tool. Keep cord away from heat, oil, sharp edges or moving parts. Damaged or entangled cords increase the risk of electric shock.
e) When operating a power tool outdoors, use an extension cord suitable for outdoor use. Use of a cord suitable for outdoor use reduces the risk of electric shock.
f) If operating a power tool in a damp location is unavoidable, use an earth leakage circuit breaker. Use of an earth leakage circuit breaker reduces the risk of electric shock.
3) PERSONAL SAFETY
a) Stay alert, watch what you are doing and use common sense when operating a power tool. Do not use a power tool while you are tired or under the influence of drugs, alcohol or medication. A moment of inattention while operating power tools may result in serious personal injury.
b) Use personal protective equipment. Always wear eye protection. Protective equipment such as dust mask, non-skid safety shoes, hard hat, or hearing protection used for appropriate conditions will reduce personal injuries.
c) Prevent unintentional starting. Ensure the switch is in the off-position before connecting to power source and/or battery pack, picking up or carrying the tool. Carrying power tools with your fi nger on the switch or energising power tools that have the switch on invites accidents.
d) Remove any adjusting key or wrench before turning the power tool on. A wrench or a key left attached to a rotating part of the power tool may result in personal injury.
e) Do not overreach. Keep proper footing and balance at all times. This enables better control of the power tool in unexpected situations.
f) Dress properly. Do not wear loose clothing or jewellery. Keep your hair, clothing and gloves away from moving parts. Loose clothes, jewellery or long hair can be caught in moving parts.
g) If devices are provided for the connection of dust extraction and collection facilities, ensure these are connected and properly used. Use of dust collection can reduce dust-related hazards.
4) POWER TOOL USE AND CARE
a) Do not force the power tool. Use the correct power tool for your application. The correct power tool will do the job better and safer at the rate for which it was designed.
b) Do not use the power tool if the switch does not turn it on and off. Any power tool that cannot be controlled with the switch is dangerous and must be repaired.
c) Disconnect the plug from the power source and/or the battery pack from the power tool before making any adjustments, changing accessories, or storing power tools. Such preventive safety measures reduce the risk of starting the power tool accidentally.
d) Store idle power tools out of the reach of children and do not allow persons unfamiliar with the power tool or these instructions to operate the power tool. Power tools are dangerous in the hands of untrained users.
e) Maintain power tools. Check for misalignment or binding of moving parts, breakage of parts and any other condition that may affect the power tool's operation. If damaged, have the power tool repaired before use. Many accidents are caused by poorly maintained power tools.
f) Keep cutting tools sharp and clean.
Properly maintained cutting tools with sharp cutting edges are less likely to bind and are easier to control.
g) Use the power tool, accessories and tool bits etc., in accordance with these instructions, taking into account the working conditions and the work to be performed. Use of the power tool for operations different from those intended could result in a hazardous situation.
5) SERVICE
a) Have your power tool serviced by a qualified repair person using only identical replacement parts.
This will ensure that the safety of the power tool is maintained.
SAFETY INSTRUCTIONS FOR POLISHERS
1) SAFETY INSTRUCTIONS FOR ALL OPERATIONS
a) This power tool is intended to function as a polisher. Read all safety warnings, instructions, illustrations and specifications provided with this power tool. Failure to follow all instructions listed below may result in electric shock, fi re and/or serious injury.
b) This power tool is not recommended for grinding, sanding, wire brushing or cutting off operations. Operations for which the power tool was not designed may create a hazard and cause personal injury.
c) Do not allow any loose portion of the polishing bonnet or its attachment strings to spin freely. Tuck away or trim any loose attachment strings. Loose and spinning attachment strings can entangle your fingers or snag on the workpiece.
d) Do not use accessories which are not specifically designed and recommended by the tool manufacturer. Just because the accessory can be attached to your power tool, it does not assure safe operation.
e) The rated speed of the accessory must be at least equal to the maximum speed marked on the power tool. Accessories running faster than their rated speed can fly apart.
f) The outside diameter and the thickness of your accessory must be within the capacity rating of your power tool. Incorrectly sized accessories cannot be adequately guarded or controlled.
g) The arbour size of wheels, flanges, backing pads or any other accessory must properly fit the spindle of the power tool. Accessories with arbour holes that do not match the mounting hardware of the power tool will run out of balance, vibrate excessively and may cause loss of control.
h) Do not use a damaged accessory. Before each use inspect the accessory such as abrasive wheels for chips and cracks, backing pads for cracks, tear or excess wear, wire brushes for loose or cracked wires. If the power tool or accessory is dropped, inspect for damage or install an undamaged accessory. After inspecting and installing an accessory, position yourself and bystanders away from the plane of the rotating accessory and run the power tool at maximum no load speed for one minute. Damaged accessories will normally break apart during this test time.
i) Wear personal protective equipment ④. Depending on application, use face shield, safety goggles or safety glasses. As appropriate, wear dust mask, hearing protectors, gloves and shop apron capable of stopping small abrasive or workpiece fragments. The eye protection must be capable of stopping fl ying debris generated by various operations. The dust mask or respirator must be capable of fi ltrating particles generated by your operation. Prolonged exposure to high intensity noise may cause hearing loss.
j) Keep bystanders a safe distance away from work area. Anyone entering the work area must wear personal protective equipment. Fragments of the workpiece or of a broken accessory may fly away and cause injury beyond the immediate area of operation.
k) Hold the power tool only by the insulated gripping surfaces when performing an operation where the cutting tool may contact hidden wiring or its own power cord. Contact with a “live” wire will also make exposed metal parts of the power tool “live” and shock the operator.
l) Position the cord clear of the spinning accessory. If you lose control, the cord may be cut or snagged and your hand or arm may be pulled into the spinning accessory.
m) Never lay the power tool down until the accessory has come to a complete stop. The spinning accessory may grab the surface and pull the power tool out of your control.
n) Do not run the power tool while carrying it at your side. Accidental contact with the spinning accessory could snag your clothing, pulling the accessory into your body.
o) Regularly clean the power tool's air vents. The motor's fan will draw the dust inside the housing and excessive accumulation of powdered metal may cause electrical hazards.
p) Do not operate the power tool near flammable materials. Sparks could ignite these materials.
q) Do not use accessories that require liquid coolants. Using water or other liquid coolants may result in electrocution or shock.
2) KICKBACK AND RELATED WARNINGS
- Kickback is a sudden reaction to a pinched or snagged rotating wheel, backing pad, brush or any other accessory. Pinching or snagging causes rapid stalling of the rotating accessory which in turn causes the uncontrolled power tool to be forced in the direction opposite of the accessory's rotation at the point of the binding.
- For example, if an abrasive wheel is snagged or pinched by the workpiece, the edge of the wheel that is entering into the pinch point can dig into the surface of the material causing the wheel to climb out or kick out. The wheel may either jump toward or away from the operator, depending on the direction of the wheel's movement at the point of pinching. Abrasive wheels may also break under these conditions.
- Kickback is the result of power tool misuse and/or incorrect operating procedures or conditions and can be avoided by taking proper precautions as given below.
a) Maintain a firm grip on the power tool and position your body and arm to allow you to resist kickback forces. Always use auxiliary handle, if provided, for maximum control over kickback or torque reaction during start-up. The operator can control torque reactions or kickback forces, if proper precautions are taken.
b) Never place your hand near the rotating accessory. The accessory may kickback over your hand.
c) Do not position your body in the area where power tool will move if kickback occurs. Kickback will propel the tool in the direction opposite to the wheel's movement at the point of snagging.
d) Use special care when working corners, sharp edges etc. Avoid bouncing and snagging the accessory. Corners, sharp edges or bouncing have a tendency to snag the rotating accessory and cause loss of control or kickback.
e) Do not attach a saw chain woodcarving blade or toothed saw blade. Such blades create frequent kickback and loss of control.
GENERAL
- Only use this tool for dry polishing
- Only use the fl anges which are supplied with this tool
- This tool should not be used by people under the age of 16 years
- Always disconnect plug from power source before making any adjustment or changing any accessory
- Do not work materials containing asbestos (asbestos is considered carcinogenic)
ACCESSORIES
- SKIL can assure fl awless functioning of the tool only when the correct accessories are used which can be obtained from your SKIL dealer
- For mounting/using non-SKIL accessories observe the instructions of the manufacturer concerned
- Use only accessories with an allowable speed matching at least the highest no-load speed of the tool
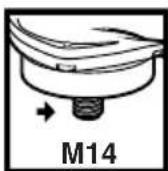
- Never use accessories with a "blind" threaded hole smaller than M14 x 21 mm
- Do not use damaged, deformed or vibrating accessories
OUTDOOR USE
- When used outdoors, connect the tool via a fault current (FI) circuit breaker with a triggering current of 30 mA maximum, and only use an extension cord which is intended for outdoor use and equipped with a splashproof coupling-socket
BEFORE USE
- Always check that the supply voltage is the same as the voltage indicated on the nameplate of the tool (tools with a rating of 230V or 240V can also be connected to a 220V supply)
- Always mount auxiliary handle A ③ or B ③; never use the tool without it
- Dust from material such as paint containing lead, some wood species, minerals and metal may be harmful (contact with or inhalation of the dust may cause allergic reactions and/or respiratory diseases to the operator or bystanders); wear a dust mask and work with a dust extraction device when connectable
- Certain kinds of dust are classified as carcinogenic (such as oak and beech dust) especially in conjunction with additives for wood conditioning; wear a dust mask and work with a dust extraction device when connectable
- Follow the dust-related national requirements for the materials you want to work with
- Secure the workpiece (a workpiece clamped with clamping devices or in a vice is held more securely than by hand)
- Do not clamp the tool in a vice
- Use completely unrolled and safe extension cords with a capacity of 16 Amps (U.K. 13 Amps)
DURING USE
- When working, always hold the tool firmly with both hands and take a secure stance
- Always keep the cord away from moving parts of the tool; direct the cord to the rear, away from the tool
- If the cord is damaged or cut through while working, do not touch the cord, but immediately disconnect the plug
- Never use the tool when cord is damaged; have it replaced by a qualified person
- In case of electrical or mechanical malfunction, immediately switch off the tool and disconnect the plug
- In case of current interruption or when the plug is accidentally pulled out, release switch K ③ in order to prevent uncontrolled restarting
AFTER USE
- Before you put down the tool, switch off the motor and ensure that all moving parts have come to a complete standstill
- After switching off the tool, never stop the rotation of the accessory by a lateral force applied against it WHEN CONNECTING NEW 3-PIN PLUG (U.K. ONLY):
- Do not connect the blue (= neutral) or brown (= live) wire in the cord of this tool to the earth terminal of the plug
- If for any reason the old plug is cut off the cord of this tool, it must be disposed of safely and not left unattended
USE
- Mounting of auxiliary handles ⑤
! disconnect the plug
- screw auxiliary handle A on the right, the top, or the left of the tool (depending on the work to be carried out)
- mount auxiliary handle B as illustrated and tighten both screws supplied with hex key C
- Mounting of accessories ③
! disconnect the plug
- clean spindle D and all parts to be mounted
- place rubber plate E onto spindle D
- tighten clamping fl ange F with spanner G while pushing spindle-lock button H
! push spindle-lock button H only when spindle D is at a standstill
- fasten wool bonnet J onto rubber plate E
- for removing accessories handle vice-versa
- Before using the tool
- ensure that accessory is correctly mounted and firmly tightened
- check if accessory runs freely by turning it by hand
- test-run tool for at least 30 seconds at highest no-load speed in a safe position
- stop immediately in case of considerable vibration or other defects and check tool to determine the cause
- On/off
- switch on/off the tool by pulling/releasing trigger K ③
! be aware of the sudden impact when the tool is switched on
- Switch locking for continuous use
- pull trigger K
- press knob L with your thumb
- unlock the switch by pulling again trigger K and then releasing it
- Speed control ⑥
- with wheel M the maximum speed can be adjusted from low to high (1-6)
- start with wheel M in position 1 (lower speed)
- if needed, select a higher speed while the tool runs
- the optimal working speed depends on the material and can be determined with practical trials
- Operating the tool
- switch on the tool
- place the tool fully on the surface to be polished and move it evenly by sections
- one move should overlap the previous move by one half
- do not stop at a single spot to avoid burning the coating
- do not move the tool in circles to avoid staining or burning the coating
! before switching off the tool, you should lift it from the workpiece
! the accessory continues to rotate for a short time after the tool has been switched off
- Holding and guiding the tool ⑦
! while working, always hold the tool at the grey-coloured grip area(s)
- always hold the tool fi rmly with both hands, so you will have full control of the tool at all times
- provide for a secure stance
! do not apply so much pressure on the tool that it comes to a standstill
- keep ventilation slots N ③ uncovered
MAINTENANCE / SERVICE
- Protect the tool from impact, shock and grease
- Always keep tool and cord clean (especially the ventilation slots N ③)
! do not attempt to clean ventilation slots by inserting pointed objects through openings ! disconnect the plug before cleaning
- If the tool should fail despite the care taken in manufacturing and testing procedures, repair should be carried out by an after-sales service centre for SKIL power tools
- send the tool undismantled together with proof of purchase to your dealer or the nearest SKIL service station (addresses as well as the service diagram of the tool are listed on www.skilmasters.com)
ENVIRONMENT
- Do not dispose of electric tools, accessories and packaging together with household waste material (only for EU countries)
- in observance of European Directive 2002/96/EC on waste of electric and electronic equipment and its implementation in accordance with national law, electric tools that have reached the end of their life must be collected separately and returned to an environmentally compatible recycling facility
- symbol ⑧ will remind you of this when the need for disposing occurs
CE DECLARATION OF CONFORMITY
- We declare under our sole responsibility that this product is in conformity with the following standards or standardized documents: EN 60 745, EN 55 014, in accordance with the provisions of the directives 2006/95/EC, 2004/108/EC, 98/37/EC (until Dec. 28, 2009), 2006/42/EC (from Dec. 29, 2009 on)
• Technical file at: SKIL Europe BV (PT-SEU/PJE), 4825 BD Breda, NL
CE
09 SKIL Europe BV A. v.d. Kloot

NOISE/VIBRATION
- Measured in accordance with EN 60 745 the sound pressure level of this tool is 88 dB(A) and the sound power level 99 dB(A) (standard deviation: 3 dB), and the vibration 4.5 m/s ^2 (hand-arm method; uncertainty K = 1.5 m/s ^2 )
- The vibration emission level has been measured in accordance with a standardised test given in EN 60 745; it may be used to compare one tool with another and as a preliminary assessment of exposure to vibration when using the tool for the applications mentioned
- using the tool for different applications, or with different or poorly maintained accessories, may significantly increase the exposure level
- the times when the tool is switched off or when it is running but not actually doing the job, may signifi cantly reduce the exposure level
! protect yourself against the effects of vibration by maintaining the tool and its accessories, keeping your hands warm, and organizing your work patterns

Polisseuse
9950
INTRODUCTION
1) SIKKERHET PÅ ARBEIDSPLASSEN
a) Hold arbeidsområdet rent og ryddig. Rotete arbeidsområder eller arbeidsområder uten lys kan føre til ulykker.
VEDLIKEHOLD / SERVICE
OPŠTA UPUTSTVA O SIGURNOSTI
PAŽNJA! Čitajte sva upozorenja i uputstva.
Propusti kod pridržavanja upozorenja i uputstava mogu imati za posledicu električni udar, požar i/ili teške povrede. Čuvajte sva upozorenja i uputstva za budućnost.
Pojam upotrebljen u upozorenjima “električni alat” odnosi se na električne alate sa radom na mreži (sa mrežnim kablom) i na električne alate sa radom na akumulator (bez mrežnog kabla).
1) SIGURNOST NA RADNOM MESTU
ÜLDISED OHUTUSJUHISED
POLEERIMISMASINATE OHUTUSJUHISED
APKALPOŠANA / APKOPE
natural_image
Two circular icons with white head and headset symbols, no text or labels present


9950




natural_image
Illustration of a power tool with meshing base and handle (no text or symbols)


- GB
- Polisher
- INTRODUCTION
- TECHNICAL SPECIFICATIONS ①
- TOOL ELEMENTS ③
- SAFETY
- GENERAL SAFETY INSTRUCTIONS
- WARNING! Read all safety warnings and all
- SAFETY INSTRUCTIONS FOR POLISHERS
- GENERAL
- ACCESSORIES
- OUTDOOR USE
- BEFORE USE
- DURING USE
- AFTER USE
- USE
- MAINTENANCE / SERVICE
- ENVIRONMENT
- CE DECLARATION OF CONFORMITY
- NOISE/VIBRATION
- Polisseuse
- VEDLIKEHOLD / SERVICE
- OPŠTA UPUTSTVA O SIGURNOSTI
- ÜLDISED OHUTUSJUHISED
- POLEERIMISMASINATE OHUTUSJUHISED
- APKALPOŠANA / APKOPE
- 9950
Brand : SKIL
Model : 9950 MA
Category : Floor cleaner