
GOS 10 8 V-LI Professional - Security and Access Control System BOSCH - Free user manual and instructions
Find the device manual for free GOS 10 8 V-LI Professional BOSCH in PDF.


| Product type | Laser distance meter for safety and access control |
| Brand | Bosch |
| Model | GOS 10 8 V-LI Professional |
| Dimensions (L x W x H) | 120 x 50 x 30 mm |
| Weight | 0.2 kg |
| Power supply | Lithium-ion battery 10.8 V |
| Battery life | Approx. 5,000 measurements |
| Measuring range | 0.05 to 50 m |
| Measurement accuracy | ± 1.5 mm |
| Laser class | 2 (IEC 60825-1) |
| Main functions | Distance measurement, area/volume calculation, indirect measurement (Pythagoras) |
| Maintenance and cleaning | Clean with a soft, dry cloth; avoid solvents |
| Safety | Do not look directly into the laser beam; integrated eye protection |
| Spare parts and repairability | Rechargeable battery, protective case; repair by Bosch authorized centers |
| General information | Professional device for safety and access control installations |
Frequently Asked Questions - GOS 10 8 V-LI Professional BOSCH
User questions about GOS 10 8 V-LI Professional BOSCH
0 question about this device. Answer the ones you know or ask your own.
Ask a new question about this device
Download the instructions for your Security and Access Control System in PDF format for free! Find your manual GOS 10 8 V-LI Professional - BOSCH and take your electronic device back in hand. On this page are published all the documents necessary for the use of your device. GOS 10 8 V-LI Professional by BOSCH.
USER MANUAL GOS 10 8 V-LI Professional BOSCH
OIII DOKL-23521-002.I'm Page 1 Monday, February 28, 2011 9:10 AM

Robert Bosch GmbH
Power Tools Division
70745 Leinfeiden-Echterdingen
Germany
www.bosch-pt.com
1 609 929 X35 (2011.02) T / 175 UNI

GOS 10,8 V-LI Professional

BOSCH
6
2 610 014 567 (∅ 17 mm, 1,22 m)
2 610 014 568 (Ø 9,5 mm, 0,91 m)
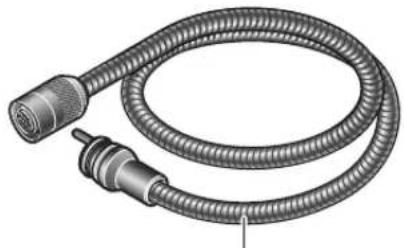
12
2 610 014 570 (0,91 m)
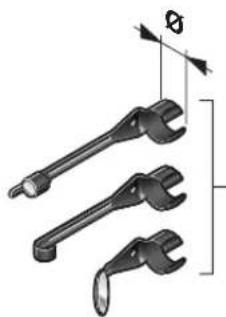
2 610 014 564 (∅ 17 mm)
2 610 014 565 (∅ 9,5 mm)


5


6 | Deutsch
Sicherheitshinweise
Digital Inspection Camera

Read all safety warnings and all instructions. Failure to follow the warnings and instructions may result in electric shock, fire and/or serious injury.
▶ Have the inspection camera repaired only through a qualified repair person and only using identical replacement parts. This will ensure that the safety of the inspection camera is maintained.
▶ Do not operate the inspection camera in explosive atmospheres, such as in the presence of flammable liquids, gases or dusts. Sparks can be created in the inspection camera which may ignite the dust or fumes.
Before any work on the inspection camera itself (e.g. assembling, maintenance, etc.) as well as when transporting and storing, remove the battery from the inspection camera.
▶ Do not open the battery. Danger of short-circuiting.

Protect the battery against heat, e.g., against continuous intense sunlight, fire, water, and moisture. Danger of explosion.
When battery pack is not in use, keep it away from other metal objects like paper clips, coins, keys, nails, screws, or other small metal objects that can make a connection from one terminal to another. Shorting the battery terminals together may cause burns or a fire.
▶ Under abusive conditions, liquid may be ejected from the battery; avoid contact. If contact accidentally occurs, flush with water. If liquid contacts eyes, additionally seek medical help. Liquid ejected from the battery may cause irritations or burns.
In case of damage and improper use of the battery, vapours may be emitted. Provide for fresh air and seek medical help in case of complaints. The vapours can irritate the respiratory system.
▶ Recharge only with the charger specified by the manufacturer. A charger that is suitable for one type of battery pack may create a risk of fire when used with another battery pack.
▶ Use the battery only together with your Bosch inspection camera. This is the only way to protect the battery against dangerous overload.
▶ Use only original Bosch batteries with the voltage listed on the nameplate of your inspection camera. When using other batteries, e.g. imitations, reconditioned batteries or other brands, there is danger of injury as well as property damage through exploding batteries.
▶ After the automatic shut-off of the inspection camera, do not continue to press the On/Off button. The battery could become damaged.
▶ Do not direct the light beam at persons or animals and do not stare into the light beam yourself (not even from a distance).
▶ Check the working range before using the inspection camera. No part of the inspection camera may come into contact with electrical lines, moving parts or chemical substances. Interrupt the power circuit of electrical lines in the working range. These measures reduce the risk of explosion, electric shock and property damage.
- Wear appropriate protective equipment such as safety glasses/goggles, protective gloves or respirator when materials that are hazardous to one's health are in the working range. Sewer lines or similar areas can contain solid, liquid or gaseous substances, which may be toxic, infectious, caustic or otherwise hazard to one's health.
Pay particular attention to cleanness when working in areas with substances that are hazardous to one's health. Do not eat during work. Avoid contact with substances that are hazardous to one's health. After finishing your work, wash hands and other affected body parts that may have come into contact, with warm soapy water.
Do not stand in water when using the inspection camera. When standing in water while working, there is a risk of electric shock.





English | 13
Magnet

Keep the magnet 15 away from cardiac pacemakers. The magnet generates a field that can impair the function of cardiac pacemakers.
▶ Keep the magnet 15 away from magnetic data medium and magnetically-sensitive equipment. The effect of the magnetic can lead to irreversible data loss.
Product Description and Specifications
While reading the operating instructions, unfold the fold-out page with the illustration of the inspection camera and leave it open.
Intended Use
The digital inspection camera is suitable for inspecting hard to reach locations or dark areas. After mounting the provided accessories to the camera head, it is also suitable for moving and removing small and light objects (e.g., small screws).
The digital inspection camera may not be used for medicinal purposes. It is also not suitable for repairing pipe clogs or pulling in cables.
Product Features
The numbering of the product features refers to the illustration of the inspection camera on the graphics page.
1 Hand unit
2 Increase-brightness button "+"
3 On/Off button
4 Reduce-brightness button “-”
5 Display
6 Camera cable
7 Camera head
8 Camera lens
9 Illumination light in camera head
10 Battery*
11 Battery unlocking button
12 Camera cable, extension*
13 Socket sleeve of camera connection
14 Camera connection
15 Magnet
16 Hook
17 Mirror
18 Video output socket
19 Video cable
*Accessories shown or described are not part of the standard delivery scope of the product. A complete overview of accessories can be found in our accessories program.
Technical Data
| Digital Inspection Camera | GOS 10,8 V-LI Professional |
| Article number | 3 601 B41 000 |
| Rated voltage | V= 10.8 |
| Operating temperature | °C -20...+65 |
| Storage temperature(hand unit without battery) | °C -30...+80 |
| Relative humidity | % 5 1) |
| Smallest bending radius of camera cable | mm 120 |
| Diameter of camera head | mm 17/9.5 |
| Depth-of-field range of camera lens | mm 38-∞ |
| Display size | mm 68.6 |
| Display resolution | 320 x 240 |
| Format of video output | NTSC |
| Operating life time, approx. | h 15 |
| Weight according to EPTA-Procedure 01/2003 | kg 0.68 |
| Dimensions (length x width x height) | mm 166 x 66 x 45 |
| 1) Free of moisture condensationPlease observe the article number on the type plate of your inspection camera. The trade names of individual inspection cameras can vary. | |




14 | English
Assembly
Before any work on the inspection camera itself (e.g. assembling, maintenance, etc.) as well as when transporting and storing, remove the battery from the inspection camera.
Battery Charging
▶ Use only the battery chargers listed on the graphics page. Only these battery chargers are matched to the lithium-ion battery used in your inspection camera.
Note: The battery is supplied partially charged. To ensure full capacity of the battery, completely charge the battery in the battery charger before using your power tool for the first time.
The lithium-ion battery can be charged at any time without reducing its service life. Interrupting the charging procedure does not damage the battery.
The battery is equipped with a NTC temperature control which allows charging only within a temperature range of between 0 °C and 45 °C. A long battery service life is achieved in this manner.
Battery Charge-control Indication
When the inspection camera is switched on, the charge condition of the battery is indicated on the display 5:
| Indication Capacity | |
| >1/2 | |
| <1/2 | |
| Reserve | |
Removing the Battery
To remove the battery 10, press the battery unlocking buttons 11 and pull the battery toward the rear out of the inspection camera. Do not exert any force when doing this.
Mounting the Camera Cable (see figure A)
For operation of the inspection camera, the camera cable 6 must be mounted to the hand unit 1.
Insert the camera cable 6 into the camera connection 14 in such a manner that the pin of the camera cable engages into the opening of the camera connection as shown in the figure. Slide the socket sleeve 13 on the camera connection over the camera cable and hand-tighten in clockwise direction.
To remove the camera cable 6, unscrew socket sleeve 13 in anticlockwise direction and pull the camera cable off.
Mounting the Camera Cable Extension (Accessory)
To mount a camera cable extension 12, the mounted camera cable 6 must be removed.
Then, mount the extension 12 onto camera connection 14 as described under "Mounting the Camera Cable" and tighten.
If required, further extensions can be mounted in the same manner. However, the image quality decreases when exceeding a total length approx. 10 m (incl. camera cable).
Screw the camera cable 6 onto the last extension 12 as described under "Mounting the Camera Cable".
▶ Check if the camera cable and the extension are firmly connected. The camera cable and the extension are only water-tight when firmly connected. Untight connections increase the risk of an electric shock or damage to the inspection camera.
Mounting the Mirror, Magnet or Hook (see figure B)
The mirror 17, the magnet 15 and the hook 16 can be mounted to the camera head 7 as auxiliary aids.
Slide one of the three auxiliary aids to the stop onto the recess on the camera head 7 as shown in the figure.
Note: The magnet 15 and the hook 16 are only suitable for moving and removing loose, small and light objects. Applying too much tension can damage the inspection camera or the auxiliary aid.
Connecting the External Image Reproduction (see figure C)
The image signal of the inspection camera can be transferred to an external monitor, which can represent a standard NTSC video signal.
Insert the black plug of the supplied video cable 19 into the video output socket 18 of the inspection camera. Connect the video cable to an appropriate monitor.
Read and observe the and operating instructions of the external monitor.
Operation
▶ Protect the hand unit 1 and the battery 10 against moisture and direct sunlight. Camera cable, camera head and extension are watertight to a depth of approx. 10 m. However, the hand unit and the battery are not protected against water; in case of contact with water, the risk of electric shock or damage is given.
▶ Do not subject the inspection camera to extreme temperatures or variations in temperature. As an example, do not leave it in vehicles for longer periods. In case of large variations in temperature, allow the inspection camera to adjust to the ambient temperature before putting it into operation.
▶ Do not use the inspection camera when the lens on the camera head 7 is misty or fogged-up. Do not switch the inspection camera on until after the moisture has evaporated. Otherwise, the inspection camera can become damaged.
Initial Operation
Inserting the Battery
▶ Use only original Bosch lithium-ion batteries with the voltage listed on the nameplate of your inspection camera. Using other batteries can lead to injuries and pose a fire hazard.
Note: Using batteries not suitable for your inspection camera can lead to malfunctions or damage the inspection camera.
Insert the charged battery 10 into the handle until it can be felt to engage and faces flush against the handle.
Switching On and Off
To switch on the inspection camera, press the On/Off button 3. The display 5 shows the image of the camera head 7.
To switch off the inspection camera, press the On/Off button 3 again.
When no button on the inspection camera is pressed for approx. 20 minutes, it automatically switches off to save the batteries.
Regulating the Illumination Light in the Camera Head
To brighten the camera image on display 5, the illumination light 9 in the camera head can be switched on and its brightness can be regulated.
To switch on the camera's illumination light 9 and increase its brightness, press button "+" 2 until the desired brightness is reached.
▶ Do not stare into the illumination light 9 and do not direct it at other persons. The brightness of the light can blind the eyes.
To reduce the brightness and switch off the camera light 9, press button “-” 4 until the desired brightness is reached or the light is switched off.
Working Advice
Check the area that you want to inspect and pay particular attention to obstructions or hazard areas.
Bend the camera cable 6 in such a manner that the camera head can be easily inserted into the area subject to the inspection. Carefully guide the camera cable in.



16 | English
Adjust the brightness of the illumination light 9 so that the image can be seen well. For heavily reflecting objects, as an example, less light will provide a better image.
When objects to be inspected are represented unsharp, reduce or increase the distance between camera head 7 and object.
If required, bend the camera cable 6 in such a manner that the camera image is shown upright on display 5.
Recommendations for Optimal Handling of the Battery
Protect the battery against moisture and water. Store the battery only within a temperature range between 0 °C and 50 °C. As an example, do not leave the battery in the car in summer.
A significantly reduced working period after charging indicates that the battery is used and must be replaced.
Observe the notes for disposal.
Maintenance and Service
Maintenance and Cleaning
Do not immerse the hand unit 1 into water or other fluids.
Keep the inspection camera clean at all times. Clean the inspection camera and all auxiliary aids particularly thorough after having worked in areas with substances that are hazardous to one's health.
Wipe off debris using a moist and soft cloth. Do not use any cleaning agents or solvents.
Especially clean the lens 8 of the camera regularly and pay attention for any lint.
If the inspection camera should fail despite the care taken in manufacture and testing, repair should be carried out by an authorised customer services agent for Bosch power tools. Do not open the inspection camera yourself.
In all correspondence and spare parts orders, please always include the 10-digit article number given on the type plate of the inspection camera.
After-sales Service and Customer Assistance
Our after-sales service responds to your questions concerning maintenance and repair of your product as well as spare parts. Exploded views and information on spare parts can also be found under:
www.bosch-pt.com
Our customer service representatives can answer your questions concerning possible applications and adjustment of products and accessories.
Great Britain
Robert Bosch Ltd. (B.S.C.)
P.O. Box 98
Broadwater Park
North Orbital Road
Denham
Uxbridge
UB 9 5HJ
Tel. Service: +44 (0844) 736 0109
Fax: +44 (0844) 736 0146
E-Mail: boschservicecentre@bosch.com
Ireland
Origo Ltd.
Unit 23 Magna Drive
Magna Business Park
City West
Dublin 24
Tel. Service: +353 (01) 4 66 67 00
Fax: +353 (01) 4 66 68 88
Australia, New Zealand and Pacific Islands
Robert Bosch Australia Pty. Ltd.
Power Tools
Locked Bag 66
Clayton South VIC 3169
Customer Contact Center
Inside Australia:
Phone: +61 (01300) 307 044
Fax: +61 (01300) 307 045
Inside New Zealand:
Phone: +64 (0800) 543 353
Fax: +64 (0800) 428 570
Outside AU and NZ:
Phone: +61 (03) 9541 5555
www.bosch.com.au





Republic of South Africa
Customer service
Hotline: +27 (011) 6 51 96 00
Gauteng - BSC Service Centre
35 Roper Street, New Centre
Johannesburg
Tel.: +27 (011) 4 93 93 75
Fax: +27 (011) 4 93 01 26
E-Mail: bsctools@icon.co.za
KZN - BSC Service Centre
Unit E, Almar Centre
143 Crompton Street
Pinetown
Tel.: +27 (031) 7 01 21 20
Fax: +27 (031) 7 01 24 46
E-Mail: bsc.dur@za.bosch.com
Western Cape - BSC Service Centre
Democracy Way, Prosperity Park
Milnerton
Tel.: +27 (021) 5 51 25 77
Fax: +27 (021) 5 51 32 23
E-Mail: bsc@zsd.co.za
Bosch Headquarters
Midrand, Gauteng
Tel.: +27 (011) 6 51 96 00
Fax: +27 (011) 6 51 98 80
E-Mail: rbsa-hq.pts@za.bosch.com
People's Republic of China
China Mainland
Bosch Power Tools (China) Co., Ltd.
567, Bin Kang Road
Bin Jiang District 310052
Hangzhou, P.R.China
Service Hotline: 400 826 8484
Fax: +86 571 8777 4502
E-Mail: contact.ptcn@cn.bosch.com
www.bosch-pt.com.cn
HK and Macau Special Administrative Regions
Robert Bosch Hong Kong Co. Ltd.
21st Floor, 625 King's Road
North Point, Hong Kong
Customer Service Hotline: +852 (21) 02 02 35
Fax: +852 (25) 90 97 62
E-Mail: info@hk.bosch.com
www.bosch-pt.com.hk
Indonesia
PT. Multi Tehaka
Kawasan Industri Pulogadung
Jalan Rawa Gelam III No. 2
Jakarta 13930
Indonesia
Tel.: +62 (21) 46 83 25 22
Fax: +62 (21) 46 82 86 45/68 23
E-Mail: sales@multitehaka.co.id
www.multitehaka.co.id
Philippines
Robert Bosch, Inc.
28th Floor Fort Legend Towers,
3rd Avenue corner 31st Street,
Fort Bonifacio Global City,
1634 Taguig City, Philippines
Tel.: +63 (2) 870 3871
Fax: +63 (2) 870 3870
matheus.contiero@ph.bosch.com
www.bosch-pt.com.ph
Bosch Service Center:
9725-27 Kamagong Street
San Antonio Village
Makati City, Philippines
Tel.: +63 (2) 899 9091
Fax: +63 (2) 897 6432
rosalie.dagdagan@ph.bosch.com
Malaysia
Robert Bosch (S.E.A.) Pte. Ltd.
No. 8A, Jalan 13/6
G.P.O. Box 10818
46200 Petaling Jaya
Selangor, Malaysia
Tel.: +60 (3) 7966 3194
Fax: +60 (3) 7958 3838
cheehoe.on@my.bosch.com
Toll-Free: 1800 880 188
www.bosch-pt.com.my
18 | English
Thailand
Robert Bosch Ltd.
Liberty Square Building
No. 287, 11 Floor
Silom Road, Bangrak
Bangkok 10500
Tel.: +66 (2) 6 31 18 79 - 18 88 (10 lines)
Fax: +66 (2) 2 38 47 83
Robert Bosch Ltd., P. O. Box 2054
Bangkok 10501, Thailand
Bosch Service – Training Centre
2869-2869/1 Soi Ban Kluay
Rama IV Road (near old Paknam Railway)
Prakanong District
10110 Bangkok
Thailand
Tel.: +66 (2) 6 71 78 00 - 4
Fax: +66 (2) 2 49 42 96
Fax: +66 (2) 2 49 52 99
Singapore
Robert Bosch (SEA) Pte. Ltd.
11 Bishan Street 21
Singapore 573943
Tel.: +65 6571 2772
Fax: +65 6350 5315
leongheng.leow@sg.bosch.com
Toll-Free: 1800 333 8333
www.bosch-pt.com.sg
Vietnam
Robert Bosch Vietnam Co. Ltd
10/F, 194 Golden Building
473 Dien Bien Phu Street
Ward 25, Binh Thanh District
84 Ho Chi Minh City
Vietnam
Tel.: +84 (8) 6258 3690 ext. 413
Fax: +84 (8) 6258 3692
hieu.lagia@vn.bosch.com
www.bosch-pt.com
Transport
Dispatch batteries only when the housing is undamaged. Tape or mask off open contacts and pack up the battery in such a manner that it cannot move around in the packaging.
Please also observe possibly more detailed national regulations.
Disposal
The inspection camera, accessories and packaging should be sorted for environmental-friendly recycling.
Do not dispose of inspection cameras and battery packs/batteries into household waste!
Only for EC countries:

According to the European Guideline 2002/96/EC, electrical devices/tools that are no longer usable, and according to the European Guideline 2006/66/EC, defective
or used battery packs/batteries, must be collected separately and disposed of in an environmentally correct manner.
Batteries no longer suitable for use can be directly returned at:
Great Britain
Robert Bosch Ltd. (B.S.C.)
P.O. Box 98
Broadwater Park
North Orbital Road
Denham
Uxbridge
UB 9 5HJ
Tel. Service: +44 (0844) 736 0109
Fax: +44 (0844) 736 0146
E-Mail: boschservicecentre@bosch.com
Battery packs/batteries:

Li-ion:
Please observe the instructions in section "Transport", page 18.
Subject to change without notice.




22 | Français
Robert Bosch (France) S.A.S.
32 | Español
Eliminación
36 | Português
38 | Português
42 | Italiano
50 | Nederlands
Ingebruikneming
Accu plaatsen
Lamp in camerakop regelen
Bosch Service Center
Telegrafvej 3
2750 Ballerup
Tel. Service Center: +45 (4489) 8855
Fax: +45 (4489) 87 55
E-Mail: vaerktoej@dk.bosch.com
Transport
Bosch Service Center
Telegrafvej 3
2750 Ballerup
Danmark
Tel.: +46 (020) 41 44 55
Fax: +46 (011) 18 76 91
Transport
OBJ_BUCH-1311-002.book Page 78 Monday, February 28, 2011 9:32 AM

78 | Ελληνικά
Απόσυρση
Bosch San. ve Tic. A.S.
Ahi Evran Cad. No:1 Kat:22
Polaris Plaza
80670 Maslak/Istanbul
Robert Bosch Sp. z o.o.
Bosch Service Center PT
K Vápence 1621/16
692 01 Mikulov
Tel.: +420 (519) 305 700
Fax: +420 (519) 305 705
E-Mail: servis.naradi@cz.bosch.com
www.bosch.cz
Přeprava
106 | Magyar
124 | Română
Punere în funcțiune
Bosch Service Center
Str. Horia Măcelariu Nr. 30–34, 013937 București
Tel. Service scule electrice: +40 (021) 4 05 75 40
Fax: +40 (021) 4 05 75 66
E-Mail: infoBSC@ro.bosch.com
158 | Latviešu
- GOS 10,8 V-LI PROFESSIONAL
- BOSCH
- 6 | DEUTSCH
- SICHERHEITSHINWEISE
- DIGITAL INSPECTION CAMERA
- MAGNET
- PRODUCT DESCRIPTION AND SPECIFICATIONS
- INTENDED USE
- PRODUCT FEATURES
- 14 | ENGLISH
- ASSEMBLY
- BATTERY CHARGING
- BATTERY CHARGE-CONTROL INDICATION
- REMOVING THE BATTERY
- MOUNTING THE CAMERA CABLE (SEE FIGURE A)
- MOUNTING THE CAMERA CABLE EXTENSION (ACCESSORY)
- MOUNTING THE MIRROR, MAGNET OR HOOK (SEE FIGURE B)
- CONNECTING THE EXTERNAL IMAGE REPRODUCTION (SEE FIGURE C)
- OPERATION
- INITIAL OPERATION
- INSERTING THE BATTERY
- SWITCHING ON AND OFF
- REGULATING THE ILLUMINATION LIGHT IN THE CAMERA HEAD
- WORKING ADVICE
- 16 | ENGLISH
- RECOMMENDATIONS FOR OPTIMAL HANDLING OF THE BATTERY
- MAINTENANCE AND SERVICE
- MAINTENANCE AND CLEANING
- AFTER-SALES SERVICE AND CUSTOMER ASSISTANCE
- WWW.BOSCH-PT.COM
- GREAT BRITAIN
- IRELAND
- AUSTRALIA, NEW ZEALAND AND PACIFIC ISLANDS
- REPUBLIC OF SOUTH AFRICA
- CUSTOMER SERVICE
- GAUTENG - BSC SERVICE CENTRE
- KZN - BSC SERVICE CENTRE
- WESTERN CAPE - BSC SERVICE CENTRE
- BOSCH HEADQUARTERS
- PEOPLE'S REPUBLIC OF CHINA
- CHINA MAINLAND
- HK AND MACAU SPECIAL ADMINISTRATIVE REGIONS
- INDONESIA
- PHILIPPINES
- MALAYSIA
- 18 | ENGLISH
- THAILAND
- SINGAPORE
- VIETNAM
- TRANSPORT
- DISPOSAL
- ONLY FOR EC COUNTRIES
- BATTERY PACKS/BATTERIES
- LI-ION
- 22 | FRANÇAIS
- 32 | ESPAÑOL
- ELIMINACIÓN
- 36 | PORTUGUÊS
- 38 | PORTUGUÊS
- 42 | ITALIANO
- 50 | NEDERLANDS
- INGEBRUIKNEMING
- ACCU PLAATSEN
- LAMP IN CAMERAKOP REGELEN
- 78 | ΕΛΛΗΝΙΚΆ
- ΑΠΌΣΥΡΣΗ
- PŘEPRAVA
- PUNERE ÎN FUNCȚIUNE
Brand : BOSCH
Model : GOS 10 8 V-LI Professional
Category : Security and Access Control System