
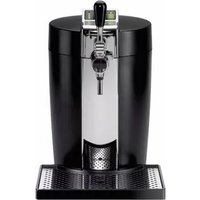
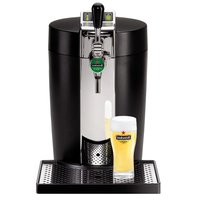
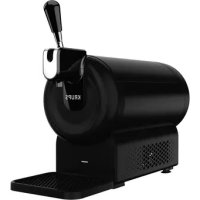
Beertender VB2158 - Beer dispenser KRUPS - Free user manual and instructions
Find the device manual for free Beertender VB2158 KRUPS in PDF.


| Product type | Beer dispenser |
| Brand | Krups |
| Model | Beertender VB2158 |
| Dimensions (WxDxH) | 40 x 25 x 40 cm |
| Weight | 10 kg |
| Power supply | 220-240 V, 50-60 Hz |
| Power | 100 W |
| Tank capacity | 5 liters |
| Cooling type | Compressor |
| Serving temperature | 2-8 °C |
| Draft pressure | Built-in CO2 |
| Main functions | Cooling, pressure dispensing, foam control |
| Maintenance and cleaning | Weekly cleaning of the hose and dispenser nozzle with warm soapy water |
| Descaling | Every 3 months with a suitable descaling product |
| Safety | Automatic shut-off in case of overheating, splash protection |
| Spare parts | Draft hose, dispenser nozzle, air filter |
| Repairability | Repairability index: 8/10 |
| Warranty | 2 years |
| Package contents | Dispenser, hose, CO2 plug, user manual |
Frequently Asked Questions - Beertender VB2158 KRUPS
User questions about Beertender VB2158 KRUPS
0 question about this device. Answer the ones you know or ask your own.
Ask a new question about this device
Download the instructions for your Beer dispenser in PDF format for free! Find your manual Beertender VB2158 - KRUPS and take your electronic device back in hand. On this page are published all the documents necessary for the use of your device. Beertender VB2158 by KRUPS.
USER MANUAL Beertender VB2158 KRUPS

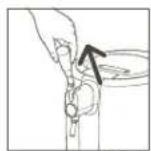
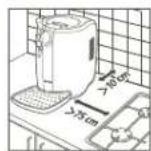
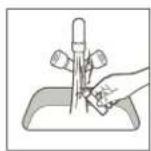
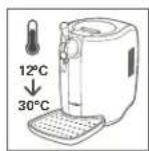
fig. 1 fig. 2 fig. 3 fig. 4
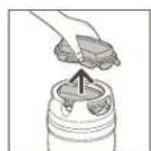


fig. 5 fig. 6 fig. 7 fig. 8

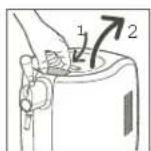

fig. 9 fig. 10 fig. 11 fig. 12


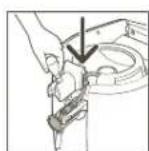
fig. 13 fig. 14 fig. 15 fig. 16
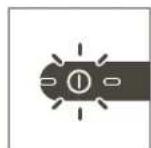

fig. 17 fig. 18 fig. 19 fig. 20


fig. 21 fig. 22 fig. 23 fig. 24


fig. 25 fig. 26 fig. 27 fig. 28
DO NOT - NEVER - COSA NON FARE - CUIDAR PARA EVITAR RIESGOS - MHN

fig. 29 fig. 30 fig. 31
General information 2
For ease of reading
PROBLEMS - CAUSES - REMEDIES
General information....18
Guidelines for reading these instructions
Using these operating instructions
Technical specifications....19
Safety rules....19
Cautionary Notes 22
Using the BeerTender system
Using the keg
Getting the BeerTender ready 24
Cooling the BeerTender keg
Installing the BeerTender appliance
Connecting to the power supply
Using the BeerTender....25
Inserting a BeerTender keg
Control panel
Sound emitted by the Beertender
Dispensing beer 27
Step 1: Preparing a glass
Step 2: Dispensing beer
Step 3: Beer in the glass
Step 4: The quality of a glass of beer
Cleaning 28
Cleaning after daily use
Cleaning after installation of a new BeerTender keg
Routine cleaning
Children's safety 29
Legal information....29
Disposal....30
Troubleshooting....30
GENERAL INFORMATION
■ The BeerTender is designed to dispense cool beer from a special container (BeerTender Keg) fitted inside the appliance itself. This elegantly designed machine has been engineered for indoor domestic use and is not suitable for continuous professional use. Any commercial use, inappropriate use or failure to comply with the instructions, the manufacturer accepts no responsibility and the guarantee will not apply.
WARNING: The manufacturer will accept no liability for damage caused as a result of:
- Improper use and use for purposes other than those envisaged;
- Repairs not performed at authorized service centers;
- Tampering with the power cord;
- Tampering with any BeerTender appliance component;
- Use of spare parts and accessories other than those supplied by the manufacturer;
- Attempts to access internal parts of the appliance.
The guarantee will be invalidated in such cases.
Please see full guarantee terms and conditions in the leaflet enclosed or on our web site: www.krups.com
GUIDELINES FOR READING THESE INSTRUCTIONS

THE WARNING INDICATES INSTRUCTIONS THAT ARE IMPORTANT FOR THE USER'S SAFETY.
■ Please adhere strictly to these directions to ensure proper use and avoid serious injury! This symbol highlights information that is especially important for getting the best out of the machine.
USING THESE OPERATING INSTRUCTIONS
- Keep these operating instructions in a safe place and make them available to any other person who uses the appliance. If you have any problems or queries please contact our Customer Relations Team first for help and advice.
(see details at the end of this manual)
TECHNICAL SPECIFICATIONS
| Rated voltage See plate on bottom of appliance |
| Rated power See plate on bottom of appliance |
| Power supply See plate on bottom of appliance |
| Insulation class II |
| Cooling class N |
| Casing material Thermoplastic |
| Size (w x h x d) (mm) 274 x 452 x 505 (490 without drip tray) |
| Weight 5.5 Kg (5.3 Kg without drip tray) |
| Cord length 1.1 m |
| Beer container BeerTender Keg |
| Control panel Top |
| Operating conditions With 80% R.H. min 12°C max 30°C |
The manufacturer reserves the right to make constructive and engineering changes as warranted by technological advances.
Appliance complying with European Directive 89/336/EEC (Legislative Decree 476 of 04/12/92) concerning electromagnetic compatibility.
SAFETY RULES
! NEVER PLACE POWERED COMPONENTS IN CONTACT WITH WATER. THERE IS A DANGER THAT THIS MAY CAUSE A SHORT CIRCUIT.
INTENDED USE
■ This appliance has been manufactured exclusively for dispensing beer in a domestic setting. ■ Only original BeerTender Kegs mentioning “Compatible BeerTender” can be used with the appliance; you should not use any other commercially available beer containers. ■ Before using a keg, check the “best before end” date shown at the bottom of the keg. Do not insert or use BeerTender Kegs after the date shown.
- You should not use the appliance for purposes or with containers other than those specified above. ■ You should not introduce any materials other than BeerTender Kegs inside the appliance. ■ You should not make technical changes or use the appliance in any manner other than as directed, due to the risks involved! ■ The appliance should be used solely by adults in full possession of their mental and physical capacities.
POWER SUPPLY
■ Connect the appliance to a suitable electric socket. ■ Make sure the power supply matches the voltage shown on the appliance rating plate.
POWER CORD
■ Never use the beer dispenser if the power cord is faulty. ■ Have faulty cords and/or plugs immediately replaced by an authorised service centre only, to avoid any danger. - Do not lay the power cord round corners or on sharp edges or hot surfaces and protect it from oil. ■ Do not lift or pull the appliance by the cord. - Do not pull out the plug by tugging on the cord and do not touch it with wet hands or feet. - Do not allow the power cord to hang loosely from tables or shelves.
PROTECTING OTHER PEOPLE
■ This appliance is not intended for use by persons (including children) with reduced physical, sensory or mental capacities, or lack of experience and knowledge, unless they have been given supervision or instruction concerning use of the appliance by a person responsible for their safety. ■ Children should be supervised to ensure that they do not play with the appliance. ■ Children are not aware of the danger associated with household appliances. - Do not leave the materials used to pack the appliance within children's reach. ■ To prevent children from using the appliance, you can remove the tap handle. To remove the handle, make sure that it is in an upright position and pull it upward - fig. 1.
POSITIONING AND MAINTENANCE
■ Install the appliance in an upright position in a safe place, where it cannot be overturned or injure anyone. ■ To ensure that the BeerTender works correctly and efficiently, you are recommended to:
- place it on a perfectly level and stable surface;
- Choose a clean, well-lit area with an easily accessible electric socket.
- Keep the appliance at a minimum distance (75 cm) from the stove as shown in the diagram - fig. 2.
- Store the BeerTender Keg at room temperature or in the fridge.
- Make sure it is not exposed to direct sunlight.
- Do not use the appliance in the open air.
- Do not place the appliance on very hot surfaces or near open flames, as these may melt or damage the casing.
CLEANING
Before cleaning the appliance, it is essential to turn off the main switch and then pull the plug out of the socket. Never immerse the appliance in water! Please note that too much dust can affect the efficiency of the cooling system of your BeerTender. It is possible that dust enters the machine through the vent grid at the rear of the machine. We recommend that, using a vacuum cleaner, you clean this particular area regularly. This will allow your BeerTender to last longer and remain efficient over time. You should never attempt to access internal parts of the appliance.
STORING THE APPLIANCE
- When the appliance is not to be used for a long period of time, switch off and pull out the plug.
- Store the appliance in a dry place out of children's reach. Protect it from dust and dirt. Do not store the appliance with a keg inside.
REPAIRS / MAINTENANCE
Should a breakdown, fault or suspected fault occur after the appliance has been accidentally dropped, pull the plug out immediately. Never operate a faulty appliance. All servicing and repairs must be carried out by an authorized service center. The manufacturer will not be liable for any injury or damage to persons and/or property caused by the appliance malfunctioning should repairs not be performed by an authorized service center.
FIRE PREVENTION
In the event of a fire, use carbon dioxide (CO2) extinguishers. Do not use water or powder extinguishers.
MACHINE COMPONENTS
BeerTender
- BeerTender dispensing system
- Refrigerating chamber
- Lid
- Lid opening handle
- LED control panel
- Tap cover
- Dispensing spout
- Beer tap handle
- Drip grate
- Drip tray
- Main switch
- Power cord with plug
- BeerTender Keg
- Beer tube
BeerTender Keg
CAUTIONARY NOTES
To obtain draft beer of optimal quality you should keep two basic factors in mind, the temperature of the beer and hygienic conditions.
- Pre-chill the beer keg to prevent excess foam. Always use a chilled keg. If you fail to chill the keg sufficiently too much foam will be produced when you start to pour your beer.
- Always clean the appliance after use. Beer is a natural product that can spoil. Therefore, you should always keep the appliance clean to maintain the quality of the beer dispensed and prevent unpleasant odours (see "Cleaning"). The dispensing spout should be cleaned before a new keg is installed and the drip tray and grate should be emptied after every use - fig. 3.
■ You should also follow these other rules when using the BeerTender system:
- Do not attempt to chill a BeerTender Keg in your freezer. Just like glass bottles, a keg may burst when placed in the freezer. Moreover, freezing diminishes the quality of the beer - fig. 29.
- Use your BeerTender in a place where the temperature is between 12°C and 30°C. At colder temperatures the appliance cooling system could be damaged, whereas at warmer temperatures the system will not be able to reach the ideal beer dispensing temperature. Store the beer keg at room temperature - fig. 4.
! WARNING! To avoid overheating, keep the BeerTender Keg out of direct sunlight - fig. 30.
- Always hold the appliance by the bottom edge when lifting it - fig. 5.
! WARNING! Do not use the handle or power cord to lift the BeerTender - fig. 31.
USING THE KEG
■ Make sure that you chill the keg before using it. If you fail to chill the keg sufficiently too much foam will be produced when you start to pour beer. ■ Please also be aware that the first glass that you pour from every new keg will contain mostly foam. Draught beer in a bar behaves in exactly the same way! ■ The BeerTender Keg "Compatible BeerTender" features a patented system for storing and dispensing beer. It guarantees beer of higher, long-lasting quality and a BeerTender system that is very easy and pleasant to use - fig. 6. !IMPORTANT: before installing a keg inside the appliance, check the "best before end" date shown at the bottom of the keg. This date is a reliable indication if the keg has been stored at room temperature. ■ The use of kegs "Compatible BeerTender" in the BeerTender system necessitate the use of beer tubes - fig. 7. A bag of 5 tubes is delivered with the BeerTender appliance. To receive additional tubes, please contact our customer service or go to BeerTender Internet site. (See details at the end of this manual)

! WARNING: contents under pressure. Do not shake or drop. Do not expose to sunlight or temperatures above 30°C. Even when the keg is empty, do not force it open and do not expose to flame or fire.
GETTING THE BEERTENDER READY

FOR YOUR OWN AND OTHERS' SAFETY, PLEASE KEEP METICULOUSLY TO THE "SAFETY RULES".
COOLING THE BEERTENDER KEG
■ BeerTender kegs must be chilled before use. ■ Using a BeerTender keg that is too warm will result in too much foam. ■ There are two ways to chill the BeerTender Keg:
- inside the BeerTender (see "Using the BeerTender"). It will take about 15 hours to cool the keg down to 4°C if the BeerTender Keg and the appliance are stabilized at a room temperature of 20°C.
- in a refrigerator. This will take about 12 hours depending on the cooling capacity of your refrigerator.
Tip: we recommend that you always keep an extra BeerTender Keg in the refrigerator. That way you will always have a chilled keg available.
We also recommend that you switch the appliance on at least one hour before intended use to get full benefit from the pre-cooling of the keg.
!WARNING! Do not attempt to chill the keg in a freezer. Just like glass bottles, a keg may burst when placed in the freezer. Moreover, freezing diminishes the quality of the beer - fig. 29.
INSTALLING THE BEERTENDER APPLIANCE
■ The original packing is designed and made to protect the appliance. It is recommended that you keep it for future transport. ■ Remove the BeerTender appliance from the packaging and place it on a dry, clean, level, stable surface that is sufficiently large to accommodate it. ■ The temperature of the room must be between 12°C and 30°C. - fig. 4. ■ Set the drip tray and grate in place at the front of the appliance. Make sure the drip tray is properly fitted and positioned. - Do not install the appliance near sources of heat or in places exposed to direct sunlight. i Note: keep in mind that during use the drip tray will have to be emptied and rinsed regularly. When the BeerTender system is not in use, you can remove the drip tray and place it elsewhere to save space. !WARNING! The drip tray must be positioned on a level surface and must not jut out from the surface it is resting on.
■ After installing the BeerTender appliance you must clean the dispensing spout; this is the only part of the appliance that will come into contact with the beer - fig. 8. It is essential that you wash the dispensing spout before using the appliance for the first time and at least every time a new keg is connected inside the BeerTender system. This part can also be washed in a dishwasher - fig. 9. ■ To clean the spout, remove it from its housing by turning it clockwise. After washing the spout, screw it back into place.
CONNECTING TO THE POWER SUPPLY
Electricity can be dangerous! Therefore you must always scrupulously abide by the safety rules.
■ The appliance must be plugged into a suitable, properly installed electric socket. ■ The voltage of the appliance has been set in the factory. Check that the mains voltage matches the voltage indicated on the rating plate on the rear of the appliance. ■ Make sure the main switch on the rear of the machine is set to "0" before connecting the BeerTender to the mains. Insert the plug into a socket with the correct voltage and turn on the appliance by moving the main switch to "I" - fig. 10.
The appliance will immediately start cooling the inner chamber as soon as the main switch is set to "I".
Note: the BeerTender may only be used with BeerTender Kegs "Compatible BeerTender" containing beer sold by the Heineken group. ■ The appliance can only be used if it contains a BeerTender Keg and only if the main switch is set to "I". ■ The LED on the left side of the control panel, when illuminated, tells you that the appliance is switched on. ■ You can open the appliance by pressing the handle on top of the lid. When the handle is released, you can lift the lid up - fig. 11-12.
Note: do not force the lid beyond the set opening position as this could damage it.
■ When the lid is completely open, insert a BeerTender Keg as shown in the figure - fig. 13.
■ Remove the tap cover by pulling it upward as shown on the drawing - fig. 14.
Note: this cover can be removed for cleaning.
■ Take the tap of the BeerTender Keg "Compatible BeerTender" and fit it into place.
Note: Do not try to actuate the tap of the BeerTender Keg by hand.
■ Position the beer tube as shown on drawing - fig. 15.
■ Put the tap cover back in place.
Note: the tap cover cannot be closed if the BeerTender Keg tap is not fitted properly.
■ Make sure the tap handle is positioned in the tapping mechanism before the lid is closed.
■ Make sure that the handle is positioned as shown on the drawing to avoid damaging the beer tube - fig. 16.
Carefully close the appliance lid - fig. 17.
CONTROL PANEL
Two LEDs on the top of the lid provide important indications:
Green ON LED on the left of the panel: when lit, it indicates that the appliance is operating - fig. 18.
Green beer-temperature LED on the right side of the panel: when the BeerTender Keg has reached the ideal temperature, the LED switches on and the appliance goes into “stand-by” cooling mode - fig. 19.
SOUND EMITTED BY THE BEERTENDER APPLIANCE
The cooling function of the BeerTender produces sound. The BeerTender features a cooling system which controls the temperature of the BeerTender Keg. There are two cooling modes:
- Stand-by cooling corresponds to the main operating conditions. In this mode, the cooling fan produces a barely audible noise.
- Active cooling is triggered when the temperature inside the cooling chamber is too high. As soon as the beer keg reaches the right temperature, the appliance will switch back to stand-by cooling mode.
DISPENSING BEER
Note: always check the “best before end” date shown on the bottom of the BeerTender Keg. Do not use the BeerTender Keg beyond this date.
Note: the beer must be dispensed into suitable containers; the dispensing function is started and stopped manually by the user.
Step 1 – Preparing a glass
In order to obtain perfect draft beer, it is essential to start with a clean, cool glass. Rinse the glass in cold water before dispensing beer (the colder the glass the better) - fig. 20.
Tip: we recommend that you use your beer glasses for drinking beer alone. Some beverages, like milk, leave a small residue in the glass which will reduce the head on your beer.
Step 2 – dispensing beer
Tip: Look at the control panel to check that the beer has reached the right drinking temperature. ■ Position a glass beneath the tap, holding it at an angle of 45 degrees (see picture) - fig. 21. ■ Firmly and quickly pull the handle down as far as it will go. Let the beer run into the glass. - Avoid contact between the dispensing spout, the glass and the beer already in the glass. This could cause excessive foaming.
i Note: every time you install a new keg in the BeerTender, the first glass of beer will fill up with too much foam. When this occurs, allow the glass to stand on the drip tray. As soon as the foam has settled, continue filling the glass.
i Note: too much foam will also be generated if the tap handle is opened just slightly or slowly; several beers can be dispensed in sequence when the tap handle is open. The beer will flow out more slowly after the first glass has been filled.
Step 3 – Beer in the glass
■ Place the glass of beer on the drip tray and wait for the foam to settle - fig. 22.
Step 4 – The quality of a glass of beer
■ An excellent draft beer has the following characteristics:
- a head of about 3 cms;
- a head evenly distributed around the wall of the glass that adheres to the surface of the beer;
- a crystal clear colour, with bubbles of carbon dioxide escaping from the sides and bottom of the glass;
- a temperature of 4°C to 6°C (in the glass).
i Note: to prevent excessive foam from forming, always use a pre-chilled BeerTender Keg and a clean glass rinsed in cold water.
CLEANING
In addition to routine cleaning, the BeerTender should be cleaned after daily use and when you install a new BeerTender Keg.
!WARNING! Do not dry the appliance and/or its components in a microwave and/or conventional oven.
CLEANING AFTER DAILY USE
■ The drip tray and grate should be cleaned after every use. Remove the grate before emptying out the drip tray. The grate must be set back in place during normal use of the BeerTender - fig. 23. i Note: You can wash the drip tray with warm water and a mild detergent. The drip tray is also dishwasher safe. !WARNING! Never use aggressive cleaning agents such as vinegar, acids, solvents or petrol.
CLEANING AFTER INSTALLATION OF A NEW BEERTENDER KEG
- When you install a new BeerTender Keg you must clean the dispensing spout. The spout is the only part of the appliance that comes into contact with the beer - fig. 24.
It is essential to wash the spout either normally by hand or in a dishwasher.
Note: the dispensing spout comprises plastic and metal parts that are permanently joined together and do not pose any problems of hygiene. Do not attempt to separate these parts.
■ The beer dispensing mechanism must be cleaned using a damp cloth and a mild detergent - fig. 25.
Note: use a piece of cotton to thoroughly clean all the parts - fig. 26.
!WARNING! Do not attempt to clean the mechanism using hard and/or sharp objects: it is a precision component and you will risk damaging it.
ROUTINE CLEANING
■ Clean the appliance cooling chamber on a regular basis using a damp cloth and mild detergent - fig. 27. ! WARNING! Do not fill the cooling chamber with water as this may result in permanent damage. Never use aggressive agents such as vinegar, acids, solvents or petrol. ■ The tap cover can be removed. Clean it with warm water and a mild detergent. ! WARNING! Do not wash the tap cover in a dishwasher, as it could be damaged and lose its shine. Never use aggressive agents such as vinegar, acids, solvents or petrol.
CHILDREN'S SAFETY
■ To prevent children from using the appliance, you can remove the tap handle. ■ To remove the handle, make sure it is in an upright position and pull it upwards - fig. 28.
LEGAL INFORMATION
■ These operating instructions contain the necessary information for the proper use and upkeep of the appliance. It is essential to read this information and comply with these instructions in order to use and maintain the appliance in complete safety. ■ Please note, moreover, that the contents of these operating instructions do not form part of a previous or already existing legal agreement or contract, hence they do not affect the terms of the latter. The manufacturer's obligations are based solely on the contract of sale, which also contains complete an exclusive terms pertaining to the warranty service provided. ■ The warranty conditions as set forth in the contract are neither limited nor extended on the basis of the explanations herein. ■ These operating instructions contain information protected by copyright. - They may not be photocopied or translated into another language without the manufacturer's prior written consent.
DISPOSAL AND ENVIRONMENT PROTECTION

This marking indicates that this product should not be disposed with other household wastes throughout the EU.
■ To prevent possible harm to the environment or human health from uncontrolled waste disposal, recycle it responsibly to promote the sustainable reuse of material resources. To return your used device, please use the return and collection systems or contact the retailer where the product was purchased. They can take this product for environmental safe recycling.
■ Appliances that are no longer used should be rendered unusable. ■ Unplug the appliance and cut the power cable. ■ Appliances no longer in use must be taken to a suitable waste collection facility so that the special components contained in the appliance may be duly disposed of. The “TEM – Module” (or Peltier’s cell) must be disposed of in accordance with the regulations currently in force in the user’s country.
TROUBLESHOOTING
| Problem Possible causes | Remedies | |
| The appliance does not come on. | The appliance is not connected to the mains power supply. | Connect the appliance to the power supply. |
| You cannot position the tap cover correctly. | The BeerTender Keg tap has been activated by hand. | Put the BeerTender Keg tap back in its original position. |
| The BeerTender Keg tap or tube is not inserted correctly. | Remove the BeerTender Keg tap from the appliance and fit it again following section: Using the BeerTender. | |
| No beer is being dispensed. | The BeerTender Keg is empty. | Replace the BeerTender Keg with a new one. |
| There is no keg inside the BeerTender appliance. | Install a keg inside the BeerTender appliance. | |
| The BeerTender appliance tap handle is not correctly installed/positioned. | Install/position the tap cover correctly. | |
| You cannot close the lid. | The tap cover has not been positioned correctly. | Position the tap cover correctly. |
| The BeerTender appliance produces too much foam when dispensing beer (see also section: Dispensing beer). | The BeerTender Keg has not reached the right dispensing temperature. | Allow the BeerTender Keg to cool to the right temperature. You can rely on the temperature indicator on the control panel of your BeerTender appliance. |
| The BeerTender Keg has been shaken. | Wait 4 hours before dispensing beer. | |
| The tap handle is being moved too slowly. | Firmly and quickly pull the handle down and forward as far as it will go. | |
| Beer flows out too slowly. | The tap handle is not open all the way. | Open the tap completely. |
| The BeerTender appliance is dispensing warm beer. | The BeerTender Keg has not been chilled for long enough and is thus not at the right serving temperature. | Allow the BeerTender Keg to cool long enough in the appliance. |
| The temperature indicator on the control panel lights up. | The BeerTender appliance is exposed to too hot a temperature or direct sunlight (see also section: Cooling the keg and Installing the BeerTender). | Use the appliance indoors and move it to a room where the ambient temperature does not exceed 30°C. |
If you have any problems or queries please contact our Customer Relations Team first for expert help and advice.
(Refer to the list of service contacts included in the guarantee leaflet enclosed with the product.)
German
General information....33
PROTECTION OF OTHER PERSONS
- GENERAL INFORMATION
- TECHNICAL SPECIFICATIONS
- SAFETY RULES
- CAUTIONARY NOTES
- GETTING THE BEERTENDER READY
- USING THE BEERTENDER
- DISPENSING BEER
- CLEANING
- CHILDREN'S SAFETY
- LEGAL INFORMATION
- DISPOSAL
- TROUBLESHOOTING
- GUIDELINES FOR READING THESE INSTRUCTIONS
- THE WARNING INDICATES INSTRUCTIONS THAT ARE IMPORTANT FOR THE USER'S SAFETY
- USING THESE OPERATING INSTRUCTIONS
- INTENDED USE
- POWER SUPPLY
- POWER CORD
- PROTECTING OTHER PEOPLE
- POSITIONING AND MAINTENANCE
- STORING THE APPLIANCE
- REPAIRS / MAINTENANCE
- FIRE PREVENTION
- MACHINE COMPONENTS
- BEERTENDER
- BEERTENDER KEG
- USING THE KEG
- COOLING THE BEERTENDER KEG
- INSTALLING THE BEERTENDER APPLIANCE
- CONNECTING TO THE POWER SUPPLY
- CONTROL PANEL
- SOUND EMITTED BY THE BEERTENDER APPLIANCE
- STEP 1 – PREPARING A GLASS
- STEP 2 – DISPENSING BEER
- STEP 3 – BEER IN THE GLASS
- STEP 4 – THE QUALITY OF A GLASS OF BEER
- CLEANING AFTER DAILY USE
- CLEANING AFTER INSTALLATION OF A NEW BEERTENDER KEG
- ROUTINE CLEANING
- DISPOSAL AND ENVIRONMENT PROTECTION
- GERMAN
- PROTECTION OF OTHER PERSONS
Brand : KRUPS
Model : Beertender VB2158
Category : Beer dispenser