
CombBind C450E - Binder GBC - Free user manual and instructions
Find the device manual for free CombBind C450E GBC in PDF.


| Product Type | Electric Comb Binding Machine |
| Brand | GBC |
| Model | CombBind C450E |
| Punching Capacity | Up to 20 sheets (80 g/m²) |
| Binding Capacity | Up to 450 sheets (51 mm rings) |
| Maximum Paper Size | A4 (210 x 297 mm) |
| Number of Holes | 11 holes (A4) |
| Power Supply | 220-240 V, 50/60 Hz |
| Power | 150 W |
| Weight | 25 kg |
| Dimensions (W x D x H) | 500 x 350 x 250 mm |
| Main Functions | Electric punching and binding, punch depth adjustment, format selector |
| Maintenance and Cleaning | Unplug before cleaning; use a soft dry cloth; lubricate punch blades every 500 cycles |
| Safety | Emergency stop, thermal protection, child safety lock |
| Spare Parts and Repairability | Punch blades, binding rings, receiving tray available; repair by authorized service center |
| General Information | User manual included; 2-year warranty |
Frequently Asked Questions - CombBind C450E GBC
User questions about CombBind C450E GBC
0 question about this device. Answer the ones you know or ask your own.
Ask a new question about this device
Download the instructions for your Binder in PDF format for free! Find your manual CombBind C450E - GBC and take your electronic device back in hand. On this page are published all the documents necessary for the use of your device. CombBind C450E by GBC.
USER MANUAL CombBind C450E GBC
natural_image
Two black industrial paper feeders with open compartments and metal fittings, no visible text or symbols on the devices themselves.CombBind C340 & C450E
GB Instruction Manual
F Manuel d'utilisation
D Bedienungsanleitung
① Manuale d'istruzioni
NL Gebruiksaanwijzing
E Manual de instrucciones
P Manual de Instruções
TR Kullanım Kılavuzu
GR Οδηγίες
DK Brugsvejledning
FI Käyttöopas
NO Bruksanvisning
⑤ Bruksanvisning
PL Instrukcja obsługi
© CZ Návod k obsluze
H Használati útmutató
RUS Руководство по эксплуатации

ATTENTION
To register and activate the warranty go to
www.accoeurope.com

natural_image
Line drawings of two different household air filter units (no text or symbols present)English 4
Français 8
Deutsch 12
Italiano 16
Nederlands 20
Español 24
Português 28
Türkçe 32
Ελληνικά 36
Dansk 40
Suomi 44
Norsk 48
Svenska 52
Polski 56
Česky 60
Magyar 64
Русский 68


natural_image
Illustration of hands typing on a keyboard (no text or symbols visible)
natural_image
Illustration of hands holding a device with a tool, no visible text or symbols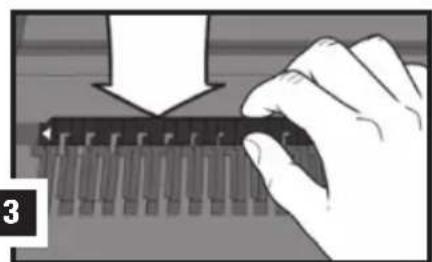
natural_image
Hand pressing down on a microchip component (no text or symbols visible)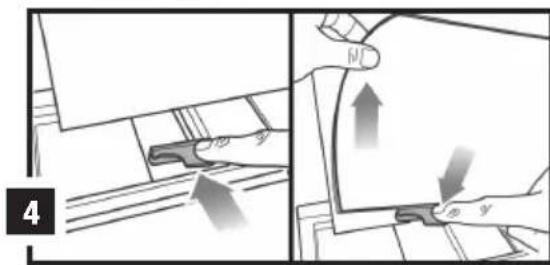
natural_image
Diagram showing two mechanical or electrical components with directional arrows, no visible text or symbols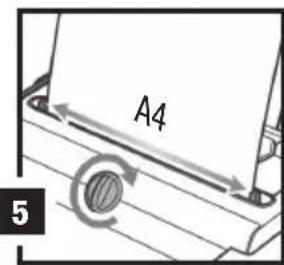


natural_image
Diagram showing a device with a highlighted internal component and a downward arrow indicating motion (no text or symbols present)
10 Quickstart Guide 1-2-3



natural_image
Illustration of hands using a tool to clean or adjust a tray (no text or symbols visible)
Specifications
| GBC CombBind C340 | GBC CombBind C450E | |
| Operation mode | manual | electric |
| Max. binding size | A4 | A4 |
| Hole pitch | US Pitch 9/6" / 14.28mm | US Pitch 9/6" / 14.28mm |
| Number of punch slots | 21 | 21 |
| Margin depth | fixed | fixed |
| Punching paper (80gsm) | max. 25 | max. 25 |
| Punching PVC plastic foils (0.2mm) | max. 3 | max. 3 |
| Max. comb diameter | 51mm | 51mm |
| Binding capacity | 450 sheets | 450 sheets |
| Net weight | 10.45kg | 15.6kg |
| Dimensions WxDxH | 440x450x200mm | 440x450x170mm |
| Voltage | n/a | 230V 50Hz AC |
CE C450E is approved to EN60950 and CE Standards. Technical data subject to change without notification.
Special notice
Thank you for choosing a GBC Binding machine. We aim to produce quality binding machines at an affordable price, with many advanced features to enable you to create excellent results every time. Before using your machine for the first time, please take a few minutes to read through this guide and retain these instructions for future reference.
Safety instructions

YOUR SAFETY AS WELL AS THE SAFETY OF OTHERS IS IMPORTANT TO ACCO BRANDS EUROPE. IN THIS INSTRUCTION MANUAL AND ON THE PRODUCT ARE IMPORTANT SAFETY MESSAGES. READ THESE MESSAGES CAREFULLY.
- In order to avoid overloading your machine, please refer to the maximum punch guide located on the front of your machine before punching.
- When punching PVC/PP covers, we recommend the cover be punched with some paper either side.
- DO NOT punch metallic objects such as staples or paper clips.
- Please empty the waste tray regularly.
- Ensure that the machine is operated on a flat stable surface.
- Never lift the machine by the punching handle. Always use the hand grips located on the side of the machine.
- The binder is not to be exposed to temperature / humidity conditions that would cause condensation. Maximum ambient temperature \~40°C.
Location of controls
A Document separator
B Clippings tray (located at side of machine)
C Comb opening teeth
D Paper centering dial
E Electric punch button (C450E only)
F Comb opening knob
G On/Off switch (C450E only)
H Punching slot
① Punching handle (C340 only)
J Quick start guide
Safety tips - C450E

• DO NOT obstruct air inlets and outlets.
- DO NOT use the binder if the power cord (mains cable) is damaged.
- DO NOT place the power cord where it may be tripped over or pulled. Ensure it does not come into contact with hot surfaces such as pipes or radiators. Make sure the cable is not squashed or pinched.
- DO NOT use an extension cable unless it is absolutely necessary and then only use one of a suitable current rating (10A or greater).
- DO NOT leave the binder connected to the electricity supply when not in use.
- DO NOT immerse the binder in water or other liquids. Doing so will result in ELECTRIC SHOCK.
- DO NOT attempt to disassemble the binder. Always consult a qualified person.
- The noise emitted by the machine does not exceed 70 dB.
Maintenance options
- If you would like to extend your warranty coverage beyond the stated manufacturers period, please consult your local ACCO Brands Europe reseller for options.
Setting up
- Your machine is ready to use when removed from the box. Retain the packaging in case you need to return the machine for repair.
- The punching mechanism is coated with a protective film of lubricant, which will mark your paper. Clear this by punching scrap sheets of paper until clean prior to binding.
Comb binding instructions
Each step relates to the illustrations throw-out at the front of this manual.
Please open the quick start guide, located at the front of the machine for reference.
Setting up - C450E
- Connect the binder to the electricity supply with the power cord supplied.
- Switch ON using the ON/OFF switch located at the rear of the binder by the power inlet socket.
- Wait while the binder goes through an automatic check procedure, both LED's light up.
- When complete the green LED will remain ON.
- The binder is ready for operation.

WARNING: This appliance MUST be earthed. If in doubt consult a qualified electrician.
1. Binding
1 Lift the lid and punch handle to the upright position.
2 Place entire document so it rests on the lid.
3 Measure document using colour coded guide (fig.1)
Open the lid of the machine and rest your document (including any cover sheets you have chosen) against the lid on the 'staging' area provided. Gently push the document back against the lid and check the document size using the colour coded guide on the staging area. You can leave your document on the staging area in readiness to punch.
4 Select comb which fits your document (fig.2)
Use the comb size guide to select the size of comb that fits your document i.e. 25 sheet document = 6mm comb.
5 Load comb onto machine (fig.3)
Insert the binding comb next to the white positional arrow on the machine, behind the metal comb support fingers, with the open side of the comb pointing upwards.
Note: If using GBC ProCombs ^™ the white arrow on your comb should align to the white arrow on the machine.
6 Open comb by turning lever towards you
The coloured arrows adjacent to the opening comb act as a guide as to how far to open in order to allow punched sheets to be easily inserted.
Rotate the binding lever toward you until the comb binding element opens sufficiently to insert your document.
Guarantee
Operation of this machine is guaranteed for two years from date of purchase, subject to normal use. Within the guarantee period, ACCO Brands Europe will at its own discretion either repair or replace the defective machine free of charge. Defects due to misuse or use for inappropriate purposes are not covered under the guarantee. Proof of date of purchase will be
Register this product online at www.accoeurope.com
required. Repairs or alterations made by persons not authorised by ACCO Brands Europe will invalidate the guarantee. It is our aim to ensure that our products perform to the specifications stated. This guarantee does not affect the legal rights which consumers have under applicable national legislation governing the sale of goods.
2. Sort paper (fig.4)
1 To manage large documents use the document separator.
2 Push the separator into the document.
3 Lift the separator upwards to reveal the first stack of paper ready for easy punching.
3. Set paper size (fig.5)
1 On manual machines, always ensure the punch handle is in the upright position before centering the paper.
2 Load the first paper stack into the punch slot.
3 Centre the paper using the dial located at the front of the machine (fig.5).
4 Adjust the machine by sliding the switch located at the front of the machine from A4 to A5.
4. Punch & bind
For manual punching: Lower the raised handle until the paper is punched, and support the machine when lifting the handle to the upright position (fig.6).
For electric punching: Press the 'punch button' located on the right panel of the machine (fig.6).
Note: If the machine is overloaded and fails to complete the punch cycle, the red LED will be lit. Press the 'punch button' to cancel the red LED. If this does not work contact the service helpline.
1 Place the front cover (finished side down) onto the opened binding element fingers. Place the document pages (face down) onto the element. Repeat for larger documents as required. Place the back cover (finished side up) on the open binding element fingers last.
2 Rotate the binding lever away from you, back to its original position to close the binding element.
3 Remove the book by lifting upward. Your document is now complete.
Binding tips
- Load the rear cover onto the open comb first, followed by the internal sheets and front cover.
- To edit your document, additional sheets may be included or removed by placing your document (comb open side up) onto the metal teeth and following instructions again.
- For further hints and tips please visit our website: www.gbceurope.com
Quickstep Guide 1-2-3 (fig.10)
The QuickStep Guide label on the machine is a quick reference guide to how to bind in three quick and simple steps.
1 Understand the comb size required by measuring on the document size area 1, select the appropriate ProComb.
2 Load the ProComb with the dot to the left and open until you see the coloured arrow.
3 Punch and load your document on to the spine until your document is complete. Close the spine.
ZipComb spine (fig.9)
The ZipComb spine allows you to create an easily editable document with comb punch orientation.
1 Place spine on to ZipComb holder (fig.9).
2 Load and punch paper as per 'Punch & bind', section 4.
3 Load punched paper on to spine.
4 Remove document and spine, close the ZipComb using the zipper included in the ZipComb boxes.
5 Complete by flipping the back cover around the spine, for a professional finish where the spine is hidden.
Security

A security slot is fitted for use with leading makes of security leash. E.g. Kensington Microsaver.
Maintenance
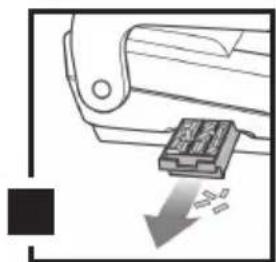
Please ensure the clippings tray is emptied on a regular basis. This may prevent your machine from overloading (fig.8).
C340:
When the clippings tray is full, you will see the clear window full of clippings. Empty the contents of the tray to continue binding.
C450E:
When the clippings tray is full, a yellow LED will be lit. Empty the contents of the tray to continue binding.
Troubleshooting
- This machine has a recommended duty cycle of 5 operations per minute, up to a maximum of 30 minutes on / 30 minutes off.
- This machine is fitted with a thermal overload safety feature. In extreme circumstances, the motor may overheat which will activate the safety feature. This feature will prevent the machine punching until it has cooled sufficiently.
- The thermal overload switch will automatically reset after approximately 15 minutes. The machine will then operate as if it had been overloaded.
ZipComb-spiralryg (figur 9)
4. Stansing & innbinding
GB ACCO Service Division
Hereward Rise, Halesowen, West Midlands, B62 8AN
Tel: 0845 658 6600, Fax: 0870 421 5576
www.acco.co.uk/service
F Acco Brands France SAS
Service après-vente, ZAC Excellence 2000,
6 rue Robert Schuman, 21800 Chevigny Saint Sauveur
Tel: +33 3 80 68 60 30, Fax: +33 3 80 68 60 49
contact@vmbs.fr
A Arnoldstrasse 5, 73614 Schorndorf, Germany
Tel: +49 7181 887 120, Fax:+49 7181 887 198
info.de@acco.com
E ACCO Brands Iberia SL
P Isaac Peral 19, 28820 Coslada (Madrid)
Tel: 902 500 182 ext. 2, Fax: 91 309 6412
① ACCO Brands Italia Srl
⑤ ACCO Brands Nordic AB
DK Makadamgatan 5, 254 64 Helsingborg, Sweden
N Tel: +46 42 38 36 00, Fax: +46 42 38 36 10
⑮ service.nordic@acco.com
LV
EST
LT
cz XERTEC a.s.
SK Kloknerova 2278/24 (vchod z ulice Koštířova, budova CeWe Color - Fotolab)
148 00 Praha 4 - Chodov
Tel: 225 004 411, Fax: 225 004 162
servis@xertec.cz, http://www.xertec.cz
PL ACCO Polska Sp. z o.o
Al. Jerozolimskie 184, 02-486 Warszawa
Tel.+48 22 570-18-29, fax +48 22 570-18-33
www.acco.pl
H Interelektronik Kft.
2 Coronation Avenue, Kings Park, NSW, Australia 2148
Tel: +61 2 9674 9000, Fax: +61 2 9674 0910
custsupport@pelikanartline.com.au
Clonshaugh Business & Technology Park, Clonshaugh, Dublin 17, Ireland
Tel: 01 816 4300, Fax: 01 816 4302
information-ie@acco.com, www.accorexel.ie
ZA Rexel Office Products (PTY) Ltd
Crusher Road, Crown Ext.3, PO Box 102,
Crown Mines, Johannesburg 2025, South Africa
Tel: +27 (0) 11 837 7723
service@rexelsa.co.za
IND ACCO Brands Asia Pte Ltd
PAK 47 Ayer Rajah Crescent, #05-08/17, Singapore 139947
BD Tel: +65 6776 0195, Fax: +65 6779 1041
webmaster@accobrandsasia.com
JPN GBC-Japan K.K.
14F Harmony Tower, 1-32-2 Honcho, Nakano-ku, Tokyo 164-8721
Tel: (81)-03-5351-1801, Fax: (81)-03-5351-1831
serv@gbc-japan.co.jp, www.gbc-japan.co.jp
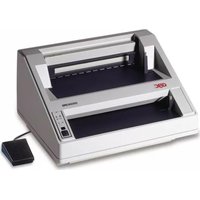

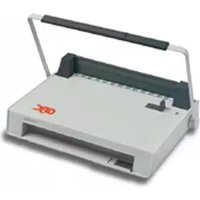

- CombBind C340 & C450E
- Special notice
- Safety instructions
- Location of controls
- Safety tips - C450E
- Maintenance options
- Setting up
- Comb binding instructions
- Setting up - C450E
- Binding
- Guarantee
- Sort paper (fig.4)
- Set paper size (fig.5)
- Punch & bind
- Binding tips
- Quickstep Guide 1-2-3 (fig.10)
- ZipComb spine (fig.9)
- Security
- Maintenance
- C340:
- C450E:
- Troubleshooting
- ZipComb-spiralryg (figur 9)
- Stansing & innbinding
Brand : GBC
Model : CombBind C450E
Category : Binder