
SWEET PEEK - Baby monitor Lorex - Free user manual and instructions
Find the device manual for free SWEET PEEK Lorex in PDF.


| Product Type | Baby Monitor |
| Brand | Lorex |
| Model | SWEET PEEK |
| Parent Unit Dimensions | Approx. 10 x 6 x 2 cm |
| Baby Unit Dimensions | Approx. 8 x 8 x 4 cm |
| Parent Unit Weight | Approx. 150 g |
| Baby Unit Weight | Approx. 120 g |
| Power Supply | Rechargeable lithium-ion battery |
| Battery Life | Up to 8 hours of continuous use |
| Range | Up to 300 m outdoors (depending on obstacles) |
| Frequency | 2.4 GHz |
| Screen | 2.8-inch TFT color screen |
| Screen Resolution | 320 x 240 pixels |
| Night Vision | Yes, automatic infrared |
| Two-way Audio | Yes, with talk-back function |
| Temperature Sensor | Yes, displayed on parent unit screen |
| Nightlight | Yes, integrated into baby unit |
| Wall Mount | Possible (mount kit not included) |
| Maintenance and Cleaning | Clean with a soft, dry cloth; do not use harsh liquids |
| Safety | Compliant with CE and RoHS standards |
| Spare Parts and Repairability | AC adapter, USB cable, replaceable battery |
Frequently Asked Questions - SWEET PEEK Lorex
User questions about SWEET PEEK Lorex
0 question about this device. Answer the ones you know or ask your own.
Ask a new question about this device
Download the instructions for your Baby monitor in PDF format for free! Find your manual SWEET PEEK - Lorex and take your electronic device back in hand. On this page are published all the documents necessary for the use of your device. SWEET PEEK by Lorex.
USER MANUAL SWEET PEEK Lorex
natural_image
Two white LOREX digital camera devices, one displaying a camera lens and the other showing a child's photo on a screen (no text or symbols visible on device body)
Safety Precautions
- Adult assembly is required. Keep small parts away from children when assembling.
- This product is not a toy. Do not allow children or infants to play with it.
- This video monitor is not a substitute for responsible adult supervision.
- Test the video monitor before use. Become familiar with its functions.
- Keep the cords out of reach from children and infants.
- Never use extension cords with power adapters.
- Only use the chargers and power adapters provided. Do not use other chargers or power adapters as this may damage the device and battery pack.
- Only insert batteries/battery pack of the same type.
• Insert batteries with the correct polarity.
• Do not mix new and used batteries.
- Do not mix alkaline, standard, and rechargeable batteries.
- Remove exhausted batteries from the product.
- Keep all batteries away from children and infants.
- Dispose or recycle batteries in accordance with local laws, which may vary by location.
- Do not cover the video monitor with a towel or blanket.
• Do not use the video monitor near water.
• Do not install the video monitor near a heat source.
- Do not touch the plug contacts with sharp or metal objects.
- Keep this user's guide for future reference.

To Avoid Injury to Children & Infants:
• MAKE SURE to keep the camera and all power cords are least 3ft / 1m away from cribs and out of reach of your child.
- Use the included cable clips to help keep power cords away from your child.

Table of Contents:
Product Includes ......2
Monitor Overview ......2
Camera Overview ......3
Getting Started ....4
Optional - Camera Batteries ......6
Optional - Wall Mounting the Camera ..... 7
Using Your Baby Monitor ....8
Using the Menus 8
Talking to Your Baby 9
Changing Channels....9
Adjusting Volume 10
Adjusting Screen Brightness....10
Using Digital Zoom....11
Turning on the Night-Light....11
Playing Lullabies 12
Temperature Alerts....13
Selecting Fahrenheit or Celsius....14
Enabling VOX Mode (Voice Trigger) ..... 14
Video Off Mode (Audio Only Mode) .....15
Pairing Additional Cameras ......16
Technical Specifications ....18
Camera 18
Monitor....18
Troubleshooting 19
Need Help? ......19
Product Includes
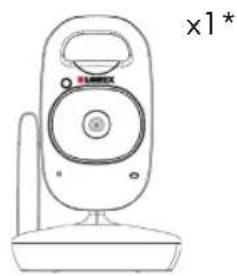
natural_image
Line drawing of a remote control device with no text or symbolsCamera
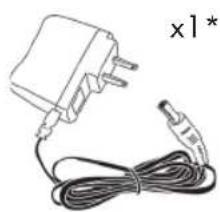
natural_image
Simple line drawing of a battery with a coiled cable and plug, no text or symbols present.Power Adapter


Screws & Anchors
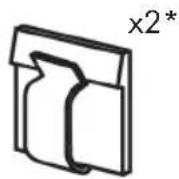
Cable Clips

natural_image
Line drawing of a vintage mobile phone with control panel and buttons (no text or symbols)Monitor

natural_image
Simple line drawing of a mobile phone charger with cable and connector (no text or symbols)Power Adapter
*Contents may vary by model
Monitor Overview
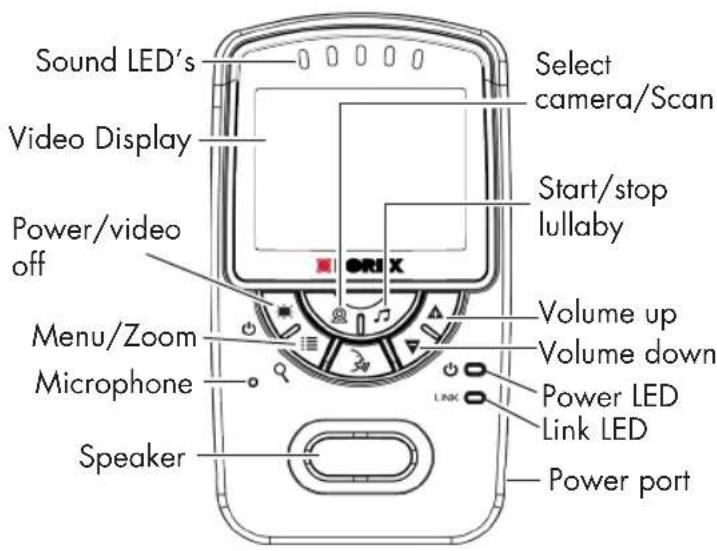

ENGLISH
Camera Overview

Getting Started
1
Connect the power adapter to the camera.


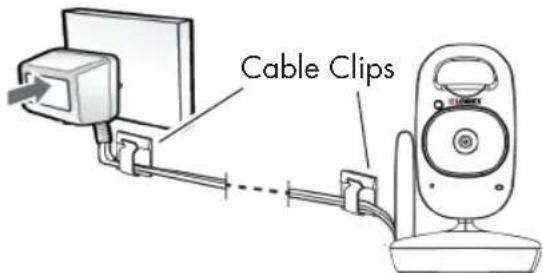
Make sure all power cables are at least 3ft / 1m away from the crib and out of reach of your child.
Use the included cable clips to help keep power cords away from your child.
2
Slide the power switch to ON.
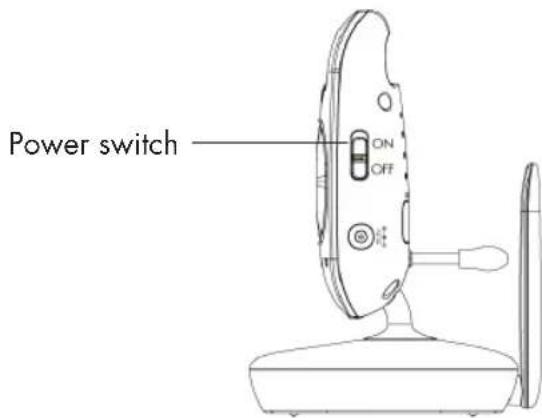
3
Press down on the battery compartment door and slide it off the monitor.
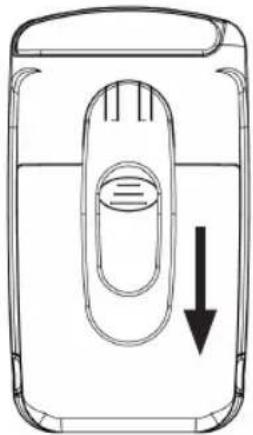
natural_image
Line drawing of a mobile phone casing with a handle and arrow indicating left-side motion (no text or symbols)4 Connect the battery cable to the monitor.
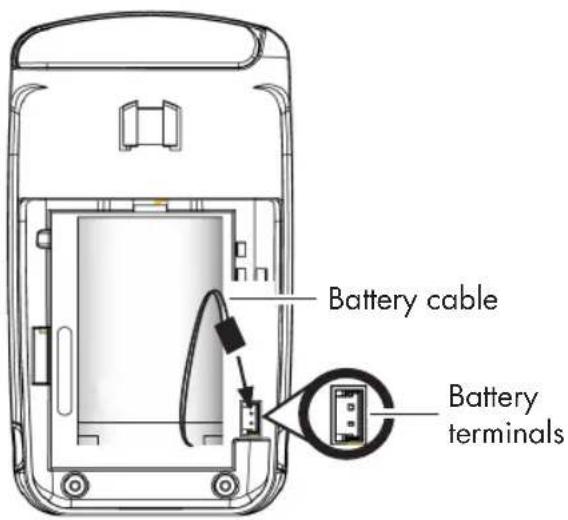
ENGLISH
The battery cable only connects one way. Do not force the battery cable.
5 Replace the battery compartment door.
6 Connect the power adapter to the monitor.

7 Press and hold the power button to turn on the monitor.

Tips
- It is recommended to charge the battery for 6 hours before use.
- For overnight monitoring, it is recommended to connect the power adapter. When fully charged, the monitor will stay on up to 8 hours in normal mode or 12+ hours on Video OFF mode (see page 15).
- For better reception, flip up the antenna on the monitor and camera.

Optional - Camera Batteries
Unscrew the battery compartment under the camera and insert 4x AAA batteries (not included). Replace the battery compartment door and screw.
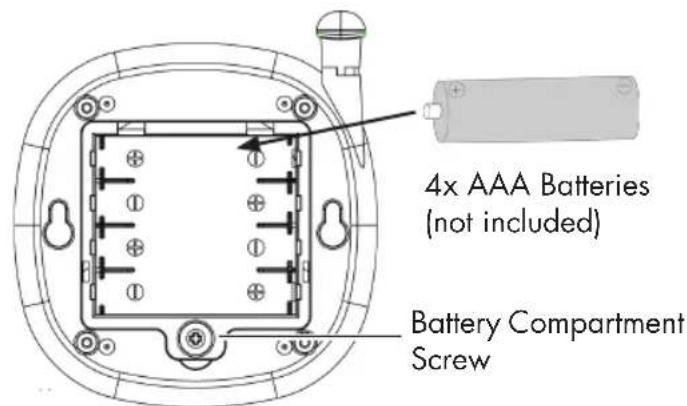

AAA batteries are not intended for overnight monitoring. The camera can operate for up to 4.5 hours on battery power.
Notes
- If using batteries, it is recommended to use the power adapter whenever possible to save battery life.
- The camera power adapter cannot charge rechargeable AAA batteries.
Optional - Wall Mounting the Camera
Before permanently mounting the camera:
• Determine where you will get the best view of your baby.
- Ensure the power cable is long enough to power the camera.

Make sure all power cables are at least 3ft / 1m away from the crib and out of reach of your child.
Use the included cable clips to help keep power cords away from your child.
1
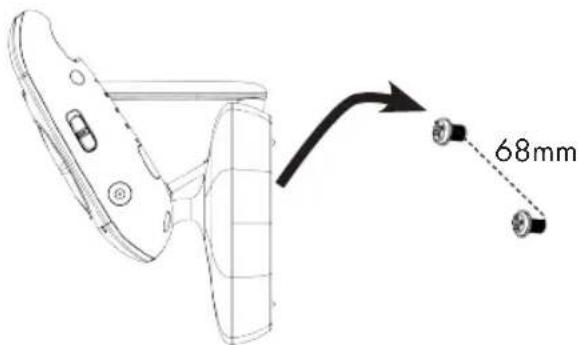
Drill 2 holes in the wall with centers exactly 68mm apart.
2
Tap anchors into holes with a hammer. Insert screws 2/3 of the way.
3
Align the mounting points with the screws and push the camera down.

Using Your Baby Monitor
The monitor shows the following icons during use:
| Icon Meaning | |
| Signal strength | |
| Selected channel | |
| Scan | Scan mode activated |
| Volume muted | |
| X2 | Digital zoom activated |
| Song currently playing | |
| Talk activated | |
| Icon Meaning | |
| VOX | VOX (Voice Trigger) on |
| Battery full | |
| Battery low | |
| Battery charging | |
| 68°F | Current room temperature |
| Out of Range | Camera out of range or off (e.g. batteries dead) |
Using the Menus

Talking to Your Baby

ENGLISH
Changing Channels

The monitor only plays sound from the camera that is currently being viewed.
When Scan mode is activated, the monitor changes channel automatically every few seconds. A Scan icon appears next to the currently selected channel number.

To connect additional cameras to the monitor, see "Pairing Additional Cameras" on page 16.
Adjusting Volume

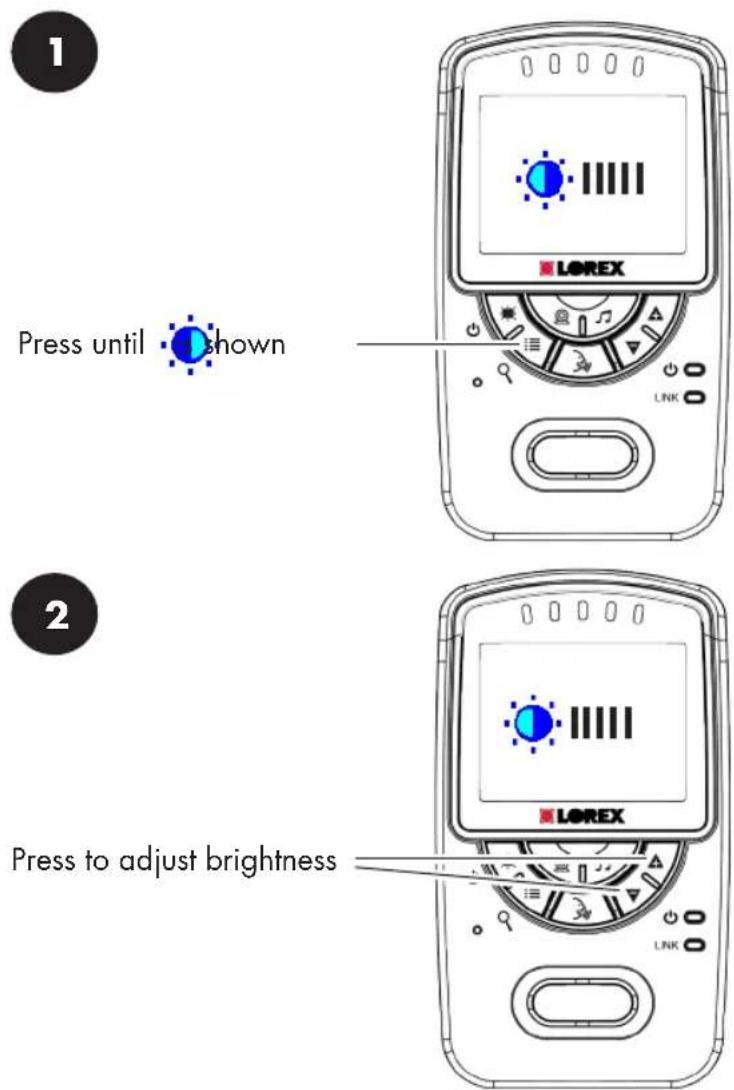
Adjusting Screen Brightness

Using Digital Zoom
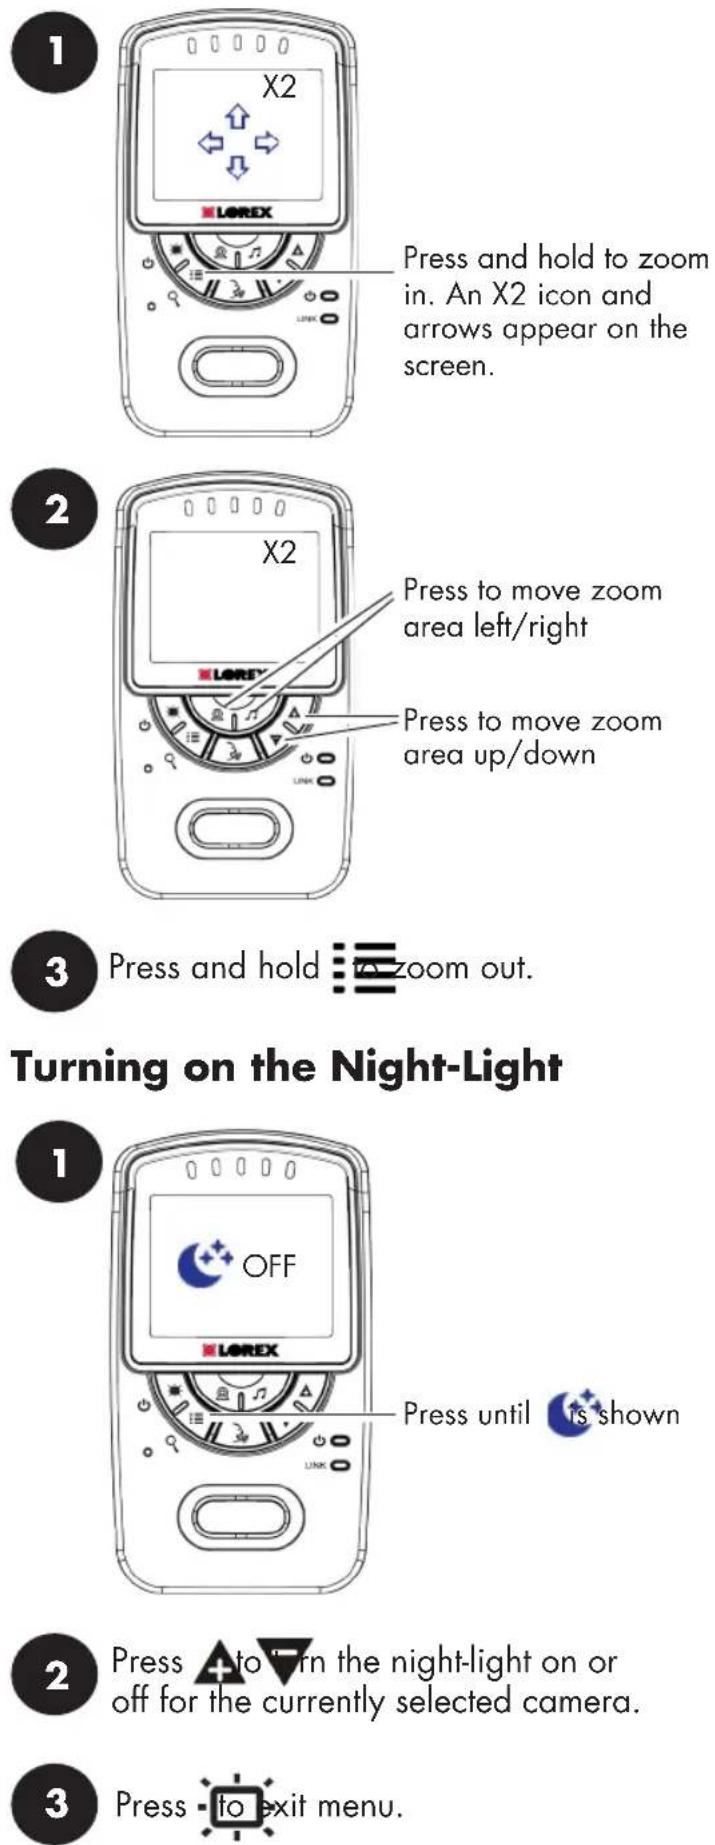
Press and hold to zoom in. An X2 icon and arrows appear on the screen.
Press to move zoom area left/right
Press to move zoom area up/down
Press and hold : to zoom out.
Turning on the Night-Light
Press until
Press +to "rn the night-light on or off for the currently selected camera.
Press to exit menu.
Playing Lullabies
The camera can play 5 different pre-loaded songs.
To play songs:


Temperature Alerts
The temperature alert feature allows you to ensure the baby's room is at a comfortable, safe temperature. The monitor beeps if the temperature gets too hot or cold. Temperature sensor is accurate within 3°F/1°C.
You can control the high and low temperatures that trigger alerts or disable temperature alerts.
To setup temperature alerts:
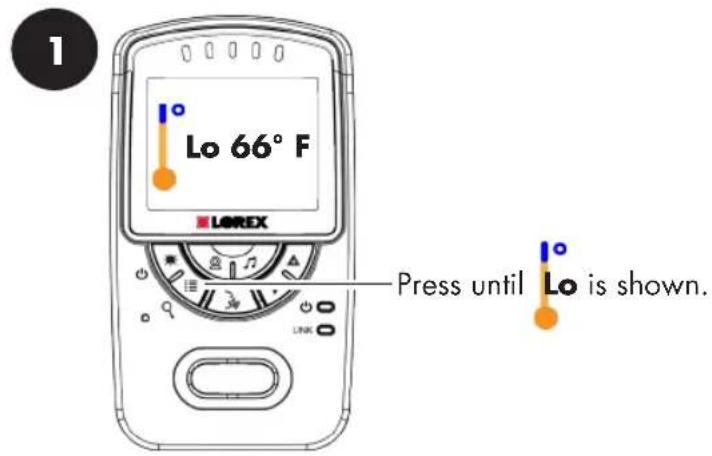
2 Press + to adjust the low temperature.
If the temperature at the selected camera goes below this temperature, the monitor will beep and the temperature reading on the monitor will say "Lo".
If you select a temperature below 62^ F / 17^ C, the low temperature alert will be turned OFF.
3 Press: until Hi is shown.
4 Press +to adjust the high temperature.
If the temperature at the selected camera goes above this temperature, the monitor will beep and the temperature reading on the monitor will say "Hi".
If you select a temperature above 86^ F / 30^ C, the high temperature alert will be turned OFF.
5 Press to exit menu.
Selecting Fahrenheit or Celsius
You can select if you would like temperature readings and alerts to be in Fahrenheit or Celsius.
To select temperature units:

2 Press + to select F (Fahrenheit) or C (Celsius)
3 Press to exit menu.
Enabling VOX Mode (Voice Trigger)
In VOX mode, the monitor's screen and speaker will turn off after a minute unless sound is detected at the selected sensitivity level. This conserves battery power, and alerts you only when needed.
To activate VOX mode:


Press +to adjust the audio sensitivity for VOX mode.

If you want softer noises to trigger the monitor (such as a faint whimper), set the sensitivity setting higher. If you only want louder noises to trigger the monitor (such as a loud cry), set the sensitivity setting lower.

Press to exit menu.
While VOX is activated, the monitor's screen and speaker will turn off after a minute unless sound is detected at the selected sensitivity level. Press any button to turn the screen back on. When VOX is on, a VOX icon is shown on the screen.
VOX mode will not work while Scan mode is activated.
Video Off Mode (Audio Only Mode)

Press to turn the screen off and monitor sound only.
The monitor will play sound from the selected channel only.
Notes
- If Scan mode is enabled, the monitor will play sound from the channel that is currently selected.
- VOX mode will override Video Off mode. See "Enabling VOX Mode (Voice Trigger)" on page 14 for details.

Press any button to turn the screen back on.
Pairing Additional Cameras
The camera(s) included have already been paired with the monitor. If you have purchased additional add-on cameras (model# BB2411AC1), OR if your monitor and camera are not paired up, follow the steps below.
To pair a camera to your monitor:
1 Place the camera and monitor next to each other. Make sure the camera is turned on.

3 Press +to select the channel you would like to pair the camera to.
If a camera is already connected to this channel, the new camera will replace the existing camera.


Press the PAIR button on the back of the camera.

Images from the camera are immediately shown on the monitor once the camera is successfully paired.
Notes
- Immediately move the camera away from the monitor to avoid speaker feedback.
• The monitor can connect up to 4 cameras.
Technical Specifications
Camera
| Frequency 2.4GHz | |
| Maximum Range Up to 450ft / 138m outdoors*Up to 150ft / 46m indoors* | |
| Image Sensor 1/5" Color CMOS | |
| Lens 3.6mm F2.8 | |
| IR LED 6 pcs | |
| Power Adapter 6.0V DC 800mA | |
| Battery Supports 4x AAA Batteries(not included) | |
| Battery Life Up to 4.5 hours on AAA batteries | |
| Weight 0.3lbs / 0.1kg | |
Monitor
| Frequency 2.4GHz | |
| Display 2.4” TFT Color LCD | |
| Power Adapter 6.0V DC 800mA | |
| Battery Li-ion Rechargeable Battery 3.7V DC 1500mAh | |
| Battery Life Up to 8 hours in normal modeUp to 12+ hours in Video Off | |
| Weight 0.3lbs / 0.1kg | |
*Based on unobstructed line of sight. Actual range will vary based on surroundings.

Troubleshooting
| Problem Solution | |
| No video displayed on the monitor | Press and hold the button to power on the monitor.Monitor is out of batteries. Plug in the monitor power adapter.Video Off or VOX mode is on. Press any button to turn the screen back on. |
| Monitor screen keeps turning off | VOX mode is on. See “Enabling VOX Mode (Voice Trigger)” on page 14 for details on disabling VOX mode.The monitor battery is low. Plug in the monitor power adapter |
| The camera is not detected; “Out of Range” is shown on the monitor | Wrong channel selected. Press repeatedly to select the channel.Make sure the camera is powered on.Camera may be out of batteries. Replace the batteries.The camera and monitor may be out of range. Extend the antennas on the monitor and camera or move the monitor and camera closer together.You may need to pair the camera and the monitor again. See “Pairing Additional Cameras” on page 16 for details. |
| Feedback / squealing noise coming from the monitor | Your camera and monitor may be too close to each other.Move them further apart.Press to lower the monitor volume. |
| Feedback / squealing noise coming from the monitor | Your camera and monitor may be too close to each other.Move them further apart.For optimal performance, avoid placing the monitor and camera near televisions, computers, cordless/mobile phones, or other electrical equipment.Lower the monitor volume. |
ENGLISH
Need Help?
Product Support is available 24/7 including product information, user guides, quick start guides, and FAQ's at www.lorexbaby.com/support
CLEANING
Clean the monitor and camera with a slightly damp cloth or an anti-static cloth. Never use cleaning agents or abrasive solvents.
- Do not clean any part of the product with cleaners with thinners or other solvents and chemicals. This may cause permanent damage to the product, which is not covered by the Warranty. When necessary, clean it with a damp cloth.
- Keep your camera and monitor away from hot, humid areas or strong sunlight, and do not get it wet.
- Every effort has been made to ensure high standards of reliability for your baby monitor. However, if something does go wrong, please do not try to repair it yourself. Contact Customer Service for assistance.
DISPOSAL OF THE DEVICE
At the end of the product life cycle, you should not dispose of this product with normal household waste, but take the product to a collection point for the recycling of electrical and electronic equipment. The symbol on the product, user's guide, and/or box indicates this.
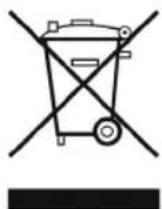
Some of the product materials can be re-used if you take them to a recycling point. By reusing some parts or raw materials from used products you make an important contribution to the protection of the environment.
Please contact your local authorities in case you need more information on the collection points in your area. Dispose of the battery pack in an environmentally-friendly manner according to your local regulations.
NOTICES
WARNING: Any changes or modifications not expressly approved by the grantee of this device could void the user's authority to operate the device.
FCC NOTICE
This device complies with Part 15, subpart C, of the FCC Rules. Operation is subject to the following two conditions: (1) this device may not cause harmful interference, and (2) this device must accept any interference received, including interference that may cause undesired operation.
The manufacturer is not responsible for any radio or TV interference caused by unauthorized modifications to this equipment. Such modifications could void the user's authority to operate the equipment. However, it is imperative that the user follows the guidelines in this manual to avoid improper usage which may result in damage to the unit, electrical shock and fire hazard injury.
CAUTION: To maintain compliance with the FCC's RF exposure guidelines, place the camera at least 20cm (7.87in) from nearby persons.
The video monitor has been tested and meets the FCC RF exposure guidelines when used with the belt clip supplied with or designated for this product. Use of other accessories may not ensure compliance with FCC RF exposure guidelines.
CANADA/IC NOTICE
This device complies with Industry Canada licence-exempt RSS standard(s). Operation is subject to the following two conditions: (1) this device may not cause interference, and (2) this device must accept any interference, including interference that may cause undesired operation of the device.

LOREX Baby
SWEET PEEK MONITEUR VIDÉO POUR BÉBÉ
GUIDE DE L'UTILISATEUR
Version 1.0

natural_image
Two white LOREX digital camera devices, one displaying a camera and the other showing a child's photo on a screen (no text or symbols visible on device body)
natural_image
Line drawing of a portable electronic device with a speaker and antenna (no text or symbols)Caméra

natural_image
Simple line drawing of a battery with a coiled cable and plug, no text or symbols present.Bloc d'alimentation


Vis et ancrages

Attache-câbles

natural_image
Line drawing of a vintage mobile phone with control panel and buttons (no text or symbols)Moniteur

natural_image
Simple line drawing of a mobile phone charger with cable and connector (no text or symbols)Bloc d'alimentation
natural_image
Line drawing of a mobile phone casing with a handle and arrow indicating direction (no text or symbols)natural_image
Two white LOREX digital camera devices, one displaying a camera lens and the other showing a screen with a baby photo (no visible text or symbols on device body)

natural_image
Diagram of a mobile phone casing with a handle and arrow indicating downward motion (no text or symbols)
- Safety Precautions
- To Avoid Injury to Children & Infants:
- Table of Contents:
- Using Your Baby Monitor ....8
- Pairing Additional Cameras ......16
- Technical Specifications ....18
- Troubleshooting 19
- Need Help? ......19
- Product Includes
- Monitor Overview
- Getting Started
- 1
- 2
- 3
- Tips
- Optional - Camera Batteries
- Notes
- Optional - Wall Mounting the Camera
- Before permanently mounting the camera:
- Using Your Baby Monitor
- Using the Menus
- Talking to Your Baby
- Changing Channels
- The monitor only plays sound from the camera that is currently being viewed.
- Adjusting Volume
- Adjusting Screen Brightness
- Using Digital Zoom
- Turning on the Night-Light
- Playing Lullabies
- To play songs:
- Temperature Alerts
- To setup temperature alerts:
- Selecting Fahrenheit or Celsius
- Enabling VOX Mode (Voice Trigger)
- VOX mode will not work while Scan mode is activated.
- Video Off Mode (Audio Only Mode)
- Pairing Additional Cameras
- To pair a camera to your monitor:
- Technical Specifications
- Need Help?
- CLEANING
- DISPOSAL OF THE DEVICE
- NOTICES
- FCC NOTICE
- CANADA/IC NOTICE
- LOREX Baby
- SWEET PEEK MONITEUR VIDÉO POUR BÉBÉ
- GUIDE DE L'UTILISATEUR
Brand : Lorex
Model : SWEET PEEK
Category : Baby monitor