
Avent SCX361 - Baby monitor PHILIPS - Free user manual and instructions
Find the device manual for free Avent SCX361 PHILIPS in PDF.


| Type | Digital audio baby monitor |
| Brand | Philips Avent |
| Model | SCX361 |
| Dimensions (parent unit) | 120 x 80 x 30 mm (4.7 x 3.1 x 1.2 in) |
| Dimensions (baby unit) | 100 x 70 x 40 mm (3.9 x 2.8 x 1.6 in) |
| Weight (parent unit) | 150 g (5.3 oz) |
| Weight (baby unit) | 120 g (4.2 oz) |
| Power supply (parent unit) | Rechargeable Li-ion battery (860 mAh) |
| Power supply (baby unit) | AC adapter (5V, 1A) |
| Range (indoor) | Up to 50 m (164 ft) |
| Range (outdoor) | Up to 300 m (984 ft) |
| Audio transmission | DECT digital technology |
| Two-way talk | Yes |
| Lullabies | 5 built-in melodies |
| Night light | Yes, adjustable brightness |
| Sound-activated lights | Yes, 5-level LED indicator |
| Temperature sensor | Built-in, alerts if out of range |
| Out-of-range alarm | Yes, visual and audible |
| Low battery warning | Yes, on parent unit |
| Cleaning | Wipe with a soft, damp cloth; do not use solvents |
| Operating temperature | 10°C to 40°C (50°F to 104°F) |
| Storage temperature | -20°C to 60°C (-4°F to 140°F) |
| Compliance | CE, FCC |
| Spare parts availability | AC adapters and batteries available from Philips |
Frequently Asked Questions - Avent SCX361 PHILIPS
User questions about Avent SCX361 PHILIPS
0 question about this device. Answer the ones you know or ask your own.
Ask a new question about this device
Download the instructions for your Baby monitor in PDF format for free! Find your manual Avent SCX361 - PHILIPS and take your electronic device back in hand. On this page are published all the documents necessary for the use of your device. Avent SCX361 by PHILIPS.
USER MANUAL Avent SCX361 PHILIPS
natural_image
Two Philips radio speakers with antenna and earphones, no visible text or symbols on the devices themselves.
natural_image
Black-and-white photo of a woman holding a baby, both looking at each other (no text or symbols visible)PHILIPS

ENGLISH 6
БЪЛГАРСКИ 10
ČEŠTINA 14
EESTI 18
HRVATSKI 22
MAGYAR 26
КАЗАКША 30
LIETUVIŠKAI 34
LATVIEŠU 38
POLSKI 42
ROMÂNĂ 46
РУССКИЙ 50
SLOVENSKY 54
SLOVENŠČINA 58
SRPSKI 62
УКРАЇНСЬКА 66
General description (Fig. 1)
A Talk button
B Power-on light
© Transmit indicator
D Socket for small plug
E Microphone
F Battery compartment lid
G Channel selection switch
H On/off switch
1 Adapter (2x)
Power-on light
K Socket for small plug
On/off switch with volume control
M Loudspeaker
N Battery compartment lid
Belt clip
P Channel selection switch
Q Latch of battery compartment lid
Important
Read these instructions for use carefully before using the appliance and save them for future reference.
This baby monitor is intended as an aid. It is not a substitute for responsible and proper adult supervision and should not be used as such.
Use and store the appliance at a temperature between 10^ C and 40^ C.
The appliance is suitable for mains voltages ranging from 220 to 240V.
Make sure that the baby unit and the cord of the adapter are always out of reach of the baby (at least 1 metre/3 feet away).
Never place the baby unit inside the baby's bed or playpen.
Never use the baby monitor in moist places or close to water.
Except for the battery compartments, do not open the housing of the baby unit and parent unit in order to prevent electric shock.
▶ Only use the adapters supplied.
If the adapters are damaged, always have them replaced by adapters of the original type in order to avoid a hazard.
The adapters contain a transformer. Do not cut off the adapters to replace them with other plugs, as this will cause a hazardous situation.
The baby monitor has an operating range of up to 150 metres/450 feet in open air.
Depending on the surroundings and other disturbing factors the operating range may be smaller (see section ‘Operating range’ in chapter ‘Using the appliance’).
Since continuous transmission is prohibited, you only hear your baby when it is making sounds.
Preparing for use
Your can use the baby monitor from the mains or on batteries.
Mains operation
1 Put one appliance plug in the baby unit and put the other in the parent unit.
2 Put both adapters in a wall socket.
Battery operation
Even if you do not intend to use the appliance on batteries, we advise you to insert batteries into both units. This guarantees automatic back-up in case of mains failure.
Both the parent unit and the baby unit run on four 1.5-volt R6 AA batteries. We strongly advise you to use Philips LR6 PowerLife batteries.
Make sure your hands and the units are dry when you insert the batteries.
Parent unit
1 Press down the latch of the battery compartment lid and remove the lid. (Fig. 2)
2 Insert four 1.5-volt AA batteries.
Make sure the + and - poles of the batteries are pointing in the right direction (Fig. 3)
3 Put the lid back onto the battery compartment. (Fig. 4)
Baby unit
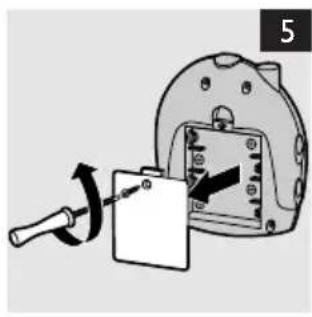
1 Remove the battery compartment lid with a screwdriver. (Fig. 5)
2 Insert four 1.5-volt AA batteries.
Make sure the + and - poles of the batteries are pointing in the right direction (Fig. 3)
3 Put the lid back onto the battery compartment and tighten the screw.
Using the appliance
1 Set the on/off switch of both the baby unit and the parent unit to 'on'. (Fig. 6)
2 Set the baby unit and the parent unit to the same channel.
It takes 10 to 30 seconds before a connection is established.
The transmission frequency of channel A is 40.695 MHz.
The transmission frequency of channel B is 40.675 MHz.
3 The baby unit and parent unit are now connected.
You will hear your baby when it is making sounds.
Talk function
When your child gets older and does not want to be listened in on continuously, it can use the talk function.
1 Set the on/off switch of the baby unit to 'off'.
2 Switch the parent unit on. Select a volume level of 4-5. (Fig. 7)
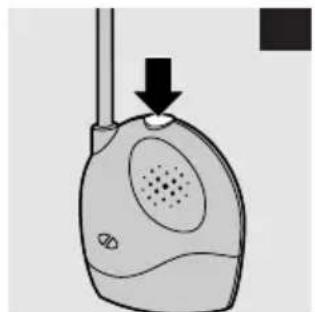
When your child wants to talk to you, it only has to press the talk button on the baby unit and speak clearly into the mircorphone. (Fig. 8)
Operating range
The operating range of the baby monitor is 150 metres/450 feet in open air. Depending on the surroundings and other disturbing factors, this range may be smaller.
Dry materials Material thickness Loss of range
| Wood, plaster, cardboard, glass (without metal, wires or lead) | < 30cm/12in 0-10% |
| Brick, plywood < 30cm/12in | 5-35% |
| Reinforced concrete < 30cm/12in | 30-100% |
| Metal grids, bars < 1cm/0.4in | 30-100% |
| Metal or aluminium sheets < 1cm/0.4in | 30-100% |
For wet and moist materials, the range loss may be up to 100%.
Cleaning and maintenance
Clean the baby unit and the parent unit with a damp cloth.
Environment
Batteries contain substances that may pollute the environment. Do not throw batteries away with the normal household waste, but dispose of them at an official collection point for batteries. Always remove the batteries before discarding the appliance and handing it in at an official collection point.
Do not throw away the appliance with the normal household waste at the end of its life, but hand it in at an official collection point for recycling. By doing this, you will help to preserve the environment. (Fig. 9)
Guarantee and service
If you need information or if you have a problem, please visit the Philips website at www.philips.com or contact the Philips Customer Care Centre in your country (you will find its phone number in the worldwide guarantee leaflet). If there is no Customer Care Centre in your country, turn to your local Philips dealer or contact the Service Department of Philips Domestic Appliances and Personal Care BV.
Frequently asked questions
This chapter lists the questions most frequently asked about the Philips baby monitor. If you can't find the answer to your question, please contact the Customer Care Centre in your country.
Question Answer
| Why can't I establish a connection? | The units may be set to different channels. Set both units to the same channel and wait 1-30 seconds for the connection to be established. |
| The baby unit may be out of range of the parent unit or there may be too many walls and/or ceilings between the two units. Try a different location or reduce the distance between the two units. | |
| Why is the connection lost every now and then? | The baby unit may be out of range of the parent unit or there may be too many walls and/or ceilings between the two units. Try a different location or reduce the distance between the two units. |
| Why do I hear noise or a schratching sound? | There may be interference from another appliance or baby monitor. Switch both units to another channel. Make sure both units are set to the same channel. |
| The parent unit may be too close to a window, causing it to pick up signals from other appliances or baby monitors. Move the unit away from the window. | |
| The baby unit may be out of range of the parent unit or there may be too many walls and/or ceilings between the two units. Try a different location or reduce the distance between the two units. | |
| The batteries may be running low. Check the batteries and replace them, if necessary. | |
| Why doesn't the baby monitor manage the specified range of 150 metres? | The specified range of 150 metres is only valid in open air. Inside the house the range is limited by the number and type of walls and/or ceilings between the two units. Change the position of one or both units to optimise the range. |
| What happens when there is a mains failure? | If you are using the units from the mains without having put batteries in them, the connection will be lost when there is a mains failure. If there are batteries in both units, they will automatically switch to battery power in case of a mains failure and the connection will not be lost. |

natural_image
Diagram of a battery holder with two batteries inserted, showing internal components and a black arrow indicating direction (no text or symbols present)
natural_image
Illustration of a mechanical device with a rotating knob and a close-up view showing internal components (no text or symbols)

natural_image
Illustration of a handheld device with a speaker grille and antenna, showing no text or symbols.
natural_image
Symbol of a trash bin crossed with no text or numbers, representing environmental protection (no text present)

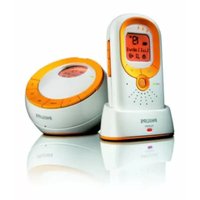
Brand : PHILIPS
Model : Avent SCX361
Category : Baby monitor