
DDJ-WEGO3-W - DJ Equipment PIONEER - Free user manual and instructions
Find the device manual for free DDJ-WEGO3-W PIONEER in PDF.


| Product Type | 2-channel DJ Controller |
| Brand | Pioneer |
| Model | DDJ-WEGO3-W |
| Compatible Software | Serato DJ Lite (included) |
| Dimensions (W x D x H) | 482 x 289 x 62 mm |
| Weight | 2.5 kg |
| Power Supply | USB 5V (cable included) |
| Audio Interface | Built-in 2-channel (input/output) |
| Jog Wheels | 2 touch-sensitive jog wheels with backlight |
| Performance Pads | 16 backlit pads (Hot Cue, Loop, Roll, Sampler) |
| Effects | Built-in sound effects (delay, reverb, flanger, etc.) |
| Faders | 2 volume faders, 1 crossfader, 2 tone faders |
| Inputs | 1 microphone input (6.35 mm jack), 1 line input (RCA) |
| Outputs | 1 headphone output (3.5 mm + 6.35 mm jack), 1 line output (RCA) |
| Connectivity | 1 USB-B port |
| Care and Cleaning | Clean with a soft, dry cloth. Avoid solvents. |
| Safety | Use only with a shielded USB cable. Do not expose to moisture. |
| Spare Parts and Repairability | Contact an authorized Pioneer service center for repairs. |
Frequently Asked Questions - DDJ-WEGO3-W PIONEER
User questions about DDJ-WEGO3-W PIONEER
0 question about this device. Answer the ones you know or ask your own.
Ask a new question about this device
Download the instructions for your DJ Equipment in PDF format for free! Find your manual DDJ-WEGO3-W - PIONEER and take your electronic device back in hand. On this page are published all the documents necessary for the use of your device. DDJ-WEGO3-W by PIONEER.
USER MANUAL DDJ-WEGO3-W PIONEER
The Pioneer DJ support site shown above offers FAQs, information on software and various other types of information and services to allow you to use your product in greater comfort.
Operating Instructions (DJ unit Setup)
This equipment is not waterproof. To prevent a fire or shock hazard, do not place any container filled with liquid near this equipment (such as a vase or flower pot) or expose it to dripping, splashing, rain or moisture.
D3-4-2-1-3_A1_En
WARNING
To prevent a fire hazard, do not place any naked flame sources (such as a lighted candle) on the equipment.
D3-4-2-1-7a_A1_En
Operating Environment
Operating environment temperature and humidity: +5 °C to +35 °C (+41 °F to +95 °F); less than 85 %RH (cooling vents not blocked)
Do not install this unit in a poorly ventilated area, or in locations exposed to high humidity or direct sunlight (or strong artificial light).
D3-4-2-1-7c* A2 En
CAUTION
The STANDBY/ON switch on this unit will not completely shut off all power from the AC outlet. Since the power cord serves as the main disconnect device for the unit, you will need to unplug it from the AC outlet to shut down all power. Therefore, make sure the unit has been installed so that the power cord can be easily unplugged from the AC outlet in case of an accident. To avoid fire hazard, the power cord should also be unplugged from the AC outlet when left unused for a long period of time (for example, when on vacation).
D3-4-2-2-2a*_A1_En
When using this product, confirm the safety information shown on the bottom of the unit.
D3-4-2-2-4_B1_En
This product is for general household purposes. Any failure due to use for other than household purposes (such as long-term use for business purposes in a restaurant or use in a car or ship) and which requires repair will be charged for even during the warranty period.
K041_A1_En
POWER-CORD CAUTION
Handle the power cord by the plug. Do not pull out the plug by tugging the cord and never touch the power cord when your hands are wet as this could cause a short circuit or electric shock. Do not place the unit, a piece of furniture, etc., on the power cord, or pinch the cord. Never make a knot in the cord or tie it with other cords. The power cords should be routed such that they are not likely to be stepped on. A damaged power cord can cause a fire or give you an electrical shock. Check the power cord once in a while. When you find it damaged, ask your nearest PIONEER authorized service center or your dealer for a replacement.
S002*_A1_En
For Europe

If you want to dispose this product, do not mix it with general household waste. There is a separate collection system for used electronic products in accordance with legislation that requires proper treatment, recovery and recycling.
Private households in the member states of the EU, in Switzerland and Norway may return their used electronic products free of charge to designated collection facilities or to a retailer (if you purchase a similar new one).
For countries not mentioned above, please contact your local authorities for the correct method of disposal.
By doing so you will ensure that your disposed product undergoes the necessary treatment, recovery and recycling and thus prevent potential negative effects on the environment and human health.
K058b_A1_En
NOTE:
This equipment has been tested and found to comply with the limits for a Class B digital device, pursuant to Part 15 of the FCC Rules. These limits are designed to provide reasonable protection against harmful interference in a residential installation. This equipment generates, uses, and can radiate radio frequency energy and, if not installed and used in accordance with the instructions, may cause harmful interference to radio communications. However, there is no guarantee that interference will not occur in a particular installation. If this equipment does cause harmful interference to radio or television reception, which can be determined by turning the equipment off and on, the user is encouraged to try to correct the interference by one or more of the following measures:
— Reorient or relocate the receiving antenna.
— Increase the separation between the equipment and receiver.
— Connect the equipment into an outlet on a circuit different from that to which the receiver is connected.
— Consult the dealer or an experienced radio/TV technician for help.
D8-10-1-2_A1_En
FEDERAL COMMUNICATIONS COMMISSION DECLARATION OF CONFORMITY
This device complies with part 15 of the FCC Rules. Operation is subject to the following two conditions: (1) This device may not cause harmful interference, and (2) this device must accept any interference received, including interference that may cause undesired operation.
Product Name: DJ Controller
Model Number: DDJ-WEGO3-K, DDJ-WEGO3-W, DDJ-WEGO3-R
Responsible Party Name: PIONEER ELECTRONICS (USA) INC.
SERVICE SUPPORT DIVISION
Address: 1925 E. DOMINGUEZ ST. LONG BEACH, CA 90810-1003, U.S.A.
Phone: 1-800-421-1404
URL: http://www.pioneerelectronics.com
D8-10-4* C1 En
Information to User
Alterations or modifications carried out without appropriate authorization may invalidate the user's right to operate the equipment.
D8-10-2_A1_En
CAUTION
This product satisfies FCC regulations when shielded cables (with Ferrite-cores attached) and connectors are used to connect the unit to other equipment. To prevent electromagnetic interference with electric appliances such as radios and televisions, use shielded cables (with Ferrite-cores attached) and connectors for connections.
D8-10-3b_A1_En
Contents
How to read this manual
- Thank you for buying this Pioneer product.
Be sure to read this booklet and the "Operating Instructions (DJ software Setup)" provided on the Pioneer DJ support site. Both include important information that should be fully understood before using this product.
After you have finished reading the instructions, put them away in a safe place for future reference. - This document describes the hardware operation methods. The various DJ software usage methods are described in the "Operating Instructions (DJ software Setup)".
- In this document, the product main unit button name and terminal name is listed in []. (Example: [CUE] button, [AUX IN] terminal)
01 Before start
Features 5
What's in the box 5
Obtaining the Operating Instructions (DJ software Setup)....5
Preparing the software....5
02 Connections
Connecting with an iPhone/iPad 6
Connecting with a computer....7
03 Part names and functions
1 Power supply....8
2 Browser 8
3 Deck 9
4 Mixer 9
04 Utility mode/Firmware update
Utilities modes 10
Firmware update....10
05 Additional information
Troubleshooting....11
About trademarks and registered trademarks 12
Specifications.... 12
Before start
Features
The unit is a compact size DJ Controller that can stage DJ performances using dynamic sound changes and a wide variety of light changes. With use of an iPhone/iPad connection cable, DJ can be enjoyed even on an iPhone/iPad, and not just on a computer.
Equipped with the "JOG FX" function enabling dynamic sound changes, and the "PULSE CONTROL" function enabling a wide variety of changes in light color using the LED of this unit.
The power source for this unit is compatible with AC adapter/USB path power/USB power adapter, etc. enabling enjoying of DJ performances in the style and preference of the user.
Hybrid DJ Controller
DJ Controller for enjoying DJ on a computer and on an iPhone/iPad. Since user can use either computer or iPhone/iPad depending on the situation, DJ can be enjoyed in a variety of DJ scenes.
iPhone/iPad CONNECTION
By connecting this unit with an iPhone/iPad using the iPhone/iPad connection cable, the contents of the iPhone/iPad can easily be used for DJ performances.
In addition, since the iPhone/iPad can be recharged even while DJing, the DJ performances can be enjoyed without needing to worry about the remaining battery charge.
JOG FX
This unit is equipped with a JOG FX function allowing multiple effects to be controlled simultaneously with the jog dial. The parameters of multiple effects can be controlled through the simple operation of turning the jog dial, so a wide variety of transformations of the sound can be enjoyed.
Also, by using in combination with FX PULSE, DJ performances can be staged with an extensive array of animations using LED lights.
PULSE CONTROL
Stages DJ performance in animations with a fusion of sound and light.
- Main animations for PULSE CONTROL
① LAUNCH PULSE
When a track is loaded, LED light flows toward the jog dial, staging so that the user knows at a glance that the track has been loaded.
② FX PULSE
The LED lights on the jog dial move in various ways according to the effect that is operated, adding excitement to the DJ performance through the movement of the light in addition to the changes in the sound.
③ BEAT PULSE
When the JOG FX mode is on, the blue LED on the JOG dial brightens depending on the volume of the sound, to enable a visual grasp of the sound volume.
Design
Achieves a flat, compact size that is easy to carry around, and does not take up space when installed, for a smart, casual design.
Uses a round layout letting first-time DJ users to enjoy DJ without feelings of difficulty and an aluminum panel on top that accentuates simplicity.
In addition, a blue LED is mounted on the JOG dial to realize a fusion of sound and light in the FX PULSE or other function, and this serves to stage the DJ performance feel, and the enjoyment of sound manipulation.
Compatibility with various DJ software programs
Since it is compatible with MIDI, a variety of DJ software can be used to perform hot cue, sampler, or other operations.
For the latest software support status, see the Pioneer DJ support site below.
- Operating Instructions (DJ unit Setup) (This document)
- AC adapter
- Power cord
- USB cable
• Warranty (for some regions) [1] - iPhone/iPad connection cable (Lightning) [2]
• VIRTUAL DJ LE license key (indicated on this unit's bottom panel) - djay for Mac license key (indicated on this unit's bottom panel)
① The included warranty is for the European region.
② iPhone/iPad connection cable (30-pin dock connector) is sold separately.
For information related to the separately sold iPhone/iPad connection cable (30-pin dock connector) and the latest supported models, see the Pioneer DJ support site below.
http://pioneerdj.com/support/
Caution
The license key cannot be reissued. Be careful not to lose it.
Obtaining the Operating Instructions (DJ software Setup)
The various instructions are sometimes provided as files in PDF format. Adobe® Reader® must be installed in order to view files in PDF format.
1 Launch a web browser on the computer and access the Pioneer DJ support site below.
2 On the Pioneer DJ support site, click [Manuals] under [DDJ-WeGO3].
3 Click on the required language on the download page.
Downloading of the operating instructions begins.
Preparing the software
The driver software of this unit and the various DJ software are listed in the Operating Instructions (DJ software Setup). See the Operating Instructions (DJ software Setup) downloaded in Obtaining the Operating Instructions (DJ software Setup), and prepare the necessary software.
Connections
Be sure to set the unit to standby mode and unplug the power cord from the power outlet before making or changing connections between devices.
Connect the power cord after all the connections between devices have been completed.
Be sure to use the power cord, AC adapter and USB cable included with this product.
Refer to the operating instructions for the component to be connected.
For the connection cables, check the position of the unit terminal, and connect correctly to the unit.
This unit can be used by connecting it to a computer using a USB cable, even without connecting the AC adapter.
- Connect this unit and the computer directly using the included USB cable.
• A USB hub cannot be used. - Connect the computer to which this unit is to be connected to an AC power supply.
- The brightness of the buttons that light is dimmer when using on USB bus power.
- When USB bus power is being used for operations, there will be situations like the following where the unit does not operate using USB bus power.
— The power supply is insufficient for USB bus power.
— When other USB devices are connected to the computer.
— When headphones with an impedance of less than 32 Ω are connected.
— When headphones are simultaneously connected to the stereo phone jack and the stereo mini-phone jack.
— When a monaural jack is connected to the [PHONES] terminal.
- This unit may restart if the AC adapter or USB cable is disconnected during operation.
This product satisfies electromagnetic noise regulations when it is connected to other equipment through shielded cables (with Ferrite-cores attached) and connectors.
Use only the furnished accessory connecting cables.
D44-8-1-2b_A1_En
The ferrite-cores are for the purpose of preventing electromagnetic noise, do not remove them.
D44-8-1-4_A1_En
Connecting with an iPhone/iPad
![graph TD A["Side panel"] --> B["Headphones cord"] B --> C["To headphones"] C --> D["Power cord (included)"] D --> E["To power outlet"] F["Rear panel"] --> G["AC adapter (included)"] G --> H["USB cable (included)"] H --> I["USB"] I --> J["To USB port"] J --> K["Dj software"] K --> L["iPhone/iPad"] L…](/content/2026/06/1262380/images/515f8b9f81aa06ed3016549a02df377225ad9530f67fb3deedb4dc2eceed80ac.jpg)
- This unit can use an iPhone/iPad connection cable to recharge on an iPhone/iPad. The unit can also be recharged while in Standby mode.
- Connect an AC adapter when recharging an iPhone/iPad.
- If power is supplied by USB bus power, iPhone/iPad recharging cannot be performed.
- When the iPhone/iPad power is off, or when residual battery power has been exhausted, iPhone/iPad recharging cannot be performed.
Connecting with a computer
Since the iPhone/iPad connection has priority, do not connect an iPhone/iPad to the unit when using a computer.
![graph TD A["Side panel"] --> B["Headphones cord"] B --> C["AC adapter (included)"] C --> D["USB cable (included)"] D --> E["DJ software"] E --> F["Computer"] F --> G["Power cord (included)"] G --> H["To headphones"] H --> I["Headphones"] E --> J["Computer"] K["Rear panel"] --> L["Microphone cable"]…](/content/2026/06/1262380/images/9f5348c6a30880b637a9cb6688ca2799dee6c8c739f199449956d54d20886032.jpg)
1 PHONES terminals
Connect headphones here.
Both stereo phone plugs (∅ 6.3 mm) and stereo mini phone plugs (∅ 3.5 mm) can be used.
- Connect headphones with an impedance of 32 Ω or more. Headphones with an impedance of less than 32 Ω are not supported.
- Do not connect headphones simultaneously to the stereo phone jack and the stereo mini-phone jack.
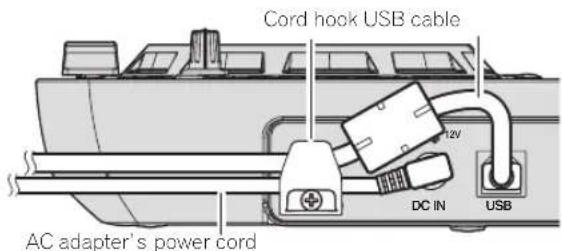
2 Cord hook
Secure the AC adapter's power cord and USB cable on this hook.
- The sound will be interrupted if the AC adapter's power cord or USB cable is disconnected from the unit during playback.
3 DC IN terminal
Connect the included AC adapter's DC plug here. Wait until all connections of the equipment are completed before connecting the power cord.
Be sure to use the power cord and AC adapter included with this product.
4 USB terminal
When using a computer
- Connect this unit and the computer directly using the included USB cable.
• A USB hub cannot be used.
When using an iPhone/iPad
- If not using an AC adapter, connect this unit and a USB mobile battery or USB power adapter using the included USB cable.
- If power is supplied by USB bus power, iPhone/iPad recharging cannot be performed. To recharge the iPhone/iPad, use an AC adapter.
- USB bus power must have a power supply capacity of DC 5 V/500 mA or greater. Note that depending on the capacity and charging status of the product being used, operation may be unstable.
5 iOS DEVICE terminal
Connect this unit with the iPhone/iPad using the iPhone/iPad connection cable.
6 Kensington security slot
7 MASTER OUT terminals
Connect powered speakers, etc., here.
8 MIC terminal
Connects a microphone here.
- Only the volume of the microphone's sound can be adjusted.
• Supports unbalanced input only.
Caution when using the iPhone/iPad stand

- This stand is exclusively for use with an iPhone/iPad. Do not place tablets other than iPad or large devices on the stand.
- Set the iPhone/iPad on the stand in the horizontal direction. It may be unstable if set in the vertical direction.
- Do not apply excessive force to the stand. Doing so may damage this unit.
- Please note that Pioneer will accept no responsibility whatsoever for damage to or malfunction of the device, injury, etc., due to the device falling, etc.
- Do not move with an iPhone/iPad placed on the stand. The iPhone/iPad could fall off.
- If there is a cover on the iPhone/iPad, remove the cover before placing the iPhone/iPad on the stand. If the cover is left on, the iPhone/iPad could be unstable.
Using the cord hook
Fasten the AC adapter's power cord and USB cable in place by hooking them on the cord hook. This prevents the power cord and USB cable from being accidentally pulled and the plugs from being disconnected from the terminals.
Part names and functions

*: The SHIFT function operation varies depending on the DJ software. For details, see the Pioneer DJ support site below. http://pioneerdj.com/support/
1 Power supply
1 STANDBY/ON indicator
Shows the unit power status.
When red
The unit power is on standby.
When green
The unit power is on.
2 STANDBY/ON button
When unit power is on standby
— Press:
Turn on the power of this unit.
When unit power is on
— Press for over 1 second:
Set this unit's power to the standby mode.
2 Browser
3 Rotary selector
- Turn:
Select the track. - [SHIFT] + press:
Operations differ depending on the DJ software.*
4 LOAD button
- Press:
Load the selected track to each deck. - [SHIFT] + press:
Operations differ depending on the DJ software.*
3 Deck
5 TEMPO slider
Adjusts the playing speed.
6 Loop half button
- Press:
Set the width of loop playback interval to 1/2 times. - [SHIFT] + press:
Operations differ depending on the DJ software.*
7 AUTO LOOP mode button
- Press:
Turns the auto loop function on and off. - [SHIFT] + press:
Operations differ depending on the DJ software.*
8 Loop double button
- Press:
Set the width of loop playback interval to 2 times. - [SHIFT] + press:
Operations differ depending on the DJ software.*
9 FX1 button
- Press:
Turns effect 1 on and off.
• [SHIFT] + press:
Switches the effect types of FX1.
10 FX2 button
- Press:
Turns effect 2 on and off. - [SHIFT] + press:
Switches the effect types of FX2.
11 FX3 button
- Press:
Turns effect 3 on and off.
• [SHIFT] + press:
Switches the effect types of FX3.
12 SYNC button
- Press:
Synchronize the track tempo. - [SHIFT] + press:
Operations differ depending on the DJ software.*
13 Jog dial
When JOG FX mode is off
— Scratch
When turned while touching a metallic part of the top of the jog dial, the sound is played according to the direction and speed at which the jog dial is turned.
— Pitch bend
The playing speed can be adjusted by turning the outer part of the jog dial during playback.
— Search
When loading a track to each deck, turning the jog dial while holding down the [SHIFT] button enable move to playback position at higher speed than scratch.
When JOG FX mode is on
— JOG FX control
Effect parameters can be adjusted by turning the jog dial.
14 SHIFT button
When another button is pressed while pressing the [SHIFT] button, a different function is called out.
15 CUE button
- Press:
Sets a cue point or moves the cue point. - [SHIFT] + press:
The playing position moves to the beginning of the track.
16 Play/Pause button
Use this to play/pause tracks.
17 Performance buttons
When in hot cue mode
— Press:
Sets the hot cue point.
— [SHIFT] + press:
Delete the hot cue set for that button.
When in sampler mode
— Press:
Replays the sample sound.
— [SHIFT] + press:
Operations differ depending on the DJ software.*
18 HOT CUE mode indicator
Lights up when the performance buttons are in hot cue mode.
19 SAMPLER mode indicator
Lights up when the performance buttons are in sampler mode.
20 HOT CUE/SAMPLER mode switching button
Switches the performance button mode to hot cue mode or sampler mode.
4 Mixer
21 MIC VOL control
Adjusts the audio level input to the [MIC] terminal.
22 MASTER VOL control
Adjusts the sound level output from the master.
- Not linked to [MASTER] on each DJ software screen.
23 EQ (HI, MID, LOW) controls
These adjust the sound quality input to the various decks.
[HI] (treble range), [MID] (middle range), [LOW] (low range)
24 HEADPHONES VOL control
Adjusts the audio level output from the [PHONES] terminal.
- Not linked to [VOL] (headphone sound volume control) on each DJ software screen.
- The sound of the microphone connected to the [MIC] jack is not output from the headphones.
25 HEADPHONES SELECT MASTER button
Monitors the master sound over the headphones.
26 HEADPHONES SELECT A/B buttons
Use this to monitor the sound of the respective decks over the headphones.
27 Channel faders
Adjusts the sound level output from the various decks.
28 Crossfader
Switches the sound of the decks assigned to the left and right sides of the crossfader for output.
Utility mode/Firmware update
Utilities modes
The following settings can be changed:
- Demo mode setting
• Auto standby setting - Pulse mode (illumination) setting
Launching utilities mode
1 Sets the unit on standby status.
LED next to [STANDBY/ON] button on the upper right of the unit is in red lighted status.
2 While holding down the [LOAD] button on the left-side deck and the [LOAD] button on the right-side deck, press the [STANDBY/ON] button.
The unit starts up in utility mode. (The [SYNC] buttons on both decks light up.)
3 For items for which you would like to change the settings, change the settings.
See the Changing the settings below for the settings that can be changed, and for the setting change methods.
4 Check that the [SYNC] button is in lighted state, and then press the [STANDBY/ON] button to restart the unit.
Performing restart may be necessary to reflect the changed setting.
Caution
When the [SYNC] button is flashing, this unit is writing the setting. If the [STANDBY/ON] button is pressed to perform restart while the [SYNC] button is flashing, the set values are not reflected in the unit.
Changing the settings
*: Setting upon purchase
◆ Demo mode setting
After restarting the unit, if no operation is performed for a certain set period, it starts in demo mode. The amount of time until start in this demo mode can be changed.
Press the [HOT CUE/SAMPLER] mode switching button on the left deck.
Left deck [1] button lighted: 10 min*
Left deck [2] button lighted: 5 min
Left deck [3] button lighted: 1 min
Left deck [CUE] button lighted: OFF
Auto standby setting
When the auto standby setting is on and if four hours have passed while the following conditions are all met, the unit automatically enters standby status.
- No buttons or controls, etc. except for the [MIC VOL] control on the unit are operated.
- Audio signals are not input to this unit (excluding microphone audio input).
Press the [HOT CUE/SAMPLER] mode switching button on the right deck.
Right deck [1] button lighted: ON*
Right deck [CUE] button lighted: OFF
◆ Pulse mode (illumination) setting
This unit is equipped with two types of pulse mode (illumination lighted/ flashing mode).
Press the [HEADPHONES SELECT MASTER] button.
[HEADPHONES SELECT A] button lighted: Normal (Standard LED lighted/flashing pattern)*
[HEADPHONES SELECT B] button lighted: Moderate (LED brightness suppress lighted/flashing pattern)
Firmware update
Firmware is the software required for controlling the unit.
To determine whether there is a firmware update for the unit, and to download the update software, check the Pioneer DJ support site below. http://pioneerdj.com/support/
Cautions
- When performing a firmware update, first disconnect the iPhone/iPad connection.
- Firmware updates for the unit cannot be performed on an iPhone/iPad.
A separate computer (Windows/Mac) is necessary.
1 Download the update software on the computer (Windows/Mac).
Download the update software from the Pioneer DJ support site below. http://pioneerdj.com/support/
2 Connect this unit to your computer via a USB cable.
3 Press the [STANDBY/ON] button on the unit, and set the unit to on status.
If the unit is in standby status, update cannot be performed.
4 Execute the update software that was downloaded in Step 1.
When the update is complete, the unit goes into standby status.
5 Press the [STANDBY/ON] button on the unit, and set the unit to on status.
The unit starts up with the updates applied.
Additional information
Troubleshooting
- Incorrect operation is often mistaken for trouble or malfunction. If you think that there is something wrong with this component, check the points below and the [FAQ] for the [DDJ-WeGO3] on the Pioneer DJ support site.
http://pioneerdj.com/support/
Sometimes the problem may lie in another component. Inspect the other components and electrical appliances being used. If the problem cannot be rectified, ask your nearest Pioneer authorized service center or your dealer to carry out repair work. - The player may not operate properly due to static electricity or other external influences. In such cases, normal operation may be restored by unplugging the power cord then plugging it back in.
Problem Check Remedy
| The power is not turned on. Is the included USB cable properly connected? Connect the included USB cable properly. | ||
| Is the supply of power from the connected computer's USB port insufficient? | Connect to a USB port providing sufficient power. | |
| If devices not being used for the DJ performance are connected to other USB ports, also disconnect them to provide sufficient power. | ||
| Try running the connected computer with the power supplied from an AC adapter rather than running it on the battery. | ||
| Is the included AC adapter properly connected? Connect the included AC adapter correctly. | ||
| This unit is not recognized by the computer. | Is the [STANDBY/ON] indicator green? | Press the [STANDBY/ON] button to turn the power on. |
| Is the included USB cable properly connected? Connect the included USB cable properly. | ||
| Are you using a USB hub? USB hubs cannot be used. Connect the computer and this unit directly using the included USB cable. | ||
| Is an iPhone/iPad connected? Disconnect the iPhone/iPad. | ||
| The unit and DJ software controls and sliders positions differ. | — When the unit controls and sliders are moved, the DJ software controls and sliders are synchronized. | |
| Distorted sound. Is the [MASTER VOL] control set to the proper position? | Adjust the [MASTER VOL] control according to the devices to be connected. | |
| Is the [HEADPHONES VOL] control set to the proper position? | ||
| Is the sound level input to the [MIC] terminal set to an appropriate level? | ||
| Sound being played is interrupted when using DJ software. | Is the computer connected to this unit connected to an AC power supply? | When using a notebook computer on battery power, the power management system may set the battery energy saving mode, decreasing the CPU's clock frequency. If this happens, noise may be generated and operation may become slower. Connect the computer to which this unit is to be connected to an AC power supply. |
| Is the driver software's latency value suitable? Set the driver software's latency to a suitable value. | ||
| No sound or small sound. Are the channel faders, crossfader and [MASTER VOL] control set to the proper positions? | Set the channel faders, crossfader and [MASTER VOL] control to the proper positions. | |
| Is the connected power amplifier, powered speakers, etc., properly set? | ||
| Are the connection cables properly connected? Connect the connection cables properly. | ||
| Are the terminals and plugs dirty? Clean the terminals and plugs before making connections. | ||
| Is the driver software properly set? (Windows) | ||
| Sound is interrupted when the ASIO driver is set. | Has the ASIO driver been set with the DJ software started up? | Set the ASIO driver before starting up the DJ software. |
| Sound being played is interrupted when using DJ software. | Is the driver software's latency value suitable? Set the driver software's latency to a suitable value. | |
| Set the DJ software's latency to a suitable value. | ||
| When trying to update the firmware, [Your DDI-WeGO3 is not connected.] is displayed. | Is an iPhone/iPad connected to the unit? | If an iPhone/iPad is connected to the unit, the computer cannot be recognized. Disconnect the iPhone/iPad from the unit, and perform the update again. |
| The iPhone/iPad cannot be recharged. | Are you using the unit on USB bus power? | Only when the unit is connected to an AC adapter, the iPhone/iPad can be recharged. Connect the unit and the AC adapter, and then connect the iPhone/iPad. |
| Is the [STANDBY/ON] indicator flashing? | Temporarily disconnect the connected iPhone/iPad, and check the connection cable. | |
| Is the iPhone/iPad power supply off? | If the iPhone/iPad power supply is off, iPhone/iPad recharging cannot be performed. Turn on the iPhone/iPad power supply, and connect to the unit. | |
| Is the iPhone/iPad battery residual power exhausted? | If the iPhone/iPad battery residual power is exhausted and the power supply cannot be turned on, iPhone/iPad recharging cannot be performed. Use the battery charger included in the iPhone/iPad to recharge the iPhone/iPad, turn on the power supply and then connect to the unit. | |
Problem Check Remedy
| [STANDBY/ON] indicator is flashing. | — | If operation is abnormal, or it won't start up, disconnect the AC adapter or USB cable, wait for a little while, and then restart again.If the symptoms still appear, put in a request for repairs. |
| Noise occurs in the sound. | — | When engaged in voice conversation or data transfer or receiving on the iPhone/iPad, sound interruptions (communication noise) may occur in the unit. If these symptoms occur, change the iPhone/iPad install location or orientation.If this still does not improve the symptoms, turn off the iPhone/iPad mobile data communications and use the Wi-Fi connection or turn on the flight mode. |
About trademarks and registered trademarks
- Pioneer is a registered trademark of PIONEER CORPORATION.
- The other names of companies, products, and technologies mentioned herein are the registered trademarks or trademarks of their respective owners.
Specifications
AC adapter
Power.....AC 100 V to 240 V, 50 Hz/60 Hz
Rated current 0.6 A
Rated output..... DC 12 V, 2 A
Power consumption (standby) 0.5 W
General – Main Unit
Power consumption
When an AC adapter is used
When connected to iPhone/iPad....DC 12 V, 1 400 mA
When connected to a computer....DC 12 V, 300 mA
When using USB bus power....DC 5 V, 500 mA
Main unit weight 1.8 kg
Max. dimensions....380 mm (W) × 59 mm (H) × 240 mm (D)
Tolerable operating temperature ....+5 °C to +35 °C
Tolerable operating humidity 5% to 85% (no condensation)
Audio Section
Rated output level
MASTER OUT 3.2 Vrms
Total harmonic distortion (20 Hz to 20 kHzBW)
MASTER OUT 0.006%
Frequency characteristic
MASTER OUT 20 Hz to 20 kHz
S/N ratio (rated output, A-WEIGHTED)
MASTER OUT 95 dB
Input impedance
MIC 11 kΩ
Output impedance
MASTER OUT 1 kΩ or less
PHONES 10 Ω or less
USB AUDIO....24 bit/Fs: 44.1 kHz, 24 bit/Fs: 48 kHz
16 bit/Fs: 44.1 kHz, 16 bit/Fs: 48 kHz
Input / Output terminals
MASTER OUT output terminal
RCA pin jacks....1 set
PHONES output terminal
Stereo phone jack (∅ 6.3 mm)....1 set
Stereo mini phone jack (∅ 3.5 mm)....1 set
MIC input terminal
Phone jack (∅ 6.3 mm)....1 set
USB terminal
B type....1 set
iOS device connection terminal
13-pin....1 set
- For improvement purposes, specifications and design of this unit and the driver software are subject to change without notice.
• © 2014 PIONEER CORPORATION. All rights reserved.

16 Touche Lecture/Pause
23 Commandes EQ (HI, MID, LOW)
[HI] (aigu), [MID] (médium), [LOW] (grave)
24 Commande HEADPHONES VOL
AUDIO USB....24 bits/Fs : 44,1 kHz, 24 bits/Fs : 48 kHz
16 bits/Fs : 44,1 kHz, 16 bits/Fs : 48 kHz
Hybrid-DJ-Controller
23 Controlli EQ (HI, MID, LOW)
Dimensioni massime....380 mm (L) × 59 mm (A) × 240 mm (P)
© 2014 PIONEER CORPORATION.
All rights reserved.
© 2014 PIONEER CORPORATION.
PIONEER ELECTRONICS (USA) INC.
P.O. BOX 1720, Long Beach, California 90801-1720, U.S.A. TEL: (800) 421-1404
PIONEER ELECTRONICS ASIACENTRE PTE. LTD.
253 Alexandra Road, #04-01, Singapore 159936 TEL: 65-6472-7555
PIONEER ELECTRONICS AUSTRALIA PTY. LTD.
5 Arco Lane, Heatherton, Victoria, 3202, Australia, TEL: (03) 9586-6300
PIONEER ELECTRONICS (THAILAND) CO., LTD.
17th Fl., KPN Tower, 719 Rama 9 Road, Bangkapi, Huaykwang, Bangkok 10310 TEL: 66-2-717-0777
PIONEER TECHNOLOGY (MALAYSIA) SDN. BHD
16th Floor, Menara Uni. Asia 1008 Jalan Sultan Ismail 50250 Kuala Lumpur TEL: 60-3-2697-2920
先鋒股份有限公司
Plaza Credicorp Bank, 14th Floor, Calle 50, No.120 Panama City
0816-01361 Republic of Panama TEL: 507-300-3900
PIONEER KOREA CORPORATION (PKC)
PIONEER INDIA ELECTRONICS PRIVATE LTD.
216, Second Floor, Time Tower, M.G. Road, Sector 28, Gurgaon 122001,
Haryana, India TEL: +91-124-463-6100
Printed in / Imprimé


- WARNING
- OPERATING ENVIRONMENT
- CAUTION
- POWER-CORD CAUTION
- FOR EUROPE
- NOTE
- FEDERAL COMMUNICATIONS COMMISSION DECLARATION OF CONFORMITY
- INFORMATION TO USER
- CONTENTS
- HOW TO READ THIS MANUAL
- 01 BEFORE START
- 02 CONNECTIONS
- 03 PART NAMES AND FUNCTIONS
- 04 UTILITY MODE/FIRMWARE UPDATE
- 05 ADDITIONAL INFORMATION
- BEFORE START
- FEATURES
- HYBRID DJ CONTROLLER
- IPHONE/IPAD CONNECTION
- JOG FX
- PULSE CONTROL
- DESIGN
- COMPATIBILITY WITH VARIOUS DJ SOFTWARE PROGRAMS
- OBTAINING THE OPERATING INSTRUCTIONS (DJ SOFTWARE SETUP)
- PREPARING THE SOFTWARE
- CONNECTIONS
- CONNECTING WITH A COMPUTER
- 1 PHONES TERMINALS
- 2 CORD HOOK
- 3 DC IN TERMINAL
- 4 USB TERMINAL
- 5 IOS DEVICE TERMINAL
- 6 KENSINGTON SECURITY SLOT
- 7 MASTER OUT TERMINALS
- 8 MIC TERMINAL
- CAUTION WHEN USING THE IPHONE/IPAD STAND
- USING THE CORD HOOK
- PART NAMES AND FUNCTIONS
- 1 POWER SUPPLY
- 1 STANDBY/ON INDICATOR
- 2 STANDBY/ON BUTTON
- 2 BROWSER
- 3 ROTARY SELECTOR
- 4 LOAD BUTTON
- 3 DECK
- 5 TEMPO SLIDER
- 6 LOOP HALF BUTTON
- 7 AUTO LOOP MODE BUTTON
- 8 LOOP DOUBLE BUTTON
- 9 FX1 BUTTON
- 10 FX2 BUTTON
- 11 FX3 BUTTON
- 12 SYNC BUTTON
- 13 JOG DIAL
- 14 SHIFT BUTTON
- 15 CUE BUTTON
- 16 PLAY/PAUSE BUTTON
- 17 PERFORMANCE BUTTONS
- 18 HOT CUE MODE INDICATOR
- 19 SAMPLER MODE INDICATOR
- 20 HOT CUE/SAMPLER MODE SWITCHING BUTTON
- 4 MIXER
- 21 MIC VOL CONTROL
- 22 MASTER VOL CONTROL
- 23 EQ (HI, MID, LOW) CONTROLS
- 24 HEADPHONES VOL CONTROL
- 25 HEADPHONES SELECT MASTER BUTTON
- 26 HEADPHONES SELECT A/B BUTTONS
- 27 CHANNEL FADERS
- 28 CROSSFADER
- UTILITY MODE/FIRMWARE UPDATE
- UTILITIES MODES
- LAUNCHING UTILITIES MODE
- CHANGING THE SETTINGS
- ◆ DEMO MODE SETTING
- AUTO STANDBY SETTING
- ◆ PULSE MODE (ILLUMINATION) SETTING
- FIRMWARE UPDATE
- CAUTIONS
- ADDITIONAL INFORMATION
- TROUBLESHOOTING
- ABOUT TRADEMARKS AND REGISTERED TRADEMARKS
- SPECIFICATIONS
- AC ADAPTER
- GENERAL – MAIN UNIT
- AUDIO SECTION
- INPUT / OUTPUT TERMINALS
- 16 TOUCHE LECTURE/PAUSE
- 23 COMMANDES EQ (HI, MID, LOW)
- 24 COMMANDE HEADPHONES VOL
- HYBRID-DJ-CONTROLLER
- 23 CONTROLLI EQ (HI, MID, LOW)
Brand : PIONEER
Model : DDJ-WEGO3-W
Category : DJ Equipment