
M3 WL - Meter VDO - Free user manual and instructions
Find the device manual for free M3 WL VDO in PDF.


| Product Type | Wireless cycle computer |
| Brand | VDO |
| Model | M3 WL |
| Dimensions (Computer) | 49 x 33 x 12 mm (H x W x D) |
| Weight (Computer) | Approx. 30 g |
| Weight (Handlebar bracket) | Approx. 10 g |
| Weight (Speed transmitter) | Approx. 20 g |
| Computer Battery | 3V CR2032, approx. 1 year life (400 ride hours) |
| Transmitter Battery | 3V CR2032, approx. 1.5 years life (15,000 km) |
| Display Type | Large easy-to-read LCD with three areas |
| Main Functions | Current speed, current/total distance, current/total ride time, average speed, maximum speed, section time, section distance, navigator (trip distance with presets), temperature, clock (12/24h), trip section counter |
| Speed Range | 2.0 to 199 km/h (with 2155 mm wheel circumference) |
| Wireless Transmission Range | Speed transmitter: 75 cm |
| Bike Support | Dual bike mode with automatic bike recognition (Bike 1/Bike 2) |
| Sleep Mode | Activates after 5 minutes with auto-start on movement |
| Wheel Circumference Setting | 100 to 3999 mm (manual or tyre table) |
| Languages | German, English, French, Italian, Spanish, Dutch, Polish |
| Guarantee | 2 years from date of purchase (excluding cables, batteries, mounting materials) |
| Accessories Included | Computer, speed transmitter (with battery), handlebar bracket, spoke magnet, cable ties, quick-start manual |
| Maintenance | Replace batteries annually; clean with damp cloth; do not use solvents |
| Repair and Spare Parts | Contact dealer or Cycle Parts GmbH; battery, transmitter, bracket, magnet available as spare parts |
Frequently Asked Questions - M3 WL VDO
User questions about M3 WL VDO
0 question about this device. Answer the ones you know or ask your own.
Ask a new question about this device
Download the instructions for your Meter in PDF format for free! Find your manual M3 WL - VDO and take your electronic device back in hand. On this page are published all the documents necessary for the use of your device. M3 WL by VDO.
USER MANUAL M3 WL VDO

Installation video
Operating video
Settings video
Preface
Congratulations
In choosing a VDO computer, you have opted for high-quality device with first rate technology.
To optimally use the computer, we recommend that you read this manual carefully. It contains full operating instructions and many useful tips.
We hope you enjoy cycling with your VDO computer.
Cycle Parts GmbH
Pack contents
First, please ensure that the contents of this pack are complete:
1 VDO computer
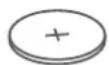
1 battery for the computer
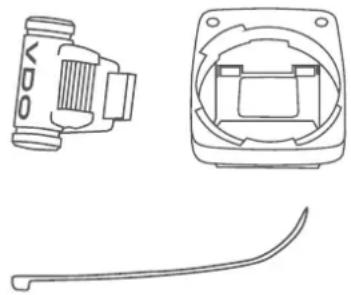
1 speed transmitter, battery installed
1 handlebar bracket
1 spoke magnet (clip magnet)
cable ties for attaching the bracket and
the transmitter
1 quick-start instruction manual

natural_image
Simple line drawing of a rectangular device with rounded corners and a central screen (no text or symbols)
natural_image
Technical line drawing of two mechanical components with a tool, no text or symbols presentTable of contents
Display 04
Buttons 06
Functions 07
Accessing the total values 10
Operation while cycling 12
Sleep mode 12
Attaching the handlebar bracket 13
Attaching the speed transmitter 14
Inserting the computer into the bracket 15
Pairing the transmitter (initial use) 16
Function testing 16
Settings 17
Language....17
Unit 19
Wheel circumference 21
Clock 25
Total distance 27
Total ride time 29
Navigator 31
Resetting the navigator to zero ....32
Trip section counter 33
Resetting the trip section counter to zero 34
Resetting trip data after the trip 34
Battery status indicator.... 35
Replacing the battery in the computer 35
Replacing the battery in the speed transmitter ..... 36
Terms of guarantee 37
Troubleshooting 38
Technical specifications 39
Display
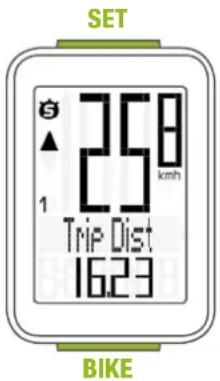
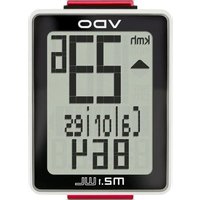
The VDO M3 WL has a large, easy-to-read display that can be divided into three areas.
Area 1:
The top line of the display permanently indicates the current speed.
Area 2:
The middle line uses clear text to display a description of the selected indicator function.
Area 3:
The bottom line of the display shows the value for the selected function.

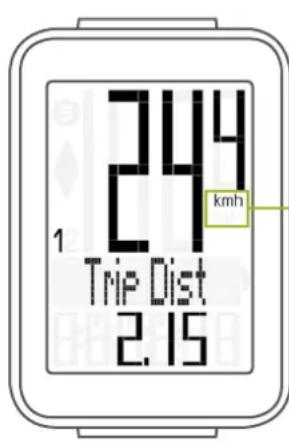
On the right of the display, under the speed indicator, the unit kmh or mph is displayed.
Display
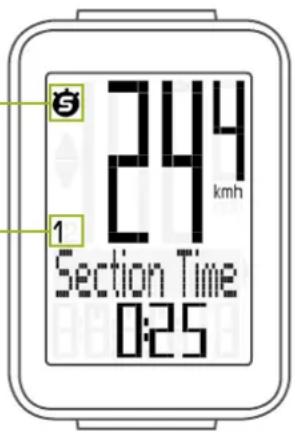
On the left of the display, next to the speed indicator, you will find the icons:
“5”: the icon is ON
if the trip section counter has been started.
A more detailed description of the trip section counter can be found on page 31.
"1" or "2"
The VDO M3 WL can be used on two bikes.
The indicator icons 1 and 2 show you whether your
VDO M3 WL is currently using the settings for bike 1 or bike 2.
"UP/DOWN arrow"

The arrows indicate whether you are currently travelling quicker or slower than your current average speed.

Buttons
The VDO M3 WL has two buttons.

natural_image
Simple line drawing of a rectangular battery with two green leads (no text or symbols)SET
In function mode:
- Scroll backwards through the functions
- Open the setting mode (press and hold)
- Access the total values for distance and ride time (press and hold)
In setting mode:
- Open the setting
– Confirm the setting once ready - Exit setting mode and return to function mode
BIKE
In function mode:
- Access the bike functions (scroll forwards through the functions)
- Reset trip data to zero (press and hold)
In setting mode:
- Scroll in the setting menu
- Change the data to be set
- Exit setting mode and return to function mode
Functions
The VDO M3 WL has the following functions:
Current speed
The current speed is permanently shown on the display. With a wheel circumference of 2,155 mm, the maximum possible speed is 199 kmh or 124 mph.
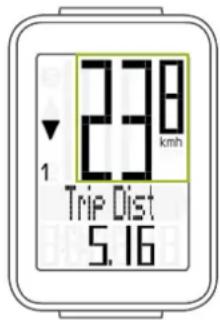
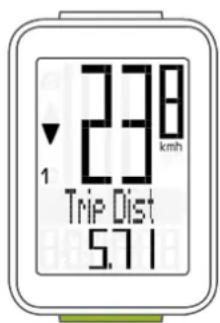
Current distance
The current distance (distance for the current trip) counts up to 9,999.99 km or miles. If this maximum value is exceeded, the counter restarts the current distance count at zero.
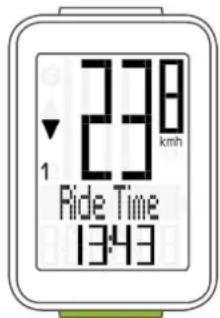
Current ride time
The current ride time (ride time for the current trip) counts up to 99:59:59 HH:MM:SS. If this value is exceeded, the ride time counter restarts at zero.
Average speed
for the current trip
The average speed is specified to two decimal places.

Maximum speed
for the current trip
The maximum speed is specified to two decimal places.

Functions
Section time
The VDO M3 WL has a trip section counter. The trip section counter is like a stopwatch. If the trip section counter is running, the section time is recorded, as on a stopwatch.
When the trip section counter is running, the section distance is also recorded.
The trip section counter is started and stopped by pressing the BIKE + SET buttons (simultaneously press both buttons – do NOT hold).
ATTENTION: the trip section counter stops automatically when the speed is zero.
A detailed description of the trip section counter can be found on page 33.

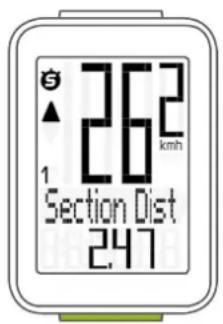
Section distance
Shows the distance travelled while the trip section counter is activated.
Functions
Navigator
The navigator is a second, completely independent trip distance counter.
The navigator is used to measure trip sections.
The navigator is particularly helpful when riding a route shown in a road book.
The navigator can:
- be reset to zero as often as desired and independently of the trip distance counter
- be preset to a specific value
– count forwards or backwards from this value
Navigator setting range:
-99.99 to +999.99 KM or M
Information on how to operate the navigator can be found on page 31.

Temperature
The VDO M3 WL has a temperature indicator.
The temperature is displayed in increments of 0.1 degrees.

Clock
The current time is displayed in 24 H or 12 H mode.
Information on how to set the time can be found on page 25.

Accessing the total values
The total values for the distance travelled and the ride time are accessed separately from the data for the CURRENT trip.
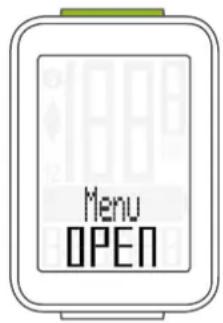
To access the totals, press and hold the SET button until the menu opens.
Press the SET button to open the Totals (total values) screen.
Press the BIKE button to scroll in the Totals.
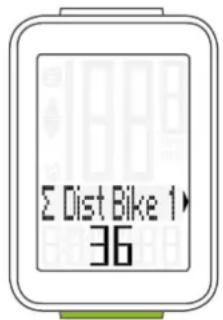
The total distance 1 (cumulative distance for all individual trips on bike 1) is displayed first.

flowchart
graph LR
    A["Menu OPEN"] --> B["Totals"]
Total distance 1
(Cumulative value for all trips on bike 1)
The total distance counts up to 99,999 km or miles.
If this value is exceeded, the total distance counter restarts at zero.
If the unit is switched from miles to km and the conversion result is greater than 100,000 km, the total distance counter is reset to zero.
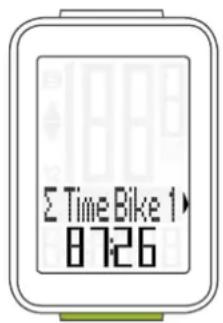
Press the BIKE button to scroll to total ride time.
(Cumulative value for all trips)
The total ride time counts up to 9999:59 HHHH:MM.
If this value is exceeded, the total ride time counter restarts at zero.
Accessing the total values
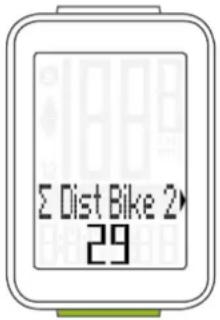
If you have also used bike 2, when continuing scrolling by pressing the BIKE button, the values for bike 2 are also displayed here.
Press the BIKE button to scroll on to Total distance bike 2
Press the BIKE button to scroll on to Total ride time bike 2
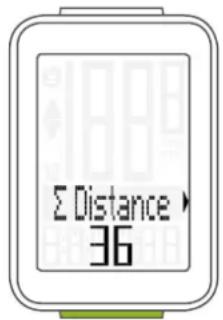
Pressing the BIKE button also enables you to access the total values (cumulative value for bike 1 + bike 2).
Press (and hold) the SET button to return from the total values information to the normal function mode.


Operation while cycling
While cycling, the display functions can be accessed by pressing the BIKE button (scroll forwards through the functions).
Pressing the BIKE button shows the next function on the display.
By pressing the SET button you can also scroll backwards through the functions. This enables you to quickly display the desired function.
Sleep mode
If you take a break and the M3 WL is in the bracket, the computer switches to sleep mode after five minutes. The model name VDO M3 WL and the time appear on the display.
If you set off again after a break, the VDO M3 WL has an auto-start function.
The VDO M3 WL instantly switches back to the function mode and the current speed and distance are once again displayed.

Attaching the handlebar bracket
You can attach the computer to the right or left of the handlebars or in the centre on the stem. Attach the handlebar bracket in the corresponding position.
STEP 1
Decide whether you want to attach the computer to the handlebars or the stem.
STEP 2
Rotate the foot of the handlebar bracket by 90° accordingly. To do so, undo the screws in the bracket, remove the foot and rotate it 90° then insert and tighten the screws again. Attention: do not overtighten the screws.
STEP 3
Guide the cable ties through the slot in the handlebar bracket, place around the handlebars or the stem and pull (do not pull tight just yet).
STEP 4
For handlebar attachment: align the computer angle to achieve optimum readability. Now pull the cable ties tight.
Use clippers to snip off protruding ends.

Attaching the speed transmitter
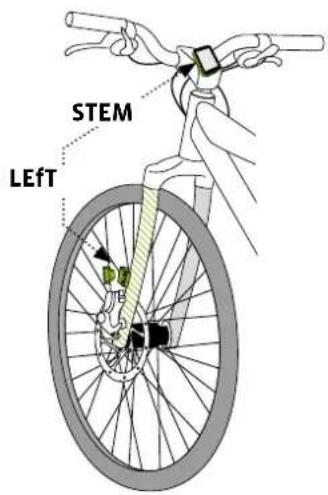
The transmitter can be attached to the fork leg on the right or left.
Note:
If you have attached the computer to the stem or the left of the handlebars, the speed transmitter MUST be attached to the LEFT fork leg.
STEP 1
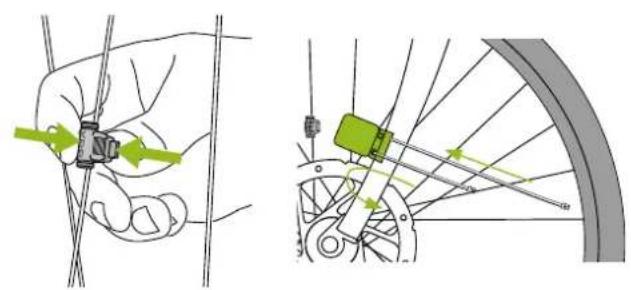
Place the rubber shim under the transmitter. Fit the transmitter on the same side of the forks where you later want to fit the computer to the handlebars (right or left) using the cable ties supplied (loosely at first, do not pull tight just yet).
ATTENTION: The cross-hatched marking on the lid of the transmitter's battery compartment must point toward the spokes.
Depending on the available space, the transmitter can be mounted along the front of the fork, on the inside of the fork, or the back of the fork.
STEP 2
Place the spoke magnet around an outside spoke. The VDO logo of the rod-shaped magnet core should point toward the transmitter. Align the magnet with the cross-hatched sensor marking on the transmitter at a distance of 1-5 mm.
STEP 3
Align the transmitter and magnet in their final positions and fasten them in place:
pull the cable ties tight and push the magnet in firmly.
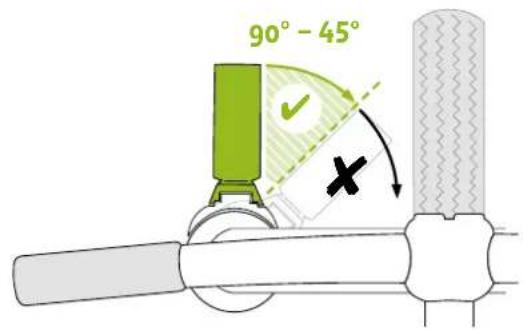
The transmitter should be folded down at a maximum angle of 45^ to the spokes. If you cannot achieve this angle, move the transmitter down along the fork leg towards the hub until you have reduced the angle to less than 45^ .
natural_image
Illustration of bicycle wheel assembly with green tool and cable (no text or symbols)


Inserting the computer into the bracket
The VDO twist-click system securely connects the computer to the handlebar bracket.
How to insert the computer:
STEP 1
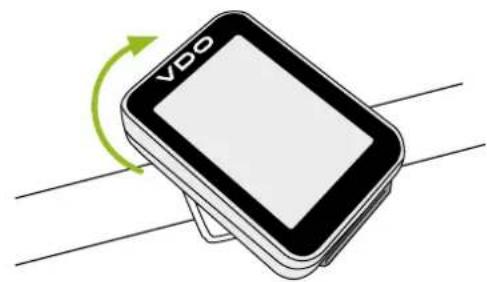
Place the computer into the bracket in a 10 o'clock position.
STEP 2
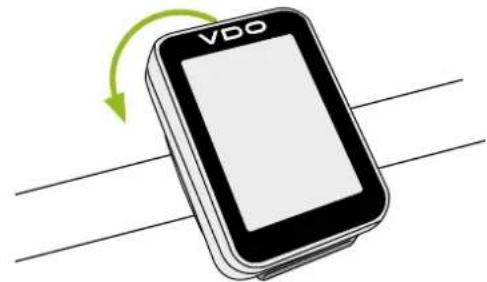
Rotate the computer to the right into the 12 o'clock position and click it into the bracket system. A noticeable resistance must be overcome to move it into place.
STEP 3
To remove the computer, rotate it to the left (without pushing or pulling).
Memory aid: Rigid to the Right, Loose to the Left

- LOcK 2. cLicK
natural_image
Illustration of a VDO smartwatch with green circular arrow indicating rotation (no text or symbols on device)- UNLOCK
natural_image
Illustration of a VDO smartphone with a green circular arrow indicating rotation (no text or symbols on the device itself)Pairing the transmitter (initial use)
The VDO M3 WL automatically pairs the transmitter.
Once the computer has been rotated into place in the bracket, it starts searching for the transmitter.
The transmitter search is identified by the flashing digits for:
- Speed
– Heart rate (if the heart rate option is activated)
– Cadence (if the cadence option is activated)
The VDO M3 WL has an automatic bike recognition function. Depending on whether you are using bike 1 or bike 2, the data is recorded for bike 1 or bike 2.
ATTENTION: When other radio signals interfere during the pairing function, the display shows the message “Too Many Signals”.
Confirm this message by pressing any key. You will then need to leave this location and move to another location. Untwist the computer from the handlebar bracket. Then reinsert the computer into the handlebar bracket. The computer will now attempt another pairing.
Potential source of interference:
- LED lights
- Mobile telephone
- GPS receiver
- WLAN
– Anti-theft security systems inside the store
These sources can interfere with the pairing.
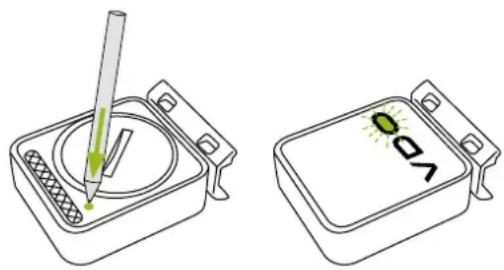
ATTENTION: when using the transmitter for the first time, the bike recognition switch must be set to either BIKE 1 or BIKE 2. Only then will the automatic bike recognition work.
Press and HOLD the button until the LED flashes.
Green flashes once = bike 1 is selected
Red flashes twice = bike 2 is selected
natural_image
Two technical illustrations: one showing a pen tip interacting with a circular component, the other showing a labeled electronic device with green and black dots (no text or symbols)Function testing
Once the transmitter has been attached, check that it functions correctly.
How to test the transmitter:
– Insert the computer into the bracket.
The speed indicator flashes. The computer now searches for its speed transmitter.
– Lift and spin the front wheel.
The green LED on the transmitter flashes several times.
- A speed should now be displayed on the computer.
If no speed is displayed, there can be several reasons for this.
The possible reasons are described in the “Troubleshooting” section.
Settings – language
The following display languages can be selected for the VDO M3 WL:
- German
- English
- French
- Italian
- Spanish
- Dutch
- Polish
How to select the language:
Press and hold the SET button until the settings menu opens.
The Totals (total values) first appear on the display.


Press the BIKE button to scroll to Settings.
Press the SET button to open the settings.
"Language" appears on the display.

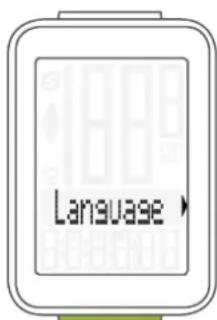
Press SET to open the language settings.
"English" flashes.

Settings – language
You can now press the BIKE button to select a different language.

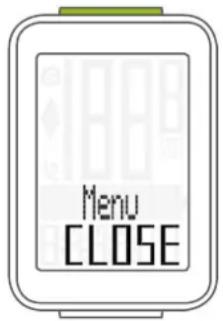
Press the SET button to confirm your language setting. The response "Set OK" appears on the display.
If you want to configure further settings, press the BIKE button to access these.
If you do not want to configure any further settings, press and hold the SET button.
The settings menu closes. The VDO M3 WL returns to function mode.

Settings - unit
Use the unit settings to specify the measurement formats for:
– Speed (kmh or mph)
– Temperature (C or F)
- Clock (24-hour or 12-hour with AM/PM)
How to set the unit:
Press and hold the SET button until the settings menu opens.
Press the BIKE button to scroll from Totals to Settings.
Press the SET button to open the settings.
"Language" appears on the display.
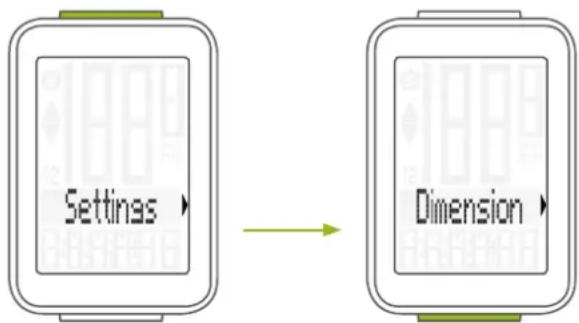
Press the BIKE button to scroll to the setting for the Dimension.
Press the SET button to open the unit setting.
First set the unit for the speed.
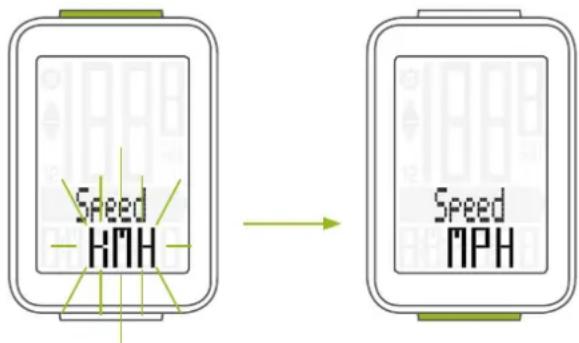
"KMH" flashes in the bottom line of the display.
Press the BIKE button to change the unit to "MPH".
Press the SET button to confirm the setting.
The setting for the temperature unit next appears on the display. Set whether the temperature should be displayed in Celsius or Fahrenheit.
Press the BIKE button to make your selection.
Press the SET button to confirm your selection.

flowchart
graph LR
    A["Settings"] --> B["Dimension"]
![Temperature - [ - ] Temperature F](/content/2026/06/1261979/images/039fe3214f8aacc7b4105622a9467234e885b0730a7fb3f663a4579cb00c2193.jpg)
Settings - unit
The setting for the time format now appears on the display. Here, you can select a 24-hour format or a 12-hour format with AM/PM.
Press the BIKE button to make the selection.
Press the SET button to confirm the selection.

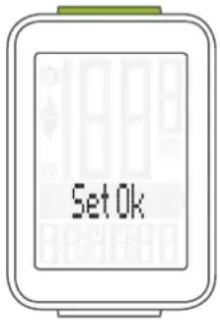
The response "Set OK" appears on the display.
If you want to configure further settings, press the BIKE button to access these.
If you do not want to configure any further settings, press and hold the SET button. The settings menu closes.
The VDO M3 WL returns to function mode.
Settings – wheel circumference/wheel size
You can set the roll circumference of your wheel in millimetres on the VDO M3 WL or select the applicable tyres from a tyre table.
The more accurate this setting, the more accurate your speed indicator and the measurement of the distance you have travelled. You can find the values for your tyres in the tyre size table and set these in the device.
ATTENTION: the values in the table are approximations only. The actual values can deviate from the values in the table depending on the manufacturer and the tyre tread.
If your tyre size is not listed in the table, you can accurately measure the roll circumference.
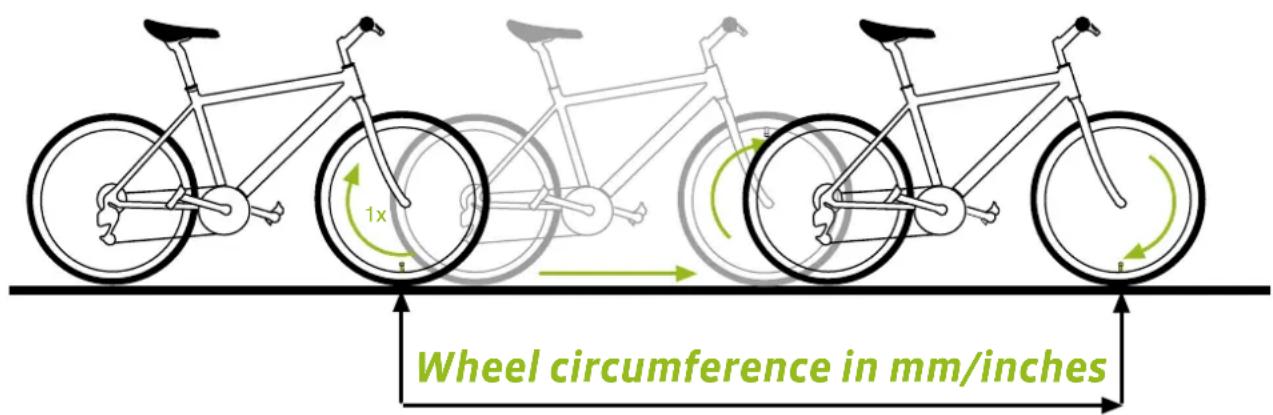
How to measure the roll circumference:
STEP 1
Stand your bike up and position the wheel to which you want to attach the sensor so that the valve is directly on the ground. Ensure that the tyres are fully pumped up in accordance with the usage instructions. Mark the position of the valve on the ground with a line or adhesive strip.
STEP 2
Now push your bike forwards in a straight line until the valve is back on the ground after one rotation.
Again mark the position of the valve on the ground with a line or adhesive strip.
STEP 3
The distance between the two marks corresponds to your wheel circumference or wheel size in millimetres.
| Tyre size ETRTO | KMH Wheelcircum-ferencein mm | MPH Wheelcircum-ferencein inches | |
| 16 x 1.75 | 47-305 1,272 50.1 | ||
| 20 x 1.75 | 47-406 1,590 62.6 | ||
| 24 x 1.75 | 47-507 1,907 75.1 | ||
| 26 x 1.5 | 40-559 2,026 79.8 | ||
| 26 x 1.75 | 47-559 2,070 81.5 | ||
| 26 x 1.9 | 2,089 82.2 | ||
| 26 x 2.00 | 50-559 2,114 83.2 | ||
| 26 x 2.10 | 54-559 2,125 83.7 | ||
| 26 x 2.25 | 57-559 2,145 84.4 | ||
| 26 x 2.35 | 60-559 2,160 85.0 | ||
| 26 x 2.40 | 62-559 2,170 85.4 | ||
| 28 x 1.5 | 40-622 2,224 87.6 | ||
| 28 x 1.6 | 42-622 2,235 88.0 | ||
| 28 x 1.75 | 47-622 | 2,268 | 89.3 |
| 29 x 2.10 | 54-622 2,295 90.4 | ||
| 29 x 2.25 | 57-622 | 2,288 | 90.1 |
| 29 x 2.40 | 62-622 | 2,300 | 90.6 |
| 650 B | 2,100 82.7 | ||
| 700 x 18C | 18-622 | 2,102 | 82.8 |
| 700 x 20C | 20-622 | 2,114 | 83.2 |
| 700 x 23C | 23-622 | 2,095 | 82.5 |
| 700 x 25C | 25-622 2,146 84.5 | ||
| 700 x 30C | 30-622 2,149 84.6 | ||
| 700 x 32C | 32-622 2,174 85.6 | ||
| 700 x 38C | 38-622 | 2,224 | 87.6 |
Settings – wheel circumference/wheel size
How to set your wheel circumference:
Press and hold the SET button until the settings menu opens.
Press the BIKE button to switch from Totals to Settings.
Press the SET button to open the settings.
"Language" appears on the display.
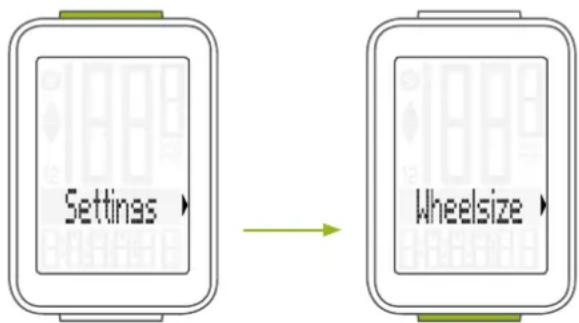
Press the BIKE button to scroll to the setting for the Wheelsize.

flowchart
graph LR
    A["Settings"] --> B["Wheelsize"]
Press the SET button to open the setting for the wheel size.
You can set the wheel size separately for bike 1 and bike 2.
Press the BIKE button to scroll from the setting for bike 1 to the setting for bike 2.

flowchart
graph LR
    A["WS Bike 1"] --> B["WS Bike 2"]
Press the SET button to open the setting (description here is for bike 1).
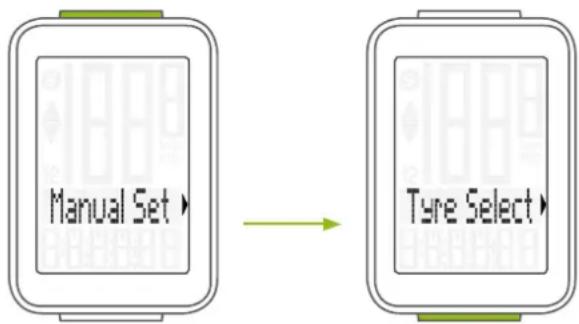
In the display, you can now choose whether you want to manually set the wheel size in millimetres/inch or select the appropriate tyres from a tyre list.
Press the BIKE button to make the selection.
Confirm the selection by pressing the SET button.
flowchart
graph LR
    A["Manual Set"] --> B["Tyre Select"]
Settings – wheel circumference/wheel size
Manual setting by entering the roll circumference in millimetres/inch
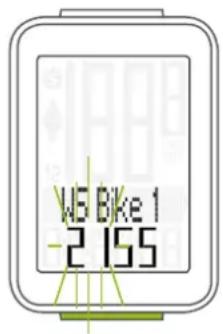
For mm: The first two digits (in the example "21") flash. Press the BIKE button to set these digits to the desired value.
For Inch: The Inch value is Flashing.
Press the BIKE Button to set the digits to the desired value.
Press the SET button to confirm your setting.
mm-Setting Inch-Setting
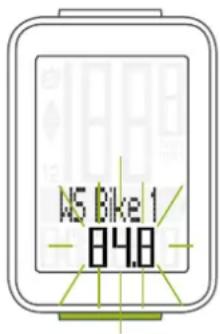
For mm: The third digit now flashes and is ready to be set.
Press the BIKE button to set this digit.
Press the SET button to confirm your setting.

For mm: The final digit on the right now flashes.
Press the BIKE button to set this digit.


Press the SET button to confirm your setting.
Your wheel circumference setting is now complete.
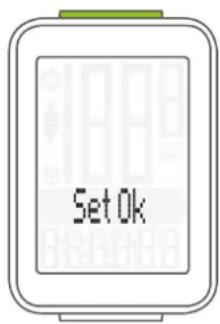
The response "Set OK" appears on the display.
If you want to configure further settings,
press the BIKE button to access these.
If you do not want to configure any further settings, press and hold the SET button.
The settings menu closes.
The VDO M3 WL returns to function mode.

Settings – wheel circumference/wheel size
Setting the wheel size using the tyre list
Open the wheel size settings via the tyre list by pressing the SET button (see page 20).

SELECT appears on the display.

Press the BIKE button to scroll through the tyre list until your tyre is displayed (in the example shown 26 x 2.35).
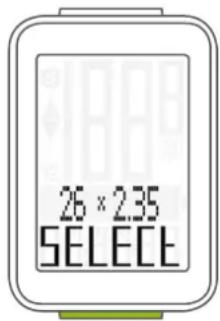
Press the SET button to confirm the selection. The response "Set OK" appears on the display.
If you want to configure further settings, press the BIKE button to access these.
If you do not want to configure any further settings, press and hold the SET button.
The settings menu closes.
The VDO M3 WL returns to function mode.
Settings - clock
In the VDO M3 WL, you can set the clock in 12-hour AM/PM format or 24-hour format.
Specify the desired time format in the unit settings (see page 19).
How to set the time:
Press and hold the SET button until the settings menu opens.
Press the BIKE button to move from Totals to Settings.
Press the SET button to open the settings.
"Language" appears on the display.
Press the BIKE button to scroll to the setting for the Clock.
Press the SET button to open the setting for the Clock.
The hour digits flash.
Press the BIKE button to change the setting for the hours.
Press the SET button to confirm your setting.

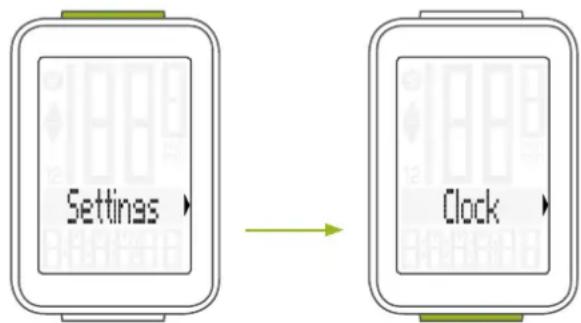
flowchart
graph LR
    A["Settings"] --> B["Clock"]
Display in 24-h format
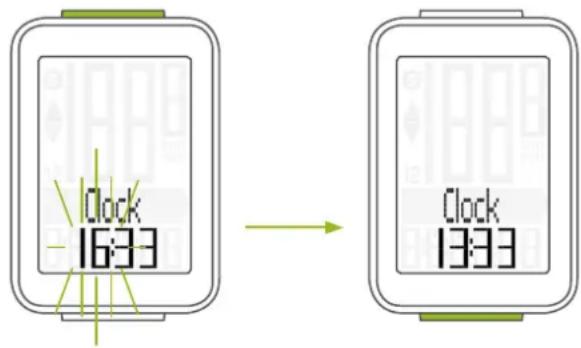
Display in 12-h format

Settings - time
The minute digits now flash on the display. Press the BIKE button to set the minutes.
Display in 24-h format
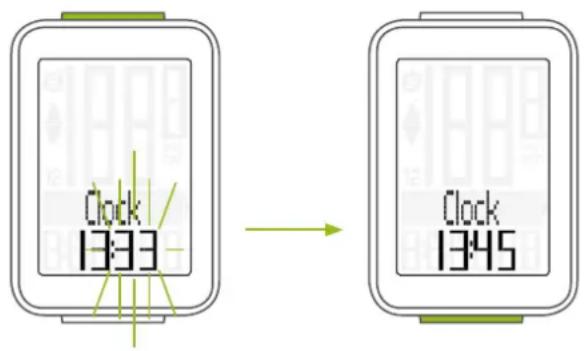
Display in 12-h format

Press the SET button to confirm your setting. The response "Set OK" appears on the display.
If you want to configure further settings, press the BIKE button to access these.
If you do not want to configure any further settings, press and hold the SET button. The settings menu closes.
The VDO M3 WL returns to function mode.

Settings – total values – total distance
You can set the total distance ridden on the VDO M3 WL.
For example, you can enter your data here at the start of a new cycling season.
You can set the total distance separately for bike 1 and bike 2.
ATTENTION: the M3 WL has a data memory. No data is lost when the battery is replaced
How to set the total values:
Press and hold the SET button until the settings menu opens.
Press the BIKE button to move from Totals to Settings.
Press the SET button to open the settings.
"Language" appears on the display.
Press the BIKE button to scroll to the setting for the Total Dist (total distance).
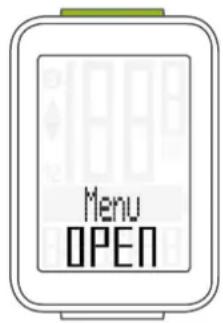

flowchart
graph LR
    A["Settings"] --> B["Total Dist"]
Press the SET button to open the settings.
Press the BIKE button to select whether you want to set the total distance for bike 1 or bike 2.
Press the SET button to confirm the selection.

flowchart
graph LR
    A["Dist Bike 1"] --> B["Dist Bike 2"]
Settings – total values – total distance
The left digit flashes.
Press the BIKE button to change the digit.
Once this digit has been set, confirm the setting by pressing the SET button.
The next digit starts to flash and is ready to be set.
Press the BIKE button to change this digit. Once this digit has also been set, confirm the setting by pressing the SET button.
The next digit flashes.
Once all digits have been set, confirm the setting again by pressing the SET button.
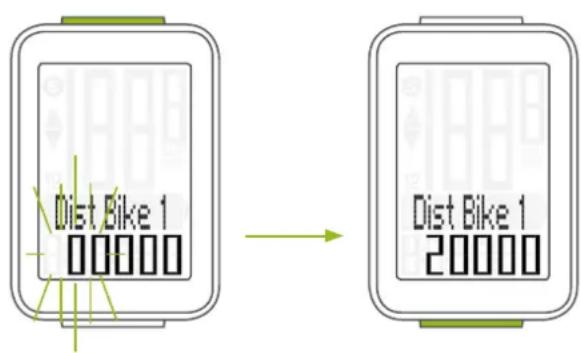

The response "Set OK" appears on the display.
The set value is stored.
If you want to configure further settings, press the BIKE button to access these.
If you do not want to configure any further settings, press and hold the SET button.
The settings menu closes.
The VDO M3 WL returns to function mode.

Settings – total values – total ride time
You can set the total ride time on the VDO M3 WL.
E.g. you can set your total ride time (cumulative ride time for all trips) at the start of the new cycling season).
You can set the values separately for bike 1 and bike 2.
ATTENTION: the M3 WL has a data memory.
No data is lost when the battery is replaced.
How to set the total ride time:
Press and hold the SET button until the settings menu opens.
Press the BIKE button to switch from Totals to Settings.
Press the SET button to open the settings.
"Language" appears on the display.
Press the BIKE button to scroll to the setting for the Total Time.
Press the SET button to open the setting for the Total Time (total ride time).
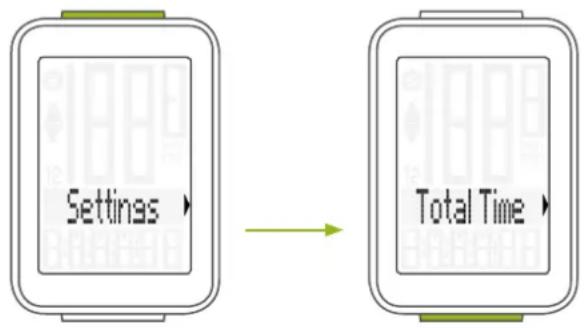
flowchart
graph LR
    A["Settings"] --> B["Total Time"]
Press the BIKE button to select whether you want to set the total time for bike 1 or bike 2.
Press the SET button to confirm the selection.

flowchart
graph LR
    A["Time Bike 1"] --> B["Time Bike 2"]
The left digit of the hours setting flashes and is ready to be set.
Press the BIKE button to set the value for this digit.
Press the SET button to confirm your setting.

Settings – total values – total ride time
The next digit on the left starts to flash and is ready to be set.
Press the BIKE button to set the value for this digit.
Press the SET button to confirm your setting.
Once you have set all four digits, confirm the setting again by pressing the SET button.

The setting for the minutes is then opened.
Press the BIKE button to set the minutes.
Once the minutes have been set, confirm the setting by pressing the SET button.
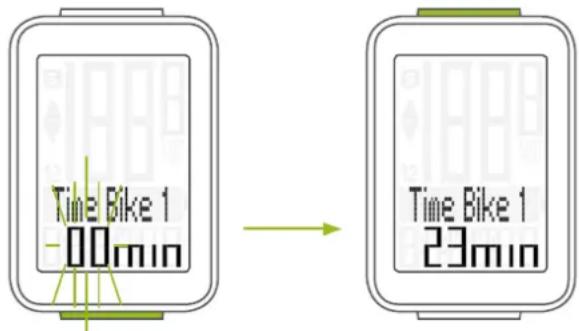
The response "Set OK" appears on the display.
If you want to configure further settings, press the BIKE button to access these.
If you do not want to configure any further settings, press and hold the SET button.
The settings menu closes.
The VDO M3 WL returns to function mode.

Setting the navigator
The navigator is a second, completely independent trip distance counter.
The navigator can:
- be reset to zero any number of desired times during a trip
- be set to a distance value
- count forwards or backwards from the set distance value.
How to set the navigator:
Press the BIKE button to display the navigator function.
Navigator setting range: -99.99 to +999.99 km or miles.
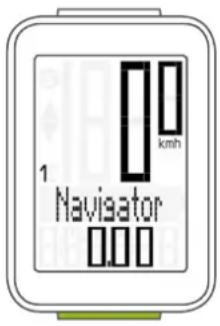
Once the navigator function is on the display, press and hold the SET button until the settings menu opens.
First select whether the navigator should count forwards or backwards from the set value.
Press the BIKE button to make the selection.
Press the SET button to confirm your selection.


flowchart
graph LR
    A["Forward"] --> B["Backward"]
The screen for setting the navigator's distance value is opened. The first digit on the left flashes.
Press the BIKE button to change the digit.
Press the SET button to confirm the entry.

Setting the navigator
The second digit on the left flashes.
Press the BIKE button to change the digit.
Press the SET button to confirm the entry.

Once all the digits have been set, confirm the entry by pressing the SET button.
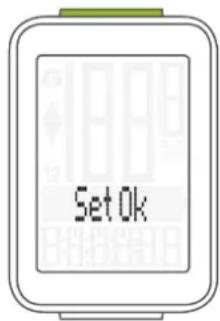
The response "Set OK" appears on the display.
The VDO M3 WL returns to function mode.
Resetting the navigator to zero
The navigator can be reset to zero any number of desired times during a trip.
How to reset the navigator:
Press the BIKE button to display the navigator function.
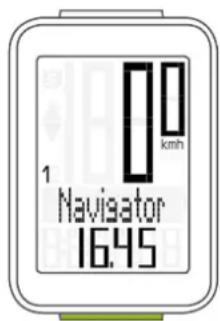
Once the navigator function appears on the display, press and hold the BIKE button.
Navigator RESET appears on the display.
If you continue to hold down the BIKE button, the navigator is reset to zero.

Trip section counter
The VDO M3 WL has a time and distance counter that works similarly to a stopwatch.
When the trip section counter is running, the time and distance covered in this time are recorded.
Starting the trip section counter
Simultaneously press the BIKE and SET buttons.
The section time immediately appears on the display and the icon for the trip section counter is visible.

Press the BIKE button to scroll to the trip section.

Stopping the trip section counter
To stop the trip section counter, simultaneously press the BIKE and SET buttons.
ATTENTION: if you take a break (speed = zero), the trip section counter will automatically stop.
When you set off again (the trip section counter is still active, as shown by the icon "5" on the display), the trip section counter will automatically restart.

Restarting the trip section counter
If you have manually stopped the trip section counter and now want to restart it, simultaneously press the BIKE and SET buttons again.
The trip section counter continues from the last value.
Resetting the trip section counter to zero
To reset the counter either the section time or the section distance must be shown on the display.
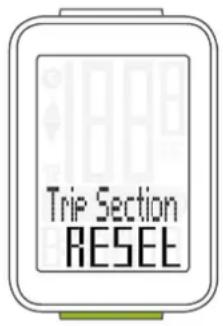
Press and hold the BIKE button.
The text Trip Section RESET appears on the display.
If you continue to hold down the BIKE button, the trip section data is now reset to zero.
The following data is reset to zero:
- Section distance
- Section ride time
Resetting trip data after the trip
After each trip, you can reset the data for this trip to zero. The VDO M3 WL is then ready for the next trip.
ATTENTION: your total distance (total number of kilometres/miles ridden) and total ride time are not reset to zero.
How to reset the trip data:
Press and hold the BIKE button for a few seconds.
The text Tour Data RESET appears on the display.
If you continue to hold down the BIKE button, the trip data is now reset to zero.
The following data is reset to zero:
- Distance
- Ride time
– Average speed - Maximum speed

Battery status indicator
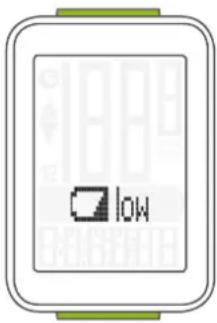
The VDO M3 WL has a low battery warning.
If the remaining battery capacity falls below a certain level, a warning appears on the display.
Press any button to clear the warning.
Following a low battery warning, you still have approximately two weeks to replace the battery.
Replacing the battery in the computer
To ensure your cycle computer is fully functional, we recommend replacing the battery annually.
ATTENTION: your settings as well as your total distance, total ride time and altitude gain/loss for the year remain stored when you replace the battery. NO data is lost.
You need a 3 V 2032 battery.
We recommend using a branded battery from Sony, Panasonic, Varta or Duracell.
How to replace the battery:
STEP 1
Use a coin to remove the battery compartment cover.
STEP 2
Remove the dead battery.
ATTENTION: wait 10 seconds before you insert the new battery. The electronics require this time to detect that the battery is being changed.
STEP 3
Insert the battery into the computer housing with the +pole up.
Ensure that the battery is not tilted.
Ensure that the rubber seal lies smoothly on the lid of the battery compartment.
STEP 4
Insert the battery compartment cover into the opening and use a coin to turn it to the right as far as it will go.
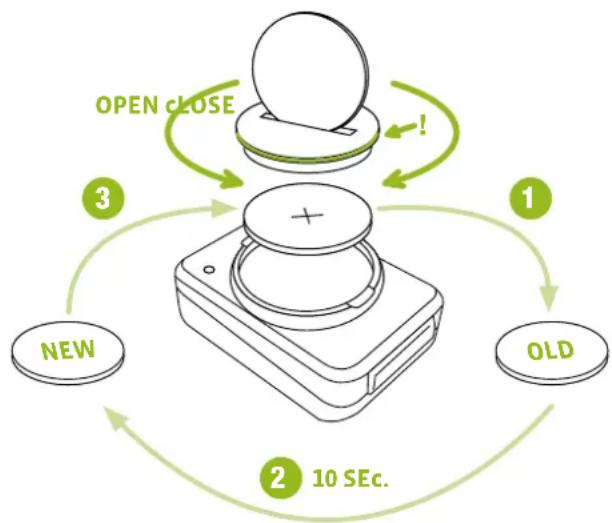
flowchart
graph TD
    A["NEW"] --> B["3"]
    B --> C["OPEN CLOSE"]
    C --> D["1"]
    D --> E["OLD"]
    E --> F["2 10 SEc."]
    F --> G["3"]
    G --> H["OPEN CLOSE"]
    H --> I["1"]
    I --> J["OPEN CLOSE"]
Replacing the battery in the speed transmitter
The battery in the speed transmitter should be replaced annually to guarantee seamless wireless transmission.
You need a 3 V 2032 battery.
We recommend using a branded battery from Sony,
Panasonic, Varta or Duracell.
How to replace the battery:
STEP 1
Use a coin to remove the battery compartment cover.
STEP 2
Remove the dead battery.
ATTENTION: Wait for 10 seconds before inserting the new battery. The electronics need this time to recognise that the battery is being changed.
STEP 3
Insert the battery into the transmitter housing with the +pole up. Ensure that the battery is not tilted.
Ensure that the rubber seal lies smoothly on the lid of the battery compartment.
STEP 4
Insert the battery compartment cover into the opening and use a coin to turn it to right as far as it will go.
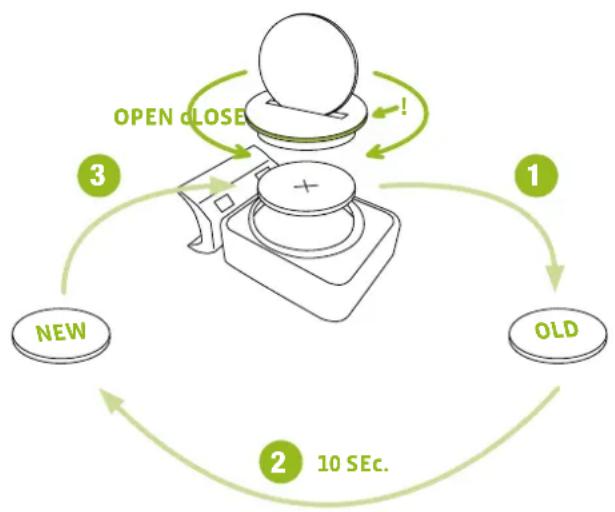
flowchart
graph TD
    A["1"] --> B["OLD"]
    B --> C["2 10 SEc."]
    C --> D["3 OPEN CLOSE !"]
    D --> E["4 NEW"]
Terms of guarantee
VDO Cycle Parts offers a two-year guarantee on your VDO computer, starting from the date of purchase. This guarantee covers material and processing defects on the computer itself, the sensor/transmitter and the handlebar bracket.
Cables, batteries and mounting materials are not covered by the guarantee.
The guarantee is only valid if the affected components have not been opened (exception: computer's battery compartment), no force has been used and there is no sign of wilful damage.
Please store the purchase receipt in a safe place as it must be submitted in the event of a complaint.
If your complaint is legitimate, you will receive a comparable replacement device. You are not entitled to a replacement of the identical model if the model in question is no longer in production due to a model change.
Please contact the dealer from whom you purchased the device for all complaints and guarantee claims. Alternatively, send your complaint directly to:
Cycle Parts GmbH
Le Quartier Hornbach 13
If you have any technical questions, please do not hesitate to call our hotline on:
+49 (0) 63 21-95 82 7-10
+49 (0) 63 21-95 82 7-18
Our telephone hotline is available to assist you
10:00-12:00 and 15:00-17:00,
Monday to Friday
Additional technical information is available at:
www.vdocyclecomputing.com
We reserve the right to make technical changes in the course of further development.
Troubleshooting
| Error Possible cause Correction | ||
| Half segments on the display (e.g. after a battery change) | Computer software not running correctly after battery change | Remove and re-insert the battery |
| No speed displayed Distance from sensor to magnet too great | Correct the sensor and magnet positions | |
| No speed displayed Computer not properly clicked into the handlebar bracket | Insert the computer into the handlebar bracket and rotate it as far as possible (“click”) | |
| No speed displayed Wheel circumference is set incorrectly or to zero | Set the wheel circumference | |
| No speed displayed Battery in the transmitter is dead Replace the battery in the transmitter | ||
| Display becomes weak Battery dead Check the battery, replace if nec. | ||
Technical specifications
Computer:
Approx. 49 H x 33 B x 12 D mm
Computer weight:
Approx. 30 g
Handlebar bracket weight:
Approx. 10 g
Speed transmitter weight:
Approx. 20 g
Computer battery:
3V, type 2032
Computer battery service life:
Approx. 1 year (approx. 400 ride hours,
approx. 8,000 km (5,000 mi)
Speed transmitter battery:
3V, type 2032
Speed transmitter battery life:
Approx. 1.5 years (approx. 15,000 km (9,000 mi)
Wireless transmission ranges:
Speed transmitter: 75 cm
Temperature indicator range on the display:
-20 to +70 °C or -4 to +158 °F
Speed range for wheel size 2,155 mm:
Min 2.0 km/h,
Max 199 km/h
Ride time measurement range:
Up to 99:59:59 HH:MM:SS.
Trip distance odometer measurement range:
Up to value 9,999.99 km or mi
NAVIGATOR measurement range:
From -99.99 to +999.99 km or mi
Total km measurement range:
Up to value 99,999 km or mi
Total ride time measurement range:
9999:59 HHHH:MM
Wheel circumference setting range:
From 100 mm to 3,999 mm (3.9 to 157.4 inches)
Correct disposal of this product (electrical waste)

(To be used in EU countries and other European countries with a separate collection system). The labelling on the product and the relevant literature indicates that it must not be disposed of with normal household waste at the end of its service life. Please dispose of this device separately to other waste so as not to harm the environment or human health through uncontrolled waste disposal. Recycle the device to promote the sustainable reuse of material resources. Private users should contact the retailer from whom they purchased the product or the responsible
authorities to find out how they can recycle the device in an environment-friendly manner. Commercial users should contact their suppliers and consult the conditions of the sales agreement. This product must not be disposed of with other commercial waste.
EU declaration of conformity
We, CYCLE PARTS GmbH, Le Quartier Hornbach 13, D-67433 Neustadt/Weinstraße, declare that when used as intended, the VDO cycle computer with wireless transmission VDO M3 WL and the transmitter D3-SPD comply with the essential requirements established in Article 3 of the R&TTE Directive 1999/5/EC.
The declaration of conformity can be viewed at: www.vdocyclecomputing.com.

Neustadt, October 2013
FCC-Addendum
This device complies with part 15 of the FCC Rules. Operation is subject to the following two conditions:
(1) This device may not cause harmful interference, and
(2) this device must accept any interference received, including interference that may cause undesired operation.
NOTE: This equipment has been tested and found to comply with the limits for a Class B digital device, pursuant to part 15 of the FCC Rules. These limits are designed to provide reasonable protection against harmful interference in a residential installation. This equipment generates, uses and can radiate radio frequency energy and, if not installed and used in accordance with the instructions, may cause harmful interference to radio communications. However, there is no guarantee that interference will not occur in a particular installation.
If this equipment does cause harmful interference to radio or television reception, which can be determined by turning the equipment off and on, the user is encouraged to try to correct the interference by one or more of the following measures:
– Reorient or relocate the receiving antenna.
- Increase the separation between the equipment and receiver.
- Connect the equipment into an outlet on a circuit different from that to which the receiver is connected.
- Consult the dealer or an experienced radio/TV technician for help.
Changes or modifications not expressly approved by the party responsible for compliance could void the user's authority to operate the equipment.
IC-Addendum
This device complies with Industry Canada licence-exempt RSS standard(s).
Operation is subject to the following two conditions:
(1) This device may not cause interference, and
(2) this device must accept any interference, including interference that may cause undesired operation of the device.
This Class digital apparatus complies with Canadian ICES-003.
Cycle Parts GmbH
Le Quartier Hornbach 13
67433 Neustadt/Weinstrasse (Germany)
+49 (0) 63 21-95 82 7-0
www.vdocyclecomputing.com
- Preface
- Pack contents
- Table of contents
- Display
- Area 1:
- Area 2:
- Area 3:
- Buttons
- SET
- In function mode:
- In setting mode:
- BIKE
- Functions
- Current speed
- Current distance
- Current ride time
- Average speed
- Maximum speed
- Section time
- Section distance
- Navigator
- Temperature
- Clock
- Accessing the total values
- Total distance 1
- Operation while cycling
- Sleep mode
- Attaching the handlebar bracket
- STEP 1
- STEP 2
- STEP 3
- STEP 4
- Attaching the speed transmitter
- Note:
- ATTENTION: The cross-hatched marking on the lid of the transmitter's battery compartment must point toward the spokes.
- Inserting the computer into the bracket
- How to insert the computer:
- Pairing the transmitter (initial use)
- Function testing
- How to test the transmitter:
- Settings – language
- Settings - unit
- How to set the unit:
- Settings – wheel circumference/wheel size
- How to measure the roll circumference:
- How to set your wheel circumference:
- Manual setting by entering the roll circumference in millimetres/inch
- Setting the wheel size using the tyre list
- Settings - clock
- How to set the time:
- Settings - time
- Settings – total values – total distance
- ATTENTION: the M3 WL has a data memory. No data is lost when the battery is replaced
- Settings – total values – total ride time
- Setting the navigator
- Resetting the navigator to zero
- Trip section counter
- Starting the trip section counter
- Stopping the trip section counter
- Restarting the trip section counter
- Resetting the trip section counter to zero
- Press and hold the BIKE button.
- The following data is reset to zero:
- Resetting trip data after the trip
- How to reset the trip data:
- Battery status indicator
- Replacing the battery in the computer
- How to replace the battery:
- Replacing the battery in the speed transmitter
- Terms of guarantee
- Cycle Parts GmbH
- Technical specifications
- Computer:
- Computer weight:
- Handlebar bracket weight:
- Speed transmitter weight:
- Computer battery:
- Computer battery service life:
- Speed transmitter battery:
- Speed transmitter battery life:
- Wireless transmission ranges:
- Temperature indicator range on the display:
- Speed range for wheel size 2,155 mm:
- Ride time measurement range:
- Trip distance odometer measurement range:
- NAVIGATOR measurement range:
- Total km measurement range:
- Total ride time measurement range:
- Wheel circumference setting range:
- Correct disposal of this product (electrical waste)
- EU declaration of conformity
- FCC-Addendum
- IC-Addendum
Brand : VDO
Model : M3 WL
Category : Meter