
POWX0478 - Sander PowerPlus - Free user manual and instructions
Find the device manual for free POWX0478 PowerPlus in PDF.


| Product type | Random orbit sander |
| Brand | PowerPlus |
| Model | POWX0478 |
| Dimensions (L x W x H) | 250 x 120 x 150 mm |
| Weight | 1.5 kg |
| Power supply | Electric, 230 V ~ 50 Hz |
| Rated power | 300 W |
| No-load speed | 6,000 – 12,000 rpm (variable) |
| Sanding pad diameter | 125 mm |
| Abrasive attachment | Hook-and-loop (Velcro) |
| Orbit stroke | 2 mm |
| Dust extraction system | Integrated dust bag + vacuum cleaner connection |
| Variable speed control | Yes, adjustment dial |
| Handle | Ergonomic with non-slip coating |
| Switch | On/Off with continuous lock |
| Protection class | II (double insulation) |
| Maintenance and cleaning | Clean ventilation slots with a brush; empty dust bag regularly |
| Safety | Safety glasses and mask recommended; disconnect before changing abrasive |
| Spare parts and repairability | Sanding pad, abrasives, dust bag available as accessories; repair by authorized service center |
| General information | User manual available online; product intended for sanding wood, metal and plastic |
Frequently Asked Questions - POWX0478 PowerPlus
User questions about POWX0478 PowerPlus
0 question about this device. Answer the ones you know or ask your own.
Ask a new question about this device
Download the instructions for your Sander in PDF format for free! Find your manual POWX0478 - PowerPlus and take your electronic device back in hand. On this page are published all the documents necessary for the use of your device. POWX0478 by PowerPlus.
USER MANUAL POWX0478 PowerPlus
natural_image
Two types of power spray equipment: a yellow power tool and a black high-qualified bag (no visible text or symbols on the main objects)
| NL | NEDERLANDS | VERTAALDE VERSIE VAN DE ORIGINELE HANDLEIDING |
| FR | FRANÇAIS | TRADUCTION DU MODE D'EMPLOI D'ORIGINE |
| EN | ENGLISH | ORIGINAL INSTRUCTION MANUAL |
| DE | DEUTSCH | ÜBERSETZUNG DER ORIGINALBETRIEBSANLEITUNG |
| ES | ESPAÑOL | TRADUCCIÓN DEL MANUAL DE INSTRUCCIONES ORIGINAL |
| IT | ITALIANO | TRADUZIONE DEL MANUALE DI ISTRUZIONI ORIGINALE |
| PT | PORTUGUÊS | TRADUÇÃO DO MANUAL DE INSTRUÇÕES ORIGINAL |
| NO | NORSK | OVERSETTELSE AV ORIGINAL BRUKERVEILEDNING |
| DA | DANSK | OVERSÆTTELSE AF DEN ORIGINALE BRUGSVEJLEDNING |
| SV | SVENSKA | ÖVERSÄTTNING AV DEN URSPRUNGLIGA BRUKSANVISNINGEN |
| FI | SUOMI | ALKUPERÄISEN OHJEKIRJAN KÄÄNNÕS |
| EL | Ελληνικά | Μετάφραση του πρωτότυπου εγχειριδίου οδηγιών |
| HR | HRVATSKI | PRIJEVOD ORIGINALNOG PRIRUČNIKA S UPUTAMA ZA RAD |
| SR | SRPSKI | PREVOD ORIGINALNOG UPUTSTVA ZA UPOTREBU |
| CS | ČESKY | PŘEKLAD ORIGINÁLNÍHO NÁVODU K POUŽITÍ |
| SK | SLOVENČINA | PREKLAD NÁVODU NA POUŽÍVANIE Z ORIGINÁLU |
| RO | ROMÂNÃ | TRADUCEREA MANUALULUI DE INSTRUCTIUNI ORIGINALE |
| PL | POLSKI | TŁUMACZENIE ORYGINALNEJ INSTRUKCJI OBSŁUGI |
| HU | MAGYAR | AZ EREDETI KEZELÉSI UTASÍTÁS FORDÍTÁSA |
| RU | РУССКИЙ | ОРИГИНАЛЬНАЯ ИНСТРУКЦИЯ ПО ЭКСПЛУАТАЦИИ |
| BG | БЪЛГАРСКИ | ПРЕВОД НА ОРИГИНАЛНОТО РЪКОВОДСТВО |
Fig. A
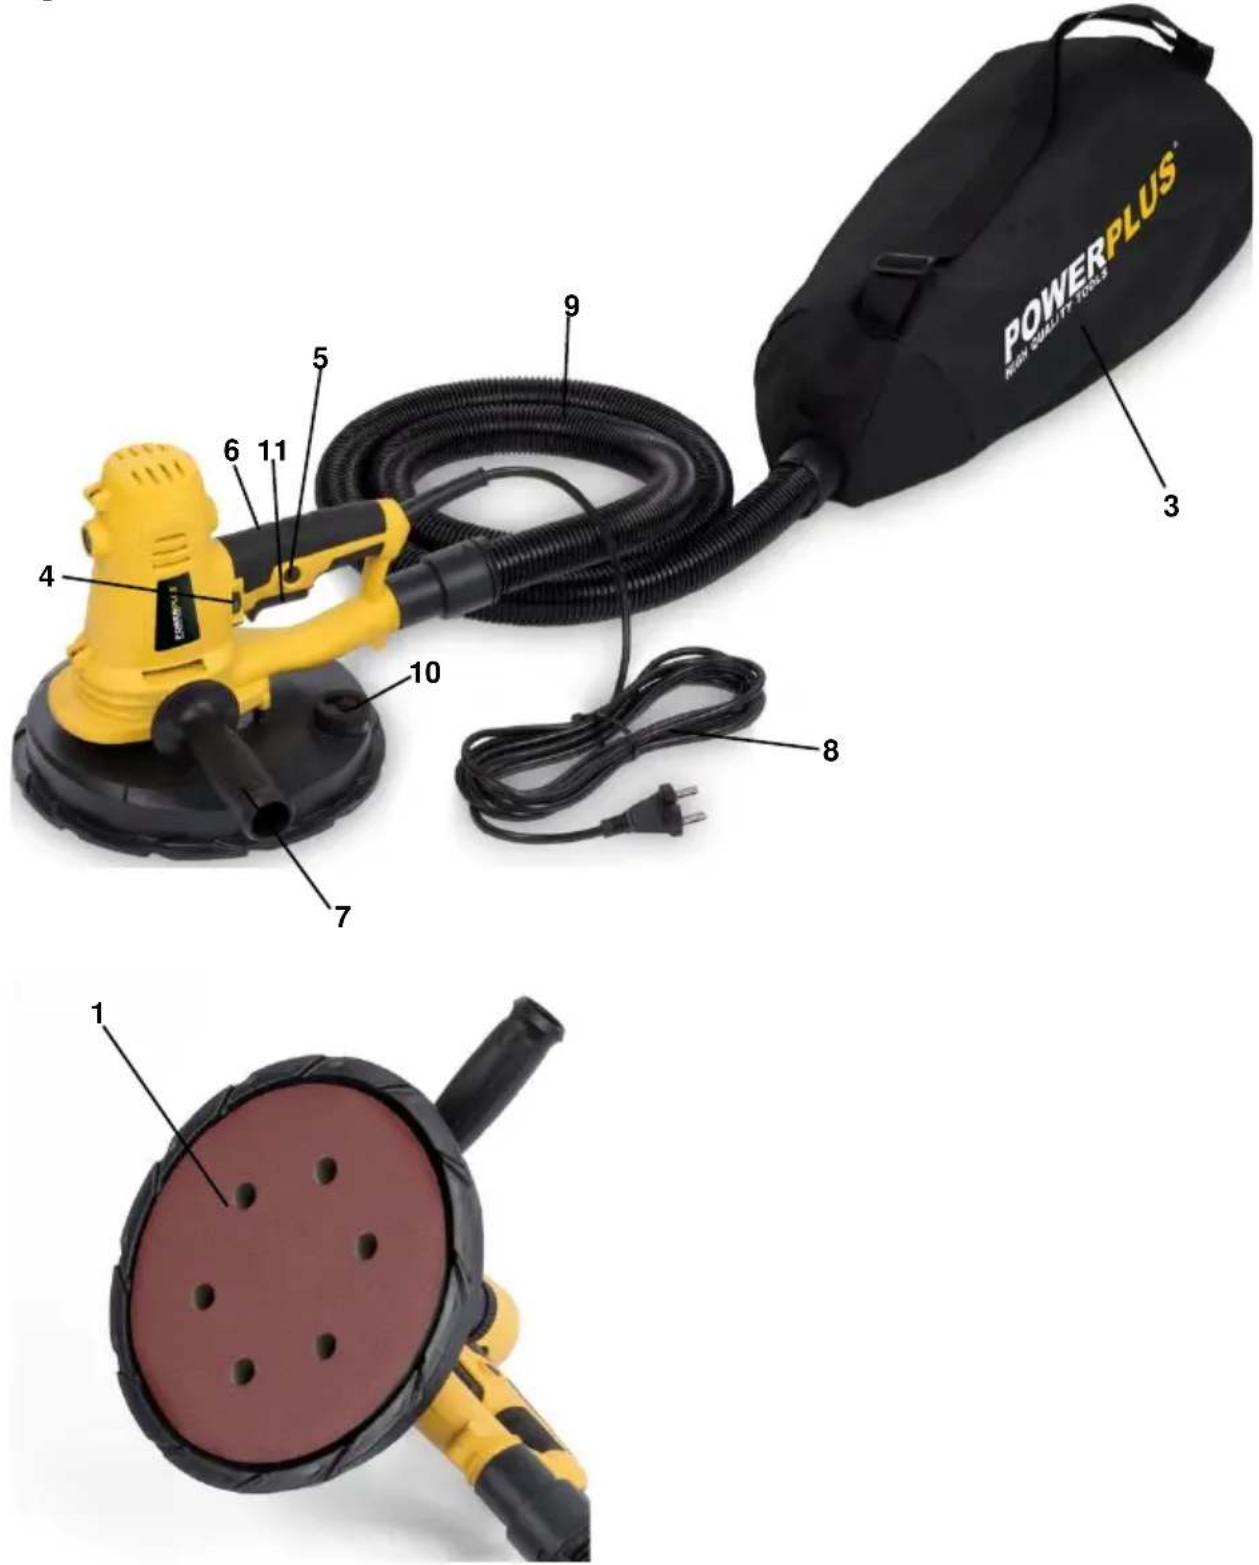
Fig. 1

natural_image
Hand holding a yellow electric shaver with black plastic hose, no visible text or symbolsFig. 2
natural_image
Yellow BYDALL LINDER RT856 power tool with black handle and white circular component, being handled by a hand (no text or symbols visible on the tool itself)Fig. 3

natural_image
Close-up of a yellow plastic tool with black handle and adjustment knob, no visible text or symbolsFig. 4

natural_image
Close-up of hands using a tool to adjust or install a black circular component with holes, next to a yellow power tool (no text or symbols visible)Fig. 5

natural_image
Person in safety gear climbing a metal ladder, wearing a vest with 'HYERLUS' logo (no visible text or symbols on equipment)Fig. 6
natural_image
Close-up of a hand adjusting a black and yellow plastic tire component (no text or symbols visible)1 BEOOGD GEBRUIK 3
2 BESCHRIJVING (FIG. A)....3
3 INHOUD VAN DE VERPAKKING....3
4 TOELICHTING VAN DE SYMBOLEN 4
5 ALGEMENE VEILIGHEIDSVOORSCHRIFTEN ....4
5.1 Werkplaats 4
5.2 Elektrische veiligheid....4
5.3 Veiligheid van personen....5
5.4 Zorgvuldige omgang met en gebruik van elektrisch gereedschap ....5
5.5 Service....6
6 GEREEDSCHAPSPECIFIEKE VEILIGHEIDSVOORSCHRIFTEN 6
2 BESCHRIJVING (FIG. A)
natural_image
Simple line drawing of a rounded rectangular shape with a small circular mark on top (no text or symbols)Philippe Vankerkhove
Regelgevings- en compliancemanager
06/05/2022, Lier - Belgium
1 UTILISATION PREVUE 3
2 DESCRIPTION (FIG. A) 3
3 LISTE DES PIECES CONTENUES DANS L'EMBALLAGE......3
4 PICTOGRAMMES....4
5 CONSIGNES DE SÉCURITÉ GÉNÉRALES ......4
natural_image
Simple line drawing of a rounded rectangular shape with a small protrusion (no text or symbols)Philippe Vankerkhove
5.2 Electrical safety 4
5.3 Personal safety 4
5.4 Power tool use and care....5
5.5 Service....5
6 MACHINE-SPECIFIC SAFETY WARNINGS....5
6.1 Electrical connection....6
7 ASSEMBLY 6
7.1 Unpacking....6
7.2 Before initial operation....6
8 OPERATION....6
8.1 How to operate....6
8.2 Electronic control....6
8.2.1 Adjusting the rotation speed (Fig. 3)....6
8.3 Replace sanding pad (Fig. 4)....6
8.4 Stick the sanding paper to the pad....7
8.5 Two options for extracting dust....7
8.6 Connect to dust bag 7
8.7 Operation on high wall (Fig. 5)....7
8.8 Suction power adjustment (Fig. 6)....7
9 SANDING OPERATIONS ....7
10 CLEANING AND MAINTENANCE 7
10.1 Keep tool clean....7
11 TECHNICAL DETAILS....7
12 NOISE....8
POWERPLUS® HIGH QUALITY TOOLS
POWX0478 EN
13 WARRANTY....8
14 ENVIRONMENT 9
15 DECLARATION OF CONFORMITY 9
WALL AND CEILING SANDER 1220W POWX0478
1 INTENDED USE
The machine is designed for sanding drywalls, ceilings and walls of the inner and outer surfaces, clearing the floor residues, paint coatings, adhesive and loose plaster etc. Our machine is not suitable for processing the object containing asbestos. Not suitable for professional use.

WARNING! Read this manual and general safety instructions carefully before using the appliance, for your own safety. Your power tool should only be passed on together with these instructions.
2 DESCRIPTION (FIG. A)
- Sanding paper
- Sanding pad
- Dust bag
- Speed adjusting wheel
- Lock switch
-
Soft grip
-
Auxiliary handle
- Power supply cable
- Vacuum hose
- Suction power adjusting wheel
- ON/OFF switch
3 PACKAGE CONTENT LIST
■ Remove all packaging materials.
- Remove remaining packing and package inserts (if included).
- Check that the package contents are complete.
- Check the appliance, the power cord, the power plug and all accessories for transportation damage.
- Keep the packing materials as long as possible till the end of the warranty period. Dispose it into your local waste disposal system afterwards.

WARNING: Packaging materials are not toys! Children must not play with plastic bags! Danger of suffocation!
8 pieces (2 pc 150#, 2 pc 180#, 2 pc 240#,
2 pc 400#) of sanding paper with dia. 225 mm
2 connection adapter (35 mm and 57 mm)
1 piece of 2.0 m flexible pipe for extracting dust
1 pair of carbon brush
1 piece of S5 internal hexagonal wrench
1 dust bag
1 back belt
1 auxiliary handle
1 manual

If any parts are missing or damaged, please contact your dealer.
4 SYMBOLS
In this manual and/or on the machine the following symbols are used:
 | Denotes risk of personal injury or damage to the tool. |  | Read manual before use |
 | In accordance with essential safety standards of applicable European directives |  | Class II - The machine is double insulated; Earthing wire is therefore not necessary. |

Mandatory use of eye protection.

Wear gloves
5 GENERAL POWER TOOL SAFETY WARNINGS
Read all safety warnings and instructions. Failure to heed warnings and follow instructions may result in electric shock, fire and/or serious injury. Keep safety warnings and instructions for future reference. The term "power tool" in the safety warnings refers to your mains-operated (corded) power tool or battery-operated (cordless) power tool.
5.1 Working area
- Keep working area clean and well lit. Untidy and dark areas can lead to accidents.
- Do not operate power tools in potentially explosive surroundings, for example, in the presence of inflammable liquids, gases or dust. Power tools create sparks which may ignite the dust or fumes.
- Keep children and bystanders at a distance when operating a power tool. Distractions can cause you to lose control of it.
5.2 Electrical safety
- Always check that the power supply corresponds to the voltage on the rating plate.
- Power tool plugs must match the outlet. Never modify the plug in any way. Do not use adapter plugs with earthed power tools. Unmodified plugs and matching outlets will reduce the risk of an electric shock.
- Avoid body contact with earthed surfaces such as pipes, radiators, kitchen ranges and refrigerators. There is an increased risk of an electric shock if your body is earthed.
- Do not expose power tools to rain or wet conditions. If water gets inside a power tool, it will increase the risk of an electric shock.
- Do not damage the cord. Never use the cord for carrying, pulling or unplugging the power tool. Keep the cord away from heat, oil, sharp edges or moving parts. Damaged or entangled cords increase the risk of an electric shock.
- When operating a power tool outdoors, use an extension cable suitable for outdoor use. Using a cord suitable for outdoor use reduces the risk of an electric shock.
- If operating a power tool in a damp location is unavoidable, use a power supply protected by a residual current device (RCD). Using an RCD reduces the risk of an electric shock.
5.3 Personal safety
- Stay alert, watch what you are doing and use common sense when operating a power tool. Do not use a power tool when you are tired or under the influence of drugs, alcohol or medication. A moment of inattention when operating a power tool may result in serious personal injury.
- Use safety equipment. Always wear eye protection. Using safety equipment such as a dust mask, non-skid safety shoes, a hard hat, or hearing protection whenever it is needed will reduce the risk of personal injury.
- Avoid accidental starts. Ensure the switch is in the off position before inserting the plug. Carrying power tools with your finger on the switch or plugging in power tools when the switch is in the on position makes accidents more likely.
- Remove any adjusting keys or spanners before turning on the power tool. A spanner or key left attached to a rotating part of the power tool may result in personal injury.
- Do not reach out too far. Keep your feet firmly on the ground at all times. This will enable you retain control over the power tool in unexpected situations.
- Dress properly. Do not wear loose clothing or jewellery. Keep your hair, clothing and gloves away from the power tool. Loose clothes, jewellery or long hair can become entangled in the moving parts.
- If there are devices for connecting dust extraction and collection facilities, please ensure that they are attached and used correctly. Using such devices can reduce dust-related hazards.
5.4 Power tool use and care
- Do not expect the power tool to do more than it can. Use the correct power tool for what you want to do. A power tool will achieve better results and be safer if used in the context for which it was designed.
- Do not use the power tool if the switch cannot turn it on and off. A power tool with a broken switch is dangerous and must be repaired.
- Disconnect the plug from the power source before making adjustments, changing accessories, or storing power tools. Such preventive safety measures reduce the risk of starting the power tool accidentally.
- Store power tools, when not in use, out of the reach of children and do not allow people who are not familiar with the power tool or these instructions to operate it. Power tools are potentially dangerous in the hands of untrained users.
- Maintain power tools. Check for misalignment or jammed moving parts, breakages or any other feature that might affect the operation of the power tool. If it is damaged, the power tool must be repaired. Many accidents are caused by using poorly maintained power tools.
- Keep cutting tools sharp and clean. Properly maintained cutting tools with sharp cutting edges are less likely to jam and are easier to control.
- Use the power tool, accessories and cutting tools, etc., in accordance with these instructions and in the manner intended for the particular type of power tool, taking into account the working conditions and the work which needs to be done. Using a power tool in ways for which it was not intended can lead to potentially hazardous situations.
5.5 Service
- Your power tool should be serviced by a qualified specialist using only standard spare parts. This will ensure that it meets the required safety standards.
6 MACHINE-SPECIFIC SAFETY WARNINGS

Attention! You must abide by the following basic safety measures against electrical shocks, injuries and the danger of fire when using electric tools. Read and abide by these instructions before you start to use any tools. These instructions must be kept in a safe place.
- Keep your hands away from rotating sanding head area at all times.
- Sanding lead-based paint is extremely toxic and should not be attempted. Only allow professionals with special training and equipment perform this task.
- Maintain proper footing and balance at all times. Do not overreach. Use proper scaffolding.
- Always wear appropriate safety equipment when operating.
- Important: after completing sanding, switch off the switch and wait for the coasting sanding head to stop completely before putting the tool down.
- Never operate the tool in an area with flammable solids, liquids, or gases. Sparks from the commutator / carbon brushes could cause a fire or explosion.
- There are certain applications for which this tool was designed. The manufacturer strongly recommends that this tool can not be modified and / or used for any application other than for which it was designed.
- Use the machine with both hands at all times. Loss of control can cause personal injury.
-
Keep power supply cord clear from the working range of the machine. Always lead the cable away behind you.
-
Immediately switch off the machine if unusual vibrations or if other malfunctions occur. Check the machine in order to find out the cause.
- The dust that arises when working with this tool can be harmful to health. Use a dust absorption system and wear a suitable dust protection mask and remove deposited dust with a vacuum cleaner.
6.1 Electrical connection
- The network voltage must conform to the voltage indicated on the tool name plate. Under no circumstances should the tool be used when the power supply cable is damaged. A damaged cable must be replaced immediately by an authorized Customer Service Centre. Do not try to repair the damaged cable yourself. The use of damaged power cables can lead to an electric shock.
7 ASSEMBLY
7.1 Unpacking
Carefully remove the tool and all loose items from the shipping container.
Retain all packing materials until after you have inspected and satisfactorily operated the machine.

Before setting up, repair or maintenance of the appliance you must always turn off the operating switch and pull out the mains plug!
7.2 Before initial operation
- Check if the rated frequency of the mains supply corresponds to the details of the type place.
■ Before using the tool, read the instruction book carefully.
8 OPERATION
8.1 How to operate
- Insert the hose into the dust access of the machine. (Fig. 1)
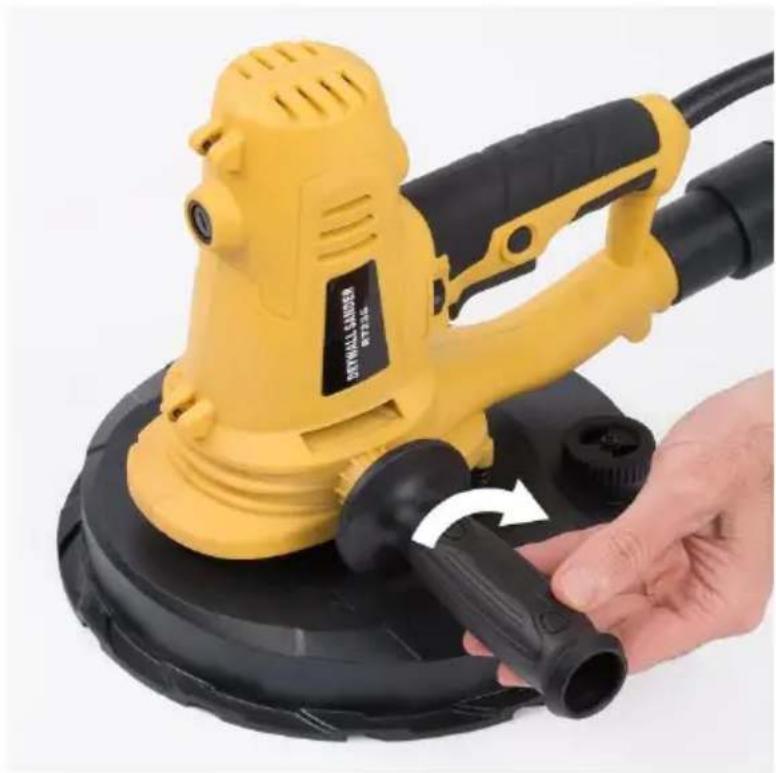
■ Tighten the side handle by turning it (Fig. 2)
8.2 Electronic control
This machine has the characteristics as below:
■ Lock-on switch (5)
■ Adjustable Speed (4)
8.2.1 Adjusting the rotation speed (Fig. 3)
The speed of the machine is variable to suit different tasks. It can be adjusted from 1500 min ^-1 up to 2300 min ^-1 by using the thumb wheel. Turn in the counter clockwise direction to decrease the speed and in the clockwise direction to increase the speed. Generally, you should use the higher speed for fast stock removal and the lower speed for more precise control.
8.3 Replace sanding pad (Fig. 4)
- Insert the hex wrench (size 5) into the hexagonal screw bolt on the sanding pad
- Hold the sanding pad firmly, and then turn the wrench to dismount the pad.
- Install new sanding pad by tightening the bolt.

Attention: Only install the specified sanding pad on the machine.
8.4 Stick the sanding paper to the pad
Please ensure the holes on the sanding paper to fit the holes on the pad accurately.
8.5 Two options for extracting dust
There are internal extraction and external extraction for dust particles. The 6-hole internal extraction system collects fine dust particles, enabling to adhere to wall and ceiling, obtaining perfect effect of extracting dust.
8.6 Connect to dust bag
Dust bag has already connected to the hose. Please ensure the dust bag to be cleaned in due time.
8.7 Operation on high wall (Fig. 5)
The machine can be backed with belt when climbing on the ladders to sand high walls.
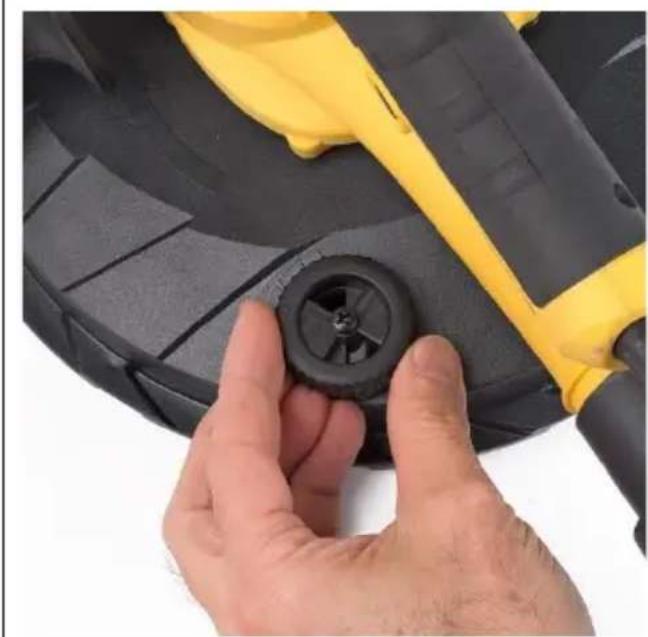
8.8 Suction power adjustment (Fig. 6)
Reduce the suction power by turning the wheel to the left, and increase by turning it to the right.
9 SANDING OPERATIONS
- Begin sanding and carefully contact the work surface as lightly as possible-just enough to keep the sanding head flat against the surface.
- The joist in the sanding head allow the sanding disc to follow the contours of the work surface.
- The best technique is to use overlapping sweeps and keep the head in constant motion. Never stop too long in any one place or there will be swirl marks. With experience it will be very easy to create excellent results.

NOTE: Ensure that the sandpaper you are using is suited to the task, Overly coarse grit paper may remove material too quickly to control. While overly fine grit paper may clog too often and not shape down the surface.

CAUTION: Take care to avoid sharp projections and nails, etc. This will wipe out the sandpaper and probably damage the sponge pad as well.
10 CLEANING AND MAINTENANCE
10.1 Keep tool clean
Periodically blow out all air passages with dry compressed air. All plastic parts should be cleaned with a soft damp cloth. NEVER use solvents to clean plastic pats. They could possibly dissolve or otherwise damage the material.
Wear safety glasses while using compressed air.
Clean the vacuum swivel connector as too much dust will keep it from turning freely.
11 TECHNICAL DETAILS
| Model nr. | POWX0478 |
| Rated Voltage | 230-240V |
| Rated Frequency | 50Hz |
| Rated Power | 1220W |
| Rotation speed | 1500-2300min^-1 |
| Disc Diameter | 225mm |
| Protection class | II |
Cable length
4m
Hose ∅
32mm
12 NOISE
Noise emission values measured according to relevant standard. (K=3)
Acoustic pressure level LpA 88
Acoustic power level LwA 99

ATTENTION! Wear hearing protection when sound pressure is over 85 dB(A).
aw (Vibration)
4.9 m/s²
K = 1,5 ~m / s^2
13 WARRANTY
- This product is warranted for a 36-month period effective from the date of purchase by the first user.
- This warranty covers all material or production flaws excluding: batteries, chargers, defective parts subject to normal wear & tear such as bearings, brushes, cables, and plugs, or accessories such as drills, drill bits, saw blades, etc. ; damage or defects resulting from maltreatment, accidents or alterations; nor the cost of transportation.
- Damage and/or defects resulting from inappropriate use also do not fall under the warranty provisions.
- We also disclaim all liability for any bodily injury resulting from inappropriate use of the tool.
- Repairs may only be carried out by an authorised customer service centre for Powerplus tools.
- You can always obtain more information at the number 00 32 3 292 92 90.
- Any transportation costs shall always be borne by the customer, unless agreed otherwise in writing.
- At the same time, no claim can be made on the warranty if the damage of the device is the result of negligent maintenance or overload.
- Definitely excluded from the warranty is damage resulting from fluid permeation, excessive dust penetration, intentional damage (on purpose or by gross carelessness), inappropriate usage (use for purposes for which the device is not suitable), incompetent usage (e.g. not following the instructions given in the manual), inexpert assembly, lightning strike, erroneous net voltage. This list is not exhaustive.
- Acceptance of claims under warranty can never lead to the prolongation of the warranty period nor commencement of a new warranty period in case of a device replacement.
■ Devices or parts which are replaced under the warranty therefore remain the property of Varo NV. - We reserve the right to reject a claim whenever the purchase cannot be verified or when it is clear that the product has not been properly maintained. (Clean ventilation slots, carbon brushes serviced regularly, etc.).
- Your purchase receipt must be kept as proof of date of purchase.
- Your appliance must be returned undismantled to your dealer in an acceptably clean state, (in its original blow-moulded case if applicable to the unit), accompanied by proof of purchase.
14 ENVIRONMENT

Should your appliance need replacement after extended use, do not dispose of it with the household refuse, but in an environmentally safe way. Waste produced by electrical machine items should not be handled like normal household rubbish. Please recycle where recycle facilities exist. Check with your Local Authority or retailer for recycling advice.
15 DECLARATION OF CONFORMITY


VARO N.V. - Vic. Van Rompuy N.V. Joseph Van Instraat 9 - BE2500 Lier - BELGIUM, declares that,
Product: WALL AND CEILING SANDER 1220W
Trade mark: POWERplus
Model: POWX0478
is in conformity with the essential requirements and other relevant provisions of the applicable European Directives, based on the application of European harmonized standards. Any unauthorized modification of the apparatus voids this declaration.
European Directives (including, if applicable, their amendments up to the date of signature);
2011/65/EU
2006/42/EC
2014/30/EU
European harmonized standards (including, if applicable, their amendments up to the date of signature);
EN60745-1 : 2009
EN60745-2-3 : 2011
EN55014-1:2017
EN55014-2:2015
EN IEC 61000-3-2 : 2019
EN61000-3-3 : 2013
Keeper of the Technical Documentation : Philippe Vankerkhove, VARO – Vic. Van Rompuy N.V.
The undersigned acts on behalf of the company CEO,

natural_image
Simple line drawing of a rounded rectangular shape with a small protrusion (no text or symbols)Philippe Vankerkhove
Regulatory Affairs – Compliance Manager
06/05/2022, Lier - Belgium
natural_image
Simple hand-drawn sketch of a rounded rectangle with a diagonal line and a small arrow on the top-right corner (no text or symbols)Philippe Vankerkhove
06/05/2022, Lier - Belgium
1 USO PREVISTO 3
natural_image
Simple line drawing of a rounded rectangular shape with a small protrusion (no text or symbols)Philippe Vankerkhove
Asuntos reglamentarios - Director de conformidad 06/05/2022, Lier - Belgium
natural_image
Simple hand-drawn sketch of a rounded rectangular shape with no text or symbolsPhilippe Vankerkhove
Regulatory Affairs – Compliance Manager
06/05/2022, Lier - Belgium
10 LIMPEZA E MANUTENÇÃO....8
natural_image
Simple line drawing of a rounded rectangular shape with a small protrusion (no text or symbols)Philippe Vankerkhove Assuntos Regulamentares – Gestor de Conformidade 06/05/2022, Lier - Belgium
1 TILTENKT BRUK 3
2 BESKRIVELSE (FIG. A) 3
3 PAKKENS INNHOLD 3
4 SYMBOLFORKLARING 3
5 GENERELLE SIKKERHETSADVARSLER 4
natural_image
Simple line drawing of a rounded rectangular shape with a small circular mark on top (no text or symbols)Philippe Vankerkhove
Regulatoriske saker - Samsvarsleder
06/05/2022, Lier - Belgium
1 TILSIGTET BRUG....3
2 BESKRIVELSE (FIG. A) 3
3 MEDF∅LGENDE INDHOLD 3
4 SYMBOLER....4
5 ALMINDELIGE SIKKERHEDSANVISNINGER FOR EL-VÄERKTÖJ....4
5.1 Arbejdsområde 4
5.2 Elektrisk sikkerhed....4
5.3 Personlig sikkerhed....4
natural_image
Simple line drawing of a rounded rectangular shape with a small arrowhead (no text or symbols)Philippe Vankerkhove
Regulatory Affairs (afdelingen for juridiske anliggender) - Compliance Manager 06/05/2022, Lier - Belgium
1 AVSEDD ANVÄNDNING 3
2 BESKRIVNING (FIG. A)....3
3 FÖRPACKNINGSINNEHÅLL 3
4 SYMBOLER....3
5 ALLMÄNNA SÄKERHETSANVISNINGAR FÖR ELEKTRISKA VERKTYG....4
3 FÖRPACKNINGSINNEHÅLL
natural_image
Simple line drawing of a rounded rectangular shape with a small protrusion (no text or symbols)11 TEKNISET TIEDOT....7
12 MELU 8
POWERPLUS® HIGH QUALITY TOOLS
POWX0478 FI
13 TAKUU 8
14 LAITTEEN KÄYTÖSTÄ POISTAMINEN 9
15 YHDENMUKAISUUSILMOITUS 9
SEINÄ- JA KATTOHIOMAKONE 1220W POWX0478
1 KÄYTTÖTARKOITUS
natural_image
Simple line drawing of a rounded rectangular shape with a small arrowhead on top (no text or symbols)natural_image
Simple line drawing of a boat hull (no text or symbols)Philippe Vankerkhove
06/05/2022, Lier - Belgium
1 NAMENJENA UPOTREBA....3
2 OPIS (SL. A)....3
3 SPISAK SADRŽAJA PAKOVANJA 3
4 SIMBOLI 4
5 OPŠTA BEZBEDNOSNA UPUTSTVA ZA ELEKTRIČNE ALATE 4
5.1 Radna oblast....4
06/05/2022, Lier - Belgium
1 ZAMÝŠLENÉ POUŽITÍ ...... 3
2 POPIS (OBR.) 3
3 SEZNAM OBSAHU BALENÍ......3
4 SYMBOLY 4
5 OBECNÁ BEZPEČNOSTNÍ UPOZORNĚNÍ PRO ELEKTRICKÉ NÁSTROJE ...... 4
natural_image
Simple hand-drawn sketch of a rounded rectangular shape with a small arrow on top (no text or symbols)Philippe Vankerkhove
06/05/2022, Lier - Belgium
1 ZAMÝŠL'ANÉ POUŽITIE 3
2 POPIS (OBR. A) 3
3 OBSAH BALENIA 3
4 SYMBOLY 3
5 VŠEOBECNÉ BEZPEČNOSTNÉ VAROVANIA PRE ELEKTRICKÉ NÁRADIE 4
natural_image
Simple hand-drawn sketch of a rounded rectangular shape with a diagonal line and a small arrow, no text or symbols present.Philippe Vankerkhove
Regulačné záležitosti – Compliance Manager
06/05/2022, Lier - Belgium
1 PREDVIDENA UPORABA 3
2 OPIS (SLIKA A) 3
3 VSEBINA ŠKATLE 3
4 SIMBOLI 3
5 SPLOŠNA VARNOSTNA OPOZORILA ZA ELEKTRIČNO ORODJE....4
5.1 Delovno mesto....4
5.2 Električna varnost....4
natural_image
Simple hand-drawn sketch of a rounded rectangular shape with a small circle on top (no text or symbols)Philippe Vankerkhove
06/05/2022, Lier - Belgium
1 UTILIZARE PREVĂZUTĂ 3
2 DESCRIERE (FIG. A)....3
3 CONTINUTUL PACHETULUI....3
4 SIMBOLURI....4
5 AVERTISMENTE GENERALE DE SIGURANTĂ PRIVIND APARATUL ELECTRIC....4
5.1 Zona de lucru....4
natural_image
Simple line drawing of a rounded rectangular shape with a small protrusion (no text or symbols)Philippe Vankerkhove
Divizia de reglementare – Director de conformitate
06/05/2022, Lier - Belgium
2 OPIS (RYC. A)....3
3 SPIS CZEŚCI 3
4 OZNACZENIA 4
5 OGÓLNE ZASADY BEZPIECZNEJ PRACY ELEKTRONARZĘDZIAMI......4
06/05/2022, Lier - Belgium
1 RENDELTETÉSI CÉL 3
2 LEÍRÁS (A ÁBRA) 3
3 CSOMAGOLÁS TARTALMA....3
4 JELZÉSEK 4
5 ÁLTALÁNOS BIZTONSÁGI SZABÁLYOK....4
natural_image
Simple line drawing of a rounded rectangular shape with a small protrusion (no text or symbols)Philippe Vankerkhove
06/05/2022, Lier - Belgium
natural_image
Simple hand-drawn outline of a rounded rectangular shape with no text or symbolsPhilippe Vankerkhove
06/05/2022, Lier - Belgium
1 ПРЕДНАЗНАЧЕНИЕ НА УПОТРЕБАТА....3
2 ОПИСАНИЕ (ФИГ. А) 3
3 СПИСЪК НА СЪДЪРЖАНИЕТО НА ОПАКОВКАТА....3
4 СИМВОЛИ 4
5 ОБЩИ ПРЕДУПРЕЖДЕНИЯ ЗА БЕЗОПАСНОСТ ПРИ ИЗПОЛЗВАНЕ НА ЕЛЕКТРОИНСТРУМЕНТИ....4
5.1 Работна зона 4
natural_image
Simple hand-drawn sketch of a rounded rectangular shape with a small circle on top (no text or symbols)Philippe Vankerkhove
06/05/2022, Lier - Belgium
1 PAREDZÊTAIS LIETOJUMS....3
2 APRAKSTS (A ATTËLS)....3
3 IEPAKOJUMA SATURA SARAKSTS....3
4 APZIMEJUMI 3
5 VISPĀRĪGI DARBARĪKA DROŠĪBAS BRĪDINĀJUMI......4
5.1 Darba vieta....4
natural_image
Simple hand-drawn sketch of a rounded rectangular shape with no text or symbolsPhilippe Vankerkhove
06/05/2022, Lier - Belgium

natural_image
Product photo of a power tool with black cord, yellow power shaver, and red circular base (no text or symbols visible)varo
WWW.VARO.COM
DESIGNED AND MARKETED BY VARO
©copyright by varo
VARO - VIC. VAN ROMPUY nv
JOSEPH VAN INSTRAAT 9 - 2500 LIER - BELGIUM



- GEREEDSCHAPSPECIFIEKE VEILIGHEIDSVOORSCHRIFTEN 6
- BESCHRIJVING (FIG. A)
- POWERPLUS® HIGH QUALITY TOOLS
- POWX0478 EN
- WALL AND CEILING SANDER 1220W POWX0478
- INTENDED USE
- DESCRIPTION (FIG. A)
- PACKAGE CONTENT LIST
- SYMBOLS
- GENERAL POWER TOOL SAFETY WARNINGS
- Working area
- Electrical safety
- Personal safety
- Power tool use and care
- Service
- MACHINE-SPECIFIC SAFETY WARNINGS
- Electrical connection
- ASSEMBLY
- Unpacking
- Before setting up, repair or maintenance of the appliance you must always turn off the operating switch and pull out the mains plug!
- Before initial operation
- OPERATION
- How to operate
- Electronic control
- Adjusting the rotation speed (Fig. 3)
- Replace sanding pad (Fig. 4)
- Attention: Only install the specified sanding pad on the machine.
- Stick the sanding paper to the pad
- Two options for extracting dust
- Connect to dust bag
- Operation on high wall (Fig. 5)
- Suction power adjustment (Fig. 6)
- SANDING OPERATIONS
- CLEANING AND MAINTENANCE
- Keep tool clean
- NOISE
- WARRANTY
- ENVIRONMENT
- DECLARATION OF CONFORMITY
- FÖRPACKNINGSINNEHÅLL
- POWX0478 FI
- SEINÄ- JA KATTOHIOMAKONE 1220W POWX0478
- KÄYTTÖTARKOITUS
Brand : PowerPlus
Model : POWX0478
Category : Sander