
TS6512HD - Digital decoder TELE System - Free user manual and instructions
Find the device manual for free TS6512HD TELE System in PDF.


| Product Type | Digital Satellite Receiver |
| Model | TS6512HD |
| Brand | TELE System |
| Dimensions (W x D x H) | 28 x 18 x 4.5 cm |
| Weight | 0.7 kg |
| Power Input | AC 100-240V, 50/60Hz |
| Power Consumption | 15 W (max) |
| Video Output | HDMI, Composite (RCA), SCART |
| Audio Output | HDMI, Digital Coaxial, Analog (RCA) |
| Supported Video Resolution | 1080p, 1080i, 720p, 576p, 576i |
| Tuner Type | DVB-S/S2 |
| Number of Tuners | 1 |
| Channel Memory | 5000 channels |
| USB Port | 2 x USB 2.0 |
| Recording | USB PVR (Time Shift, Record) |
| Ethernet | 1 x RJ45 (10/100) |
| CI Slot | 1 x CI+ |
| Card Reader | Yes, for pay-TV |
| Remote Control | Yes, included |
| Operating Temperature | 0°C to 40°C |
| Maintenance | Clean with dry cloth; avoid liquids |
| Safety | Use rated adapter; keep vents clear |
| Spare Parts | Remote control, adapter available |
| Repairability | Repairable by qualified technician |
Frequently Asked Questions - TS6512HD TELE System
User questions about TS6512HD TELE System
0 question about this device. Answer the ones you know or ask your own.
Ask a new question about this device
Download the instructions for your Digital decoder in PDF format for free! Find your manual TS6512HD - TELE System and take your electronic device back in hand. On this page are published all the documents necessary for the use of your device. TS6512HD by TELE System.
USER MANUAL TS6512HD TELE System
TS6512HD - HD DVB-T Set-top Box
Manuale d'utilizzo
User Manual
Instrukcja Obslugi
Indice
1 Safety regulations 2
2 Product description and connections....3
2.1 Front Panel....3
2.2 Rear panel and connections 4
2.3 Remote Control Unit 5
2.3.1 Batteries 5
2.3.2 Buttons and related functions 5
3 First time installation 6
4 Receiver settings....7
4.1 Password....7
4.2 Parental Control 7
4.3 Advanced menu protection (Hotel Function)....7
4.4 Channel scanning and updating....7
4.4.1 Channel scanning....7
4.4.2 Standby channel updating....7
4.5 Clock setting....7
4.6 Software Upgrading....8
4.6.1 Via USB 8
4.6.2 Over The Air (OTA) 8
4.7 Energy saving (Auto Standby) 8
4.8 Factory Reset 8
5 USB - Recording and playback....8
5.1 TV program recording 9
5.2 Timeshift 9
5.3 Reading 9
6 The menus 10
7 Problem solver 11
8 Technical Specifications.... 12
1 Safety regulations
We advise you to read the following advice concerning the safety regulations carefully in order to ensure safe use of the appliance.
ELECTRICAL SUPPLY
- The appliance should only be supplied by a current of 230 Volt AC, 50Hz.
- The appliance must not be repaired in any way by the user, in case of breakages or failures please refer to the nearest centre for assistance.
- Do not remove the cover. The inside of the appliance could contain higher voltages than that of the supply voltage which could endanger the user. High voltage is also present when the appliance is on standby. The receiver should be disconnected from the electrical supply before performing any intervention. Non-authorised removal will mean that the warranty is no longer valid!
POWER CABLE
- Before installing the appliance make sure that the cable is intact, paying particular attention to its connection to the power supply and to the receiver. If the cable is damaged do not attempt to connect the appliance and refer the problem to an authorised centre for assistance.
- When installing the cable make sure that it can not be flattened in any way by items placed above or next to the appliance. Avoid placing the cable in an area where it could accidentally be stepped on, removed from the wall or damaged in any way.
- If the cable is damaged in any way carefully disconnect from the appliance and refer to specialised technicians or the centre for assistance to get a replacement.
LIQUIDS
- Keep the appliance far from any liquids. Do not place any objects containing liquids on the appliance, such as vases, humidifiers etc. The appliance must not be installed in areas where it could come into contact with sprays or drops of water or in an environment with a high level of humidity where condensation could occur.
- If the receiver should accidentally come into contact with liquids, disconnect immediately from the wall. DO NOT TOUCH the device until it has been disconnected.
SMALL OBJECTS
- Keep the receiver away from coins or other small objects. Objects which fall into the appliance via the ventilation gaps could cause serious damage.
CLEANING
- Before cleaning, disconnect the device from the power supply.
- To clean the outside of the receiver use a soft and dry or slightly damp cloth. Avoid using products which contain chemicals or solvents.
VENTILATION
- Make sure that the area where the appliance is to be installed has good air circulation so that the heat can be dissipate well in order to avoid overheating.
- In order to allow enough ventilation it is necessary to have a distance of at least 10 cm on either side of the appliance and 15cm above the appliance.
- The vents must be kept clear from any obstructions such as newspapers, table cloths, furniture material, curtains, carpets etc.
- Avoid installing the receiver close to any heat sources (i.e. radiators, stoves etc) or on top of any other appliances which omit heat (video players, DVD etc).
WARNING!
- Keep the appliance out of reach of children.
- The plastic bags used for packaging can be dangerous. To avoid suffocating keep the bags out of reach of children.
- Do not expose the receiver or remote control to direct sunlight.
- The appliance must be placed on a solid and stable base.
- Connect the device to the power supply only after installation is complete.
- Remove the batteries from the remote control if they will not be used for a long period of time. The remote control could be damaged by any eventual battery leakages.
- Dispose of the product correctly so as to avoid damage to the environment and human health as well as to facilitate recycling of the components/materials used in the appliance. If the product is not disposed of properly this could be punishable according to the involved law.
- The manufacturers recommend that the parts are recycled separately and are taken to sites which conform to current regulations.
- Take the product, including its accessories and batteries, when no longer usable to a collection point which is authorised to handle waste from electrical or electronic appliances that should be kept separate from regular household waste.
2 Product description and connections
2.1 Front Panel


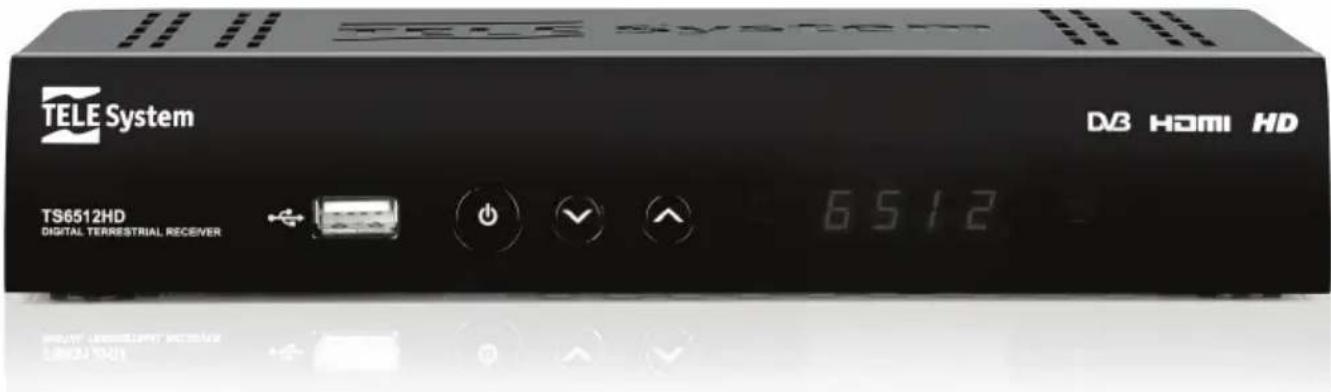
- USB USB port for reading .JPG picture, .MP3 music, .MPEG2/MPEG4 video and for recording from digital terrestrial tuner source.
CAUTION
-
Admitted USB mass storage file systems: FAT32.
It's not guarantee the compatibility with all USB mass storage devices of the market.
• We suggest USB Hard Disk Drives with an own external power supply. -
ON / Stand-by button.
-
CHANNEL ▼ Previous channel button.
-
▲ CHANNEL Next channel button.
-
IR Infrared sensor for remote control.
-
Display LED display, 7-segment, 4-digit. It shows the tuned channel number in operative mode or the clock during standby.
-
LED Standby status indicator (RED=stand-by).
2.2 Rear panel and connections
CAUTION
- It is good practice to connect the receiver with other appliances (e.g. TV, VCR, HI-FI, etc.) and the antenna before plugging in the mains lead. When the receiver is powered electrical voltage differences may be created when plugging in the jacks, which may generate currents that could damage the appliances.
- The direct audio-video connection with TV screen should always be used as a first operating test, since other more complex connection sequences may give malfunctions that are not caused by faults or defects of the actual appliances but by problems of incompatibility.

flowchart
graph TD
    A["Terrestrial Antenna"] --> B["RF Cable"]
    B --> C["TV SCART"]
    C --> D["Power Socket"]
    D --> E["HDMI"]
    E --> F["HI-FI"]
    F --> G["Radio System"]
    style A fill:#f9f,stroke:#333
    style B fill:#ccf,stroke:#333
    style C fill:#cfc,stroke:#333
    style D fill:#fcc,stroke:#333
    style E fill:#cff,stroke:#333
    style F fill:#ffc,stroke:#333
    style G fill:#fcf,stroke:#333
- ANT IN Antenna Input.
- RF OUT Antenna TV loop through output.
- TV SCART Analogue audio-video connection, as an alternative to digital HDMI output.
- SPDIF Coaxial Digital Audio output for home-theatre amplifier.
- HMDI Digital audio-video output.
CAUTION
If the HDMI connection creates issues, use the SCART and set properly the Video Resolution from the menu System Setup - TV System, respecting the characteristics of the TV screen.
- AC IN Mains lead for 230V\~, 50Hz.
- ON/OFF Power main switch.
2.3 Remote Control Unit
Get well acquainted with your remote control and you will find it much easier to navigate through the various menu options.
2.3.1 Batteries
Information and warnings
Battery type: 2 x AAA, 1.5V.
Insert/replace the batteries at the first installation or when the remote control doesn't work well.
It's recommended to remove batteries from the remote control if it is not used for long time, in order to avoid any possible damage.
Do not use different types of battery or flat and new batteries at the same time.
Insertion and removal
Open the battery cover on the bottom of remote control and insert the two batteries (AAA format) respecting the right polarity direction as indicated on their place. Then, close the cover.
Remove the flat batteries, that must be disposed separately from common garbage and they must be taken to the shop or waste collection point, repeating similar operations done during the insertion.
2.3.2 Buttons and related functions
- ON/ST.BY ON / Stand-by
- TV/RADIO Swaps between TV / radio program receiver modes.
- MUTE Mute.
- 0÷9 (numeric buttons) Change channel/enter number in menu input boxes.
CAUTION
During a recording, for channel changing, use only PROG+/- or channel list (OK button).
- TEXT Teletext.
- FAV Favourite channels recall.
- BACK Go back to previous menu or channel.
- EPG Electronic Program Guide.
- INFO Display channel information.
- EXIT Quit function or menu.
- ▲/▼ Navigate menu items/options.
- ◀/▶ Modify menu parameters/options.
- OK
a. Viewing mode: channel list menu.
b. Menu mode: confirm action/changes.
- VOL+ / VOL- Audio volume up/down.
- PROG+/PROG- Next/Previous channel.
- Coloured Buttons Contextual menu functions.
- MENU Main menu.
- AUDIO Set audio mode or select audio track.
- SUB Subtitles either Standard (DVB) or Teletext (TTX).
- SLEEP Sleep timer
- |◀◀ PREV/▶▶| NEXT Go to previous/next step or content on USB.
- ◀◀ REW / ▶▶ FW Rewind/forward during multimedia file playback.
- REC Manual instant recording. Press twice for changing the recording duration (default value: 2h).
- FILE Go to Media Player menu.
- ▶ PLAY/|| PAUSE
a. Viewing mode: Freeze video picture or Timeshift function (par. 5.2).
b. Menu/USB mode: Pause/restart playback of a multimedia file.
- ■ STOP Stop multimedia file playback or recording.

3 First time installation
When all the connections on the receiver are ready (section 2.2), the mains lead is plugged in and the rear mains switch is on position I (ON), the receiver will start up automatically. If this does not happen, press the ON button on the front panel of the receiver or on the remote control.
An easy installation menu will be displayed where you can set different parameters and then run the channel scan:
Language
Use the arrow ◀/▶ button to select a language for the On Screen Display menu (OSD). Press ▼ to go to the next parameter.
Region
Use the arrow ◀/▶ buttons to select your Country. Press ▼ to proceed.
CAUTION
If the wrong country is selected the channel scan may not detect all the channels available.
Summer Time
Choose the proper summer time option (Auto/On/Off) by using the arrow ◀/▶ button. Press ▼ to move forward.
CAUTION
Under automatic summer time mode, the receiver will follow the time data transmitted by the broadcaster.
Display Mode
Adjust the video resolution of the HDMI output with arrow ◀/▶ button, taking care about the technical characteristics of the connected TV monitor. Push ▼ to go down.
Aspect Mode
With arrow ◀/▶ button set the video aspect ratio between 16:9 FS (Full Screen), 16:9 PB (Pillar Box - black left and right bars during 4:3 video source), 4:3 FS (Full Screen) e 4:3 LB (Letter Box - black up and down bars during 16:9 video source). Press ▼ to proceed.
LCN
When the Logical Channel Numbering option is active, after the scanning, the TV/Radio services will be automatically stored in the list following the order requested by broadcasters. Press ▼ to go forward.
NOTE
When LCN mode is turned on, we suggest to not change the channel positions in the TV/Radio Channel List menu.
Password Definition
Input a 4-digit numeric password (PIN) on New Password field for the Parental Control function (see par. 4.2), then reinsert the same password on Confirm Password. Press ▼ to proceed.
Channel Scan
Press OK item to start the automatic channel scan. When the scan is completed, if there are no LCN conflict the receiver will enter the viewing mode, otherwise see below step.
LCN Conflict Resolution
When the LCN function is active and more than a service asks for the same channel list position, the system will recognize that conflict and display on screen a list of the involved services. Choose the preferred channel by using ▼/▲ arrow buttons e confirm with OK. As an alternative, go to the automatic solution. Also, if the user doesn't make a choice, after a few time the appliance will carry out a solution by itself. After these actions, the receiver will enter the viewing mode.
4 Receiver settings
The first time installation procedure (chapter 3) will allow the receiver to be used with its basic functions. However the receiver offers many more advanced features and options that are illustrated in the following sections.
4.1 Password
To access settings and events locked by the Parental Control (par. 4.2), a password has to be entered. The password is defined by the end-user at the first time installation (cap. 3), but it can be changed by pressing MENU and selecting the System Setup - Parental Control menu.
CAUTION
If you forget your personal password, you have to reset the device by using Tools - Factory Setting menu.
4.2 Parental Control
The Parental Control protects children by the viewing of sensitive contents. When an event is broadcasted with a parental rating equal or higher than the parental lock level defined on receiver menu, a system message will notify that the channel is locked. To see that channel, you have to enter the password (see par. 4.1).
The factory set level is Age=18 and it can be changed by the user on System Setup - Parental Lock - Channel Lock menu.
4.3 Advanced menu protection (Hotel Function)
The Hotel Function is a hidden utility, which consists in an advanced protection of the receiver. It allows to enter the main menu only after typing the password.
In order to enable/disable that function, on viewing mode press RED button and input the special code 1688 by using the numerical buttons of the remote control.
4.4 Channel scanning and updating
The first time guided installation procedure runs a channel scan and saves any channels available at that time. However later scans may become necessary if, for instance, a new channel becomes available or when an existing channel changes frequency.
4.4.1 Channel scanning
To access the channel scan function from the viewing mode, press MENU on the remote control to open the main menu, select Installation and then got to one of the following submenu:
- Auto Scan: an automatic scan of all digital terrestrial channels through whole frequency range. Define the FTA Only parameter (No for all channels or Yes for Free to air) and the type of Action (Update or Reinstall). Press OK on Search to start the scan.
CAUTION
When a reinstallation is run, the previous existing channel list will be lost.
- Channel Scan (for expert users): set all needed parameters displayed on video related to the interested RF channel, then select Search and press OK.
4.4.2 Standby channel updating
In standby mode, this receiver is set to search daily for new available channels, at the exact Time defined on Tools - Automatic Upgrade Setting - Automatic Channel List Update menu. Through this menu, it's possible to modify the searching Time, disable the In Standby Mode option and even set the searching In Operation Mode.
4.5 Clock setting
In viewing mode, press MENU and go to System Setup - Local Time Setting menu. Two kind of settings are available under GMT Usage item:
• Off: the user manually sets date and time.
- On: the receiver will automatically set the time according to the selected Region or to Greenwich Mean Time offset (GMT Offset). Furthermore, set properly the Summer Time option (Auto, Off, On).
CAUTION
Some digital terrestrial services transmit information, which is strictly linked to the precise time setting of the receiver. In addition, under automatic summer time mode, the receiver will follow the time data transmitted by the broadcaster.
4.6 Software Upgrading
Since your receiver is made to last, the time may come when its software needs to be modified or improved by updates. These updates will optimise the receiver's functions or correct minor flaws.
4.6.1 Via USB
When a software image file is made available, upload it on the root directory of an USB pendrive. Connect that one to the USB port of front panel of the receiver and launch the upgrading by entering the Tools - Upgrade By USB menu, select the software image file, then press OK on Start.
CAUTION
During the upgrade, do not interact with the receiver and never turn off the main leads: risk of permanent damage!
4.6.2 Over The Air (OTA)
Updates may also be distributed to the receiver over the air.
CAUTION
An OTA upgrade could take several time, in particular in case of weak signal. During the upgrade, do not interact with the receiver and never turn off the main leads: risk of permanent damage!
Manual
When an update is made available, enter the Tools - S/W Upgrade by OTA.
Automatic
Thanks to the Tools - Automatic Upgrade Setting - Automatic Software Upgrade menu, you may customize the automatic software upgrading, which can take place In Standby Mode (On/Off) and In Operation Mode (On/Off), at the Time defined on menu.
4.7 Energy saving (Auto Standby)
This receiver is equipped with an energy saving function: after three hours in active mode without any action of the user, it will be switched automatically into standby mode. Also, a few minutes before the switching, a notification message will appear on screen.
The automatic power-down function is set to On (active) by default, but the user may disable it from the System Setup - Auto Standby menu.
CAUTION
If you have to set a program timer on menu System Setup - Timer Setting or from EPG (par. 5.1), with a duration greater than three hours, we suggest to disable the Auto Standby function.
4.8 Factory Reset
The default settings of the receiver can be restored by a general reset. To do so, press MENU on the remote control, select Tools and then Factory Setting.
CAUTION
A reset will lose all personal options and features settings saved in the receiver.
5 USB - Recording and playback
The USB port of this receiver allows the reading of multimedia files and the recording of free digital terrestrial programs.
CAUTION
- The receiver recognizes USB mass storage devices with FAT32 File System.
- For a proper working, some HDD could require an auxiliary power supply.
- It's not guarantee the compatibly with all the various USB mass storage devices of the market.
USB storage connection
After the connection of a USB mass storage device, the mounting will be notified displaying on screen a special message.
At the first installation of the disk, the receiver will automatically create on it a folder, named ALIDVRS2, dedicated to contents recorded by the receiver itself.
USB storage removal
For a safe removal of the connected USB mass storage device, use the Remove USB device safely utility of the Tools menu.
CAUTION
Do not remove the USB storage device during playback, recording, formatting or when a scheduled recording timer is raising: risk of permanent damage!
5.1 TV program recording
This receiver is equipped with a recording function, which allows the following actions:
- Record a digital terrestrial program while watching a different channel in the same transmission frequency and using TimeShift (par. 5.2).
- Record two different programs of the same transmission frequency and watch contemporarily another channel broadcasted on the same frequency of the recorded programs and use TimeShift (par. 5.2) on one of the two recorded programs.
CAUTION
- Before recording, verify the status of the USB memory and related available space: enter the PVR and Media Player - PVR Storage Information menu.
- For channel change during recording, use only PROG+/- or channel list (OK button).
Recorder Configuration
On PVR and Media Player - PVR Setting menu, you may enable the:
- PS Recording: special format file for recording content, which includes video and main and secondaries audio tracks. As an alternative, the receiver uses the TS file type, which, further to video and audio, imports all auxiliary data, such as teletext and subtitle, but requiring more memory space respect to PS file.
- Standby after record: function which switches automatically the receiver in standby at the end of a scheduled recording.
Instant Recording
To perform a manual recording, tune the interested program and press REC button on the remote control. The default recording duration is two hours, but you can extend it by pressing REC again and typing the needed values of hour and minutes. To stop the recording by yourself, press STOP key and confirm.
Scheduled Recording
Through the System Setup -Timer Setting menu, it's possible to schedule one or more recording timer, in addition to channel, date, starting time and duration, enable the Record as Timer Service.
As an alternative, on an existing event information in the EPG menu, press GREEN button (Timer) to reserve it and set the Timer Service parameter to Record.
The reserved programs can be consulted on System Setup -Timer Setting menu.
NOTE
- Before to reserve a recording, check the disk space and, perhaps, the status of automatic standby function (par. 4.7). Also, keep the USB storage device connected to the receiver.
- Starting times of different timers have to differ at least of one minutes.
Recorded Files Managing
Enter the PVR and Media Player - Media Player menu and press SLEEP button to select the Record window, where it's possible to rename, delete and protect the recorded files stored on ALIDVRS2 folder. Choose the desired option following the dialog window of the menu.
5.2 Timeshift
Watching an event, if you press the PLAY/PAUSE button, the Timeshift function will records the program temporarily, until the next channel change. This offers the possibility to resume the viewing of the event from the previous suspended time by pressing again PLAY/PAUSE button. For enabling/disabling that function, go to PVR and Media Player - PVR Setting menu and adjust the Timeshift parameter.
5.3 Reading
The readable format files are: JPG pictures, MP3 music and MPG2/MPEG4 video.
Recorded Files Playback
To recall a file, recorded with the receiver, from the working directory, press the FILE button of the remote control or enter the PVR and Media Player - Media Player menu, go to the Record window through SLEEP button pressure, then choose the file from the list and press OK for starting the playback.
Multimedia Files Playback
To read a multimedia file on a personal folder of the connected USB mass storage device, go to PVR and Media Player - Media Player menu and choose the type of content (Music/Image/Video) by pressing SLEEP button. Browse the folders and highlight the file, then press OK or PLAY to begin its playback.
You may also create an image slideshow or a music play list.
6 The menus
The menu map:
| Main Menu | |||||
| Edit Channel | Installation | System Setup | Tools | Game | PVR and Media Player |
| -TV Channel List | -Auto Scan | -Language | -Information | -Othello | -PVR Storage Information |
| -Radio Channel List | -Channel Scan | -TV System | -Factory Setting | -Sudoku | -PVR Setting |
| -TV Channel Recycle List | -Aerial Adjustment | -Display Setting | -Upgrade by RS232 | -Media Payer | |
| -Radio Channel Recycle List | -LCN | -Local Time Setting | -S/W Upgrade by OTA | ||
| -Favourites rename | -Timer Setting | -Automatic Upgrade Setting | |||
| -Delete All | -Parental Lock | -Upgrade by USB | |||
| -OSD Setting | -Remove USB device safely | ||||
| -Audio Description Setting | |||||
| -Auto Standby | |||||
CAUTION
The menus are simple and easy to navigate. Use the arrows, OK and number buttons and always follow the instructions given in the bottom toolbar.
7 Problem solver
| PROBLEM POSSIBLE CAUSE REMEDY | ||
| 1. The receiver does not start (the LED display is not lighted up on the front panel) | -The main 0/I switch on back panel is on position 0.-The external power adaptor is not plugged in.-The power adaptor is plugged in but the receiver still does not work. | -Change the switch position to I.-Make sure the external power adapter is properly plugged in.-Unplug the power adopter and check it for damage (RISK of electric shock!). |
| 2. No Video or Audio signal | -No signal or a poor signal.-SCART/HDMI cable or antenna cable not connected properly.-Audio volume low or zero.-AV channel not selected on TV. | -Verify the antenna installation and signal quality-Check the SCART/HMDI connection.-Make sure the TV and receiver volumes are not set to zero.-Make sure the AV channel is selected on the TV (consult the TV user manual). |
| 3. The channel scan gives no results | -No antenna signal.-Your antenna system is not fully compliant with the digital terrestrial signal. | -Check for a signal using the receiver menu.-Ask for an antenna technician help.-Manually scan for channels. |
| 4. The settings are not saved. | -Setting changes are not confirmed before quitting. | -Before quitting a menu press the confirm button to save the changes (if any). |
| 5. The remote control does not work. | -The receiver is in Stand-by.-The remote control is not being directed towards the receiver.-The remote control batteries are flat.-The batteries have been inserted in the wrong direction.-The remote control has been dropped and its internal components have been damaged. | -Press the STAND-BY button on the front panel to check the receiver is working properly.-Make sure nothing is obstructing the front panel.-Change batteries.-Check the battery polarities.-Contact the local dealer and buy a new remote control. |
| 6. You have forgotten the Password. | -Consult this manual at section 4.1. | |
| 7. The receiver does not interact with the remote control buttons. | -The receiver is temporarily blocked.-A broadcaster transmits wrong data.-There is a problem with the remote control. | -Unplug the mains lead of the receiver for at least one minute and then plug it back in.-Reboot the box without the antenna connection, delete the problematic channel, then connect again the antenna.-Go to point 5 of this chapter. |
| 8. The USB mass storage device is not recognized or doesn't work properly. | -Incompatible USB device or not formatted properly.-USB memory speed is not enough for the recording.-Incompatible file/codec type.-The USB memory needs for an external power unit. | -Go to USB menu (chap. 5). |
| 9. The scheduled recording/event timer doesn't work properly. | -The specific program transmits a wrong time information.-The receiver time has not been set correctly. | -Set the time from the menu (see section 4.5). |
| 10. Instant recording stops after 2h | -The default duration is set to 2 hours. | -Adjust the duration (see section 5.1). |
| 11. Channel change denied. | -During a recording, the numeric buttons are disabled. | -Use PROG+/- or channel list (OK button). |
| 12. The receiver goes down into standby mode automatically. | -The Auto Standby function is active | -Disable the automatic power-down function (see section 4.7). |
CAUTION
Generally, in case of dysfunctional behaviours of the receiver, a factory reset (par. 4.8) could solve the problem.
8 Technical Specifications
| Product type Free to air digital terrestrial receiver (ETSI EN 300 744) with USB | |
| Input frequency range 147÷230 MHz (VHF) / 470÷862 MHz (UHF) | |
| Bandwidth 6 / 7 / 8 MHz | |
| Front Panel Display ● | |
| Menu language Eng, Fra, Deu, Ita, Spa, Por, Rus, Tur, Pol, Ara, Fas, Slo, Gre | |
| OSD menu ● | |
| Teletext (ETSI EN 300 472) ● | |
| Subtitle ( ETSI EN 300 706) ● | |
| Electronic Program Guide (EPG) ● | |
| RF modulator - | |
| Video format ratio 16:9 Full Screen / 16:9 Pillar Box / 4:3 Full Screen / 4:3 Letter Box | |
| Coaxial Digital Audio Output (SPDIF) ● | |
| Optical Digital Audio Output (SPDIF) - | |
| HDMI Output ver.: 1.2, video resolution/upscaling: up to 1080p | |
| TV SCART Output | Out: Video RGB / CVBS, audio L+R |
| VCR SCART Output | - |
| Stereo Audio Output RCA | - |
| Video Output RCA | - |
| RS232 Serial Data Port | - |
| USB Port | USB 2.0 - 5V, 500mA MAX |
| Supported external USB disk:(optional) | HDD: FAT32, min: 300GB, max: 2TBFlash Stick: FAT32, min: 16GB, max: 32GB |
| USB Media Player | Foto JPG, Musica MP3, Video MPEG2/MPEG4 |
| USB Recording | - From internal tuner source TV, in original format (no encoding).- Up to two different recordings while watching another program (see par. 5.1) |
| Software Upgrade | Via USBOver The Air (OTA) |
| Factory Reset Function | ● |
| Favourite Channel List | ● |
| Timer Reservation | On-off switching / recording |
| Auto Standby (power saving) | ● |
| Channel Auto Updating | ● |
| Power Supply | 110 ÷240V~, 50/60Hz. |
| Power Consumption | Standby mode: 1.07W |
| Active mode: 7W w/o USB, 12W (AVG) w USB connected | |
| Dimensions | 220 x 125 x 40 mm |
Indeks
HD Digital Terrestrial receiver
Free To Air, USB
TELE System TS6512 HD
Tele System Electronic states that this product meets the basic European requirements of 2009/125/CE reg. no. 1275/2008 (Energy related Products – ErP), 2004/108/CE (Electromagnetic Compatibility - EMC) and 2006/95/CE Low Voltage Directive - LVD), following the technical standards:
TELE System Electronic


- TS6512HD - HD DVB-T Set-top Box
- Indice
- Safety regulations
- ELECTRICAL SUPPLY
- POWER CABLE
- LIQUIDS
- SMALL OBJECTS
- CLEANING
- VENTILATION
- WARNING!
- Product description and connections
- Front Panel
- CAUTION
- Rear panel and connections
- Remote Control Unit
- Batteries
- Information and warnings
- Insertion and removal
- Buttons and related functions
- First time installation
- Language
- Region
- Summer Time
- Display Mode
- Aspect Mode
- LCN
- NOTE
- Password Definition
- Channel Scan
- LCN Conflict Resolution
- Receiver settings
- Password
- Parental Control
- Advanced menu protection (Hotel Function)
- Channel scanning and updating
- Channel scanning
- Standby channel updating
- Clock setting
- Software Upgrading
- Via USB
- Over The Air (OTA)
- Energy saving (Auto Standby)
- Factory Reset
- USB - Recording and playback
- USB storage connection
- USB storage removal
- TV program recording
- Recorder Configuration
- Instant Recording
- Scheduled Recording
- Recorded Files Managing
- Timeshift
- Reading
- Recorded Files Playback
- Multimedia Files Playback
- The menus
- Problem solver
- Technical Specifications
- Indeks
- HD Digital Terrestrial receiver
- TELE System TS6512 HD
Brand : TELE System
Model : TS6512HD
Category : Digital decoder