
TS4501CI+HD - Digital decoder TELE System - Free user manual and instructions
Find the device manual for free TS4501CI+HD TELE System in PDF.


| Product Type | Digital Satellite Receiver |
| Brand | TELE System |
| Model | TS4501CI+HD |
| Compatibility | DVB-S2, MPEG-4, H.264, HD 1080p |
| CI+ Slot | 1x CI+ (Common Interface Plus) for conditional access modules |
| Dimensions (W x D x H) | Approx. 260 x 160 x 45 mm |
| Weight | Approx. 0.8 kg |
| Power Supply | 12V DC, 1.5A (external power adapter) |
| Power Consumption | Max. 18W (operating), <1W (standby) |
| Resolution | Up to 1080p (Full HD) |
| Video Outputs | HDMI, Composite (RCA), Component (YPbPr) |
| Audio Outputs | HDMI, Digital Optical (S/PDIF), Analog Stereo (RCA) |
| Connectivity | USB 2.0 (for recording/playback), Ethernet, Wi-Fi (optional dongle) |
| Storage | External USB storage support (FAT32/NTFS) for PVR |
| Tuner | Single DVB-S2 tuner |
| Remote Control | Infrared, included |
| Operating Temperature | 0°C to 40°C |
| Safety Features | Overcurrent protection, CE certified |
| Maintenance | Clean with dry cloth; avoid liquids and direct sunlight |
| Spare Parts Availability | Remote control, power adapter, HDMI cable available from manufacturer or authorized dealers |
| Warranty | 2 years (EU), varies by region |
Frequently Asked Questions - TS4501CI+HD TELE System
User questions about TS4501CI+HD TELE System
0 question about this device. Answer the ones you know or ask your own.
Ask a new question about this device
Download the instructions for your Digital decoder in PDF format for free! Find your manual TS4501CI+HD - TELE System and take your electronic device back in hand. On this page are published all the documents necessary for the use of your device. TS4501CI+HD by TELE System.
USER MANUAL TS4501CI+HD TELE System
TS4501CI+HD - Digital Satellite Receiver - HD CI+
Manuale d'utilizzo
User Manual

GentileCliente,
1 Safety Regulation. 2
2ProductDescription. 3
2.1 FrontPanel. 3
2.2RearPanel....3
2.3RemoteControl. 4
2.4Connections. 4
2.4.1 TVConnection. 5
2.4.2HI-FIAudioSystem. 5
3Installation. 6
3.1 First Installation. 6
3.2ChangingFirstInstallation. 6
4MenuDescription.
4.1MainMenu....7
4.2Channels. 7
4.2.1 TVChannelList. 8
4.2.2RadioChannelList 8
4.2.3 Favorites.
4.2.4DeleteAll. 8
4.3 Installation 8
4.3.1 AntennaConnection. 8
4.3.2 SatelliteList. 9
4.3.3AntennaSetup. 9
4.3.3.1 Basic Mode 9
4.3.3.2 DiSEqC Mode 10
4.3.3.3 Motor Mode 10
4.3.4Single-SatelliteSearch. 10
4.3.5 RicercaMulti-SatelliteSearch. 1 1
4.3.6 TP List
4.4SystemSetup.... 1
4.4.1Language.... 1 1
4.4.2TVSystem. 1 2
4.4.3DisplaySettings. 1 2
4.4.4 Local Time Settings
4.4.5TimerSetting. 1
4.4.6 Parental Lock
4.4.7 OSD Settings
4.4.8 Other
4.5 Tools
4.5.1 Information. 13
4.5.2 Factory Settings
4.5.3 Software Upgrade via OTA
4.5.4 Common Interface (Cl/Cl+)
4.6 USB
4.6.1USBSoftwareUpgradeandSave. 1 4
4.6.2 MediaPlayer. 1 4
4.6.3RemoveUSBDevicesafely. 1 4
4.7 REC Setting
4.7.1PVRStorageSetting. 1
4.7.2 PVR Setting
5UsageinViewingMode. 1
5.1 Changing Channel
5.2ChannelList.... 1
5.3ChannelInfoBanner....1
5.4 TV/Radio Mode Switching
5.5CAMModule....1
5.6 Extra features on Channels and Services
5.7 Timeshifting and Records
5.8ElectronicProgrammingGuide(EPG)....1
6 Problem Solving
7 Technical Specifications
1 Safety Regulation
Weadviseyoutoreadthefollowingadviceconcerningthesafetyregulationscarefullyinordertoensuresafeuseof theappliance.
ELECTRICALSUPPLY
Theapplianceshouldonlybesuppliedbyacurrentof100-240VoltAC,50/60Hz.Theappliancemustnotbe repairedinanywaybytheuser,incaseofbreakagesorfailurespleaerefertothenearestcenterforassistance. Donotremovethecover.Theinsideoftheappliancecouldcontainhighervoltagesthanthatofthesupplyvoltage whichcouldendangertheuser.Highvoltageisalsopresentwhentheapplianceisonstandby.Thereceivershould be disconnected from the electrical supply before performing any intervention.Non-authorised removal will mean thatthewarrantyisnolongervalid!
POWERCABLE
Beforeinstallingtheappliancemakesurethatthecableisintact,payingparticularattentiontoitsconnectionto thepowersupplyandtothereceiver.Ifthecableisdamageddonotattempttoconnecttheapplianceandreferthe problemtoanauthorisedcenterforassistance.Wheninstallingthecablemakesurethatitcannotbeflattenedinany waybyitemsplacedaboveornexttotheappliance.Avoidplacingthecableinanareawhereitcouldaccidentallybe steppedon,removedfromthewallordamagedinanyway.Ifthecableisdamagedinanywaycarefullydisconnect fromtheapplianceandrefertospecialisedtechinicansorthecenterforassistancetogetareplacement.
LIQUIDS
Keep the appliance far from any liquids. Donot place any objects containing liquids on the appliance, such as vases, humidifier setc. The appliance must not be installed in areas where it could come into contact with sprays or drops of water or an environment with a high level of humidity where condensation could occur. If thereceivers should accidentally come into contact with liquids, disconnect immediately from the wall. DONOT TOUCH the device until it has been disconnected.
SMALLOBJECTS
Keepthereceiverawayfromcoinsorothersmalobjects.Objectswhichfallintotheapplianceviatheventilation gapscouldcauseseriousdamage.
CLEANING
Beforecleaning, disconnect the device from the powers supply. To clean the outside of there, ever use as soft and dryors lightly damp cloth. Avoid using products which contain chemicals or solvents.
VENTILATION
Makesurethattheareawheretheapplianceistobeinstalledhasgoodaircirculationsothattheheatcanbe dissipatewellinordertoavoidoverheating.Inordertoallowenoughventilationitisnecessarytohaveadistanceof atleast10cmoneithersideoftheapplianceand15cmabovetheappliance.Theventsmustbekeptclearfromany obstructions such as newspapers, table cloths, furniture material, curtains, carpets etc. Avoid installing the receiver closetoanyheatsources(i.e.radiators,stovesetc)orontopofanyotherapplianceswhichomitheat(videoplayers, DVDetc).
WARNING!!!
Keep the appliance out of reach of children. The plastic bags used for packaging can be dangerous. To avoid suffocating keep the bags out of reach of children. Donot exposethereceiver or remote control to direct sunlight.
The appliance must be placed on solid and stable base.

Connect the device to the powers supply only after installation is complete. Removethe batteries from the remote control if they will not be used for a long period of time. The remote control could be damaged by any eventual battery leakages. Dispose of the product correctly so aosto avoid damage to the environment and human health as well as to facilitate recycling of the components/materials used in the appliance. If the product is not disposed of properly this could be punishable according to the involved law. The manufacturers recommend that the parts are recycled separately and are taken to sites which conform to current regulations.
2ProductDescription
2.1FrontPanel

- LEDIndicators: SIGNALledshowsthepresenceofantennasignal.
- Display: 7-segment 4-digit display, it shows the channel number if the decoder is in operative mode or the currenttimeifthedecoderisinstandbymode.
NOTE
Instandbymodethedisplaybrightnessislowwhileinoperativemodethedisplaybrighthnessishigh.
- IRReceiver: Infrared IR Receiver for remote control unit
- PhysicalKeyboard:
a. Thekeys ◀/▶ allowtotunetoadifferentchannel
b.ThePowerbuttonallowdstochangedecoderstatus(operativeorstandbymode)
- USB Port: USB port for upgrading software version, recording (PVR) and playing multimedia contents
- CI/CI+Slot: slot for CI/CI+modules
2.2RearPanel
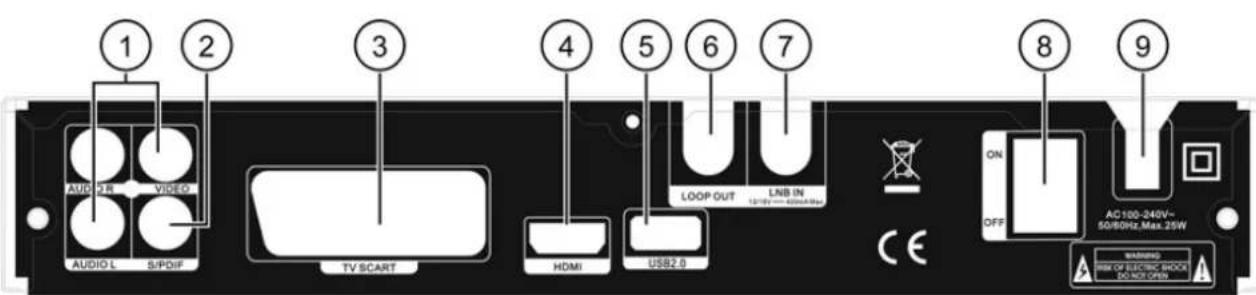
- CompositOut: yellowconnectorforvideoandred/whiteconnectorforaudio
- CoaxialDigitalAudioOut:blackconnector
- TVSCARTOut: SCARToutput for TV connection at standard definition
- TVHDMIOut:HDMIoutputforTVconnectionathighdefinition
- USB port: USB port for upgrading software version, recording (PVR) and playing multimedia contents
- LOOPOUT: Antennasignalloopthroughoutputforanotherreceiver
- LNBIN: Parabolicantennainput
- HardSwitch: Switch for power on/off thereceiver
- PowerSupplyCable: Mainsleadforconnectiontomainspowersocket
2.3 RemoteControl
Getwellacquaintedwithyourremotecontrolandyouwillfinditmucheasiertonavigatethroughthevariousmenu optionsandtotakeadvantageofthespecialfunctionsthatcanonlybeselectedbyremotecontrol.Thebuttonshave veryeasy,user-friendlyfunctions.
CAUTION
Makesurethattheremotecontrolbatteriesareinsertedintherightdirection.Checktheirpolarityonthe backofthebatterycover.Use2xAAAbatteries.
• POWERKey: Receiveron(ON) or off (Stand-by)
•MUTEKey:Audiomutebutton
• DISPKey:(inviewingmode)Changingscreenresolution
• AUDIO Key: (in viewing mode) Changing audio track (if there are more audio tracks)
• TV/RadioKey:(inviewingmode)SwapbetweenTV/radioreceivermodes
• SLEEPKey: It start stimerinordertoputreceiver instand-bymode
• Numericalkeys0-9: Inviewingmode: changingchannel, inmenumode: numeric valueinsertion
- EPGKey:(inviewingmode)toenterinElectronicProgrammeGuide
- USBKey:(inviewingmode)toaccessmultimediafilesintheUSBdevices connectedtothereceiver
- MenuKey:toenter/leavein/frommainmenu
- Exit Key: (in menu) coming back to previous menu or exit from current visualized menu
- Keys CH▲ / CH▼ / VOL◀ / VOL▶: allow to move among menu items and select values. Moreover CH▲and CH▼can tune to a different channel and VOL◀and VOL▶canincrease/decreasethevolume
- OKKey:inviewingmodeenterthechannellistwhileinmenuconfirmtheselection
- Keys P ≈ / P ≈ : page up/down for moving faster on a list
• FAVKey: changing current channellist for satellite or favourite channel group
- BACK Key: in viewing mode coming back to previous tuned channel while in menus comingbacktopreviousmenuorexitfromcurrentvisualizedmenu
•ZOOMKey:zoomfunction(1–16x).PressExitforexiting
- Function Keys: red/green/yellow/blue keys have several functions regarding the selectedmenu
- INFO Key: In viewing mode, by pressing once, it shows information banner, by pressingtwiceitshowsdetailedinformationonthecurrentprogram.bypressing threetimesitshowsinformationonsignalstrengthandquality
•SUBKey:subtitlesenabled/disabled
- DVR Key: information on the current record/timeshifting and on the records already done(iftheyareintheUSBdeviceconnectedtothereceiver)
• TXTKey:teletextenabled/disabled
- Keys ◄ / ▶: moving forward/backward during a record/timeshift (the default jump durationis30seconds)
- Keys ◀◀ /▶▶: fast forward / fast backward during playing records/timeshift
- Keys ■ /▶ / || : stop/play/pause during record/timeshift
- REC Key: start of the record (if the USB device is connected). Press ■ to exit from record.

2.4Connections
Satellite digital TV is transmitted via numerical type signals from satellites. This is why it is essential to make sure that the parabolic antenna is correctly pointed. If your receiver is unable to tune into any channels, before contacting theaftersalesservice,itisimportantthatyouhaveyourantennaplantcontrolledbyaspecialistantenna installer.
CAUTION
Itisgoodpractisetoconnectthereceivertotherappliances(e.g.TV,VCR,DVD,etc.)andtheantennabefore plugginginthemainslead.Whenthereceiverispoweredelectricalvoltagedifferencesmaybecreatedwhen plugginginthejacks,whichmaygeneratecurrentsthatcoulddamagetheappliances.
2.4.1 TVConnection
The connection can be done via SCART (standard definition) or via HDMI (high definition). If there are a connected to television via HDMI and there are issues on having clear screen output, try to use SCART connection and to change video resolution.

CAUTION
The direct TV Scart connection should always be used as a first operating test since other more complex connectionsequences involving videorecorders, DVDplayers, etc, may give malfunction that are not caused by faults or defect so the actual appliances but by problem so in compatibility.
2.4.2HI-FIAudioSystem
Connectingcoaxialdigitalaudiooutputtoahome-theatreaudiosystem(S/PDIFconnector):

CAUTION
Inordertohavedigitalaudiooutputworkingcorrectly,checkconfigurationofS/PDIF.
3Installation
3.1 First Installation
After connecting TV to receiver as shown in par. 2.4.1, Connect power supply cable to power socket. After few seconds, thereceiver will show the first install menu on TV screen. This menu appears on first boot and after a factory reset (par. 4.5.2). This menu consists in:
-Firstwindow
-Language:setmenulanguage
-FirstAudio:favoriteaudiotrack
-SecondAudio:secondfavoriteaudiotrack
- Subtitles: setsubtitleslanguage
-Teletext:setteletextlanguage
- Secondwindow
-GMT:settimezone
-SummerTime:summertimeon/off
•Thirdwindow
-CHpassword:setapasswordforlockthevisualizationofachannel
CAUTION
Afterchangingthepassword,pleasekeepthenewpasswordinasafeplace.Iftheuser forgetstheCHpassword,theonlywaytoresetthepasswordwillbechangingCHpassword from menu 4.4.6 or performing a factory reset (par. 4.5.2) and then perform again the first installation.
- Fourthwindow
- Default Channels: a popup asks the user to load default channel list (channels from Hotbird and/or Astra satellites)
CAUTION
For each of the above windows the user can use keys CH▲ e CH▼ in order to select an item and keys VOL◀ e VOL▶ for interact with these selected item.
3.2ChangingFirstInstallation
The user can change any time the first installation parameters from main menu by entering the submenu Installation. For further details please refer to section 4.3.
4MenuDescription
CAUTION
Modification of some settings in this men may affect the correct operation of thereceiver. Therefore it is important that you carefully read this section of the manual before changing any settings. Some functions are protected by a password to prevent accidental changes.
4.1MainMenu
The main menu appear as soon as the user ends the first installation procedure (par. 3.1). It consists of six entries:
- Channels: channel and radio lists can be modified and erased from this submenu
- Installation:setmainparametersofantennasystem
- SystemSetup: setsystemandOSDsettings
- Tools: it manages software upgrade via OTA and it shows information about system and CI/CI+ module
- USB: it manages software upgrade via USB and the multimedia files in the USB devices connected to the receiver
- RecordSettings: theusercanchangesettingsforrecordsandPVR
MainRulesformenunavigation
Inordertomovefocusonmenuitems,pleaseusethefollowingkeys:
•MENUkey:open/closemainmenu
- CH▲ / CH▼ (also VOL▶/ VOL◀ in some menus) for selecting entries
- OKkey(alsoVOL▶insomemenus)forchoosingselectedentry
- BACK or EXIT key for coming back to previous menu
Moreover, in some menus, it is possible to refer to indications on the function of a particular key (usually it is useful forred/green/yellow/bluekey).
CAUTION
InordertoapplyachangetheusercanexitfromcurrentmenuwithBACKorEXITkey.Withregardstothe appliedchange,apopupwhichasksforuserconfirmationcanappear.
ProtectionandPassword
Somemenus/functionsareprotected.Toaccesssuchmenus,thesystemwillaska4-digitpassword(systemPIN). ThedefaultsystemPINis0000(fourzeros).
Thereare2kindsofPIN:thefirstisthesystemPINandthesecondachannelPIN.ThechannelPINisthepassword chosenbytheuserduringfirstinstallationprocedureinordertolockthevisualizationofsomechannels.Forfurther informationaboutpasswordandprotection,pleaserefertomenuParentalLock(sec.4.4.6).
4.2Channels
Menuconcernedwiththesortingandremovalofchannels. Thismenuconsistsofthefollowingsubmenus:
-TVChannelList
-RadioChannelList
-FavoriteGroups
-DeleteAll
CAUTION
Someofthesesubsectionscouldbedisabledbecauseitismandatorytomakeafirstchannelsearch(par.4.3.4e4.3.5).
4.2.1 TVChannelList
- FAVkey:addtheselectedchanneltoafavoritechannelgroup
- RED key: lock the channel; after locking it you can view the channel only after digging the right password (the channelPIN,seepar.4.4.6).
- GREENkey: thechannelwillbeskippedinviewingmode
- YELLOWkey:movethechanneltoadifferentposition
- BLUEkey:itshowstheeditmenu.Thepossibleactionsare:
-Sortingthelist(redkey);youcansortalphabetically(A-Z,Z-A),freechannelbeforescrambledones,or byLock,thatislockedchannelswillbeputasfirstchannels
-Editingchannelname(greenkey)
-Deletingchannel(bluekey)
Bypressingoneofthefunctionalkeys,therelatedfunctionwillbeactivated.Now,inordertomodifytheselectedchanneljustpressOKonit.ToexitpressEXITorpressagainthefunctionalkey.
4.2.2 RadioChannelList
ThislisthasthesamefunctionalitiesofTVchannellist,buttisconcernedonlytoRadioChannels(foracomplete listofthefunctionalities,pleaserefertopar.4.2.1.
4.2.3 Favorites
Inthismenuyoucanchangefavouritechannelgroupnames.
4.2.4 DeleteAll
Thismenuallowstheremovalofallthechannels(bothTVandRadio)storedonthereceiver.
4.3 Installation
Installationmenuisconcernedtoantennaconnectionandsetup.Itssubmenuare:
-AntennaConnection
-SatelliteList
-AntennaSetup
-Single-SatelliteSearch
-Multi-SatelliteSearch
-TPList
4.3.1 AntennaConnection
AntennaConnectionmenucontainsthefunctionsrequiredtoconfigurethereceiveraccordingtoyourantennaplant.
CAUTION
The Antenna Setup menu settings a respect to your antennaplant. Any wrong setting may make impossible to view certain TV programs. Before changing any settings it is important that you know the characteristics of your plant or consult the installer for a correct receiver configuration.
The following parameters will be listed:
-LNB1:selectifantennaisfixedormotorized(DiSEqC/USALSprotocols).
4.3.2 SatelliteList
SatelliteListmenucontainsasatellitelist.Beforegoingaheadwithantennaconfiguration,itismandatorytochoose at least a satellite from the list or to add a new one (green key). For choosing a satellite from the satellite list, moving on the list with the keys CH ▲ / CH ▼ and then press OK. The functional keys are:
- RED Key: edit a satellite in the satellite list; you can change satellite name and position
- GREEN Key: add a new satellite. It is mandatory to insert a name and a position for the new satellite
- BLUE Key: remove a satellite from the list. A confirm box will appear before removing the satellite
Bypressingredkeyandgreenkey,anewboxwillappear;thisboxisusedtowrite/changethenameandtheposition ofasatelliteusingthenumericalkeyboardoftheremotecontroller. Thefunctionalkeysassociatedtothisboxare describedontheboxitself:
- REDKey: fromuppercasetolowercase and viceversa
- GREEN Key: delete the last inserted character. For deleting a different character move on the string using VOL◄/VOL►andthenpressgreenkey.
- BLUEKey:exitfromtheboxwithoutsavingthechanges
- OK/YELLOWKey:savingthechangesandclosethebox
4.3.3 Antenna Setup
Thesubmenusare:
- Satellite: select the satellite name from the ones selected on menu Satellite List (par. 4.3.2)
• LNBFreq:setthetypeofLNB(normallyUniversal9750-10600)
•Transponder:selectoneoftheTPoftheselectedsatellite - DiSEqC1.0: select the DiSEqC tone for the LNB associated to the satellite (Off when using a motor)
- DiSEqC1.1: configuration parameter for DiSEqC 1.1 antenna plant (usually for complex plant, select Disable ifnotused)
- 22k:onlyuseifLNBTypeisNOTsettoUniversal(i.e.automatic)
•Polarization:selectthepolarity(H=horizontal, V=vertical)
NOTE
The following examples are just as an indication, and strictly related to the characteristics of the antenna plant. In caseofneed, pleaserefertotheinstaller
4.3.3.1 BasicMode
SingleLNBantennaplantsdonotuseDiSEqCorotherspecificcommunicationprotocols.InItaly,withatraditional singleLNBantennaplantpointingonHotbird13° Eastusethefollowingsettings:
•Satellite:Hotbird13 ° East
• LNBType: Universal9750/10600
• DiSEqC1.0: Disabled
• DiSEqC1.1: Disabled
•Polarization:Automatic
4.3.3.2DiSEqCMode
This function is used for multiple converter antenna plants. For a typical Italian two LNB or dual-feed antenna plant, with the first LNBpointingonHotbird13 ° EastandthesecondonAstra ° East,usethefollowingsettings:
•Satellite:Hotbird13 ° East
•Satellite:Astra19 ° East
• LNBType: Universal9750/10600
• LNBType: Universal9750/10600
• DiSEqC1.0:Port1
•DiSEqC1.0:Porta2
• DiSEqC1.1: Disabled
•DiSEqC1.1:Disabilita
•Polarization:Automatic
•Polarization:Automatic
4.3.3.3MotorMode
ThisreceivercancommandamotorisedantennaeitherbytheDiSEqC1.2orUSALSprotocol,dependingonthetypeofmotor used in the plant. To use this mode the DiSEqC in the Antenna Setup menu must be set to Disable. Then go to Positioner and selectthecorrectprotocol(i.e.DiSEqC1.2orUSALS).
DiSEqC1.2
•LNBFreq:Universal9750/10600
•MotorType:DiSEqC1.2
- DeleteAll:toresetmotorsettings
•MotorSetting:
-Satellite:satellitetosearchfor
- Transponder: transponder related to the satellite (press OK to open the list of transponders on memory). Make sure that you select a transponder that can still be received and not out of date so that the signal strength and quality bars are satisfactory.
- Position N.&Save: the satellite position reference is assigned and saved when a satellite has been detected(tosavethepositionpressOK). This will automatically recall the position.
- LimitSetup:
- Limit Setup : to enable/disable the limit for moving motor towards east/west
-Gotoreference:toresetmotorposition
USUALS
• LNBFreq: Universal9750/10600
- MotorType:USUALS
• Longitude:locallongitude
• Latitude:locallatitude
- DeleteAll:resettingmotorsettings
- MotorSettings:
-Satellite:satellitetosearchfor
- Transponder: transponder related to the satellite (press OK to open the list of transponders on memory). Make sure that you select a transponder that can still be received and not out of date so that the signal strength and quality bars are satisfactory.
- LimiteSetup:
- Limit Setup: to enable/disable the limit for moving motor towards east/west
-Gotoreference:toresetmotorposition
4.3.4 Single-SatelliteSearch
Single Satellite Search menu functions automatically detect and memorise the transponders and channels of the satellite received by the antenna. With this function new channels can be added to the list and existing channels can be updated if the broadcaster has varied their PID (transmission parameters that identify the programme's audio and video). The features of this search are:
- FTA only: only Free-To-Air channels; the default values is No, that is extend search also to scrambled channels
- ScanChannel:searchingonlyTVchannels,Radiochannelsorboth
•NetworkSearch:searchingchannelthatbelongstoanetwork - Scan Mode: Auto or Preset. Preset mode follows the TP list associated with the chosen satellite while automatic search performaglobalsearch, not following TPIstassociatedwiththesatellite.
Tostartthechannelsearch, pressOKonSearch.
4.3.5 RicercaMulti-SatelliteSearch
Multi Satellite Search menu has the same functions of Single Satellite Search menu, the only difference is that the search is for allsatelliteschoseninsatellitelist(par.4.3.2).
4.3.6TPList
TP List menu functions scan/update channels belonging to a specific transponder. To run a scan you must know the transponder's transmission parameters and enter them in the right way. If a TP list is already showed, for starting searching press OK on the chosen TP, changing the parameters Only FTA, Scan Channel, Network Search as on par. 4.3.4. For adding or changing a TP, the functionalkeys are:
•REDkey:changeanexistingTP
• GREENkey: addanewTP
• YELLOWkey: deletetheselectedTP
•BLUEkey:startthechannelsearchontheselectedTP
BypassingREDorGREENkeyaboxwiththefollowingparametersappears:
• Frequency: TP frequency
•SymbolRate:TPsymbolrate
•Polarization:selectthepolarity(H=horizontal,V=vertical)
PressOKonSaveforsavingthechanges.
CAUTION
If the signal strength and quality bars at the bottom of the screen end on a response indicator low levels, makes sure the parameters have been entered correctly and/or the selected TP is not out of date and/or the Antenna Setup menu settings are correct and/or your antennaplant in working properly and that it is designed to receive these selected TP.
4.4SystemSetup
Thismenuisconcernedtotheadadvancedconfigurationofthesystem.Itssubmenusare:
-Language
-TVSystem
-DisplaySettings
-LocalTimeSettings
-TimerSettings
-ParentalLock
-OSDSettings
-Other
4.4.1 Language
SystemLanguageConfiguration:
•Language:OSDlanguage
- FirstAudio:firstaudiotoselectinviewingchannels
•SecondAudio:secondaudiotoselectinviewingchannels
- Subtitles: subtitleslanguage
- Teletext:teletextlanguage
4.4.2TVSystem
TVSystemsettings:
- Video Resolution: the user can choose these resolutions: 480i / 480p, 576i / 576p, 720p_50 / 720p_60, 1080i_25 / 1080i_30, 1080p_50/1080p_60/1080p_25/1080p_30/1080p_24
- Aspect Mode: the user can choose tv format: 16:9 (Pillar-Box or Full) o 4:3 (Pan-Scan or Full)
- Digital Audio Out: choosing between LPCM (Linear Pulse-Code Modulation) and BS (BitStream).
4.4.3 DisplaySettings
From this menu you can change the value of Brightness, Contrast, Saturation, Hue and Sharpness.
4.4.4 LocalTimeSettings
This menu can be used to set the clock required by the receiver to be able to view all the programmes related to the electronic programmeguide(EPG)andtoseteventtimers.Theitemsthatcanbesetare:
• GMTOffset:definedifferencebetweenGMTandlocaltime
- SummerTime: enable/disablesummertime
4.4.5TimerSetting
The Timer Setting menu can be used to set up to 8 timers on the receiver to schedule the viewing of programmes or memo messages. The timers can be set directly in the EPG electronic programme guide for channels that transmit this information. To access timer setting functionalities just press OK on one of the 8 timers; a window with the following items will appear:
- TimerMode:selecttimermode(once,daily,weekly,Mon-Fri,Sat-SunorOFF)
- Timer Service: select if the timer is only for viewing (Channel) or also for recording (Record)
• WakeupChannel: channeltoview/record - WakeupDate:setdate
- Ontime:setstartingtime
•Duration:setrecordduration
- After Record: action to perform when the timer/record finishes, that is Automatic (the receiver will remain in the same status before timer/record), Power On (the receiver will remain ON after timer/record) or Standby (the receiver will power downaftertimer/record).
4.4.6 ParentalLock
The Parental Lock menu functions can be used to create safety locks for the Installation menu, for certain important functions and for channels. Thelockisopened by a four-figure PINcode or password. There are twodifferentPIN passwords:
-systemPIN:theoneusedforlockingInstallationmenuorothermenuimportantfunctions(thispasswordhasasdefault value0000)
- channel PIN: the one used for locking channels (this password is chosen by the user in the first installation procedure)
Thismenuoffersthefollowingfunctions:
- Menu Lock: Enable/Disable menu protection. The system PIN password is asked every time the user will perform an action that can changes system settings
- ChannelLock: Enable/Disablechannelprotection
- NewMenuPassword:forchangingsystemPINpassword
- ConfirmPassword:confirmthenewinsertedsystemPINpassword
- NewCHPassword:forchangingchannelPINpassword
- ConfirmPassword:confirmthenewinsertedchannelPINpassword
CAUTION
The default system PIN password is 0000 while the channel PIN password is set by the user on first installation procedure. Keep these passwordsinasafeplace.
4.4.7OSDSettings
The OSD Settings menu can be used to customise the OSD (On Screen Display) aspect and certain menu settings. The following options are available:
- SubtitleDisplay:enable/disablesubtitles
- OSDTimeout:channelinfobannerduration
- OSDTransparency:OSDtransparencycanbeincreasedfrom10%to40%
- OSDAnimation: enable/disableOSDanimationeffects
4.4.8 Other
Inthismenuyoucanmadeothercustomizations:
• LNBPower.enable/disableLNBpower
- Channel Play Type: play only free, scrambled or both types of channels
- Beeper: enable/disablesoundduringsignalsearching
- Auto Standby: if on, the receiver goes in standby mode if a valid signal is not found
• LEDBrightness: theusercansetthevalueofdisplaybrightness
4.5Tools
The Tools menu provides a range of extra functions that help the user use the receiver: general hardware and software information, CI/CI+information, factoryresetandsoftwareupgradeviaOTA.Itssubmenusare:
-Information
-FactorySettings
-S/WUpgradebyOTA
-CommonInterface
4.5.1 Information
It shows information on bootloader and on the software version installed on thereceiver.
4.5.2 FactorySettings
The Factory Setting feature allows to come back to the original configuration of the receiver. By pressing OK on this entry a popupwillasktheuserforsystemPINpassword(par.4.4.6).
CAUTION
By performing a Factory reset the user looses all the personal settings and data. All channels and menu personalization will be erased. After performing a factory reset, the first installation (par.3.1) must be done again
4.5.3 Software Upgrade via OTA
During receiver lifetime, it can be useful changing or correcting some software functionalities with software upgrades released from manufacturer. The upgrade can be done via OTA (Over The Air upgrade). Once the right settings of satellite and TP are inserted, the software will be downloaded automatically.
CAUTION
Software download via OTA could take several hours, mainly due to poor signal quality. During the upgrade please do not interact with the receiver and do not power off the receiver: you can seriously damage the receiver itself.
4.5.4 CommonInterface(Cl/Cl+)
Common Interface (CI/CI+) menu controls common interface (CI), common interface plus (CI+) and CAM module inserted on the slot on receiver front panel. A CAM module has an own internal software which shows information and allows editing of settingsandfeatures. ThefeaturesdependsonthekindofownedCAM(refertoCAMmodulemanual).
4.6USB
This menu consists in all the fuctions which can be done with a connected USB device. These features are software upgrade via USBandmultimediafilemanaging.Theentriesare:
-USBUpgradeandSave
-MediaPlayer
-RemoveUSBdevicesafely
4.6.1 USBSoftwareUpgradeandSave
ReceiversoftwarecanbeupgradedthankstotheUSBports.
CAUTION
In order to upgrade the receiver through USB device, please be sure that the connected device filesystem is FAT or NTFS and that the upgrade file is put on root filesystem (not inside folders). During upgrade procedure please do not switch off the receiver: youcanseriouslydamagethereceiveritself.
4.6.2 MediaPlayer
By connecting an USB device to one of the two USB ports of the receiver, the user can show images, music, records and videos to TV. The keys VOL◄ / VOL► are used to choose the kind of multimedia file; the possible kinds are: Image, Music, Video, e Record. The keys CH▲e CH▼ are used to select the previous/next multimedia content while EXIT key comes back to previous folder.
DuringnavigationintoUSBdevice, the functional key are:
- OK/▶key:playtheselectedcontent
- REDkey:showplaylist
• GREENkey: addselectedcontenttoplaylist - YELLOW key: (for Music/Image) add all the folder contents to playlist
•BLUEkey:editmenu,thatis:
-REDkey:renameselectedcontent
-GREENkey:copytheselectedcontentinadifferentfolderoradifferentUSBdevice - YELLOWkey:deleteselectedcontent
-BLUEkey:exitwithoutsavingthechange
-DVRkey:createanewfolderonUSBdevice
- SWAPkey:swapbetweenfirstandsecondconnectedUSBdevice
• DVRkey: orderingfilesforname/date/dimension/favorite
- BACK key: (for Image) change the slideshow settings and image repetition
- TXTkey:(forImage)enablegridvisualization
Duringplayofmultimediacontents:
- CH▲ / CH▼ keys: play of previous/next multimedia contents
- Tasto VOL◄/VOL► : (for Image) rotation by 90° clockwise/counterclockwise;(forMusic/Video)jumpforward/backward
•ZOOMkey:(forImage)zoom1x-16xonselectedimage
• A-Bkey: (forMusic/Video) enablerepetitionmode(singlefile, folderfilesorrandom)
• AUDIOkey: (forVideo/Record) changing audiotrack - SUBkey:(forVideo/Record)enable/disablesubtitles
•MARKkey:(forVideo/Record)setamarkontheaudio/videostream
•JUMPMARKkey:(forVideo/Record)jumptothemarkpreviouslyset
CAUTION
During reading please do not disconnect USB device: you can seriously damage the device or loss data!
4.6.3 Remove USB Devices safely
BypressingOKonthismenuitemyoucanremovesafelytheUSBdeviceconnectedtothereceiver.
4.7RECSetting
4.7.1PVRStorageSetting
This menu shows information about USB device connected to the receiver. You can find total USB space, total available space, spacereservedfortimeshiftandfilesystemused. Thefunctionalkeysare:
- VOL◄ / VOL► keys: change the active partition (if there are more partitions on the same USB device)
- CH▲ / CH▼ keys: if there are two USB devices connected to the receiver, the user can use these keys to change the workingUSBdevice
• YELLOWkey: formatUSBdrive - BLUE key: it shows DVR setting (that is REC&TMS, i.e. record and timeshifting in same partition, Record i.e. only record onpartition, Timeshifti.e.onlytimeshiftonpartition)
4.7.2PVRSetting
Thismenuallowschangesontimeshiftingandrecordingfeatures. Theitemsonthismenuare:
• Timeshift: enable/disabletimeshifting
• Jump: itdefinesthejumpstep
- TSfilesize:maxdimensionreservedfortimeshiftingfile
- Timeshifttorecord:ifenableaddthetimeshiftingcontenttotherecord
- PSrecord: enable/disablerecordinginPSformat(defaultformatisTS)
- Display REC icon: it represents how many seconds the REC icon will be shown on TV during a record
5UsageinViewingMode
This section describes the receiver features while in viewing mode. To make it easier to use the receiver and manage the great many satellite channels, several windows and menus can be opened by pressing just one remote control button (par. 2.3). The menus have been designed for the most common needs and their functions are essential in saving time when using the receiver. Fortheadvancedfunctionsinthereceiver,itssettingsandcustomoptionsconsultChapter4.
5.1 ChangingChannel
Tochangechannels,doasoneofthefollowingway:
- PresskeysCH▲oCH▼ofremotecontrolunit
- Digitthenumberofthechannelthroughthenumericalkeyboardoftheremotecontroller
- PresskeysCH▲oCH▼onthefrontpanelofthereceiver
- Press OK key on the remote controller for viewing channel list. Using keys CH▲ o CH▼ (or keys P≈ / P≈ for page up and down)tomovethroughthelistandconfirmthechoiceofthechannelbypassingOKontheremotecontroller.
5.2ChannelList
ThislistisshowedbypassingOKkeywhileinviewingmode.So:
- Press keys VOL◀ or VOL▶ to choose the satellite (if there are more than one satellite)
- PresskeysCH▲orCH▼totunetoprevious/nextchannel
- Press keys P ≈ oP ≈ to move the list page by page (10 channels)
- Press OKtotunetoselectedchannel
- PressREDkeytosearchforachannel(byname)
- Press GREEN key for ordering channels in alphabetic order (to change the initial letter use keys VOL◄ / VOL►). For comingbacktostandardviewjustpressEXITkey.
- Press key YELLOW to change channel ordering (HD channels as first, alphabetic A-Z/Z-A, FTA (Free-To-Air) first, Scambledfirst)
5.3ChannelInfoBanner
Every time you change channel or press INFO key, a box will appear at the bottom of the screen, known as an information banner related to the channel being viewed. The banner can include the following information (if transmitted by the broadcaster): name and number of channel, satellite name, date and time, info concurrent/next channel program.
By pressing twice INFO key detailed information about current program are shown. If you press a third time INFO key signal qualityandstrengthareshown.
5.4TV/RadioModeSwitching
ForafastswitchbetweenTVandRadiomode,useTV/RADkeyonremotecontroller.
5.5CAMModule
InordertoseescrambledchannelsaCAMmoduleandasubscriptioncardcouldbeneeded.ThereceiversupportsallCAM modulescompatiblewithCI/CI+standards.
CI+Authentication
If a CI+ module is inserted, a popup which shows authentication/pairing CI+ module will appear. Waiting few minutes, the module will become operative (the user will be warned thanks to a new popup) the scrambled channels will be descrambled.
CAUTION
If the CAM module is inserted for the first time or if a different module is inserted, the authentication phase could take several minutes. Please wait the end of authentication phase
5.6ExtrafeaturesonChannelsandServices
Some programs can have more features like several audio tracks and teletext. In this case, using keys AUDIO, TXT, SUB and DISPontheremotecontrolleryoucanrespectivelyenterthefollowingfeatures::
•Audio:selectadifferentaudiotrack
- Teletext: enableteletext(pressEXITtoclose)
- Subtitles: enables subtitles
• TVResolution: changingTVresolution
5.7 Timeshifting and Records
Timeshifting
If the following requirements are fulfilled:
a.beinginviewingmode
b.USBdeviceconnectedtoreceiver
c.timeshiftingenabled(par.4.7.2)
then by pressing multimedia key pause timeshifting feature starts. The first time pause key is pressed an info banner is showed with details about the record in order to make more comfortable to move ahead/backward using fast rewind or fast forward. If no info banner appears, wait for about 2 minutes before pressing again pause key, in order to have enough buffer in order to use timeshifting.Toexitfromtimeshiftingpressstopkeyonremotecontroller.
Recording
If the following requirements are fulfilled:
a.beinginviewingmode
b.USBdeviceconnectedtoreceiver
by pressing REC key a new record starts. The default length is 2 hours. If you want to change this value press again REC key and insert the new value with the numeric keyboard of the remote controller. Press stop key (or change channel to a channel in adifferentTP)inordertoclosetherecord.Inanycase,aconfirmboxwillbeshowedbeforeclosetherecord.
5.8ElectronicProgrammingGuide(EPG)
If the receiver is in viewing mode and EPG key is pressed, the Electronic Programming Guide is showed. The functional keys are:
- Keys CH, CH, VOL, VOL : moving through channels or time
- OK key: open a box with detailed info about current program on TV. If the info are available in several languages, the green keywillallowthelanguagechanging.ToclosetheboxpressredkeyorEXIT/BACK
- RED key: it allows the movement trough time on EPG by activating a more comfortable menu. You can move by programs orbydaysonlybyselectingtherightkeyandpressingOKonit.ToclosethismenupressEXIT
- GREEN key: it shows a box for reserving a program (for viewing it or recording it); the values that can be changed are the sameastheonesinpar.4.4.5.
NOTE
If green key is pressed when a TV program is selected, some timer values are already set with the value of the TV program, in ordertomakeeasiertheprogramreservation
ThereservationscanbeviewedandchangedbymovingtomainmenuSystemSetup>TimerSetting.PressBACKorEXITto comebacktoviewingmode.
6ProblemSolving
| PROBLEMPROBABLECAUSEREMEDY | ||
| TheLED'sonthefrontpaneldon't lightup | Thereceiverisnotpluggedintothe mains | Makesurethemainsleadis properlypluggedin |
| Nosignal(signalLEDoff) | Theantennacableisnotconnected tothereceiverTheantennaplantisdamagedThe plant is not compatible | Makesuretheparabolicantenna cableisproperlyconnectedtothe receiverChecktheplantisinworkingorder(parabolaorientation,conditionofantennacable,commuter andLNBefficiency).Itwouldbe besttohavetheplantcheckbya antennaspecialist.Check the type of satellite plant (single or dual feed, switch, IF IF). If in doubtcontacttheinstaller. |
| Nosoundorimage | ThereceiverisinstandbyTheTVscartcable(orHDMIcable) isnotconnectedproperlyor theTV isnotonAV(orinHDMI)The television is turned off or tunedintothewrongchannel.Thechannelyouaretryingtoseeis outofdateorcoded | TurnonthereceiverMake sure the TV scart is properly connectedortuneintheTVtothe correctAVchannel.Turn ontheTVand/orselecttherightchannel(e.g. A/V)Changechannelorperformanew channelsearch |
| Theremotecontroldoesn'twork | FlatbatteriesornobatteriesThebatteriesareinsertedwiththeir polaritiesthewrongway | InsertnewbatteriesCheckthepolarityofthebatteries(check the indications inside the batterycompartment) |
7TechnicalSpecifications
General
HDDVB-S/DVB-S2satellitereceiver
VideoMPEG-2,MPEG-4H.264/AVC
CommonInterface/CommonInterfacePlus:1 slot
Display:4digits(7segments)
AspectRatio:4:3(realorLB),16:9(fullscreenorPB)
VideoResolution:480i,480p,576i,576p,720p,1080i,1080p
3physicalkeysonfrontpanel:ON/ST.BY,◀,▶
DiSEqC1.0,1.2,1.3(USUALS)
ParentalLock
Mutefeature
SCR: Unicablefeature
MultimediacontentsfromUSB(imagesJPG,BMP;videosAVI(SRTsubtitles),MKV,TS,TP,TPR,MPG,MP4;musicMP3)
Upto5000channelsandseveralfavoritegroupsforchannels
SoftwareupgradebyOTAandUSB
Tuner
Inputfrequency:950-2150MHz
LNBpower:ON/OFF
Bandswitching:22KHzandDiseqc1.0,1.1,1.2,USALS
Audio,VideoandDataconnections
HDMI:high-definitiondigitaloutput
SCART:standard-definitionoutput
COMPOSIT(yellowconnector)+right(red)eleft(white)audiochannel:standard-definitionoutput
SPDIF:Coaxialdigitalaudiooutput
USB:2USB2.0portsformultimediacontents,PVR,timeshiftingandsoftwareupgrade
PowerSupply/Consumption
PowerSupply:AC100\~240V,50/60Hz
PowerConsumption:Max.25W;instandby<1W
USBConsumption:(inoperativemode)5V,500mA
DimensionsandUsage
UsageTemperature:0-40°C(humidity<95%)
Dimensions:260x190x40mm
Weight:950g

DOLBY.
DIGITAL PLUS
ManufactoredunderlicensefromDolbyLaboratories.Dolbyandthedouble-Dsymbolaretrademarks ofDolbyLaboratories.
TELESystemElectronicstatesthatthisproductmeets thebasicEuropeanrequirementsof2004/108/EC(EMC -ElectromagneticCompatibility)and2006/95/EC(LVD-LowVoltageDirective),followingthetechnicaldirectives:
•BassaTensione/LowVoltage:
-EN60065:2002+A1:2006+A11:2008

ITALY
TELESystemElectronicSrl
Web:www.telesystem-world.com
(Italyonly) Tel.AssistenzaGuasti:199214455


- TS4501CI+HD - Digital Satellite Receiver - HD CI+
- GentileCliente,
- Safety Regulation
- ELECTRICALSUPPLY
- POWERCABLE
- LIQUIDS
- SMALLOBJECTS
- CLEANING
- VENTILATION
- WARNING!!!
- 2ProductDescription
- 2.1FrontPanel
- NOTE
- 2.2RearPanel
- RemoteControl
- CAUTION
- 2.4Connections
- TVConnection
- 2.4.2HI-FIAudioSystem
- 3Installation
- First Installation
- -Firstwindow
- - Secondwindow
- •Thirdwindow
- - Fourthwindow
- 3.2ChangingFirstInstallation
- 4MenuDescription
- 4.1MainMenu
- MainRulesformenunavigation
- ProtectionandPassword
- 4.2Channels
- TVChannelList
- RadioChannelList
- Favorites
- DeleteAll
- Installation
- AntennaConnection
- SatelliteList
- Antenna Setup
- BasicMode
- 4.3.3.2DiSEqCMode
- 4.3.3.3MotorMode
- DiSEqC1.2
- USUALS
- Single-SatelliteSearch
- RicercaMulti-SatelliteSearch
- 4.3.6TPList
- 4.4SystemSetup
- Language
- 4.4.2TVSystem
- DisplaySettings
- LocalTimeSettings
- 4.4.5TimerSetting
- ParentalLock
- 4.4.7OSDSettings
- Other
- 4.5Tools
- Information
- FactorySettings
- Software Upgrade via OTA
- CommonInterface(Cl/Cl+)
- 4.6USB
- USBSoftwareUpgradeandSave
- MediaPlayer
- Remove USB Devices safely
- 4.7RECSetting
- 4.7.1PVRStorageSetting
- 4.7.2PVRSetting
- 5UsageinViewingMode
- ChangingChannel
- 5.2ChannelList
- 5.3ChannelInfoBanner
- 5.4TV/RadioModeSwitching
- 5.5CAMModule
- CI+Authentication
- 5.6ExtrafeaturesonChannelsandServices
- Timeshifting and Records
- Timeshifting
- Recording
- 5.8ElectronicProgrammingGuide(EPG)
- 6ProblemSolving
- 7TechnicalSpecifications
- General
- Tuner
- Audio,VideoandDataconnections
- PowerSupply/Consumption
- DimensionsandUsage
- ITALY
Brand : TELE System
Model : TS4501CI+HD
Category : Digital decoder