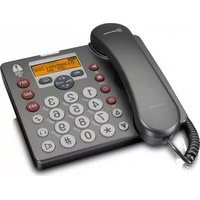
PowerTel 58 - Telephone Amplicom - Free user manual and instructions
Find the device manual for free PowerTel 58 Amplicom in PDF.


| Product Type | Corded telephone with integrated answering machine |
| Power Supply (Base) | Input: 100-240V ~ 50/60Hz 250mA; Output: 12VDC 670mA; Model: S008CU1200067 |
| Optimal Ambient Temperature | 32°F to 113°F (0°C to 45°C) |
| Optimal Relative Humidity | 20% to 80% |
| Display | Backlit LCD with icons; contrast adjustable (5 levels) |
| Phonebook Capacity | Up to 200 entries (16 letters for name, 24 digits for number) |
| Quick Dial Memory | 3 dedicated buttons (M1, M2, M3) for speed dial |
| Answering Machine | Digital; records up to 59 minutes; modes: Answer & Record, Answer Only, Off; remote access via PIN |
| Handset Volume Boost | Yes, with flashing indicator; high volume may cause hearing damage to normal-hearing individuals |
| Handsfree Feature | Built-in speakerphone with 5 volume levels |
| Headset Jack | 2.5mm on base; compatible with NL100 headset |
| Equalizer | Adjustable tone control per user profile |
| Caller ID | Stores up to 30 incoming calls; requires subscription from phone provider |
| Redial | Last 5 numbers; with voice announcement (if enabled) |
| Ringer | 10 melodies; volume 5 levels plus Off |
| User Profiles | 3 programmable profiles with custom volume, boost, and equalizer settings |
| Dialing Modes | Tone (DTMF) and Pulse |
| Recall Time | 300ms or 600ms (selectable) |
| Warranty | 24 months from date of purchase |
| Cleaning Instructions | Use a soft, lint-free cloth; never use cleaning agents or solvents |
| Disposal | Do not dispose with household waste; separate collection for electrical and electronic equipment |
| Safety Certifications | FCC Part 68 and Part 15; ETL Listed Mark; TIA-1083 Compliant |
| Hearing Aid Compatibility | Compatible with most T-coil equipped hearing aids and cochlear implants |
Frequently Asked Questions - PowerTel 58 Amplicom
User questions about PowerTel 58 Amplicom
0 question about this device. Answer the ones you know or ask your own.
Ask a new question about this device
Download the instructions for your Telephone in PDF format for free! Find your manual PowerTel 58 - Amplicom and take your electronic device back in hand. On this page are published all the documents necessary for the use of your device. PowerTel 58 by Amplicom.
USER MANUAL PowerTel 58 Amplicom
Using the answering machine .....24
Help and support ....33
Troubleshooting guide 33
Technical details ......35
Default settings ......36
Maintenance and warranty ....37
FCC Compliance
The FCC requires that you will be advised of certain requirements involving the use of this telephone.
-
This equipment complies with Part 68 of the FCC rules. A label on the base unit of this equipment contains, among other information, the ACTA Registration Number (US:AAAEQ##TXXXX) and the Ringer Equivalence Number (REN) for this equipment. You must, upon request, provide this information to your telephone company.
-
An applicable certification jacks Universal Service Order Codes (USOC) for the equipment is provided (i.e., RJ11C) in the packaging with each piece of approved terminal equipment.
-
A plug and jack used to connect this equipment to the premises wiring and telephone network must comply with the applicable FCC Part 68 rules and requirements adopted by the ACTA. A compliant telephone cord and modular plug is provided with this product. It is designed to be connected to a compatible modular jack that is also compliant. See installation instructions for details.
-
The REN is useful to determine the quantity of devices you may connect to your telephone line and still have all of those devices ring when your number is called. In most, but not all areas, the sum of the REN of all devices should not exceed five (5.0). To be certain of the number of devices you may connect to your line, as determined by the REN, you should call your local telephone company to determine the maximum REN for your calling area.
NOTICE: If your home has specially wired alarm equipment connected to the telephone line, ensure the installation of this equipment does not disable your alarm equipment. If you have questions about what will disable alarm equipment, consult your telephone company or a qualified installer.
-
If your telephone causes harm to the telephone network, the telephone company may discontinue your service temporarily. If possible, they will notify you in advance. But if advance notice is not practical, you will be notified as soon as possible. You will be advised of your right to file a complaint with the FCC.
-
Your telephone company may make changes to its facilities, equipment, operations or procedures that could affect the proper operation of your equipment. If they do, you will be given advance notice so as to give you an opportunity to maintain uninterrupted service.
-
If you experience trouble with the telephone, please contact the Amplicom Service Center at 1-866-AMPLICOM (267-5426) for repair/warranty information. The telephone company may ask you to disconnect this equipment from the network until the problem have been corrected or you are sure that the equipment is not malfunctioning.
-
This equipment may not be used on coin service provided by the telephone company. Connection to party lines is subject to state tariffs. (Contact your state public utility commission or corporation commission for information.)
This device complies with Part 15 of the FCC Rules. Operation is subject to the following two conditions: (1) This device may not cause harmful interference, and (2) this device must accept any interference received, including interference that may cause undesired operation. Privacy of communications may not be ensured when using this phone. Changes or modifications not expressly approved in writing by Amplicom may void the user's authority to operate this equipment.
Some cordless phones operate at frequencies that may cause interference to nearby TVs and VCRs; to minimize or prevent such interference, the base of the cordless phone should not be placed near or on top of a TV or VCR; and, if interference is experienced, moving the cordless telephone farther away from the TV or VCR will often reduce or eliminate the interference.
NOTE: This equipment has been tested and found to comply with the limits for a Class B digital device, pursuant to Part 15 of the FCC rules. These limits are designed to provide reasonable protection against harmful interference in a residential installation. This equipment generates, uses, and can radiate radio frequency energy and, if not installed and used in accordance with the instructions, may cause harmful interference to radio communications. However, there is no guarantee that interference will not occur in a particular installation. If this equipment does cause harmful interference to radio or television reception, which can be determined by turning the equipment off and on, the user is encouraged to try to correct the interference by one or more of the following measures: (1) Reorient or relocate the receiving antenna. (2) Increase the separation between the equipment and receiver. (3) Connect the equipment into an outlet on a circuit different from that to which the receiver is connected. (4) Consult the dealer or an experienced radio TV technician for help.
2 Instructions available in other languages at www.amplicomusa.com.
PHONE GUIDE

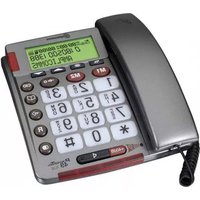
PowerTel 58 corded phone base
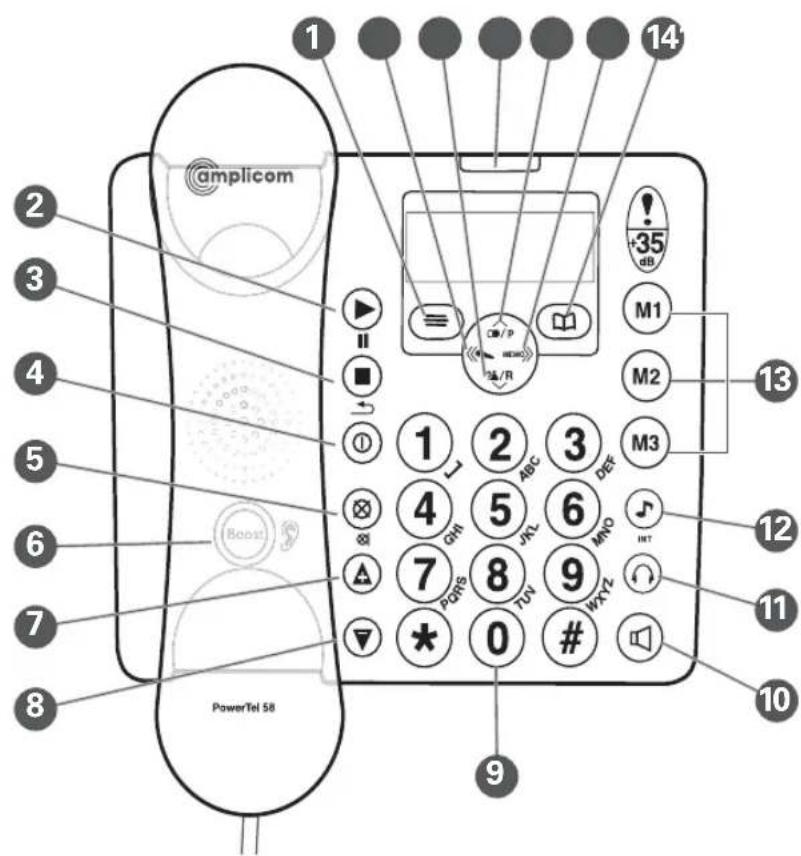
1 Menu/OK
52 Play/Pause
3 Stop/Esc
4 Answer on/off
5 Mute/Delete
6 Boost (under handset)
7 Volume up
8 Volume down
9 Keypad
10 Handsfree
11 Headset
12 Equalizer
13 Quick dial memories/User profi les
14 Phonebook
15 Fast forward/Memo
16 Up/Redial/Pause
17 Incoming call light/ New messages received
18 Down/Calls list/Recall
19 Rewind/OGM

Warning: This Handset has been specially designed for individuals who are hard of hearing and has a normal volume which is louder than a standard phone. Use of the Boost feature can cause hearing damage to individuals who are not experiencing hearing loss.

SAFETY
Important Safety Instructions
When using your telephone equipment, basic safety precautions should always be followed to reduce the risk of fire, electric shock and injury to persons, including the following:
- Do not use this product near water, for example, near a bath tub, wash bowl, kitchen sink or laundry tub, in a wet basement or near a swimming pool.
- Do not use the telephone to report a gas leak in the vicinity of the leak.
- Use only the power cord indicated in this manual.
- Avoid using a telephone (other than a cordless type) during an electrical storm. There may be a remote risk of electric shock from lightning.
SAVE THESE INSTRUCTIONS
Intended use
This phone is suitable for use on a public telephone network. Any other use is considered unintended use. Unauthorized modification or reconstruction is not permitted. Do not open the device and attempt any repair work yourself.
Phone location
Locate corded phone:
- On a dry, flat and stable surface
- Where the power cable will not be a trip hazard
• Where it is not obstructed by furniture - At least three feet from other electrical appliances
- Away from smoke, dust, vibration, chemicals, moisture, heat or direct sunlight.
Medical equipment
Do not use the phone near emergency or intensive care medical equipment, or during an electrical storm. If you have a pacemaker check with a medical expert before using this product.
Hearing aid compatibility
This phone works with most popular hearing aids. However, given the wide range of hearing aids available, the phone may not function fully with every hearing aid.
Telephones identified with this logo have reduced noise and interference when used with most T-coil equipped hearing aids and cochlear implants. The TIA-1083 Compliant Logo is a trademark of the Telecommunications Industry Association. Used under license.

Important: The phone will produce high volume when Boost is switched on.

GETTING STARTED
Getting Started — Included Equipment
• 1 Corded Phone Base, Handset and Answering Machine
- 1 Power Adapter
• 1 Telephone Cable
Set up
Connect phone base
- Plug the power adapter into the back of the corded phone base and the other end into a wall socket. Turn the power on.
- Plug the telephone cable into the back of the corded phone base and the other end into the phone wall jack.
- Plug one end of the handset cable into the handset and the other end into the side of the base.

The telephone is now ready for use!
Important: Use only Power supply model S008CU1200067 supplied by Ten Pao Industrial Co., Ltd. for Base unit.
Corded Phone Handset Display Icons
The following icons can appear in the handset display:

Phone book mode

Ringer off

Handsfree mode

Call in progress

Boost receiver volume is on (Icon will fl ash)

Handset microphone is muted

You have new calls

ew calls in the calls list

I calls in the calls list

GETTING STARTED
Phone Menu and Display Guide
The phone menu display allows access to the phone's functionality.
Open main menu: Press ≡.
Browse sub menu: Open the main menu and then press ⬤/P or ?&/R
Select sub menu item: Scroll using ⬤/P or ?!/R until the menu item desired is highlighted and press ≡.
Browse a function: Open the sub menu and press ⬤/P or ?#/R
Select a function: Scroll using ⬤/P or ?!/R until the required function is highlighted and press ≡.
Enter digits or letters: Use the keypad.
Confir rm or save an entry or action: Press ≡.
Cancel and return to standby: Press
Note: After 20 seconds, the phone will go into standby mode unless a button is pressed.
Calling Functions
Make a call
- Enter the phone number.
- Press ☒ to delete a mistaken entry.
- Dial the number by picking up the handset or by pressing 📄.
End a call
Return the corded phone to its base.
Answer a call
- Lift the handset off the base or press ☐ on the corded handset.
Redial a number
The phone stores the last 5 numbers dialed.
- Open the redial list by pressing
- Scroll through the redial list using Ⓗ/P or until the desired number to redial is highlighted.
- To dial the number lift the handset or press Ⓞ to dial in handsfree mode.

Note: Each phone number will be announced from the redial list provided the Read Number feature is enabled. See page 13 for details.

CALLING FUNCTIONS
Call back a previous caller
The phone stores the last 30 incoming phone numbers.
- Open the incoming calls list by pressing ?/R
- Scroll to find the desired number using ⬤/P or ?#/R, and pick up the handset.
Dial a number in the phone book
- Open the phone book by pressing
- Scroll to find the desired number using /P or /R , pick up the handset.

Dial a number using the quick dial buttons
- Choose a quick dial number by pressing
- Pick up the handset to dial the number.


Adjust the handset earpiece volume
Note: The handset earpiece volume is louder than a standard phone.
To adjust the volume during a call, adjust the setting with volume buttons ⚠ or ⏰.
Boost the handset earpiece volume
To boost the handset earpiece volume during a call, press 📄. An image of an ear will flash in the display and the light on the top of the base will be lit to show that boost is on.
CALLING FUNCTIONS

Handsfree feature
Use the handsfree feature to talk to the caller without holding the handset or to let other people in the room listen to the conversation.
Switch on handsfree mode by pressing 📄. To adjust handsfree volume, press ⚠ or ▼ where are 5 levels).
Use a headset (not included)
Plug a headset into the ⏻ socket on the back of the base and press ⏻
For servicing or replacement, you can purchase a headset with model no. NL100 through the service center or your retailer.
Mute the phone
Muting the phone during a call will silence the mouthpiece on the phone so it does not transmit any noise to parties on the other end of the line.
To switch off the mouthpiece, press Ⓗ. Mute will be displayed. To switch it on again, press Ⓗ. The display will show Unmute.
Switch ringer on and off
- Press ≡ scroll to highlight ringer tone with or ⌘/P ?!/R , and press ≡
- Scroll using ⬆/P or ?#/R to highlight volume, then press ≡
- Scroll using ⬆/P or ?#/R to highlight ring off, then press ≡

MENU OPTIONS
Menu Options
User Profi les
The phone can store 3 different user profi les with different settings for the Volume, Boost and Equalizer features. Each Profi le can be given a personalized name.
Change a profi le name
- Open the menu by pressing ☑, then scroll using ⬤/P or ?#/R to highlight Profile. Then press ☑.
- Scroll using ⬤/P or ?#/R to highlight Profile 1, 2, or 3. Then, press ≡.
- Scroll using ⬆/P or ?#/R to highlight Name. Then, press ≡.
- Press ☒ to delete current name.
- Enter a new name (up to ten letters). Then, press ≡.
Change a profi le's handset Volume or Equalizer
- Press ≡, then scroll using ⬤/P or ?#/R to highlight Profile and press ≡ again.
- Scroll using ⬆/P or ?#/R to highlight Profile 1, 2, or 3. Then, press ≡.
- Scroll using ⬆/P or “until the desired setting (Volume, Boost, or Equalizer) is highlighted. Press ≡.
Changing Menu Settings
Ringer melody — There are ten ringer melodies.
Ringer volume — There are five volume levels plus Off.
Base key tone — Pressing a button makes a key tone sound if On.
Base display contrast — There are five contrast levels.
Base display language — There are six languages: English, German,
French, Spanish, Dutch and Italian.
Remember boost — When this feature is set to ON, pressing Boost causes the handset to remember and use the last boost setting for all calls.
Read number — With this feature set to On, each number is announced when someone: enters a phone number, presses a quick dial button, scrolls through entries in the phonebook redial list, or accesses a call list.
Change case — Changes the case setting on the display.
Changing Settings:
-
Open menu by pressing ≡, then scroll using ⬤/P or ?#/R to highlight change case and press ≡.
-
The current setting will be displayed.
-
Change the setting using /P or 'and press

MENU OPTIONS
Change date/time
- Open menu by pressing ≡, then scroll using ⬤/P or ?#/R to highlight the desired menu setting (see above) and press ≡.
- Scroll using ⬤/P or ?#/R to highlight Date & Time and press ≡.
- Enter the month, day, and year and press ≡.
- Enter the hours (the handset has a 24-hour clock) and press ≡.
Change clock hours to 12- or 24-hour format display
- Open menu by pressing ☑ then scroll using or ⬆/P ?!/R to highlight Time. Press ≡ again.
- Scroll using ⬤/P or ?#/R until you highlight Format and press ≡.
- The display will show the current time format setting (e.g. 24 hour).
- Change the time format using ⬆/P or ?/R and press .
Reset to default settings
It is easy to reset your handset to its default settings.
Note: Doing this will delete the phone book, calls and redial lists and any answering machine messages.
- Open the menu by pressing ☐, then scroll using ⬇/P ?#/R to highlight Reset. Press ☐ again.
- The display will show PIN:____(Dfault0000). Press ☐ to confirm or to cancel.

PHONE BOOK
Phone book
Up to 200 names with phone numbers can be alphabetically stored in the phone book. To quickly find a phone book entry, simply enter the first letter of a stored name.
Note: Each phone book entry allows for up to 16 letters for any name and up to 24 digits for any phone number.
Important: Enter the area code for each phone number in the phone book
Keypad use for phone book
The keypad contains alpha-numeric keys. Pressing one key multiple times will scroll through the available letters and numbers which that key represents.
Other useful keys:
- Press ① for a space
- Press Ⓧ to delete a number or letter
- Press 0 or 1 for certain special characters
- Press ⭐ to change to upper and lower case
Note: To enter the same letter twice, enter the letter and then pause until the cursor moves to the next space before entering it again.
Enter a name and number in the phone book
- Press and hold 📁 for 2 seconds until the display shows Enter Name and a flashing cursor.
- Use the keypad to enter the name to be stored. Then, press ≡.
- Enter the phone number to be stored. Then, press ≡.
- Scroll using ⬤ or ⬇ to choose a ringer melody for this name and number. Press ≡. The display will show Saved.
Edit a phone book entry

- Press
- Scroll using ⬤ or ⬇ find the entry to edit.
- Open options by pressing ≡, then scroll using ⏻ or 🔍 to highlight Edit. Press ≡.
- Edit the name using ◆ or MEMOVE the cursor, enter the new letters, and press ≡.
- Edit the phone number using or move the cursor, enter the new digits, and press ≡.
- Scroll using ⬆ or ⬇ to choose a ringer melody for this name and number

PHONE BOOK
and press ≡. The display will show Saved.
Delete a phone book entry
- Press
- Scroll using ⬤ or ⭕ to find the entry to delete.
- Open options by pressing ≡, then scroll using Ⓞ to highlight Delete, and press ≡.
- The display will show the Delete? Press ≡ to confirm the deletion or to cancel.

Delete all phone book entries
- Press
- Open options by pressing ≡, then scroll using 🔊 to highlight Delete All, and press ≡.
- The display will show Delete All? Press ☐ to confirm the deletion or ☐ to cancel.

Using quick dial memory
A phone can store a name (max. 16 characters) and telephone number
(max. 24 digits) under each of its quick dial memory buttons: M1, M2 and . M3
Store a quick dial name and number
- Choose the quick dial button under which to store a name and number by pressing either M1, M2, M3 and press ≡.
- Press M1, M2 M3 and press ≡.
- Enter the name to store and press Ⓥ.
- Enter the phone number to store and press ≡.
- Scroll ⬤/P or ?#/R to choose a ringer melody for this name and number and press ≡. The display shows Saved.
Edit a quick dial entry
- Choose the quick dial entry to edit by pressing either M1, M2 or M3.
- Press ≡. Edit is displayed, press ≡ again.
- Use or move the cursor, enter the new letters. Press.

PHONE BOOK
- Use or MEMO to move the cursor, enter the new digits, and press ≡.
- Scroll using 🔒 or to choose a ringer melody for this name and number and press ≡. The display will show Saved.
Delete a quick dial entry
- Choose the quick dial entry to delete by pressing either M1 M2 or M3
- Press ≡. Press to highlight Delete and press.
- The display will show Delete? Press ≡ to confirm or to cancel.
Change case
- Change to upper or lower case in the phone book input name by pressing * button.
Incoming Calls
Note: You must subscribe to your phone service provider's Caller Display/Caller ID service for this feature to work.
Incoming call telephone numbers will appear in the calls list. If the caller's number is stored in the phonebook, the name will be displayed instead. A total of 30 incoming calls can be stored in the calls list (16 letters per name and 24 digits per number). The number of new calls received will be shown in the display with the flashing 📞 icon. If the number does not appear, the caller's identification (Call Line ID) has been withheld by the caller.
Open and view the calls list by pressing ?/R. To scroll through the calls list, press or . Other displayed information:
- WITHHELD NUMBER – withheld number, or ID information isn't available
• INTERNATIONAL – call is from another country or using an internet service - PAYPHONE – caller is calling from a public payphone
Store numbers from a calls list to the phonebook or quick

CALLER LIST
dial memory (M1, M2, M3)
To store incoming call numbers to your phone book or quick dial list:
- Press ?/R to open the calls list at the most recent entry.
- Scroll using ⬤/P or ?#/R to find the entry to store.
- Open options by pressing ☐, then scroll using ⬣/P to highlight Save to PB or M1, M2 or M3, and press ☐.
- Enter a name for this stored number and press ≡.
- Edit the number for this name, if necessary, and press ≡.
- Scroll using ⬆/P or ?#/R to choose a ringer melody for the entry and press ≡.
Delete a single calls list entry
- Press to open a calls list at the most recent entry.
- Scroll using ⬤/P or ?&/R to find the entry to delete.
- Open options by pressing ≡ and then scroll using or to highlight Delete, and press ≡.
- The display will show Delete? Press ⏱ to confirm or 📄 to cancel.
Delete all calls list entries
- Press to open a calls list at the most recent entry.
- Press Ⓧ, and then scroll using ▲ or ▼ to highlight Delete All. Press Ⓧ.
- The display will show Delete All? Press ≡ to confirm or □ to cancel.

ANSWERING MACHINE
Using the answering machine
After setting up the phone system, use the following steps to set up and use the answering machine.
Switch answering machine on or off
Press ☐ to turn the answering machine off and on.
The current answer mode will be announced.
When new messages are received, the message counter on the base and the base indicator light flash. The message counter also indicates the number of messages.
Set the language
Choose the answering machine voice prompt language: English, Spanish or French.
- Press and hold ≡ twice.
- Scroll using ⏻ or ⚠ to highlight Language and press ≡.
- Choose the language using ⏻ and press .
Set the answer mode
Choose the answer mode: Answer & Record or Answer only. With the machine in Answer only mode, callers will not be able to leave a message.
- Press ☐ to switch the answering machine on.
- To change the mode between Answer & Record, Answer Only or
Answer Off, press and hold 📄 for two seconds.
Check the outgoing message
Press to hear the current outgoing message.
Record an outgoing message
The outgoing message must be less than two minutes long. To change the default answering message:
-
Press and hold ◀ on the base for two seconds. Record the new message after the beep.
-
To stop recording, press 📄. To listen to the recorded message, press

Note: to return to the default message, press and hold ☑ while the outgoing message is playing.

ANSWERING MACHINE
Set the answer delay
Choose the number of times the phone will ring before the answering machine answers an incoming call. Or, choose Time Saver, if no one will be available to answer the phone. Time Saver is useful if someone will be calling in from a different phone to listen to messages: if the machine answers after 2 rings, there are new messages to listen to. If it answers after 5 rings, there are no new messages. This feature gives the option of hanging up after 3 rings (because there are no new messages) to save time and avoid being charged for the call.
- Press twice.
- Scroll using ⬤/P or ?#/R to highlight Answer Delay. Press ≡.
- The display will show the current answer delay setting (e.g. 5 rings).
- Choose the number of desired rings (2–9) or Time Saver using ⬤/P or ?#/R, and press ≡
Record a memo
Memo messages can be played back like normal messages.
- Press and hold memory two seconds.
- After the beep, record the memo.
- Press ☐ to stop recording.
Listen to messages or memos using the corded phone
Messages and memos are played in reverse order, with newer messages played first. The time and date of each message or memo is announced before playback.
Use the following buttons to control message playback:
• To play or pause, press

- To stop, press
- To rewind, press

• To fast forward, press
MEMO
Delete a single message or memo
- Press ▶ to play a message or memo.
- To delete it, press and hold Ⓧ during playback.
Delete all messages and memos
- Press twice.
- Scroll using ⬤/P or ?#/R to highlight Del. All Msgs. Press ≡.
- The display will show Delete All?
- To confirm, press ☒. Or to cancel, press ☐

ANSWERING MACHINE
Memory full
When the memory is full, the answering machine announces that fact, automatically stops taking more messages, and switches to Answer Only mode. Some existing messages or memos must be deleted before any new messages can be recorded.
Access the answering machine from a remote location
Messages on the answering machine can be listened to from other phones, including mobile phones.
A PIN (Personal Identification Number) code is required to access the answering machine. The default code is 000. Change the PIN code to keep messages secure.
Change PIN
- Press ≡ twice, then scroll using ⬤/P or ?#/R to highlight Remote PIN, and press ≡.
- Enter the old PIN, and press ≡. The default PIN is 000.
- Enter the new PIN, and press ≡.
- Enter the new PIN a second time, and press ≡.
Call in to check messages
- Dial the system's phone number from a remote phone and wait until the answering machine picks up the call.
- Press ⭐ twice, then enter the 3 digit PIN after the voice prompt.
- Refer to the next section, "Manage messages from another phone" for additional instructions.
Note: if the wrong PIN is entered three times, the answering machine will hang up, and it will be necessary to call again and enter the correct PIN.

ANSWERING MACHINE
Manage messages using another phone
Use these numbers to manage messages from a remote location.
Press...
1 to Rewind
2 to Play or Pause your messages
3 to Fast Forward through your messages
4 to Hear the outgoing message
5 to Record outgoing message (6 to stop recording)
6 to Stop messages
7 to Delete current message
8 to Turn OFF answering machine
9 to Turn ON answering machine
0 to Delete all old messages
to Record a memo (6 to stop recording)
Use on a private branch exchange
If the phone is on an exchange (e.g. dial 9 to get an outside line), calls can be transferred or called back by using the R button. Check with the system administrator for system set-up and instructions. Private exchanges are normally used in a business-setting.
To set recall time
- Open your menu by pressing Ⓦ, then scroll using ⬤/P or ?#/R to highlight Settings and press ≡.
- Scroll using ⬆/P or ?#/R to highlight Recall and press ≡.
- The current recall timing setting (e.g. Short) will be displayed.
- Choose the desired recall time setting (Short or Long) using ⬤/P or ?&/R and press ≡.
Insert a dialing pause
Insert a pause before the dial tone if the system requires an outside line which takes awhile to connect.
To insert a dialing pause using your corded phone, enter the number to reach the outside line and then press ⬤/P. A P on your display will show dialing pause is active.

ON A PRIVATE BRANCH EXCHANGE
Note: A dialing pause can be used with a phone number in the phone book.
Set the dial mode
There is a choice of two dialing modes: tone and pulse. The default setting is TONE and this is the correct setting for use within the United States.
To change dial mode using the corded phone
- Press ≡, then scroll using ⬤/P or ?#/R to highlight Settings and press ≡.
- Scroll using ⬤/P or ?#/R to highlight Dial Mode and press ≡.
- The current dial mode setting (e.g. Tone) will be displayed.
- Choose the desired dial mode setting (Tone or Pulse) using ⬤/P or ?½/R and press ≡.
Help and support
Troubleshooting guide
I can't make phone calls
- Make sure the phone cable is connected properly. Make sure you are using the phone cable that came with your phone.
- Make sure the base is plugged in, switched on and working.
- Test the phone line and socket by using another phone.
The phone system isn't responding
You may need to reset to default settings. Please see page 38.
Answering machine won't record messages or memos
- Check that the answering machine is connected and switched on.
- Answering memory may be full. See page 28.
Caller's identifi cation (Call Line ID) isn't working
- Check that you have this service on your phone line. Please call your network provider.
- The caller may have withheld their phone number.

HELP AND SUPPORT
My base doesn't ring
Check that the ringer is on.
There is interference in the earpiece and/or internet connection is very slow when using the phone
You must plug the phone into the wall socket via an ADSL fi Iter if you have broadband internet on your phone line.
The white light on the base is constantly fl ashing
You have new answering machine message(s). Press ▶ to listen to them and the flashing will stop. My answering machine won't record messages or memos
- Check that your answering machine is connected and switched on.
- Answering memory may be full. See page 28.
My remote access isn't working
- Check you're using the correct PIN. See page 29.
- Make sure you're using a touchtone phone.
Energy effi cient power adapter
The included power adapter meets the eco-design requirements of the European Union (Directive 2005/32/EG).

Disposal
The symbol on this product indicates that electrical and electronic apparatus and battery pack must be disposed of separately from domestic waste at suitable collection points provided by the public waste authorities.
Technical details
Power supply (base station) Input: 100-240V\~50/60Hz 250mA
Output: 12VDC 670mA
Dialing mode Tone (DTMF)
Pulse
Optimum ambient temperature 32°F to 113°F (0°C to 45°C)
Optimum relative humidity 20% to 80%
Recall 300, 600 ms

GENERAL INFORMATION
Default settings
| Language | English |
| Answer mode Answer and Record | |
| PIN code for remote access 000 | |
| Answer delay 5 | |
| Time format 24 Hour | |
| External memory 8 | |
| Ringing volume 5 | |
| Key tone On | |
| Contrast | 4 |
| Boost memory Off | |
| Shaker | On |
| Recall time 600ms | |
| Dialing mode Tone |
Maintenance and Warranty
Maintenance
- Please clean your equipment's surfaces with a soft, lint-free cloth.
- Never use cleaning agents or solvents.
Warranty
AMPLICOM equipment is produced and tested according to the latest production methods. The implementation of carefully chosen materials and highly developed technologies ensure trouble free functioning and a long service life. The terms of the warranty do not apply where the cause of the equipment malfunction is the fault of the telephone network operator or any interposed private branch extension system. The terms of the warranty do not apply to the rechargeable battery pack or power packs used in the products. The period of warranty is 24 months from the date of purchase.
All defi ciencies resulting from material of production faults which occur during the period of warranty will be eliminated free of charge. Rights to claims under the terms of warranty are annulled following intervention by the purchaser or third parties. Damage caused as a result of improper handling or operation, incorrect positioning or storing, improper connection or installation, Acts of God or other external influence are not covered by the terms of warranty.
In the case of complaints, we reserve the right to repair or replace defect parts or provide a replacement device. Replacement parts or devices become

GENERAL INFORMATION
our property.
Rights to compensation in the case of damage are excluded where there is no evidence of intent or gross negligence by the manufacturer.
If your equipment shows signs of defect during the period of warranty, please return to the sales outlet in which you purchased the AMPLICOM equipment together with the purchase receipt. All rights to claims under the terms of warranty in accordance with this agreement must be asserted exclusively with regard to your sales outlet.
Two years after the purchase of our products, claims under the terms of warranty can no longer be asserted.
Declaration of conformity
The ETL Listed Mark is an alternative to the CSA and UL marks. ETL Testing Laboratories owned by Intertek Testing Services (ITS) is recognized by OSHA as a Nationally Recognized Testing Laboratory (NRTL). ITS tests products according to nearly 200 safety and

Intertek 3189534
performance standards. The ETL Listed Mark is accepted throughout the United States when denoting compliance with nationally recognized standards such as ANSI, IEC, UL, and CSA.
This certification mark indicates that the product has been tested to and has met the minimum requirements of a widely recognized (consensus) U.S.
product safety standard, that the manufacturing site has been audited, and that the applicant has agreed to a program of periodic factory follow-up inspections to verify continued conformance. our property.
INDEX

A
Adjusting the handsfree volume 11
Adjusting the earpiece volume 10
Answering machine 24-30
B
Base ringer melody 13
Base ringer volume 13
Base settings 12
Boost memory 13
Boosting the earpiece volume 13
C
Changing the system's PIN code 29
Change case 13, 16
Checking messages 25
Check the contents of the box 6
D
Date/time 14
Default settings 36
Dial mode 32
Dialing pause 31
Dialing from the phone book 16
Display icons 7
Display calls list entries 21
E
Earpiece volume 10
End a call 9
Entering names in the phonebook 17
Equalizer 12
H
Handset name 32
Handset ringer melody 13
Handset ringer on/off 11
Handset ringer volume 10
Handsfree 11
Headset use 11
L
Language 13
M
Making a call 9
Memory full 28
Mute 11

INDEX
P
Phone book 16-20
Profi les 12-14
Q
Quick dial 10
R
Record outgoing message 25
Redial 9
Remotely checking messages 29
T
Tone control (see Equalizer)
U
Using a headset 11
Using the menu 12
V
Volume 10-13
THIS PAGE LEFT INTENTIONALLY BLANK

nplicom
PowerTel 58
Guía del usuario

Amplicom USA Service Center
310 Ambrose Avenue
Nashville, TN 37207
V/TTY:
1-866-AMPLICOM (267-5426)
www.amplicomusa.com

amplicom
Distributed by: Amplicom USA LLC
- FCC COMPLIANCE
- 2 INSTRUCTIONS AVAILABLE IN OTHER LANGUAGES AT WWW.AMPLICOMUSA.COM
- PHONE GUIDE
- SAFETY
- IMPORTANT SAFETY INSTRUCTIONS
- SAVE THESE INSTRUCTIONS
- INTENDED USE
- PHONE LOCATION
- MEDICAL EQUIPMENT
- HEARING AID COMPATIBILITY
- GETTING STARTED
- GETTING STARTED — INCLUDED EQUIPMENT
- SET UP
- CONNECT PHONE BASE
- THE TELEPHONE IS NOW READY FOR USE
- CORDED PHONE HANDSET DISPLAY ICONS
- PHONE MENU AND DISPLAY GUIDE
- CALLING FUNCTIONS
- MAKE A CALL
- END A CALL
- ANSWER A CALL
- REDIAL A NUMBER
- CALL BACK A PREVIOUS CALLER
- DIAL A NUMBER IN THE PHONE BOOK
- DIAL A NUMBER USING THE QUICK DIAL BUTTONS
- ADJUST THE HANDSET EARPIECE VOLUME
- BOOST THE HANDSET EARPIECE VOLUME
- HANDSFREE FEATURE
- USE A HEADSET (NOT INCLUDED)
- MUTE THE PHONE
- SWITCH RINGER ON AND OFF
- MENU OPTIONS
- USER PROFI LES
- CHANGE A PROFI LE NAME
- CHANGE A PROFI LE'S HANDSET VOLUME OR EQUALIZER
- CHANGING MENU SETTINGS
- CHANGING SETTINGS
- CHANGE DATE/TIME
- CHANGE CLOCK HOURS TO 12- OR 24-HOUR FORMAT DISPLAY
- RESET TO DEFAULT SETTINGS
- NOTE: DOING THIS WILL DELETE THE PHONE BOOK, CALLS AND REDIAL LISTS AND ANY ANSWERING MACHINE MESSAGES
- PHONE BOOK
- KEYPAD USE FOR PHONE BOOK
- ENTER A NAME AND NUMBER IN THE PHONE BOOK
- EDIT A PHONE BOOK ENTRY
- DELETE A PHONE BOOK ENTRY
- DELETE ALL PHONE BOOK ENTRIES
- USING QUICK DIAL MEMORY
- STORE A QUICK DIAL NAME AND NUMBER
- EDIT A QUICK DIAL ENTRY
- DELETE A QUICK DIAL ENTRY
- CHANGE CASE
- INCOMING CALLS
- CALLER LIST
- DIAL MEMORY (M1, M2, M3)
- DELETE A SINGLE CALLS LIST ENTRY
- DELETE ALL CALLS LIST ENTRIES
- ANSWERING MACHINE
- USING THE ANSWERING MACHINE
- SWITCH ANSWERING MACHINE ON OR OFF
- SET THE LANGUAGE
- SET THE ANSWER MODE
- CHECK THE OUTGOING MESSAGE
- RECORD AN OUTGOING MESSAGE
- SET THE ANSWER DELAY
- RECORD A MEMO
- LISTEN TO MESSAGES OR MEMOS USING THE CORDED PHONE
- DELETE A SINGLE MESSAGE OR MEMO
- DELETE ALL MESSAGES AND MEMOS
- MEMORY FULL
- ACCESS THE ANSWERING MACHINE FROM A REMOTE LOCATION
- CHANGE PIN
- CALL IN TO CHECK MESSAGES
- MANAGE MESSAGES USING ANOTHER PHONE
- PRESS
- TO RECORD A MEMO (6 TO STOP RECORDING)
- USE ON A PRIVATE BRANCH EXCHANGE
- TO SET RECALL TIME
- INSERT A DIALING PAUSE
- ON A PRIVATE BRANCH EXCHANGE
- SET THE DIAL MODE
- TO CHANGE DIAL MODE USING THE CORDED PHONE
- HELP AND SUPPORT
- TROUBLESHOOTING GUIDE
- I CAN'T MAKE PHONE CALLS
- THE PHONE SYSTEM ISN'T RESPONDING
- ANSWERING MACHINE WON'T RECORD MESSAGES OR MEMOS
- CALLER'S IDENTIFI CATION (CALL LINE ID) ISN'T WORKING
- MY BASE DOESN'T RING
- THERE IS INTERFERENCE IN THE EARPIECE AND/OR INTERNET CONNECTION IS VERY SLOW WHEN USING THE PHONE
- THE WHITE LIGHT ON THE BASE IS CONSTANTLY FL ASHING
- MY REMOTE ACCESS ISN'T WORKING
- ENERGY EFFI CIENT POWER ADAPTER
- DISPOSAL
- TECHNICAL DETAILS
- GENERAL INFORMATION
- DEFAULT SETTINGS
- MAINTENANCE AND WARRANTY
- MAINTENANCE
- WARRANTY
- DECLARATION OF CONFORMITY
- INDEX
- A
- B
- C
- D
- E
- H
- L
- M
- P
- Q
- R
- T
- U
- V
- THIS PAGE LEFT INTENTIONALLY BLANK
- POWERTEL 58
- GUÍA DEL USUARIO
- AMPLICOM USA SERVICE CENTER
- AMPLICOM
Brand : Amplicom
Model : PowerTel 58
Category : Telephone