
740C - Cd player/recorder CAMBRIDGE - Free user manual and instructions
Find the device manual for free 740C CAMBRIDGE in PDF.


| Product Type | CD Player/Recorder |
| Brand | Cambridge |
| Model | 740C |
| Dimensions (W x H x D) | 430 x 115 x 330 mm |
| Weight | 5.2 kg |
| Power Supply | AC 220-240 V, 50/60 Hz |
| Power Consumption | 35 W |
| Supported Disc Formats | CD, CD-R, CD-RW |
| Audio Outputs | Analog RCA, Digital Coaxial, Optical |
| Audio Inputs | Analog RCA, Digital Coaxial |
| Recording Functions | CD to CD, CD to USB (if equipped) |
| Playback Modes | Play, Pause, Stop, Skip, Repeat, Random |
| Display | Backlit LCD with track/time info |
| Remote Control | Included |
| Maintenance | Clean laser lens with dry cloth; avoid moisture |
| Safety Precautions | Do not open casing; avoid water; use approved power cord |
| Spare Parts / Repairability | Contact authorized service center; no user-serviceable parts |
| General Information | Designed for home audio use; manual in PDF available |
Frequently Asked Questions - 740C CAMBRIDGE
User questions about 740C CAMBRIDGE
0 question about this device. Answer the ones you know or ask your own.
Ask a new question about this device
Download the instructions for your Cd player/recorder in PDF format for free! Find your manual 740C - CAMBRIDGE and take your electronic device back in hand. On this page are published all the documents necessary for the use of your device. 740C by CAMBRIDGE.
USER MANUAL 740C CAMBRIDGE
Upsampling compact disc player
User's manual
2

natural_image
Line drawing of a computer monitor case with ventilation slots and buttons (no text or symbols)Cambridge Audio
Contents Introduction
Introduction 2
Limited warranty....3
Safety precautions ....3
Important safety instructions ....4
Rear panel connections....5
Front panel controls....6
Remote control....7
Remote control of matching products ....7
iPod compatibility....7
Operating instructions ....8
External digital sources 9
CD player setup....10
Custom installation use....11
Troubleshooting ....11
Technical Specifications 11
This guide is designed to make installing and using this product as easy as possible. Information in this document has been carefully checked for accuracy at the time of printing; however, Cambridge Audio's policy is one of continuous improvement, therefore design and specifications are subject to change without prior notice. If you notice any errors please feel free to email us at: support@cambridgeaudio.com
This document contains proprietary information protected by copyright. All rights are reserved. No part of this manual may be reproduced by any mechanical, electronic or other means, in any form, without prior written permission of the manufacturer. All trademarks and registered trademarks are the property of their respective owners.
© Copyright Cambridge Audio Ltd 2007
Adaptive Time Filtering (ATF) technology is copyright Anagram Technologies SA. All Rights Reserved.
iPod is a registered trademark of Apple Computer, Inc. All rights reserved.
Thank you for purchasing this Azur 740C Upsampling Compact Disc Player. We hope that you will appreciate the results and enjoy many years of listening pleasure from it.
Key to the abilities of the 740C is ATF ^™ (Adaptive Time Filtering) an upsampling process developed in conjunction with Anagram Technologies of Switzerland.
This system intelligently interpolates 16 bit/44.1kHz CD (or other) audio data to 24bit/384kHz through the use of a 32 bit Analog Devices Black Fin DSP (Digital Signal Processor) for the very best sound quality. The ATF system applies sophisticated polynomial curve fitting interpolation and incorporates a time domain model which allows data buffering and re-clocking almost completely eradicating digital jitter.
As with the 540C/640C V2 CD players our proprietary Dual Differential Virtual Earth Balanced filter topology is used. However in the 740C this has been further enhanced. As the upsampled audio data rate is so high, aliasing artefacts are moved way above audible frequencies, this in turn allows us to use a new low order 2 pole linear-phase Bessel version of the topology for constant group delay and minimal phase shift in the audio band.
Two very high quality Wolfson WM8740 24 bit DACs (Digital to Analog Converters) are used in dual differential mode. As each channel has its own DAC to process information, completely separate and symmetrical analog filter circuitry can be implemented. These allow both left and right channel circuitry to operate identically, ensuring the 740C delivers fantastic sound-staging and stereo imaging properties.
Two digital inputs are fitted allowing other digital sources to be brought into the 740C and upsampled, the 740C then working as a very high quality DAC.
A digital output is also fitted which can even output upsampled data at various rates and word widths, independent from the main audio output, which is always set at 24/384 for best sound quality.
In addition to these audiophile features Control Bus Input/Output and IR Emitter Inputs are provided to make it easy to integrate this unit into Custom Installation systems if desired.
All this proprietary engineering is housed within our low resonance, acoustically damped chassis. An Azur Navigator remote control is also provided, giving full remote control of your CD player and Azur amplifiers in an attractive and easy to use handset.
Your CD player can only be as good as the system it is connected to. Please do not compromise on your amplifier, speakers or cabling. Naturally we particularly recommend amplification from the Cambridge Audio Azur range, and in particular the new 740A Integrated Amplifier which has been designed to the same exacting standards as this CD player. Your dealer can also supply excellent quality Cambridge Audio interconnects to ensure your system realises its full potential.
Thanks for taking the time to read this manual; we do recommend you keep it for future reference.

Matthew Bramble
Technical Director
Cambridge Audio warrants this product to be free from defects in materials and workmanship (subject to the terms set forth below). Cambridge Audio will repair or replace (at Cambridge Audio's option) this product or any defective parts in this product. Warranty periods may vary from country to country. If in doubt consult your dealer and ensure that you retain proof of purchase.
To obtain warranty service, please contact the Cambridge Audio authorised dealer from which you purchased this product. If your dealer is not equipped to perform the repair of your Cambridge Audio product, it can be returned by your dealer to Cambridge Audio or an authorised Cambridge Audio service agent. You will need to ship this product in either its original packaging or packaging affording an equal degree of protection.
Proof of purchase in the form of a bill of sale or receipted invoice, which is evidence that this product is within the warranty period, must be presented to obtain warranty service.
This Warranty is invalid if (a) the factory-applied serial number has been altered or removed from this product or (b) this product was not purchased from a Cambridge Audio authorised dealer. You may call Cambridge Audio or your local country Cambridge Audio distributor to confirm that you have an unaltered serial number and/or you purchased from a Cambridge Audio authorised dealer.
This Warranty does not cover cosmetic damage or damage due to acts of God, accident, misuse, abuse, negligence, commercial use, or modification of, or to any part of, the product. This Warranty does not cover damage due to improper operation, maintenance or installation, or attempted repair by anyone other than Cambridge Audio or a Cambridge Audio dealer, or authorised service agent which is authorised to do Cambridge Audio warranty work. Any unauthorised repairs will void this Warranty. This Warranty does not cover products sold AS IS or WITH ALL FAULTS.
REPAIRS OR REPLACEMENTS AS PROVIDED UNDER THIS WARRANTY ARE THE EXCLUSIVE REMEDY OF THE CONSUMER. CAMBRIDGE AUDIO SHALL NOT BE LIABLE FOR ANY INCIDENTAL OR CONSEQUENTIAL DAMAGES FOR BREACH OF ANY EXPRESS OR IMPLIED WARRANTY IN THIS PRODUCT. EXCEPT TO THE EXTENT PROHIBITED BY LAW, THIS WARRANTY IS EXCLUSIVE AND IN LIEU OF ALL OTHER EXPRESS AND IMPLIED WARRANTIES WHATSOEVER INCLUDING, BUT NOT LIMITED TO, THE WARRANTY OF MERCHANTABILITY AND FITNESS FOR A PRACTICAL PURPOSE.
Some countries and US states do not allow the exclusion or limitation of incidental or consequential damages or implied warranties so the above exclusions may not apply to you. This Warranty gives you specific legal rights, and you may have other statutory rights, which vary from state to state or country to country.
Plug Fitting Instructions (UK Only)
The cord supplied with this appliance is factory fitted with a UK mains plug fitted with a 3 amp fuse inside. If it is necessary to change the fuse, it is important that a 3 amp one is used. If the plug needs to be changed because it is not suitable for your socket, or becomes damaged, it should be cut off and an appropriate plug fitted following the wiring instructions below. The plug must then be disposed of safely, as insertion into a mains socket is likely to cause an electrical hazard. Should it be necessary to fit a 3-pin BS mains plug to the power cord the wires should be fitted as shown in this diagram. The colours of the wires in the mains lead of this appliance may not correspond with the coloured markings identifying the terminals in your plug. Connect them as follows:
The wire which is coloured BLUE must be connected to the terminal which is marked with the letter 'N' or coloured BLACK.
The wire which is coloured BROWN must be connected to the terminal which is marked with the letter 'L' or coloured RED.
The wire which is coloured GREEN/YELLOW must be connected to the terminal which is marked with the letter 'E' or coloured GREEN.
If your model does not have an earth wire, then disregard this instruction.

If a standard 13 amp (BS 1363) plug is used, a 3 amp fuse must be fitted, or if any other type of plug is used a 3 amp or 5 amp fuse must be fitted, either in the plug or adaptor, or on the distribution board.
Safety precautions Limited warranty
Checking the Power Supply Rating
For your own safety please read the following instructions carefully before attempting to connect this unit to the mains.
Check that the rear of your unit indicates the correct supply voltage. If your mains supply voltage is different, consult your dealer.
This unit is designed to operate only on the supply voltage and type that is indicated on the rear panel of the unit. Connecting to other power sources may damage the unit.
This equipment must be switched off when not in use and must not be used unless correctly earthed. To reduce the risk of electric shock, do not remove the unit's cover (or back). There are no user serviceable parts inside. Refer servicing to qualified service personnel. If the power cord is fitted with a moulded mains plug the unit must not be used if the plastic fuse carrier is not in place. Should you lose the fuse carrier the correct part must be reordered from your Cambridge Audio dealer.
The lightning flash with the arrowhead symbol within an equilateral triangle is intended to alert the user to the presence of un-insulated 'dangerous voltage' within the product's enclosure that may be of sufficient magnitude to constitute a risk of electric shock to persons.


The exclamation point within an equilateral triangle is intended to alert the user to the presence of important operating and maintenance instructions in the service literature relevant to this appliance.
The crossed-out wheeled bin is the European Union symbol for indicating separate collection for electrical and electronic equipment. This product contains electrical and electronic equipment which should be reused, recycled or recovered and should not be disposed of with unsorted regular waste. Please return the unit or contact the authorised dealer from whom you purchased this product for more information.

Approvals

This product complies with European Low Voltage (73/23/EEC) and Electromagnetic Compatibility (89/336/EEC) Directives when used and installed according to this instruction manual. For continued compliance only Cambridge Audio accessories should be used with this product and servicing must be referred to qualified service personnel.
NOTE: THE MANUFACTURER IS NOT RESPONSIBLE FOR ANY RADIO OR TV INTERFERENCE CAUSED BY UNAUTHORIZED MODIFICATIONS TO THIS EQUIPMENT. SUCH MODIFICATIONS COULD VOID THE USER AUTHORITY TO OPERATE THE EQUIPMENT.
This equipment has been tested and found to comply with the limits for a Class B digital device, pursuant to Part 15 of the FCC Rules. These limits are designed to provide reasonable protection against harmful interference in a residential installation. This equipment generates, uses and can radiate radio frequency energy and, if not installed and used in accordance with the instructions, may cause harmful interference to radio communications. However, there is no guarantee that interference will not occur in a particular installation.
If this equipment does cause harmful interference to radio or television reception, which can be determined by turning the equipment off and on, the user is encouraged to try to correct the interference by one or more of the following measures:
- Re-orient or relocate the receiving antenna.
- Increase the separation between the equipment and receiver.
- Connect the equipment into an outlet on a circuit different from that to which the receiver is connected.
- Consult the dealer or an experienced radio/TV technician for help.
Important safety instructions
Please take a moment to read these notes before installing your 740C, as they will enable you to get the best performance and prolong the life of the unit. We advise you follow all instructions, heed all warnings and keep the instructions for future reference.
Ventilation
IMPORTANT - The unit will become hot when in use.
Please ensure there is ample ventilation (at least 10cm clearance all round). Do not put any objects on top of this unit. Do not situate it on a rug or other soft surface and do not obstruct any air inlets or outlet grilles. Do not install near any heat sources such as radiators, heat registers, stoves, or other apparatus (including amplifiers) that produce heat. Do not stack multiple units on top of each other. Do not place in an enclosed area such as a bookcase or in a cabinet without sufficient ventilation.
Ensure that small objects do not fall through any ventilation grille. If this happens, switch off immediately, disconnect from the mains supply and contact your dealer for advice.
Positioning
Choose the installation location carefully. Avoid placing it in direct sunlight or close to a source of heat. Also avoid locations subject to vibration and excessive dust, cold or moisture. Do not place the unit on an unstable surface or shelf. The unit may fall, causing serious injury to a child or adult as well as serious damage to the product. Do not place a DVD player or other equipment on top of the unit.
This unit must be installed on a sturdy, level surface. Do not place in a sealed area such as a bookcase or in a cabinet. Any space open at the back (such as a dedicated equipment rack) is fine however. When a cart is used, use caution when moving the cart to avoid injury from tip-over.

WARNING - To reduce the risk of fire or electric shock, do not expose this unit to rain or moisture. This unit must not be used near water or exposed to dripping or splashing water or other liquids. No objects filled with liquid, such as vases, shall be placed on the unit. In the event, switch off immediately, disconnect from the mains supply and contact your dealer for advice.
Electronic audio components have a running in period of around a week (if used several hours per day). This will allow the new components to settle down, the sonic properties will improve over this time.
Grounding and polarisation
Do not defeat the safety purpose of the polarized or grounding type plug. A polarized plug has two blades with one wider than the other. A grounding type plug has two blades and a third grounding prong. The wide blade or third prong are provided for your safety. If the provided plug does not fit your outlet, consult an electrician for replacement of the obsolete outlet.
Power sources
The unit is of Class 1 construction and must be connected to a Mains socket outlet with a protective earthing connection.
The unit should be operated only from the type of power source indicated on the marking label. If you are not sure of the type of power-supply to your home, consult your product dealer or local Power Company.
This unit has been designed to be left in Standby mode when not in use, this will increase the life of the amplifier (this is true with all electronic equipment). To turn the unit off completely switch off on the rear panel. If you do not intend to use this unit for a long period of time, unplug it from the mains socket.
Power cord protection
The unit must be installed in a manner that makes disconnection of the mains plug from the mains socket outlet (or appliance connector from the rear of the unit) possible. Where the mains plug is used as the disconnect device, the disconnect device shall remain readily operable. Protect the power cord from being walked on or pinched particularly at plugs, convenience receptacles, and the point where they exit from the unit.
Be sure to insert each power cord securely. To prevent hum and noise, do not bundle the interconnect leads with the power cord or speaker leads.
Overloading
Do not overload wall outlets or extension cord as this can result in a risk of fire or electric shock. Overloaded AC outlets, extension cords, frayed power cords, damaged or cracked wire insulation, and broken plugs are dangerous. They may result in a shock or fire hazard.
Lightning
For added protection during a thunderstorm, or when it is left unattended and unused for long period of time, unplug the unit from the wall outlet and disconnect the antenna or cable system. This will prevent damage to the unit from lightning and power-line surges.
Cleaning
To clean the unit, wipe its case with a dry, lint-free cloth. Do not use any cleaning fluids containing alcohol, ammonia or abrasives. Do not spray an aerosol at or near the amplifier.
Attachments
Do not use attachments not recommended by your dealer as they may cause harm to the unit. Only use the specified attachments/accessories with this unit.
Servicing
These units are not user serviceable, never attempt to repair, disassemble or reconstruct the unit if there seems to be a problem. A serious electric shock could result if this precautionary measure is ignored. In the event of a problem or failure, please contact your dealer.
Contact the service department should any of these conditions occur:
- When the power-supply cord or plug is damaged.
- If liquid has been spilled, or objects have fallen into the unit.
- If the unit has been exposed to rain or water.
- If the unit does not operate normally after following the operation instructions, adjust only those controls that are covered by the operation instructions.
- If the unit has been dropped or damaged in any way.
- When the unit exhibits a distinct negative change in performance.
Important Note

This unit has been designed to play compact discs, recordable CDs (CD-R) and re-writable CDs (CD-RW) bearing the identification logo shown here. No other
DIGITAL AUDIO discs can be used. The CD-R/CD-RW discs should contain properly recorded TOC (Table of Contents) information so that they can be played back. This unit can play only the discs recorded in the CD-DA format designed for music reproduction. Do not attempt to play a disc on this unit containing other data, such as a CD-ROM for PCs.
Rear panel connections
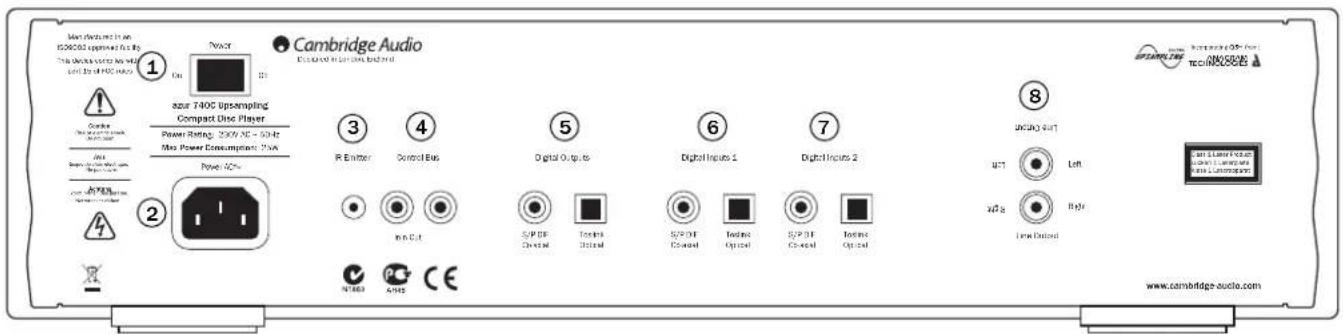
① Power On/Off
Switches the unit on and off.
② AC power socket
Once you have completed all connections to the amplifier, plug the AC power cable into an appropriate mains socket then switch on. Your compact disc player is now ready for use.
③ IR (Infra Red) Emitter In
Allows modulated IR commands from multi-room systems or IR repeater systems to be received by the amplifier. Commands received here are not looped out of the Control Bus. Refer to the 'Custom Installation' section for more information.
④ Control Bus
In - Allows un-modulated commands from multi-rooms systems or other components to be received by the unit.
Out - Loop out for control bus commands to another unit.
⑤ Digital outputs
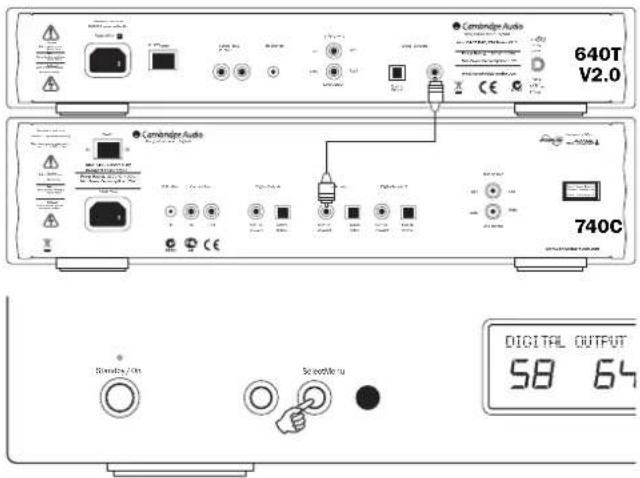
The digital outputs allow a separate DAC or digital recording device to be connected. The sophisticated DSP software in the 740C even allows these outputs to be set to output raw (pass through) or upsampled data independently from the main audio outputs. Refer to the 'CD player setup' section for more information.
S/P DIF CO-axial Digital - To obtain best results, use a high quality 75 ohm digital RCA interconnect cable (not one designed for normal audio use).
Toslink Optical Digital - Use a high quality TOSLINK fibre optic interconnect cable designed specifically for audio use.
Only one of the two output types should be used at a time.
⑥ & ⑦ Digital Inputs 1 / 2
The digital inputs allow the digital outputs of other source components to be connected to the 740C. The 740C can then act as a very high quality upsampling DAC, improving the sound quality of the connected sources. Two digital inputs allow two external sources to be connected:
S/P DIF CO-axial Digital - Use a high quality 75 ohm digital RCA interconnect cable (not one designed for normal audio use).
Toslink Optical Digital - Use a high quality TOSLINK fibre optic interconnect cable designed specifically for audio use.
Only one of the two input types for each input should be used at a time.
⑧ Line Output
Use good quality RCA/Phono interconnect cables from these sockets to any line level input on your amplifier.
Cambridge Audio
Front panel controls

① Standby/On
Switches the unit between Standby mode (indicated by dim power LED) and On (indicated by bright power LED). Standby is a low power mode where the power consumption is less than 10 Watts. The unit should be left in Standby mode when not in use.
② Menu
Press to scroll through the 740C menu screens. Please refer to the 'CD player setup' section of this manual for more information.
③ Select
Press to select between CD Playback or Digital Inputs 1 and 2. Also used to toggle through the options on selected menu screens. Please refer to the 'CD player setup' section of this manual for more information.
④ Infrared sensor
Receives IR commands from the supplied Azur remote control. A clear unobstructed line of sight between the remote control and the sensor is required.
⑤ Disc tray
Compact Disc tray. Use the Open/Closebutton to activate.
⑥ Display
LCD used to display upsampling rate, CD track number, elapsed/remaining time and other CD functions. Please refer to the 'CD player setup' section of this manual for more information.
⑦ Open/Close
Allows you to open and close the disc tray thus making it possible to load a disc. Pressing Playwill also close the tray and start the CD.
⑧ Play/Pause
Plays the disc and pauses play.
⑨ Stop
Stops the CD playing.
⑩ Skip/Scan
Allows for skipping between tracks and also searching within tracks. Press once to skip a track, press and hold to search within a track.
Remote control
The 740C is supplied with an Azur Navigator remote control that operates both this CD player and other Cambridge Audio Azur amplifiers. Insert the supplied AAA batteries to use.
Note: The remote may be in Amp mode when first activated. Please refer to the Amp Control section for more information.
Standby/On
Switches the unit between On and Standby mode.
Open/Close
Opens and closes the disc tray.
① Numerical Track select
Press the number of the desired track. The track will then be played from the start of the track.
Track select
To select a track number greater than ten, press -/- followed by the track number.
Bright
Alters the brightness of the display backlight. There are three levels of brightness: Bright, Normal, and Off.
Play / Stop / Pause
Press the relevant button to play, stop or pause the CD.
Skip
Right Skip - Press once to skip forward by one track on the CD. Press and hold to skip forwards through tracks.
Left Skip - Press once to skip backward by one track on the CD. Press and hold to skip backwards through tracks.
Search
Press and hold to search within the selected track. Right button to fast forward, left button to rewind.
Menu Menu
Press to access the 740C menu system on the front panel display. Please refer to the 'CD player setup' section of this manual for more information.
Select Select
Press to accept the item/function highlighted in the display menu. Please refer to the 'CD player setup' section of this manual for more information.
Program, Remain, A-B, Repeat, Intro, Random, Space
Read the 'Operating instructions' section of this manual for information on the functions of these buttons.
Remote control of matching products
Amp Control mode

The 740A/C remote control comes with an Amplifier Control button, that when pressed, puts the remote into Amp mode, allowing operation of a Cambridge Audio Azur amplifier. When pressed, the LED will light up for 7 seconds (to let you know you are in Amp mode), and will then flash when any of the relevant circled Amp buttons is pressed. All other remote buttons are inactive when in Amp mode.
The functions relevant to the amplifier are as follows:
Standby/On
Switches the amplifier between On and Standby mode.
① Numerical buttons 1-6
Press to change the input source to the amplifier. Button 6 toggles Tape Monitor on/off.
Mode
Press to switch between Volume and Balance modes.
Mute
Mutes the audio on the amplifier. The mute mode is indicated by MUTE appearing and the volume level being replaced by two flashing dashes in the display. Press again to cancel mute.
Volume
Increase or decrease the volume of the amplifier output.
Speaker A/B
Press to scroll through the speaker sets connected to the loudspeaker terminals on the back panel (speaker sets A, B or A and B).
Bright
Adjust the backlight of the front panel display; bright, dim or off.
To exit Amp mode (and return to CD mode), press the Amp Control/button again (the LED will light up for one second).
iPod™ compatibility
The 740A/C remote can also control the basic functions of Apple iPod's when mounted in Apple's Universal Dock (or other docks compatible with the Apple Remote). Refer to your dock's instruction manual on how to connect it to your amplifier. To use the Azur remote to control the docked iPod, put the remote into Amp mode and press one of the following buttons:
Play/Pause
Press to play the iPod, press again to pause play.
Skip
Press once to skip forwards or backwards one track.
Menu
Press to return to the iPod main menu.

Operating instructions
Loading and unloading discs
- Press the Standby/Onswitch.
- Press the Open/Closebutton.
- When the disc tray has opened fully, place a disc carefully in the tray with the label side facing up.
- To close the disc tray, press the Open/Closebutton again. When the tray, with a correctly loaded disc, is fully closed the disc will start turning automatically. After the CD player has read the disc it will be ready to play. Pressing Playwill also close the tray and start playing the disc.
- The disc tray can be opened at any time by pressing the Open/Close button. Only remove the disc after the tray has fully opened.
Note:
- Do not put anything except a Compact Disc into the tray, foreign objects may damage the mechanism.
- Do not force the tray by hand during the opening and closing operations.
- To avoid dirt and dust entering the mechanism, keep the disc tray closed.
- If the Compact Disc is seriously scratched or too dirty the player may not be able to read it or play it.
- Never load more than one disc into the disc tray at one time.
Normal disc play
- Switch on your amplifier and set its input selector to the correct position. Adjust the volume control to a minimum.
- Press the Standby/Onswitch.
- Press the Open/Closebutton to open the disc tray, and load a disc.
- Press the Open/Closebutton again to close the tray. The CD player will read the disc and enter Standby mode. Alternatively pressing Play will close the tray and start playing the disc.
- Press the Playbutton. The disc will start playing from the beginning of the first track. When the last track has finished playing, the CD player will return to Standby mode.
- To stop the disc at any point press the Stop button. Pressing the Pausebutton while the disc is playing will pause the disc. When the disc is paused the display will flash, play can be resumed by pressing the Playbutton again.
Locating a specific track
- Ensure that a disc is loaded.
- Pressing the right Skip/Scan(Skipon remote) button once will forward the CD by one track. Repeat as necessary.
- Press Play. The disc will play to the end of the disc and then return to Standby mode.
- Pressing the left Skip/Scan (Skip on remote) button will access the previous track.
Locating a particular point in a track
- Ensure that the disc is playing the desired track.
- Press and hold the right Skip/Scan button (Search on remote), the CD will then fast forward within the track.
- Release the button when the desired time has been reached. Play will resume.
- Press and hold the left Skip/Scan (Search on remote) button, the CD will then rewind within the track.
Repeating discs and tracks
- Ensure that the disc is playing.
- Press the Repeatbutton on the remote control. 'Repeat All' will appear on the display. The whole disc will now be repeated until the function is turned off.
- To repeat a specific track press Repeat twice while the track is playing, 'Repeat' will appear on the display and the selected track will now be repeated until the function is turned off.
- Press Repeatagain to turn off the repeat function.
Playing tracks in a random order
- Ensure that a disc is loaded and the player is in Standby mode.
- Press the Randombutton on the remote control. 'Random' will appear on the display.
- Press Play. The CD Player will now play the entire disc in a random order.
- Press Random to exit Random function. The disc will continue playing to the end in the correct order.
- Press the Stopbutton at any time to stop the disc.
Using the Intro function
- Ensure that a disc is loaded. The player can be in Standby mode or playing.
- Press Intro on the remote control. If the player is in Standby mode it will automatically play the first ten seconds of each track and then return to Standby mode. If a disc is being played when Intro is pressed the player will progress to the next track and play the first ten seconds of any remaining tracks.
- Press Introagain at any time to enter normal play mode.
Using the A-B function
- Ensure that the disc is playing, press A-B on the remote control. This will allow you to continuously repeat a specific section of a track.
- Press the Repeatbutton on the remote control at the beginning of the section you want to loop. The A-B icon will be displayed and the player will memorise the time A-B was pressed.
- Press A-B again at the end of the section that you want to loop. The player will now continuously repeat the selected section.
- Press A-Bagain to return to normal play mode.
Using the Remain function
- Ensure that the disc is playing.
- Press the Remainbutton on the remote control once to display the time remaining on the track playing.
- Press Remain a second time to show remaining number of tracks and total disc time remaining.
- Press Remainagain to return to normal play mode.
Using the Space function
- Ensure that a disc is loaded. The player can be in Standby mode or playing.
- Press Space on the remote control. 'Space' will appear on the display and a four second gap will be put between each track played.
Programming disc play
- Ensure that a disc is loaded and the player is in Standby mode.
- Press Program on the remote control. The Program set-up will appear in the display.
- Using the Skip/Scan (Skip on the remote) buttons, skip to the track number that you want to program as your first track (or press the actual track number on the remote).
- Press Program. The desired track is now entered and the program number increases by one.
- Repeat steps three and four until all your desired tracks are entered.
- Press Play. The programmed tracks will play.
- You can use the Skip and Search functions on your remote control to move through your programmed selection in the same way as normal playback.
- Pressing Stop once will stop play and pressing Stop twice at any time will wipe the program and return the player to stopped mode.
External digital sources
To access external digital sources connected to the rear of the 740C, press the Select button (on front panel or remote) to change between CD playback, Digital Input 1 and Digital Input 2.
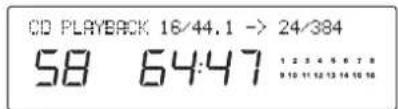
CD playback
The 16 bit/44.1kHz sampling data on a standard CD is upsampled to 24 bit/384kHz for best possible sound quality.
Digital Input 1/2
Press Selectagain to select Digital Input 1.
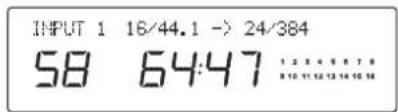
The incoming word length (16 to 24 bit) and sample rate will be displayed along with the indication that the data is being upsampled to 24 bit/384kHz. Note that rather than exact word width, some sources report data as either 20 bit maximum (displayed as < = 20 ) or 24 bit maximum (displayed as < = 24 ).

If no digital signal is present, the display will show "UNLOCKED" and the output will be muted.
Press Selectagain to select Digital Input 2.
Cambridge Audio
CD player setup
The 740C has a custom-made display on the front of the unit showing the current status and allowing access to the 740C System Configuration menus. The 740C features some advanced settings that allow its use to be customised to user preference.
Menu structure
Press the Menu button to scroll through the menus, then use the Select button to scroll through the options/sub menus of that menu. Press the Menubutton again to move to the next menu, or after a few seconds the display will return to the default main menu.

flowchart
graph TD
    A["Default screen"] --> B["Digital output (Note: If Pass Through is selected here, the next three menus are bypassed.)"]
    B --> C["Digital out sample frequency"]
    C --> D["Digital out word width"]
    D --> E["Digital out dither on/off"]
    E --> F["Input 1 naming"]
    F --> G["Input 2 naming"]
    G --> H["Software version"]
Digital outputs
The digital outputs can be set to two options:
- Output the raw data from the CD (or digital input) with no processing.
DIGITAL OUTPUT - PASS THROUGH
58 64:47 1 2 2 4 5 6 7 8 9 10 11 12 13 14 15 16
- Upsampled data processing by the DSP to greater resolution.
DIGITAL OUTPUT - DSP UPSAMPLE
58 64:47 1 2 3 4 5 6 7 8 9 10 11 12 13 14 15 16
Press Selectto switch between DSP Upsample or Pass Through.
For DSP upsampling the sample frequency, word width and dither are set by the next three available menus.
Digital out sample frequency
The digital output sample frequency (note this is different to the main audio output sample frequency which is fixed at 384kHz for best sound quality) can be set to 48, 96 or 192kHz (the maximum frequency supported by SPDIF/Toslink):
DIGITAL OUT SAMPLE FREQ 192 kHz
58 64:47 1 2 3 4 5 6 7 8 9 10 11 12 13 14 15 16
Press Selectto switch between the frequency options.
Digital out word width
The digital output word width can be set to 16, 20 or 24 bit (note this is different to the main audio output word width which is fixed at 24 bit for best sound quality):
DIGITAL OUT WORD WIDTH 24 BITS
58 64:47 1 2 3 4 5 6 7 8 9 10 11 12 13 14 15 16
Press Selectto switch between the word width options.
Digital out dither
Dithering is a process where pseudo random noise is added to a signal to remove quantisation effects that cause harmonic distortion and replace them with a slightly increased noise floor. The process can improve the perceived quality of digitised audio signals as a small decrease in signal to noise ration (especially where the noise is random) is much preferably to harmonic distortion to the human ear.
The 740C is able to add what is called Triangular Probability Density Function dither to the upsampled Digital Output signals. Normally, dither will have already been added to any CD or source material during its mastering process so the default for this option is off. However if a source with no dither is used (perhaps an off board A/D converter etc) TPDF dither can be turned on:
DIGITAL OUT DITHER ON
58 64:47 1 2 3 4 5 6 7 8 9 10 11 12 13 14 15 16
Press Selectto switch between Dither On and Dither Off.
Changing input names / source naming
The 2 digital inputs can be renamed to reflect the actual source units you have connected to the 740C. Press the Menubutton to scroll to either the Digital Input 1 or Digital Input 2 naming menus:
INPUT 1 NAMING - INPUT 1
58 64:47 1 2 3 4 5 6 7 8 9 10 11 12 13 14 15 16
Press Select to start changing the name of the input. The first editable character will begin to flash. Use the Stopbutton to go up through the alphabet/available characters, and Play/Pause to scroll down. To accept your character selection, move to the next character by using the Skip/Scanbuttons:
INPUT 1 NAMING - DABIT 1
58 64:47 1 2 3 4 5 6 7 8 9 10 11 12 13 14 15 16
To save and exit, press Select. To cancel and exit, press Menu.
Software version
Displays the currently loaded software version:
SOFTWARE VERSION 01 / 050 / 1.0
58 64:47 1 2 3 4 5 6 7 8 9 10 11 12 13 14 15 16
Custom installation (C.I.) use
The 740C features a Control Bus input/output that allow un-modulated remote control commands (positive logic, TTL level) to be received electrically by the unit and looped to another unit if desired. These control commands are typically generated by custom installation (multi-room) systems or remote IR receiver systems. The Control Bus sockets are colour-coded orange.
IR Emitter
Control Bus


In In Out
An IR Emitter Input is also provided that allows modulated IR remote control commands to be received electrically by the unit. Commands on this input operate the unit only and are not looped out demodulated on the Control Bus Output. This feature is useful for multi-room systems (such as the Cambridge Audio Incognito multi-room system) which feature routed I.R. emitter outputs. Instead of using window emitters stuck over the CD players front panel IR receiver, a mono 3.5mm mini-jack to 3.5mm mini-jack lead can be used for a more reliable electrical connection.
In addition the units feature 'direct' IR/Control codes as well as toggle codes for some of their features to simplify programming custom installation systems. Special direct On/Off and Mute commands can be accessed on the supplied remote control for teaching into C.I. systems as follows:
- Press and hold the Standby button. The remote first generates it's standby (toggle) command. Keep the button held down, after 12 seconds a CD player "On" command will be generated. If the button is kept held down for a further 12 seconds, a CD player "Off" command is generated.
A full code table for this product is available on the Cambridge Audio website at www.cambridge-audio.com.
Troubleshooting
There is no power
Ensure the AC power cord is connected securely.
Ensure the plug is fully inserted into the wall socket and is switched on.
Check fuse in the mains plug or adaptor.
The player will not read the disc
Check the disc is not loaded upside down.
Check that the disc is not too scratched or dirty.
There is no sound
Ensure that the amplifier is set correctly.
Check that the interconnects are inserted correctly.
The disc is skipping
Check that the disc is not too scratched or dirty.
Ensure the player is on a firm surface and not subject to vibrations.
There is a hum coming from the speaker
Ensure that all cable connections are secure.
The remote handset will not function
Check that the batteries have not expired.
Ensure that nothing is blocking the remote sensor.
Technical specifications
D/A converters Dual Wolfson
WM8740 24 bit DACs
Digital filter Analog Devices Black Fin
ADSP-BF532 32 bit DSP
Performing ATF™
upsampling to 24 bit 384kHz
Analog filter 2 Pole Dual Differential Bessel
Double Virtual Earth Balanced
Frequency response 20Hz to 20kHz (+/-0.1dB)
THD @ 1kHz 0dBFs < 0.0008%
THD @ 1kHz -10dBFs < 0.0005%
THD @ 20kHz 0dBFs < 0.001%
IMD (19/20kHz) 0dBFs < 0.0006%
Linearity @ -90dBFs +/- 0.5dB
Stopband rejection (>24kHz) > 115dB
S/N ratio, A weighted > 113dB
Total correlated jitter < 130pS
Crosstalk @1kHz < -130dB
Crosstalk @20kHz < -110dB
Output impedance < 50 ohms
Digital input word widths supported
16 - 24 bit
Digital output word widths supported
16, 20, 24 bit
Digital input sampling frequencies supported
32kHz, 44.1kHz, 48kHz, 88.2kHz,
96kHz, 176.4kHz, 192kHz
Digital output sampling frequencies supported
32kHz - 192kHz pass through
(Including 44.1kHz for CD)
48kHz, 96kHz, 192kHz upsampled
Audio output upsampling Fixed 24 bit, 384kHz
Dimensions - H x W x D 115 x 430 x 315mm
(4.5 × 16.9 × 12.4")
Weight 6.4Kg (14.1Lbs)
Cambridge Audio
Gallery Court
Hankey Place
London SE1 4BB
England
www.cambridge-audio.com

natural_image
Line drawing of a computer monitor case with ventilation grilles and ports (no text or symbols)
- Cambridge Audio
- Contents Introduction
- Plug Fitting Instructions (UK Only)
- Safety precautions Limited warranty
- Checking the Power Supply Rating
- Approvals
- Important safety instructions
- Ventilation
- Positioning
- Grounding and polarisation
- Power sources
- Power cord protection
- Overloading
- Lightning
- Cleaning
- Attachments
- Servicing
- Important Note
- Rear panel connections
- ① Power On/Off
- ② AC power socket
- ③ IR (Infra Red) Emitter In
- ④ Control Bus
- ⑤ Digital outputs
- ⑥ & ⑦ Digital Inputs 1 / 2
- ⑧ Line Output
- Front panel controls
- ① Standby/On
- ② Menu
- ③ Select
- ④ Infrared sensor
- ⑤ Disc tray
- ⑥ Display
- ⑦ Open/Close
- ⑧ Play/Pause
- ⑨ Stop
- ⑩ Skip/Scan
- Remote control
- Remote control of matching products
- iPod™ compatibility
- Operating instructions
- Loading and unloading discs
- Note:
- Normal disc play
- Locating a specific track
- Locating a particular point in a track
- Repeating discs and tracks
- Playing tracks in a random order
- Using the Intro function
- Using the A-B function
- Using the Remain function
- Using the Space function
- Programming disc play
- External digital sources
- CD playback
- Digital Input 1/2
- CD player setup
- Menu structure
- Digital outputs
- Digital out sample frequency
- Digital out word width
- Digital out dither
- Changing input names / source naming
- Software version
- Custom installation (C.I.) use
- Troubleshooting
- There is no power
- The player will not read the disc
- There is no sound
- The disc is skipping
- There is a hum coming from the speaker
- The remote handset will not function
- Technical specifications
Brand : CAMBRIDGE
Model : 740C
Category : Cd player/recorder