
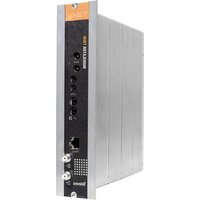
RSD7118 - Digital decoder TELEVES - Free user manual and instructions
Find the device manual for free RSD7118 TELEVES in PDF.


| Product Type | Digital Decoder (Set-Top Box) |
| Brand | Televes |
| Model | RSD7118 |
| Dimensions (W x D x H) | 200 mm x 150 mm x 50 mm |
| Weight | 0.5 kg |
| Power Supply | 12V DC, 1A (external adapter) |
| Power Consumption | 12 W (max) |
| Supported Standards | DVB-T2, DVB-S2, MPEG-4, H.265 |
| Video Output | HDMI (1.4), SCART (optional via adapter) |
| Audio Output | HDMI audio, digital optical (S/PDIF) |
| USB Ports | 1 x USB 2.0 (for media playback and recording) |
| Storage | Supports external USB storage for recording and timeshift |
| Smart Card Slot | 1 x CI+ slot for pay-TV modules |
| Remote Control | Infrared, included |
| Main Functions | Digital TV reception, EPG, teletext, subtitles, parental lock, favorite lists, picture-in-picture |
| Maintenance and Cleaning | Wipe with a dry, soft cloth; avoid liquids and solvents |
| Safety Precautions | Do not expose to moisture, heat, or direct sunlight; use only supplied power adapter |
| Spare Parts and Repairability | Contact Televes customer service for spare parts; no user-serviceable internal components |
| General Information | Firmware updates via USB or OTA; compatible with standard satellite and terrestrial antennas |
Frequently Asked Questions - RSD7118 TELEVES
User questions about RSD7118 TELEVES
0 question about this device. Answer the ones you know or ask your own.
Ask a new question about this device
Download the instructions for your Digital decoder in PDF format for free! Find your manual RSD7118 - TELEVES and take your electronic device back in hand. On this page are published all the documents necessary for the use of your device. RSD7118 by TELEVES.
USER MANUAL RSD7118 TELEVES
Digital Satellite Receiver User manual
“RSD - 7118”

ÍNDICE Pág.
natural_image
Line drawing of a box open with an open-out remote control and a closed folder (no text or symbols)natural_image
Line drawing of a hand gripping a rectangular object (no text or symbols)
natural_image
Simple line drawing of a battery inside a housing (no text or symbols)
natural_image
Person holding a transparent container with liquid, partially covered by hands, next to a cloth (no visible text or symbols)natural_image
Black-and-white photo of a person wearing sunglasses and a necklace, with blurred background signage (no readable text)natural_image
Portrait of a man in formal attire with a camera icon overlay (no readable text or symbols)■ Cargar Conf. OSD Original
Estructura del menú

flowchart
graph TD
    A["Idioma"] --> B["English, Deutsch, Français, Español, Italiano, Português, Polska, Türkçe, Russe ..."]
    C["Canal"] --> D["Lista Canal TV"]
    C --> E["Lista Canal Radio"]
    C --> F["Borrar Todo"]
    G["Instalación"] --> H["Config Antena"]
    G --> I["Búsqueda de TP"]
    G --> J["Búsqueda Preconf."]
    G --> K["Auto Búsqueda"]
    H --> L["Satélite, Long, LNB, DiSEqC, Posicionador ..."]
    H --> M["Satélite, Indice TP, Frecuencia, SR, Polar, Modo ..."]
    H --> N["Satélite, Modo Búsqueda, Buscar canal"]
    H --> O["Satélite, Modo Búsqueda, Buscar canal"]
    P["Sistema Config"] --> Q["Sistema de TV"]
    P --> R["Config. Canal"]
    P --> S["Config. Tiempo y Temporizador"]
    P --> T["Configuración OSD"]
    P --> U["Bloqueado con Contraseña"]
    P --> V["Otros"]
    P --> W["Valores Defecto"]
    P --> X["Actual. Software"]
    P --> Y["Juego"]
    P --> Z["Información"]
    R --> AA["Modo Pantalla"]
    R --> AB["Modo Aspecto"]
    R --> AC["Video Eurocon. RGB CVBS"]
    R --> AD["Sistema RF"]
    R --> AE["Canal RF C21 - C69"]
    R --> AF["Canal comienzo"]
    R --> AG["Canal, Modo"]
    R --> AH["Tiempo"]
    R --> AI["Temporizador"]
    R --> AJ["Tiempo OSD"]
    R --> AK["Transparencia OSD"]
    R --> AL["Cargar Conf. OSD Original"]
    R --> AM["C. de la Instalación"]
    R --> AN["Bloquear canales"]
    R --> AO["Camb. Contraseña"]
    R --> AP["Nueva, Confirmar"]
    AQ["Herramientas"] --> AR["Valores Defecto"]
    AQ --> AS["Actual. Software"]
    AQ --> AT["Juego"]
    AQ --> AU["Tetris, Serpiente, Othello"]
MPEG-2 Main Profile @ Main Level
Conector 2 x RCA (L/R)
3.- Description of panels and connections 38
4.- Equipment installation 40
4.1.- Connections to be made 40
5.- Basic Operation 41
5.1.- How to select channels 41
5.2.- How to adjust the volume 42
5.3.- Sound suppression (mute) 42
5.4.-Audio language 42
5.5.-Audio modes 43
5.6.- How to use the favorite channel list 43
5.7.- Electronic Programming Guide (EPG) 44
5.8.- Tele-text function 45
5.9.- Subtitle function 45
5.10.- Zoom function 46
5.11.- Mosaic function 46
5.12.- Call to previous channel 46
5.13.- Return to previous channel with auto-save 46
5.14.- Image freeze (pause) 46
6.- Main Menu 47
Technical features 65
Guarantee 67
1.- Safety measures
The Receiver you have just purchased has been manufactured to meet international safety standards. We recommend that you carefully read the safety instructions below.
POWERING:
220 - 240 V\~ 50/60 Hz.
OVERLOAD:
Do not overload the sockets, extenders or adapters to avoid a fire hazard or risk of electric shock.
LIQUIDS:
Take care not to spill any liquids over the Receiver, or splash it.
Avoid placing recipients or objects with liquids on or next to the Receiver.
SMALL OBJECTS:
Avoid placing small metallic objets close to the unit. These could accidentally enter through the ventilation slots and cause serious damage.
CLEANLINESS:
Unplug the Receiver from the mains before cleaning it.
Use a slightly damp, soft cloth (no detergent) to clean the outside of the Receiver.
VENTILATION:
Place the Receiver in a well-ventilated area so that the slots are not blocked in any way.
Avoid exposure to the sun or to other sources of heat.
Do not place on top of other equipment.
CONNECTIONS:
Carry out the recommended connections only to avoid any possible damage.
LNB CONNECTIONS:
Switch the Receiver off before connecting or disconnecting the LNB.
IF YOU DO NOT DO THIS, YOU MAY DAMAGE THE LNB.
TV or VCR CONNECTIONS:
Switch the Receiver off before connecting or disconnecting the TV or VCR.
IF YOU DO NOT DO THIS, YOU MAY DAMAGE THE TV OR VCR.
LOCATION:
Place the Receiver inside where it is protected from the rain, lightning and direct sunlight.
Install the Receiver in a horizontal position.
WARNING
RISK ELECTRICAL SHOCK DO NOT OPEN


TO REDUCE THE RISK OF ELECTRIC SHOCK DO NOT REMOVE THE COVER.
THERE ARE NO USER-REPAIRABLE PARTS INSIDE.
FOR REPAIRS SEE A QUALIFIED TECHNICIAN.
This symbol indicates that the product displays “dangerous voltage” with a risk of electric shock or personal harm.
This symbol indicates that this product possesses important instructions for use.
A Digital Satellite Receiver is a product enabling the viewing of a large number of satellite-fed channels. This instruction manual explains both how the Receiver is installed and what steps you can take to improve a number of services it provides.
The manual also offers a detailed explanation of a series of services that are only available in the Receiver, so that you can use it properly.
To install the Receiver and make proper use of it, please make sure you read the manual and keep it handy for later consultation.
- Easy-to-use onscreen menu.
- 8 lists of favorite channels
- DiSEqC 1.2 / USALS compatible
- Unicable LNB compatible
- PLL output channel Ch21 - Ch69 (pre-adjust to Ch38).
- High quality video and audio
- RGB signal available on TV scart.
- Channel management using: "Move", "Search", "Order", "Edit"
-
Event information using EPG
-
Teletext function
- Standard/Teletext subtitles
- Pre-programmed transponders from different satellites.
- Shows transponder information
- Searches for newly added Mosaic function transponders
- Access control
- Automatic PAL/NTSC support system
- Auto-save function for last channel used and auto-return function.
- 4 digit display
- Remote control
- Slim Size
- Timer function
- Software update function
ed Mosaic function - Zoom function
- Time display
- Games
- Low consumption
- Auto Shut Down 60, 120 & 180 min.
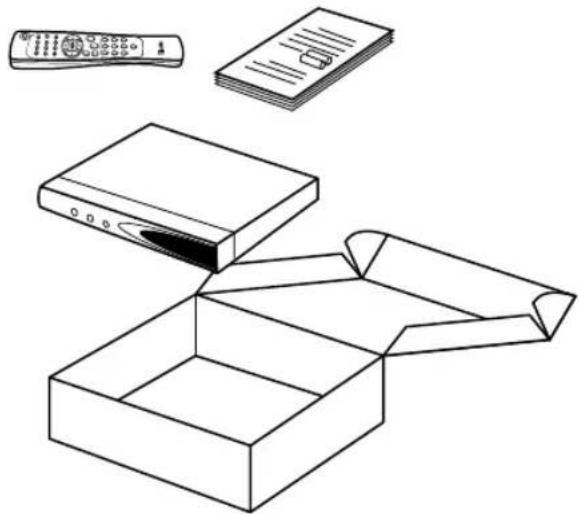
2.3.- Composition
Make sure the following come within the packing box:
1 - Satellite Receiver RSD-7118
1 - Remote control
2 - Type "AAA", LRO3 or "AM-4" batteries
-- The instruction manuals
natural_image
Line drawing of a box open with an open lid, accompanied by a remote control and a stack of documents (no text or symbols)3.- Description of panels and connections
Fig. 1 - Front Panel
| Button Function | |
| Commutes between normal and standby operation modes. | |
| ▲ | Increases by one program number. |
| ▼ | Decreases by one program number. |
| Display In normal mode shows channel N°, in STANDBY gives time. | |
Fig. 2 - Back Panel
| Name | Function |
| LNB IN | Entry signal of satellite aerial. |
| IF OUT | Exit signal of satellite to connect with another receiver. |
| TV | To connect a TV set with a SCART connector. |
| VCR To connect a VCR with a SCART connector. | |
| ANT IN | Terrestrial antenna's signal input. |
| TV OUT | RF signal output to connect to a VCR/TV. |
| VIDEO Video signal output. | |
| AUDIO R | Audio output (right channel). |
| AUDIO L | Audio output (left channel). |
| RS232 Connection to a serial port or another receiver to update software. | |
| POWER | Switch on/off. |
Fig. 3 - Remote Control
| Button Function | |
| Switches between operating and standby modes. | |
| TV/SAT Switches between TV and SAT modes. | |
| TV/月 | Switches between TV and RADIO channels. Commutes between TV and RADIO lists. |
| ZOOM Enables the Zoom option. | |
| PAUSE Freezes the image. To continue viewing press again. | |
| AUDIO Selects different audio options. | |
| EPG Enables the Electronic Program Guide (EPG). | |
| SubT Enables the Subtitle function of a program, when available. | |
| TEXT Enables the Tele-text menu and the subtitles (TXT) when available. | |
| EXIT To return to the previous menu used. | |
| MENU Shows the main menu on screen. | |
| M/P Shows a mosaic of images on screen. | |
| MUTE Suppresses sound. | |
| V+ / V- Turns sound up or down. Selects a menu option. | |
| CHXCH Selects a lower or higher channel number. Selects a menu option. | |
| OK | Executes the option selected on the menu or enters the desired value in any input mode.In normal mode shows the channel list. |
| P- / P+ To flip pages on the channel list. | |
| Returns to previous channel. | |
| FAV Enables favorite channels lists. | |
| 0 ... 9 Selects a channel for viewing. Enables direct entry of menu data. | |
| INFO Shows information on the channel being viewed. | |
| Timer | Shows the Timer function. |

Fig. -1-

Fig. -2-


natural_image
Line drawing of a hand gripping a small object (no text or symbols)
natural_image
Simple line drawing of a battery inside a container (no text or symbols) | >95%  |
 >50°C >50°C | <-5°C  |
 |  |
 |  |
4.- Equipment Installation
4.1.- Connections to be made
This section explains how the satellite receiver is installed. For the installation of the external equipment such as the aerial, consult the manual supplied with the product. If you wish to add any new pieces of equipment, make sure you consult the pertinent part of the manual.
1- Install the aerial so that it faces the satellite directly. After doing so, connect the aerial cable to the satellite receiver.
2- Connect the satellite receiver to the TV set and other peripheral equipment.
3- Establish the items on the receiver menu according to the TV set and the peripheral equipment.
The receiver is now ready for use.

flowchart
graph TD
    A["Satellite Reception"] --> B["Televes"]
    A --> C["Televes"]
    A --> D["7268 Cable"]
    E["Terrestrial Reception"] --> F["Satellite"]
    E --> G["RSD-7118"]
    H["TV"] --> I["VCR"]
    I --> J["(Recommended)"]
    style A fill:#f9f,stroke:#333
    style E fill:#ccf,stroke:#333
    style F fill:#cfc,stroke:#333
    style G fill:#fcc,stroke:#333
    style H fill:#cff,stroke:#333
    style I fill:#ffc,stroke:#333
    style J fill:#fcc,stroke:#333
Note:
- All the cables used for connecting the Receivers must be of the screened type (shielded from interference).
5.- Basic Operation
First installation
■ Turn on the TV and all the peripheral equipment connected to the system.
■ Turn on the satellite receiver by pushing the standby ignition button (💡) on the Receiver or on the remote control.
■ Select the language using the V+/V- keys. Press OK on the desired language.
■ The preprogrammed channel list will depend on the selected language.

5.1.- How to select programs
The TV/Radio channels can be selected using so much the remote control as the keys of the receiver.
■ Press the button to select the service mode desired (TV channels (☐) or radio channels (☐)). The default mode is the TV mode.
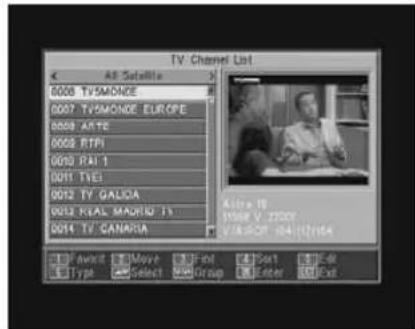
■ Press the OK button when you are viewing a program. You will then se on screen the general (all satellite) program list. If you want only the programs of a certain satellite to appear on the list, select it with the V+/V-buttons. Next select a program on the list using the CH▲/CH▼ buttons and press OK to view it. You can also move through the channel list by groups of ten by using the P+/P- buttons.
Another way of selecting a program is by pressing the CH button when you are already viewing one to select the next program or by pressing the CH button to select the previous program, both on the remote control and on the front keyboard of the receiver. If you wish to go to a certain program, punch in its number using the numerical keyboard on the remote control.
■ The program you select will immediately appear on the screen, together with a small information window.
This information window shows the date and time and also informs whether the program is TV or radio, giving the program name and its position on the list, as well as the list that has been selected at that moment (All Satellite, Astra 19, Hotbird, etc.).
If the program has EPG, Tele-text or subtitles, it will show the indications "EPG", "TEX" and "SubT" as well as the time and the title of the current event and of the next to be screened.
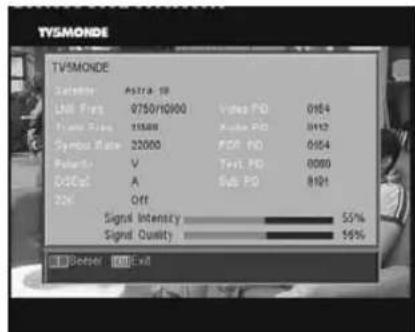
■ On pressing the INFO button, the screen will show a window with all the information on the current program.
On this window, when Button 1 (beeper) is pressed, the receiver will emit a beep, showing the level of the signal received. The higher the signal level, the higher pitched the beep.
To suppress this signal, press button 1 again, or else press EXIT to return to normal viewing mode.

5.2.- How to adjust volume
The volume may be adjusted by using the remote control command.
■ To increase volume, press button V+, and to reduce it press button V-on the remote control.
■ The existing volume levels may be identified by using the volume indicator shown on the screen.

natural_image
Person handling a transparent container with liquid, placed on a cloth (no visible text or symbols)5.3.- Sound suppression (mute)
■ Press button MUTE to suppress the sound of the program.
■ To regain sound, press the same button once again. The previous sound level will be recovered.
■ To adjust the volume, press buttons V+ or V-.
natural_image
Black-and-white photo of a person with blonde hair wearing sunglasses and a silver pendant necklace (no visible text or symbols)5.4.- Audio language
Some channels are broadcasted in different audio modes. This function depends on whether the broadcast includes this information on the signal sent to the Receiver.
In the case of TV channels, these different audio modes usually correspond to different languages in which the channel is broadcasted (for example, in the case of "Euronews" – HOTBIRD, the Spanish language is received on the 5th audio channel).
In regard to the radio channels, each audio identifies a different radio station (for example, the channel "Radio Esp." – ASTRA contains ten Spanish radio broadcasting stations – 40 principales, M80, etc.).
■ Press the AUDIO button to activate the menu containing the different broadcast languages.
■ Select the desired audio from among the existing options by using the V+/V- buttons, and press OK.
■ To leave the audio menu, press the EXIT or AUDIO button.

5.5.- Audio Modes
■ Press the AUDIO button to enable the audio menu.
■ Enable the option "Audio Mode" using the buttons CH▲/CH▼.
■ Select the desired audio output mode from among the existing options "Stereo", "Left", "Right" and "Mono", using buttons V+/V-.
■ To leave the audio menu, press the EXIT or AUDIO buttons.
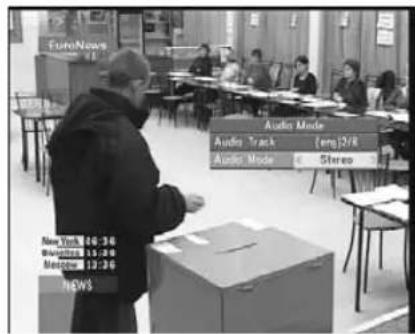
5.6.- How to use the List of Favorite Channels
You can easily select your favorite TV or Radio channels using the List of Favorite Channels. You are able to keep up to 8 separate lists at one time. On these lists will only appear the TV and Radio channels selected from the main channels list.
■ Press the button to select the list of TV or Radio channels.
■ When viewing a TV channel or listening to a radio channel, press the button FAV to access the Favorite Channel List.
If there are no channels on the favorites list, the favorites menu will not be shown on screen, the message "No FAV channel" appearing instead. Using the V+ / V- buttons, select a list or group of channels where your favorite program is located. The programs may be grouped by: Favorite, Sport, News, Music, Movie, Shopping, Education and Leisure. If any one of these groups is without an allocated program, the group will not be shown.
■ Select any program from the list, using the buttons CH▲/CH▼ and press the OK button to view it.
To return to the general program list, press the OK button in the normal mode (watching a program). The current group will be shown on screen. Using the V+ / V- buttons, select the "All Satellite" group, and select another program by pressing the OK button.
■ To leave the Favorite Channels List, press the EXIT button.
See paragraph 8.1 "Organizing Channels" in Section 8 "Receiver Installation Menu" in order to find out how to prepare the Favorite Channels Lists.


5.7.- Electronic Programming Guide (EPG)
The RSD-7118 receives and stores information on the current TV and radio channels. This information includes the detailed timetable of the next program. This guide is very easy to use, since it shows all the information on screen.
The information supplied by this guide consists of: program N°, program name, date and time of broadcast (start and finish times).
■ Using the button, you can change from the TV to the Radio list.
■ Press the EPG button while tuning in to Radio or TV channels to access the Electronic Programming Guide (EPG).
■ The EPG will appear divided into three parts.
One of them is a list showing the numbers and names of the channels. Using the CHACH buttons you can move from one channel to another.
Immediately on your right it will show minimal information on the current and next events.
Finally, at the bottom of the screen a window shows the menu options.
■ Press button 1 on the EPG window to access a list with all the events being shown on that channel as well as their broadcast times.
To move along the different days and broadcast times use the buttons V+, V-, CH▲ or CH▼. If you need more detailed information on a specific event, you should access the "Detail" sub-menu by pressing button OK.
Another way of accessing the "Detail" sub-menu is by pressing button 2 on the EPG window.
You will access this sub-menu, which gives a description of the current event. By pressing button 1 you will be able to see this description in extend or short form. By pressing button 2 you will directly access the "Timer" menu, where an event with the data corresponding to the program selected will appear. If you agree with the data, press the OK button to save it.
The information provided in the guide comes with the signals provided by the supplier. In the event a channel does not contain data for the guide, the message "no information" will appear on screen.
■ Press the EXIT or MENU buttons to leave the EPG and directly access the selected channel.


Notes:
- In order to receive the correct broadcast timetables on the guide, you must first provide a reference time adjustment of your LOCAL TIME compared with GMT(Greenwich mean time), or else directly insert your current time in the option "Time and Timer Setting".
- When we set the time using the GMT option, the time that appears on screen is that set by the supplier, due to which this information may appear as incorrect for certain programs.
5.8.- Tele-text function
On this menu you can select from all the Tele-text services offered by the service supplier. Among them you will also find the subtitles (see how to access them on each channel).
Tele-text
Press the TEXT button on the remote control to enable the Tele-text menu. Using the CH▲/CH▼ buttons, select the language of the Teletext (if there is more than one), and press OK.
The Tele-text services will be shown in the usual way.
Even if your TV set has no Tele-text decoder, you will be able to view it on screen, since the Receiver generates it automatically.
By pressing the OK button on the remote, you can make the background color on the Tele-text page more or less transparent.
To go forward or backward 100 pages at a time, press the V+/V-buttons, and to flip back or forth page by page press the CH▲/CH▼ buttons.
■ Sub-titles (Tele-text mode)
Press the TEXT button on the remote control to enable the Tele-text menu. Using the V+/V- buttons select the "Tele-text Sub-title" option, and then using the CH▲/CH▼ buttons, select one of the available languages, and press OK.
Now you should look on the Tele-text pages for that corresponding to sub-titles, and they will start to be shown on the screen.
To leave the "Tele-text menu", press the EXIT or TEXT buttons.
NOTE: Not all the suppliers provide this type of information.
The channels that possess this function show the legend "TEX" on the information window.


The receiver enables you to view the sub-titles of a certain channel, providing they are supplied by the operator.
■ Press the SubT button on the remote to access the sub-title function.
■ Within this option, it is necessary to select the language sub-titles will be shown in by using the CH▲/CH▼ buttons, and confirm the selection by pressing OK.
■ To leave "Sub-titles", press the EXIT or SubT buttons.
NOTE: The channels that have this function available show the legend "SubT" on the information window.

This function enables you to magnify a selected area on the image that you are viewing.
■ To enable this function, press the ZOOM button. A small schematic of the screen will be displayed, indicating the level of magnification and the area being shown.
■ Each time you press the ZOOM button, the zoom factor doubles, up to a maximum of 16X.
To move the magnification zone through the rest of the picture, use the V+, V-, CH▲ and CH▼ buttons.
■ Press the EXIT button to leave Zoom.
NOTE: Bear in mind that as you go increasing the zoom factor, the quality of the image will worsen.

natural_image
Portrait of a man in formal attire with a camera icon overlay (no readable text or symbols)5.11.- Mosaic Function
This function enables you to view a mosaic-type picture formed by a group of channels shown on nine small screens.
■ Press the M/P button to enable this option. Once the mosaic image is displayed on screen, it is possible to choose a channel to view using the V+, V-, CH▲ or CH▼ buttons.
■ By pressing the OK button on the selected picture, this will be shown full-screen size.
NOTE: This function does not enable the simultaneous viewing of two programs.

5.12.- Call to previous channel
If you want to return to the last channel you were viewing and do not remember what number it was, press the button.
5.13.- Return to previous channel with auto-save
In the event of a failure in the power supply, either because the satellite receiver has been unplugged or there has been an outage, when the receiver has been plugged into the mains again and power is flowing, the TV/Radio channel that had been tuned in at the time of the blackout will appear again automatically on screen with the last Audio selected.
5.14.- Image freezing
If you want to freeze an image on screen while you are viewing a program, press the PAUSE button. To go on viewing the program, press the PAUSE button again.
Bear in mind that while you freeze an image on screen, the channel you were viewing continues with its transmission, due to which you will lose the part of the transmission that took place while your frozen image was on screen.
6.- Main Menu
■ Press the MENU button when you are viewing a channel, and the main menu will appear on screen.
■ Select a menu option using the CH▲/CH▼ buttons, and press OK to execute.
■ Press the EXIT or MENU buttons to leave the main menu and return to the TV or Radio channel you were viewing.

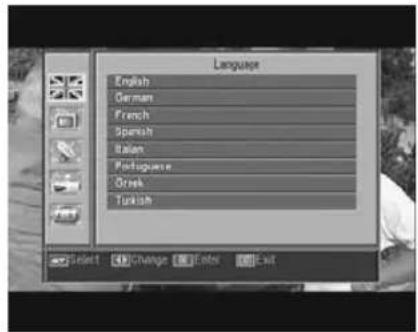
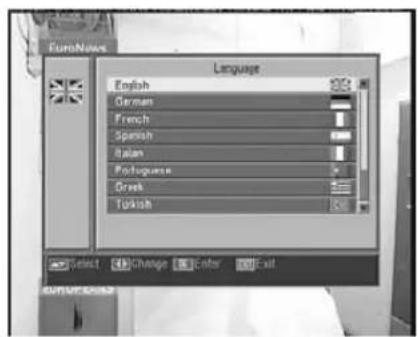
This menu enables you to choose the language for the onscreen menus. The languages available in the receiver are: English, German, French, Spanish, Italian, Portuguese, Greek, Turkish, Polish, Russian and Arabic.
■ Press the MENU button on the remote to activate the main menu on your screen. The first menu option selected by default is -Language-. You will see that a national flag icon for the current language selected will appear.
If you wish to change this language, press the OK button to access other languages. With the CH▲/CH▼ buttons, select the new language desired and press OK. On moving through the different languages, the menu will show flag icons for each one.
8.- Channel Menu
8.1.- Organizing channels
Using this menu you can create/edit the favorite channel list, and you can move, block and erase channels and add new channels to the list. After editing, the rest of the channels are automatically ordered.
As the relative functioning of Radio channel editing is the same as that of TV channels, this manual will only explain the editing of TV channels.
To change from the TV to the Radio channel list, press the button, or access the "Radio Channel List" menu option.
■ Press the MENU button on the remote to activate the main menu on your screen.
Using the CH▲/CH▼ buttons, locate the option -Channel- and press OK to access this sub-menu. At this point you can organize the TV and Radio channel lists, and you can also erase all the channels from the list.
Select one of the options, using the CH▲/CH▼ buttons, and press OK. You may access this menu directly by pressing the OK button in the normal viewing mode (while viewing a channel).
■ Organizing TV or Radio channels
- Favorite Channels: Select the channel you wish to mark as a favorite using the CH▲/CH▼ buttons, and then press button 1. The channel will be marked as a favorite using the symbol.
You can also add another 7 distinct lists to your favorites list. These may be denominated: "Sport", "News", "Music", "Movie", "Shopping", "Education" and "Leisure". For the purpose, once the desired channel has been selected on the list, press button 6, and on an popup menu, select the group to which it will be allocated.
Press the EXIT button to return to the previous menu. A confirmation message will appear enabling you to save (YES) or reject (NO) the changes.
On including a channel within a group or class, we enable that group, which will be shown as a new list when you press the FAV button.
If no channel has been allocated to the lists, the message: "No FAV channel" will appear.
To leave the menu, press the EXIT button. A confirmation message will appear enabling you to save (YES) or reject (NO) the changes.
- Moving channels: If you wish to move a channel from its current position on the general list, first select the channel on the list, and then press button 2. The channel marked for moving will be identified with the ◆ symbol.
Using the CHACH buttons, move the channel to its new place on the list, and press the OK button.
Press the EXIT button to leave the menu. A confirmation message will appear enabling you to save (YES) or reject (NO) the changes.


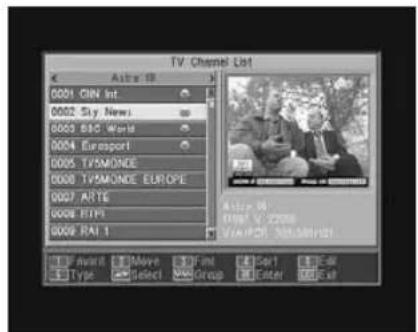
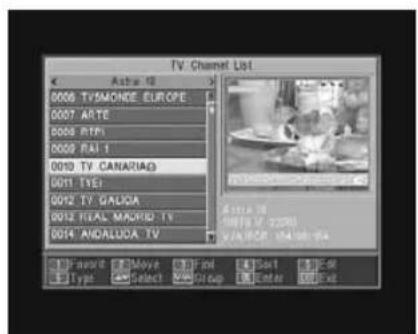
- Searching for channels: If you want to tune in on a channel and can not remember its position you can carry out a search by name. To do this, press button 3.
On the keyboard appearing on the screen type in the name of the channel. As you type the name, the number of channels on the list will progressively reduce. When the name of the desired channel appears on the list, place your cursor on the "OK" option and click the OK button.
On the "Found Channels" list, select the channel and lastly press the OK button to view it.
To leave the menu, press the EXIT button.
- Organizing the channels: The channel list may appear organized by different criteria. These are: "Default" (original configuration), "FTA/S", "Lock", "Name (A-Z)" and "Name (Z-A)".
For the purpose, press button 4, and on the popup menu, select one of the organizing criteria, using the CH▲/CH▼ buttons, and press OK.
The list will be shown organized according to the option selected.
Press the EXIT button to leave the menu. A confirmation message will appear enabling you to save (YES) or reject (NO) the changes.
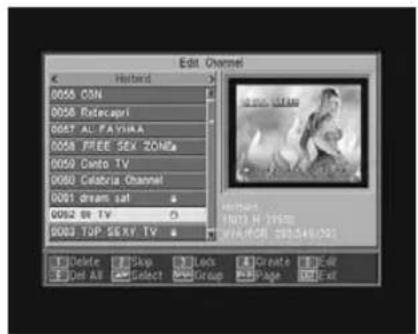
- Editing the channels: This option enables you to edit the channel list in detail.
For the purpose, press button 5. You will be asked for your password to access the following sub-menu.
- Erasing Channels:
To erase a channel, click button 1 on the selected channel. This will mark it with an (✗) You can select several channels to be erased in one operation by clicking button 1 on each in turn. If you click the button on a selected channel again, the mark will be eliminated and the channel will not be erased.
To suppress all the channels at one stroke, press button 6, and all the channels will be marked.
To erase the channels that have been marked, press the EXIT button.
Whether you wish to erase one, several or all the channels, a new window will appear asking you to confirm the decision to erase (YES) or to leave the erasure menu without making any changes (NO).
- Omitting (skipping) channels:
To omit a channel, click button 2 on the selected channel. This will mark it with a ( ) symbol. If you click the button on a selected channel again, the mark will be eliminated and the channel will not be omitted.
Press the EXIT button to leave the menu. A confirmation message will appear enabling you to save (YES) or reject (NO) the changes.


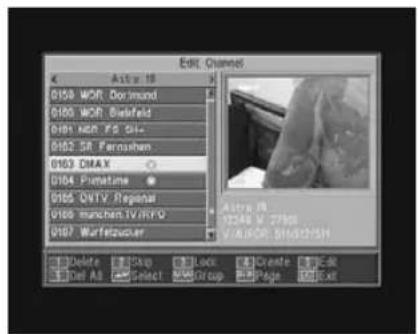

- Blocking channels:
To block a channel, click button 3 on the selected channel. This will cause a ( 🔒 symbol to appear, marking it. If you want to de-block it, click button 3 on the channel again. This will eliminate the mark.
The new state of channel blocking will be enabled when you leave this menu.
Press the EXIT button to leave the menu. A confirmation message will appear enabling you to save (YES) or reject (NO) the changes.
To access any blocked channel, the password must be entered, provided the "Channel Lock" option in the "Parental Lock" menu is enabled.
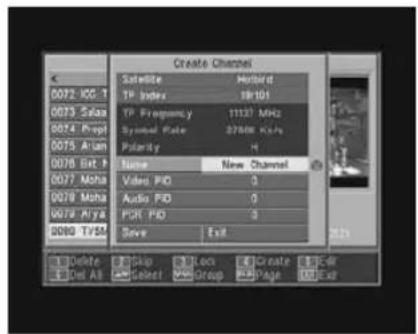
- Creating channels (manual search):
If you wish to add a new channel broadcast to the list of channels, without carrying out an automatic search, this option enables you to do so. For the purpose you must know the Video PID, Audio PID and PCR values, as well as the data of Frequency, Symbol Velocity and Polarity.
Press button 4. A new menu will appear where you can enter the values requested for a new channel search.
To move through the options, use the CH▲/CH▼ buttons. Once you have entered all the values, select the option "Save", and press the OK button. The new channel will be added to the list.
- Editing channels:
If you wish to modify channel parameters such as the name, the Audio PID, the Video PID or the PCR PID, you can do so in this menu.
Press button 5. You will access a sub-menu in which you can change the channel name or the PID values.
Once you have entered all the values, select the "Save" option and press OK.
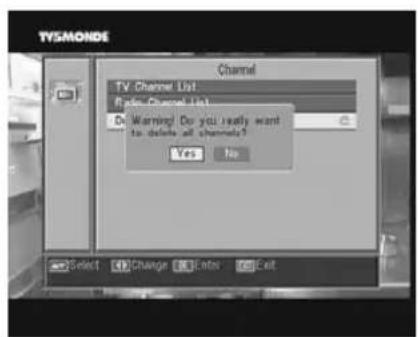
Delete All
Select this option on the -Channel- menu, using buttons CH▲/CH▼ and press OK.
You will be asked to enter your password.
A new window will appear asking you to confirm the decision to erase all the channels (YES) or to leave the erasure menu without making any changes (NO).

9.- System Setup
9.1.- TV system
On this menu you can select the TV standard and format type for screen viewing.
■ Display Mode
This option enables you to select the TV norm or standard among the following modes: Automatic, PAL, PAL-M, PAL-N and NTSC. Select the option using the V+/V- buttons.
■ Aspect Mode
The screen format presents an aspect ratio that may be: "Auto", "4:3PS", "4:3LB" or "16:9". If you select 4:3, all the programs will be viewed with this aspect ratio. If you select 16:9, the screen format will be automatically adjusted according to the aspect ratio of the program to be viewed.
■ Video Output
This option enables you to select the Video Output mode, RGB or CVBS, available on TV scart.
■ RF System
Select the TV standard type from the mode PAL BG, PAL I, PAL DK and NTSC.
RF Channel
Select the RF Output Channel that the receiver will have with the keys V+/V-. The possible value are C21 ... C69). At the factory default configuration, the RF output CH is Ch38 (PAL G).

9.2.- Channel Setup
This menu can configure the initial channel in the event of a power outage.
■ Startup Channel
Press the OK button on the option "Startup Channel". Enable the option (Boot on Channel) using the V+/V- buttons. Select the TV or Radio mode and then the startup channel.
To leave the menu, press the EXIT button.
Note: If no channel has been selected with this option, the receiver will start on the last program selected.

9.3.- Time
The Receiver has a clock that shows the time. This clock is automatically adjusted with the information received from the service supplier within the satellite signal itself. Nevertheless, both date and time can be set without using the GMT option.
The service supplier sends two kinds of time information, one with the current time (for viewing on the clock), and the other informing the broadcasting times of the different events (to be used in the EPG).
Both kinds of time information are sent in the GMT format, so you should adjust the Receiver by entering your country's time-zone offset in this option.
■ Select the "Time" option on the menu "Time and Timer setting", and press the OK button.
■ Enable the option "GMT usage" (On).
Using the V+/V- buttons, indicate whether you want to increase (+) or reduce (-) GMT time by 30-minute periods to correspond with local time. If you wish to set time independently of the GMT option, you must disable this option to allow you to edit the date and time.
■ With the option "Time Display" enabled, current updated time is shown permanently on screen.
■ Press the EXIT button to leave the menu and save the data.
NOTE: Not all of the suppliers provide this type of information

9.4.- Timer
The receiver has a timer to turn it on and off automatically at given times. It has 8 positions for programming the same number of events. You only have to enter the following data.
By default, the cursor will appear always on the first free timer number. If no event has been programmed, it will be on number 1.
- Timer Number.- Select one of the 8 available events using the V+/V-buttons.
- Timer Mode.- By default, it will appear in the "Off" mode. You can select other modes, such as: "Once", "Daily" (once a day), "Weekly" (once a week), "Monthly" (once a month), or "Yearly" (once a year). The selection is made by pressing the V+/V- buttons.
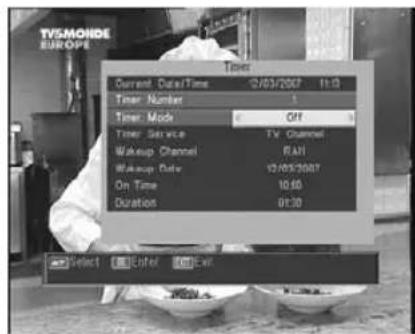
- Timer Service.- Select the type of service you want the timer to perform. You can select a TV program a Radio program, or the display of a Message or a reminder. The selection is made by pressing the V+/V- buttons.
- Wakeup Channel.- Select the channel you want for the timer. For the purpose, press button OK on this option, and then using buttons CH▲, CH▼, V+ or V-, select the channel from the popup list. Confirm your channel selection by pressing the OK button again.
- Wakeup Message.- Select the message with which you want to activate the receiver from among the options: "Birthday", "Anniversary" or "General", using the V+/V- buttons.
This option will be available if you select the "Message" option on the "Timer Service" Section.
- Wakeup Date.- The current date will appear by default. You can modify this date using the remote control number keyboard (0 .... 9).
- On Time.- Current time display appears by default. Using the remote control number keyboard (0 .... 9), enter the starting time of the event.
- Duration.- Using the remote control number keyboard (0 .... 9), enter the estimated duration time of the event.
■ Repeat the same steps if you wish to program other events.
If you wish to eliminate any of these events, you can do so by placing yourself on its number, and the in "Timer Mode", select the option "Off".
■ To memorize data and leave the menu, press the EXIT button.


9.5.- OSD Setting
■ OSD Timeout
This allows you to define the onscreen time of the information window (1 to 10 seconds).
The selection can be made by pressing the V+/V- buttons.
■ OSD Transparency
This allows you to define the degree of menu transparency on a scale from 10% through 20%, 30%, 40% and Off.
The selection can be made by pressing the V+/V- buttons.
■ Load Default OSD Setting
This option allows you to recover the original OSD Setting. Press button OK on the option.
■ To leave the menu, press the EXIT button.

9.6.- Blocking with Password
The password consists of four numbers that will not be viewed on screen. When selecting one of the menu options requiring the use of a secret code (accessing blocked channels, channel list editing, etc.), the message "Input Password" will appear on screen, asking you to type out your password. In the event that the password entered is incorrect, access will be denied.
■ Installation Lock
If you wish to protect the installation data and information, you must enable this function by selecting the option "Yes" with the V+/V-buttons.
■ Channel Lock
If you wish to block child access to any channels, you must enable this function by selecting the option "Yes" with the V+/V- buttons. This option is enabled by default.
■ Changing Password
This option enables you to change the pre-defined password. Enter a new password using the numerical (0 ... 9) keyboard on the remote control. Next, confirm the new password by entering it again.
As from this moment, you must always enter this new password when required to do so.
NOTE: The factory-defined default password is: 0 0 0 0 Once you have changed the password, keep it safely to yourself.


9.7.- Other
■ Auto Shut Down
This option allows you to save energy, because once it is activates, places the receiver in Standby mode when they pass 60, 120 or 180 minutes without acceding to any function of the receiver during that time.
By defect one is activates (180 minutes), nevertheless is possible to deactivate selecting it to the option "Disable".

10.- Installation Menu
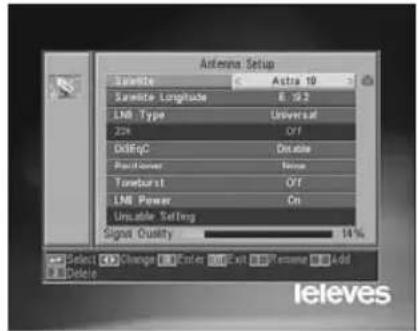
10.1.- Antenna Setup
This menu enables you to configure the receiver according to your installation.
Access the Antenna Setup menu by pressing the OK button on the option "Installation" in the main menu.
The CH▲/CH ▼ buttons enable you to move the cursor up and down within the menu, while the V+/V- buttons enable you to select from among the available options.
Satellite
Select one of the satellites that are pre-programmed on the receiver using the V+/V- buttons, or pressing the OK button to activate the popup menu and thus easily select the satellite.
By pressing button 1, you activate a keyboard where you can change the name of the selected satellite.
By pressing button 2, you can enter a new satellite, and here you must enter all the necessary data for its correct functioning, as indicated in the following steps.
By pressing button 3 you will erase the satellite selected. Here you will have to confirm the decision to erase.
Satellite Longitude
Introduce the satellite longitude in degrees (3 digits) using the numerical keyboard. With the V+/V- buttons you can indicate if the position is East or West.
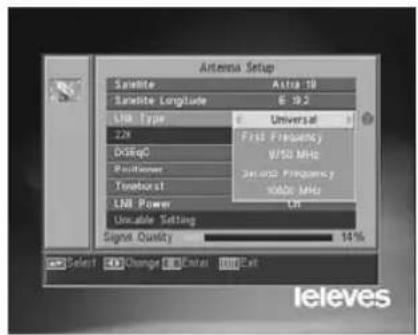
■ LNB Type
Indicate if the LNB placed on the aerial is "Universal", "Unicable", "C-band" or "User", using the V+/V- buttons.
You can also edit the LNB frequency by pressing the OK button on this option. In the popup menu, with the V+/V- buttons, we can select other values for LNB frequency.
22KHz
To enable or disable the 22KHz tone. If you have selected a Universal LNB in the previous operation, this option will not be available.
DiSEqC
Select one of the options: "Disable", "A", "B", "C" or "D". To do so, press the OK button to activate the popup menu, and thus select the correct input.
If you are selecting one of the inputs, the "Positioner" option will not be available.
With the "Tone Burst" option enabled, the inputs to be selected will be "A" and "B".

■ Positioner
Select one of the options: "None", "DiSEqC1.2" or USALS for the switch, using the V+/V- buttons.
By pressing the OK button on each of the two options of the Polarizer, we access a sub-menu where we can configure each of the options. See Sections. "Conf. DiSEqC 1.2" and "USALS - DiSEqC 1.3".
This option (Positioner) is not available when the "DiSEqC" and "Tone Burst" options are enabled.
■ Toneburst
It enables or disables the "Tone Burst" function using the V+/V- buttons. If this function is enabled, the "Positioner" option will not be available, and the DiSEqC option will be available on "A" and "B" inputs.
■ LNB Power
Select the option "Turn on" or "Turn off" for the LNB power feed.
■ Unicable Setting:
Select the frequency for each IF channel.


10.2.- TP Scan
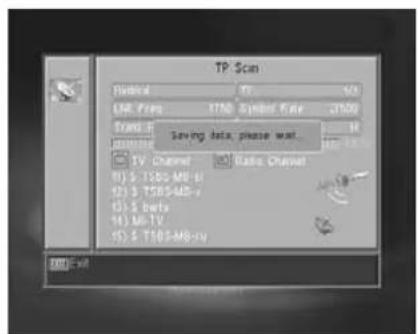
This menu enables you to carry out a search within a certain transponder on the transponder list or, conversely, to add new transponders to the list.
Satellite
Select one of the satellites that appear pre-programmed on the receiver with the V+/V- buttons or press the OK button to activate the popup menu.
■ TP Index
Select a transponder from the transponder list, or add a new one.
To add a new transponder, press button 1 on the remote control (Add), and fill in the fields Frequency, Symbol Rate and Scan Mode. Finally, go to the "Search" option and press the OK button.
This will start a scan of the channels belonging to this transponder. The channels found will be added to the list.
If you wish to erase the selected transponder, press button 2 (Erase) on the remote control, and confirm the selection by pressing OK.
To erase all the transponders, press button 3. You will have to confirm this operation on an emerging window by pressing (Yes), or reject the change by pressing (NO).
Frequency
Using the numerical keyboard, enter the frequency corresponding to the transponder.
SR
Using the numerical keyboard, enter the Symbol Rate corresponding to the transponder.
■ Polarity
Using the V+/V- buttons, indicate the type of polarity corresponding to the transponder (H or V).
Scan Mode
Select the type of scan mode to use from among: "All" (all satellite channels) or "Free" (open broadcasting channels).
Search
Press the OK button on this option to start the channel search on the transponder.
As a guide, you have the indicators of "Signal Intensity" and "Signal Quality", which will inform you of the existence of the signal as well as its strength.


10.3.- Preset Scan
To carry out the channel scan of the default programmed transponders of your receiver, press the OK button on the option -Preset Scan- on the "Installation" menu.
The options to be selected are:
Satellite
To select one of the satellites, use the V+/V- buttons, or press OK to activate the popup menu.
■ Scan Mode
Indicate if you wish to scan for all the satellite channels (All) or only those broadcast openly (Free) during the satellite sweep.
■ Scan Channel
Select the type of channels to scan for among "TV channels", "Radio channels" or "TV and Radio channels".
Search
Press the OK button on this option to start the channel search on the transponder programmed for that satellite.
The channels found will be added to the list.
If you wish to halt the search process before its end, you should press the EXIT button on the remote control.

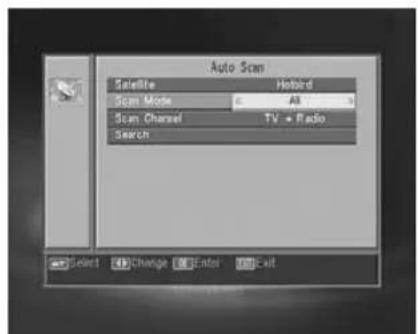
10.4.- Auto Scan
To carry out a complete channel scan on any of the satellites of your installation, press the OK button on the -Auto Scan- option of the "Installation" menu.
The options to select from are the same as those of the previous item.
When you press the OK button on the "Search" option a scan of all the available channels on the selected satellite will begin.
If you wish to halt the search process before its end, you should press the EXIT button on the remote control.
10.5.- DiSEqC 1.2/USALS Positioner
By pressing the OK button on each of the options "DiSEqC 1.2" or "USALS" of the "Positioner" option in the "Antenna Setup" menu, you access the option range for dish positioning in each case.
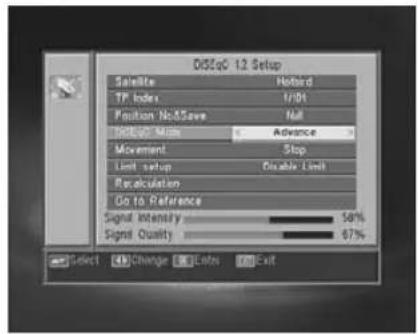
DiSEqC 1.2
This menu enables you to vary the orientation of the mobile aerial to select orbital positions of new satellites or correct the positions of existing satellites that have already been memorized.
- Satellite
We have to define the satellites we are going to use. For this purpose we can use the V+/V- buttons, or press OK to activate the popup menu.
- TP Index
Specify a transponder to act on, using the V+/V- buttons.
Each satellite will have a different position number. There are 60 positions available. Allocate a position number to the satellite that has been defined.
- DiSEqC Mode
Select a DiSEqC mode from among "User", "Go to X", "Installer" and "Advance" modes.
- Movement
This will move the aerial East or West, using the V+/V- buttons. Each click on the button moves the aerial one step. If you keep your finger on the button, the movement will be constant.
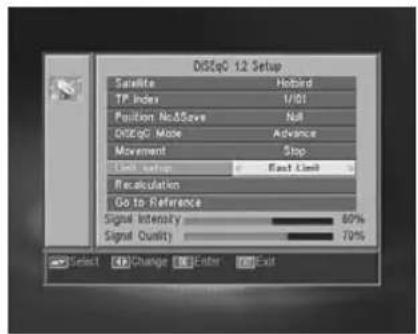
- Limit setup (Advance mode)
The limit points are those which indicate the maximum rotation of the aerial at both ends of the arc. There is an Eastern and a Western limit.
To set the limits, after memorizing the orbital positions select the (East or West) limit to be set, using the V+/V- buttons.
Go up to the "Movement" option and using the V+/V- buttons, move the dish to set the limit.
Return to the option "Limit Setup", select the other limit and proceed as above.
The option "Disable Limit" disables the use of limits. If limits are not used, you run the risk of physical damage to the motor or the aerial.
- Recalculation (Advance mode)
This reorganizes all positions after including new ones or eliminating existing ones.
- Go to Reference (Advance mode)
This points the aerial Southwards (0°).

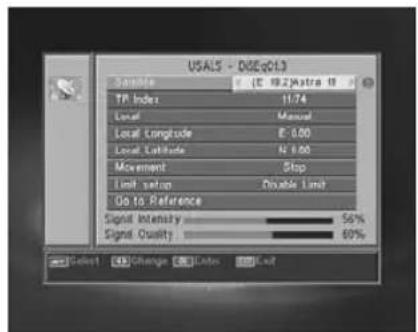
■ USALS - DiSEqC 1.3
This menu enables you to direct the mobile aerial at a satellite automatically when you only know the satellite's orbital position and your geographical position (latitude and longitude).
- Satellite
We have to define the satellites we are going to use. For this purpose we can use the V+/V- buttons, or press OK to activate the popup menu.
- TP Index
Specify a transponder to act on, using the V+/V- buttons, or press OK to activate the popup menu.
- Local
Press the OK button to activate the popup menu. If you live in a capital city that figures on the list, select it. For other locations, select the "Manual" option and enter your exact location in degrees (latitude and longitude). Type the position onto the (4 digit) numerical keyboard. Then press the V+/V- buttons to indicate whether Longitude is East or West and whether Latitude is North or South.
- Movement
You will move the aerial East or West by using the V+/V- buttons. Each click on the button moves the aerial one step. If you keep your finger on the button, the movement will be constant.
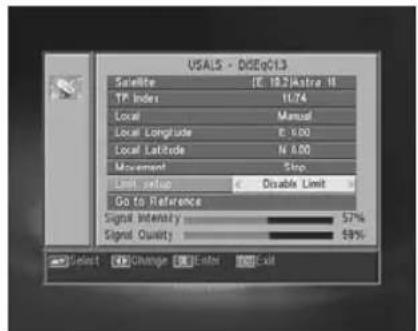
- Limit Setup
The limit points are those which indicate the maximum rotation of the aerial at both ends of the arc. There is an Eastern and a Western limit.
To set the limits, after memorizing the orbital positions select the (Eastern or Western) limit to be set, using the V+/V- buttons.
Go up to the "Movement" option and using the V+/V- buttons, move the dish to set the limit.
Return to the option "Limit setup", select the other limit and proceed as above.
The option "Disable Limit" disables the use of limits. If limits are not used, you run the risk of physical damage to the motor or the aerial.
- Go to reference
This points the aerial Southwards (0°)
An information bar at the bottom of the screen indicates the signal level available in the transponder.

11.- Tools Menu
11.1.- Default value
This function will replace all the parameters that have been entered with the factory-established default parameters.
If you wish to reset your receiver to its original ex-factory condition, select the "Default Value" option and press the OK button. To execute this operation your password will be required.
■ An information message will appear on screen. To accept, press OK on the "Yes" option.
Note: Every time you execute the "Default Value" function, all the information and data entered by the user will be automatically erased and replaced by factory-defined configurations.
After executing the "Default Value" function it is necessary to turn the receiver off and turn it on again, using the back panel switch so that it regains all its functions.

11.2.- Software upgrade
If you wish to use the same software and the same channel list on several receivers, you can duplicate it (by inter-receiver transfer) simply by using an RS-232 "Null Modem" (female/female) cable connection.
After connecting both receivers with the RS-232 cable, you should follow the instructions below.
■ Turn on the "Master" receiver (the receiver possessing the software and the list of channels to be transferred), using the switch at the back.
■ Access the option "Software Upgrade", and press the OK button to start communication.
Now turn on the "Slave" receiver (the receiver you wish to update) using the switch at the back.
■ The update will take a few minutes. Please wait until it is complete.
■ Once the transfer process has ended, you must turn off and restart the receiver to initiate the new configuration.
Note: Once you have executed the option "Default Value" on the "Slave" receiver, it will lose the current channel list and adopt instead the default channel list corresponding to the main "Master" receiver.

11.3.- Games
On this menu, you can choose one of the three games available on the receiver:
- Tetris
- Snake
- Othello
■ Select one of the available games using the CH▲ / CH▼ buttons, and press OK.
■ To play, follow the instructions appearing on the screen..
■ To leave the game at any time, press the EXIT button.

11.4.- Information
This option shows a window on screen with receiver information.
■ To activate this menu, press the OK button on the "Information" option of the Tools menu.
■ Press the MENU or EXIT buttons to leave the menu.

Menu Structure

flowchart
graph TD
    A["Language"] --> B["English, Deutsch, Français, Español, Italiano, Português, Polska, Turkçe, Russe..."]
    C["Channel"] --> D["TV Channel List"]
    C --> E["Radio Channel List"]
    C --> F["Delete All"]
    G["Installation"] --> H["Antenna Setup"]
    G --> I["TP Scan"]
    G --> J["Preset Scan"]
    G --> K["Auto Scan"]
    H --> L["Satellite, Long, LNB, DiSEqC, Positioner ..."]
    H --> M["Satellite, TP Index, Frequency, SR, Polar, Mode ..."]
    H --> N["Satellite, Scan Mode, Scan Channel, Search"]
    H --> O["Satellite, Scan Mode, Scan Channel, Search"]
    P["System Setup"] --> Q["TV System"]
    P --> R["Channel Setup"]
    P --> S["Time & Timer setting"]
    P --> T["OSD Setting"]
    P --> U["Parental Lock"]
    P --> V["Other"]
    P --> W["Default Value"]
    P --> X["Software Upgrade"]
    P --> Y["Game"]
    P --> Z["Information"]
    Q --> AA["Display Mode"]
    Q --> AB["Aspect Mode"]
    Q --> AC["Video Output RGB, CVBS"]
    Q --> AD["RF system"]
    Q --> AE["RF channel Ch21 - Ch69"]
    AA --> AF["Auto, PAL, NTSC"]
    AB --> AG["Auto, 4:3, 16:9"]
    AC --> AH["PAL BG, PAL I, PAL DK & NTSC"]
    AD --> AI["Channel, Mode"]
    AE --> AJ["Time"]
    AE --> AK["Timer"]
    AJ --> AL["GMT Usage, Date, Time, Time Display"]
    AK --> AM["No., Mode, Chan, .."]
    AL --> AN["OSD Timeout"]
    AL --> AO["OSD Transparency"]
    AL --> AP["Load Default OSD Setting"]
    AN --> AQ["1, 2, ... 10 seg"]
    AO --> AR["Off, 10 ... 40%"]
    AP --> AS["Installation Lock"]
    AP --> AT["Channel Lock"]
    AP --> AU["New Password"]
    AP --> AV["Auto Shut Down"]
    AQ --> AW["Yes, No"]
    AQ --> AX["Yes, No"]
    AV --> AY["Tetris, Snake, Othello"]
Description of Connectors
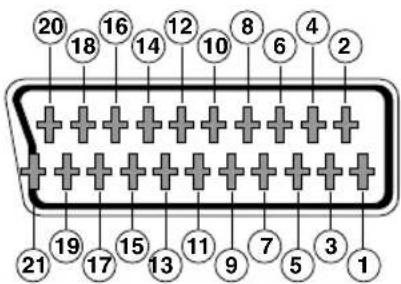
SCART
PIN TV VCR
1 Audio output (D) Audio output (D)
2 N/A Audio input (D)
3 Audio output (I) Audio output (I)
4 Ground audio Ground audio
5 Blue Ground Ground
6 N/A Audio input (I)
7 Blue output N/A
8 Voltage switching Voltage switching
9 Green Ground Ground
10 N/A N/A
11 Green output N/A
12 N/A N/A
13 Red Ground Ground
14 "Fast Blanking" Ground "Fast Blanking" Ground
15 Red output N/A
16 "Fast Blanking" Output "Fast Blanking" Input
17 Video Ground Video Ground
18 Video Ground Video Ground
19 Video Output Video Output
20 N/A Video Input
21 Ground Ground
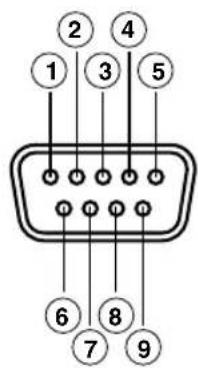
RS 232C
PIN Description
1 N/A
2 RXD (Data Input)
3 TXD (Data Output)
4 N/A
5 Ground
6 N/A
7 N/A
8 N/A
9 N/A
Technical Specifications
Fully compatible with DVB
Video decoder
MPEG-2 Main Profile @ Main Level
Process rate > 15Mbits/s
Video format 4:3, 16:9
Audio decoder
MPEG-1 layer I & II (Musicam Audio)
Mono, Dual, Stereo, Joint Stereo
System
RAM 2 Mbyte
Flash memory 2 Mbyte
Graphics 720 x 576 (PAL)
720 x 480 (NTSC)
LNB input / tuner
Connector 2 x "F"
Input frequency 950 - 2150 MHz
LNB powering 13/18V, max. 300 mA
Band switching 22 KHz tone
DiSEqC switching Version 1.0, Tone Burst A/B
Positioner DiSEqC 1.2 / USALS
Demodulation QPSK
Symbol rate 2 - 45 Msps
Covers the C and Ku bands
Covers SCPC and MCPC
Unicable LNB technology compatible
RF modulator
Output channel PAL BG Ch21 to Ch69 (default Ch38)
Output level 71 ±4 dB
IN/OUT connectors
IEC female/male
TV scart
RGB, CVBS, Audio L/R
VCR scart
CVBS (input/output), Audio L/R (input/output)
Hi-Fi output
Connector 2 x RCA (L/R)
Serial data interface
Connector 9-pin D-sub
Signals
RS232 max.19.2K baud
Total connectors
2 x LNB input (F type)
2 x IEC (in/out RF)
2 x SCART (TV/VCR)
3 x jacks RCA (VIDEO, AUDIO L/R)
1 x RS232 (9-pin D-sub)
Powering
220 - 240V\~, 50/60 Hz
Max. consumption 25 W
Standby consumption
<1 W
Size
280 x 165 x 43 mm
Approx. weight 1.3 Kg
Garantía
Televés S.A. offers a two year guarantee, beginning from the date of purchase for countries in the EU. For countries that are not part of the EU, the legal guarantee that is in force at the time of purchase is applied. Keep the purchase invoice to determine this date.
During the guarantee period, Televés S.A. complies with the guarantee by repairing or substituting the faulty equipment.
The harm produced by improper usage, wear and tear, manipulation by a third party, catastrophes or any other cause beyond the control of Televés S.A. is not included in the guarantee.

RED COMERCIAL - COMMERCIAL NETWORK


- ÍNDICE Pág.
- ■ Cargar Conf. OSD Original
- 1.- Safety measures
- POWERING:
- OVERLOAD:
- LIQUIDS:
- SMALL OBJECTS:
- CLEANLINESS:
- VENTILATION:
- CONNECTIONS:
- LNB CONNECTIONS:
- TV or VCR CONNECTIONS:
- LOCATION:
- WARNING
- 2.3.- Composition
- 3.- Description of panels and connections
- 4.- Equipment Installation
- 4.1.- Connections to be made
- 5.- Basic Operation
- First installation
- 5.1.- How to select programs
- 5.2.- How to adjust volume
- 5.3.- Sound suppression (mute)
- 5.4.- Audio language
- 5.5.- Audio Modes
- 5.6.- How to use the List of Favorite Channels
- 5.7.- Electronic Programming Guide (EPG)
- Notes:
- 5.8.- Tele-text function
- Tele-text
- ■ Sub-titles (Tele-text mode)
- 5.11.- Mosaic Function
- 5.12.- Call to previous channel
- 5.13.- Return to previous channel with auto-save
- 5.14.- Image freezing
- 6.- Main Menu
- 8.- Channel Menu
- 8.1.- Organizing channels
- - Erasing Channels:
- - Omitting (skipping) channels:
- - Blocking channels:
- - Creating channels (manual search):
- - Editing channels:
- Delete All
- 9.- System Setup
- 9.1.- TV system
- ■ Display Mode
- ■ Aspect Mode
- ■ Video Output
- ■ RF System
- RF Channel
- 9.2.- Channel Setup
- ■ Startup Channel
- 9.3.- Time
- 9.4.- Timer
- 9.5.- OSD Setting
- ■ OSD Timeout
- ■ OSD Transparency
- ■ Load Default OSD Setting
- 9.6.- Blocking with Password
- ■ Installation Lock
- ■ Channel Lock
- ■ Changing Password
- 9.7.- Other
- ■ Auto Shut Down
- 10.- Installation Menu
- 10.1.- Antenna Setup
- Satellite
- Satellite Longitude
- ■ LNB Type
- 22KHz
- DiSEqC
- ■ Positioner
- ■ Toneburst
- ■ LNB Power
- ■ Unicable Setting:
- 10.2.- TP Scan
- ■ TP Index
- Frequency
- SR
- ■ Polarity
- Scan Mode
- Search
- 10.3.- Preset Scan
- ■ Scan Mode
- ■ Scan Channel
- 10.4.- Auto Scan
- 10.5.- DiSEqC 1.2/USALS Positioner
- DiSEqC 1.2
- - Satellite
- - TP Index
- - DiSEqC Mode
- - Movement
- - Limit setup (Advance mode)
- - Recalculation (Advance mode)
- - Go to Reference (Advance mode)
- ■ USALS - DiSEqC 1.3
- - Local
- - Limit Setup
- - Go to reference
- 11.- Tools Menu
- 11.1.- Default value
- 11.2.- Software upgrade
- 11.3.- Games
- 11.4.- Information
- Menu Structure
- Description of Connectors
- SCART
- PIN TV VCR
- RS 232C
- PIN Description
- Technical Specifications
- Video decoder
- Audio decoder
- System
- LNB input / tuner
- RF modulator
- Hi-Fi output
- Serial data interface
- Total connectors
- Garantía
- RED COMERCIAL - COMMERCIAL NETWORK
Brand : TELEVES
Model : RSD7118
Category : Digital decoder