
XL-E75H - Hi-Fi System SHARP - Free user manual and instructions
Find the device manual for free XL-E75H SHARP in PDF.


| Product Type | Hi-Fi System |
| Brand | Sharp |
| Model | XL-E75H |
| Dimensions (W x H x D) | Approx. 200 x 250 x 300 mm |
| Weight | Approx. 5.5 kg |
| Power Supply | AC 230 V, 50 Hz |
| Power Consumption | 60 W |
| Output Power (RMS) | 2 x 25 W |
| Speaker Impedance | 6 ohms |
| Frequency Response | 20 Hz - 20 kHz |
| CD Player Compatibility | CD, CD-R, CD-RW |
| Radio Bands | FM, AM with 40 presets |
| Audio Inputs | Auxiliary (3.5 mm) |
| Remote Control | Included |
| Additional Features | Clock, Timer, Sleep, Equalizer |
| Cleaning | Wipe with dry cloth; avoid solvents |
| Safety | Do not expose to moisture; unplug during storms |
| Spare Parts Availability | Contact Sharp service center |
| Repairability | Professional repair recommended |
| Documentation | 104-page manual available online |
Frequently Asked Questions - XL-E75H SHARP
User questions about XL-E75H SHARP
0 question about this device. Answer the ones you know or ask your own.
Ask a new question about this device
Download the instructions for your Hi-Fi System in PDF format for free! Find your manual XL-E75H - SHARP and take your electronic device back in hand. On this page are published all the documents necessary for the use of your device. XL-E75H by SHARP.
USER MANUAL XL-E75H SHARP
HIGH-DEFINITION MULTIMEDIA INTERFACE
DIGITAL



Digital Out
ENGLISH
... Please refer to pages i to ix and E-1 to E-30.
POLSKI
When the ON/STAND-BY button is set at STAND-BY position, mains voltage is still present inside the unit.
When the ON/STAND-BY button is set at STAND-BY position, the unit may be brought into operation by the remote control.
Warning:
This unit contains no user serviceable parts. Never remove covers unless qualified to do so. This unit contains dangerous voltages, always remove mains plug from the socket before any service operation and when not in use for a long period.
Audio-visual material may consist of copyrighted works which must not be recorded without the authority of the owner of the copyright. Please refer to relevant law in your country.
Warning:
To prevent fire or shock hazard, do not expose this appliance to dripping or splashing. No objects filled with liquids, such as vases, shall be placed on the apparatus.
This product is classified as a CLASS 1 LASER PRODUCT.
CAUTION
This product contains a low power laser device. To ensure continued safety, do not remove any cover or attempt to gain access to the inside of the product.
Refer all servicing to qualified personnel.
Copyright Information:
Unauthorized copying, broadcast, public display, transmission, public performance, and rental (regardless of whether or not such activities are for profit) of disc contents are prohibited by law.
This system is equipped with copy protection technology that causes substantial degradation of images when the contents of a disc are copied to a video tape.
Copy Protection:
This unit supports Macrovision copy protection.
On DVD discs that include a copy protection code, if the contents of the DVD disc are copied using a VCR, the copy protection code prevents the videotape copy from playing normally.
Apparatus Claims of U.S. Patent Nos. 4,631,603, 4,577,216, 4,819,098, and 4,907,093, licensed for limited viewing uses only.
This product incorporates copyright protection technology that is protected by method claims of certain U.S. patents and other intellectual property rights owned by Macrovision Corporation and other rights owners.
Use of this copyright protection technology must be authorized by Macrovision Corporation, and is intended for home and other limited viewing uses only unless otherwise authorized by Macrovision Corporation.
Reverse engineering or disassembly is prohibited.
"HDMI, the HDMI logo and High-Definition Multimedia Interface are trademarks or registered trademarks of HDMI Licensing LLC."
Manufactured under license from Dolby Laboratories. Dolby and the double-D symbol are trademarks of Dolby Laboratories.
Manufactured under license under U.S. Patent #: 5,451,942 & other U.S. and worldwide patents issued & pending. DTS and DTS Digital Out are registered trademarks and the DTS logos and Symbol are trademarks of DTS, Inc. © 1996-2007 DTS, Inc. All Rights Reserved.
DivX, DivX Certified, and associated logos are trademarks of DivX, Inc. and are used under license.
PL - IMPORTANT INFORMATION
SK - IMPORTANT INFORMATION
Attention: Your product is marked with this symbol. It means that used electrical and electronic products should not be mixed with general household waste. There is a separate collection system for these products.
A. Information on Disposal for Users (private households)
1. In the European Union
Attention: If you want to dispose of this equipment, please do not use the ordinary dustbin!
Used electrical and electronic equipment must be treated separately and in accordance with legislation that requires proper treatment, recovery and recycling of used electrical and electronic equipment.
Following the implementation by member states, private households within the EU states may return their used electrical and electronic equipment to designated collection facilities free of charge*. In some countries* your local retailer may also take back your old product free of charge if you purchase a similar new one.
*) Please contact your local authority for further details.
If your used electrical or electronic equipment has batteries or accumulators, please dispose of these separately beforehand according to local requirements.
By disposing of this product correctly you will help ensure that the waste undergoes the necessary treatment, recovery and recycling and thus prevent potential negative effects on the environment and human health which could otherwise arise due to inappropriate waste handling.
2. In other Countries outside the EU
If you wish to discard this product, please contact your local authorities and ask for the correct method of disposal.
B. Information on Disposal for Business Users
1. In the European Union
If the product is used for business purposes and you want to discard it:
Please contact your SHARP dealer who will inform you about the take-back of the product. You might be charged for the costs arising from take-back and recycling. Small products (and small amounts) might be taken back by your local collection facilities.
2. In other Countries outside the EU
If you wish to discard of this product, please contact your local authorities and ask for the correct method of disposal.
INFORMATION ON BATTERY DISPOSAL

For EU: The crossed-out wheeled bin implies that used batteries should not be put to the general household waste! There is a separate collection system for used batteries, to allow proper treatment and recycling in accordance with legislation. Please contact your local authority for details on the collection and recycling schemes.
For Switzerland: The used battery is to be returned to the selling point.
For other non-EU countries: Please contact your local authority for correct method of disposal of the used battery.
PL - INFORMATION ON DISPOSAL OF USED DEVICE
Thank you for purchasing this SHARP product. To obtain the best performance from this product, please read this manual carefully. It will guide you in operating your SHARP product.
Special Note
Supply of this product does not convey a license nor imply any right to distribute content created with this product in revenue-generating broadcast systems (terrestrial, satellite, cable and/or other distribution channels), revenue-generating streaming applications (via Internet, intranets and/or other networks), other revenue-generating content distribution systems (pay-audio or audio-on-demand applications and the like) or on revenue-generating physical media (compact discs, digital versatile discs, semiconductor chips, hard drives, memory cards and the like). An independent license for such use is required. For details, please visit http://mp3licensing.com MPEG Layer-3 audio coding technology licensed from Fraunhofer IIS and Thomson.
Accessories
Please confirm that the following accessories are included.

CONTENTS
Page
General Information
Precautions 2 Controls and indicators 2 - 3 Types of playable discs 4 Description of discs 5
Preparation for Use
System connections 6 - 7 Remote control 7 Changing the setup menu 8 - 11
Basic Operation
General control 12
DVD Operation
DVD playback
Playback 13 To resume playback after stopping (resume play)....13 DVD mode operation indicators. 13
Basic operation
To locate the beginning of a chapter (track) (skip) .... 14 Fast forward/Fast backward (search) 14 To play in the desired order (programmed play) ..... 14 To start playback from the desired point (direct play) 14 - 15
Useful operation
Still picture 15
Step function (Frame by frame advance playback) .... 15
Slow-motion play 15 - 16
To change the angle 16
To zoom images (zoom) 16
To play repeatedly (repeat play) 16
To play the contents between the specified points repeatedly (A-B repeat) 17
To select a title from the top menu of the disc. . . . . . . 17
To select a subtitle or audio language from the disc menu 17
Various settings
To change the subtitle language 17 To change the audio channel 18 To change the display on TV screen. 18
Page
Video CD and Super Video CD Operation
Video CD and Super Video CD playback
Playback of a video CD (super video CD) with P.B.C.ON 19 To play without activating the playback control function 19 To start playback from the desired point (direct play) . .19 Random play 20 To change the audio channel .....20 Disc digest selection .....20 Track digest selection .....20
CD, CD-R and CD-RW Operation
CD operation
To play in the desired order (programmed play) .....21
To start playback from the desired point (direct play) . .21
MP3 and JPEG disc operation
To start playback from the desired point (direct play) . .22 Playback on the MP3 menu screen....22 To play repeatedly (repeat play) 22 - 23 Rotating a picture 24 Simultaneously playback the MP3 and JPEG .....24 Random play (REMOTE CONTROL ONLY) .....24 MP3/WMA folder mode (only for MP3/WMA files) .....25
Radio Operation
Listening to the radio .....26
Advanced Features
Using the Radio Data System (RDS) 27 - 28
Enhancing your system....29
References
Troubleshooting chart 29 - 30
Maintenance 30
Specifications 30
General
- Please ensure that the equipment is positioned in a well-ventilated area and ensure that there is at least 10 cm (4") of free space along the sides, top and back of the equipment.

- Use the unit on a firm, level surface free from vibration.
- Keep the unit away from direct sunlight, strong magnetic fields, excessive dust, humidity and electronic/electrical equipment (home computers, facsimiles, etc.) which generate electrical noise.
- Do not place anything on top of the unit.
- Do not expose the unit to moisture, to temperatures higher than 60°C (140°F) or to extremely low temperatures.
- If your system does not work properly, disconnect the AC power lead from the wall socket. Plug the AC power lead back in, and then turn on your system.
- In case of an electrical storm, unplug the unit for safety.
- Hold the AC power plug by the head when removing it from the wall socket, as pulling the lead can damage internal wires.
- The AC power plug is used as a disconnect device and shall always remain readily operable.
- Do not remove the outer cover, as this may result in electric shock. Refer internal service to your local SHARP service facility.
- The ventilation should not be impeded by covering the ventilation openings with items, such as newspapers, tablecloths, curtains, etc.
- No naked flame sources, such as lighted candles, should be placed on the apparatus.
- Attention should be drawn to the environmental aspects of battery disposal.
- This unit should only be used within the range of 5°C - 35°C (41°F - 95°F). The apparatus is designed for use in moderate climates.
Warning:
The voltage used must be the same as that specified on this unit. Using this product with a higher voltage other than that which is specified is dangerous and may result in a fire or other type of accident causing damage. SHARP will not be held responsible for any damage resulting from use of this unit with a voltage other than that which is specified.
Volume control
The sound level at a given volume setting depends on speaker efficiency, location, and various other factors. It is advisable to avoid exposure to high volume levels. Do not turn the volume on to full at switch on and listen to music at moderate levels. Excessive sound pressure from earphones and headphones can cause hearing loss.
Controls and indicators


Front panel
Reference page
- CD Compartment .... 13
- Open/Close Button 13
- Function Button 26
- On/Stand-by Button 8, 12, 13, 26
- Remote Sensor ....7
- Volume Control....12
- Stop Button 13
- DVD/CD Play/Pause Button 13, 15, 19, 21
- Headphone Socket 29
■ Display
Reference page
- DVD Indicator 13
- FM Indicator 26
- FM Stereo Mode Indicator 26
- Memory Indicator 26
- Dolby Digital Signal Indicator ..... 18
- DTS Indicator 18
- RDS Indicator 27
- Tuner Receiving Frequency Indicator 26
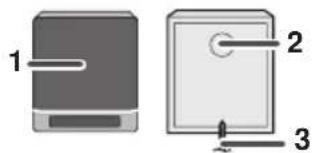
Speaker system
- Full Range
- Bass Reflex Duct
- Speaker Wire
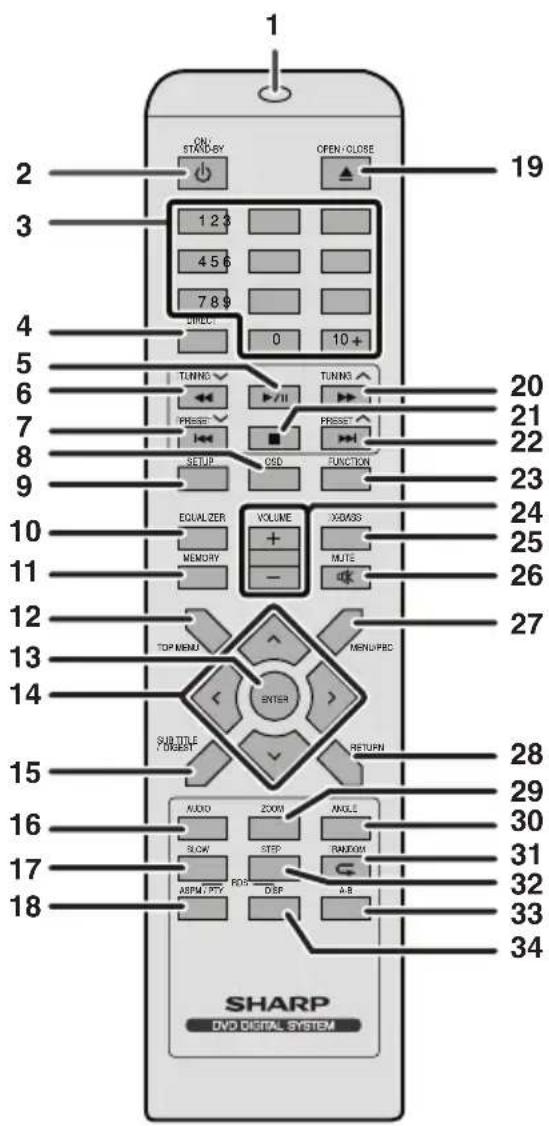
Remote control
Reference page
- Remote Control Transmitter 7
- On/Stand-by Button 8, 12, 13, 26
- Direct Search Buttons ..... 20, 21, 22, 24
- Direct Button 14, 19
- DVD/CD Play and Pause Button ..... 13, 15, 19, 21
- Fast Reverse or Tuning Down Button ..... 14, 26
- Chapter (Track) Skip Down or Preset Down Button 14, 19, 20, 21
- On Screen Display On/Off Button 18
- Setup Button 8, 9, 10
- Equaliser Button.... 12
- Memory Button 26
- Top Menu Button 17
- Enter Button 8, 14, 15, 19, 20, 21, 22
- Cursor Buttons ..... 14, 15, 19, 21, 22, 23, 25
- Subtitle/Digest Button 17, 20, 21
- Audio Button 18
- Slow Button 15
- RDS ASPM/PTY Button 27, 28
- Disc Tray Open/Close Button 13
- Fast Forward or Tuning Up Button ..... 14, 26
- Stop Button.... 13, 19, 20, 21
- Chapter (Track) Skip Up or Preset Up Button 14, 19, 20, 21, 26
- Function Button 26
- Volume Up and Down Buttons 12
- X-Bass Button....12
- Mute Button 12
- Menu/PBC Button....17, 19
- Return Button 19
- Zoom Button 15, 16
- Angle Button 15, 16
- RANDOM/Repeat Button 22
- Step Button 15, 19
- A-B Repeat Button 17
- RDS Display Button 27, 28
Types of playable discs
The DVD player can play back discs bearing any of the following marks:
| Disc type Disc contents | |
DVD Video Disc Audio and video (movies) | |
Super Video CD Audio and video (movies) | |
Video CD Audio and video (movies) | |
Audio CD Audio | |
CD-R/CD-RW (*1) Or CD-R/CD-RW recorded in JPEG format (*2) (*3) Or CD-R/CD-RW recorded in JPEG format (*2) (*3) | Audio and picture |
DivX®Video disc (Ver 5.2 and below) | Audio and video (movies) |
(*1): The CD-R/CD-RW may not be played back properly depending on the recording equipment or the disc. (*2): JPEG or JPG picture discs also play on this unit. However, pictures may not be clear (depends on resolution and recording method). (*3): Maximum JPEG file size is 10Mb. If photo bigger than this size, it will take some time for the file to be displayed.
- For unplayable discs, see page 5.
Types of playable DVD discs vary depending on the region. This unit can play back only DVDs with the same region number as written on the back of the unit.


Icons used in this operation manual
Some functions may not be available depending on discs. The following icons indicate the discs that can be used in the section.
DVD ... Indicates DVDs. SVCD ... Indicates Super video CDs. VCD ... Indicates video CDs. CD ... Indicates audio CDs. JPEG ... Indicates CD-R/RW with JPEG recording. DivX ... Indicates DivX® Video.
- Some operations may not be performed depending on discs even if they are described in this manual.
- During operation, “” may be displayed on the screen. This means that the operations described in this manual are not possible.
Copyright Information:
- Unauthorised copying, broadcast, public display, transmission, public performance and rental (regardless of whether or not such activities are for profit) of disc contents are prohibited by law.
- This system is equipped with copy protection technology that causes substantial degradation of images when the contents of a disc are copied to a videotape.
- This system is protected by U.S. patents and other intellectual property rights, the copyright for which belongs to Macrovision Corporation. The use of Macrovision's copy protection technology in the system is authorised by Macrovision and is intended for home use only, unless otherwise authorised in writing by Macrovision. Reverse engineering or disassembly is prohibited.
■ Discs that cannot be played
● DVDs without the region number on the disc.
CDG
● DVDs with SECAM system
CDV
- DVD-ROM
- Photo CD
DVD-RAM
CD-ROM
DVD-Audio
SACD
● Discs recorded in special formats, etc.
- The discs above cannot be played at all, or no sound is heard although images appear on the screen or vice versa.
- Incorrect operation may damage the speakers and can have a negative effect on your hearing when played at high volume settings.
● You cannot play illegally produced discs.
Notes:
- A disc which has scratches or fingerprints may not play properly. Refer to "Care of compact discs" (page 30) and clean the disc.
- Do not play the discs of special shapes (heart or octagon shaped) as they can be ejected whilst rotating and cause injury.
■ Title, chapter and track
DVDs are divided into "titles" and "chapters". If the disc has more than one movie on it, each movie is a separate "title". "Chapters" are subdivisions of titles.
![graph TD A["Title 1"] --> B["Chapter 1"] A --> C["Chapter 2"] A --> D["Chapter 3"] A --> E["Chapter 1 Chapter2"]](/content/2026/06/1258714/images/31a49ec2005546ce485bd17525e3dc4b3d577b4d9e975e42cdcc6d3b93d82d84.jpg)
Audio CDs consist of "tracks".
A "track" is each tune on an audio CD.
![graph TD A["COMPACT DISC"] --> B["Track 1"] A --> C["Track 2"] A --> D["Track 3"] A --> E["Track 4"] A --> F["Track 5"]](/content/2026/06/1258714/images/04ae031d7615694392a9fae954eb831aca8f0def88078f6ae97e835898c93ff4.jpg)
Note:
Title, chapter, or track numbers may not be recorded on some discs.
DivX®
- Official DivX Certified™ product.
- Plays all versions of DivX® video (including DivX® 6) with standard playback of DivX® media files.
(DivX® version cannot be upgraded on this product.)

■ Icons used on DVD discs
Check the icons on the DVD case before playing your discs.
| Display Description | |
Region number (playable area number)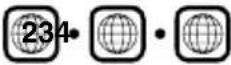 | DVD discs are programmed with region numbers indicating countries in which they can be played. This system can play discs with region number on the back of the unit. |
| Format recorded on the DVD | To adopt the video format to the connected TVs ("wide-screen TV" or "4:3 size TV"). |
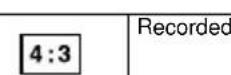 | in 4:3. |
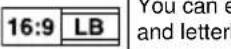 | enjoy wide images on a wide-screen TV box size images on the 4:3 size TV. |
 | You can enjoy wide images on a wide-screen TV images with the side edges cut on the 4:3 |
| Type of subtitles recordedExample:1: English2: French | Recorded subtitle languages.Language can be selected with the SUB TITLE button. |
| Number of camera angles | Number of angles recorded on the DVD.Angles can be selected with the ANGLE button. |
| Number of audio tracks and audio recording systemsExample:1: Original(Dolby Digital 2 Surround)2: English(Dolby Digital 5.1 Surround) | The number of audio tracks and audio recording systems are indicated.The audio recorded on the DVD can be switched by using the AUDIO button.The number of audio tracks and recording systems vary depending on the DVD. Check them in the DVD's manual. |
Type of subtitles recordedExample: 1: English2: French 1: English2: French | Recorded subtitle languages.Language can be selected with the SUB TITLE button. |
Number of camera angles | Number of angles recorded on the DVD.Angles can be selected with the ANGLE button. |
Number of audio tracks and audio recording systems Example:1: Original(Dolby Digital 2 Surround)2: English(Dolby Digital 5.1 Surround) Example:1: Original(Dolby Digital 2 Surround)2: English(Dolby Digital 5.1 Surround) | The number of audio tracks and audio recording systems are indicated.The audio recorded on the DVD can be switched by using the AUDIO button.The number of audio tracks and recording systems vary depending on the DVD. Check them in the DVD's manual. |
Make sure to unplug the AC power lead before making any connections.
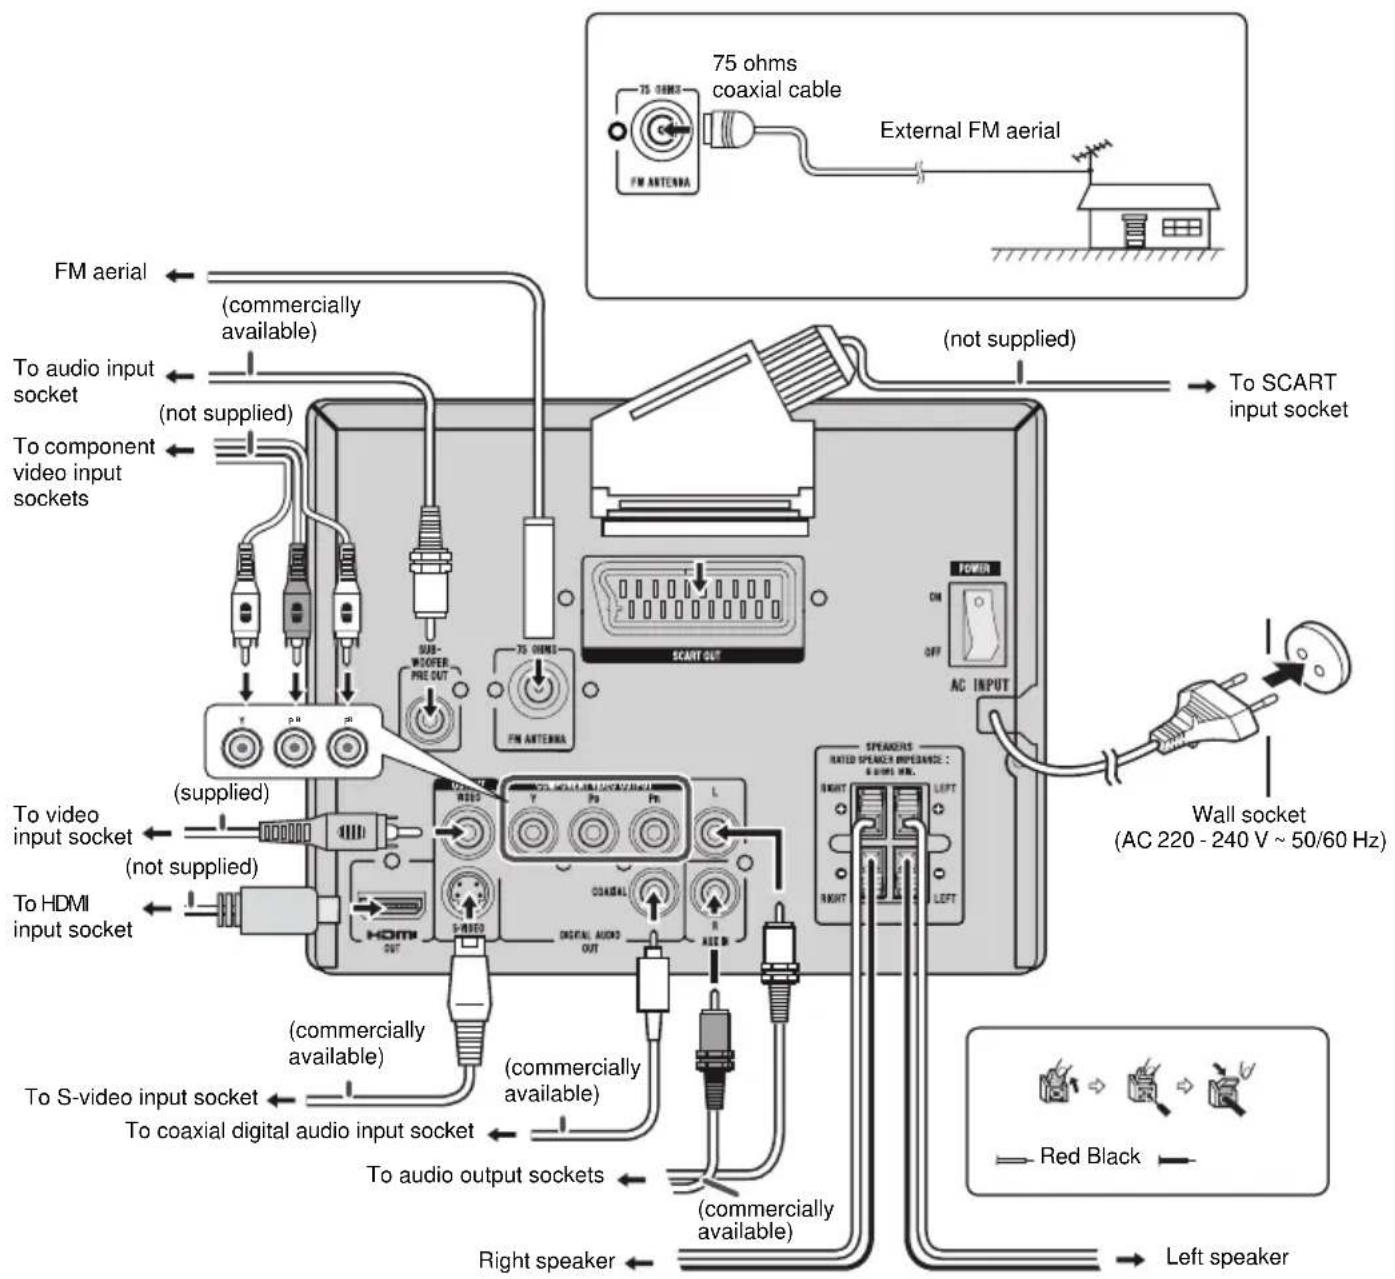
Aerial connection
Supplied FM aerial:
Connect the FM aerial wire to the FM ANTENNA 75 OHMS socket and position the FM aerial wire in the direction where the strongest signal can be received.
Note:
Placing the aerial on the unit or near the AC power lead may cause noise pickup. Place the aerial away from the unit for better reception.
■ External FM aerial
Use an external FM aerial if you require better reception. Consult your dealer.
Note:
When an external FM aerial is used, disconnect the supplied FM aerial wire.
■ Speaker connection
Connect the black wire to the minus (−) terminal, and the red wire to the plus (+) terminal.
Caution:
- Use speakers with an impedance of 6 ohms or more, as lower impedance speakers can damage the unit.
- Do not mistake the right and the left channels. The right speaker is the one on the right side when you face the unit.
- Do not let the bare speaker wires touch each other.
- Do not allow any objects to fall into or to be placed in the bass reflex ducts.
- Do not stand or sit on the speakers. You may be injured.
Incorrect
Remote control
Battery installation
1 Open the battery cover.
2 Insert the supplied batteries according to the direction indicated in the battery compartment.
When inserting or removing the batteries, push them towards the battery terminals.
3 Close the cover.

Precautions for battery use:
- Replace all old batteries with new ones at the same time.
- Do not mix old and new batteries.
- Remove the batteries if the unit will not be used for long periods of time. This will prevent potential damage due to battery leakage.
Caution:
- Do not use rechargeable batteries (nickel-cadmium battery, etc.).
- Installing the batteries incorrectly may cause the unit to malfunction.
- Batteries (battery packed or battery installed) shall not be exposed to excessive heat such as sunshine, fire or the like.
Battery removal:
Open the battery cover and pull up the battery to take out.
Notes concerning use:
- Replace the batteries if the operating distance is reduced or if the operation becomes erratic. Purchase 2 "AAA" size batteries (UM-4, R03, HP-16 or similar).
- Periodically clean the transmitter on the remote control and the sensor on the unit with a soft cloth.
- Exposing the sensor on the unit to strong light may interfere with operation. Change the lighting or the direction of the unit if this occurs.
- Keep the remote control away from moisture, heat, shock, and vibrations.
■ AC power connection
After checking all the connections have been made correctly, plug the AC power lead of this unit into the wall socket. If you plug in the unit first, the unit will enter the stand-by mode.
Note:
Unplug the AC power lead from the wall socket if the unit will not be in use for a prolonged period of time.
■ Test of the remote control
After installing the unit (see pages 6 - 7), check that the remote control operates correctly. Point the remote control directly at the remote sensor on the unit.
The remote control can be used within the range shown below: Press the ON/STAND-BY button. Does the power turn on? Now, you can use the unit.

Changing the setup menu
Turn on the TV, and switch the input to the "VIDEO 1", "VIDEO 2", etc. accordingly.

1 Press the ON/STAND-BY button to turn the power on.
● The startup screen appears. - The startup screen does not appear when the input is not set to the disc mode. Press the FUNCTION button to select DVD/CD mode.

2 Press the SETUP button.
3 Press the button to select a menu and press the ENTER button.
- See the list on pages 8 - 10 for setup menu.
4 Press the ▲ or ◀ button to change the setting and press the ENTER button.
- See the list on pages 8 - 10 for the selectable parameters.
5 Press the SETUP button.
● The setting is completed. ● To change other settings, begin from step 2.
Notes:
- During playback, "PREFERENCES" settings cannot be changed.
- Settings are stored even if the unit is set to the stand-by mode.
- The backup function protects the stored settings for a few hours should there be a power failure or the AC power lead disconnection.
- If the startup screen is blurred, change the TV type in the setup menu.
| Setup menu $electable parameters (* indicates default setting) Description | |||||
| General TV |  | DISPLAY | 4:3 PANSCAN*4:3 LETTERBOX16:9WIDE SQUEEZE | The screen mode should be set according to the connected TV type (for details, see page 10). | |
| ANGLE MARK | ON*OFF | ||||
| OSD LANGUAGE | ENGLISH*POLISHCZECHSLOVAKROMANIANHUNGARIAN | You can select the desired OSD (On Screen Display) language for the setup menu or playback control screen. | |||
| SCREEN SAVER | ON* A screen saver appears. | ||||
| OFF The screen saver disabled. | |||||
| LAST MEMORY | ON* If accidentally push ON/STAND-BY or OPEN/CLOSE or FUNCTION button during playback mode, you can resume playback from the point playback is stopped after power on back or you push the OPEN/CLOSE button to close the disc tray. | ||||
| OFF Last memory not function. | |||||
| Audio ANALOG |  | AUDIO | DOWNMIX | LT/RT STEREO* | |
| DIGITAL AUDIO | DIGITAL OUTPUT | SPDIF OFFSPDIF/RAW*SPDIF/PCM | Useful whilst using HDMI cable. When playing a disc recorded with Dolby Digital or DTS, the corresponding digital signals will be output from the HDMI Output socket.PCM: Choose this setting if the HDMI TV cannot support Dolby Digital or DTS to avoid noise or mute from the TV.RAW: Choose this setting if the HDMI TV can support Dolby Digital or DTS. | ||
| LPCM OUTPUT | 48K*96K | Select the sampling frequency at 48 kHz/16 bit or 96 kHz/24 bit capability after you select SPDIF/PCM at SPDIF SETUP. | |||
| Setup menu | Selectable parameters (* indicates default setting) | Description | |||
| Dolby |  | DUAL MONO | STEREO* L-MONO R-MONO MIX-MONO | ||
| DYNAMIC (*1) | FULL Audio with fully compressed dynamic range. | ||||
| 3/4 1/2 1/4 | Audio with partially compressed dynamic range. | ||||
| OFF* Audio with uncompressed dynamic range. | |||||
| Video |  | VIDEO OUTPUT (*2) | SVIDEO COMPONENTS SCART* | ●SVIDEO: Choose this setting for S-VIDEO output. ●COMPONENTS: Choose this setting for COMPONENT output. ●SCART: Choose this setting for SCART output. | |
| RESOLUTION | 480I 576I 720P (50Hz)* 1080I (50Hz) 1080P (50Hz) 720P (60Hz) 1080I (60Hz) 1080P (60Hz) | You can select HDMI resolution whilst using HDMI cable. If you use TV without multi-system (PAL or NTSC only) whilst doing HDMI setup, select any resolution with 50 Hz only for PAL system. Whilst for TV with NTSC system, select any resolution with 60 Hz. | |||
| COLOR SETTING | SHARPNESS H | GH MEDIUM* LOW | |||
| BRIGHTNESS -20 -> 0* -> +20 | |||||
| CONTRAST -16 -> 0* -> +16 | |||||
| GAMMA HIGH | MEDIUM* LOW NONE | ||||
| HUE | -9 -> 0* -> +9 | ||||
| SATURATION | -9 -> 0* -> +9 | ||||
| LUMA DELAY | 0T* 1T | ||||
| DivX VOD | OK | SHARP provide you the DivX registration code that allows you to rent and purchase videos using the DivX service. Please go to www.divx.com/vod for more information. | |||
| HDMI SETUP | HDMI | ON* OFF | |||
| AUDIO SOURCE | AUTO* PCM | ||||
| PCM | |||||
| Preference |  | TV TYPE | PAL* AUTO NTSC | Please refer page 10. | |
| PBC | ON* OFF | Please refer page 19. | |||
| AUDIO | ENGLISH* POLISH CZECH SLOVAK ROMANIAN HUNGARIAN | Select the language audible from the speakers. | |||
| SUBTITLE | ENGLISH* POLISH CZECH SLOVAK ROMANIAN HUNGARIAN OFF | Select the subtitle displayed on the TV screen. | |||
| DISC MENU | ENGLISH* POLISH CZECH SLOVAK ROMANIAN HUNGARIAN | ||||
| PARENTAL 1 | KID SAFE2 G3 PG4 PG 135 PGR6 R7 NC 178 ADULT* | Set a restriction level for DVD viewing. (For details, see page 11) | |||
| PASSWORD | PASSWORD | CHANGE See | page 11 for password setting. | ||
| DEFAULT RESET This resets all setting (Except for Parental and Password) to factory default. | |||||
(*1) Selects the dynamic range compression to fit the individual listening situation of the audience. This function can be used in DVD playback. Depending on the disc, sounds may become too loud or inaudible during playback. Dolby Digital's dynamic range control allows you to adjust the sound range. (*2) Selecting resolution in SCART/COMPONENTS output has no effect on the SCART/COMPONENTS output resolution.
TV display setting
| Indicator Setting | ||
| 4:3PANSCAN | When playing a wide image (16:9) disc, the left and right sides of the image are cut (pan scan) to display a natural-looking 4:3 size image.A wide image disc without pan scan played back in 4:3 letterbox.A 4:3 disc is played in 4:3. |  |
| 4:3LETTERBOX | When playing a wide image (16:9) disc, black bands are inserted at the top and bottom and you can enjoy full wide images (16:9) on a 4:3 size TV.A 4:3 disc is played in 4:3. |  |
| 16:9 A wide image (16:9) is displayed when playing a wide image (16:9) disc.When playing a 4:3 image disc, the image size depends on the setting of the connected TV.If you play back a wide image (16:9) disc with this unit connected to a 4:3 TV, the vertically shrunk image is displayed. | 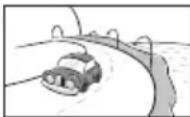 | |
| WIDESQUEEZE | When play 4:3 disc with this unit connected to a 16:9 TV (wide screen TV), the horizontally expended image is displayed. If you use this setting, a natural looking image 4:3 size can be viewed with the black bands are inserted at the left and right of the screen.If you playback a wide image (16:9) disc with 4:3 TV, the vertically shrunk image is displayed. |  |
Note: When playing the disc with a fixed video format, it will not change even if the TV screen size is changed.
Language setting
| Indicator Setting | |
| OSD LANGUAGE | A language for screen display can be set for the setup menu, messages, etc.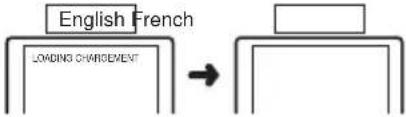 |
| AUDIO A language | A language for audio can be set.You can specify a language for conversation and narration. |
| SUBTITLE A | language for subtitle can be set.The subtitles are displayed in a specified language. |
| DISC MENU | A language for disc menus can be set.Menu screens are displayed in a specified language. |
■ Parental setting
1 Select "PREFERENCES" on the setup menu screen (see steps 1 - 3 on page 8). 2 After selecting "PARENTAL" in step 4 on page 8, select the parental level and press the ENTER button. 3 Enter a 6-digit password using the Direct Search buttons and press the ENTER button.
* If this is the first time, enter "000000".
| Indicator Setting | |
| 1 KID SAFE Only | DVD software intended for children can be played back. |
| 2 G to 7 NC-17 O | only DVD software intended for general use and children can be played back. |
| 8 ADULT | DVD software of any grade (adult/general/children) can be played back. |
Note:
While playing a disc with parental lock, the display may show a request for a password to watch some restricted scenes. In such a case, enter the password to temporarily change the parental level.
■ Password setting
From the setup menu, select "PASSWORD SETUP PAGE", "PASSWORD" and then "CHANGE". A screen appears.
![graph TD A["Input: NETS, ALNT, USB BY, USB1, PASSWORD"] --> B["Password: GET/NO"] B --> C["Password: GET/NO"] C --> D["OK: PASSWORD, NEW PASSWORD"] D --> E["OK: PASSWORD, RETURN FREE"] E --> F["FINAL: OK/NO"]](/content/2026/06/1258714/images/98683adb88fc97b1641dd5647a1b05e8cd2e61638b716b13c1ee20fa3a3e7d83.jpg)
1. Enter the old password using the Direct Search buttons. (If this is the first time, enter "000000"). 2. Enter the new password using the Direct Search buttons. 3. Enter the new password again for confirmation.
Note:
If you forget your password, follow the sequence below.
At the setup menu, select "PASSWORD SETUP PAGE", "PASSWORD" and then "CHANGE".
- Enter the old password as "000000" using the Direct Search buttons.
- Enter the new password.
- Enter the new password again for confirmation.

■ To turn the power on
Turn the power switch to the ON position; this will put the set in standby mode. Press the ON/STAND-BY button to turn the power on.
After use:
Press the ON/STAND-BY button to enter the power stand-by mode. In STAND-BY mode, the red indicator will light up.

Note:
When the power switch is turned OFF, the backup function will protect the memorized function mode for a few hours.
■ Auto power off function
In the stop mode of DVD/CD operation, the main unit enters the stand-by mode after 15 minutes of inactivity.
Volume auto set-in
- If you turn off and on the main unit with volume set to 16 or higher, the volume will start at 16.
- If you turn the unit off then on again with the volume level set to less than 15, it will turn on again at the level set.
Volume control
Main unit operation:
When the VOLUME control is turned clockwise, the volume will increase. When it is turned anti-clockwise, the volume will decrease.
Remote control operation:
Press the VOLUME (+ or -) button to increase or decrease the volume.

■ Extra bass control (X-BASS)
When the X-BASS button is pressed, the unit will enter the extra bass mode which emphasizes the bass frequencies and "X-BASS ON" will appear.
To cancel the extra bass mode, press the X-BASS button again.
Muting
The volume is muted temporarily when pressing the MUTE button on the remote control. Press again to restore the volume.
* The TV screen displays "MUTE" when the MUTE button is pressed.
Equalizer
When the EQUALIZER button on the remote control is pressed, the current mode setting will be displayed. To change to a different mode, press the EQUALIZER button repeatedly until the desired sound mode appears.


Playback
DVD CD MP3 JPEG DivX SVCD VCD
1. Press the ON/STAND-BY button to turn the power on. 2. When the input is not set to the disc mode, press the FUNCTION button repeatedly to display the startup screen.
The startup screen appears.

3. Press the (▲) button to open the disc tray. 4. Place the disc on the disc tray, label side up. Be sure to place 8 cm (3") discs in the middle of the disc position. 5. Press the (▲) button to close the disc tray. Discs supporting auto start will start to play once you close the disc tray even if you do not press the ▶ (▼) button. 6. If playback does not start in step 5, press the /▶/1 button.
Note:
During operation of FM/AUX, opening or closing the CD tray will switch to DVD function.
To interrupt playback:
Press the ▶ (Ⅱ) button. To resume playback from the same point, press the ▶/Ⅱ ( /) ▶ button.
To stop playback
DVD:
Press the ■() button twice.
Audio CD/MP3/JPEG
Press the ■( ) button.
When the unit is left unoperated for more than 5 minutes after pressing the ☐ button, a screen saver appears (see page 8 when the screen saver setting is "ON").
Press any button on the main unit or remote control. The startup screen returns.
Caution:
- Close the disc tray when not in use. Otherwise, dust may accumulate inside and cause malfunction.
- The unit gets slightly warm when used for a long time. It does not mean the unit is damaged.
- When attempting to play discs with scratches or of a different region number, or unplayable or restricted (*1) discs, an error message will appear on the TV display and the disc will not play. (*1) Viewing is prohibited on some DVDs according to the audience age.
Notes:
● During disc initialisation, the volume cannot be adjusted. - Stop positions may be recorded on some discs. When you play such a disc, playback stops there. - During an operation, Ⓞ may appear indicating that the operation is disabled by the disc. - The main unit detects loaded discs automatically and then the indicators light up.
■ To resume playback after stopping (resume play)
DVD
You can resume playback from the point playback is stopped.
1 Whilst a disc is playing, press the ☐ Button. The system stores the point you stopped.
2 To restart play, press the ▶(M) button. Play resumes from the point you stopped.
To cancel the resume playback:
Press the ■( ) button twice.
Notes:
● The resume playback feature is disabled on some discs. - Depending on the disc, playback may resume from slightly before the stopped position.
■ DVD mode operation indicators
DVD
The following are examples of operation indicators that appear during DVD playback.
| Operation TV screen Unit display | ||
| When the power is on without a disc. | NO DISC | NO DISC |
| Disc data is being read. | LOADING | LOADING |
| Stop | STOP | |
| Play | ||
| Pause | ||

■ To locate the beginning of a chapter (track) (skip)
DVD SVCD VCD CD MP3 JPEG
You can move to other tracks with simple operations. When playing SVCD or VCD, cancel the P.B.C. (playback control) (see page 19).
Whilst a disc is playing, press the or button.
- Use the ▶ button to skip to the next chapter (track).
- Use the button to skip to the previous chapter (track).
- On SVCD, VCD and Audio CD, press the button to skip to the beginning of the current track. Press the button again (twice) to skip to the beginning of the previous track.
Notes:
- Some discs do not display the chapter (track) and the skip feature is disabled.
- On a DVD, skip does not operate between titles.
■ Fast forward/Fast backward (search)
DVD SVCD VCD CD MP3 DivX
You can search the desired point as you play the disc.

- WARNING
- CAUTION
- COPYRIGHT INFORMATION
- COPY PROTECTION
- PL - IMPORTANT INFORMATION
- SK - IMPORTANT INFORMATION
- INFORMATION ON DISPOSAL FOR USERS (PRIVATE HOUSEHOLDS)
- IN THE EUROPEAN UNION
- IN OTHER COUNTRIES OUTSIDE THE EU
- INFORMATION ON DISPOSAL FOR BUSINESS USERS
- INFORMATION ON BATTERY DISPOSAL
- PL - INFORMATION ON DISPOSAL OF USED DEVICE
- SPECIAL NOTE
- ACCESSORIES
- CONTENTS
- PAGE
- GENERAL INFORMATION
- PREPARATION FOR USE
- BASIC OPERATION
- DVD OPERATION
- DVD PLAYBACK
- USEFUL OPERATION
- VARIOUS SETTINGS
- VIDEO CD AND SUPER VIDEO CD OPERATION
- VIDEO CD AND SUPER VIDEO CD PLAYBACK
- CD, CD-R AND CD-RW OPERATION
- CD OPERATION
- MP3 AND JPEG DISC OPERATION
- RADIO OPERATION
- ADVANCED FEATURES
- REFERENCES
- GENERAL
- VOLUME CONTROL
- CONTROLS AND INDICATORS
- FRONT PANEL
- DISPLAY
- SPEAKER SYSTEM
- REMOTE CONTROL
- TYPES OF PLAYABLE DISCS
- ICONS USED IN THIS OPERATION MANUAL
- DISCS THAT CANNOT BE PLAYED
- NOTES
- TITLE, CHAPTER AND TRACK
- NOTE
- DIVX®
- ICONS USED ON DVD DISCS
- AERIAL CONNECTION
- SUPPLIED FM AERIAL
- EXTERNAL FM AERIAL
- SPEAKER CONNECTION
- BATTERY INSTALLATION
- PRECAUTIONS FOR BATTERY USE
- BATTERY REMOVAL
- NOTES CONCERNING USE
- AC POWER CONNECTION
- TEST OF THE REMOTE CONTROL
- CHANGING THE SETUP MENU
- LANGUAGE SETTING
- PARENTAL SETTING
- PASSWORD SETTING
- TO TURN THE POWER ON
- AFTER USE
- AUTO POWER OFF FUNCTION
- VOLUME AUTO SET-IN
- MAIN UNIT OPERATION
- REMOTE CONTROL OPERATION
- EXTRA BASS CONTROL (X-BASS)
- MUTING
- EQUALIZER
- PLAYBACK
- TO INTERRUPT PLAYBACK
- TO STOP PLAYBACK
- DVD
- AUDIO CD/MP3/JPEG
- TO RESUME PLAYBACK AFTER STOPPING (RESUME PLAY)
- TO CANCEL THE RESUME PLAYBACK
- DVD MODE OPERATION INDICATORS
- TO LOCATE THE BEGINNING OF A CHAPTER (TRACK) (SKIP)
- WHILST A DISC IS PLAYING, PRESS THE OR BUTTON
- FAST FORWARD/FAST BACKWARD (SEARCH)
Brand : SHARP
Model : XL-E75H
Category : Hi-Fi System