
DXI 80 WL - Radio SCOTT - Free user manual and instructions
Find the device manual for free DXI 80 WL SCOTT in PDF.


| Product Type | Portable Radio |
| Brand | Scott |
| Model | DXI 80 WL |
| Dimensions (approx.) | 200 x 120 x 60 mm |
| Weight (approx.) | 500 g |
| Power Supply | 4 x AA batteries (not included) or AC adapter (optional) |
| Battery Life (approx.) | Up to 30 hours with alkaline batteries |
| Frequency Bands | AM (MW) and FM |
| Tuning Method | Analog dial with fine tuning knob |
| Built-in Speaker | Yes, 3-inch dynamic speaker |
| Headphone Jack | 3.5 mm stereo jack |
| Volume Control | Rotary knob |
| Antenna | Telescopic antenna for FM, built-in ferrite for AM |
| Additional Features | Carry handle, battery level indicator |
| Care & Cleaning | Wipe with a soft dry cloth; avoid liquids and abrasives. |
| Safety Precautions | Do not expose to water or excessive heat; keep away from children. |
| Spare Parts & Repairability | Contact Scott customer service for spare parts; repair only by qualified personnel. |
Frequently Asked Questions - DXI 80 WL SCOTT
User questions about DXI 80 WL SCOTT
0 question about this device. Answer the ones you know or ask your own.
Ask a new question about this device
Download the instructions for your Radio in PDF format for free! Find your manual DXI 80 WL - SCOTT and take your electronic device back in hand. On this page are published all the documents necessary for the use of your device. DXI 80 WL by SCOTT.
USER MANUAL DXI 80 WL SCOTT
Follow the advice below for safe and appropriate operations.
PLACEMENT
· Do not use the unit in places which are extremely hot, cold, dusty, or humid.
- Place the unit on a flat and even surface.
- Do not restrict the air flow of the unit by placing it in a place with poor air flow, by covering it with a cloth, or by placing it on a carpet.
- Do not place naked flame sources, such as lighted candles on the apparatus.
- Use the apparatus only in moderate climates.
- Do not expose the apparatus to rain or splash it with water.
- Do not place objects filled with liquids such as vases, on the apparatus.
SAFETY
- When connecting and disconnecting the AC power cord from the AC mains outlet, take hold of the plug and not the cord. Pulling the cord may damage it and may be dangerous.
- The mains plug must be easily accessible.
- When you are not going to use the unit for a long period of time, disconnect the AC power cord from the AC mains outlet.
AC VOLTAGE
- Before use, check that the rated voltage of your unit matches your local mains voltage.
CONDENSATION
- The unit may not work properly if it has condensation inside.
- Unplug the unit for 1 to 2 hours before turning the power back on, or gradually heat the room up and dry the unit before use.
- Leave a space of at least 5 cm around the unit to ensure sufficient ventilation.
BATTERIES
· Pay attention to the environmental aspects of battery disposal.
 | CAUTION |  |
| RISK OF ELECTRIC SHOCK DO NOT OPEN | ||
| The lightning flash with an arrowhead symbol within a triangle is a warning sign alerting the user to the presence of dangerous voltage inside the unit. | ATTENTION: To reduce the risk of electric shock, do not remove the cover. There are no user serviceable parts inside the unit. Refer all servicing to qualified personal. | The exclamation mark within a triangle is a warning sign alerting the user to the presence of important instructions accompanying the product. |
TABLE OF CONTENTSABLE OF CONTENTS
PRECAUTIONS 1
TABLE OF CONTENTS----2
BOX CONTENTS 2
FEATURES 2
LOCATION OF CONTROLS----3
PREREQUISITES FOR INTERNET RADIO 4
CONNECTIONS 4-5
INSTALLING THE BATTERY----5
BASIC OPERATIONS----6-7
TROUBLESHOOTING GUIDE 12
TECHNICAL SPECIFICATIONS----13
BOX CONTENTSX CONTENTS
-
Main unit
-
Audio cable
-
Remote control with battery
-
Instruction manual
FEATURESTURES
This unit allows you to enjoy thousands of Internet radio stations from around the world through your broadband Internet connection. Here are the different features of your Internet radio:
- You can listen to web radio stations even when your PC is switched off. vTuner, the live Internet radio service, offers more than 11,000 radio stations from around the world and more than 10,000 regularly updated podcasts.
· Enjoy music stored on your (networked) PC. - You can connect the unit to your Internet network wirelessly (Wi-Fi) or with a cable (Ethernet).
· You can store up to nine web radio stations. - You can record programs broadcast on a web radio station on a USB device or SD/MMC card for private usage only.
- You can play files on your USB device or SD/MMC card.
- You can connect an external amplifier system to your unit with the audio out jack.
- Automatic time set and summer/winter time for European time zones.
· The firmware can easily be upgraded via the Internet.
Note:
Due to continuous improvements, the features may be subject to change without notice. Please upgrade the firmware regularly by browsing through the menus: Main menu -> Set-up -> Update software. Please download the latest version of the instruction manual at http://www.awox.com/Downloads/scott/.
LOCADICAN OF CONTROLSOLDF CONTR
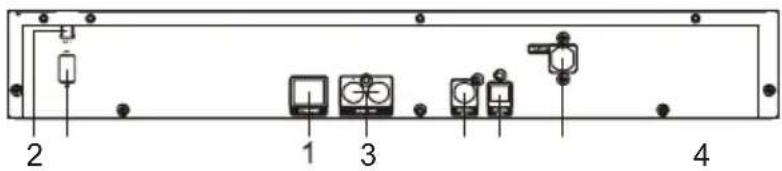
Rear panel
-
Ethernet jack
-
AC power cord
-
Audio Out L/R jacks
-
Power ON/OFF switch
-
COAXIAL OUT jack
-
OPTICAL OUT jack
-
WiFi antenna
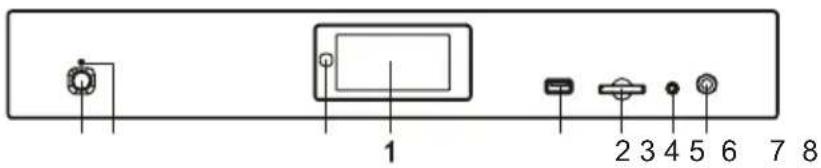
Front panel
- LCD display
- SD/MMC card slot
- USB port
- IR (Infra-red) remote control sensor
- (ON/STANDBY button
- Standby LED indicator
- AUX IN jack
- Headphones jack
Remote control
- (⏻) ON/STANDBY button
- BACK button
- DOWN ▼ button
- Preset buttons
- Repeat/Shuffle 📋/ 📋 button
- Previous ◀◀ button
- VOL +/- buttons
- OK button
- UP▲ button
- Play/Pause ▶ II button
- Stop ■ button
- Next ▶▶ button
- RECORD REC button
- Fast backward ◀ button
- MEM button (memory)
- MENU button
- MUTE button
- Fast forward ▶ button
- RADIO button
- USB/CARD button
- MEDIA button
- SETUP button

LCD display
- Name of current menu
- Connection status (Wi-Fi or Ethernet)
- Navigation
- Volume
- Time
- Content of the current menu

First of all, you will need a broadband Internet connection: a modem + router or a wireless access point. You can choose between a wired connection (Ethernet) and a wireless connection (Wi-Fi).
CONNECTIONS CONNECTIONS
Note: In order to avoid any malfunctions, do not turn on the unit before making the connections.
Wired connection (Ethernet)
Connect the unit to your broadband Internet connection using an RJ45 Ethernet cable (not supplied) via the router and broadband modem (cable/DSL) as illustrated. Follow your router's instruction manual to ensure a correct Internet connection.
If you do not have a router, connect the unit directly to the modem and then switch the modem off and back on again to access the Internet connection.
Note:
Some modems have a built-in router, so they are included in the same unit.
Wi-Fi connection
Use a router (not supplied) to connect the wireless access point (Wi-Fi) to your broadband Internet connection as illustrated. Should you have problems with the Internet connection setup, contact your networking device supplier and/or Internet service provider.
Notes:
- The unit should work anywhere within a range of at least 15 meters around the wireless access point. However, the connection will depend on your router's performance and environmental factors such as the number and thickness of the walls, doors or windows.
- Some modems include a wireless router incorporated in the same unit.
![graph TD A["Router MODEM"] -->|RJ45 ETHERNET CABLE (NOT SUPPLIED)| B["Internal Data Port"] B --> C["Internet Data Port"] C --> D["External Data Port"]](/content/2026/06/1258684/images/c6f1a14dab1a1679cff3e2fd96337e9a8153073970577e9aecadfce114e3c5f3.jpg)
![graph TD A["Router MODEM"] -->|Wireless Signal| B["Internet Data Port"] B --> C["Data Port"] style A fill:#f9f,stroke:#333 style B fill:#ccf,stroke:#333 style C fill:#cfc,stroke:#333](/content/2026/06/1258684/images/6c81b91c25cc2722c537dd90f0a60b24e8df980a98d133780bbf38afc27fdf0a.jpg)
Configurations
- If your wireless network is protected by Wired Equivalent Privacy (WEP) or Wi-Fi Protected Access (WPA) data encryption, you need to know the WEP or WPA code in order to connect the unit to the network.
If your wireless network is configured to accept trusted units only, you need to enter the unit's MAC address into your wireless access point. The unit's MAC address can be located by browsing through the menus: Main menu -> Set-up -> Information -> Network Status.
To enter the unit's MAC address into your wireless access point, you must read the instructions supplied with the wireless access point.
For more details on configurations, refer to the "INTERNET RADIO OPERATION" section.

Connecting the power supply
Insert the AC power cord plug into an AC mains outlet with a 230V AC \~ 50Hz power source.
Connecting an external amplifier system
Connect the Internet radio's Audio Out L/R jacks to the AUDIO IN jacks on the external amplifier system using the audio cable (supplied).
For better sound quality, connect the COAXIAL OUT or OPTICAL OUT jack to a digital amplifier system (cable not supplied.
| Audio cable | RCA jacks | |
| Right | Left | |
| Red plug √ | ||
| White plug √ | ||
Connecting headphones
Plug the headphones (not supplied) into the unit's Ω jack for private listening.
INSTALLING ATHENGBARTEERIESTTERIES
Installing the remote control batteries
- Remove the battery compartment cover at the back of the remote control.
- Insert 2 AAA/LR03 batteries with the polarity (+) as shown in the diagram at the back of the remote control.
- Replace the battery compartment cover.
Note:
The remote control battery normally lasts for about one year, although it depends on how often and for what operations the remote control is used.
Replace the batteries if the remote control fails to work when it is operated near the unit.
Precautions when using batteries
- Replace only with the same or equivalent type of battery.
- Ensure you follow the correct polarities when installing the batteries (see battery compartment). Reversed batteries may damage the remote control.
- Exhausted batteries must be removed as they may leak.
- Dispose of batteries properly according to the environmental regulations in force.
BASIC OPERATIONS
ON/ STANDBY mode
After connecting the Internet radio to the power supply (refer to previous section - CONNECTIONS), set the power ON/OFF switch to "ON" and then press the (⏻) ON/STANDBY button to turn on the unit or go to standby mode.
Mode
Press the RADIO, USB/CARD, MEDIA or SETUP button to enter the mode.
Main menu
Press the MENU button repeatedly to switch between the main menu and playback screen.

Navigation and number/character entry
Use the ▲,▼ buttons to scroll through the menu and press the OK button to enter the highlighted item. Press the BACK button to return to the previous menu. Press the MENU button to return to the main menu. When entering numbers, e.g. a time, press the ▲,▼ buttons to select the desired number and press the OK button to confirm.
When entering characters, such as a WEP/WPA key for example (during the Wi-Fi connection set-up), use the ◀◀, ▶▶| buttons to move to the previous or next number or character. Use the BACK button to delete the last
number or character entered. Press the ▶II button to confirm your choice.

In the main menu, you can select: "Internet Radio", "USB/SD/MMC", "My media servers", "Aux In", and "Setup".

"Set-up" menu:
| Settings ttinin Descriptions Display | |||
| “Internet Connection” | Wi-Fi: Ethernet: | Wi-Fi connection. Ethernet connection. | 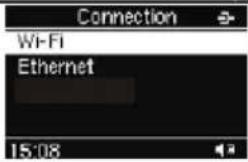 |
| “Time” | Automatic: Manual: Format: | Automatic time set. Adjust the clock time manually. Select 24-hour or 12-hour display. |  |
| “Time zone” | Select the time zone for your region. The default is GMT+01. | ||
| “Language” | Select the on-screen-display language. | ||
| “Update software” | Update firmware via the Internet. |  | |
| Information | Check the serial number and network status such as MAC address. | ||
| “Reset” | Reset all settings to default values. | ||
TIME set
Automatic time set
Select Set-up -> Time -> Automatic. When the unit is successfully connected to the Internet, the time is automatically set in accordance with the preset time zone.
Note:
Winter and summer time are automatically set when the GMT+01 time zone is selected.
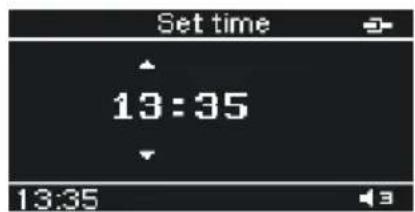
Setting the clock manually
When not connected to the Internet, you have to set the clock manually.
- Select the following menus: Set-up -> Time -> Manual. The clock time is displayed.
-
Press the ▲,▼ buttons to adjust the hours and press the OK button to confirm.
-
Repeat step 2 to adjust the minutes.
INTERNET RADIO INTERNET RADIO
Your unit can be connected to a wireless network (Wi-Fi) or an Ethernet connection. This allows you to enjoy the vTuner web radio service.
Note:
Before operating this mode, make sure that you have read and understood the instructions in "PREREQUISITES FOR INTERNET RADIO" and "CONNECTIONS".
Configurations
Wired connection (Ethernet)
- Connect the unit to your broadband Internet connection using an RJ45 Ethernet cable (not supplied). Refer to "CONNECTIONS" for more details.
- Browse through the following menus: "Set-up" -> "Internet Connection" -> "Ethernet" -> "Automatic mode (DHCP)" or "STATIC IP".
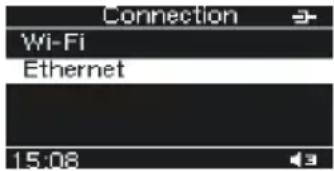
Depending on your Internet connection type, select "Automatic mode (DHCP)" or "STATIC IP" to enable the unit to connect to the Internet. In "DHCP" mode, an IP address is automatically assigned to the unit. In "STATIC IP" mode, you must check with your service provider to obtain the correct IP data. To enter these IP data, browse through the following menus:
"IP address" -> "network mask" -> "gateway IP address" -> "DNS server IP address"
Wi-Fi connection
- Ensure that your Wi-Fi network is working properly (refer to the "CONNECTIONS" section).
- Browse through the following menus: "Set-up" -> "Internet Connection" -> "Wi-Fi". The unit will scan for all available wireless networks and display their names.
- Select the network and press the OK button to confirm.
- The encryption security system (WEP or WPA) will be detected. Enter the WEP or WPA code. In order to do so, refer to previous section - BASIC OPERATIONS.

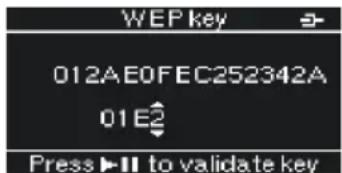
- Press the ▶II button to confirm.
Note:
For both the Ethernet and Wi-Fi connection, the message “Connection successful” will be displayed to confirm that the unit is connected to the Internet. If this is not the case, “Connection failed” will be displayed. In this case, enter the IP data and the WEP or WPA key again and also make sure that the wired or wireless networks are available and working.
Listening to a web radio station
After successfully connecting to the Internet, you can enjoy the vTuner web radio service by selecting "Internet Radio". The following options are available:

| Option Description | |
| Country | The unit can automatically detect the country in which the unit is located and display the web radio stations in that country. |
| Favorites | The “Favorites” option allows you to find your favorite web radio stations. |
| Location | This option allows you to select a country and then select a web radio station in this country. |
| Format | This option allows you to choose a category: “News”, “Comedy”, “Dance” and “Sports”. etc. |
| New Stations | Select new stations that have been added since the last update. |
| Most Popular Stations | Select the most popular stations. |
| Podcasts By Genre | Select your favorite type of podcast such as “Arts Entertainment”, “Lifestyle”, “Music”, “Talk”, “TV” and “Variety”. |
| Podcasts By Location | Select the type of podcast by location. |
During playback, you can press the ▶ button to pause/resume play. Press the ■ button to stop.
Preset web radio stations
You can store up to nine preset web radio stations.
-
Select a station. Press the MEM button and then one of the preset buttons (1-9) to store the station under that number. The icon “①” will be displayed.
-
Repeat step 1 to store any other stations.
Listening to a preset web station
In web radio mode, press one of the preset buttons (1 -9) to listen to the preset of your choice.
Favorites list
You can bookmark the current web radio station in a list of "Favorites". This list is stored in the "Favorites" menu.
-
When you wish to store a web radio station, press the OK button to bookmark it in the "Favorites" menu.
-
To find a station stored in the "Favorites" menu, browse through the following menus: "Internet Radio" -> "Favorites" and select the desired station.
-
Press the OK button to confirm.
-
To remove a station from the favorites list, press the 📋/💡 button. Exit the "Favorites" menu and re-enter it to check that the station is no longer listed.
Notes:
Some web radio stations do not broadcast 24 hours per day, and some are not always on-line.
The Wi-Fi antenna is mounted at the back of the unit. To achieve optimum reception of the wireless connection, point the antenna toward the wireless access point and place the unit close to it. The reception depends on your router's performance and certain environmental factors.
USING A USB DEVICE AND SD/MMC CARD USING
US
This unit allows you to listen to files on a USB device or SD/MMC card. You can also copy files from your USB device to your SD/MMC card and vice-versa. You can also record web radio programs to a USB device or SD/MMC card.
Playback
-
Insert a USB device into the USB port and/or an SD/MMC card into the SD/MMC card slot on the front of the unit.
-
Browse through the following menus: "USB/SD/MMC" -> "Playing" -> "USB" or "SD/MMC".
-
Press the ▲,▼ buttons to select a folder and press the OK button to confirm the selection. Then repeat the procedure to select a file and start playback.
-
Use the ◀◀, ▶buttons to skip to the next/ previous file,.
-
To search fast backward/forward, hold down the ◀◀,▶buttons repeatedly to skip in steps of 30 seconds or 1 minute or return to normal playback. You can also press the ▶II button to return to normal playback. (Note: This function will be available at a later date.)
-
To pause playback, press the ▶II button. Press it again to resume playback.
-
To stop playback, press the ■ button.

REPEAT and RANDOM playback
Press the 📋/💡 button repeatedly to select one of the following playback modes: Repeat file 🔊, Repeat
folder 📋, Random 📋 or Repeat/ Random off.
Copy files
-
Insert both a USB device and an SD/MMC card into the unit.
-
Browse through the following menus: "USB/SD/MMC"
-> "Copy" -> "USB" or "SD/MMC".
-
Select the file to you wish to copy and press the OK button to confirm.
-
Select the destination folder and press the REC button to confirm.

Notes:
If there is not enough space on the destination device is full, copying will fail. Some external hard disks may not be supported. Preference should be given to hard disks with a built-in power supply.
Due to different formats, some models of USB devices, SD/MMC cards or MP3 players may take longer to read or may not be read at all.
You can record a program broadcast on a web radio station to a USB device or SD/MMC card.
Recording web radio station broadcasts
1) Insert a USB device and/or SD/MMC card into the unit and select the desired web radio station.
2) Press the REC button to start recording. If you have inserted both a USB device and an SD/MMC card, select the destination device (USB or SD/MMC). Press the OK button to confirm.
3) You can name the file you are about to create. To do this, use the ▲,▼ buttons to choose a character, the BACK button to delete characters and the |◀,▶| buttons to move to the previous/next character. Then press the REC or OK button to start recording.
Note:
By default, the unit will give the recorded file the name of the radio station followed by the time of recording as the name of the MP3 file.
4) To stop recording, press the button. The file will then be saved on the chosen device.


Playing recorded files
Refer to "USB DEVICE AND SD/MMC CARD OPERATION" to play the recorded files.
MEDIA SERVER MEDIA SERVER
Step 1: Set Up Media Sharing in Windows Media Player 11
After downloading and installing Windows Media Player 11 and connecting your radio to the network, you need to set up media sharing so that you can share music with your radio. The following steps describe how to set up
media sharing in Windows Media Player 11.
- In Windows Media Player 11, click the Library tab, and then click Media Sharing.
- In the Media Sharing dialogue box, select the Share my media check box.
- Check the "share my media to" option. In the list, click the icon representing your radio, then click Allow, and the selected device will show a green tick. Now click OK.
- If your device does not appear in the list of devices, perform the following steps:
In the main menu of your Internet radio, select "My Media Servers". A list of available computers will appear. Select the required computer.
Your device will now appear in the list. If you want to check that this is your radio, right-click on the device and select "Properties": your radio's MAC address will be shown.


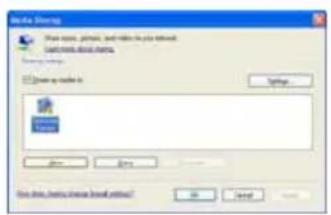


Note:
Please ensure that your PC is connected to the same network as your Internet radio. You can choose the folders that you want to share using the Library tab.
Step 2: Play Music on your Internet Radio.
After installing and configuring your radio and Windows Media Player 11, you are now ready to play music via a wireless connection. The following steps describe how to play music with your radio:
- Select "My Media Servers" in the main menu.
- Select the computer you wish to play the music files from.
- Use the controls to choose one of the following categories: Artists, Album, Playlist, Rating and then press the OK button to confirm.
- Select the tracks you want to play, then press the OK button to start playing the music.
AUX IN FUNCTIONUX IN FUNCTION
This unit has an AUX IN jack for connecting an external audio device, such as an MP3 player or portable CD player with an AUX IN cable (not supplied).
- Plug an AUX IN cable (not supplied) into the AUX IN jack. Refer to the "CONNECTIONS" section.
- In the main menu, select "Aux IN".
- Operate your external audio device as usual to select and play the music.
- Adjust the volume controls on both your external audio device and this unit to the desired volume level.

Note:
In AUX IN mode, this unit cannot display any music information (e.g. track no.) for your external audio device.
Care and maintenance
To clean the casing, unplug the unit and wipe off dust and stains with a soft, damp cloth moistened with a mild soap and water solution only. Never use benzene, thinner or similar chemicals.

If at any time in the future you should need to dispose of this product, please note that electrical products should not be disposed of with household waste. Find out where your nearest recycling centre is. Check with your local authority or retailer for more details. (Waste Electrical and Electronic Equipment Directive)
TROUBLESHOOTING GUIDETROUBLESHOOTING
GUIDE
| Problems Recommendations | |
| Internet Radio | |
| 1. No Internet connection | 1.1 Ensure that you have configured your local network correctly by connecting to the Internet from a PC using the same network.1.2 For a wired connection (Ethernet), check that the Ethernet cable is properly connected.1.3 Ensure that a DHCP server is available or that you have configured a static IP address. Read the instructions supplied with the wireless access point to set up the DHCP server.1.4 Ensure that your wireless access point does not restrict connections to particular MAC addresses. The unit's MAC address can be located by browsing through the menus: “Set-up” →“Information”→“Network Status”.1.5 If you have an encrypted network, ensure that the correct WEP or WPA codes have been entered. |
| 2. The Internet connection is successful but it is impossible to receive a particular web radio station | 2.1 The station selected does not broadcast 24 hours per day.2.2 The station has reached the maximum number of on-line listeners allowed.2.3 The station is no longer broadcasting.2.4 The link on the unit is out of date.2.5 Slow Internet connection between you and the server (often located in a different country). |
| USB device, SD/MMC card | |
| 3. USB device or SD/ MMC card cannot be inserted | 3.1 Insert it the other way round. |
| 4. USB device or, SD/MMC card is not read | 4.1 Some external hard disks may not be supported. Preference should be given to hard disks with a built-in power supply.4.2 The unit does not support NTFS format. Check that the USB device file system has FAT or FAT32 format.4.3 Due to different technical specifications, some models of USB devices, SD/MMC cards or MP3 players cannot be read. |
| General | |
| 5. The unit or display is not working properly | 5.1 Press the ON/STANDBY ⏻ button to go to Standby mode and press it again to turn the unit back on again.5.2 Reset by unplugging the AC power cord for few seconds and plugging it back in again. |
| 6. No sound 6.1 Adjust the volume.6.2 Ensure that the audio cable is properly connected.6.3 Switch off the mute function. | |
| 7. The remote control is not working | 7.1 Move closer to the unit and point the remote control towards the infrared sensor.7.2 Insert the battery with the polarity (+) as shown in the diagram on the bottom of the remote control.7.3 Replace the battery. |
Note:
Should the problem persist, please download the firmware for this Internet radio from http://www.awox.com/Downloads/scott/ and place it on a USB device. Unplug the AC power cord and insert the USB device into the unit. Plug the AC/power cord back in and it will automatically upgrade the system.
TECHNICAL SPECIFICATIONSTICALS SPECIFICA
Internet Radio
| Wired connection | Network 10/100 RJ 45 Ethernet jack |
| Wireless (Wi-Fi) connection | 802.11b/g with WEP/WPA encryption |
| V-tuner web radio service | 11,000 stations + 10,000 podcasts |
| Number of stations that can be stored | 9 |
| Wi-Fi antenna | Rigid articulated antenna |
USB device/ Card
| Compatible files | MP3, WMA, WAV |
| USB port type | 2.0 |
| USB maximum handling capacity | 320 GB |
| Card type | SD/MMC (SD HC cards are supported) |
| Card maximum handling capacity | 320 GB |
| MP3 sampling rate | 32, 44, 48 kHz |
| WMA sampling rate | 44, 48 kHz |
| Other connections | Aux in 3.5mm, stereo headphones 6.35mm, Audio out L/R, Digital Coaxial out and Optical out. |
| Power consumption | 15 W |
| Power supply | AC 230V ~ 50Hz |
| Remote control battery | 2 x 3V AAA/LR03 batteries |
| Dimensions | 70 (H) x 445 (W) x 195 (D) mm |
| Weight | 2.3 kg |
Note:
Due to continuing improvements, the technical specifications are subject to change without notice.


- PLACEMENT
- SAFETY
- AC VOLTAGE
- CONDENSATION
- BATTERIES
- TABLE OF CONTENTSABLE OF CONTENTS
- BOX CONTENTSX CONTENTS
- FEATURESTURES
- NOTE
- LOCADICAN OF CONTROLSOLDF CONTR
- REAR PANEL
- FRONT PANEL
- REMOTE CONTROL
- LCD DISPLAY
- CONNECTIONS CONNECTIONS
- WIRED CONNECTION (ETHERNET)
- WI-FI CONNECTION
- NOTES
- CONFIGURATIONS
- CONNECTING THE POWER SUPPLY
- CONNECTING AN EXTERNAL AMPLIFIER SYSTEM
- CONNECTING HEADPHONES
- INSTALLING ATHENGBARTEERIESTTERIES
- INSTALLING THE REMOTE CONTROL BATTERIES
- PRECAUTIONS WHEN USING BATTERIES
- BASIC OPERATIONS
- ON/ STANDBY MODE
- MODE
- MAIN MENU
- NAVIGATION AND NUMBER/CHARACTER ENTRY
- TIME SET
- AUTOMATIC TIME SET
- SETTING THE CLOCK MANUALLY
- INTERNET RADIO INTERNET RADIO
- LISTENING TO A WEB RADIO STATION
- PRESET WEB RADIO STATIONS
- LISTENING TO A PRESET WEB STATION
- FAVORITES LIST
- USING A USB DEVICE AND SD/MMC CARD USING
- PLAYBACK
- REPEAT AND RANDOM PLAYBACK
- COPY FILES
- RECORDING WEB RADIO STATION BROADCASTS
- PLAYING RECORDED FILES
- MEDIA SERVER MEDIA SERVER
- STEP 1: SET UP MEDIA SHARING IN WINDOWS MEDIA PLAYER 11
- STEP 2: PLAY MUSIC ON YOUR INTERNET RADIO
- AUX IN FUNCTIONUX IN FUNCTION
- CARE AND MAINTENANCE
- TROUBLESHOOTING GUIDETROUBLESHOOTING
- GUIDE
- TECHNICAL SPECIFICATIONSTICALS SPECIFICA
Brand : SCOTT
Model : DXI 80 WL
Category : Radio