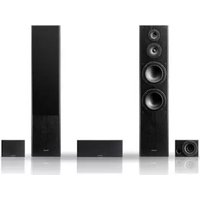
S-ES3TB - Loudspeaker PIONEER - Free user manual and instructions
Find the device manual for free S-ES3TB PIONEER in PDF.


| Product Type | Floor-standing speaker |
| Brand | Pioneer |
| Model | S-ES3TB |
| Dimensions (W x H x D) | 210 mm x 900 mm x 300 mm |
| Weight | 15 kg |
| Color | Black |
| Speaker Type | 3-way bass reflex |
| Woofer | 16 cm (6.5 in) cone |
| Tweeter | 2.5 cm (1 in) soft dome |
| Impedance | 6 ohms |
| Sensitivity | 88 dB |
| Frequency Response | 40 Hz - 20 kHz |
| RMS Power Handling | 150 W |
| Maximum Power Handling | 250 W |
| Crossover Frequencies | 500 Hz, 3 kHz |
| Connector Type | Binding posts |
| Application | Home theater, stereo |
| Maintenance | Clean with a soft dry cloth |
| Safety | Do not place near heat sources |
| Spare Parts & Repairability | Contact Pioneer support for parts |
| Warranty | 1 year |
Frequently Asked Questions - S-ES3TB PIONEER
User questions about S-ES3TB PIONEER
0 question about this device. Answer the ones you know or ask your own.
Ask a new question about this device
Download the instructions for your Loudspeaker in PDF format for free! Find your manual S-ES3TB - PIONEER and take your electronic device back in hand. On this page are published all the documents necessary for the use of your device. S-ES3TB by PIONEER.
USER MANUAL S-ES3TB PIONEER
natural_image
Two identical black speakers with circular speaker holes, no text or symbols visible- Front speakers x 2

• Surround speakers x 2

- Operating instructions

Center
(2 m, Tie color : Black)

- Center speaker x 1
- Grilles (for front speaker) x 2

• Non-skid pads x 12 (4 pcs x 3 sheets)

Front right / left (3 m, Tie color : Blue)

Surround right / left (10 m, Tie color : Red)
• Speaker cords x 5
BEFORE USE
Thank you for buying this Pioneer product.
Please read through these operating instructions before using your speaker system to optimize performance.
- The nominal impedance of this speaker system is 8 . Connect the speaker system to an amplifier with a load impedance ranging from 6 to 16 (a model with "6 to 16 ) displayed on the speaker output terminals).
- In order to prevent damage to the speaker system resulting from input overload, please observe the following precautions:
- Be sure to turn the connected devices off and remove the power cord from the wall outlet beforehand when changing the connection or installation method.
-Do not use excessive amplifier volume if using a tone control to emphasize high or low frequencies.
- Do not use the speaker to output distorted sound for long periods of time. This can result in a fire hazard.
INSTALLATION PRECAUTIONS
- Do not install these units near a stove or other heating appliance, or put them in a place exposed to the sun. Such locations may cause the cabinet to change color and the speaker system to break down.
FRONT / CENTER SPEAKERS
- Do not attach the front and center speakers to the wall or ceiling. It may fall off and cause injury.
- This speaker system is magnetically shielded. However, depending on the installation location, color distortion may occur if the speaker system is installed extremely close to the screen of a television set.
If this happens, turn off the television, then turn it on again after 15 min to 30 min. If the problem persists, place the speaker system away from the television set. - Do not install your speakers overhead on the ceiling or wall. The grille is designed to be detachable, and as such it may fall and cause damage or personal injury if installed overhead.
SURROUND SPEAKERS
- The surround speakers are not magnetically shielded and so should not be placed near a TV or monitor, as the interaction of magnetic materials can cause distortion of the colors on your TV screen. Magnetic storage media (such as floppy discs and tape or video cassettes) should also not be kept close to these speakers.
PLACEMENT AND FINE TUNING
FRONT SPEAKERS
For best results the speakers should be separated a distance approximately equal to the listening distance. Angling the speakers inward towards the listener will improve the image stability for non-central listeners. Close proximity to a side or rear wall will enhance the midbass performance, although too close (particularly a corner location) and the bass may be unnaturally high and image performance may be degraded.
CENTER SPEAKER
The speaker should be positioned below the TV. For best results align the front of the speaker with the front of the TV. If the speaker is placed under the TV and very close to the floor, then tilting upwards may be beneficial.
Do not place the center speaker on top of TV, the speaker may fall from the TV due to external shocks such as earthquakes, endangering those nearby or damaging the speaker.
SURROUND SPEAKERS
For best results the speakers should be positioned at or above ear level. Depending upon your room layout and preferences, the left and right rear speakers should be positioned on the side walls just the rear of the listening position, or on the walls.
STANDARD SURROUND SETUP
This is a standard multichannel surround sound speaker setup for optimal 5.1 channel home theater sound.

NON-SKID PADS
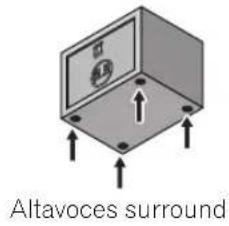
If the front, center and surround speakers are placed on a hard surface, such as wood or tile place four non-skid pads on the bottom flat surface of the speakers.

MAKING AMPLIFIER SETTINGS
Before connecting the speakers, please read the operating instructions supplied with your amplifier to select the speaker setting of amplifier :
• FRONT SPEAKERS : LARGE
• CENTER / SURROUND SPEAKERS : SMALL
CONNECTING YOUR SYSTEM

Important
Make sure all equipment is turned off before making any connections.
- Correct wiring of your speakers is essential for achieving the best sound quality. Be careful to ensure proper polarity of connection.
CAUTION
These speaker terminals carry HAZARDOUS LIVE voltage. To prevent the risk of electric shock when connecting or disconnecting the speaker cables, disconnect the power cord before touching any uninsulated parts.
D3-4-2-2-3 A1 En
Connect to the speaker terminals on the rear of the amplifier.
Connect the striped speaker cord to the red (+) terminal and the other cord to the black (−) terminal as shown below (for more details, refer to your amplifier instruction manual).

Connect to the speaker terminals on the rear of the speakers.
- For front speakers:
Unscrew the terminals on the speaker and insert the striped speaker cord into the red (+) terminal and the other cord into the black (−) terminal as shown below.

• For all other speakers:
To connect, press the lever and insert the striped speaker cord into the red (+) terminal and the other cord into the black (−) terminal as shown below.

- Remember that the speaker system is heavy and that its weight could cause the screws to work loose, or the wall material to fail to support it, resulting in the speaker falling. Make sure that the wall you intend to mount the speakers on is strong enough to support them. Do not mount on plywood or soft surface walls.
- Mounting screws are not supplied. Use screws suitable for the wall material and support the weight of the speaker.

SECURING THE FRONT SPEAKERS
• Pass a commercially-available reinforced string through the plastic catch to securely support the speaker to the wall. Be sure that the wall to which you fasten the speaker is strong enough to support the weight of the speaker. After fastening the speaker, make sure that it does not fall over.
• The speaker can incur damage in the event of a fall.
- Do not attach the plastic catch directly to the wall. It should only be used in conjunction with reinforced string to prevent the speaker from falling.
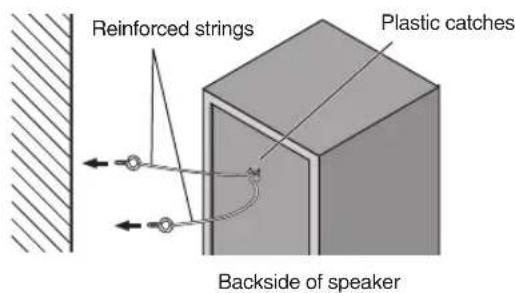
Pass and tie two reinforced strings through the plastic catches, and fasten the speaker to the wall as shown above.

Note
- If you are unsure of the quality and strength of the walls, consult a professional for advice.
- Pioneer is not responsible for any accidents or damage that result from improper installation.
CABINET MAINTENANCE
Use a polishing cloth or dry cloth to wipe off dust and dirt. When the cabinet is very dirty, clean with a soft cloth dipped in some neutral cleanser diluted five or six times with water, and then wipe again with a dry cloth. Do not use furniture wax or cleaners.
Never use thinners, benzine, insecticide sprays and other chemicals on or near the cabinets, since these will corrode the surfaces.
ATTACHING / DETATCHING THE GRILLE
The front grille of this speaker system is removable. Proceed as follows:
FRONT SPEAKERS
- To attach the grille, line up the holes on the speaker with the projections on the grille firmly.
- To delatch the grille, grab it by its bottom with both hands and toward you to separate the bottom part of the grille from the speaker.
- Slide your hands up the middle section of the grille, and once again pull gently toward you. This will remove the middle section of the grille from the speaker.
- Finally, repeat this same motion for the top part of the grille, detatching the grille entirely from the speaker.
- To detach the grille, grab it by its bottom with both hands and toward you to separate the bottom part of the grille from the speaker.
- Next, grab the top part of the grille and gently pull it toward you to remove the top portion.
- To replace the grille, align the holes in the front of the speaker's corners with the projections on the grille, and push each of the corners into place.
TROUBLESHOOTING
Symptom Possible cause Remedy
| No sound | Bad speaker cord or connection.Amplifier is off.Volume control is at zero. | Connect correctly or replace cord.Turn on amplifier.Slowly turn up volume. |
| Sound is distorted. | Extreme signal condition. | Turn down the amplifier's output level (volume, bass control, bass boost) to lower the level. |
SPECIFICATIONS
FRONT SPEAKERS
Enclosure .... Bass-reflex floorstanding type (magnetically shielded)
Configuration 3-way
Woofer 16 cm cone x1
Passive radiator 16 cm cone x1
Mid-range speaker....7.7 cm cone x1
Tweeter 2.6 cm semi-dome x1
Impedance 8Ω
Frequency response .....40 Hz to 30 kHz
Sensitivity (1m, 1W) 83.0 dB
Maximum input power.... 150 W
Exterior dimensions
220 (W) mm × 980 (H) mm × 249 (D) mm
Weight (Including grille) 10.0 kg
SURROUND SPEAKERS
Enclosure ...... Bass-reflex bookshelf type
Configuration 10 cm 1-way
Speakers 10 cm cone x1
Impedance 8Ω
Frequency response .....50 Hz to 20 kHz
Sensitivity (1m, 1W) 81.5 dB
Maximum input power.... 120 W
Exterior dimensions
180 (W) mm x 130 (H) mm x 162 (D) mm
Weight 1.3 kg
CENTER SPEAKER
Enclosure .... Bass-reflex bookshelf type (magnetically shielded)
Configuration.....10 cm 1-way
Speakers. 10 cm cone x2
Impedance 8Ω
Frequency response .... 50 Hz to 20 kHz
Sensitivity (1m, 1W)....88.0 dB
Maximum input power 120 W
Exterior dimensions .... 350 (W) mm x 130 (H) mm x 162 (D) mm
Weight 2.5 kg
SUPPLIED ACCESSORIES
Speaker cords 5
Non-skid pads 12 (4 pcs x 3 sheets)
Grilles(for front speaker) 2
Operating instructions

Note
Specifications and design subject to possible modification without notice due to improvements.
Published by Pioneer Corporation.
Copyright © 2010 Pioneer Corporation.
All rights reserved.

If you want to dispose this product, do not mix it with general household waste. There is a separate collection system for used electronic products in accordance with legislation that requires proper treatment, recovery and recycling.
Private households in the member states of the EU, in Switzerland and Norway may return their used electronic products free of charge to designated collection facilities or to a retailer (if you purchase a similar new one).
For countries not mentioned above, please contact your local authorities for the correct method of disposal.
By doing so you will ensure that your disposed product undergoes the necessary treatment, recovery and recycling and thus prevent potential negative effects on the environment and human health.
K058b_A1_En
CONTENIDO DE LA CAJA

natural_image
Two identical black speakers with circular speaker holes, no text or symbols visible• Altavoces delanteros x 2

• Altavoces surround x 2
natural_image
3D diagram of a rectangular metal enclosure with mounting holes and a lid, showing internal structure and mounting points (no text or symbols)Altavoz central
PARA LLEVAR A CABO LOS AJUSTES DEL AMPLIFICADOR
Copyright © 2010 Pioneer Corporation.
natural_image
Two identical black speakers with circular speaker holes, no text or symbols visibleИздано Pioneer Corporation.
© Pioneer Corporation, 2010.
Все права защищены.
包裝箱中的內容

natural_image
Two identical black speakers with circular speaker holes, no text or symbols visible- 前置揚聲器 x 2
- 環繞揚聲器 x 2

·操作手册

中置
(2 m · 繫帶顏色:黑色)

- 中置揚聲器 x 1
•格柵 (用於前置揚聲器) × 2
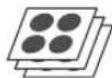
- 防滑墊 × 12 (4個 × 3張)
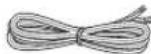
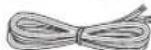
左前置 / 右前置
(3 m,繫帶顏色:藍色)

Published by Pioneer Corporation.
Copyright © 2010 Pioneer Corporation.
All rights reserved.
PIONEER CORPORATION
1-1, Shin-ogura, Saiwai-ku, Kawasaki-shi, Kanagawa 212-0031, Japan
Корпорация Пайонир
PIONEER ELECTRONICS (USA) INC.
P.O. BOX 1540, Long Beach, California 90801-1540, U.S.A. TEL: (800) 421-1404
PIONEER ELECTRONICS OF CANADA, INC.
300 Allstate Parkway, Markham, Ontario L3R 0P2, Canada TEL: 1-877-283-5901, 905-479-4411
PIONEER EUROPE NV
Haven 1087, Keetberglaan 1, B-9120 Melsele, Belgium TEL: 03/570.05.11
PIONEER ELECTRONICS ASIACENTRE PTE. LTD.
253 Alexandra Road, #04-01, Singapore 159936 TEL: 65-6472-7555
PIONEER ELECTRONICS AUSTRALIA PTY. LTD.
5 Arco Lane, Heatherton, Victoria, 3202, Australia, TEL: (03) 9586-6300
PIONEER ELECTRONICS DE MEXICO S.A. DE C.V.
Blvd.Manuel Avila Camacho 138 10 piso Col.Lomas de Chapultepec, Mexico, D.F. 11000 TEL: 55-9178-4270
K002_B3_Ru
- BEFORE USE
- INSTALLATION PRECAUTIONS
- FRONT / CENTER SPEAKERS
- SURROUND SPEAKERS
- PLACEMENT AND FINE TUNING
- FRONT SPEAKERS
- CENTER SPEAKER
- STANDARD SURROUND SETUP
- NON-SKID PADS
- MAKING AMPLIFIER SETTINGS
- CONNECTING YOUR SYSTEM
- Important
- CAUTION
- Connect to the speaker terminals on the rear of the amplifier.
- Connect to the speaker terminals on the rear of the speakers.
- SECURING THE FRONT SPEAKERS
- Note
- CABINET MAINTENANCE
- ATTACHING / DETATCHING THE GRILLE
- TROUBLESHOOTING
- SPECIFICATIONS
- SUPPLIED ACCESSORIES
- CONTENIDO DE LA CAJA
- PARA LLEVAR A CABO LOS AJUSTES DEL AMPLIFICADOR
- 包裝箱中的內容
- PIONEER CORPORATION
- Корпорация Пайонир
- PIONEER ELECTRONICS (USA) INC.
- PIONEER ELECTRONICS OF CANADA, INC.
- PIONEER EUROPE NV
- PIONEER ELECTRONICS ASIACENTRE PTE. LTD.
- PIONEER ELECTRONICS AUSTRALIA PTY. LTD.
- PIONEER ELECTRONICS DE MEXICO S.A. DE C.V.
Brand : PIONEER
Model : S-ES3TB
Category : Loudspeaker