
Avance Collection HR1653 - Blender PHILIPS - Free user manual and instructions
Find the device manual for free Avance Collection HR1653 PHILIPS in PDF.


| Product Type | Blender |
| Brand | Philips |
| Model | Avance Collection HR1653 |
| Power Consumption | 600 W |
| Capacity | 1.5 L |
| Speed Settings | 2 speeds + pulse |
| Blade Material | Stainless steel |
| Jar Material | BPA-free Tritan plastic |
| Dimensions (H x W x D) | 40 x 18 x 18 cm |
| Weight | 2.5 kg |
| Cord Length | 1.2 m |
| Color | Silver/Black |
| Dishwasher Safe Parts | Jar and lid (top rack) |
| Safety Features | Non-slip feet, overload protection |
| Warranty | 2 years |
Frequently Asked Questions - Avance Collection HR1653 PHILIPS
User questions about Avance Collection HR1653 PHILIPS
0 question about this device. Answer the ones you know or ask your own.
Ask a new question about this device
Download the instructions for your Blender in PDF format for free! Find your manual Avance Collection HR1653 - PHILIPS and take your electronic device back in hand. On this page are published all the documents necessary for the use of your device. Avance Collection HR1653 by PHILIPS.
USER MANUAL Avance Collection HR1653 PHILIPS
natural_image
Black Philips 3D handheld device with visible internal components and a triangular base (no text or symbols on body)
natural_image
Diagram of three open panels with grid patterns and directional arrows, no text or symbols present


natural_image
Simple line drawing of a mechanical component with a cylindrical shaft and textured base (no text or symbols)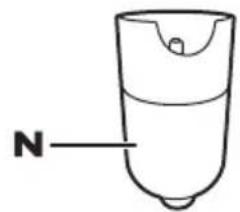

natural_image
Simple line drawing of a conical object with a vertical rod and horizontal line, no text or symbols present.

natural_image
Simple line drawing of a mechanical component with a circular end and a small hole (no text or symbols)
natural_image
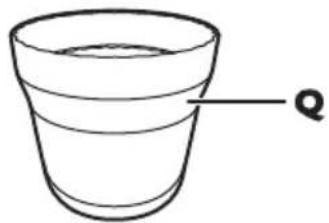
Simple line drawing of a cup with a label 'Q' pointing to the side (no text or symbols on the cup itself)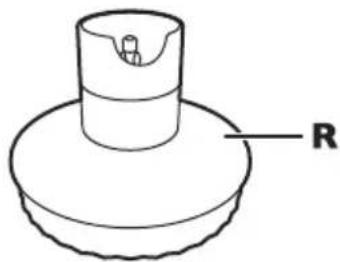
natural_image
Simple line drawing of a mechanical component with a cylindrical top and flange base, labeled 'R' (no text or symbols beyond label)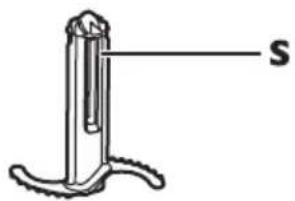


ENGLISH 6
INDONESIA 14
한국어 22
BAHASA MELAYU 30
ภาษาไทย 38
TIÊNG VIÊT 45
繁體中文 53
简体中文 60

Introduction
Congratulations on your purchase and welcome to Philips! To fully benefit from the support that Philips offers, register your product at www.philips.com/welcome.
General description (Fig. 1)
A Speed ring
B On/off button
C Turbo button
D Motor unit
E Release button
F Blender bar
G Protection cap
Potato bar (HR1655 only):
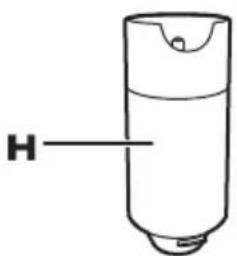
H Potato bar coupling unit
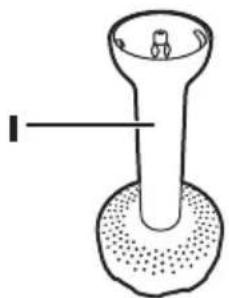
I Potato bar
Oval beaker:
J Oval beaker
K Oval beaker lid
Whisk and milk foamer:
L Milk foamer
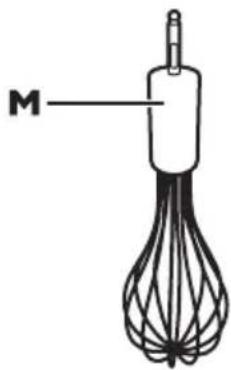
M Whisk
N Whisk and milk foamer coupling unit
Mini chopper (HR1653 only)
- Chopper lid
P Blade unit
Q Chopper bowl
Medium Chopper (HR1655 only)
R Chopper lid
S Ice-crushing blade unit
T Blade unit
U Chopper bowl
Important
Read this user manual carefully before you use the appliance and save it for future reference.
Danger
- Never immerse the motor unit in water or any other liquid, nor rinse it under the tap. Only use a moist cloth to clean the motor unit.
Warning
- Check if the voltage indicated on the appliance corresponds to the local mains voltage before you connect the appliance.
- Do not use the appliance if the plug, the mains cord or other parts are damaged.
- If the mains cord is damaged, you must have it replaced by Philips, a service centre authorised by Philips or similarly qualified persons in order to avoid a hazard.
- Avoid touching the blades, especially when the blender bar is attached to the motor unit. The blades are very sharp.
- Never use the chopper blade unit without the chopper bowl.
-
If the appliance is damaged, always have it replaced with one of the original type, otherwise your guarantee is no longer valid.
-
This appliance is not intended for use by persons (including children) with reduced physical, sensory or mental capabilities, or lack of experience and knowledge, unless they have been given supervision or instruction concerning use of the appliance by a person responsible for their safety.
- Do not allow children to use the appliance without supervision.
- Children should be supervised to ensure that they do not play with the appliance.
- Never let the appliance operate unattended.
- Be careful to avoid splashing when you process hot ingredients.
- None of the accessories are suitable for use in the microwave.
- Do not touch the blades, especially when the appliance is plugged in. The blades are very sharp.
- If the blades get stuck, unplug the appliance before you remove the ingredients that block the blades.
Caution
- Switch off the appliance and disconnect it from the mains before you assemble, disassemble, store and clean it.
- Never use any accessories or parts from other manufacturers or that Philips does not specifically recommend. If you use such accessories or parts, your guarantee becomes invalid.
- This appliance is intended for household use only. If the appliance is used improperly or for professional or semi-professional purposes or if it is not used according to the instructions in the user manual, the guarantee becomes invalid and Philips refuses any liability for damage caused.
- Keep the motor unit away from heat, fire, moisture and dirt.
- Never fill the beaker or the chopper bowl with ingredients that are hotter than 80°C/175°F.
- Do not exceed the quantities and processing times indicated in the tables.
- Do not process more than 1 batch without interruption. Let the appliance cool down for 5 minutes before you continue processing.
- Never use the potato bar to mash ingredients in a pan over direct heat. Always remove the pan from the heat and allow the ingredients to cool slightly before you start mashing them.
- Do not tap the potato bar on the side of the pan during or after mashing. Use a spatula to remove excess food.
Electromagnetic fields (EMF)
This Philips appliance complies with all standards regarding electromagnetic fields (EMF). If handled properly and according to the instructions in this user manual, the appliance is safe to use based on scientific evidence available today.
Before first use
Thoroughly clean the parts that come into contact with food before you use the appliance for the first time (see chapter 'Cleaning').
Preparing for use
1 Let hot ingredients cool down before you chop them, blend them or pour them into the beaker (max. temperature 80^ C/ 175^ F).
2 Cut large ingredients into pieces of approx. 2cm before you process them.
3 Assemble the appliance properly before you put the plug in the wall socket.
Using the appliance
Hand blender
The hand blender is intended for:
- blending fluids, e.g. dairy products, sauces, fruit juices, soups, mixed drinks and shakes.
- mixing soft ingredients, e.g. pancake batter or mayonnaise.
- pureeing cooked ingredients, e.g. for making baby food.
1 Put the ingredients in the beaker.
See the table for the recommended quantities and processing times.
Blending quantities and processing times
Ingredients Blending quantity Time Speed
Fruits & vegetables 100-200g 30sec. Turbo
Baby food, soups & sauces 100-400ml 60sec. 15-20
Batters 100-500ml 60sec. 15-20
Shakes & mixed drinks 100-1000ml 60sec. 15-20
2 Attach the blender bar to the motor unit ('click') (Fig. 2).
3 Put the plug in the wall socket.
4 Immerse the blade guard completely in the ingredients.
5 Press the on/off button or the turbo button to switch on the appliance (Fig. 3).
- When you use the on/off button, you can adjust the speed with the speed ring. The higher the speed, the shorter the processing time required.
- The speed ring has settings from 1 (low speed) to 20 (high speed).
- When you use the turbo button, the appliance operates at maximum speed. In this case, you cannot adjust the speed with the speed ring.
6 Move the appliance slowly up and down and in circles to blend the ingredients (Fig. 4).
Mini chopper (HR1653 only) and medium chopper (HR1655 only)
The choppers are intended for chopping ingredients such as nuts, meat, onions, hard cheese, boiled eggs, garlic, herbs, dry bread etc.
The medium chopper is supplied with a blade unit with straight blades and an ice-crushing blade unit with serrated blades. For all ingredients mentioned in the table below you have to use the blade unit with straight blades. Use the ice-crushing blade unit with serrated blades for crushing ice cubes only.
Be very careful when you handle the blade units, the blades are very sharp. Be particularly careful when you remove the blade unit from the chopper bowl, when you empty the chopper bowl and during cleaning.
Caution: Do not process more than 1 batch without interruption. Let the appliance cool down for 5 minutes before you continue processing.
Note: Cut large ingredients into pieces of approximately 2cm before you process them.
1 Put the blade unit in the chopper bowl (Fig. 5).
2 Put the ingredients in the chopper bowl.
See the table for the recommended quantities and processing times.
Mini chopper quantities and processing times (HR1653 only)
| Ingredients Chopping quantity Time Speed | |
| Onions & eggs 100g 5 × 1sec. 1-5 | |
| Meat 120g (max) 5sec. turbo | |
| Herbs 20g 5 × 1sec. 10-15 | |
| Parmesan cheese 50-100g (max) 15sec. turbo | |
| Nuts and almonds 100g 20sec. turbo | |
| Garlic | 50g 5 × 1sec. 15-20 |
Medium chopper quantities and processing times (HR1655 only)
| Ingredients Chopping quantity Time Speed | |
| Onions and eggs | 200g 5 × 1sec. 1-5 |
| Meat 200g 10sec. turbo | |
| Herbs 30g 10 × 1sec. | 10-15 |
| Nuts and almonds 200g 30sec. turbo | |
| Dry bread | 80g 30sec. turbo |
| Parmesan cheese 200g 20sec. turbo | |
| Dark chocolate | 100g 20sec. turbo |
3 Put the chopper lid on the chopper bowl (Fig. 6).
4 Fasten the motor unit onto the chopper lid ('click') (Fig. 7).
5 Put the plug in the wall socket.
6 Press the on/off button or the turbo speed button to switch on the appliance.
Note: If the ingredients stick to the wall of the chopper bowl, unplug the appliance and loosen dry ingredients from the wall with a spatula or by adding some liquid (e.g. if you make pesto).
Whisk
The whisk is intended for whipping cream, whisking egg whites, desserts etc.
Caution: Do not process more than 1 batch without interruption. Let the appliance cool down for 5 minutes before you continue processing.
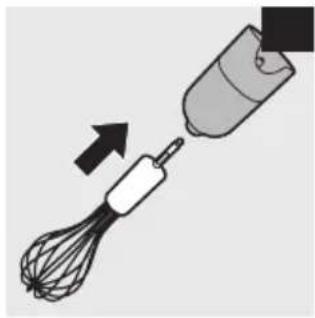
1 Connect the whisk to the coupling unit ('click') (Fig. 8).
2 Put the ingredients in a bowl.
See the table for the recommended quantities and processing times.
ENGLISH10
Whisking quantities and processing times
Ingredients Whisking quantity Time
Cream 250ml 70-90sec.
Egg whites 4 eggs 120sec.
3 Connect the coupling unit to the motor unit ('click').
4 Put the plug in the wall socket and press the on/off button.
5 After approx. 1 minute, you can press the turbo button to continue at turbo speed.
Whisking tips
- If you want to process a small quantity, tilt the beaker slightly for a quicker result. (Fig. 9)
- When you beat egg whites, use a large bowl for the best result.
- To prevent splashing, start at a low speed setting and continue with a higher speed after approx. 1 minute.
- When you whip cream, use the beaker to avoid splashing.
Note: Do not use the whisk to prepare dough or cake mixture.
Detaching the whisk
1 To detach the whisk, press the release button.
2 To detach the coupling unit, pull it from the whisk.
Potato bar (HR1655 only)
The potato bar can be used to mash cooked ingredients such as potatoes, swede and peas.
Caution
- Never use the potato bar to mash ingredients in a pan over direct heat. Always remove the pan from the heat and allow the ingredients to cool slightly before you start mashing them.
- Do not mash hard or uncooked foods, as this may damage the potato bar.
- Do not tap the potato bar on the side of the pan during or after mashing. Use a spatula to remove excess food.
- Do not process more than 1 batch without interruption. Let the appliance cool down for 5 minutes before you continue processing.
1 Cook and drain the potatoes.
2 Connect the potato bar to the coupling unit by turning it clockwise (“click”) (Fig. 10).
3 Connect the coupling unit to the motor unit (Fig. 11).
4 Plug in the appliance.
5 Place the potato bar in a bowl with ingredients and set the speed ring to 10.
6 Press the on/off button.
7 Move the potato bar up and down for approximately 20 seconds. Continue until the desired result is achieved.
Tip: You can enhance the flavour by adding salt, butter or milk.
Tip: To get the best results, make sure the pot is not more than half filled.
Detaching the potato bar
1 To detach the potato bar, press the release button. (Fig. 12)
2 To remove the paddle from the potato bar turn it clockwise (Fig. 13).
3 To detach the coupling unit from the potato bar turn it counterclockwise (Fig. 14).
Note: Always clean the potato bar immediately after use (see chapter 'Cleaning' and the cleaning table).
Milk foamer
1 Connect the milk foamer to the coupling unit. (Fig. 15)
2 Connect the coupling unit to the motor unit (Fig. 16).
3 Plug in the appliance.
4 Heat up the milk to a temperature between 55^ C - 65^ C/131°F - 149°F.
Tip: You will achieve the best results if you use long-life milk with 3.5% fat content.
Note: Do not heat up the milk to a temperature beyond 65^ C/149°F. Never let the milk boil.
Caution: Do not process more than 1 batch without interruption. Let the appliance cool down for 5 minutes before you continue processing.
5 Pour the milk into a tall heat-resistant beaker.
6 Set the speed ring to the highest setting, press the turbo button and froth the milk for approximately 60 seconds.
Note: Clean the milk foamer immediately after use (see chapter ‘Cleaning’ and the cleaning table).
Detaching the milk foamer
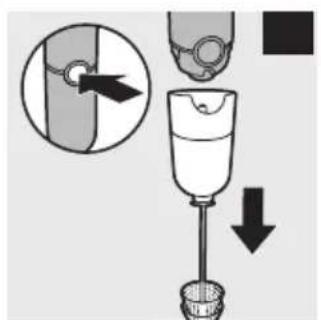
1 To detach the coupling unit, press the release button (Fig. 17).
2 To detach the milk foamer, pull it off the coupling unit (Fig. 18).
3 To detach the milk foamer cones, pull them off the milk foamer (Fig. 19).
Cleaning (Fig. 20)
Do not immerse the motor unit, the coupling units, and the mini chopper lid (HR1653 only) or the medium chopper lid (HR1655 only) in water or any other liquid, nor rinse it under the tap. Use a moist cloth to clean the motor unit, the coupling units, and the mini chopper lid (HR1653 only) or the medium chopper lid (HR1655 only) (Fig. 21).
1 Unplug the appliance.
2 Press the release button on the motor unit to remove the accessory you have used.
3 Disassemble the accessory.
Note: To clean the potato bar, remove the paddle by turning it clockwise. (Fig. 13)
Tip: You can also remove the rubber rings from the chopper bowls for extra thorough cleaning.
4 See the cleaning table for further instructions.
Tip: For quick cleaning of the blender bar or the potato bar, pour warm water with some washing-up liquid into the beaker or jar you have used, insert the blender bar or potato bar and let the appliance operate for approx. 10 seconds.
Storage
1 You can store the motor unit, the blender bar and the whisk in the beaker (Fig. 22).
Ordering accessories
If you need to replace an accessory or want to purchase an additional accessory, go to your Philips dealer or visit www.philips.com/support. If you have problems obtaining accessories, please contact the Philips Consumer Care Centre in your country.
Accessories available
Accessory Service code no.
Whisk coupling unit 4203 035 95631
Whisk 4203 035 95641
Milk foamer 4203 035 95651
Medium chopper coupling unit 4203 035 95661
Medium chopper bowl 4203 035 95671
Medium chopper blade unit* 4203 035 95681
Medium chopper ice crushing blade* 4203 035 95691
Mini chopper coupling unit 4203 035 95701
Mini chopper bowl 4203 035 95711
Mini chopper blade unit* 4203 035 95721
Oval beaker with lid
4203 035 95741
*Including protection cap
Environment
- Do not throw away the appliance with the normal household waste at the end of its life, but hand it in at an official collection point for recycling. By doing this you help to preserve the environment (Fig. 23).
Guarantee and service
If you need service or information or if you have a problem, please visit the Philips website at www.philips.com or contact the Philips Consumer Care Centre in your country (you find its phone number in the worldwide guarantee leaflet). If there is no Consumer Care Centre in your country, go to your local Philips dealer.
Frequently asked questions
Question Answer
The appliance makes a lot of noise, produces an unpleasant smell, feels hot to the touch or produces smoke. What should I do?
The appliance may produce an unpleasant smell or emit a little smoke if it has been used too long. In this case you should switch off the appliance and let it cool down for 60 minutes. If the problem persists, please contact the nearest Philips Customer Care Centre.
Can I process boiling hot ingredients?
Let the ingredients cool down to approximately 80^ C/175°F before processing them.
Which size should the ingredients have before processing?
Cut the ingredients into approximately 2 x 2 cm pieces.
Is it possible to damage the appliance by processing very hard ingredients?
Yes, the appliance may get damaged if you process very hard ingredients such as bones and fruit with stones. You can process ingredients such as Parmesan or chocolate.
Why does the appliance suddenly stop working?
Some hard ingredients may block the blades. Release the on/off button, unplug the appliance, detach the motor unit and remove the ingredients that block the blades.
Recipe
Pancake filling
Ingredients:
- 120g honey
- 100g prunes
1 Put the honey in the fridge for several hours.
2 Put the prunes in the medium chopper bowl and pour honey over them.
3 Press the Turbo button and chop for 5 seconds.
Pendahuluan
J Gelas blender oval
K Tutup gelas blender oval
1 public school in the United States is a college of 12 years old. The public school has been a large number of students who are employed in the United States, and it is not a large number of students who are employed in the United States.
2 Cắt nguyên liệu lớn thành từng miệng nhỏ khoảng 2cm trước khi chế biến.
3 Lắp ráp thiết bị theo đúng cách trước khi cắm điện.
Sử dụng máy
1 Để tháo bộ phận đánh kem, hãy bâm nút tháo.
2 public sector public sector public sector public sector public sector public sector public sector public sector public sector public sector public sector public sector public sector public sector public sector public sector public sector public sector public sector public sector public sector public sector public sector public sector public sector public sector public sector public sector public sector public sector public sector public sector public sector public sector public sector public sector public sector public sector public sector public sector public sector public sector public sector public sector public sector public sector public sector public sector public sector public sector public sectors, government, state, and local government.
1 public school, 1980, 1984. The public school in Hanoi, 1985, was a national school of the United States. (Hình 12)
2 publicly fiscal fiscal fiscal fiscal fiscal fiscal fiscal fiscal fiscal fiscal fiscal fiscal fiscal fiscal fiscal fiscal fiscal fiscal fiscal fiscal fiscal fiscal fiscal fiscal fiscal fiscal fiscal fiscal fiscal fiscal fiscal fiscal fiscal fiscal fiscal fiscal fiscal fiscal fiscal fiscal fiscal fiscal fiscal fiscal fiscal fiscal fiscal fiscal fiscal fiscal fiscal fiscal fiscal fiscal fiscal fiscal fiscal fiscal fiscal fiscal fiscal fiscal fiscal fiscal fiscal fiscal fiscal fiscal fiscal fiscal fiscal fiscal fiscal fiscal fiscal fiscal fiscal fiscal fiscal fiscal fiscal fiscal fiscal fiscal fiscal fiscal fiscal fiscal fiscal fiscal fiscal fiscal fiscal fiscal fiscal fiscal fiscal fiscal fiscal fiscal FY1997, 2008, 2009, 2010, 2011, 2012, 2013, 2014, 2015, 2016, 2017, 2018, 2019, 2020, 2021, 2022, 2023, 2024, 2025, 2026, 2027, 2028, 2029, 2030, 2031, 2032, 2033, 2034, 2035, 2036, 2037, 2038, 2039, 2040, 2041, 2042, 2043, 2044, 2045, 2046, 2047, 2048, 2049, 2050, 2051, 2052, 2053, 2054, 2055, 2056, 2057, 2058, 2059, 2060, 2061, 2062, 2063, 2064, 2065, 2066, 2067, 2068, 2069, 2070, 2071, 2072, 2073, 2074, 2075, 2076, 2077, 2078, 2079, 2080, 2081, 2082, 2083, 2084, 2085, 2086, 2087, 2088, 2089, 2090, 2091, 2092, 2093, 2094, 2095, 2096, 2097, 2098, 2099, 2100
3 public sector public sector public sector public sector public sector public sector public sector public sector public sector public sector public sector public sector public sector public sector public sector public sector public sector public sector public sector public sector public sector public sector public sector public sector public sector public sector public sector public sector public sector public sector public sector public sector public sector public sector public sector public sector public sector public sector public sector public sector public sector public sector public sector public sector public sector public sector public sector public sector public sector public sector public sectors (Hình 14).
1 Để tháo bộ ghép nổi, hãy bâm nút tháo (Hình 17).
2 public sector public sector public sector public sector public sector public sector public sector public sector public sector public sector public sector public sector public sector public sector public sector public sector public sector public sector public sector public sector public sector public sector public sector public sector public sector public sector public sector public sector public sector public sector public sector public sector public sector public sector public sector public sector public sector public sector public sector public sector public sector public sector public sector public sector public sector public sector public sector public sector public sector public sector public sectors
3 public sector public sector public sector public sector public sector public sector public sector public sector public sector public sector public sector public sector public sector public sector public sector public sector public sector public sector public sector public sector public sector public sector public sector public sector public sector public sector public sector public sector public sector public sector public sector public sector public sector public sector public sector public sector public sector public sector public sector public sector public sector public sector public sector public sector public sector public sector public sector public sector public sector public sector public sectors (Hình 19).
The image is too blurry to recognize any text content.
natural_image
Illustration of hands using a pipette to test liquid in a beaker (no text or symbols visible)
natural_image
Illustration of a hand pouring liquid into a beaker with rotating arrows (no text or symbols)
natural_image
Diagram of a mechanical component with a lever and pointer, no text or symbols present
natural_image
Illustration of a mechanical device with a handle and internal components, no text or symbols present
natural_image
Illustration of a whisker and a tool interacting with a surface (no text or symbols)
natural_image
Illustration of a hand using a brush to clean or brush another cup of water (no text or symbols)


natural_image
Diagram showing a mechanical component with an inset close-up of a curved cutaway section (no text or symbols)
natural_image
Diagram of a biological cell with a central cell and surrounding vesicles, showing internal structures and a curved arrow indicating rotation (no text or labels)

natural_image
Illustration of a screwdriver with a pointed tip and handle, showing an arrow indicating motion (no text or symbols)

natural_image
Simple line drawing of a screwdriver with a pointed tip and handle, no text or symbols present
natural_image
Diagram showing a conical object with a pointed tool and a numbered label '19' (no text or symbols on the object itself)

natural_image
Illustration of a kitchen utensil with a mixing bowl and whisk (no text or symbols)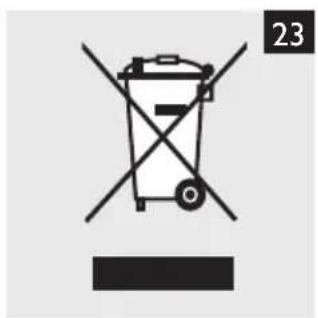
natural_image
Diagram showing three open panels with grid patterns and curved arrows indicating rotation or movement (no text or symbols)
- Introduction
- General description (Fig. 1)
- Potato bar (HR1655 only):
- Oval beaker:
- Whisk and milk foamer:
- Mini chopper (HR1653 only)
- Medium Chopper (HR1655 only)
- Important
- Danger
- Warning
- Caution
- Electromagnetic fields (EMF)
- Before first use
- Preparing for use
- Using the appliance
- Hand blender
- Blending quantities and processing times
- Ingredients Blending quantity Time Speed
- Mini chopper (HR1653 only) and medium chopper (HR1655 only)
- Whisk
- ENGLISH10
- Whisking quantities and processing times
- Ingredients Whisking quantity Time
- Whisking tips
- Detaching the whisk
- Potato bar (HR1655 only)
- Detaching the potato bar
- Milk foamer
- Detaching the milk foamer
- Cleaning (Fig. 20)
- Storage
- Ordering accessories
- Accessories available
- Accessory Service code no.
- Environment
- Guarantee and service
- Frequently asked questions
- Question Answer
- Recipe
- Pancake filling
- Pendahuluan
- Sử dụng máy
- The image is too blurry to recognize any text content.
Brand : PHILIPS
Model : Avance Collection HR1653
Category : Blender