
AJ3650 - Radio PHILIPS - Free user manual and instructions
Find the device manual for free AJ3650 PHILIPS in PDF.


| Product Type | Radio Alarm Clock |
| Brand | Philips |
| Model | AJ3650 |
| Dimensions (Approx.) | 8.5 x 5.2 x 3.1 inches |
| Weight (Approx.) | 0.9 lbs |
| Power Supply | AC 120V/60Hz or 2 x AAA batteries for backup |
| Radio Bands | FM (87.5-108 MHz), AM (520-1710 kHz) |
| Preset Stations | 20 (10 FM + 10 AM) |
| Alarm Type | Dual alarms with radio or buzzer |
| Snooze Function | Yes, 9-minute snooze |
| Sleep Timer | 60, 45, 30, 15 minutes |
| Display | LED clock display with dimmer control |
| Audio Output | Built-in speaker, 3.5mm headphone jack |
| Clock Backup | Battery backup keeps time during power outage |
| Cleaning | Wipe with soft dry cloth; avoid liquids |
| Safety | Do not expose to water; use only specified power supply |
| Spare Parts / Repairability | Contact Philips support for replacement parts; not user-serviceable |
| Warranty | 1 year limited warranty |
Frequently Asked Questions - AJ3650 PHILIPS
User questions about AJ3650 PHILIPS
0 question about this device. Answer the ones you know or ask your own.
Ask a new question about this device
Download the instructions for your Radio in PDF format for free! Find your manual AJ3650 - PHILIPS and take your electronic device back in hand. On this page are published all the documents necessary for the use of your device. AJ3650 by PHILIPS.
USER MANUAL AJ3650 PHILIPS
1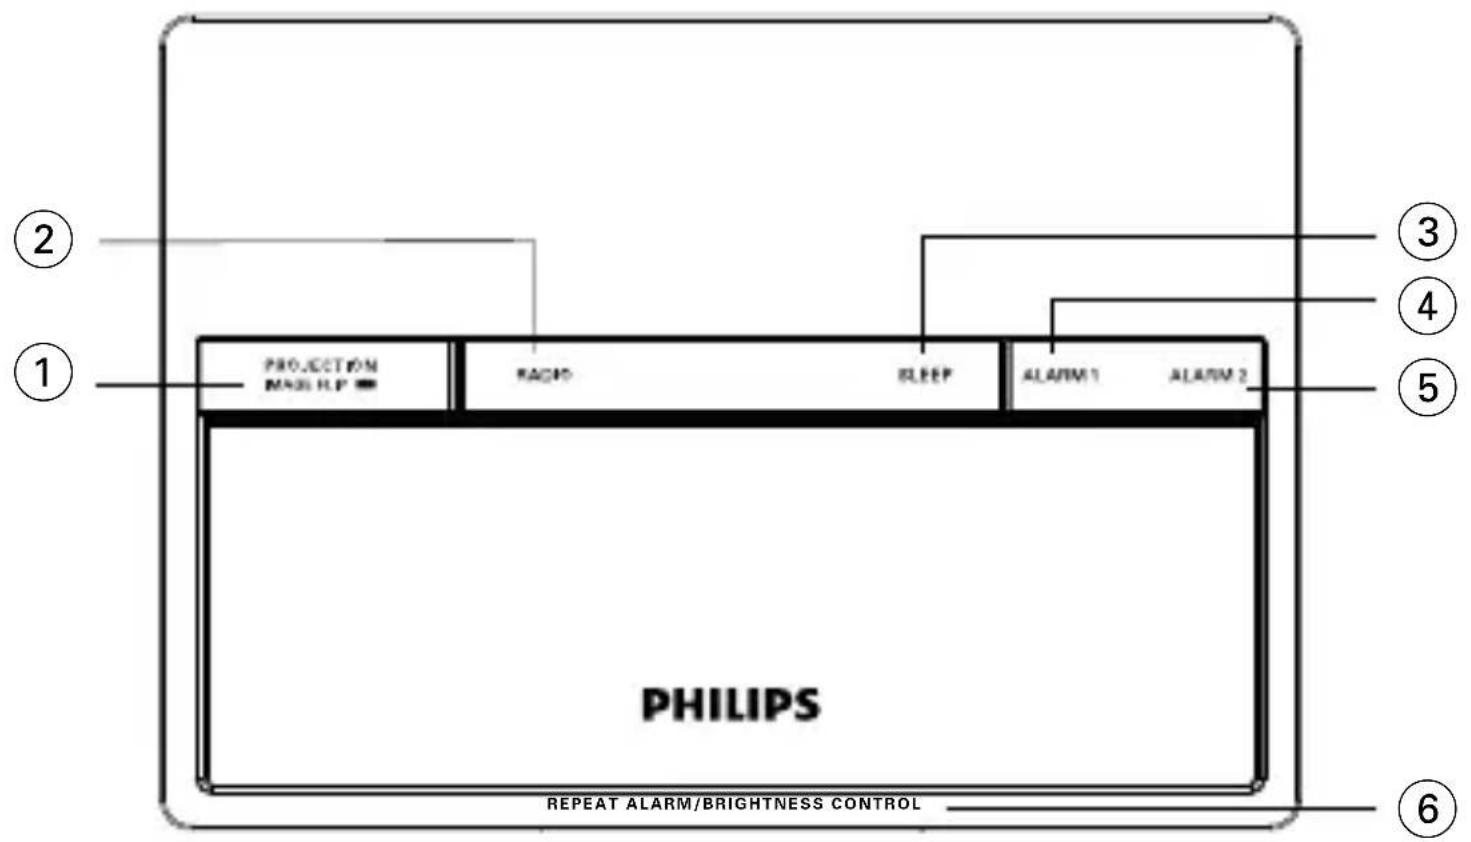

2
3

4
English
Congratulations on your purchase and welcome to Philips!
To fully benefit from the support that Philips offers, register your product at www.philips.com/welcome.
SUPPLIED ACCESSORIES
- 1 switching power adapter
(Model: DSA-9W-69F EU 075100, Input: 100-240V~50/60 Hz, 0.5 A, Output: 7.5 V, 1.0 A)
- 1 outdoor temperature sensor
FRONT and TOP PANEL (See 1)
① PROJECTION/IMAGE FLIP
- toggles projection on and off
- LED light on/off indication
- switches project brightness levels between: bright, dim, very dim
- press and hold it to flip the image
② RADIO
- switches the radio on/off – displays radio frequency
③ SLEEP
- switches sleep timer between: 15->30->60->90->120->OFF
④ ALARM 1
—press it to switch on or off ALARM 1 —press and hold it to set time and alarm sound of ALARM 1 - press it to display status of ALARM 1
⑤ ALARM 2
—press it to switch on or off ALARM 2 —press and hold it to set time and alarm sound of ALARM 2 - press it to display status of ALARM 2
⑥ REPEAT ALARM/BRIGHTNESS CONTROL
- turns off the alarm temporarily and repeats alarm after 9 minutes
- press to turn on or off the blue background light
⑦ AUTO SCAN
- in tuner mode, press and hold it to scan radio stations automatically and stores them as preset stations
- clock and projection mode, press and hold it to search the outdoor temperature sensor
⑧ DATE/SET TIME
- press and hold it to set time, date, and year
- press it to display date and day of week
⑨ DISPLAY
— press it to toggle between indoor and outdoor temperatures - press and hold it to display indoor temperature, outdoor temperature, and day of week cyclically
10 FOCUS
- adjusts focus of the projector to make projection clear
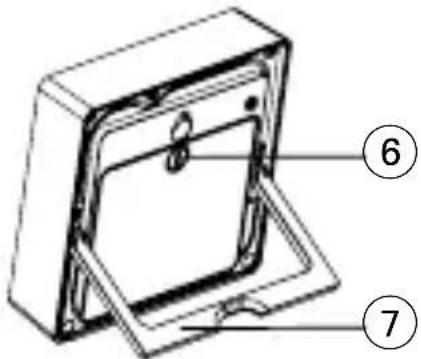
LEFT, RIGHT, and BACK PANEL(See 2)
⑪ PUSH
- press it to pop out the projection lens for angle adjustment
⑫ PRESET +/-
- selects a preset station
- press and hold it to set current frequency as the preset station
- adjusts the preset station number in radio mode — selects a track of relaxation music during setting sleep timer
⑬ TUNING +/-
- tunes to radio stations
- sets time, date, and year – selects alarm sounds during alarm setting
⑭ VOLUME
-adjusts the sound level
⑮ DC IN
- socket for AC/DC 7.5 V adapter
⑯ Pigtail
- temperature sensor and antenna to enhance FM reception
⑰ RESET
—press if the set does not react to operation of any button
⑱ Battery compartment
—holds the clock backup battery
⑲ IMAGE ROTATE
—rotates the image by 90 degrees clockwise or counterclockwise
Controls on the sensor (See 3)
① LCD display
– shows current temperature, and low battery indication of the sensor
② LED light
– flashes when the sensor is transmitting
③ RESET
- resets to start transmitting
④ ( 0 C 0 F) Slide Switch
- selects between Centigrade ( 0 C) or Fahrenheit ( 0 F) temperature unit display
⑤ CHANNEL 1/2/3
- selects RF channel to transmit and receive between the senor and the main unit
⑥ Door lock
- turns to lock and un-lock the sensor door.
⑦ Sensor support
– pulls out to stand the sensor
POWER SUPPLY
Mains adapter
1 Connect the mains adapter to the set's DC IN socket and to the power socket.
2 Always disconnect the mains adapter if you are not using the set.
Helpful hints:
To avoid damage to the set, use only the adapter supplied!
SETTING THE CLOCK
The clock uses 24-hour time format.
Important!
Pull out the plastic protective sheet to activate the clock backup battery (CR2032). This battery is included and installed in the set.
Manual setting
- Press and hold DATE/SET TIME to enter the clock setting mode.
→ Year digits start flashing.
- Hold down or press TUNING +/- repeatedly to set the current year.
- Press DATE/SET TIME to confirm.
→ Month digits start flashing.
- Hold down or press TUNING +/- repeatedly to set the current month.
- Press DATE/SET TIME to confirm.
→ Date digits start flashing.
- Hold down or press TUNING +/- repeatedly to set the current date.
- Press DATE/SET TIME to confirm.
→ Date and Month indicators, D and M, start flashing.
- Press TUNING +/- repeatedly to set the desired date format.
- Press DATE/SET TIME to confirm.
→ Hour digits start flashing.
- Hold down or press TUNING +/- repeatedly to set the current hour.
- Press DATE/SET TIME to confirm.
→ Minute digits start flashing.
- Hold down or press TUNING +/- repeatedly to set the current minute.
- Press DATE/SET TIME to confirm.
→ H- and offset number start flashing.
- Press TUNING +/- repeatedly to set the desired hour offset value.
- Press DATE/SET TIME to confirm.
RADIO
TUNING TO RADIO STATIONS
Automatic tuning
Press and hold TUNING +/- to automatically tune to the next or previous station of sufficient reception.
Manual tuning
Press TUNING +/- briefly or repeatedly until you reach the desired frequency.
To improve reception:
Extend and position the pigtail fully to obtain optimum reception.
STORING PRESET STATIONS
You can store up to a total of 15 radio stations in the memory.
Manual scanning
- Tune to your desired station (see TUNING TO RADIO STATIONS).
- To store a preset station, hold down PRESET +/- briefly until the preset number appears.
- Press PRESET +/- repeatedly to select the preset station number.
You can overwrite a preset station by storing another frequency in its place.
Automatic scanning
- Press and hold AUTO SCAN until the frequency digits start flashing.
The set scans all available stations and stores them as preset stations in sequence. The set starts to play preset 1 when it finishes scanning.
LISTENING TO RADIO
- Press RADIO once to switch on the radio.
The display shows the radio frequency of the last selected station briefly before returning to the clock time. Your preset station is also shown if you are listening to a preset station.
- Adjust the volume by turning VOLUME.
- Press RADIO to switch off.
Helpful hints:
When the clock time is displayed, to view the current radio frequency, press RADIO twice. For preset stations, press the respective PRESET button once or repeatedly.
USING THE ALARM
Two different alarm times can be set. This can be useful when you and your partner need to be woken up at different times. Besides, you can set different alarm sounds respectively among tuner or sounds of nature.
SETTING THE ALARM
- Press and hold ALARM 1 until the hour digits start flashing.
- Hold down or press TUNING +/- repeatedly to set the desired hour.
- Press ALARM 1 to confirm.
→ Minute digits start flashing.
- Hold down or press TUNING +/- repeatedly to set the desired minute.
- Press ALARM 1 to confirm.
→ 🎨 starts flashing.
- Press TUNING +/- repeatedly to select the desired alarm sound.
- Press ALARM 1 to confirm.
- Repeat the steps above but press ALARM 2 instead of ALARM 1 to set the other alarm.
Helpful hints:
— If you have selected radio as the alarm sound, make sure you have properly tuned to a station and set the volume before turning off the radio. - To check the alarm time setting for ALARM 1 or ALARM 2, press ALARM 1 or ALARM 2. — It is not possible to adjust the alarm time during an alarm call or alarm repeating mode.
SWITCHING OFF THE ALARM REPEAT ALARM
This repeats your alarm call at 9 minute intervals.
- During the alarm call, press REPEATALARM /BRIGHTNESS CONTROL. → Alarm sound indicator flashes during a repeat alarm.
- Repeat if desired.
DEACTIVATING THE ALARM COMPLETELY
- Press ALARM 1 or ALARM 2 button once or more until the disappears.
SLEEP
About Sleep
This set has a built-in sleep timer, which enables the radio to be automatically switched off or relaxation music volume to be turned down gradually after a set period of time.
Setting and switching off SLEEP
- Press SLEEP.
→ Time to sleep flashes.
- Press SLEEP repeatedly to switch between:15->30->60->90->120->OFF.
- Press PRESET +/- repeatedly to select next or previous in-built relaxation music.
- To cancel sleep, switches the timer to OFF.
USING THE PROJECTION
With this projection feature, you can conveniently project the clock time onto a surface e.g. walls ceiling (furniture and glass are not recommended).
- Press PROJECTION/IMAGE FLIP to switch on projection.
The projection lens and LED indicator light up.
- Press PROJECTION/IMAGE FLIP and DISPLAY to switch between time or loop projection modes:
Loop (cyclically): time > indoor temperature > outdoor temperature.
In the other mode, only time is projected.
- Turn the FOCUS wheel to make the projected image clearest.
- Press and hold PROJECTION/IMAGE FLIP to flip the projected image vertically,
along the horizontal axis.
- Push the projection cone to pop it out (see 4).
- To change the projection slightly to a different angle, turn the IMAGE ROTATE wheel (maximum 90 degrees left or right).
- Press PROJECTION/IMAGE FLIP to switch between: bright, dim, very dim, and off.
Helpful hints:
Turn the projection lens right side up before trying to push it back into the set. In sleep mode, only animation is projected by default. You can also press PROJECTION/IMAGE FLIP and DISPLAY to project both animation and time.
Warning:
The projection light might harm your eye. Please do not look at the projection lens directly.
USING THE SENSOR TO DETECT OUTDOOR TEMPERATURE (See 3)
The main unit comes with an outdoor sensor. Using the sensor, the unit is capable of measuring and displaying outdoor temperature by receiving data transmitted from the sensor placed at another location.
- Place the sensor in a desired open area. The place must be within 50 meters away from the main unit. Make sure the sensor is loaded with batteries.
- For the first time using the outdoor sensor and the main unit, press RESET located on the sensor back, and RESET located in the bottom of the main unit. Then, the main unit will begin to receive transmission from the sensor.
- To update the outdoor temperature from the sensor at any time, press and hold AUTO SCAN for 5 seconds.
→ The temperature will be updated from the sensor about every 3 minutes.
→ When the outdoor temperature is updating with the sensor searching, is displayed on the main unit.
To improve the sensor reception:
In case of intermittent/no connection,
- Slide the CHANNEL switch to Channel 2 or 3, located in the battery compartment of the sensor, then repeat the setup connection described above.
- Reduce the distance between the sensor and the main unit.
- Press and hold AUTO SCAN for about 3 seconds to start searching for the remote sensor signal.
Note:
Each time you change a channel, press RESET on both the sensor and the main unit, then press and hold AUTO SCAN on the main unit to search for the sensor. INDOOR TEMPERATURE
The set can also automatically measure and display the current temperature in Centigrade.
- Press DISPLAY to toggle the display between indoor temperature and outdoor temperature.
- Press and hold DISPLAY to cyclically display indoor temperature, outdoor temperature, and day of the week.
→ Ⓗ is displayed.
To select between °C or °F readings, use the (°C/°F) slide switch (located in the battery compartment).
LOW BATTERY INDICATION
When the batteries of the sensor are running low, the low battery icon will be displayed on the main unit or the sensor, indicating that the batteries should be replaced soon.
- Do not expose the set to humidity, rain, sand, or excessive heat caused by heating equipment or direct sunlight.
- To clean your set, use a soft damp cloth or chamois leather. Do not use cleaning products that contain benzene, thinner, etc., as these may harm the housing.
ENVIRONMENTAL INFORMATION
We have reduced the packaging to its minimum using only paper and cardboard.
Your set consists of materials that can be recycled if disassembled by a specialized company. Please observe local regulations on the disposal of packing materials and old equipment.
TROUBLESHOOTING
If a fault occurs, first check the points listed below before taking the set for repair. If you are unable to remedy a problem by following these hints, consult your dealer or service centre.
WARNING: Under no circumstances should you try to repair the set yourself, as this will invalidate the guarantee. Do not open the set as there is a risk of electric shock!
No sound
- Volume not adjusted
- Adjust the volume
No display backlight / display malfunction/ radio and alarm do not function
- The set is out of power
- Connect AC/DC adapter to power supply
Display error / no reaction to any controls
- Electrostatic discharge
- Press the RESET hole on the bottom of the set with a ball-pen. Or disconnect set from AC/DC adapter for 5 minutes, and then re-plug the adapter.
Intermittent crackling sound during FM reception
- Weak signal
- Extend and position the pigtail aerial
The alarm does not work
- Alarm time/ mode not set
• See SETTING THE ALARM
— ALARM not tuned to a radio station or volume level is too low
- Make sure that the set is tuned to a radio station before you set the radio as alarm sound and volume level is high enough.
– Angle between the projection surface too large - Adjust the angle. - Focus is not proper - T u FOCUS wheel.
The main unit cannot read or update outdoor temperature from the sensor
—No signal or weak signal.
- Reset both the main unit and the sensor. Or improve the sensor reception. See "Using the sensor to detect outdoor temperature".
This product complies with the radio interference requirements of the European Union.
The typeplate and production number are located inside the battery compartment.
Disposal of your old product
Your product is designed and manufactured with high quality materials and components, which can be recycled and reused.

When this crossed-out wheeled bin symbol is attached to a product it means the product is covered by the European Directive 2002/96/EC.
Please inform yourself about the local separate collection system for electrical and electronic products.
Please act according to your local rules and do not dispose of your old products with your normal household waste. The correct disposal of your old product will help prevent potential negative consequences for the environment and human health.
Clock radio
Meet Philips at the Internet
http://www.philips.com
English
Français
Español
Deutsch
Nederlands
Italiano


- ENGLISH
- CONGRATULATIONS ON YOUR PURCHASE AND WELCOME TO PHILIPS
- TO FULLY BENEFIT FROM THE SUPPORT THAT PHILIPS OFFERS, REGISTER YOUR PRODUCT AT WWW.PHILIPS.COM/WELCOME
- SUPPLIED ACCESSORIES
- FRONT AND TOP PANEL (SEE 1)
- ⑥ REPEAT ALARM/BRIGHTNESS CONTROL
- ⑦ AUTO SCAN
- ⑧ DATE/SET TIME
- ⑨ DISPLAY
- FOCUS
- LEFT, RIGHT, AND BACK PANEL(SEE 2)
- ⑪ PUSH
- ⑫ PRESET
- ⑬ TUNING
- CONTROLS ON THE SENSOR (SEE 3)
- POWER SUPPLY
- MAINS ADAPTER
- HELPFUL HINTS
- SETTING THE CLOCK
- IMPORTANT
- MANUAL SETTING
- RADIO
- TUNING TO RADIO STATIONS
- AUTOMATIC TUNING
- MANUAL TUNING
- TO IMPROVE RECEPTION
- STORING PRESET STATIONS
- MANUAL SCANNING
- AUTOMATIC SCANNING
- LISTENING TO RADIO
- USING THE ALARM
- SETTING THE ALARM
- SWITCHING OFF THE ALARM REPEAT ALARM
- DEACTIVATING THE ALARM COMPLETELY
- SLEEP
- ABOUT SLEEP
- SETTING AND SWITCHING OFF SLEEP
- USING THE PROJECTION
- WARNING
- USING THE SENSOR TO DETECT OUTDOOR TEMPERATURE (SEE 3)
- TO IMPROVE THE SENSOR RECEPTION
- NOTE
- LOW BATTERY INDICATION
- ENVIRONMENTAL INFORMATION
- TROUBLESHOOTING
- NO SOUND
- NO DISPLAY BACKLIGHT / DISPLAY MALFUNCTION/ RADIO AND ALARM DO NOT FUNCTION
- DISPLAY ERROR / NO REACTION TO ANY CONTROLS
- INTERMITTENT CRACKLING SOUND DURING FM RECEPTION
- THE ALARM DOES NOT WORK
- THE MAIN UNIT CANNOT READ OR UPDATE OUTDOOR TEMPERATURE FROM THE SENSOR
- DISPOSAL OF YOUR OLD PRODUCT
- CLOCK RADIO
Brand : PHILIPS
Model : AJ3650
Category : Radio