
HD 550 CI - Digital decoder MEGASAT - Free user manual and instructions
Find the device manual for free HD 550 CI MEGASAT in PDF.


| Product Type | Digital Decoder (Satellite Receiver) |
| Brand | Megasat |
| Model | HD 550 CI |
| Dimensions (approx.) | 260 x 160 x 45 mm |
| Weight (approx.) | 0.8 kg |
| Power Supply | 12V DC, 1.5A (external adapter) |
| Power Consumption | Max 15 W |
| Video Output | HDMI, SCART |
| Audio Output | Digital optical (S/PDIF), analog RCA |
| Input Connections | F-type (satellite), CI slot, USB (for updates) |
| Supported Satellite Standards | DVB-S/S2, MPEG-4, H.264 |
| Max Resolution | 1080p (Full HD) |
| Channel Memory | 5000 channels |
| DiSEqC Support | DiSEqC 1.0, 1.2, USALS |
| Maintenance | Keep dry, clean with soft cloth, avoid direct sunlight |
| Safety | Operate at 0-40°C, keep ventilation slots clear |
| Spare Parts / Repairability | Remote control, power adapter, HDMI cable (standard parts) |
| General Information | Compatible with common satellite dishes, supports CI+ modules |
Frequently Asked Questions - HD 550 CI MEGASAT
User questions about HD 550 CI MEGASAT
0 question about this device. Answer the ones you know or ask your own.
Ask a new question about this device
Download the instructions for your Digital decoder in PDF format for free! Find your manual HD 550 CI - MEGASAT and take your electronic device back in hand. On this page are published all the documents necessary for the use of your device. HD 550 CI by MEGASAT.
USER MANUAL HD 550 CI MEGASAT
Digital HD Satellite Receiver Megasat HD500

Inhalt


Bitte beachten Sie:
5.6 System

1 Important Safety Instructions.... 2
2 Front and Rear Panel Illustration.... 4
3 Remote Control 5
3.1 Key introduce ....5
3.2 Installing the Batteries 6
3.3 Using the Remote Control 6
4 Connections....7
5 First Time Installation....8
5.1 Program Manage Settings....8
5.1.1 Program Edit....9
5.1.2 EPG (Electronic program guide) 10
5.1.3 Sort.... 10
5.2 Video Setting....10
5.2.1 Aspect Ratio 10
5.2.2 Resolution.... 10
5.2.3 TV format 10
5.2.4 Video output 11
5.3 Channel Search....11
5.3.1 Satellite 11
5.3.2 Transponder 13
5.4 Time Setting....13
5.5 Option....14
5.6 System....14
5.6.1 Set Password 14
5.6.2 Restore Factory Default.... 14
5.6.3 Information.... 14
5.6.4 Recall List 14
5.6.5 Software update 14
5.7 USB.... 15
5.7.1 Multimedia 15
5.7.2 Photo configure 16
6 Glossary.... 16
7 Troubleshooting 17
8 Specifications.... 18
1 Important Safety Instructions
1) Read these instructions.
2) Keep these instructions.
3) Heed all warnings.
4) Follow all instructions.
5) Do not use this apparatus near water.
6) Clean only with dry cloth.
7) Do not block any ventilation openings, install in accordance with the instructions.
8) Do not install near any heat sources such as radiations, heat registers, stoves, or other apparatus (including amplifiers) that produce heat.
9) Do not defeat the safety purpose of the polarized plug. If the provided plug does not fit into your outlet, consult an electrician for replacement of the obsolete outlet.
10) Protected the power cord from being walked on or pinched particularly at plugs, convenience receptacles, and the point where they exit from the apparatus.
11) Only use attachments/accessories specified by the manufacturer.
12) Unplug this apparatus during lighting storms or when unused for long periods of time.
13) Refer all servicing to qualified service personnel. Servicing is required when the apparatus has been damaged in any way, such as power-supply cord or plug is damaged, liquid has been spilled or objects have fallen into the apparatus, the apparatus has been exposed to rain or moisture, does not operate normally, or has been dropped.
14) Mains plug is used as the disconnect device, the disconnect device shall remain readily operable.
15) The ventilation should not be impeded by covering the ventilation openings with items, such as newspapers, table-cloth, curtains, etc.
16) No naked flame sources, such as lighted candles, should be placed on the apparatus.
17) Attention should be drawn to the environmental aspects of battery disposal.
18) The use of apparatus in moderate climate.
19) The apparatus shall not be exposed to dripping or splashing and that no objects filled with liquids, such as vases, shall be placed on the apparatus.
WARNING: To reduce the risk of fire or electric shock, do not expose this apparatus to rain or moisture.
WARNING: The batteries shall not be exposed to excessive heat such as sunshine, fire or the like.
WARNING: The USB memory stick should be plugged in the unit directly. USB extension cable should not be used to avoid failing of data transferring and interference caused.


The symbol indicates that dangerous voltages constituting a risk of electric shock are present within this unit.

The symbol indicates that there are important operating and maintenance instructions in the literature accompanying this unit.

The symbol indicates that this product incorporates double insulation between hazardous mains voltage and user accessible parts. When servicing use only identical replacement parts.

CAUTION:
When the apparatus was in electrostatic circumstance, it may be malfunction and need to reset by user. If.
Tips regarding environmental protection
At the end of its operating life, this product may not be disposed of by way of your normal household waste. Instead it must be delivered to a collection point for recycling electrical and electronic equipment. The icon on the product, in the operating instructions or on the packaging, indicates this.
The materials used in manufacturing this product are recyclable, depending on their identifying markings. By recycling this equipment, by recycling its components, or through other procedures of re-using outdated equipment, you are making an important contribution to protection our environment. Please ask you local municipal administration for the location of the corresponding recycling point.
Battery Recycling
In order to ensure the environmentally friendly disposal of batteries, please do NOT dispose of used batteries through normal household waste. Please take the batteries to your local retail or community collection point for recycling.
The following may be an indication of a discharged battery: The device cannot be switched on. The device switches off automatically and "Battery Empty" is shown in the display. The device and or battery do not function properly.
Appropriate use
The receiver is designed for receiving unencrypted digital SD and HD satellite channels (free-to-air) for private use. It is exclusively meant for this purpose and must only be used for the same. This also includes paying attention to all information contained in this operating manual, especially in the safety instructions. Any other usage is considered to be improper and may lead to material damages and even personal injuries. Moreover, it will result in the immediate loss of guarantee. The manufacturer does not bear any liability for damages caused due to improper use.
2 Front and Rear Panel Illustration
- Front panel
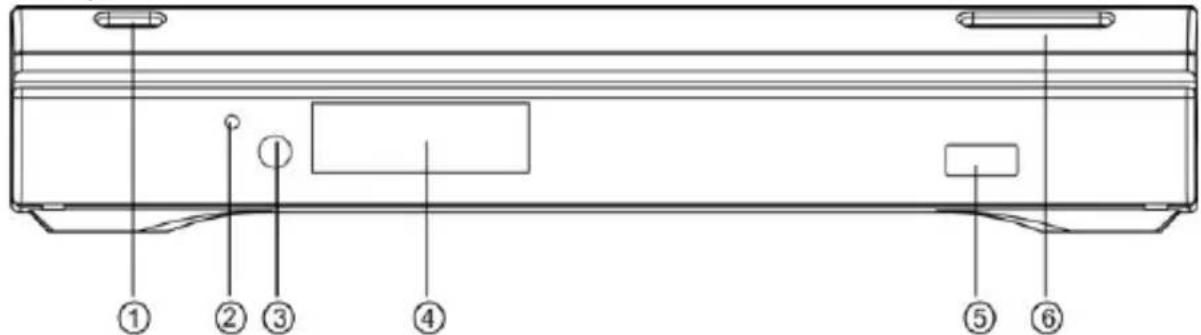
- Standby: Used to switch the set top box to on or standby.
- Standby Indicator: Used to visually show power state of the set top box, the green LED will show if turned on the set top box and the red LED will be light if the set top box entered standby mode.
- Remote Control Sensor: Used to receive the signal from the remote control.
- LED Display: Used to display channel information.
- USB Port: To connect a external USB 2.0 Device.
- Channel Up/Down: Used to change channels without using the remote control.

Caution:
If possible, please connect USB devices directly to the USB interface. If this is not possible, use only USB extension cables not exceeding 25 cm.
- Rear panel

- RF Loop Through: This socket will bypass the RF signal to either your TV or another video system.
- RF IN : This socket connects to your external aerial.
- Coaxial: This socket connects to a coaxial socket on your surround sound system.
- HDMI OUT: This socket connects to HDMI in device.
- TV Scart: This socket connects to your TV.
- VCR Scart: This socket connects to either a DVD or other video system.
- Mains Cable: This is used to connect to your main power supply.

Caution:
Select HDMI OR Scart output. unit can not support HDMI / Scart output at the same time.
3 Remote Control
3.1 Key introduce
| No | Key Function | |
| 1 MUTE Mute or Restore Audio Output. | ||
| 2 INFO Displays additional channel information. | ||
| 3 TTX Displays Teletext Information. | ||
| 4 DTV/VCR Switches the product to VCR input if it is in DTV state. Switches the product to DTV if it is in VCR state. | ||
| 5 | SUBTITLE | Selects Subtitles Language. |
| 6 EXIT Exits the current Menu or returns to the previous Menu. | ||
| 7 OK Confirms an entry or selection. Displays the list of channels. | ||
| 8 | ◄/► Navigates through the Menus. Increases or decreases volume. | |
| 9 TV/RADIO Switches from TV function to Radio function and from Radio to TV. | ||
| 10 RECALL Used to switch between the last two viewed channels. | ||
| 11 GOTO Selects the play time of media. | ||
| 12 ◀ (PREV) | Skips to the previous track during playing media. | |
| 13 ► (NEXT) | Skips to the next track during playing media. | |
| 14 REPEAT Selects Repeat or turn off Repeat mode. | ||
| 15 ■ (STOP) | Stops media play. | |
| 16 STANDBY Switch the product to on or standby. | ||
| 17 EPG (Electronic Program Guide)Turns the program guide on. | ||
| 18 AUDIO Selects an Audio Language or Audio Mode. | ||
| 19 ▼/▲ | Navigates through the Menus. Selects the next or previous Channel. | |
| 20 MENU Turns on Main Menu. | ||
| 21 FAVOURITE Turns on Favourite Menu. | ||
| 22 0-9 (Numeric Buttons) | Selects a channel or setting. | |
| 23 ► (FWD) | Searches forwards during media play. | |
| 24 ← (REV) | Searches backwards during media play. | |
| 25 ► (PLAY) | Starts or resumes media play. | |
| 26 II (PAUSE) | Pauses media play. | |
| 27 COLOUR BUTTONS | Teletext functions.Additional function for this keys: | |
| 1RED | Find function | |
| 2Green | Switch resolution | |
| 3Yellow | Switch aspect ratio | |
| 4Blue | Timer setting | |


Note:
SUBTITLE / TEXT / AUDIO may not be available for all channels.
3.2 Installing the Batteries
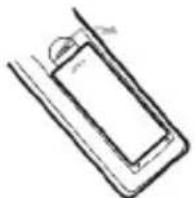
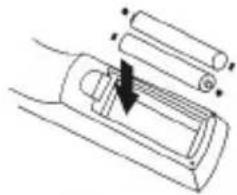
Remove the battery cover from the remote control and put 2xAAA size batteries inside the compartment.
The diagram inside the battery compartment shows the correct way to install the batteries.
-
Open the cover
-
Install batteries
-
Close the cover


Notes on batteries
If the remote control is not used for a long period of time, please remove the battery from the compartment.
Do not heat batteries or dispose of them in fires.
Do not dismantle, deform or modify batteries.
3.3 Using the Remote Control
To use the remote control, point it towards the front of the digital set top box. The remote control has a range of up to 7 metres from the set top box at an angle of up to 60 degrees.
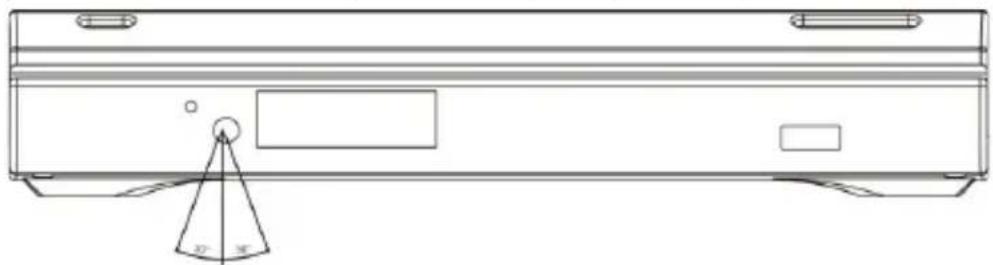
The remote control will not operate if its path is blocked.

Note:
Sunlight or very bright light will decrease the sensitivity of the remote control.
Please do not plug out the storage media directly when it is being used, such as the following functions or menus: music/album/movie/, PVR timeshift/recording/playback. If you want to plug out it, please close or stop the functions and menus above firstly.
4 Connections

Caution:
Make sure to check the voltage specification of the wall outlet is the same rating with the receiver. To prevent the risk of electric shock, do not open the cover or the back of the receiver.


Note:
When connecting the receiver to other equipment, e.g., TV, VCR and amplifier, make sure to refer to relevant user manual for instruction. Also, make sure you disconnect all the equipments from the mains supply before the connection.
5 First Time Installation
After all connections have been made properly, switch on TV and make sure the receiver is connected to the Main Power. Press Power button to switch receiver on. If you are using the receiver for the first time or restored to Factory Default, the Main Menu will appear on your TV screen.
(1) Select [OSD Language] and press ◀ / ▶ key to select the desired language.
(2) Select [Satellite Setup] and press ◀ / ▶ /OK to Satellite Setup menu.
(3) Select the desired satellites by using the ▲/▼-Keys and press OK to confirm.
Press ◀ / ▶ key to switch to the satellite settings and use the ▲ / ▼ -keys to select.
Use the ◀ / ▶ key to change the settings.


Note:
If you are using more than one Satellite you need to assign the satellites the correct DiSEqC-LNB that is used in your satellite installation.
(4) Press the BLUE button to proceed.
(5) Select how to search and which channels should be stored.
Select the Scan Mode. Normally Standard is the best choice.
Select the channels to be stored. For this device only free available channels can be stored.
Select if all or only TV or Radio channels should be stored.
(6) Press the BLUE button to start the scan process.
(7) Once channel tuning is complete, you are now ready to watch TV.
5.1 Program Manage Settings
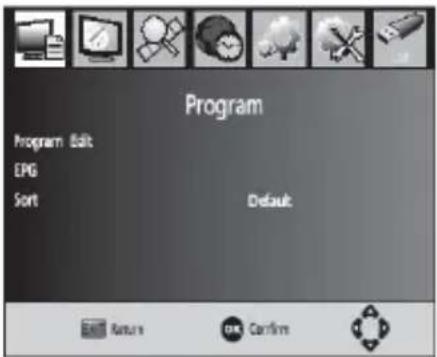
To access the Menu, press the MENU button and select [Program]. The Menu provides options to adjust the Program Manage Settings. Select an option and press OK or ▶ to adjust that setting. Press the EXIT button to exit the Menu.
5.1.1 Program Edit
To edit your program preferences (lock, skip, favourite, move or delete), you will need to enter the Program Edit Menu. This Menu requires a password to access. Enter the default password '000000'
Set Favourite Program
You can create a short list of favourite programs that you can easily access. Set Favourite TV or Radio program:
- Select the preferred program then press the FAVOURITE button. A heart-shaped symbol will appear and the program is marked as a favourite.
- Repeat the previous step to select more Favourite programs.
- To confirm and exit the Menu, press the EXIT key Disable favourite TV or Radio Program; Press the FAVOURITE button on the Remote Control with the heart-shaped symbol.
View Favourite Program
- Press the Favourite button and the Favourite Menu will appear.
- Press ▲/▼ to select your Favourite Programs.
- Press OK to select your favourite program.
Delete a TV or Radio Program
- Select the Program and then press the BLUE button, A message will appear. Press OK to delete the program.
- Repeat the previous step to select more programs to delete.
Skip TV or Radio Program
- Select the program you would like to skip and press the GREEN button. A skip symbol is displayed. The program is marked as a skip.
- Repeat the previous step to select more programs.
- To confirm and exit the menu, press EXIT key. Disable a skip TV or Radio program: Press the GREEN button on the skip program with the skip symbol.
Move a TV or Radio Program
- Select the preferred program then press the RED button. A move symbol will appear.
- Press ▼/▲ to move the program.
- Press OK to confirm.
- Repeat the above steps to move more channels.
Lock Program
You can lock selected programs for restricted view. Lock a TV or Radio Program:
- Select the preferred program then press the YELLOW button. A lock-shaped symbol is displayed. The program is now marked as locked.
- Repeat the previous step to select more programs.
- To confirm and exit the menu, press the EXIT button.
- Press the YELLOW button to disable the locked program.
- To view the locked program, you will be required to enter either the default password '000000' or your last set password.


5.1.2 EPG (Electronic program guide)
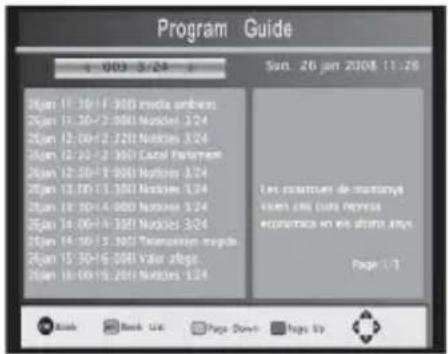
The EPG is an on-screen TV guide that shows scheduled programs seven days in advance for every tuned channel. Press the EPG button on the Remote Control to access guide. You can use the ▼/▲ key to select the preferred program. If there is more than one page of information, use the BLUE button for page up and the YELLOW button for page down.
Use the OK button to add the currently selected program to the schedule list. The device will switch to this program automatically when the time is reached.
Use the INFO button in EPG mode to open the schedule menu.

5.1.3 Sort
Sort your channels from the following options:
[Default]- remain the original order.
[By Encrypt] -Sort the channels in encrypt mode.
[Service Name]-Sort the channels in alphabetical order.
[By Freq] -Sort the channels according to the freq.
5.2 Video Setting
To access the Menu, press MENU then select [Picture]. The Menu provides options to adjust the video settings. Press ▼/▲ to select an option and press ◀/▶ to adjust that setting. Press EXIT to exit the menu.
5.2.1 Aspect Ratio
You must set the display format to either 4:3 Pan Scan, 4:3 Letter Box, 16:9 Wide Screen or Auto to get the maximum display when watching TV.
5.2.2 Resolution
If the video does not appear correctly, change the setting. This setting is to match the most common setting for HDMI.
[480i]: for NTSC system TV.
[480P]: for NTSC system TV.
[576i] for PAL system TV.
[576P]: for PAL system TV.
[720P]: for NTSC or PAL system TV.
[1080I]: for NTSC or PAL system TV.
5.2.3 TV format
If the video does not appear correctly, you need to change the settings. This should match the most common setting for TVs in your country.
[NTSC]: for NTSC system TV.
[PAL]: for PAL system TV.
[Auto]: set TV format according to the stream automatically.
5.2.4 Video output
Depending on your TV set you can change the Video output signal for SCART connections.
CVBS: CVBS output.
RGB: RGB output.
5.3 Channel Search
To access the menu, press MENU and select
[Search Channel]. The Menu provides options to adjust the Search Channel settings. Select an option and press ◀ / ▶ to adjust the settings. Press EXIT to exit the Menu.


5.3.1 Satellite
Configure the settings of satellites.
Satellites' list: Press ▲/▼ to select a satellite, whose settings will be shown at right side.
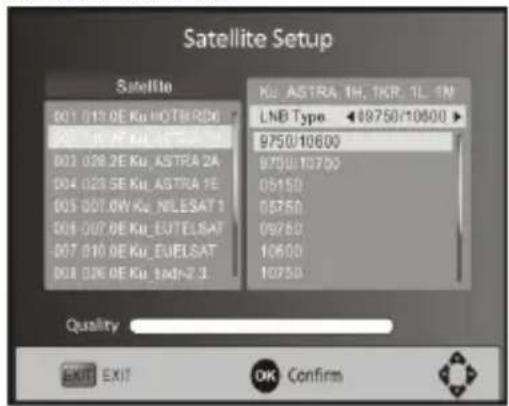
LNB Type: Press ◀ / ▶/OK to show the list of LNB Types which is shown as frequencies of local oscillator. You also can enter frequency by User Single, User Dual at bottom of the list.
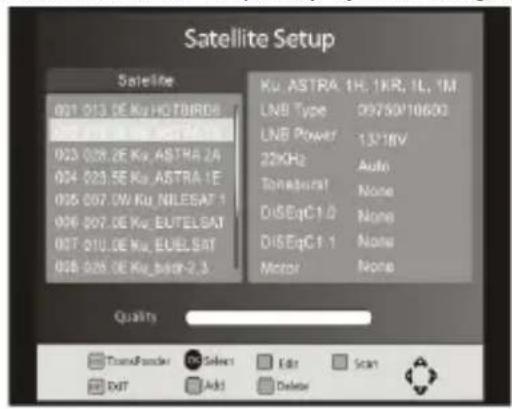
LNB Power: Press ◀ / ▶ to set the LNB power.
22K: Press ◀ / ▶ to switch on or off the 22K, which is set with auto when LNB Type is dual local oscillator.
| Toneburst: Enable or Disable the toneburst switcher. | |
| DiSEqC1.0: select the right port up to 4 for the right LNB. | |
| DiSEqC1.1: select the right port up to 16 for the right LNB. | |
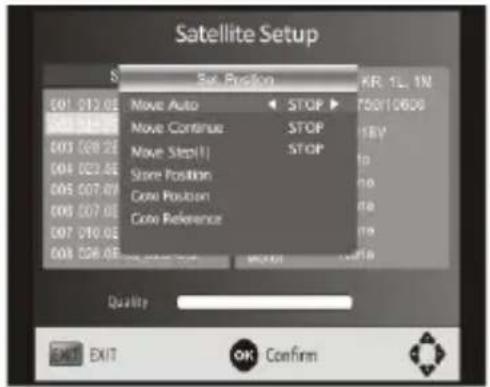
| Motor: Press LEFT/RIGHT to select DiSEq C1.2 or DiSEqC1.3. Then Press OK to show the menu to set position. | |
| DiSEqC1.2: Move the motor to a right position to lock the signal. | |
| DiSEqC1.3: Move the motor according to the local and satellite positions. | |
| Motor Settings: (Select DiSEqC and press OK to open) | |
| Move Auto: Press LEFT/RIGHT to start to move West/East. It will be stopped automatically when the signal is locked. | |
| Move Continue: Press LEFT/RIG HT to start to move West/East. It will keep moving until you stop it. | |
| Move Step[1]: Press LEFT/RIGHT to move just a step. | |
| Store Position: store current position of motor. | |
| Goto Position: Press LEFT/RIGHT to goto the position stored. | |
| Goto Reference: Rest all the positions. | |
| Goto X: goto the position on calculated from the local and satellite positions. |

Add satellites:
Press RED to add a new satellite, in which you must input an unique longitude, and edit the satellite's name with soft keyboard.
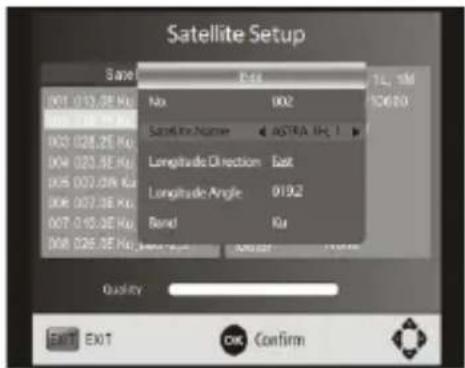
Edit satellites:
Press GREEN to edit the focused satellite.
Delete satellite:
Press YELLOW to delete the focused satellite.
Press OK to confirm.
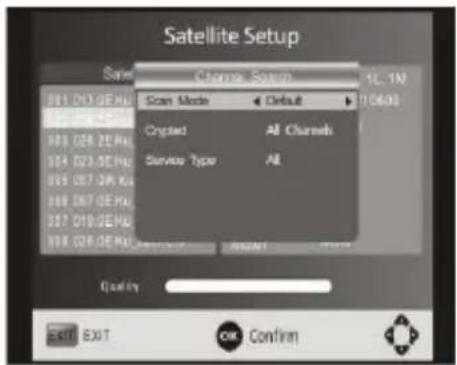
Single Satellite Scan:
Press BLUE to pop the menu of scanning settings.
Scan Mode:
Press ◀ / ▶ to select default, which scan the default transponders built in, Blind Scan and NetWork, which scan with NIT on.
Crytped:
Press ◀ / ▶ to select All Channels or FTA Channels;
Service Type:
Press ◀ / ▶ to select ALL, DTV or Radio.
Press OK to start scanning with the above settings.
Multi-Satellites Scan:
Press OK to select satellites with the mark " √ ", then press BLUE to pop the menu of scanning setting. After
Configuring like single satellite scan, press OK to start multi-satellites scan.
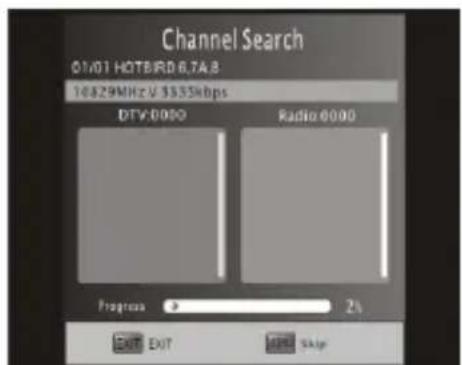
Channel Search
Scan the satellites or Transponders according the configurations.

Blind Scan
First scan the band to get the transponders which can be locked. After gathering all Transponders, Scan the transponders one by one to get the programs.
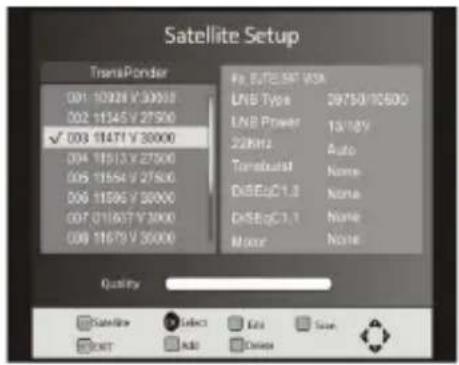
5.3.2 Transponder
Press GOTO to switch the list to show transponders of the focused satellite. Also you can press GOTO to switch back to satellites' list.
Add transponder:
Press RED to add a new transponder. It can't save an existing TP under the same satellite.
Edit transponder:
Press GREEN to edit the focused transponder. It can't save an existing TP under the same satellite.
Delete transponder: Press YELLOW to delete the focused transponder. Press OK to confirm.
Single Transponder Scan:
Press BLUE to pop the menu of scanning setting. After configuring the settings, Press OK to start scanning.
Multi-Transponder Scan:
Press OK to select transponders with the mark"√", then press BLUE to pop the menu of scanning setting. After Configuring the settings, press OK to start multi-transponder scanning.

5.4 Time Setting
To access the Menu, press MENU then select [Time]. The Menu provides options to adjust the time settings. Press ▼/▲ to select an option and press ◀/▶ to adjust the settings. Press EXIT to exit the menu.
(1)Time Auto: Update time with the stream time, or NOT.
(2)Time Zone: Select the Time Zone Offset.
(3)Date: Show and set the system date.
(4)Time: Show and set the system time.
(5)Sleep: If this setting is off, this function does not work. If this setting is not off, a message will pop up after your preferred time to inform you, that the device
will go in to sleep mode. This message will appear under no any operation. Auto-off function can be set in a time period at 0-12 hours. Standard setting is off.
Press STANDBY button to exit sleep/auto-off mode.

5.5 Option
To access the Menu, press MENU and select [Option]. The menu provides options to adjust the OSD Language, Subtitle Language and Audio Language. Select an option and press // to adjust the setting. Press EXIT to exit the Menu.
(1) OSD Language: Select an OSD language.
(2) Audio Language: Select the preferred audio language for watching TV channels. If the language is not available, the default program language will be used.
(3) Subtitle Language: Select the preferred subtitle language.
(4)Digital Audio: Set output mode of Digital Audio.
(5)Banner Time: Set the period of banner auto disappearing.

5.6 System
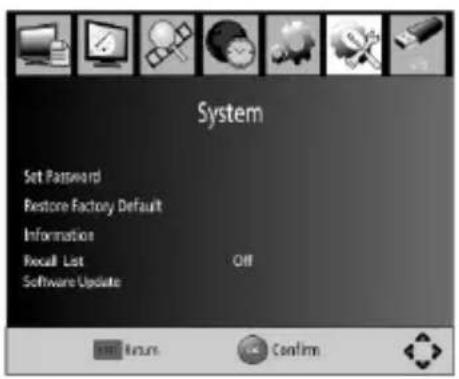
To access the Menu, press MENU and select [System]. The menu provides options to adjust the system settings. Press the ▼/▲ key to select an option and press ◀/▶ to adjust the setting. Press EXIT to exit the Menu.
5.6.1 Set Password
Set or change the password for locked programs. Enter your old password or the default password '000000'. You will then be asked to enter your new password. To confirm re-enter your new password. Once it is confirmed, press EXIT to exit the Menu.
5.6.2 Restore Factory Default
Reset your Set Top Box to the Default Factory Settings. In Main Menu select [Restore Factory Default] and press OK or RIGHT to select. Enter your password or the default password '000000' and press OK to confirm. This option will delete all preset channels and settings.
5.6.3 Information
View model, hardware and software information.
5.6.4 Recall List
Enable or disable Recall list function, which support multi-recall -program switching.
5.6.5 Software update
Select to start software update if USB is connecting and there's a upgrading file.
5.7 USB
To access the Menu, press the MENU button and select [USB]. The menu provides options to playback Music and Photo files, it can support MP3, WMA, JPEG, BMP files.
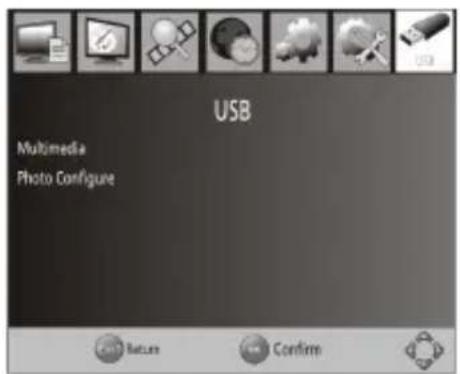


Note:
The unit will only support USB device with FAT and FAT32 file system. It will not support NTFS file system.
5.7.1 Multimedia
If no USB device plugged into it, a warning message "No USB Device is Found" displays, otherwise you can select the Music or Photo type in this menu and press OK to enter the file browser and select the file to playback.

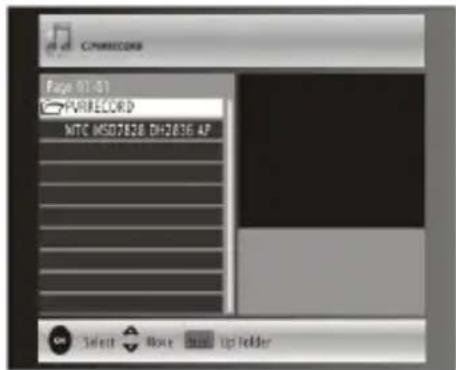
Use the ARROW keys to select the desired song or photo and press OK to open.
Playback functions
| Key Music Playback Photo slideshow | ||
| OK | Select song | Select Photo |
| ▸ | Start or resume playback Start slideshow | |
| II | Pause playback Pause slideshow | |
| ■ | Stop playback Stop slideshow | |
| ◀◀ | Fast rewind - | |
| ▶▶ | Fast forward - | |
| ◀◀ | Previous Song Previous photo | |
| ▶▶ | Next Song Next photo | |
| Repeat | Toggle repeat functions- No repeat- Repeat one- Repeat all once- Repeat all randomly | Toggle repeat functions- No repeat- Repeat one- Repeat all once- Repeat all randomly |
| Goto Go to time indexUse Arrow keys and number keys to enter | Open Thumbnail preview | |
| Recall Open lower folder | Open lower folder | |
5.7.2 Photo configure
-Slide Time: adjust slide show interval to 1\~8 seconds.
-Slide Mode: adjust slide show effect as mode 0\~59 or random.
-Aspect Ratio: Keep displays the picture as its original aspect, Discard displays the picture in full screen mode.

Note:
Start music playback and change to photo slide show will continue music playback during the slide show.
6 Glossary
| DiSEqC Digital Satellite Equipment Control Digital system, with which the receiver can control different components of the external unit. It is especially used for selecting from multiple satellite positions (for example Astra and Eutelsat). | |
| EPG | Electronic Programme Guide |
| RF connector Coaxial connector for LNB antenna cable. | |
| FTA Free to air services Free of charge services that can be received without a special decoder. | |
| LNB Low Noise Block Amplifier / Converter A device at the centre of the antenna, which converts high frequency incoming signals from satellites into a low frequency range and amplifies them simultaneously. | |
| Mute Key of the remote control for turning off sound | |
| OSD On screen display Menu control displayed on the screen. | |
| PID Identification number of a received data stream. The PIDs ensure that a channel is received completely. | |
| Receiver Receiver unit, which converts signals from the antenna into video and audio signals. | |
| SCART A21 pole connector for connecting the TV set to the receiver. | |
| Transponder Satellite frequency. Several digital channels can be broadcasted simultaneously on a transponder. | |
| VCR Abbreviation for Video Cassette Recorder or DVD Player. | |
| HDMI High Definition Multimedia Interface. A connector for connecting the TV set to the receiver and transmit picture and sound in HD quality. | |
| Coaxial | Electrical digital audio output for connecting an audio amplifier. |
7 Troubleshooting
If you experience problems with this receiver or its installation, in the first instance please read carefully the relevant sections of this UserManual and this Troubleshooting section.
| Problem Possible cause What to do | ||
| Power isn't connected Connect the power No picture | ||
| The power switch is not on Switch on the power | ||
| No Signal | Not connect DVB-S cable Plug in the DVB-S cable Screen shows | |
| Incorrect setting Set up correct parameter | ||
| No sound from Speaker | No or incorrect connection with audio cable | Connect the audio cable correctly |
| Mute the sound Switch on the correct volume control | ||
| Incorrect sound track Try another sound track | ||
| Only sound, no image on the screen | No or incorrect connection with AV cable | Connect the audio cable correctly |
| The program is a radio program | Presskey to shift into TV mode | |
| Scrambled channel message | Channel is scrambled Select an alternative channel | |
| Forgotten channel lock code | Re-install channels to cancel channel lock | |
| No response to remote control | Receiver off | Plug in and turn on receiver |
| Handset not aimed correctly | Aim handset at front panel | |
| Front panel obstructed | Check for obstructions | |
| Remote control batteries are inserted incorrectly | Check batteries direction | |
| Handset batteries exhausted | Replace remote control | |
| The image stop suddenly or mosaic | The signal is too weak | Strengthen the signal |
8 Specifications
| Item | Specification | |
| Tuner | Frequency 950MHz to 2150MHz | |
| Input Impedance 75Ohms unbalanced | ||
| Signal Input -65 ~ -25dBm | ||
| Symbol Rate 2-45Mbps | ||
| LNB Power 13/18V,Max 350mA | ||
| Demodulator | QPSK/8PSK Demodulation | |
| FEC | 1/2,2/3,3/4,5/6,7/8,8/9,9/10 | |
| Connections | LNB IN F connector | |
| LOOP OUT F connector | ||
| TV SCART Composite TV(CVBS),RGB, Audio L/R | ||
| VCR SCART Composite Video, Audio L/R | ||
| COAXIAL RCA, for SPDIF digital audio output | ||
| HDMI Connects to HDMI in device. | ||
| Input 100-240V ~ 50/60Hz Power | ||
| Consumption | Max 18W | |
| Decoder Module PAL,NTSC Display | ||
| Resolution | 720X576(PAL),720X480(NTSC),720P,1080i480i,480P,576i,576P | |
| Decoding | Aspect Rate | 4:3(Letterbox, Pan& Scan)16:9 |
| Video | MPEG2 Transport MP@ML.HL | |
| MPEG4 AVC/H.264 HP@L4 | ||
| Audio MPEG2 Audio Layer I&II | ||
| Others | Compliance | ETSI/EN 300421 DVB-S compliant |
| Sound Mode | Right, Left, Stereo | |
* Specifications are subject to change without further notice.
MEGASAT


- DIGITAL HD SATELLITE RECEIVER MEGASAT HD500
- INHALT
- BITTE BEACHTEN SIE
- 5.6 SYSTEM
- 1 IMPORTANT SAFETY INSTRUCTIONS
- CAUTION
- TIPS REGARDING ENVIRONMENTAL PROTECTION
- BATTERY RECYCLING
- APPROPRIATE USE
- 2 FRONT AND REAR PANEL ILLUSTRATION
- 3 REMOTE CONTROL
- 3.2 INSTALLING THE BATTERIES
- NOTES ON BATTERIES
- 3.3 USING THE REMOTE CONTROL
- NOTE
- 4 CONNECTIONS
- 5 FIRST TIME INSTALLATION
- 5.1 PROGRAM MANAGE SETTINGS
- 5.1.1 PROGRAM EDIT
- SET FAVOURITE PROGRAM
- VIEW FAVOURITE PROGRAM
- DELETE A TV OR RADIO PROGRAM
- SKIP TV OR RADIO PROGRAM
- MOVE A TV OR RADIO PROGRAM
- LOCK PROGRAM
- 5.1.2 EPG (ELECTRONIC PROGRAM GUIDE)
- 5.1.3 SORT
- 5.2 VIDEO SETTING
- 5.2.1 ASPECT RATIO
- 5.2.2 RESOLUTION
- 5.2.3 TV FORMAT
- 5.2.4 VIDEO OUTPUT
- 5.3 CHANNEL SEARCH
- 5.3.1 SATELLITE
- ADD SATELLITES
- EDIT SATELLITES
- DELETE SATELLITE
- SINGLE SATELLITE SCAN
- SCAN MODE
- CRYTPED
- SERVICE TYPE
- MULTI-SATELLITES SCAN
- CHANNEL SEARCH
- BLIND SCAN
- 5.3.2 TRANSPONDER
- ADD TRANSPONDER
- EDIT TRANSPONDER
- SINGLE TRANSPONDER SCAN
- MULTI-TRANSPONDER SCAN
- 5.4 TIME SETTING
- 5.5 OPTION
- 5.6.1 SET PASSWORD
- 5.6.2 RESTORE FACTORY DEFAULT
- 5.6.3 INFORMATION
- 5.6.4 RECALL LIST
- 5.6.5 SOFTWARE UPDATE
- 5.7 USB
- 5.7.1 MULTIMEDIA
- 5.7.2 PHOTO CONFIGURE
- 6 GLOSSARY
- 7 TROUBLESHOOTING
- 8 SPECIFICATIONS
- MEGASAT
Brand : MEGASAT
Model : HD 550 CI
Category : Digital decoder