
DG8030 EXPERT PRESSURE IRON STEAMER - Steam iron ROWENTA - Free user manual and instructions
Find the device manual for free DG8030 EXPERT PRESSURE IRON STEAMER ROWENTA in PDF.
| Product type | High pressure steam generator |
| Brand | ROWENTA |
| Model | DG8030 EXPERT PRESSURE IRON STEAMER |
| Power supply | 120 V |
| Water tank capacity | 1 liter |
| Steam pressure | High pressure (Expert Pressure) |
| Safety systems | Overpressure valve, thermal fuse |
| Temperature adjustment | Thermostat: Linen/Cotton, Silk/Wool, Synthetics |
| Steam flow adjustment | Adjustment button from min to max |
| Vertical steam function | Yes |
| Dry ironing | Yes |
| Indicator lights | Steam ready, iron heating, empty tank, boiler drain |
| Boiler maintenance | Rinse every 10 uses approximately |
| Cleaning | Soleplate: damp cloth; Housing: soft cloth |
| Usage | Household use only |
| Spare parts available | Drain plug, plug gasket, drain accessory |
| Warranty | 1 year appliance, 2 years tank (except specific legislation) |
| Recommended water type | Tap water; if very hard, mix 50% demineralized water |
Frequently Asked Questions - DG8030 EXPERT PRESSURE IRON STEAMER ROWENTA
User questions about DG8030 EXPERT PRESSURE IRON STEAMER ROWENTA
0 question about this device. Answer the ones you know or ask your own.
Ask a new question about this device
Download the instructions for your Steam iron in PDF format for free! Find your manual DG8030 EXPERT PRESSURE IRON STEAMER - ROWENTA and take your electronic device back in hand. On this page are published all the documents necessary for the use of your device. DG8030 EXPERT PRESSURE IRON STEAMER by ROWENTA.
USER MANUAL DG8030 EXPERT PRESSURE IRON STEAMER ROWENTA
M1V 3N8, Scarborough, Ontario, Canada
Groupe SEB USA, 2121 Eden Road
Millville, NJ 08332 - USA
www.rowenta.com
PREPARATION
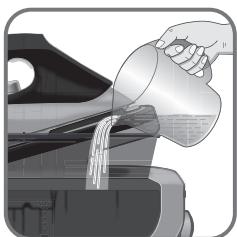
fig.1
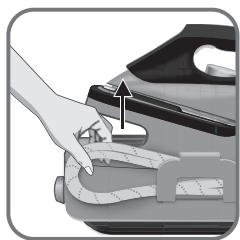
fig.2
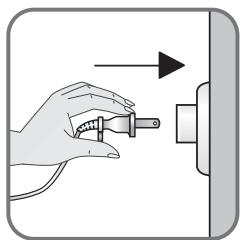
fig.3
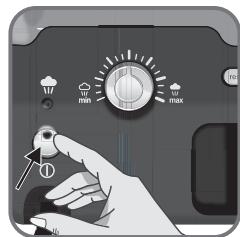
fig.4
USE
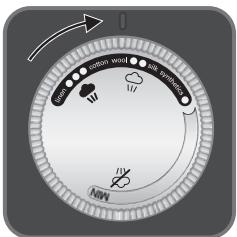
fig.5
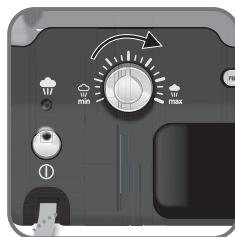
fig.6
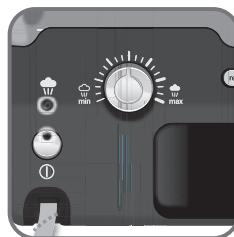
fig.7
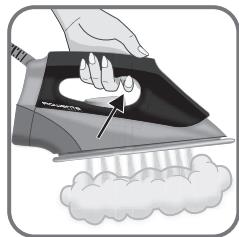
fig.8
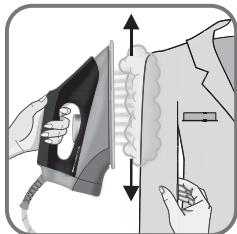
fig.9
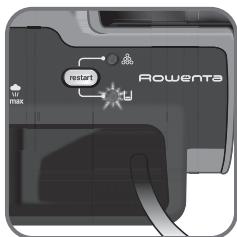
fig.10
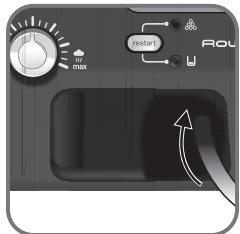
fig.11
MAINTENANCE
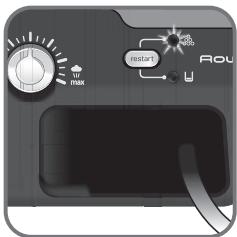
fig.12

fig.13
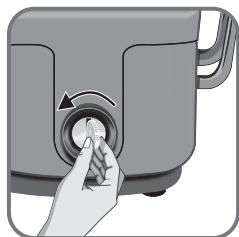
fig.14

fig.15
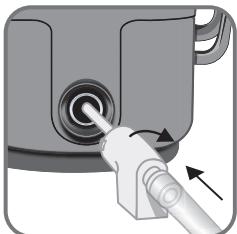
fig.16
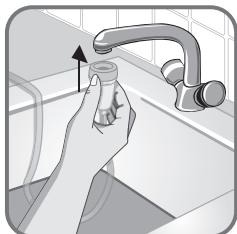
fig.17
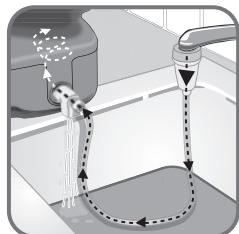
fig.18
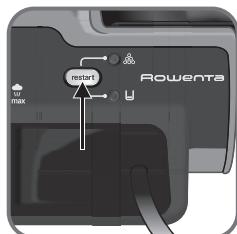
fig.19
IMPORTANT SAFETY INSTRUCTIONS
When using your appliance, basic safety precautions should always be followed, including the following :
Read all instructions before using the Expert Pressure Iron & steamer.
- Use appliance only for its intended use.
- To protect against a risk of electric shock, do not immerse the appliance in water or other liquids.
- The appliance should always be turned off before plugging or unplugging from outlet. Never yank the cord to disconnect from outlet, instead grasp plug and pull to disconnect.
- Always disconnect appliance from electrical outlet when filling or emptying when not in use.
- Do not allow cord to touch hot surfaces. Let iron cool completely before putting away.
- Do not operate appliance with a damaged cord or if appliance has been dropped or damaged.
- To avoid the risk of electric shock, do not disassemble the appliance. Ship it to the nearest authorized Rowenta approved service center for examination and repair. Incorrect
reassembly can cause a risk of electric shock when the appliance is used.
- Not intended for use by children. Close supervision is necessary for any appliance being used near children. Unsupervised use can result in fire or personal injury. Do not leave appliance unattended while plugged in, on an ironing board, or while it is still hot.
-
Burns can occur from touching hot metal parts, hot water or steam. Use caution when you turn an Expert Pressure Iron & steamer upside down. There may be hot water in the reservoir.
-
Never attempt to unscrew the boiler rinse cap while the appliance is in use. The strong steam pressure could result in burns. Only unscrew the cap when generator is cold or there is no more pressure in the boiler.
-
Do not direct steam at people, animals or iron clothes while they are being worn.
- The use of accessory attachments is not recommended by Rowenta and may result in fire, electric shock or personal injury.
- Always put the iron with the soleplate down on the iron rest, never resting on its heel.
SPECIAL INSTRUCTIONS
- This is a 1800 watt appliance. To avoid a circuit overload, do not operate a high wattage appliance on the same circuit.
- This unit comes equipped with a 12 foot power cord and 6 foot steam hose.
- If an extension cord is absolutely necessary, a
15 ampere cord should be used. Cords rated for less amperage may overheat. Care should be taken to arrange the cord so that it cannot be pulled or tripped over unintentionally.
- Your Rowenta appliance is intended for household use only.
Save these instructions
FOR YOUR SAFETY
Please read these instructions carefully before first use. This product has been designed for domestic use only.
Any commercial use, inappropriate use or failure to comply with the instructions, the manufacturer accepts no responsibility and the guarantee will not apply.
For your safety, this appliance conforms to the applicable standards and regulations (Low Voltage, Electromagnetic Compatibility, Environmental Directives, as applicable...).
Your steam generator is an electrical appliance. It should be used under normal conditions. It is intended for domestic use only.
Your generator is fitted with 2 safety systems: - a pressure release valve which, in the event of a malfunction, releases any excess steam; - a thermal fuse to prevent the appliance from overheating.
Always plug your steam generator into an electrical installation with voltage 120V .
Connecting to the wrong voltage may cause irreparable damage to the appliance and will invalidate your guarantee.
If you are using a mains extension lead, ensure that it is correctly rated (15A) and is fully extended.
Completely unwind the power cord from its storage space before connecting to a socket.
If the electric power cord or the iron-unit is damaged, it must be replaced by an Approved Service Centre in order to prevent any danger. Do not unplug the appliance by pulling on the cord.
Always unplug your appliance:
-
before rinsing out the boiler or before filling the water tank,
-
before cleaning your generator,
-
after each use.
The appliance must be used and placed on a flat, stable, heat-resistant surface. When you place the iron on the iron rest, make sure that the surface on which you place it is stable.
This appliance is not intended for use by
persons (including children) with reduced physical, sensory or mental capabilities, or lack of experience and knowledge, unless they have been given supervision or instruction concerning use of the appliance by a person responsible for their safety.
Children should be supervised to ensure that they do not play with the appliance.
Never leave the appliance unattended :
-
when it is connected to the mains,
-
until it has cooled down (around 1 hour).
The soleplate and generator iron-rest can become very hot and cause burns: never touch these parts.
Never touch the electric cords with the soleplate of the iron.
Your appliance gives off steam which can cause burns. Handle your iron carefully, particularly when using the vertical steam function. Never direct the steam towards persons or animals.
Before unscrewing the boiler rinse cap, wait until the generator is cold (unplugged for more than 2 hours).
While rinsing out the boiler, never fill it directly under the tap.
If you lose or damage the boiler rinse cap, have it replaced by an approved Service Centre.
Never immerse your steam generator in water or any other liquid. Never hold it under the water tap.
The appliance must not be used if it has fallen to the floor, shows evidence of damage, leaks or fails to function correctly. Never dismantle your appliance. To avoid any danger, have it inspected in an approved service centre.
This appliance has been designed for domestic use only. Any commercial use, inappropriate use or failure to comply with the instructions, the manufacturer accepts no responsibility and the guarantee will not apply.
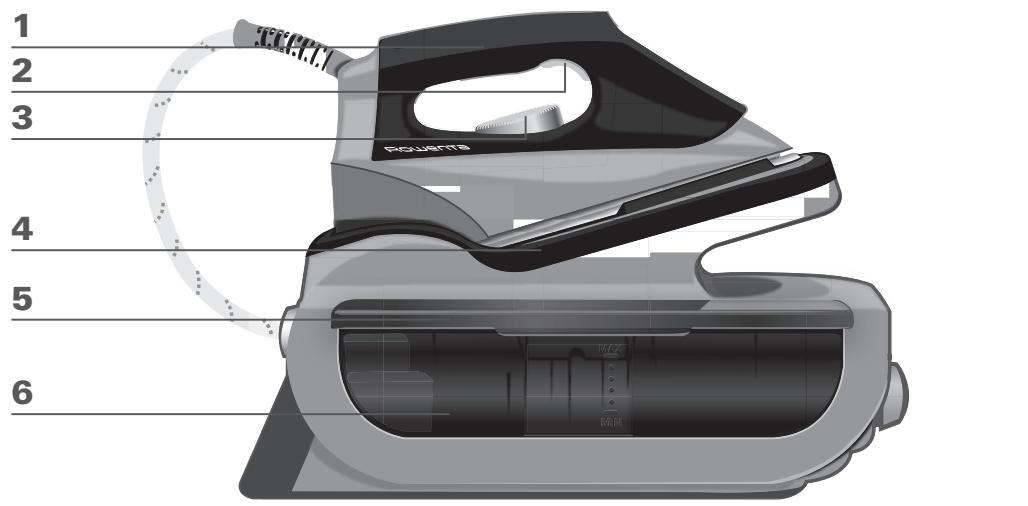
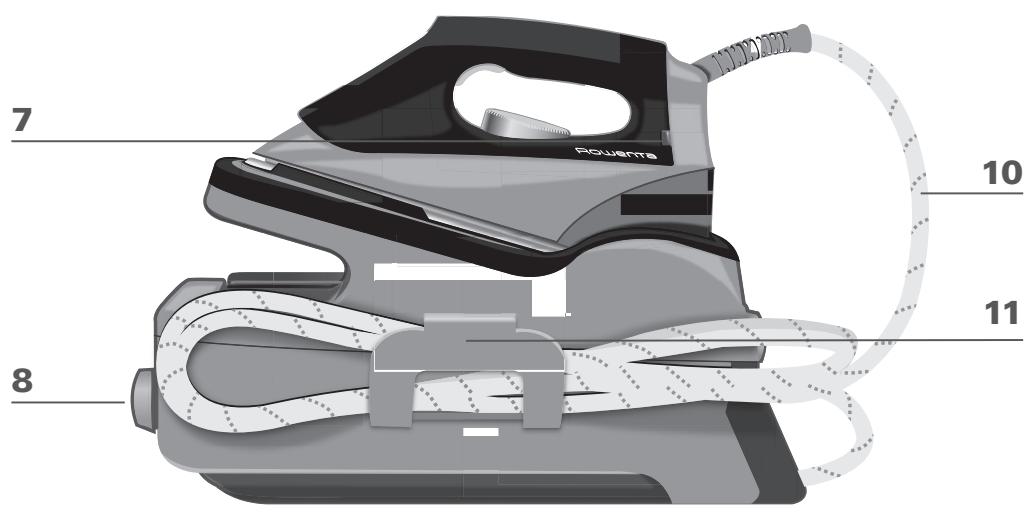
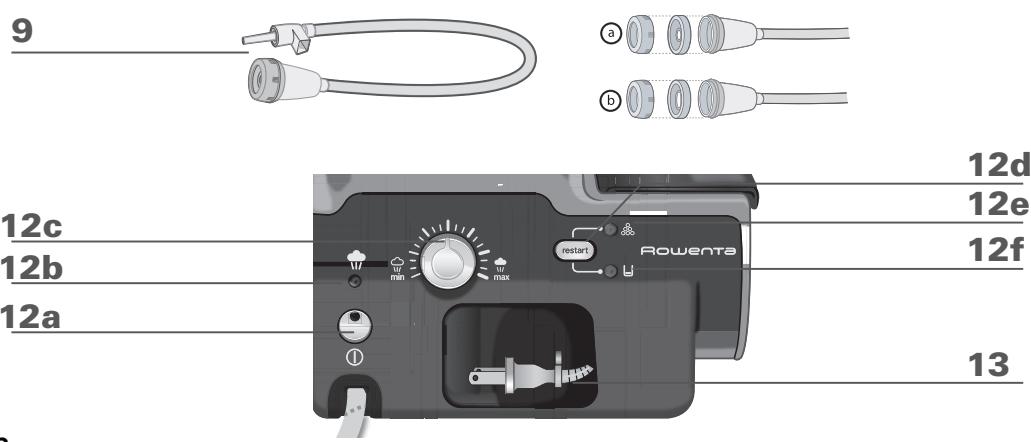
DESCRIPTION
- Iron handle
- Steam trigger
- Temperature control dial for iron soleplate
- Iron rest
- Anytime refill water tank
- Water tank cover
- Iron temperature control light
- Boiler rinse cap cover / Boiler rinse cap
-
Rinsing accessory
-
Steam hose
- Steam hose storage clip
- Control panel
a. Illuminated on / off switch
b. "Steam ready" light
c. Variable steam control dial
d. "Restart" button
e. "Boiler rinse" light
f. "Water tank empty" light
- Power cord
Due to the powerful steam output, a mesh type ironing board must be used to allow any excess steam to escape and to avoid steam venting sideways.
BEFORE USE
Please read all of the instructions for use and the Important Safeguards carefully. Remove all packaging from the expert pressure iron & steamer. It is normal for a small amount of smoke and a light odor to be produced the first time it is used. This will quickly disappear.
1·Water recommendations
Tap water
Rowenta irons are designed to be used with REGULAR TAP WATER (up to 12 grains of hardness). If your water is harder than this, Rowenta recommends mixing half tap water with half distilled water which reduces the hardness; or just use inexpensive bottled spring water. Never use 100% distilled water as this can cause the iron to spit and leak.
Softened water
There are many types of household water softeners and the water from many of them is perfectly acceptable for use in the expert pressure iron & steamer. However, some types of softeners, particularly those that use chemicals such as salt, can cause the appliance to leak or spit during use. If you experience this type of problem, we recommend that you try using inexpensive bottled spring water or untreated tap water.
Once you have changed water it will take several uses to correct the problem. Rowenta recommends trying the steam function for the first time on an old towel or cloth that can be discarded to avoid damaging your clothes.
Iron and other impurities
If your water supply contains large amounts of iron or organic matter, these minerals can collect inside the appliance and eventually appear as brown stains. If you experience these problems Rowenta recommends using inexpensive bottled spring water.
Never use 100% pure distilled water.
Always remember :
Battery water and water containing additives (such as starch, perfume or fabric conditioner) may not be used. Such additives can affect the properties of the steam and at high temperatures can form deposits in the steam chamber which will mark the laundry when they are emitted through the steam vents.
Dscaling liquids/agents should not be used.
2 • Filling the expert pressure iron & steamer
The expert pressure iron and steamer is designed to operate using tap water. (Fig. 1).
While unplugged, place the pressure iron & steamer on a stable, heat resistant surface.
Open the water tank cover. fill the the tank with a maximum of 33 oz. of water, taking care not to overfill. close the water tank cover.
Completely unwind the power cord and steam hose. (fig. 2)
The water tank can be filled at any time during use. when refilling take care not to overfill the tank.
USE
3·Turning on and off
Plug the expert pressure iron & steamer into a 120 volt electric outlet (Fig. 3).
Press on/off switch (Fig. 4), the iron light and steam indicator light will turn on and the steam ready light will flash. When the expert pressure iron & steamer is in use, the electric pump will make a humming noise as it pulls water into the boiler to produce steam. This noise is normal. The expert pressure iron & steamer is ready to use when the steam ready indicator light stops flashing, (approximately 2 minutes).
During ironing the temperature indicator light for the iron and the steam indicator light will turn on and off. This is normal as the temperature is being regulated. The unit is still on when these lights go out.
4 • Operating the control panel
- Flashing green light: the water is heating up in the boiler (fig.7)
- Continuous green light: steam is ready for use (fig.7)
- Continuous red light: the water tank is empty (fig.10).
- Orange light flashes: your boiler needs rinsing (fig.12).
5 • Using your expert pressure iron & steam
Place the iron's temperature control (fig.5) to the type of fabric to be ironed and set the steam output (fig.6) - see table below. The iron temperature control light turns on (fig.7).
While ironing, the light on top of the iron and the steam ready light turn on and off, as the temperature adjusts without interrupting ironing. To obtain steam, press on the steam trigger beneath the iron handle and keep it
| Type of fabric | Setting temperature control | Setting steam control |
| Cotton / Linen | ●●● | min max |
| Silk / Wool | ●● | min max |
| Synthetics | ● | min max |
pressed (fig.8). The steam will stop when you release the trigger.
ENG
Recommendations: To prime the steam circuit, either before using the iron for the first time, or if you have not used the steam function for a few minutes, press the steam trigger several times in a row, holding the iron away from your clothes.
Iron temperature control setting: Start with fabrics to be ironed at a low temperature and finish with those which need higher temperatures. Each time you change fabrics, wait for he light to turn off. Mixed fibre fabrics: set the ironing temperature to the setting for the most delicate fabric. Woollen garments: press repeatedly on the steam control button to obtain short bursts of steam, without placing the iron on the garment itself. This will avoid making the fabric shiny. Steam output control dial setting: Thick fabric: increase the steam setting. At a low temperature: set the steam output control dial to the low position. For delicate fabrics(●), press the steam trigger (under the handle of the iron) intermittently to avoid possible water droplets appearing with the steam.
Do not place the iron on a metal support. Always place the iron on the iron rest of the unit. It is equipped with non-slip pads and has been designed to withstand high temperatures.
6Vertical steam ironing
Set the iron temperature control and the steam output control dial (located on the control panel) to the maximum position. Hang the garment on a coat hanger and hold the fabric slightly taut with one hand. Press repeatedly on the steam (fig.8) trigger (beneath the iron handle) moving the iron from top to bottom (fig.9).
As steam is very hot: never attempt to remove creases from a garment while it is being worn, always hang garments on a coat hanger. For fabrics other than linen or cotton, hold the iron a few centimetres from the garment to avoid burning the fabric.
7 • Dry ironing
Do not press on the steam trigger.
8 Fill the water tank again
When there is no more steam and the "Water tank empty" light flashes: water tank is empty (fig.10). Turn the unit off (see section "Turning on and off") and unplug from outlet. Open the water tank filler cover and fill with maximum 33 oz of water.
Take care not to overfill the tank.
If this occurs, remove the excess water.
Close the water tank. Press on the on / off switch (fig.4). Press the "Restart" button. The expert pressure iron & steamer is ready to iron when the steam ready indicator light is steady green and the iron thermostat dial light has gone out.
9 • Storing your expert pressure iron & steamer
Turn the unit off (see section "Turning on and off") and unplug from outlet. Place the iron on the iron rest. Store the steam hose in its clip and the electrical cord in its compartment.
Leave the iron to cool down for 1 hour before putting it away if it is stored in a cupboard or confined space.
MAINTENANCE AND CLEANING
ENG
Before cleaning or rinsing, ensure that the appliance is unplugged and that the soleplate and the iron rest have cooled down for at least 2 hours, in order to avoid any risk of scalding.
10 • Cleaning the expert pressure iron & steamer
Do not use any cleaning or descaling products for cleaning the soleplate or the base-unit. Never hold the iron or the base unit under the tap.
The Iron soleplate:
In normal use a draggy coating may build up on the soleplate (starch, detergent buildup, burnt synthetic fibers). This can be easily removed by using the Rowenta Soleplate Cleaning Kit or a quality hot iron soleplate cleaner available at most stores.
To prevent scratching the soleplate, do not iron over sharp objects (zippers, etc.). Do not place the iron on rough surfaces, e.g. metal iron support, which may scratch the soleplate.
Always put the iron with the soleplate down on the iron rest, never place on its heel.
The Base Unit:
Clean the plastic parts of the appliance occasionally with a soft cloth.
11 - Rinsing the boiler
Your generator is equipped with an orange "boiler rinse" warning light (fig.12) that flashes on the control panel after about 10 uses.
You can continue ironing normally but remember to rinse the boiler before the next use.
ATTENTION: Do not use descending agents for rinsing out the boiler, as they could damage it.
Before attempting to rinse the boiler of the expert pressure iron & steamer, it is essential to leave it to cool for at least 2 hours in order to avoid any risk of scalding.
Place the expert pressure iron & steamer on the edge of a sink, with the iron to one side, standing on its heel. Remove the boiler rinse cap cover (fig.13). Using a coin, gently unscrew the boiler rinse cap (fig.14).
With the rinsing accessory: it will be easier to rinse the boiler as expert pressure iron & steamer will need less handling. The rinsing accessory has been designed to work on a wide range of faucets.
Choose the one best suited to your faucet (a or b)(fig.15). Place the plastic nozzle of the rinsing pipe into the hole of the boiler and turn gently to the right until it locks (fig.16). The outlet of this nozzle must be positioned over the sink (fig.17). Connect the rubber end of the rinsing pipe to a cold tap (R). Turn the tap on gently and gradually and let cold water run through the rinsing pipe into the sink for about 1 minute (fig.18). Switch off the faucet and remove the rinsing pipe.
Or
Without the rinsing accessory:
Gently unscrew the boiler rinse cap (fig.14). Holding the expert pressure iron & steamer in a tilted position, fill the boiler (in the base unit) with 8 oz of tap water.
Shake the base unit for a few moments and
The next time you use the generator, hold down the "restart" (fig.19) button to turn off the orange light.
then empty it completely over your sink.
To obtain the best result, we recommend that this operation is done twice.
TROUBLESHOOTING
| Issues | Possible causes | Solutions |
| The thermostat light and the on/off switch are not lit. | The appliance is not switched on. | Check that your appliance is correctly plugged in and press the illuminated on/off switch (on the front of the base-unit). |
| Water runs through the holes in the soleplate. | You are using the steam trigger before the iron is hot enough. | Decrease the steam output while ironing at low temperature (steam output control dial on the control panel).Wait for the thermostat light to go out before activating the steam control button. |
| Water has condensed in the pipes because you are using steam for the first time or you have not used it for some time. | Press the steam trigger away from your ironing board until the iron produces steam. | |
| White streaks come through the holes in the soleplate. | Your boiler has a build-up of scale because it has not been rinsed out regularly. | Rinse out the boiler after every 10 uses, when the orange indicator light flashes (see chapter 11). If your water is hard increase the frequency. |
| You have already rinsed the boiler and the orange “boiler rinse” light is flashing. | You have not pressed the “Restart” button. | Press the “Restart” button to turn off the indicator light. |
| Brown streaks come through the holes in the soleplate and stain the linen. | You are using chemical descaling agents or additives in the water for ironing. | Never add this type of product in the water tank or in the boiler (see our recommendations regarding water to be used). |
| Your linen is not rinsed sufficiently or you have ironed a new garment before washing it. | Ensure linen is rinsed thoroughly to remove any soap deposits or chemicals on new garments. | |
| The soleplate is dirty or brown and may stain the linen. | You are ironing at too high a temperature. | See our recommendations regarding temperature control setting. |
| There is no steam. | The water tank is empty (light turn on). | Fill the water tank and press the “Restart” button on the control panel. |
| There is little steam. | The steam output control dial is set at minimum. | Increase the steam output (control dial on the control panel). |
| The soleplate temperature is set to the maximum. | The generator is working but steam is very hot and dry. As a consequence, it is less visible. | |
| Water streaks appear on the linen. | Your ironing board is saturated with water because it is not suitable for use with a steam generator. | Check that your ironing board is suitable. A mesh type ironing board must be used to allow any excess steam to escape and to avoid steam venting sideways. |
| The red “removable water tank empty” light is on. | You have not pressed the “Restart” button | Press the “Restart” button on the control panel. |
| Steam escapes from the rinse cap. | The rinse cap has not been tightened correctly. | Tighten the rinse cap correctly. |
| The rinse cap seal is damaged. | Contact an Approved Service Centre to order a new rinse plug seal. This is a wear and tear item. |
USA:
If troubleshooting does not assist, before consulting the retailer regarding their return/exchange policy, please telephone consumer service at 1-800-769-3682.
Canada :
If you are unable to trace the cause of the fault, contact an official Rowenta Customer Service Centre. The addresses are shown in the enclosed service centre address list.
Further hints and tips are obtainable from our homepage: www(rowenta.ca.
Environment protection first!
Your appliance contains valuable materials which can be recovered or recycled.
Leave it at a civic waste disposal centre.
POUR VOTRE SECURITÉ
In the interest of improving products, Rowenta reserves the right to change specifications without prior notice.
LIMITED WARRANTY
This Rowenta product is warranted for 1 year from date of purchase against defects in material and workmanship. During this period, any Rowenta product that, upon inspection by Rowenta, is proved defective, will be repaired or replaced, at Rowenta's option, without charge to the customer. If a replacement product is sent, it will carry the remaining warranty of the original product. This warranty does not apply to any defect arising from a buyer's or user's misuse of the product, negligence, failure to follow Rowenta's instructions, use on current or voltage other than that stamped on the product, or alteration or repair not authorized by Rowenta. Repair or disassembly by anyone other than a Rowenta authorized service center will void the warranty.
THE WARRANTY SET FORTH HEREIN ARE EXCLUSIVE AND NO OTHER WARRANTY, EXPRESS OR IMPLIED, INCLUDING BUT NOT LIMITED TO ANY WARRANTY OF MERCHANTABILITY OR FITNESS FOR A PARTICULAR PURPOSE OR USE, ARE MADE BY ROWENTA OR ARE AUTHORIZED TO BE MADE WITH RESPECT TO THE PRODUCT.
Some states do not allow limitations on how long an implied warranty lasts or do not allow the exclusion of incidental or consequential damages, so the above limitations may not apply to you. This warranty gives you specific legal rights, and you may also have other rights, which vary from state to state.
If you believe your product is defective, bring the product (or send it, postage prepaid) along with proof of purchase to the nearest authorized Rowenta Service Center (see below). If you send the product, please include a letter explaining the nature of the claimed defect.
CORRESPONDENCE CAN BE SENTTO : GROUPE SEB USA
2121 Eden Road
Millvill, NJ 08332 - USA
www.rowentausa.com
OFFICE LOCATION ONLY Letters will be accepted at this address and packages without a return authorization number will be refused or forwarded to a service center.
If your appliance needs service, ship the product to your nearest regional service center. Be sure to put your name on the outside of the shipping box (no P.O. boxes please). Include a brief note describing the issue, and include a copy of the sales receipt if the product is in warranty. If in warranty, Rowenta will repair or replace the product at their discretion. If the product is out of warranty, you will be advised of the cost of repair before any work begins.
Turnpike Appliance
3495A Lawson Blvd.
Oceanside, NY 11572
516-483-5596
Authorized Appliance
1644 West Ogden Ave.
Downers Grove, IL 60515
630-852-1550
California Electric
1170G Burnett Ave.
Concord, CA 94520
925-827-1011
SERVICE CENTER INFORMATION IS SUBJECT TO CHANGE.
Please visit our website at www(rowentausa.com or call 1-800-769-3682 for automated service center information.
- PREPARATION
- USE
- MAINTENANCE
- IMPORTANT SAFETY INSTRUCTIONS
- SPECIAL INSTRUCTIONS
- Save these instructions
- FOR YOUR SAFETY
- DESCRIPTION
- BEFORE USE
- 1·Water recommendations
- Tap water
- Softened water
- Iron and other impurities
- Always remember :
- • Filling the expert pressure iron & steamer
- 3·Turning on and off
- • Operating the control panel
- • Using your expert pressure iron & steam
- 6Vertical steam ironing
- • Dry ironing
- Fill the water tank again
- • Storing your expert pressure iron & steamer
- MAINTENANCE AND CLEANING
- • Cleaning the expert pressure iron & steamer
- The Iron soleplate:
- The Base Unit:
- - Rinsing the boiler
- Without the rinsing accessory:
- TROUBLESHOOTING
- USA:
- Canada :
- Environment protection first!
- POUR VOTRE SECURITÉ
- LIMITED WARRANTY
Brand : ROWENTA
Model : DG8030 EXPERT PRESSURE IRON STEAMER
Category : Steam iron