
APPOMLASER - Mouse Approx - Free user manual and instructions
Find the device manual for free APPOMLASER Approx in PDF.


| Product type | Wired laser mouse |
| Brand | Approx |
| Model | APPOMLASER |
| Detection technology | Optical laser |
| Resolution | 1600 DPI (default, adjustable) |
| Number of buttons | 3 buttons (left click, right click, clickable scroll wheel) |
| Scroll wheel | Yes, with click function |
| Interface | Wired USB (1.5 m cable) |
| Power supply | Powered via USB port (5V, 100 mA) |
| Dimensions (L x W x H) | 120 x 65 x 35 mm |
| Weight | 85 g (without cable) |
| Housing material | ABS plastic |
| Compatible operating systems | Windows, macOS, Linux (plug-and-play) |
| Maintenance and cleaning | Clean with a slightly damp soft cloth; avoid solvents |
| Safety instructions | Do not expose to moisture, extreme temperatures, or violent shocks |
| Spare parts and repairability | Product not user-repairable; contact Approx customer service in case of malfunction |
| Warranty | 2 years (excluding normal wear) |
| Package contents | Mouse, quick start guide |
Frequently Asked Questions - APPOMLASER Approx
User questions about APPOMLASER Approx
0 question about this device. Answer the ones you know or ask your own.
Ask a new question about this device
Download the instructions for your Mouse in PDF format for free! Find your manual APPOMLASER - Approx and take your electronic device back in hand. On this page are published all the documents necessary for the use of your device. APPOMLASER by Approx.
USER MANUAL APPOMLASER Approx
Wireless Laser Mouse
VERSION1.1
Guía de usuario
User guide
INTERRUPTOR "ON/OFF"
- Wireless Laser Mouse
- USB receiver
• 2 AAA alkaline batteries - User manual
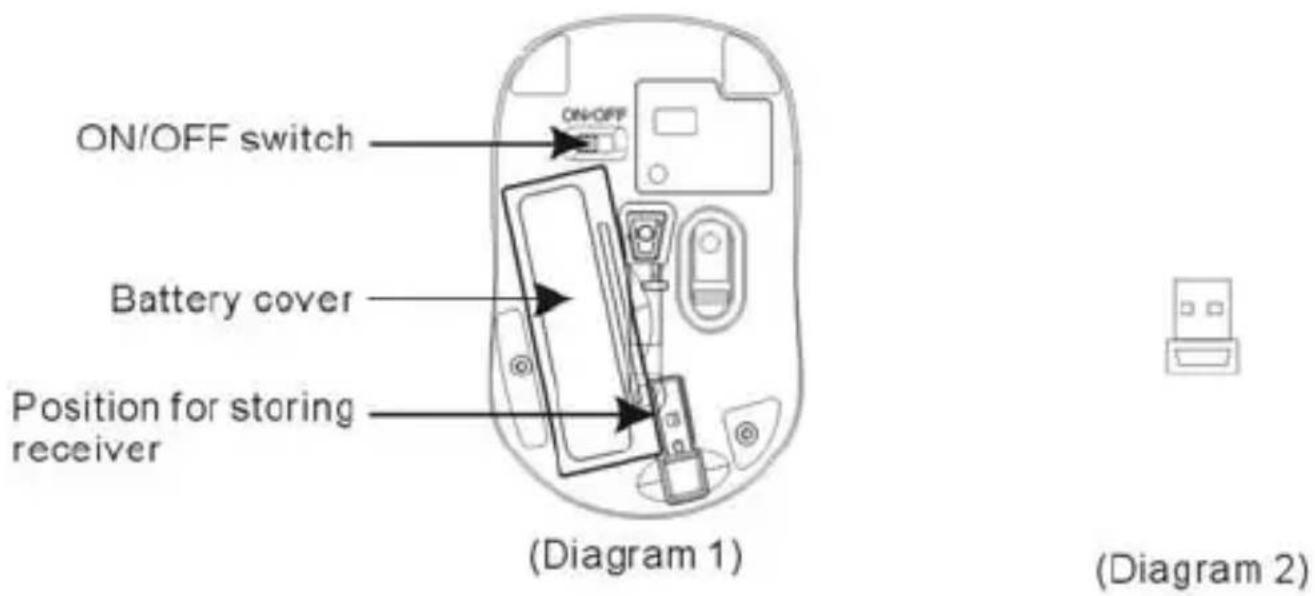
INSTALLING THE BATTERY
Whenever new batteries are installed, make sure that they are fresh 1.5V AAA batteires.
A) Remove the battery cover.
B) Insert two AAA batteries into the battery compartment, make sure to properly orient the positive (+) and negative (-) ends as specified by the marks in the battery compartment. Replace the battery cover and make sure it is locked.
C) Switch on the mouse.
INSTALLING THE RECEIVER
The codes of receiver and mouse were successfully connected in factory. User can directly use the complete set of products, no worry about the code connecting.
A) Insert receiver into USB port of PC, the computer system will automatically detect and prepare it for full operation.
B) The mouse may use then.
If the user wrongly operates, please redo the above operating procedures.
"ON/OFF" SWITCH
Without using the mouse, user may turn off it by "ON/OFF" switch for saving battery power.
DESCRIPTION OF KEYS AND DPI ADJUSTING
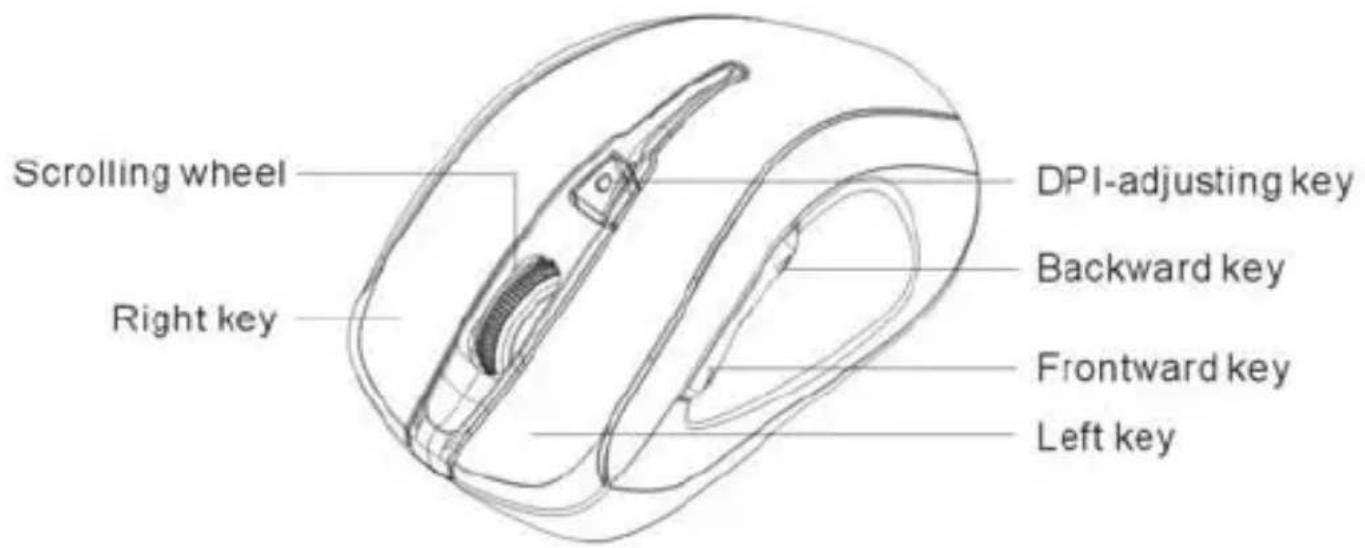
A) Using “DPI-adjusting key” the resolution of mouse can be switched between 800dpi and 1600dpi in turn. That LED light in “DPI-adjusting key” blinks slow indicates 800dpi and fast 1600dpi.
B) Backward and Forward keys for your easily navigating forward and backward on the Internet.
LOW-VOLTAGE ALARMING FUNCTION
When batteries have been used for some time and discover the LED light in “DPI-adjusting key” blinks automatically, which reminds you that batteries’ voltage is becoming low, suggested you replace the batteries with new ones.
SYSTEM REQUIREMENTS
Windows® 2000/ XP, VISTA, 7
SPECIFICATIONS
- Super mini receiver can be stored at bottom for easy carrying
• 2.4GHz, freely operating within 10 meters - Wireless carrier frequency: 2,402MHz - 2,480MHz
• 16 Wireless working channels, automatic frequency jumping - 2-way communication technology speeds up data transmission without delay
- With latest laser technology, mouse can be operated on many more surfaces
• Power ON/OFF function - Low-voltage alarming function
- Resolution: 800DPI and 1600DPI adjustable
CONTENU DE L'EMBALLAGE
INSTALLATION DES BATTERIES
BATTERIEN INSTALLATION
OW-VOLTAGE ALARMING FUNCTION
natural_image
Simple line drawing of a refrigerator with two windows and a door, labeled (Diagrama 2) below (no text or symbols on the diagram itself)INTERRUPTOR "ON/OFF"
Brand : Approx
Model : APPOMLASER
Category : Mouse