
AVENT SCD530 - Baby monitor PHILIPS - Free user manual and instructions
Find the device manual for free AVENT SCD530 PHILIPS in PDF.


| Product Type | Baby Monitor |
| Brand | Philips |
| Model | AVENT SCD530 |
| Parent Unit Dimensions | 115 x 70 x 30 mm |
| Baby Unit Dimensions | 90 x 60 x 50 mm |
| Parent Unit Weight | 150 g |
| Baby Unit Weight | 100 g |
| Display | 2.8-inch Color LCD |
| Range | Up to 330 m outdoors |
| Frequency | 2.4 GHz FHSS |
| Night Vision | Infrared LED (automatic) |
| Temperature Sensor | Yes, in baby unit |
| Battery Life (Parent Unit) | Up to 8 hours |
| Battery Type | Rechargeable Li-ion |
| Power Supply | AC adapter (included) |
| Audio | Two-way talk back |
| Volume Control | 5-level |
| Lullabies | Built-in |
| Cleaning | Wipe with dry cloth |
| Maximum Parent Units | 1 |
| Maximum Baby Units | 4 |
| Spare Parts Availability | Optional accessories |
| Repairability | Not user-serviceable |
| Warranty | 1 year |
Frequently Asked Questions - AVENT SCD530 PHILIPS
User questions about AVENT SCD530 PHILIPS
0 question about this device. Answer the ones you know or ask your own.
Ask a new question about this device
Download the instructions for your Baby monitor in PDF format for free! Find your manual AVENT SCD530 - PHILIPS and take your electronic device back in hand. On this page are published all the documents necessary for the use of your device. AVENT SCD530 by PHILIPS.
USER MANUAL AVENT SCD530 PHILIPS

B

C

Congratulations on your purchase and welcome to Philips AVENT! To fully benefit from the support that Philips AVENT offers, register your product at www.philips.com/welcome.
Philips AVENT is dedicated to producing caring, reliable products that give parents the reassurance they need. This Philips AVENT baby monitor provides round-the-clock support by ensuring you can always hear your baby clearly without any distracting noise. The DECT technology guarantees zero interference from other wireless appliances and a crystal clear signal between the baby unit and the parent unit. The temperature and humidity sensor enables you to monitor the climate in your baby's room, and offers you personalised settings to help keep your baby's room healthy and comfortable.
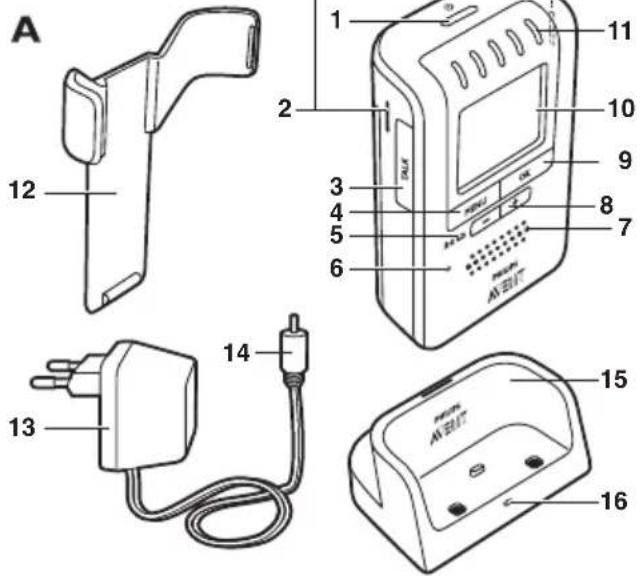
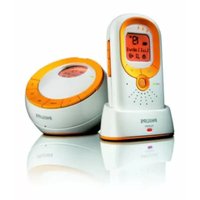
General description (Fig. 1)
A Parent unit
1 On/off button ⏻
2 Slot for belt clip
3 TALK button
4 MENU button
5 LINK light
6 Microphone
7 Loudspeaker
8 Menu and volume +/- buttons
9 OK button
10 Display
11 Sound level lights
12 Belt clip
13 Adapter
14 Small appliance plug
15 Charger
16 Charging light
17 Neck strap
18 Compartment for rechargeable battery pack
19 Opening for neck strap
20 Lid of compartment for rechargeable battery pack
21 Rechargeable battery pack (included)
B Baby unit
1 On/off button ⏻
2 PAGE button
3 Display
4 Power-on light
5 Volume +/- buttons
6 Nightlight button
7 Lullaby button ♪
8 Play/stop button ▶■
9 Microphone
10 Adapter
11 Large appliance plug
12 Cooling vents
13 Loudspeaker
14 Temperature and humidity sensor
15 Socket for large appliance plug
16 Non-rechargeable batteries (not included)
17 Compartment for non-rechargeable batteries
18 Lid of compartment for non-rechargeable batteries
C Display
1 = temperature alert
2 88^= room temperature indication
3 (11●11) = sound alert
4 88% = humidity indication
5 •»» = paging symbo
6 ♪ = lullaby symbol
7 ⚙ = nightlight symbol
8 = battery symbol
9 Volume/microphone sensitivity indications:

Other display indications (not shown):
- 'High' = room temperature above temperature set in menu
- 'Low' = room temperature below temperature set in menu
- 'Not linked' = no connection between units*
- 'Paused' = lullaby is interrupted
- 'Searching' = units are searching for connection*
- 'Linked' = units are linked*
- 'Talk' = talk function is active
* This is only shown on the display of the parent unit.
D Travel pouch
Important
Read this user manual carefully before you use the appliance and save it for future reference.
Danger
- Never immerse any part of the baby monitor in water or any other liquid.
Warning
- Check if the voltage indicated on the adapters of the baby unit and the charger corresponds to the local mains voltage before you connect the appliance.
- Only use the adapter supplied to connect the baby unit to the mains.
- Only use the charger and adapter supplied to charge the parent unit.
- The adapters contain a transformer. Do not cut off the adapters to replace them with other plugs, as this causes a hazardous situation.
- If the adapters are damaged, always have them replaced with one of the original type in order to avoid a hazard. For the correct type, see chapter 'Replacement'.
- If the charger of the parent unit is damaged, always have it replaced with one of the original type.
- Never use the baby monitor in moist places or close to water.
- Except for the battery compartments, do not open the housing of the baby unit and parent unit in order to prevent electric shock.
- This appliance is not intended for use by persons (including children) with reduced physical, sensory or mental capabilities, or lack of experience and knowledge, unless they have been given supervision or instruction concerning use of the appliance by a person responsible for their safety.
- Children should be supervised to ensure that they do not play with the appliance.
Caution
- Use and store the appliance at a temperature between 10°C and 40°C.
- Do not expose the baby unit and parent unit to extreme cold or heat or to direct sunlight. Do not put the baby unit and the parent unit close to a heating source.
ENGLISH8
- Make sure the baby unit and the cord are always out of reach of the baby (at least 1 metre/3 feet away).
- Never place the baby unit inside the baby's bed or playpen.
- Never cover the parent unit and the baby unit with anything (e.g. a towel or blanket). Always make sure the cooling vents of the baby unit are free.
- Always place non-rechargeable batteries of the correct type in the baby unit.
- Always use the included rechargeable battery pack for the parent unit to avoid a hazard.
- If you place the parent unit next to a transmitter or other DECT appliance (e.g. a DECT telephone), the connection with the baby unit may be lost.
General
- This baby monitor is intended as an aid. It is not a substitute for responsible and proper adult supervision and should not be used as such.
- The humidity and temperature sensor only measures the temperature and humidity in the baby room. It cannot be used to control or adjust the temperature and humidity in the baby room.
Electromagnetic fields (EMF)
This Philips AVENT appliance complies with all standards regarding electromagnetic fields (EMF). If handled properly and according to the instructions in this user manual, the appliance is safe to use based on scientific evidence available today.
Preparing for use
Baby unit
You can use the baby unit from the mains or on non-rechargeable batteries. Even if you are going to use the unit from the mains, we advise you to insert non-rechargeable batteries. This guarantees automatic back-up in case of mains failure.
Mains operation
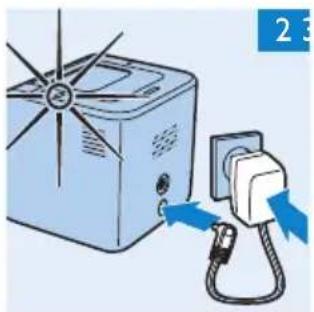
1 Put the large appliance plug in the baby unit and put the adapter in a wall socket (Fig. 2).
The power-on light goes on.
Operation on non-rechargeable batteries
The baby unit runs on four 1.5V R6 AA batteries (not included). We strongly advise you to use Philips LR6 PowerLife batteries.
Do not use rechargeable batteries, as the baby unit does not have a charging function.
Unplug the baby unit and make sure your hands and the unit are dry when you insert the non-rechargeable batteries.
1 Remove the lid of the compartment for non-rechargeable batteries. (Fig. 3)
2 Insert four non-rechargeable batteries (Fig. 4).
Note: Make sure the + and - poles point in the right direction.
3 Reattach the lid. (Fig. 5)
Parent unit
Operation on rechargeable battery pack
The parent unit comes with a rechargeable Li-ion 1000mAh battery pack.
Charge the parent unit before you use it for the first time or when the parent unit indicates that the battery is low (the empty battery symbol flashes on the display and the parent unit beeps). The parent unit starts indicating that the battery pack is low 30 minutes before the battery pack is completely empty.
Note: If the rechargeable battery pack is completely empty, the parent unit automatically switches off and loses contact with the baby unit.
1 Remove the lid of the compartment for the rechargeable battery pack (Fig. 6).
2 Insert the rechargeable battery pack (Fig. 7).
3 Reattach the lid (Fig. 8).
4 Insert the small appliance plug into the charger, put the adapter in a wall socket and place the parent unit in the charger (Fig. 9).
The charging light on the charger goes on.
The display shows a charging battery symbol to indicate that the parent unit is charging.
5 Leave the parent unit in the charger until the battery pack is fully charged.
During charging, the charging light on the charger lights up continuously.
When the battery pack is fully charged, the display of the parent unit shows a full battery symbol 📄.
- When you charge the parent unit for the first time or after a long period of disuse, switch it off and let it charge continuously for at least 10 hours.
- Charging normally takes 4 hours, but it takes longer when the parent unit is switched on while charging. To keep the charging time as short as possible, switch off the parent unit during charging.
- When the battery pack is fully charged, the parent unit can be used cordlessly for at least 24 hours.
Note: When the parent unit is charged for the first time, the operating time is less than 24 hours. The battery pack only reaches its full capacity after you have charged and discharged it four times.
Note: When the parent unit is not in the charger, the battery pack gradually discharges, even when the parent unit is switched off.
Using the appliance
1 Place the parent unit and the baby unit in the same room to test the connection (Fig. 10). Make sure the baby unit is at least 1 metre/3 feet away from the parent unit.
2 Press and hold the on/off button ⏻ on the baby unit until the green power-on light goes on. (Fig. 11)
Note: The power-on light always lights up green, even when there is no connection with the parent unit.
The nightlight lights up briefly and then fades out again.
The display lights up and the battery symbol appears on the display (Fig. 12).
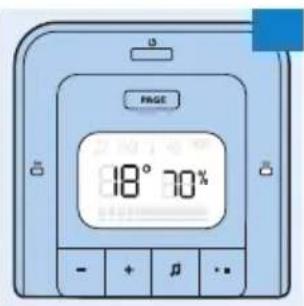
After 2 seconds the temperature and humidity values are shown on the display (Fig. 13).
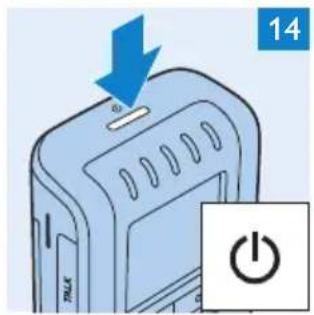
3 Press and hold the on/off button ⏻ on the parent unit until the sound level lights light up briefly. (Fig. 14)
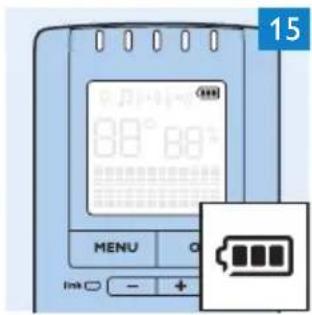
The display goes on and the battery symbol appears on the display (Fig. 15).
The LINK light flashes red and the message 'Searching' appears on the display. (Fig. 16)
The LINK light on the parent unit turns green and lights up continuously when a connection has been established between the baby unit and parent unit. The message ‘Linked’ appears on the display. (Fig. 17)
After 2 seconds the message ‘Linked’ disappears and the temperature and humidity values are shown on the display. (Fig. 18)
The first time you switch on the parent unit, the message ‘Language’ appears on the display. Select the desired language (see chapter ‘Menu options, section ‘Setting display language’). (Fig. 19)
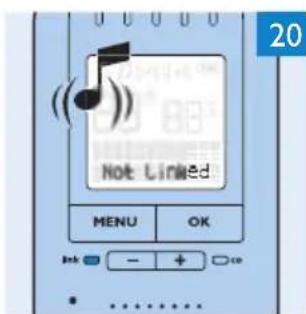
If no connection is established, the LINK light on the parent unit stops flashing and lights up red. The parent unit beeps from time to time and the message 'Not Linked' appears on the display. (Fig. 20)
Positioning the baby monitor
1 Place the baby unit at least 1 metre/3 feet away from your baby (Fig. 21).
2 Place the parent unit within the operating range of the baby unit. Make sure it is at least 1 metre/3 feet away from the baby unit to avoid acoustic feedback (Fig. 10).
For more information on the operating range, see section 'Operating range' below.
Operating range
The operating range of the baby monitor is 330 metres/1000 feet in open air. Depending on the surroundings and other disturbing factors, this range may be smaller. Indoors the operating range is up to 50 metres/150 feet.
Dry materials Material thickness Loss of range
Wood, plaster, cardboard, glass < 30cm/12in 0-10% (without metal, wires or lead)
Brick, plywood < 30cm/12in 5-35%
Reinforced concrete < 30cm/12in 30-100%
Metal grilles or bars < 1cm /0.4in 90-100%
Metal or aluminium sheets < 1cm/0.4in 100%
For wet and moist materials, the range loss may be up to 100%.
Features
The following features are described in chapter ‘Menu options’, as they can only be operated in the menu of the parent unit:
- Adjusting microphone sensitivity
- Sound alert on/off
- Setting room temperature range (minimum and maximum temperature)
- Temperature alert on/off
- Vibration alert on/off
Adjusting loudspeaker volume
1 Press the volume + or – button on the baby unit until the desired loudspeaker volume for the baby unit has been reached (Fig. 22).
2 Press the volume + or - button on the parent unit until the desired loudspeaker volume for the parent unit has been reached (Fig. 23).
The displays give visual feedback on the volume settings of the units:
- □□□□□□□ = parent unit volume switched off/silent baby monitoring
- □□□□□ = minimum volume (parent unit and baby unit)
- ■ ■ ■ ■ = maximum volume (parent unit and baby unit)
Note: If the volume is set to a high level, the units consume more power.
Talk function
You can use the TALK button on the parent unit to talk to your baby (e.g. to comfort your baby).
1 Press and hold the TALK button and talk clearly into the microphone from a distance of 15-30cm (Fig. 24).
The green LINK light starts flashing and the message 'Talk' appears on the display.
2 Release the TALK button when you have finished talking.
Sound level lights
The parent unit continuously monitors the sound level in your baby's room and the sound level lights let you know if there is any activity. If your baby cries, you see the sound level lights light up on the parent unit.
- As long as the baby unit does not detect a sound, all sound level lights on the parent unit are out.
- When the baby unit picks up a sound, one or more sound level lights on the parent unit go on. The number of lights that go on is related to the loudness of the sound picked up by the baby unit.
Nightlight
Note: You can also switch the nightlight on and off in the menu of the parent unit (see chapter 'Menu options', section 'Nightlight').
1 Press the nightlight button ⚙ on the baby unit to switch on the nightlight. (Fig. 25)
appears on the display of the parent unit.
2 Press the nightlight button 🌐 again to switch off the nightlight.
The nightlight dims gradually before it goes out completely.
disappears from the display of the parent unit.
Tip: Switch off the nightlight when you operate the baby unit on non-rechargeable batteries. This saves power.
Paging the parent unit
If you have misplaced the parent unit and its volume is switched off, you can use the PAGE button on the baby unit to locate the parent unit.
Note: The paging function only works when the parent unit is switched on.
1 Press the PAGE button on the baby unit (Fig. 26).
The message ‘Paging’ and the paging symbol appear on the displays of the baby unit and parent unit.
The parent unit produces a paging alert tone.
2 To stop the paging alert tone, press the PAGE button again or press any button on the parent unit.
Lullaby function
Note: You can also operate the lullaby function in the menu of the parent unit (see chapter 'Menu options', section 'Lullaby function').
1 Press the play/stop button ▶■ on the baby unit to play the currently selected lullaby. (Fig. 27)
2 To select another lullaby, press the lullaby button ♪ on the baby unit within 2 seconds to toggle through the list of lullabies. (Fig. 28)
Note: If you do not press the lullaby button ♪ for more than 2 seconds, the lullaby shown on the display starts to play.
The number of the lullaby appears on the display together with the lullaby symbol ♩.
The lullaby repeats continuously.
ENGLISH12
3 To stop the lullaby, press the play/stop button ▶■ on the baby unit again. (Fig. 27)
The number of the lullaby and the lullaby symbol ♪ disappear from the display.
4 To select another lullaby when a lullaby is playing:
- Press the lullaby button ♪ on the baby unit within 2 seconds to toggle through the list of lullabies.
Note: If you do not press the lullaby button ♩ for more than 2 seconds, the lullaby shown on the display starts to play.
Humidity
When there is a connection between the baby unit and the parent unit, the humidity level is shown on the display of both units.
The optimal humidity level is between 40% and 60%. It is very important to maintain the correct humidity level as it helps to protect your baby from irritation of the mucous membranes, dry and itchy skin, chapped lips and a dry, sore throat. When the mucous membranes do not function optimally, they cannot give your baby full protection from all kinds of germs. This increases the chance of your baby catching a cold or the flu, and reduces its resistance to infections from mould and bacteria.
The Philips AVENT Ultrasonic Humidifier can help you improve the air quality and maintain a comfortable humidity level in your baby's room. Contact your local Philips Consumer Care Centre for stockists.
Note: The baby monitor only measures the humidity level. You cannot adjust the humidity level with the baby monitor.
Out of range alert
When the parent unit is out of range of the baby unit, the parent unit beeps from time to time and the message 'Not linked' appears on the display. The LINK light on the parent unit lights up red.
Note: The message ‘Not Linked’ also appears on the display of the parent unit when the baby unit is switched off.
Menu options
Most functions can be operated on both the baby unit and the parent unit, but some functions can only be operated in the menu of the parent unit.
Menu operation - general explanation
Note: Menu functions can only be operated when a connection has been established between the baby unit and the parent unit.
1 Press the MENU button to open the menu (Fig. 29).
The first menu option appears on the display.
2 Use the - and + buttons to select the desired menu option (Fig. 30).
Note: The arrow indicates in which direction you can navigate.
3 Press the OK button to confirm (Fig. 31).
4 Use the + and - buttons to select the desired setting.
5 Press the OK button to confirm.
The new setting flashes twice and then disappears from the display.
6 Press the MENU button again to exit the menu.
Nightlight on/off
1 Select 'Light' with the + and - buttons.
2 Press the OK button to confirm.
3 If the nightlight is off, the display shows 'On?'. Press the OK button to switch on the nightlight. If the nightlight is on, the display shows 'Off?'. Press the OK button to switch off the nightlight.
Lullaby function
Selecting a lullaby
1 Select 'Lullaby' with the + and - buttons.
2 Press the OK button to confirm.
3 Press the + button once or several times to select one of the five lullabies from the list or to select 'Play All'.
4 Press the OK button to confirm.
When you have selected one of the five lullabies, it plays continuously.
Switching to another lullaby
1 Press the + button to choose another lullaby from the list.
2 Press the OK button to confirm.
Pausing a lullaby
1 Press the OK button.
The message ‘Paused’ appears on the display.
2 Press the OK button again to continue the lullaby.
If you do not continue the lullaby within 20 seconds, the lullaby function switches off automatically. The message 'Paused' and the lullaby symbol disappear from the display.
Stopping a lullaby
1 Press the + button to select 'Stop' from the list.
2 Press the OK button to confirm.
Adjusting microphone sensitivity
Note: You can only adjust the microphone sensitivity in the menu of the parent unit.
You can set the microphone sensitivity of the baby unit to the desired level. You can only change the microphone sensitivity when a connection between the baby unit and the parent unit has been established, i.e. when the LINK light on the parent unit lights up green continuously.
1 Select 'Sensitivity' with the + and - buttons.
2 Press the OK button to confirm.
3 Select the desired microphone sensitivity level for the baby unit with the + and - buttons.
- = minimum sensitivity level
- = maximum sensitivity level
4 Press the OK button to confirm.
The message ‘Saved’ appears on the display.
Note: When the microphone sensitivity of the baby unit is set to a high level, it picks up more sounds and therefore transmits more often. As a result, the units consume more power.
Sound alert on/off
Note: You can only switch the sound alert on and off in the menu of the parent unit.
This feature allows you to monitor your baby silently. It enables you to switch off the volume on your parent unit and still be alerted if your baby cries.
If the sound alert is switched on, the parent unit beeps as soon as the fourth sound level light lights up while the volume is switched off. In addition, the backlight of the parent unit display goes on and the sound alert symbol ( (1111) ) flashes on the display.
1 Select 'Sound Alert' with the + and - buttons.
2 Press the OK button to confirm.
3 If the alert is off, the display shows 'On?'. Press the OK button to switch on the alert. If the alert is on, the display shows 'Off?'. Press the OK button to switch off the alert.
If you have set the sound alert to 'on', the sound alert symbol ( [1] ) appears on the display of the parent unit.
Setting room temperature range
Note: You can only adjust the temperature range in the menu of the parent unit.
A baby will sleep comfortably in a room heated to a temperature between 16^ C and 20^ C. This is important, since a baby cannot regulate its body temperature as well as an adult. A baby needs more time to adjust to temperature changes.
If you do not set a temperature range, the baby monitor alerts you when the temperature in your baby's room drops below 14^ C or rises above 30^ C. In this case, the backlight of the parent unit display goes on and 'High' or 'Low' appears on the display. To change the default minimum and maximum temperature, follow the instructions below.
Note: The temperature of the baby's room is shown on the display of both units when they are linked.
1 Select 'Temperature' with the + and - buttons.
2 Press the OK button to confirm.
3 Select 'Range' with the + and - buttons.
4 Press the OK button to confirm.
5 Set the desired minimum temperature with the + and - buttons.
6 Press the OK button to confirm.
7 Set the desired maximum temperature with the + and - buttons.
8 Press the OK button to confirm.
The message ‘Saved’ appears on the display.
Note: If the temperature in the baby's room drops below or exceeds the set temperature range, the display is on continuously. This causes the unit to consume more power.
Temperature alert on/off
Note: You can only switch the temperature alert on and off in the menu of the parent unit.
Note: If the temperature alert is activated too often, reduce the set minimum temperature and/or increase the set maximum temperature (see 'Setting room temperature range').
If the temperature alert is switched on, the parent unit beeps if the actual room temperature exceeds the set maximum temperature or drops below the set minimum temperature. In addition, the backlight of the parent unit display goes on, the temperature alert symbol ( 🔒) flashes and 'High' or 'Low' appears on the display. If no minimum and maximum temperatures have been set, the temperature alert is given when the room temperature drops below 14°C or rises above 30°C.
1 Select 'Temperature' with the + and - buttons.
2 Press the OK button to confirm.
3 Select 'Alert' with the + and - buttons.
4 Press the OK button to confirm.
5 If the alert is off, the display shows 'On?'. Press the OK button to switch on the alert. If the alert is on, the display shows 'Off?'. Press the OK button to switch off the alert.
Vibration alert on/off
Note: You can only switch the vibration alert on and off in the menu of the parent unit.
If the vibration alert is switched on, the parent unit vibrates as soon as the fourth sound level light lights up while the volume is switched off.
1 Select 'Vibration' with the + and - buttons.
2 Press the OK button to confirm.
3 If the vibration alert is off, the display shows 'On?'. Press the OK button to switch on the vibration alert. If the vibration alert is on, the display shows 'Off?'. Press the OK button to switch off the vibration alert.
Setting display language
1 Select 'Language' with the + and - buttons.
2 Press the OK button to confirm.
3 Select the desired language with the + and - buttons.
4 Press the OK button to confirm.
Reset function
This function in the menu of the parent unit allows you to reset both the parent unit and the baby unit to the default settings at the same time. You can use this function if problems occur that you cannot solve by following the suggestions in chapter 'Frequently asked questions'.
1 Select 'Reset' with the + and - buttons.
2 Press the OK button to confirm.
The message ‘Confirm?’ appears on the display of the parent unit.
3 Press the OK button to confirm.
The parent unit switches off and then switches on again.
The units have now both been reset to the default factory settings.
Default settings
Parent unit
- Vibration alert: off
- Language: English
- Loudspeaker volume: 1
- Microphone sensitivity: 3
- Sound alert: off
- Temperature alert: off
- 'Temperature low' alert: 14°C
- 'Temperature high' alert: 30°C
Baby unit
- Loudspeaker volume: 3
- Nightlight: off
- Lullaby: 1
Accessories
Belt clip and neck strap
If the battery pack of the parent unit is sufficiently charged, you can take the unit with you inside and outside the house if you attach the unit to your belt or waistband with the belt clip or if you hang it around your neck with the neck strap. This allows you to monitor your baby while you are moving around.
Connecting the belt clip
1 Snap the belt clip onto the parent unit (Fig. 32).
Disconnecting the belt clip
1 Pull the belt clip off the parent unit.
Connecting the neck strap
1 Insert the end loop of the neck strap through the hole behind the strap post. Thread the neck strap through the end loop and pull the neck strap tight (Fig. 33).
Disconnecting the neck strap
1 Pass the neck strip through the end loop and pull the end loop out of the hole behind the strap post.
Cleaning and maintenance
Do not immerse the parent unit or the baby unit in water and do not clean them under the tap.
Do not use cleaning spray or liquid cleaners.
1 Unplug the baby unit if it is connected to the mains and take the parent unit out of the charger.
2 Clean the parent unit and the baby unit with a damp cloth.
Make sure the parent unit is dry before you put it back into the plugged-in charger.
3 Clean the charger with a dry cloth.
4 Clean the adapters with a dry cloth.
Storage
- You can use the travel pouch to store the baby monitor while you travel.
- When you are not going to use the baby monitor for some time, remove the non-rechargeable batteries from the baby unit and remove the rechargeable battery pack from the parent unit. Store the parent unit, the baby unit, the charger of the parent unit and the adapters in the travel pouch supplied.
Replacement
Baby unit
Batteries
Only replace the non-rechargeable batteries of the baby unit with four 1.5V R6 AA batteries.
Note: We strongly advise you to use Philips non-rechargeable batteries.
Adapter
Only replace the adapter of the baby unit with an adapter of the original type. You can order a new adapter from your dealer or a Philips service centre.
- UK only: BD075040D
- Other countries: VD075040D
Parent unit
Battery pack
Only replace the battery pack of the parent unit with a Li-ion 1000mAh battery pack.
Adapter
Only replace the adapter of the parent unit charger with an adapter of the original type. You can order a new adapter from your dealer or a Philips service centre.
- UK only: SSA-5W-09 UK 075050F
- Other countries: SSA-5S-09 EU 075050F
Environment
- Do not throw away the appliance with the normal household waste at the end of its life, but hand it in at an official collection point for recycling. By doing this, you help to preserve the environment (Fig. 34).
- Non-rechargeable batteries and battery packs contain substances that may pollute the environment. Do not throw away non-rechargeable batteries and battery packs with the normal household waste, but hand them in at an official collection point. Always remove non-rechargeable batteries and battery packs before you discard and hand in the appliance at an official collection point.
Guarantee and service
If you need service or information or if you have a problem, please visit the Philips AVENT website at www.philips.com/AVENT or contact the Philips Consumer Care Centre in your country (you find its phone number in the worldwide guarantee leaflet). If there is no Consumer Care Centre in your country, go to your local Philips dealer.
Frequently asked questions
This chapter lists the questions most frequently asked about the appliance. If you cannot find the answer to your question, contact the Customer Care Centre in your country.
Question Answer
Why don't both the power-on light of the baby unit and the LINK light of the parent unit come on when I press the on/off buttons of the units?
Perhaps the rechargeable battery pack of the parent unit is empty and the parent unit is not in the plugged-in charger. Insert the small appliance plug into the charger, put the adapter of the charger in a wall socket and place the parent unit in the charger. Then press the on/off button to establish connection with the baby unit.
Question Answer
| Perhaps the non-rechargeable batteries of the baby unit are empty and the baby unit is not connected to the mains. Replace the non-rechargeable batteries or connect the baby unit to the mains. Then press the on/off button to establish connection with the parent unit. | |
| The baby unit and the parent unit may be out of range of each other. Move the parent unit closer to the baby unit, but not closer than 1 metre/3 feet. | |
| If the LINK light on the parent unit still does not start to flash, use the reset function to reset the units to their default settings. | |
| Why does the LINK light on the parent unit light up red continuously and why is the message 'Not Linked' shown on the display? | The baby unit and the parent unit are out of range of each other. Move the parent unit closer to the baby unit. |
| The baby unit may be switched off. Switch on the baby unit. | |
| Why does the battery symbol flash on the display of the baby unit? | The non-rechargeable batteries of the baby unit are running low. Replace the non-rechargeable batteries or connect the baby unit to the mains (see chapter 'Preparing for use'). |
| Why does the parent unit beep? | If the parent unit beeps while the LINK light lights up red continuously and the message 'Not Linked' is shown on the display, the connection with the baby unit is lost. Move the parent unit closer to the baby unit. |
| If the parent unit beeps and the battery symbol on the display is empty, the rechargeable battery pack of the parent unit is running low. Recharge the rechargeable battery pack. | |
| If you have switched off the volume while the sound alert is on, the parent unit beeps whenever the fourth sound level light lights up because the baby unit has picked up a sound. | |
| If you have set the room temperature range on the parent unit and the temperature alert is on, the parent unit beeps when the temperature drops below the set level or below 14°C or when the temperature rises above the set level or above 30°C. | |
| The baby unit may be switched off. Switch on the baby unit. | |
| Why does the appliance produce a high-pitched noise? | The units may be too close to each other. Make sure the parent unit and the baby unit are at least 1 metre/3 feet away from each other. |
| The volume of the parent unit may be set too high. Decrease the volume of the parent unit. | |
| Why don't I hear a sound/Why can't I hear my baby cry? | The volume of the parent unit may be set too low or may be switched off. Increase the volume of the parent unit. |
| Question Answer | |
| The microphone sensitivity level of the baby unit may be set too low. Set the microphone sensitivity level to a higher level in the menu of the parent unit. | |
| The baby unit and the parent unit may be out of range of each other. Reduce the distance between the units. | |
| Why does the parent unit react too quickly to other sounds? | The baby unit also picks up other sounds than those of your baby. Move the baby unit closer to the baby (but observe the minimum distance of 1 metre/3 feet). |
| The microphone sensitivity level of the baby unit may be set too high. Decrease the microphone sensitivity level in the menu of the parent unit. | |
| Why does the parent unit react slowly to the baby's crying? | The microphone sensitivity level of the baby unit may be set too low. Increase the microphone sensitivity level of in the menu of the parent unit. |
| Why do the non-rechargeable batteries of the baby unit run low quickly? | The microphone sensitivity level of the baby unit may be set too high, which causes the baby unit to transmit more often. Decrease the microphone sensitivity level in the menu of the parent unit. |
| The volume on the baby unit may be set too high, which causes the baby unit to consume a lot of energy. Decrease the volume of the baby unit. | |
| You may have set a maximum room temperature that is lower than the actual room temperature or a minimum room temperature that is higher than the actual room temperature. In this case the display is lit all the time, which increases the power consumption of the baby unit. This causes the non-rechargeable batteries of the baby unit to run low quickly. | |
| Perhaps you have switched on the nightlight. If you want to use the nightlight, we advise you to run the baby unit on mains power. | |
| Why does the charging time of the parent unit exceed 4 hours? | The parent unit may be switched on during charging. Switch off the parent unit during charging. |
| The specified operating range of the baby monitor is 330 metres/1000 feet. Why does my baby monitor manage a much smaller distance than that? | The specified range is only valid outdoors in open air. Inside your house, the operating range is limited by the number and type of walls and/or ceilings in between. Inside the house, the operating range is up to 50 metres/150 feet. |
| Why is the connection lost every now and then? Why are there sound interruptions? | The baby unit and the parent unit are probably close to the outer limits of the operating range. Try a different location or decrease the distance between the units. Please note that it takes about 30 seconds each time before a connection between the units is established. |
Question Answer
| What happens during a power failure? | If the parent unit is sufficiently charged, it continues to operate during a power failure, both inside and outside the charger. If there are batteries in the baby unit, it also continues to operate during a power failure. |
| Is my baby monitor secure from eavesdropping and interference? | The DECT technology of this baby monitor guarantees no interference from other equipment and no eavesdropping. |
| The operating time of the parent unit is supposed to be at least 24 hours. Why is the operating time of my parent unit shorter? | When the rechargeable battery pack of the parent unit has been charged for the first time, the operating time is less than 24 hours. The rechargeable battery pack only reaches its full capacity after you have charged and discharged it at least four times. |
| The volume of the parent unit may be set too high, which causes the parent unit to consume a lot of energy. Decrease the volume of the parent unit | |
| The microphone sensitivity level of the baby unit may be set too high, which causes the parent unit to consume a lot of energy. Decrease the microphone sensitivity level in the menu of the parent unit. | |
| Why doesn’t the battery symbol appear on the display of the parent unit when I start to recharge the parent unit? | It may take a few minutes before the battery symbol appears on the display of the parent unit when you charge the parent for the first time or after a long period of disuse. |
Introduktion
Standardinnstillinger
Foreldreenhet
EC DECLARATION OF CONFORMITY
| Philips Domestic Appliances and Personal CareThe aspects radio, EMC and safety have been investigated by the Competent Body CETECOM.The results have been laid down in the report series 4-2545-xxx | Ref: DOC-SCD530 |
| Date: 5 Jun, 2008 | |
| By: Phoebe Cheng |
We, PHILIPS DOMESTIC APPLIANCES AND PERSONAL CARE BV
(Manufacturer's name)
Tussendiepen 4, 9206 AD DRACHTEN, The Netherlands
(Manufacturer's address)
declare under our responsibility that the electrical products:
Philips SCD510, SCD520, SCD530
(Name) (Type or model)
Baby Monitor
(Product description)
To which this declaration relates is in conformity with the following harmonized standards:
| EN60950-1:2001+ am 11: 2004 | EN 50371 : 2002 | ETSI EN 301 489-1 V1.6.1 (2005-09) |
| ETSI EN 301 489-6 V1.2.1 (2002-08) | ||
| ETSI EN 301 406 V 1.5.1 (2003-07) | ||
Year in which the CE-mark was affixed: (2008)
Following the provisions of 1999/5/EC (R&TTE Directive)
and are produced under a quality scheme at least in conformity with ISO 9001 or CENELEC Permanent Documents
For the CoC
Signature:
Name Quality Manager: Agamen Pun Date: 5 Jun, 2008
For DAP
Signature:
Name Quality Manager DAP: A. Speelman Date: 10 Jun, 2008
© Philips Domestic Appliances and Personal Care B.V. Corporate Quality Support
UHV 989-0304 d8
natural_image
Illustration of a wind turbine connected to an electrical plug, showing airflow direction (no text or symbols)
natural_image
Diagram of a device with a blue downward arrow indicating compression or disassembly (no text or symbols present)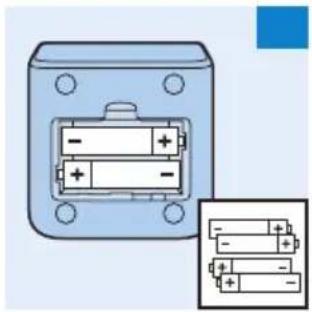
natural_image
Diagram of a battery pack with two 20-pin batteries and one partially filled with positive charges (no text or symbols)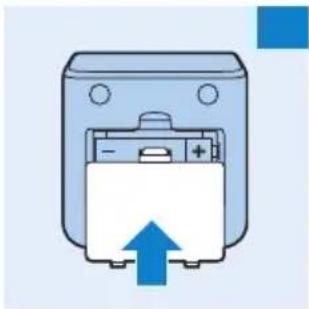
natural_image
Diagram of a battery pack with an upward arrow indicating positive charge (no text or symbols)
natural_image
Illustration of a cylindrical device with a blue downward arrow indicating a decrease or drop (no text or symbols present)
natural_image
Illustration of a mobile phone casing with a blank display panel and buttons (no text or symbols)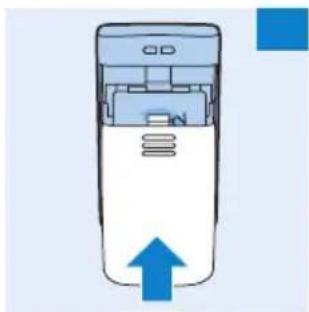
natural_image
Illustration of a handheld device with an upward arrow and blue square markers (no text or symbols)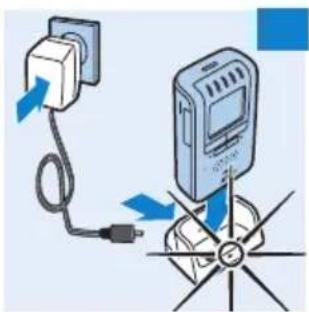
natural_image
Illustration of a power plug connected to a mounted device with a compass rose (no text or symbols)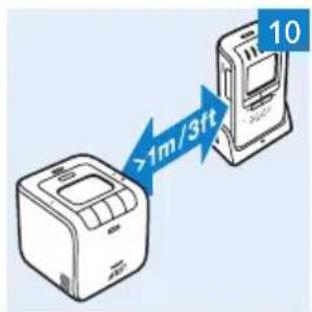







- General description (Fig. 1)
- A Parent unit
- B Baby unit
- C Display
- D Travel pouch
- Important
- Danger
- Warning
- Caution
- ENGLISH8
- General
- Electromagnetic fields (EMF)
- Preparing for use
- Baby unit
- Mains operation
- Operation on non-rechargeable batteries
- Parent unit
- Operation on rechargeable battery pack
- Using the appliance
- Positioning the baby monitor
- Operating range
- Dry materials Material thickness Loss of range
- Features
- Adjusting loudspeaker volume
- Talk function
- Sound level lights
- Nightlight
- Paging the parent unit
- Lullaby function
- ENGLISH12
- Humidity
- Out of range alert
- Menu options
- Menu operation - general explanation
- Nightlight on/off
- Selecting a lullaby
- Switching to another lullaby
- Pausing a lullaby
- Stopping a lullaby
- Adjusting microphone sensitivity
- Sound alert on/off
- Setting room temperature range
- Temperature alert on/off
- Vibration alert on/off
- Setting display language
- Reset function
- Default settings
- Accessories
- Belt clip and neck strap
- Connecting the belt clip
- Disconnecting the belt clip
- Connecting the neck strap
- Disconnecting the neck strap
- Cleaning and maintenance
- Storage
- Replacement
- Batteries
- Adapter
- Battery pack
- Environment
- Guarantee and service
- Frequently asked questions
- Question Answer
- Introduktion
- Standardinnstillinger
Brand : PHILIPS
Model : AVENT SCD530
Category : Baby monitor