
CDJ-400 - DJ Equipment PIONEER - Free user manual and instructions
Find the device manual for free CDJ-400 PIONEER in PDF.


| Product Type | Professional CD/MP3 player for DJ |
| Brand | Pioneer |
| Model | CDJ-400 |
| Dimensions (W × H × D) | 320 × 105 × 370 mm |
| Weight | 4.0 kg |
| Power Supply | 220-240 V AC, 50/60 Hz |
| Power Consumption | 28 W |
| Supported Disc Formats | Audio CD, CD-R/RW, MP3 (on CD) |
| USB Playback | Yes, via front USB port (mass storage devices) |
| USB Audio Formats | MP3, AAC, WAV, AIFF |
| Main Functions | Play, pause, cue, loop (auto/manual), hot cue, pitch adjustment, master tempo, reverse, instant start |
| Pitch Adjustment Range | ±6%, ±10%, ±16%, ±24% (selectable) |
| Display | Backlit LCD screen |
| Audio Outputs | 1 × RCA (stereo), 1 × headphones (3.5 mm mini-jack) |
| Control Input/Output | 1 × link port for connection to another CDJ or DJM |
| Maintenance and Cleaning | Clean with a soft, dry cloth. Do not use solvents or abrasive products. |
| Safety | Do not expose to moisture, liquids, or extreme temperatures. Disconnect before cleaning. |
| Spare Parts and Repairability | Contact an authorized Pioneer service center for repairs and original parts. |
| Included Accessories | Power cord, RCA audio cable, user manual |
Frequently Asked Questions - CDJ-400 PIONEER
User questions about CDJ-400 PIONEER
0 question about this device. Answer the ones you know or ask your own.
Ask a new question about this device
Download the instructions for your DJ Equipment in PDF format for free! Find your manual CDJ-400 - PIONEER and take your electronic device back in hand. On this page are published all the documents necessary for the use of your device. CDJ-400 by PIONEER.
USER MANUAL CDJ-400 PIONEER
Operating Instructions
Mode d'emploi
Bedienungsanleitung
Thank you for buying this Pioneer product.
Please read through these operating instructions so you will know how to operate your model properly. After you have finished reading the instructions, put them away in a safe place for future reference.
In some countries or regions, the shape of the power plug and power outlet may sometimes differ from that shown in the explanatory drawings. However the method of connecting and operating the unit is the same. K015 En
IMPORTANT

The lightning flash with arrowhead symbol, within an equilateral triangle, is intended to alert the user to the presence of uninsulated 'dangerous voltage' within the product's enclosure that may be of sufficient magnitude to constitute a risk of electric shock to persons.
CAUTION
RISK OF ELECTRIC SHOCK DO NOT OPEN
CAUTION:
TO PREVENT THE RISK OF ELECTRIC SHOCK. DO NOT REMOVE COVER (OR BACK). NO USER-SERVICEABLE PARTS INSIDE. REFER SERVICING TO QUALIFIED SERVICE PERSONNEL.

The exclamation point within an equilateral triangle is intended to alert the user to the presence of important operating and maintenance (servicing) instructions in the literature accompanying the appliance.
D3-4-2-1-1 En-A
Replacement and mounting of an AC plug on the power supply cord of this unit should be performed only by qualified service personnel.
IMPORTANT: THE MOULDED PLUG
This appliance is supplied with a moulded three-pin mains plug for your safety and convenience. A 5 amp fuse is fitted in this plug. Should the fuse need to be replaced, please ensure that the replacement fuse has a rating of 5 amps and that it is approved by ASTA or BSI to BS1382.
Check for the ASTA mark on the BSI mark on this body of the fuse.
If the plug contains a removable fuse cover, you must ensure that it is refitted when the fuse is replaced. If you lose the fuse cover the plug must not be used until a replacement cover is obtained. A replacement fuse cover can be obtained from your local dealer.
If the fitted moulded plug is unsuitable for your socket outlet, then the fuse shall be removed and the plug cut off and disposed of safely. There is a danger of severe electrical shock if the cut off plug is inserted into any 13 amp socket.
If a new plug is to be fitted, please observe the wiring code as shown below. If in any doubt, please consult a qualified electrician.
IMPORTANT: The wires in this mains lead are coloured in accordance with the following code: Blue : Neutral Brown : Live
As the colours of the wires in the mains lead of this appliance may not correspond with the coloured markings identifying the terminals in your plug, proceed as follows;
The wire which is coloured BLUE must be connected to the terminal which is marked with the letter N or coloured BLACK.
The wire which is coloured BROWN must be connected to the terminal which is marked with the letter L or coloured RED.
How to replace the fuse: Open the fuse compartment with a screwdriver and replace the fuse.

D3-4-2-1-2-2 B En
CAUTION
This product is a class 1 laser product, but this product contains a laser diode higher than Class 1. To ensure continued safety, do not remove any covers or attempt to gain access to the inside of the product. Refer all servicing to qualified personnel. The following caution label appears on your unit. Location: Inside of the player
CLASS 1
LASER PRODUCT APPAREIL Á LASER DE CLASSE 1
CAUTION
CLASS 3B INVISIBLE LASER RADIATION WHEN OPEN, A/OID EXPOSURE TO BEAM
ATTENTION
RADIATIONS LASER INVISIBLES DE CLASSE 3B QUAND OUVERT. ÉVITEZTOUT EXPOSITION AU FAISCEAU.
ADVARSEL
KLASSE 3B USYNLIG LASERSTRALING VED ABNING. UNDGÅ UDSÄETTELSE FOR STRALING.
WARNING
KLASS 3B OSYNLIG LASERSTRÄLNING NÄR DENNA DEL ÄR ÖPPNAD. UNDIVK ATT UTSÄTTA DIG FÖR STRÅLEN.
VORSICHT
BEI GEÖFFNETER ABDECKUNG IST UNSICHTBARE LASERSTRAHLUNG DER KLASSE 3B IM GERÄTEINNEREN VORHANDEN. NICHT DEM LASERSTRAHLAUSSETZEN!
PRECAUCIAÓN
Operating Environment
Operating environment temperature and humidity: +5 °C - +35 °C (+41 °F - +95 °F); less than 85 %RH (cooling vents not blocked)
Do not install this unit in a poorly ventilated area, or in locations exposed to high humidity or direct sunlight (or strong artificial light) D3-4-2-1-7c_A_En
This product complies with the Low Voltage Directive 2006/95/EC and EMC Directive 2004/108/EC.
D3-4-2-1-9a_A_En
If the AC plug of this unit does not match the AC outlet you want to use, the plug must be removed and appropriate one fitted. Replacement and mounting of an AC plug on the power supply cord of this unit should be performed only by qualified service personnel. If connected to an AC outlet, the cut-off plug can cause severe electrical shock. Make sure it is properly disposed of after removal. The equipment should be disconnected by removing the mains plug from the wall socket when left unused for a long period of time (for example, when on vacation). D3-4-2-2-1a A En
WARNING
This equipment is not waterproof. To prevent a fire or shock hazard, do not place any container filled with liquid near this equipment (such as a vase or flower pot) or expose it to dripping, splashing, rain or moisture. D3-4-2-1-3_A_En
WARNING
Before plugging in for the first time, read the following section carefully.
The voltage of the available power supply differs according to country or region. Be sure that the power supply voltage of the area where this unit will be used meets the required voltage (e.g., 230V or 120V) written on the rear panel. D3-4-2-1-4. A En
WARNING
To prevent a fire hazard, do not place any naked flame sources (such as a lighted candle) on the equipment. D3-4-2-1-7a_A_En
VENTILATION CAUTION
When installing this unit, make sure to leave space around the unit for ventilation to improve heat radiation (at least 5 cm at rear, and 5 cm at each side).
WARNING
Slots and openings in the cabinet are provided for ventilation to ensure reliable operation of the product, and to protect it from overheating. To prevent fire hazard, the openings should never be blocked or covered with items (such as newspapers, table-cloths, curtains) or by operating the equipment on thick carpet or a bed. D3-4-2-1-7b A En
CAUTION
The POWER switch on this unit will not completely shut off all power from the AC outlet. Since the power cord serves as the main disconnect device for the unit, you will need to unplug it from the AC outlet to shut down all power. Therefore, make sure the unit has been installed so that the power cord can be easily unplugged from the AC outlet in case of an accident. To avoid fire hazard, the power cord should also be unplugged from the AC outlet when left unused for a long period of time (for example, when on vacation). D3-4-2-2-2a A En
POWER-CORD CAUTION
Handle the power cord by the plug. Do not pull out the plug by tugging the cord and never touch the power cord when your hands are wet as this could cause a short circuit or electric shock. Do not place the unit, a piece of furniture, etc., on the power cord, or pinch the cord. Never make a knot in the cord or tie it with other cords. The power cords should be routed such that they are not likely to be stepped on. A damaged power cord can cause a fire or give you an electrical shock. Check the power cord once in a while. When you find it damaged, ask your nearest PIONEER authorized service center or your dealer for a replacement. \$002 En
When using this product follow the instructions written on the underside of the unit, which concern rated voltage, etc. D3-4-2-2-4_En

If you want to dispose this product, do not mix it with general household waste. There is a separate collect on system for used electronic products in accordance with legislation that requires proper treatment, recovery and recycling.
Private households in the member states of the EU, in Switzerland and Norway may return their used electron c products free of charge to designated collection facilities or to a retailer (if you purchase a similar new one).
For countries not mentioned above, please contact your local authorities for the correct method of disposal.
By doing so you will ensure that your disposed product undergoes the necessary treatment, recovery and recycling and thus prevent potential negative effects on the environment and human health.
K058_A_En
FEATURES
Designed for professional use by DJs, the CDJ-400 compact disc player provides all the functions and performance required in disco clubs while offering performance, sound quality and functionality superior to analog players.
SCRATCH JOG EFFECT
Equipped with Scratch Jog Effect for new scratch sounds. Equipped with three buttons [BUBBLE], [TRANS] and [WAH] for new scratch sounds. Effects that are different from the normal scratch sound can be obtained, broadening the possibilities of your DJ play.
DIGITAL JOG BREAK
Equipped with Digital Jog Break for original sound effects. Individual remix assist functions [JET], [ROLL] and [WAH] have been provided individually in three buttons. By choosing a function and operating the jog dial in time with the music, a new remix world can be experienced.
JOG DIAL
The large 115 mm diameter jog dial enables better handling than an analog turntable.
■PITCH BEND
This function changes the music tempo depending on the direction and speed the jog dial is rotated.
■SCRATCH PLAY
In the VINYL mode when the surface of the jog dial is pressed playback is discontinued and then continues according to the direction and speed the dial is rotated.
■FRAME SEARCH
Moves the pause position in frame units (1/75 sec) when the jog dial is rotated in the pause mode.
SUPER-FAST SEARCH
By turning the jog dial while holding down the manual search button or the track search button, disc search can be performed faster than normal search or track search functions.
TEMPO CONTROL
100 mm long high-precision slider allowing free speed adjustment.
With a digital display calibrated in 0.02 % units (within a ±6 % range), tempo adjustments can be made more easily and accurately.
■TEMPO CONTROL RANGE
The maximum variable range can be set to four variable ranges; ±6%, ±10%, ±16%, WIDE, to provide easier operation environment.
■MASTER TEMPO
Maintains the same pitch of sound while changing the music tempo.
REVERSE PLAY
When the reverse button (DIRECTION REV) is pressed so that the button's indicator lamp lights, play is performed in the reverse direction.
CUE
■BACK CUE
After storing cue points in memory, press the CUE button while playing a track to return and start from the stored cue point.
■AUTO CUE
Skips the non-recorded part at the top of a track and automatically enters stand-by mode at the track's starting point, allowing playback to begin instantly when the PLAY/PAUSE button (▶/Ⅲ) is pressed.
■CUE POINT SAMPLER
Playback can be started at one touch from a stored cue point, convenient for confirming start points and as sampler.
CUE/LOOP MEMORY
This player is equipped with an internal memory that permits the recording of cue point or loop point; the recorded points can later be recalled as desired.
REAL TIME SEAMLESS LOOP
This function simplifies the setting and canceling of loops. The loop can be set at the very instant the track is being played. By setting a loop just before the end of the track, the track can be made so that it doesn't stop. In addition, an ADJUST mode has been added to enable one-touch adjustments to the loop-out point, thereby facilitating the loop operation.
RELOOP
Allows returning to the set loop position any number of times. Press the RELOOP/EXIT button after canceling loop play to return to the loop start position. By using the loop ON and OFF combined with the rhythm of the track, new sound effects can be created.
BEAT LOOP/LOOP DIVIDE
Automatically sets a loop-out point according to the track's BPM and starts loop-play. Each additional time the button is pressed, the loop is divided and a new rhythm produced.
PLAYING ADDRESS
The bar graph provides a visual reference of the track playback progress that enables the user to visualize the current playback position, in the same way as is done with an analog record by checking the position of the needle. The current position can be confirmed by the length of the graph, and in addition, the graph flashes to notify the ending of the track.
FADER START
When a Pioneer DJ mixer (sold separately) is connected, the mixer's fader operation can be used to perform quick start and back cue.
RELAY PLAY
Two CDJ-400 units can be connected in tandem to perform automatic relay play.
When track playback stops on one of the players, the standby mode of the other player is released and playback begins automatically.
OIL DAMPER FLOAT
OIL DAMPER FLOAT construction helps resist shakes and impacts.
This unit features an OIL DAMPER FLOAT design, making it harder for distortions and sound breakup to occur due to impacts from operation and vibrations from the floor.
MULTI READ
Supports playback of CD-R and CD-RW discs. (Some discs may not replay properly, however, due to certain special characteristics of some discs and recorders, as well as due to dirty or damaged discs.)
MP3 DJ PLAY
MP3 files recorded on CD-ROM or USB memory device can be played with DJ functions.
PC CONNECTION
Virtually all the button and slider functions of the CDJ-400 can be output to external devices.
These signals can then be used to control Pioneer's own DJ software "DJS" as well as other computer software applications. In addition, music tracks played on the computer can be output as audio from the CDJ-400.
Disclaimer
●Microsoft and Windows are registered trademarks of Microsoft Corporation, registered in the U.S. and other countries.
Apple and Mac OS are trademarks of Apple Inc., registered in the U.S. and other countries.
●The typefaces included herein are partially developed by DynaComware Taiwan Inc.
●ASIO is a registered trademark of Steinberg Media Technologies GmbH.
CONTENTS
BEFORE OPERATING
FEATURES 3
DISCS USABLE WITH THIS UNIT 5
CAUTIONS REGARDING HANDLING 7
CONNECTIONS....8
PANEL FACILITIES 10
OPERATIONS
DISC LOADING/UNLOADING 13
DJ PLAYER OPERATIONS 14
Auto cue function 14
Starting playback 14
Resume function.... 14
To stop playback.... 14
To temporarily interrupt playback 14
Jog dial functions 15
Fast-forward/fast-reverse 15
Track cueing 15
Rotary seach 15
Change playback speed 16
Applying master tempo 16
Scratch Jog Effect 16
Digital Jog Break 16
Cue point settings 17
Mixing different tracks 17
Loop playback 18
Fader start playback 18
Scratch play 18
Spin play.... 18
Reverse play 18
Cue point/loop point memory 19
Relay play using two players 19
Writing and reading data 19
MIDI SETTING.... 20
OTHER
TROUBLESHOOTING 21
SPECIFICATIONS 23
DISCS USABLE WITH THIS UNIT
Types of discs playable on this unit
●The following marks and logos are displayed on disc labels, packaging, or jackets.
Types and Logos of playable discs
| CD CD-TEXT (Note 1) | CD-R (Note 2) | CD-RW (Note 2) | |||
| COMPACTDISCDIGITAL AUDIO | COMPACTDISCDIGITAL AUDIO TEXT | COMPACTDISCDIGITAL AUDIO Recordable | COMPACTDISCDIGITAL AUDIO | COMPACTDISCDIGITAL AUDIO ReWritable | |
Note 1) Regarding TEXT display:
The number of characters that can be displayed is up to 48. When a display exceeds eight characters in length, the display will scroll. Only alpha-numerics and a limited number of symbols can be displayed (P. 12).
Note 2) CD-R/CD-RW discs:
This player supports playback of CD-R/CD-RW discs recorded in audio CD format or MP3.
* For details, consult the Operating Instructions for your recorder.
Notes:
●Some CD-R/CD-RW discs recorded on standalone recorders or computer drives may not be playable back on this player, due to a variety of reasons, including disc characteristics, scratches, dirt, player lens dirt or condensation, etc.
●Some discs recorded on computer drives may not be playable on this player, depending on the recording application used, its settings, and operating environment. Be sure to use the correct formatting for the discs used. For details, consult the application author.
●This unit cannot play partially recorded CD-R or CD-RW discs that have not been finalized.
- For detailed information regarding the handling of CD-R/CD-RW discs, consult the handling precautions supplied with each disc.
■Regarding CD-R/RW discs
Due to the unique construction of CD-R/RW discs, leaving them for extended periods of time in the pause (or cue standby) mode at a single point may result in the discs' becoming difficult to play at that place. The same symptom may also occur if the loop function is used to play back a single point on the disc excessively.
As a result, users are advised to construct backup archive discs when playing discs containing important data.
■About DualDisc playback
This product is designed to conform to standards for music CDs. No warranty is made for operation or performance when used with discs not conforming to such music CD standards.
Playing MP3 files
MP3 files may be found in two formats: Constant Bit Rate (CBR) and Variable Bit Rate (VBR). This component supports playback and DJ play with both CBR and VBR type MP3 files, but in comparison with CBR files, files recorded in VBR format will experience slower search and super-fast search speeds. As a result, when operating speed is most important, the use of the CBR recording format is recommended for MP3 files.
MP3 files must follow the format requirements listed below.
| MP3 format MPEG-1 | Supports Audio Layer-3 sampling frequency 32 kHz, 44.1 kHz, 48 kHz, Bit Rate 32 Kbps to 320 Kbps. | |
| MPEG-2 | Supports Audio Layer-3 sampling frequency 16 kHz, 22.05 kHz, 24 kHz, Bit Rate 16 Kbps (stereo) to 160 Kbps. | |
| ID3 tag | Supports ID3 Vers. 1.0/1.1/2.2/2.3/2.4. Displays title, album, artist. Only alpha-numerics and a limited number of symbols can be displayed. | |
| File extension | .mp3, .MP3, .mP3, .Mp3 |
■Playing Tracks from USB memory
By connecting a USB memory device to the CDJ-400, MP3 files on the USB memory can be played.
- The CDJ-400 may not support playback with all USB memory devices or provide sufficient electrical power. Additionally, note that Pioneer is not responsible for any loss of data on a USB memory device that may occur as the result of connecting to the CDJ-400.
- Reading from a USB memory device may take time if large quantities of data are involved.
- Erratic performance may result when a USB hub is used.
■To disconnect a USB memory device
Use SOURCE SELECT to cancel the selection of the USB memory device, and then confirm that the USB memory device indicator has gone out before removing the device.
| USB Memory Device Format | Folder hierarchy | Maximum eight levels (cannot play files in folders exceeding 8th hierarchy level) |
| Folder Max | 10 000 | |
| File Max | 20 000 (maximum 10 000 in single folder) | |
| Recording format | Devices conforming to USB mass storage class (USB MSC), including external hard discs, portable flash memory devices, and digital audio playback devices (supporting FAT16 and FAT32 format). |
* No file sort function. Playback is in order recorded in memory.
* Longer startup times are required with increasing numbers of files.
■About CD-ROM playback
MP3 files recorded on CD-ROM can be played back on this unit.
| Disc format File extension | .mp3, .MP3, .mP3, .Mp3 | |
| Folder layers | Maximum eight layers; files in folders exceeding eight layers cannot be played. | |
| Maximum number of folders | 2 000 | |
| Maximum number of files | 3 000 | |
| Multi-session | Does not support multi-session.When the disc used is a multi-session disc, only the first session will be played. | |
| CD-R recording method | Record following the ISO9660 CD-ROM file system.Supports only Disc At Once or Track At Once.CDJ-400 does not support Packet Write recorded discs. |
* No file sort function. Playback is in order recorded in memory.
* Longer startup times are required with increasing numbers of files.
CAUTIONS REGARDING HANDLING
Location
Install the player in a well-ventilated location where it will not be exposed to high temperatures or humidity.
Do not install the player in a location which is exposed to direct sunlight, or near stoves or radiators. Excessive heat can adversely affect the cabinet and internal components. Installation of the player in a damp or dusty environment may also result in a malfunction and can be hazardous. Avoid installation near cookers etc., where the player may be exposed to oily smoke, steam or heat.
Installation Guidelines
- Placing and using the compact disc player for long periods on heat-generating sources such as amplifiers or near spotlights, etc. will affect product performance. Avoid placing the player on heat-generating sources.
- Install this compact disc player as far as possible away from tuners and TV sets. A compact disc player installed in close proximity to such equipment may cause noise or degradation of the picture.
- Noise may be noticeable when an indoor antenna is used. In such cases, make use of an outdoor antenna or turn off power to the compact disc player.
- When the unit is used in a loud-sound environment, e.g., near a speaker, sound skip may occur. Install the unit away from the speaker or reduce the listening volume.
- Place this unit on a level surface and a stable platform.
- Be sure the player, including its audio and power supply cords, does not touch vibrating materials. Any cause of vibration other than the insulators may cause the disc to skip. Take special care when using the player while it is installed in a carrying case.
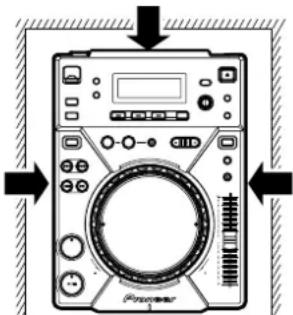
- Please be sure to leave a space to allow for heat radiation.
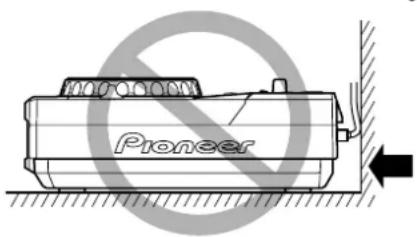
Do not place on or against vibrating materials!
Cleaning the Player
To clean the PLAYER wipe with a polishing or a soft, dry cloth. For stubborn dirt, moisten a soft cloth with a weak solution of neutral detergent (diluted in five to six parts water), wring the cloth well, and wipe away the dirt. Use a dry cloth to wipe the surface dry. Do not use volatile liquids such as benzene or thinner which will damage the unit.
CD Lens Cleaner
The player's pickup lens should not become dirty in normal use. If for some reason, the lens becomes soiled and malfunctions, contact your nearest PIONEER authorized service center. Lens cleaners for CD players are commercially available, but special care should be exercised in their use as some may cause damage to the lens.
Storing Discs
●Discs are made of the same kinds of plastic used for conventional analog audio records. Be careful not to allow discs to warp. Always store discs in their cases vertically, avoiding locations with high heat, humidity, or extremely low temperatures. Avoid leaving discs in cars; the interior of a car in direct sunlight can become extremely hot.
●Always read and abide by the precautionary notes listed on disc labels.
Condensation
When this unit is brought into a warm room from previously cold surroundings or when the room temperature rises sharply, condensation may form inside the unit and impair its performance. In such cases, allow the unit to stand for about an hour or raise the room temperature gradually.
Cleaning and Handling Compact Discs
●The presence of fingerprints or smudges on the surface of the disc will not directly affect the recorded signals, but, depending on the degree of contamination, the brightness of the light reflected from the signal surfaces may be reduced causing degradation of sound quality. Always keep your discs clean by wiping them gently with a soft cloth from the inner edge toward the outer edge.
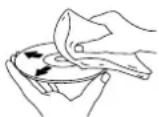
- If a disc becomes very dirty, dampen a soft cloth with water, (be sure to wring it out well) and wipe the away dirt gently. Remove any water drops with another soft, dry cloth.
- Do not use record cleaning sprays or anti-static agents on discs. Never clean discs with benzene, thinner, or other volatile solvents or damage to the disc surface may result.
●With this player, use only those discs which display the mark shown right (Optical audio digital discs).
●SACD hybrid discs cannot be played.


- When holding discs, do not touch their signal surfaces. Hold by the edges, or by one edge and the center hole.
- Do not affix gummed labels or tape to the disc surface. Also, do not scratch or damage the label.
●Discs rotate at high speeds inside the player. Do not use damaged, cracked or warped discs.

natural_image
Illustration showing hands holding a disc and CDs with no symbols (no text or labels)Do not play a CD with a special shape
Do not play a CD having other shape than a circular disc, such as heart shaped disc. Otherwise malfunction may occur.


CONNECTIONS
Before making or changing connections, switch off the power and disconnect the power cord from the AC outlet.
1. Connection to a Pioneer DJ mixer (audio output and CONTROL connector)
Using the supplied audio cables, connect the white plug into the L (left) terminal and the red plug to the R (right) terminal.
Connect the supplied control cable to enable control of the unit from the mixer for fader start play and back cue.
When connecting to a DJ mixer (DJM-400)

flowchart
graph TD
    A["DJM-400"] --> B["CDJ-400"]
    B --> C["Supplied audio cable"]
    B --> D["Supplied control cable"]
    A --> E["CDJ-400B"]
    A --> F["CDJ-400A"]
    A --> G["Supplied audio cable"]
    A --> H["Supplied control cable"]
    A --> I["Supplied audio cable"]
    style A fill:#f9f,stroke:#333
    style B fill:#ccf,stroke:#333
    style C fill:#cfc,stroke:#333
    style D fill:#fcc,stroke:#333
    style E fill:#ffc,stroke:#333
    style F fill:#cfc,stroke:#333
    style G fill:#fcc,stroke:#333
    style H fill:#ffc,stroke:#333
    style I fill:#cfc,stroke:#333
- When connecting to DJM-600, DJM-300 and DJM-500, connect as shown in the accompanying illustration.
- When connecting to DJM-909 and DJM-707, connect CH-1 CD with A PLAYER, CH-2 CD with B PLAYER using the supplied audio cables.
- When connecting to DJM-3000, connect A PLAYER to LINE 1 of CH-1, and B PLAYER to LINE 3 of CH-2.
- When connecting to the DJM-1000, use the supplied audio cable to connect one set of the CD/LINE connectors to PLAYER A and the other CD/LINE connectors to PLAYER B. For digital audio signal output, use a coaxial digital signal cable (sold separately) to connect the CDJ-400's DIGITAL OUT connector to one of the DJM-1000's DIGITAL IN connectors (channel 4 to 6).
- When connecting to the DJM-800, use the supplied audio cable to connect one set of the CD/LINE connectors to PLAYER A and the other set of CD/LINE connectors to PLAYER B. For digital output of audio signals, use a coaxial digital signal cable (sold separately) to connect the CDJ-400's DIGITAL OUT connector to the DJM-800's DIGITAL IN connector.
- When connecting to the DJM-700, use the supplied audio cable to connect one set of CD/LINE connectors to PLAYER A and the other set of CD/LINE connectors to PLAYER B.
- When connecting to a audio mixer other than the ones listed above, connect the unit's AUDIO OUT terminal to the mixer's line in terminal, or the AUX terminal (* do not connect to the PHONO terminal, since distortion or improper operation may occur).
2. Connecting control cable for relay play
Alternating playback can be automatically performed when the CONTROL connectors of the two units are connected with the supplied control cable. (P.19)

3. Connecting to other devices
ⒶConnecting to a stereo amplifier (when not using a DJ mixer)

flowchart
graph LR
    A["Stereo amplifier"] --> B["Connect to the CD or AUX input connectors\n(Do not use the PHONO input connectors.)"]
    B --> C["CD"]
    B --> D["L"]
    B --> E["R"]
    C --> F["Supplied audio cable"]
    D --> F
    E --> F
    F --> G["CDJ-400"]
    G --> H["OUTPUT"]
    G --> I["OUTPUT OUT"]
⑧Connecting to a component with digital input connectors

- The DIGITAL OUT connectors produce audio data only (without subcodes; CD graphics are not supported).
- Depending on the CD recorder or other component connected, some recording or other functions may be limited. For details, consult the operating instructions for the connected component.
©Connecting to a Computer

● Supported computer operating systems include Windows Vista, Windows XP, Windows 2000, and Mac OS 10.3 or later.
- When used with Windows 2000, a special MIDI driver must be installed before performing connections.
- A special ASIO driver is also available to allow audio signals to be output from computer.
- Please visit the following website to download special drivers, and for more information about the Pioneer DJ software program "DJS."
http://www.prodjnet.com/support/
4. Connecting the power cord
After all other connections have been made, connect the power cord to the AC inlet on the rear panel of the player and connect the power plug to an AC wall outlet or to a power receptacle on the rear panel of the amplifier.
PANEL FACILITIES

1. POWER switch (OFF/ ON)
This switch is located on the rear panel of the unit. Switches the unit's power ON/OFF.
2. Display (P.12)
3. Folder BACK button
Returns to the next higher level in the folder hierarchy when using a CD-ROM or USB memory with a hierarchical folder structure (P.15).
4. EJECT button
Ejects the disc. (P.13)
5. CUE/LOOP button
■CUE/LOOP MEMORY/DELETE button
Use to record cue points and loop points. (P.19)
■CUE/LOOP CALL buttons (◀, ▶)
Use to call cue points and loop points recorded. (P.19)
6. Rotary dial (SELECT PUSH |◀◀, ▶▶)
Use to select tracks in forward or reverse direction (track advance) and to select folders. (P.15)
Press to confirm folder/track selections.
7. HOLD button
Preserves the effect of the Digital Jog Break and Scratch Jog Effect. (P.16)
8. JOG MODE VINYL button
VINYL mode: The button indicator lights. When the surface of the jog dial is pressed during playback, play stops, and if the jog dial is then rotated, sound is produced in accordance with the degree of rotation.
CDJ mode: The above action does not occur when the jog dial is pressed.
●The currently set jog mode is stored in memory even when power is turned off.
9. TEMPO control range button (±6/±10/±16/WIDE)
Changes the variable range of the tempo control. (P.16)
●The tempo range will be saved in memory when the power is turned off.
10. MASTER TEMPO button/indicator
Turns the Master Tempo function ON/OFF (lights when turned ON). (P.16)
11. TEMPO control slider
Controls the track's tempo (playback speed). (P.16)
12. Jog dial (-REV/+FWD) (P.15)
A photograph or other graphic of your choice can be inserted (P.12)
13. Jog indicator
●Indicator lights when disc is inserted during normal mode, or if USB memory is selected during normal mode.
●The illumination pattern of the jog indicator can be changed.
- Changing the jog indicator's illumination pattern.
-
Hold the TEXT MODE/UTILITY MODE button depressed for one second or more to enter utility setting mode. Turn the rotary dial so that the display screen shows [JOG ILLUMI], and then press to confirm the selection. The display screen will show [PATTERN 1].
-
Turn the rotary dial to change the illumination pattern. Patterns can be chosen from PATTERN 1 to PATTERN 6.
-
Press the rotary dial to confirm. Utility setting mode will be canceled if no command is entered for 15 seconds. Pressing the BACK button will also exit the setting mode.
14. Disc loading slot
Located in front panel. (P.13)
15. Disc indicator
- When no disc is inserted, the indicator is turned off.
- When disc loading is completed, indicator turns on.
16. Forced ejection hole
Located in front panel of the unit. (P.13)
17. PLAY/PAUSE button (▶/II)
$$ (\text { 口 } P. 1 4) $$
18. PLAY/PAUSE indicator (▶/II)
Lights when playing, and flashes when in pause mode.
19. CUE button
Use to set and confirm cue point. (P.17)
20. CUE indicator
Lights when cue point is set, and flashes when in pause mode.
21. SEARCH buttons (◀◀, ▶▶)
Use to perform fast-forward and fast-reverse (with sound) during playback mode. (P.15)
22. TRACK SEARCH buttons (◀◀, ▶▶)
Changes tracks in the forward/reverse direction. (P.15)
23. Reverse button (DIRECTION REV) (P. 18)
When this button is pressed, its indicator lights and the unit is set to reverse play.
24. LOOP buttons
■IN/REALTIME CUE/HOT LOOP button/indicator
Use to input loop-in point. (IN P.18)
Use to set the current playback point as cue point. (REALTIME CUE P.17)
When pressed during loop play, returns playback to loop-in point and begins replay. (HOT LOOP P.18)
■OUT/OUT ADJUST button/indicator
Use to input loop-out point. (OUT P.18)
When pressed during loop play, adjusts loop-out point. (OUT ADJUST P.18)
■RELOOP/EXIT button
After finishing loop play, the stored loop-in/out information can be used to begin loop play again. (RELOOP P.18)
When pressed during loop play, loop play stops and playback returns to normal playback mode. (EXIT P.18)
■BEAT LOOP/LOOP DIVIDE buttons/indicator
If pressed while playing or pausing a track, the loop-end will be calculated based on the BPM (Beat Per Minute) of the track, and loop-play will then start (BEAT LOOP P.18).
Pressing the - button during loop-playback will divide the playback loop, and pressing the + button will return the playback loop to its original length (LOOP DIVIDE P.18).
During loop-playback, the button's indicator will light to indicate that the LOOP DIVIDE button is enabled.
25. SCRATCH JOG EFFECT/DIGITAL JOG BREAK buttons
The button's function changes depending on the JOG mode.
■SCRATCH JOG EFFECT buttons
Turns on/off each of the effects BUBBLE, TRANS, and WAH during VINYL mode (P.16).
■DIGITAL JOG BREAK buttons
Turns on/off each of the effects JET, ROLL, and WAH during CDJ mode (P.16).
26. SOURCE SELECT buttons
■USB select button
Select when playing files from a connected USB memory device. Each time the button is pressed, the function alternates between USB and PC.
■CD select button
Select when playing CDs or files on a CD-ROM.
27. USB port
Use to connect a USB memory device.
28. TEXT MODE/UTILITY MODE button
Changes the TEXT display (P.12)
Hold the button depressed to enter utility setting mode.
29. TIME MODE/AUTO CUE button
Switches the display between the track's elapsed time and remaining time (P.12).
Hold the button depressed to turn the auto cue function on/off (P.14).
30. Jog touch indicators
During VINYL mode, lights when the top of the jog dial is pressed.

Rear Panel
1. USB port
Use to connect a computer.
2. AUDIO OUT L, R connectors
RCA-type analog audio output jacks.
3. CONTROL connector
When the accessory control cord is used to connect this connector to the corresponding CONTROL connector on a Pioneer DJ mixer, the DJ mixer can be used to control the CD player for fader start play and back cue.
Also, by connecting this connector to the CONTROL connector on another Pioneer DJ CD player, automatic relay play can be performed. (P. 19)
4. DIGITAL OUT connector
RCA type coaxial digital output connectors used to connect a DJ mixer or AV amplifier, CD player, etc., equipped with digital input connectors. The digital outputs here support all DJ and other functions, but only audio data is output (without subcodes; CD graphics are not supported).
5. AC inlet (AC IN)
Use the accessory power cord to connect this inlet to a standard AC power outlet.
6. POWER ■ OFF/■ ON switch

Display
1. Segment display x3
Displays folder number, track number, or alphanumeric data.
2. REMAIN
Lights when the track remaining time is displayed.
3. Segment display x3
Displays time (minutes) or alphanumeric data.
4. Segment display x2
Displays time (seconds) or alphanumeric data.
5. Segment display x2
Displays time (frame) or alphanumeric data.
6. TEMPO
Displays the change rate of tempo.
7. MT
Lights when Master Tempo function is ON.
8. WIDE
Lights when the TEMPO control range button is set to WIDE.
9. ±6, ±10, ±16
Lights to display tempo range.
10. BPM
Displays the BPM of the track displayed.
11. Dot matrix display (7x5) x12
Displays text.
12. A.CUE
Lights when Auto Cue function is turned on.
13. Playing address display
Displays the current playback position in a one-track full-scale graph.
When displaying elapsed time, the graph lights from the left, and when displaying the remaining time the graph light turns off from the left.
When remaining time is less than 30 seconds, the graph flashes slowly, and when remaining time is less than 15 seconds the graph flashes rapidly.
14. MEMORY
Lights when a cue/loop point is saved.
Time display
- Press the TIME MODE button to alternate between elapsed time (TIME) and the track's remaining time (REMAIN).
●The display mode is saved when the power is turned off.
About TEXT display
Press the TEXT MODE button to switch the display between track name/album name/artist name for CD-TEXT. During MP3 playback, the display shows ID3 tag track name (if no ID3 tag is recorded, the display shows the file name) /ID3 tag album name/ ID3 tag artist name.
●Each item can display up to 48 characters of text; text longer than 10 characters is scrolled.
●Text may include alphanumerics and some symbols.
- If no text is available, the [NO TEXT] message will be displayed.
When a track name is selected in TEXT display, the [ ] icon will be displayed followed by the track name (with MP3, the ID3 tag's title name or file name will be displayed).
Also, during MP3 play, the bit rate will be displayed following the track name.
CDJ-400 [128 Kbps]
When an album name is selected in TEXT display, the [icon] will be displayed followed by the album name.
Pioneer
When an artist name is selected in TEXT display, the [icon will be displayed followed by the artist's name.
Pioneer PRO DJ
When folder search is performed with MP3, the folder name is displayed during the search.
Pioneer DJ
Removing the jog sheet
Using the furnished screwdriver, remove the two screws and the jog plate. The inner jog sheet can then be replaced with another supplied jog sheet or a graphic of your choice.
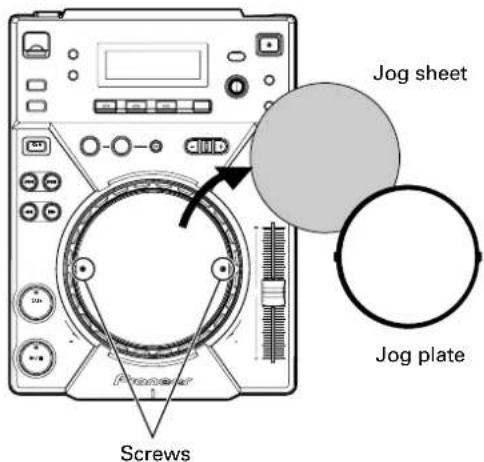
DISC LOADING/UNLOADING

1. Set the rear-panel POWER switch to ON.
Do not force a disc into the unit when the POWER switch is set to OFF as this may damage the disc and the unit.
2. Insert a disc.
●Hold the disc with label surface upwards, and insert into the front panel disc loading slot.
- Only one disc can be loaded at a time. Never attempt to load more than one disc at the same time, or attempt to load a second disc when one disc has already been loaded.
- When loading a disc, do not placing any twisting force on the disc, or try to force the disc into the slot. Also, do not attempt to interrupt or defeat the motion of the disc when the player begins to draw a disc into the slot or to eject a disc, since damage to the disc or player could occur.
3. Press the EJECT button to remove the disc.
- When the EJECT button is pressed, disc rotation stops and the disc is ejected from the loading slot.
- If the disc cannot be ejected with the EJECT button, insert a pin in the forced ejection hole on the front panel of the player.
■Canceling eject command
In the event the EJECT button is pressed by mistake, if the PLAY/PAUSE (▶/II) button is pressed immediately (before [EJECT] is displayed), the eject command will be canceled and playback will restart from the place immediately before the EJECT button was pressed (during this time, sound output will be temporarily interrupted).
CAUTION:
Do not attempt to press a disc back into the slot when the [EJECT] indicator appears. Pressing a disc back into the slot while the [EJECT] indicator appears may cause the player to stop. In this case, press the EJECT button again and wait until the [EJECT] indicator goes out before reinserting the disc.
Forced disc ejection
If the EJECT button does not function or the disc cannot be removed, pushing the pin provided into the forced ejection hole on the front panel will enable the disc to be removed.
When performing forced ejection, be sure to follow the precautions below.
① Be sure to turn OFF the power of the CD player, and check that the disc has stopped rotating. It takes about 60 seconds for the disc to stop rotating after the power has been turned OFF.
If forced ejection is performed while the disc is rotating;
●As the disc will be ejected outside the CD player rotating, it may hit your finger and cause injuries.
●As the disc will be rotating with the clamp unstable, it may be scratched.
For the above reasons, never attempt to eject the disc forcibly while it is rotating.
②Always use the pin provided (Do not use other objects). The provided pin is found in a groove in the bottom surface of the player.
When the provided forced eject pin is inserted fully into the forced eject hole on the front panel, the loaded disc is ejected about 5 mm to 10 mm from the loading slot, making it possible to remove it by hand.

DJ PLAYER OPERATIONS

Auto cue function
When a disc is loaded or track search/track change is performed, this function automatically sets the cue point (P.17) to the point immediately before the actual audio starts.
●Turning on/off
Hold down the AUTO CUE button to turn the auto cue function on. The auto cue indicator [A. CUE] in the display lights when auto cue is on. Hold down the AUTO CUE button again to turn the auto cue function off.
●The on/off of the auto cue function will still be saved when the power is turned off.
●The auto cue level can be varied.
■Changing the auto cue level
1. Hold down the TEXT MODE/UTILITY MODE button for one second or more.
Utility setting mode is enabled. Turn the rotary dial so the display screen shows [A.CUE LEVEL], then press to confirm.
The display screen will show -60dB.
2. Change the value by turning the rotary dial.
Values can be selected from -36 dB, -42 dB, -48 dB, -54 dB, -60 dB, -66 dB, -72 dB, and -78 dB.
3. Press the rotary dial to select.
Utility setting mode will be canceled if no command is entered for 15 seconds. Pressing the BACK button will also exit the setting mode.
Starting playback
1. Insert disc in the player.
- When inserting a disc, keep the label-side up, and insert only one disc into the disc loading slot located in the front panel of the unit. (P.13)
- If a CD-ROM with no MP3 file in the first session is inserted, the display will read [NO TRACK] and the CD-ROM will not be played.
- When a USB memory device is connected to the USB port, press the SOURCE SELECT button to alternate between playback from disc (CD) or files on the USB memory.
2. When Auto Cue function is ON, press the PLAY/PAUSE button (▶/II).
- Wait for the display's time display to appear before pressing the button. The non-recorded portion at the beginning of the displayed track will be skipped and playback will begin instantly. When the first track's playback ends, the player will automatically search for the beginning of the next track. The indicator on the CUE button will light, the PLAY/PAUSE button (▶/Ⅱ) indicator will flash and the player will then wait for the PLAY/PAUSE button (▶/Ⅲ) to be pressed before beginning playback of the next track.
When the Auto Cue function is turned off, playback will begin automatically from the first track.
- When Auto Cue function is turned off, playback will continue after the first track has been played, with all subsequent tracks being played in sequence.
Resume function
When the same disc is inserted after being ejected once, the disc will be restarted from the place immediately before the disc was ejected. However, the Digital Jog Break and Scratch Jog Effect functions will not be restored. If desired, the TRACK SEARCH button can be pressed before playback begins to perform normal track search and playback.
To stop playback
1. Press the EJECT button.
●Playback will stop and the disc will be ejected.
●The CDJ-400 is not provided with a conventional stop button.
- In the event the EJECT button is pressed accidentally, immediately (before [EJECT] is displayed in the display) press the PLAY/PAUSE button (▶/Ⅲ) to cancel the eject command; playback will then restart from the place immediately before the EJECT button was pressed (during this time, sound output will be temporarily interrupted).
To temporarily interrupt playback
Press the PLAY/PAUSE button (▶/II) during playback.
- The PLAY/PAUSE button (▶/Ⅲ) indicator and the CUE button indicator will flash and playback will be paused.
- When the PLAY/PAUSE button (▶/II) is pressed again, the indicator on the button will light and the playback will continue.
- In CDJ mode, broken playback sound will be output even during pause. If you wish for no sound to be output, lower the output level of the audio mixer.
●After setting the unit to pause, if no subsequent operation is performed for 100 minutes, the disc rotation will automatically stop. In this event, pressing the PLAY/PAUSE button (▶/II) will cause playback to resume. - If the [END] display is left on for 100 minutes without further player operations, the unit will stop, even if it is in the play mode.
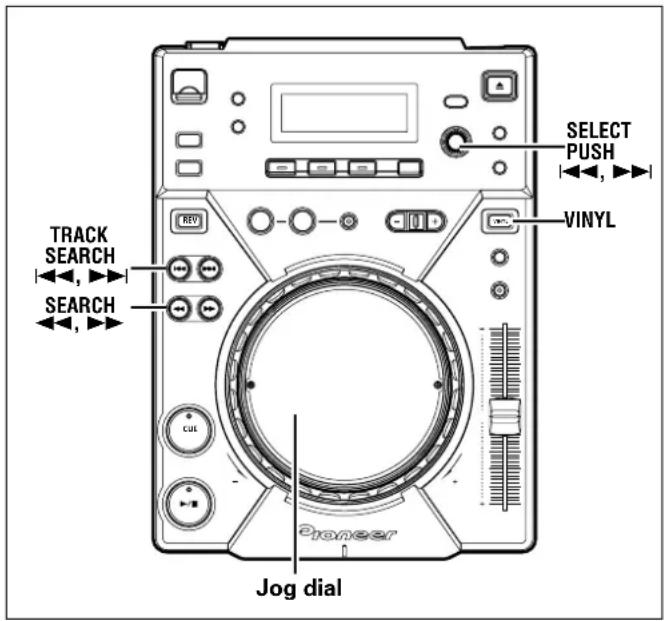
Jog dial functions
[Pitch Bend]
Rotate jog dial during playback.
When jog mode is set to [VINYL], operate the jog dial by touching only the beveled sides of the dial. Different functions are enabled if the top surface is touched.
- In proportion to the amount of rotation, the playback speed is accelerated (FWD+) or decelerated (REV-). When in the reverse mode, the playback speed accelerates when the dial is rotated in the REV- direction, and decelerates when rotated in the FWD+ direction.
- When dial rotation is stopped, playback reverts to the previous speed.
[Scratch play]
Rotate jog dial during playback.
See "Scratch play" in the ADVANCED OPERATIONS.
[Frame search]
Rotate jog dial during pause.
When jog mode is set to CDJ, the audible pause mode is enabled and when set to [VINYL], inaudible pause is performed; the audio is played at a speed corresponding to the speed of jog dial rotation.
●The pause position will change in units of one frame.
●One rotation of the jog dial corresponds to 1.8 seconds of play-back (135 frames).
[Cue point adjust]
P.17 "Changing the cue point"
[Super-Fast Search]
P.15 "Super-Fast search"
[Super-Fast track search]
P.15 "Super-Fast track search"
[Digital Jog Break]
P.16 "Digital Jog Break"
[Scratch Jog Effect]
P.16 "Scratch Jog Effect"
Fast-forward/fast-reverse
■SEARCH buttons (◀◀, ▶▶)
Press one of the SEARCH buttons (◀◀, ▶▶) during playback. Press and hold the ▶▶ button for fast forward the disc; press and hold the ◀◀ button for fast reverse.
●During playback of MP3s, fast-forward/fast-reverse are supported only for tracks inside the same folder.
■Super-Fast search
Rotate the jog dial while pressing one of the SEARCH buttons (◀◀, ▶▶).
- Hold down one of the SEARCH buttons (◀◀, ▶▶) while turning the jog dial in the desired direction to enter super-fast forward or super-fast reverse mode.
●During Super-Fast search, the search direction is determined by the direction the jog dial is turned. The direction of the pressed SEARCH button (◀◀, ▶▶) is ignored. - When the jog dial rotation stops, the unit returns to playback mode.
- When the SEARCH button (◀◀, ▶▶) is released, Super-Fast search is canceled.
●During playback of MP3s, fast-forward/fast-reverse is supported only tracks inside the same folder.
Track cueing
■TRACK SEARCH buttons (|◀◀, ▶▶)
Press one of the TRACK SEARCH buttons (|◀◀, ▶▶▶).
●Each time the button is pressed, the track is cued in the direction corresponding to the arrow on the button (during playback of a track, to cue playback to the beginning of the preceding track, press the ◄◀ button twice). During playback of MP3s, the first track found in the direction pressed will be cued, and only those tracks inside the same folder are searched.
- When the Auto Cue function is turned ON, the track will be set in cue standby position at the beginning of the track after cueing.
- When the TRACK SEARCH button (l◄◄, ►►) is held depressed, cueing is performed continuously. If the button is held depressed for two seconds or more, the cue speed increases.
- By pressing the ◀◀ button twice at the beginning of the first track (Track NO.1), the last track will be cued. During playback of MP3s, when the ◀◀ button is pressed the track with the smallest number, the last track in the same folder will be cued.
- By pressing the ▶▶ button at the last track, the first track (Track NO.1) will be cued. During playback of MP3s, when the ▶▶ button is pressed at the last track, the track with the smallest number in the same folder will be cued.
■Super-Fast track search
Rotate the jog dial while pressing one of the TRACK SEARCH buttons (|◀◀, ▶▶▶).
- By turning the jog dial in the desired search direction while pressing either of the TRACK SEARCH buttons (◀◀, ▶▶), the track number will be searched corresponding to the turning of the jog dial.
●During Super-Fast track search, the search direction is determined by the direction of rotation of the jog dial. The direction of the pressed TRACK SEARCH button (◀◀, ▶▶) is ignored. - When the TRACK SEARCH button (|◀◀, ▶▶|) is released, Super-Fast track search will be ended.
Rotary search
1. Turn the rotary dial (SELECT PUSH |◀◀, ▶▶).
●The search will move one track for each calibration unit the dial is rotated, corresponding to the direction of rotation. If the search arrives at the root directory, the folder name [ROOT] will be displayed.
- When text mode is selected, the folder name will be displayed after rotary search, followed by the folder's beginning track number and file name.
●Turn the rotary dial during playback to select tracks while the track is being played. Turn the rotary dial before inserting discs or a USB memory device to preset the track number.
2. Press the rotary dial (SELECT PUSH ◀◀, ▶▶).
●The playback of the selected track will begin. If a folder is selected, the hierarchy of that folder will be entered. Press the BACK button to return one level higher in the folder hierarchy.

Change playback speed
Sliding the TEMPO Control slider forward and back.
By sliding the lever towards you (+) increases the tempo; sliding the lever away from you (−) decreases the tempo. The center detent position is the normal speed.
●The rate of change in playback speed (tempo) is shown in the display.
●The playback speed can be changed without changing the pitch («“Applying master tempo”).
■Selecting range of tempo adjustment Press the TEMPO ±6/±10/±16/WIDE button.
Each time the button is pressed, the variable range of the TEMPO control slider alternates between ±6% , ±10% , ±16% and WIDE. The tempo can be adjusted in units of 0.02 % when set to ±6% , units of 0.05 % when set to either ±10% or ±16% , and units of 0.5 % when set to WIDE.
The variable tempo range for MP3s is ±6%/±10%/±16%.
●The set variable range will be shown in the display.
●The tempo range will be saved in memory when the power is turned off.
Applying master tempo
Press the MASTER TEMPO button during playback.
The MASTER TEMPO button and the [MT] indicator in the display will light, and the speed (tempo) can be changed using the TEMPO control slider without changing the pitch (key).
●Due to digital processing of the sound, the sound quality will drop.
●The setting will be saved in memory when the power is turned off.
Scratch Jog Effect
Press one of the SCRATCH JOG EFFECT buttons (BUBBLE, TRANS, WAH) during playback while in VINYL mode.
●The effect is produced only while scratching.
BUBBLE
Produces a bubbly sound effect, simulating the bubble scratch technique.
TRANS
Produces an effect resembling sound muted with the mixer's cross fader.
WAH
Produces an effect resembling the wah-wah pedal used for guitars.
Digital Jog Break
Press one of the DIGITAL JOG BREAK buttons (JET, ROLL, WAH) during playback while in CDJ mode.
●The selected effect will appear in the display, and the effect will change corresponding to the degree of rotation of the jog dial.
JET
Changes the delay time in response to rotation of the jog dial, and adds a short delay sound to the original, thereby causing an interference between the sounds and creating a "swooshing" effect.
●The delay time corresponds to the jog dial's rotation and changes between 0 ms (when jog dial is completely stopped) to a maximum of 3 ms.
- When removing hand from jog dial, the sound will gradually settle back into the original sound.
●The setting is canceled when the disc is ejected.
ROLL
The playback sound will be affected with pitch and playback time varied in response to the rotation of the jog dial.
- When the jog dial was touched, audio will be loop-played then rolled.
- When removing hand from jog dial, the sound will gradually settle back into the original sound.
●The setting is canceled when the disc is ejected.
●ROLL cannot be performed during reverse playback.
WAH
Adds a filter with cutoff frequency that changes in response to jog dial rotation.
●The filter changes into a high-pass filter when the jog dial is turned clockwise; the filter changes into a low-pass filter when the jog dial is turned counterclockwise.
- When removing hand from jog dial, the sound gradually settle back into the original sound.
●The setting is canceled when the disc is ejected.
[HOLD function]
Used to maintain the effect that has been created by the turning of the jog dial even after the jog dial's rotation is stopped.
Press the HOLD button during usage of Digital Jog Break or Scratch Jog Effect function.
- If you remove hand from jog dial, the effect at that point will be maintained.
- When the HOLD function is turned ON, even if another effect is selected, the setting prior to the new effect selection will be preserved in memory so long as hold is not turned off.

Cue point settings
Once a cue point has been stored in memory, it can be used during playback to set the player in the cue standby mode (ready to begin playback from the cueing position by pressing the CUE button).
■Setting the cue during CDJ mode
-
During playback, press the PLAY/PAUSE button (▶/II) to pause playback at the point you wish to set as cue point.
-
Search for the precise position of the cue point.
●Using frame numbers to specify cue points.
Cue points may be specified in one-frame units (where 75 frames are equivalent to one second).
Use the jog dial or the forward or reverse SEARCH button (◀◀, ▶▶) to advance to the desired frame. Each rotation of the jog dial corresponds to 135 frames in the specified direction; by pressing the SEARCH button (◀◀, ▶▶) frames will advance 1 frame in the specified direction. During the playback of MP3s, only files inside the same folder can be searched.
●Listening to the sound to determine the cue point.
While turning the jog dial slowly, return the track to the point immediately before the desired playback point (The cue point will be the point directly after the sound which can be heard during the cueing pause).
- Press the CUE button when the frame number or sound has reached the desired cueing point.
●The sound is muted, and the time display lights steadily when the cue point has been stored in memory.
●Each time a new cue point is stored to memory, the previous cue point will be erased.
[Changing the cue point]
- Press the CUE button during playback.
●This will take you back to the set cue point.
-
Press the SEARCH button (◀◀, ▶▶) and set to audible pause mode.
-
Go through steps 2 and 3 of "Cue Point Settings" mentioned above.
■Setting the cue during VINYL mode
■REALTIME CUE
During playback, press the IN/REALTIME CUE/HOT LOOP button at the desired cueing point.
●This point will be set as a new cue point.
■Back Cue (returning to cue point)
- Press the CUE button during playback.
●This will take you back to the set cue point.
●During the playback of MP3 files, back cue can be performed only within the same folder. As long as a new cue point is not overwritten, the cue point will be saved after folder search as well.
2. Press the PLAY/PAUSE button (▶/III).
●Playback will instantly start from the set cue point.
■Cue point sampler (confirming cue points)
After specifying a cueing point, press the CUE button in the cue standby mode.
●The sound at the specified cue point will continue to play as long as the CUE button is pressed.
●During playback of MP3s, sounds can be heard only for cue points within the same folder.
Mixing different tracks
Example: Mix track B with track A which is currently playing from the speakers.
- Connect CD1 to the DJ mixer's CH-1, and connect CD2 to CH-2.
- Raise the TRIM, CHANNEL FADER, and MASTER VOLUME settings appropriately so that sound is produced from CD1.
-
Set the DJ mixer's CROSS FADER slider at its left side (CH-1). ●Track A is heard from speakers.
-
Load a CD on player CD2.
-
Press the TRACK SEARCH buttons (◀◀, ▶▶) on player CD2 to find and select track B.
-
Operate the DJ mixer's MONITOR SELECTOR button to monitor CH-2.
-
Turn the DJ mixer's MONITOR LEVEL dial so that track B can be heard from the headphones.
●Only track A is heard from the main speakers.
- Set cueing position for track B on the headphones.
① With player CD2 in the playback mode, press the PLAY/PAUSE button (▶/■) near the desired cueing point.
●The player will enter the pause mode.
②Rotate player CD2's jog dial and search for the track's cueing point (first beat).
③ When cueing point is found, press player CD2's CUE button.
- The player's sound will be muted and cueing will be completed.
- Simultaneously press player CD2's PLAY/PAUSE button (▶/II) along with the sound of track A played from the speakers.
●Only track A will be heard from the main speakers.
●Track B will be heard from the headphones.
- Move the TEMPO control slider so that the tempo (BPM=Beat Per Minutes) of track B and A matches.
Move the TEMPO control slider of player CD2's so that the BPM of track B matches the BPM of track A.
- When the two BPM rates match, the BPM synchronization is complete.
- Press the CUE button on player CD2.
●Player CD2 will enter pause mode at the cue point.
-
Press the PLAY/PAUSE button (▶/II) of player CD2 in time with track A of player CD1 (the sound heard from speaker). ●Track B will begin playing.
-
While checking the sound on the headphones, gradually move the DJ mixer's CROSS FADER slider from left to right.
●The sound of track A from the speakers will gradually be mixed with the sound of track B.
- When the DJ mixer's CROSS FADER slider is completely moved to the right side, the sound heard from the speaker will have changed from track A to track B, and the operation is complete.
■Long Mix Play
If the BPM rates match, the mixed sound of track A and track B will not sound unnatural even if the CROSS FADER slider is placed in the middle position.
■Fader Start Play
By using the Cross Fader Start function of Pioneer DJ mixer, step 10 above can be skipped for simpler mixing.
In addition, when the CROSS FADER slider is returned to its original position, the status returns to that in step 9, so that the same play can be repeated.
ADVANCED OPERATIONS

Loop playback
■Creating a loop
- Press the PLAY/PAUSE button (▶/II) button to start play-back.
- During playback, press the IN/REALTIME CUE/HOT LOOP button at the loop-in point.
●Note that this operation is not needed if a prerecorded cue point is to be used as the start of the loop.
-
During playback, press the OUT/OUT ADJUST button at the desired loop-out point.
-
Loop playback will start between the loop-in point and loop-out point.
- By using the frame search, the loop-out point can be set in units of frames.
●During playback of MP3s, looping is only possible within one and the same track set having a cue point.
■To start loop playback with automatically set loop-out point (Auto BEAT LOOP)
Press the BEAT LOOP/LOOP DIVIDE during playback or pause mode.
●The point at which the button is pressed will be set as the loop-in point, and a loop-out point will automatically be set based on the track's BPM; loop playback will then start.
- If the numerical BPM value is not displayed, loop play will begin based on BPM=130.
■To divide loops (LOOP DIVIDE)
Press the BEAT LOOP/LOOP DIVIDE buttons during loop playback.
- Pressing the – button will divide the playback loop, and pressing the + button will return the playback loop to its original length.
■Returning to loop-in point during loop playback to start over the loop playback (HOT LOOP)
Press IN/REALTIME CUE/HOT LOOP button during loop play-back.
●Returns to loop-in point and restarts loop playback.
■To exit loop playback
Press RELOOP/EXIT button during loop playback.
●The track will continue playback in sequence from the loop out point without returning to the loop-in point.
■Changing the loop-out point
- Press the OUT/OUT ADJUST button during loop playback.
- The time of the out point is shown in the display, the OUT/OUT ADJUST button starts to flash rapidly and the IN/REALTIME CUE/HOT LOOP button indicator turns off.
- Press one of the SEARCH buttons (◀◀, ▶▶) or turn the jog dial.
●The loop-out point is moved forwards or backwards in one-frame units.
●The loop-out point cannot be moved before the loop-in point.
●During playback of MP3s, loop adjustment is only possible within one and the same track set having a cue point.
- Pressing the OUT/OUT ADJUST button or waiting 30 seconds or longer will cause the player to exit from the loop-out adjust mode and to resume loop playback.
■Returning to loop playback (RELOOP)
After loop playback has been stopped, press the RELOOP/EXIT button during playback.
- Returns to the previously set loop-in point, and restarts loop playback. If the loop is divided with loop divide, the loop will return to its original length.
●During playback of MP3s, re-looping is possible only within the same folder.
Fader start playback
The supplied control cable may be used to connect the CONTROL connector of the CDJ-400 to the matching CONTROL connector on a Pioneer DJ mixer, thus making it possible to exit from cueing standby mode and start playback immediately by raising the channel fader on the DJ mixer. The cross fader may also be used to perform fade-in starts on the player as well. The fader may also be returned to its original position to return the player to the cueing point (back cueing.) (See P.8 for instructions on connecting the units.)
Scratch play
When jog mode is set to [VINYL], pressing the top surface of the jog dial and turning it causes playback to occur in proportion to the speed and direction of jog dial rotation.
- Press the JOG MODE VINYL button so the button indicator lights.
- During playback, press the top surface of the jog dial.
●The playback will stop and become playback corresponding to the rotation of the jog dial (as explained in step 3).
- Rotate the jog dial in the direction and at the speed you wish playback to be performed.
●Playback will be heard in the direction and speed proportional to the jog dial rotation.
- Remove hand from jog dial.
●Returns to original playback.
Spin play
During playback in VINYL mode, either press the surface of the jog dial or press the PLAY/PAUSE button (▶/II) to pause playback, then rotate the jog dial quickly; playback will occur in the direction and at a speed proportional to the direction and speed of jog dial rotation, even if you then release your hand from the jog dial.
Reverse play
Press the DIRECTION REV button. The button indicator will light.
Playback will begin in the reverse direction.
●Playback acceleration/deceleration produced with jog dial rotation will operate in reverse.
●Reloop cannot be performed during reverse playback.
- Seamless reverse playback cannot be performed with loops of 15 seconds or more.
- If track search or loop play are performed, scratch/reverse operations may be temporarily disabled.
●In the case of MP3, reverse play that overlaps multiple folders is not possible.
●During MP3 play, reverse playback may not occur immediately with some tracks. (The message [Searching] may appear on the display while play time information is read into the unit before playback starts.)
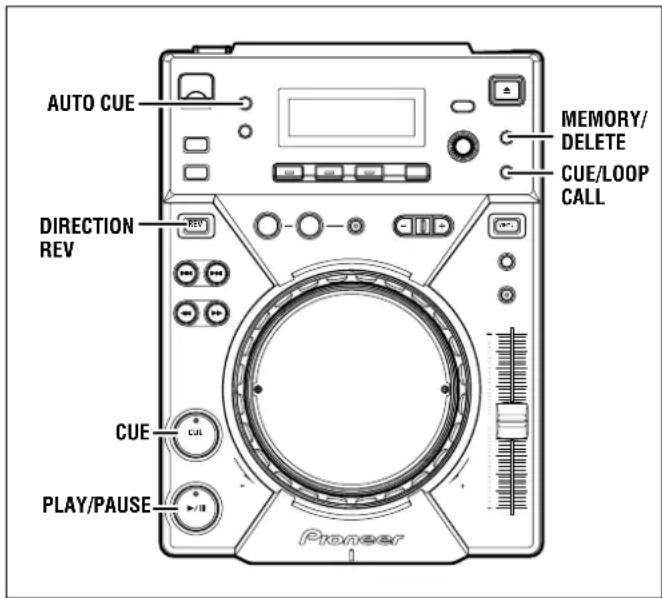
Cue point/loop point memory
The CDJ-400 is able to save cue points and loop points in memory. One cue/loop point can be saved in memory for each track.
●A single loop is composed of two points (IN/OUT).
■Recording a cue point
- Use the auto cue function or CUE button to input a cue point.
- Press the CUE/LOOP MEMORY button.
- The [MEMORY] indicator will light, showing that the cue point has been stored.
■Recording a loop point
- Set a loop-in point and loop-out point and begin loop play-back.
- During loop playback, press the CUE/LOOP MEMORY button.
- The [MEMORY] indicator will light, showing that the loop data has been stored.
■To recall a memorized cue/loop point
If a cue/loop point is saved, the [MEMORY] indicator will light.
- Press the CUE/LOOP CALL button.
- When the CALL button is pressed, the cue/loop point will be called up from memory, and the player will enter the standby mode at that point.
- Press the PLAY/PAUSE button (▶/II).
●Play/loop play will begin.
■To delete cue/loop points
- Press the CUE/LOOP CALL button.
- When the CALL button is pressed, the cue/loop point will be called up from memory, and the player will enter the standby mode at that point.
- Hold down the MEMORY/DELETE button for one second or more at the cue/loop point you wish to delete.
- The display will show the [DELETE] message, and the selected cue point or loop point data will be erased.
Relay play using two players
By using the supplied control cable to connect the CONTROL connectors of two CDJ-400, or other CDJ series CD players, relay play can be performed. P.8
- Set both players' auto cue function to ON (The [A.CUE] indicators will light in the displays.)
-
Set the DJ mixers Cross Fader control to its center position.
-
Begin playback on the first player.
-
When the currently playing track ends, playback will begin automatically on the standby player.
-
The first player will enter cue pause mode at the beginning of the next track on its disc.
-
By repeating this operation, the two players can be used to perform continuous relay play.
- By loading new discs and choosing desired tracks on the player in standby, a continuous program of selected tracks can be played.
- By setting a cue point on the standby player, a relay of any desired cue point of the selected track can be performed. P.17 "Cue Point Settings"
Note:
●Relay play may not operate properly if the AUDIO OUT jacks on the two players are not connected to the same DJ mixer.
- If the power to one player is turned off during its playback, the other player may begin playback.
●Fader start and relay play cannot be performed simultaneously, since different control cord connections are required.
Writing and reading data
Using a USB memory device, data (cue/loop points) saved from the CDJ-400 can be copied to other players.
■Writing data to USB memory devices
- With no USB memory device or discs inserted into the player, hold the OUT/OUT ADJUST button depressed for five seconds or more.
The OUT/OUT ADJUST button will light, and [WRITE MODE] will appear in the display.
- Connect a USB memory device, and press PLAY/PAUSE once the USB MEMORY indicator lights.
The playing address section will begin to light, and data will begin writing to the USB memory device. Once the writing of data finishes, [END] will appear in the display, and the unit will return to the regular operating mode.
- If [ERROR] appears in the display, the data writing has not been completed properly. Turn the unit's power off then on again, and restart the process from step 1.
●Any data in the USB device will be overwritten, so all previously saved data on the device will be lost.
■Reading data from a USB memory device
- With no USB memory device connected or disc inserted, hold the IN/REALTIME CUE/HOT LOOP button depressed for five seconds or more.
The IN/REALTIME CUE/HOT LOOP button will light, and [READ MODE] will appear in the display.
- Connect the USB memory device, and press PLAY/PAUSE once the USB MEMORY indicator lights.
The playing address section will begin to light, and data read-in will begin. Once all data has been read, [END] will appear in the display, and the unit will return to normal operation mode.
- If [ERROR] appears in the display, the reading of data has not been properly completed. Turn the unit's power off then on again, and restart the process from step 1.
* Any data within the CDJ-400 will be overwritten, so all previously saved data will be lost.
MIDI SETTING
MIDI (Musical Instrument Digital Interface) is a unified standard for data exchange between electronic instruments and computers. By selecting the computer with the SOURCE SELECT button, the CDJ-400 is able to send its operating information to applications supporting USB MIDI.
Setting the MIDI channel
Set and save the MIDI channel (1 to 16).
- Hold the TEXT MODE/UTILITY MODE button depressed for one second or more to enter the utility setting mode.
Turn the rotary dial so that the display screen shows [MIDI CH], then press to confirm.
The display screen will show [CH 1] (if factory default has not been changed).
- Change the channel by turning the rotary dial.
Channels can be selected from [CH 1] to [CH 16].
- Press the rotary dial to confirm the selection.
Utility setting mode will be canceled if no command is entered for 15 seconds. Pressing the BACK button will also exit this mode.
| SW Name | SW Type | MIDI Message | Remarks | ||
| JOG (TOUCH) | General Purpose Controller | Bn | 10 | dd | Linear value for speeds between stop to x4 speed, 64 at stop, FWD (CW) direction: 65 (x0.06 speed) to 127 (x4 speed). REV (CCW) direction: 63 (x0.06 speed) to 0 (x4 speed). |
| TEMPO SLIDER | VR | Bn | 1D | dd | 0-127 0 at - side, 127 at + side, 64 at center. |
| JOG RING | General Purpose Controller | Bn | 30 | dd | Linear value for speeds between x0.5 to x4. 64 at stop (below x0.49 speed), FWD (CW) direction: 65 (x0.5 speed) to 127 (x4 speed). REV (CCW) direction: 63 (x0.5 speed) to 0 (x4 speed). |
| ENCODER | General Purpose Controller | Bn | 4F | dd | Transfers differential count value from previous time. 64 with no difference. In CW direction: 64 + change amount (Max 127), CCW direction: 64 - change amount (Min 0). |
| PLAY/PAUSE | SW | 9n | 00 | dd | OFF=0, ON=127 |
| CUE | SW | 9n | 01 | dd | OFF=0, ON=127 |
| SEARCH FWD | SW | 9n | 02 | dd | OFF=0, ON=127 |
| SEARCH REV | SW | 9n | 03 | dd | OFF=0, ON=127 |
| TRACK SEARCH Next | SW | 9n | 04 | dd | OFF=0, ON=127 |
| TRACK SEARCH Prev | SW | 9n | 05 | dd | OFF=0, ON=127 |
| LOOP IN | SW | 9n | 06 | dd | OFF=0, ON=127 |
| LOOP OUT | SW | 9n | 07 | dd | OFF=0, ON=127 |
| RELOOP | SW | 9n | 08 | dd | OFF=0, ON=127 |
| MEMORY | SW | 9n | 0A | dd | OFF=0, ON=127 |
| CALL | SW | 9n | 0B | dd | OFF=0, ON=127 |
| TIME/A.CUE | SW | 9n | 0E | dd | OFF=0, ON=127 |
| TEXT | SW | 9n | 0F | dd | OFF=0, ON=127 |
| TEMPO RANGE | SW | 9n | 10 | dd | OFF=0, ON=127 |
| MT | SW | 9n | 11 | dd | OFF=0, ON=127 |
| JOG MODE (VINYL) | SW | 9n | 12 | dd | OFF=0, ON=127 |
| LOOP DEVIDE + | SW | 9n | 16 | dd | OFF=0, ON=127 |
| LOOP DEVIDE - | SW | 9n | 17 | dd | OFF=0, ON=127 |
| JOG TOUCH | SW | 9n | 20 | dd | OFF=0, ON=127 |
| REVERSE | SW | 9n | 21 | dd | OFF=0, ON=127 |
| HOLD | SW | 9n | 22 | dd | OFF=0, ON=127 |
| WAH | SW | 9n | 23 | dd | OFF=0, ON=127 |
| TRANS/ROLL | SW | 9n | 24 | dd | OFF=0, ON=127 |
| BUBBLE/JET | SW | 9n | 25 | dd | OFF=0, ON=127 |
| EJECT | SW | 9n | 2F | dd | OFF=0, ON=127 |
| BACK | SW | 9n | 32 | dd | OFF=0, ON=127 |
| ENCODER PUSH | SW | 9n | 33 | dd | OFF=0, ON=127 |
TROUBLESHOOTING
Incorrect operations can be mistaken as malfunctions. If you believe the unit is not operating correctly, consult the chart below. Sometimes incorrect operation may be due to a malfunction in another component. If the problem is not fixed, check the other components used with the player. If the problem still persists, contact your nearest Pioneer authorized service center or dealer for service.
| Symptom | Cause | Remedy |
| Disc doesn't eject even when EJECT button is pressed. | ●Power plug is disconnected from outlet. | ●Connect plug to wall outlet. |
| Play doesn't commence even when the disc is inserted. | ●The auto cue function is set to on. | ●Press the AUTO CUE button to turn off the Auto Cue function. |
| Playback immediately stops when started. During playback, the player pauses or stops. | ●Smudges on the disc, etc. | ●Clean the smudges from the disc and then play it again. |
| Cannot playback MP3s. | ●The files are in the wrong format. | ●P.5 "Playing MP3 Files." |
| Cannot search MP3s. | ●Attempted to search (fast-forward/fast-reverse) MP3s into a different folder. | ●Track searching with MP3s are only possible within the same folder. |
| No sound is audible. | ●Output cables are connected incorrectly or are loose. | ●Recheck connections. Refer to installation instructions. (P. 8, 9) |
| ●Incorrect operation of DJ mixer. | ●Check the settings of the DJ mixer switches and sound volume controls. | |
| ●Pin plugs and/or amplifier terminals are dirty. | ●Clean away dirt. | |
| ●Player is in pause mode. | ●Press the PLAY/PAUSE button (I/II). | |
| Sound is distorted, noise is output. | ●Incorrect connections. | ●Connect to audio mixer's LINE INPUT terminals. (Do not connect to MIC terminals.) |
| ●Pin plugs and/or amplifier terminals are dirty. | ●Clean away dirt. | |
| ●Interference is being picked up from a TV set. | ●Switch OFF TV set, move player away from TV set or plug the player into a separate outlet. | |
| With certain discs, loud noise is produced or play stops. | ●Disc has a bad scratch or warp. | ●Replace disc. |
| ●Disc is extremely dirty. | ●Clean disc. | |
| When the auto cue function is set ON, track search is not finished. | ●If the sound muted portion between selections is long, searching time will be long. | ●Press the AUTO CUE button to turn off the Auto Cue function. |
| ●If the point cannot be found within 10 seconds, the cue point is set at the track's beginning. | ||
| Back cue function cannot be carried out even though the CUE button is pressed in playback mode. | ●The cue point is not set yet. | ●Set the cue point. (P. 17) |
| ●The cue point is set to an MP3 file in a different folder. | ●During playback of MP3s, back cue is possible only within the same folder. | |
| Pressing the OUT/OUT ADJUST button does not start loop play. | ●No cue points (loop-in points) have been set. | ●Set a cue point. (P. 17) |
| ●In the case of MP3, loop cannot be performed if no loop-in point is located within the currently playing track. | ●During playback of MP3s, looping is possible only within the same track that has a cue point (loop-in point) set. | |
| The jog dial does not operate as desired. | ●Incorrect jog mode (VINYL/CDJ) is set. | ●Press the JOG MODE VINYL button to set the desired jog mode (VINYL or CDJ). |
| The picture of the TV screen is fluctuated or FM broadcast is interfered with noise. | ●Interference is being picked up from the CD player. | ●Turn off POWER switch of the player, or move the player away from the TV or tuner. |
| The disc is not rotating when power is ON. | ●The disc rotation stops automatically if no operation has been performed for 100 minutes or more in pause mode. | ●Playback can be started from the first track by pressing the PLAY/PAUSE button (I/II). Press the EJECT button to eject the disc. |
- Static electricity and other external effects may cause this unit to malfunction. In this case, set the POWER switch to OFF, then switch it on again after the disc has come to a complete stop.
●This unit cannot playback unfinalized (partial discs) CD-R or CD-RW discs. - Irregularly shaped discs cannot be played on the CDJ-400 (as it may result in breakage or accidents). Please use only standard circular 12 cm discs.
- The BPM value measured by the CDJ-400 may differ from the BPM value recorded on a CD or from our DJ mixer, but this difference is a result of differences in the BPM value measurement method; not a result of a fault with the player.
- When playing CD-R/RW discs, the performance rate may drop due to quality of the recorded data.
Error message display
When the CDJ-400 CD player is unable to operate properly, an error code is displayed on the display panel. Check the error code displayed against the following table and take the recommended action to correct the error. If an error code other than any of the error codes listed in the table below is displayed or if the same error code is displayed even after corrective action has been taken, contact your nearest Pioneer Service Station or contact the store from which you purchased your player for assistance.
| Error Code | Error Type | Description | Possible cause and recommended action |
| E-72 01 | TOC READ ERROR | Player unable to read TOC data. | Disc is cracked.→Recommended action: replace disc. |
| E-83 01E-83 02E-83 03 | PLAYER ERROR | Disc is rotating, but rotation cannot be ascertained.Player unable to play back currently inserted disc. | Disc is soiled or dirty.→Recommended action: clean disc.If other discs play normally, the problem is with the disc itself. |
| E-83 04 | MP3 DECODE ERROR | The disc loaded cannot be played properly. | The disc format does not conform to MP3.→Change to disc conforming to MP3 format. |
| E-83 05 | DATA FORMAT ERROR | ||
| E-91 01 | MECHANICAL TIME OUT | Mechanical operation has failed to complete within specified time interval. | Dust or some other form of foreign particles have found their way into disc insertion slot.→Recommended action: remove dust or other foreign particles. |
SPECIFICATIONS
1. General
System.... Compact disc digital audio system
Power requirements ...... AC 220 V to 240 V, 50 Hz/60 Hz
Power consumption 19 W
Operating temperature ....+5°C to +35°C
Operating humidity ..... 5 % to 85 % (without condensation)
Weight 2.7 kg
Dimensions ....217.9 mm (W) × 107.5 mm (H) × 296.3 mm (D)
2. Audio section
Frequency response 4 Hz to 20 kHz
Signal-to-noise ratio 115 dB or more (JEITA)
Distortion 0.006% (JEITA)
3. Accessories
- Operating instructions.... 1
- Power cord.... 1
- Audio cable .... 1
- Control cable.... 1
- Forced eject pin
(housed in a groove in the bottom panel) .... 1
●Screwdriver (housed in a groove in the bottom panel) .... 1 - Jog sheets (for replacing) 3
NOTE:
Specifications and design are subject to possible modification without notice.
CLASS 1 LASER PRODUCT APPAREIL Á LASER DE CLASSE 1
CAUTION
ATTENTION
ADVARSEL
WARNING
CLASS 3B INVISIBLE LASER RADIATION WHEN OPEN, AVOID EXPOSURE TO BEAML RADIATIONS LASER INVISIBLES DE CLASSE 3B OUAND OUVERT. ÉVITEZ TOUT EXPOSITION AU FAISCEALL. KLASSE 3B USYNLIG LASERSTRALING VED ABNING. UNDGA UDGÄTTEELSE FOR STRALING. KLASS 3B OSYNLIG LASERSTRALING NÄR DENNA DEL ÄR ÖPPNAD. UNDIVIK ATT UTSÄTÄ DİG FÖR STRÄLEN.
VORSICHT
PRECAUCIAÓN
VARO!
BEI GEÖFFNETER ABDECKUNG IST UNSICHTBARE LASERSTRAHLUNG DER KLASSE 3B IM GERÄTEINNEREN VORHANDEN. NICHT DEM LASERSTRAHLAUSSETZEN! CUANDO SE ABRE HAY RADIACIÓN LÄSER DE CLASE 3B INVISIBLE. EVITE LA EXPOSICIÓN A LOS RAYOS LASER. AVATTAESSA OLET ALTINA NÄKYMÄTTÖMÄLLE LUOKAN 3B LASERSÄTEILYLLE. ÄLA KATSO SÄTEEESEN.
DRW2308-A
D3-4-2-1-8_B_Fr
CLASS 1 LASER PRODUCT APPAREIL Á LASER DE CLASSE 1
CAUTION
ATTENTION
CLASS 3B INVISIBLE LASER RADIATION WHEN OPEN, AVOID EXPOSURE TO BEAML
RADIATIONS LASER INVISIBLES DE CLASSE 3B QUAND OUVERT. ÉVITEZ TOUT EXPOSITION AU FAISCEAU.
ADVARSEL
KLASSE 3B USYNLIG LASERSTRÅLING VED ÅBNING. UNDGÅ UDSÆTTELSE FOR STRÅLING.
WARNING
KLASS 3B OSYNLIG LASERSTRÄLNING NÄR DENNA DEL ÄR ÖPPNAD. UNDVIK ATT UTSÄTTA DIG FÖR STRÄLEN.
VORSICHT
DER KLASSE SD IMIGERATENNEREN VORHÄNDEN, NICHT DEM LASERSTRAHLAUSSETZEN!
PRECAUCIAÓN
DÉMARCHES ÉVOLUÉES 58
Lecture inversée ....60
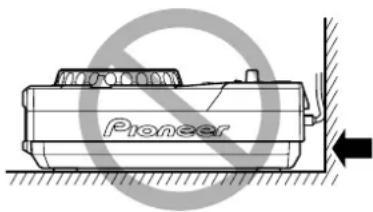
10. Bouton/voyant MASTER TEMPO
■Bouton/voyant IN/REAL TIME CUE/HOT LOOP
■Bouton/voyant OUT/OUT ADJUST
Affichage
14. MEMORY-Anzeige
Publication de Pioneer Corporation.
© 2007 Pioneer Corporation.
CLASS 1 LASER PRODUCT APPAREIL Á LASER DE CLASSE 1
CAUTION
ATTENTION
ADVARSEL
WARNING
CLASS 3B INVISIBLE LASER RADIATION WHEN OPEN, AVOID EXPOSURE TO BEAM. RADIATIONS LASER INVISIBLES DE CLASSE 3B QUAND OUVERT. ÉVITEZ TOUT EXPOSITION AU FAISCEAU. KLASSE 3B USYNUG LASERSTRALING VED ABNING. UNDGÀ UDSSETTELSE FOR STRALING. KLASS 3B OSYNUG LASERSTRALING NÄR DENNA DEL ÄR ÖPPNAD. UNDIVK. ATT UTSÄTTA DIG FÖR STRÄLEN.
VORSICHT
PRECAUCIAÓN
VARO!
BEI GEÖFFNETER ABDECKUNG IST UNSICHTBARE LASERSTRAHLUNG DER KLASSE 3B IM GERÄTENNEREN VORHANDEN. NICHT DEM LASERSTRAHLAUSSETZEN!
CLASS 1 LASER PRODUCT APPAREIL Á LASER DE CLASSE 1
CAUTION
ATTENTION
ADVARSEL
WARNING
CLASS 3B INVISIBLE LASER RADIATION
WHEN OPEN, AVOID EXPOSURE TO BEAM
RADIATIONS LASER INVISIBLES DE CLASSE 3B QUAND
KLASSE 3B USYNLIG LASERSTRÅLING VED ÅBNING.
UNDGÅ UDSÆTTELSE FOR STRÅLING.
KLASS 38 OSYNLIG LASERSTRÄLNING NÄR DENNA DEL ÄR ÖPPNAD, UNDVIK ATT UTSÄTTA DIG FÖR STRÅLEN.
VORSICHT
PRECAUCIAÓN
VARO!
WAARSCHUWING NETSNOER
ACHTERWAARTSE WEERGAVE
DISCS DIE MET DIT APPARAAT
GEBRUIKT KUNNEN WORDEN 78
BEHANDELING VAN DE CD-SPELER 81
AANSLUITINGEN 82
BEDIENINGSORGANEN 86
BEDIENING
PLAATSEN/UITNEMEN VAN DE CD 93
BEDIENING VAN DE DJ-SPELER 94
Auto Cue function.... 94
natural_image
Illustration showing hand holding a disc with no symbols, including a crossed-out circle and prohibition signs (no text or labels)BEHANDELING VAN DE CD-SPELER
Opstelling
Display
1. Display a segmenti x 3
9. ±6, ±10, ±16 indicators
Copyright © 2007 Pioneer Corporation.
CLASS 3B INVISIBLE LASER RADIATION WHEN OPEN, AVOID EXPOSURE TO BEAM.
ATTENTION
RADIATIONS LASER INVISIBLES DE CLASSE 3B QUAND OUVERT. ÉVITEZ TOUT EXPOSITION AU FAISCEAU.
ADVARSEL
KLASSE 3B USYNLIG LASERSTRALING VED ABNING. UNDGA UDSÄETTELSE FOR STRALING.
WARNING
KLASS 3B OSYNLIG LASERSTRALNING NÄR DENNA DEL ÄR ÖPPNAD, UNDVIK ATT UTSÄTTADIG FÖR STRÅLEN.
VORSICHT
BEI GEÖFFNETER ABDECKUNG IST UNSICHTBARE LASERSTRAHLUNG DER KLASSE 3B IM GERÄTENNEREN VORHANDEN NICHT DEM LASERSTRAHLAUSSETZEN!
PRECAUCIAON
CLASS 1 LASER PRODUCT APPAREIL Á LASER DE CLASSE 1
CAUTION
CLASS 3B INVISIBLE LASER RADIATION WHEN OPEN, AVOID EXPOSURE TO BEAM
ATTENTION
RADIATIONS LASER INVISIBLES DE CLASSE 3B QUAND OUVERT. ÉVITEZ TOUT EXPOSITION AU FAISCEAU.
ADVARSEL
KLASSE 3B USYNLIG LASERSTRÁLING VED ÁBNING. UNDGÁ UDSÆTTELSE FOR STRÁLING.
WARNING
KLASS 3B OSYNLIG LASERSTRÄLNING NÄR DENNA DEL ÄR ÖPPNAD. UNDVIK ATT UTSÄTTA DIG FÖR STRÄLEN.
VORSICHT
BEI GEÖFFNETER ABDECKUNG IST UNSICHTBARE LASERSTRAHLUNG DER KLASSE 3B IM GERÄTEINNEREN VORHANDEN NICHT DEM LASERSTRAHLAUSSETZEN!
PRECAUCIAON
BUCLE CONTINUO EN TIEMPO REAL
natural_image
Illustration showing four different hand positions: one with a circular object, one with a disc marked by a prohibition symbol (no text or labels present)Visualizador
Control deslizable del TEMPO/Ползунковый регулятор TEMPO [Темп]
Copyright © 2007 Pioneer Corporation.
Издано Pioneer Corporation.
© Pioneer Corporation, 2007.
Все права защищены.
Ru
Supply of this product only conveys a license for private, non-commercial use and does not convey a license nor imply any right to use this product in any commercial (i.e. revenue-generating) real time broadcasting (terrestrial, satellite, cable and/or any other media), broadcasting/streaming via internet, intranets and/or other networks or in other electronic content distribution systems, such as pay-audio or audio-on-demand applications. An independent license for such use is required. For details, please visit http://www.mp3licensing.com.

Fraunhofer
MPEG Layer-3 audio coding technology licensed from Fraunhofer IIS and Thomson multimedia.
Published by Pioneer Corporation.
Copyright © 2007 Pioneer Corporation
All rights reserved.


- IMPORTANT
- CAUTION
- RISK OF ELECTRIC SHOCK DO NOT OPEN
- CAUTION:
- IMPORTANT: THE MOULDED PLUG
- If the fitted moulded plug is unsuitable for your socket outlet, then the fuse shall be removed and the plug cut off and disposed of safely. There is a danger of severe electrical shock if the cut off plug is inserted into any 13 amp socket.
- CLASS 1
- LASER PRODUCT APPAREIL Á LASER DE CLASSE 1
- ATTENTION
- ADVARSEL
- WARNING
- VORSICHT
- PRECAUCIAÓN
- Operating Environment
- VENTILATION CAUTION
- POWER-CORD CAUTION
- FEATURES
- SCRATCH JOG EFFECT
- DIGITAL JOG BREAK
- JOG DIAL
- ■PITCH BEND
- ■SCRATCH PLAY
- ■FRAME SEARCH
- SUPER-FAST SEARCH
- TEMPO CONTROL
- ■TEMPO CONTROL RANGE
- ■MASTER TEMPO
- REVERSE PLAY
- CUE
- ■BACK CUE
- ■AUTO CUE
- ■CUE POINT SAMPLER
- CUE/LOOP MEMORY
- REAL TIME SEAMLESS LOOP
- RELOOP
- BEAT LOOP/LOOP DIVIDE
- PLAYING ADDRESS
- FADER START
- RELAY PLAY
- OIL DAMPER FLOAT
- MULTI READ
- MP3 DJ PLAY
- PC CONNECTION
- Disclaimer
- CONTENTS
- BEFORE OPERATING
- OPERATIONS
- OTHER
- DISCS USABLE WITH THIS UNIT
- Types of discs playable on this unit
- Note 1) Regarding TEXT display:
- Note 2) CD-R/CD-RW discs:
- Notes:
- ■Regarding CD-R/RW discs
- ■About DualDisc playback
- Playing MP3 files
- ■Playing Tracks from USB memory
- ■To disconnect a USB memory device
- ■About CD-ROM playback
- CAUTIONS REGARDING HANDLING
- Location
- Installation Guidelines
- Cleaning the Player
- CD Lens Cleaner
- Storing Discs
- Condensation
- Cleaning and Handling Compact Discs
- Do not play a CD with a special shape
- CONNECTIONS
- Connection to a Pioneer DJ mixer (audio output and CONTROL connector)
- Connecting control cable for relay play
- Connecting to other devices
- Connecting the power cord
- PANEL FACILITIES
- POWER switch (OFF/ ON)
- Display (P.12)
- Folder BACK button
- EJECT button
- CUE/LOOP button
- ■CUE/LOOP MEMORY/DELETE button
- ■CUE/LOOP CALL buttons (◀, ▶)
- Rotary dial (SELECT PUSH |◀◀, ▶▶)
- HOLD button
- JOG MODE VINYL button
- TEMPO control range button (±6/±10/±16/WIDE)
- MASTER TEMPO button/indicator
- TEMPO control slider
- Jog dial (-REV/+FWD) (P.15)
- Jog indicator
- - Changing the jog indicator's illumination pattern.
- Disc loading slot
- Disc indicator
- Forced ejection hole
- PLAY/PAUSE button (▶/II)
- PLAY/PAUSE indicator (▶/II)
- CUE button
- CUE indicator
- SEARCH buttons (◀◀, ▶▶)
- TRACK SEARCH buttons (◀◀, ▶▶)
- Reverse button (DIRECTION REV) (P. 18)
- LOOP buttons
- ■IN/REALTIME CUE/HOT LOOP button/indicator
- ■OUT/OUT ADJUST button/indicator
- ■RELOOP/EXIT button
- ■BEAT LOOP/LOOP DIVIDE buttons/indicator
- SCRATCH JOG EFFECT/DIGITAL JOG BREAK buttons
- ■SCRATCH JOG EFFECT buttons
- ■DIGITAL JOG BREAK buttons
- SOURCE SELECT buttons
- ■USB select button
- ■CD select button
- USB port
- TEXT MODE/UTILITY MODE button
- TIME MODE/AUTO CUE button
- Jog touch indicators
- Rear Panel
- USB port
- AUDIO OUT L, R connectors
- CONTROL connector
- DIGITAL OUT connector
- AC inlet (AC IN)
- POWER ■ OFF/■ ON switch
- Display
- Segment display x3
- REMAIN
- Segment display x3
- Segment display x2
- Segment display x2
- TEMPO
- MT
- WIDE
- ±6, ±10, ±16
- BPM
- Dot matrix display (7x5) x12
- A.CUE
- Playing address display
- MEMORY
- Time display
- About TEXT display
- Removing the jog sheet
- DISC LOADING/UNLOADING
- Set the rear-panel POWER switch to ON.
- Insert a disc.
- Press the EJECT button to remove the disc.
- ■Canceling eject command
- Forced disc ejection
- If forced ejection is performed while the disc is rotating;
- DJ PLAYER OPERATIONS
- Auto cue function
- ●Turning on/off
- ■Changing the auto cue level
- Hold down the TEXT MODE/UTILITY MODE button for one second or more.
- Change the value by turning the rotary dial.
- Press the rotary dial to select.
- Starting playback
- Insert disc in the player.
- When Auto Cue function is ON, press the PLAY/PAUSE button (▶/II).
- When the Auto Cue function is turned off, playback will begin automatically from the first track.
- Resume function
- To stop playback
- Press the EJECT button.
- To temporarily interrupt playback
- Press the PLAY/PAUSE button (▶/II) during playback.
- Jog dial functions
- [Pitch Bend]
- Rotate jog dial during playback.
- [Scratch play]
- [Frame search]
- Rotate jog dial during pause.
- [Cue point adjust]
- [Super-Fast Search]
- [Super-Fast track search]
- [Digital Jog Break]
- [Scratch Jog Effect]
- Fast-forward/fast-reverse
- ■SEARCH buttons (◀◀, ▶▶)
- ■Super-Fast search
- Track cueing
- ■TRACK SEARCH buttons (|◀◀, ▶▶)
- ■Super-Fast track search
- Rotary search
- Turn the rotary dial (SELECT PUSH |◀◀, ▶▶).
- Press the rotary dial (SELECT PUSH ◀◀, ▶▶).
- Change playback speed
- Sliding the TEMPO Control slider forward and back.
- ■Selecting range of tempo adjustment Press the TEMPO ±6/±10/±16/WIDE button.
- Applying master tempo
- Press the MASTER TEMPO button during playback.
- BUBBLE
- TRANS
- WAH
- JET
- ROLL
- [HOLD function]
- Cue point settings
- ■Setting the cue during CDJ mode
- [Changing the cue point]
- ■Setting the cue during VINYL mode
- ■Back Cue (returning to cue point)
- Press the PLAY/PAUSE button (▶/III).
- ■Cue point sampler (confirming cue points)
- Mixing different tracks
- ■Long Mix Play
- ■Fader Start Play
- ADVANCED OPERATIONS
- Loop playback
- ■Creating a loop
- ■To start loop playback with automatically set loop-out point (Auto BEAT LOOP)
- ■To divide loops (LOOP DIVIDE)
- ■Returning to loop-in point during loop playback to start over the loop playback (HOT LOOP)
- ■To exit loop playback
- ■Changing the loop-out point
- ■Returning to loop playback (RELOOP)
- Fader start playback
- Scratch play
- Spin play
- Cue point/loop point memory
- ■Recording a cue point
- ■Recording a loop point
- ■To recall a memorized cue/loop point
- ■To delete cue/loop points
- Relay play using two players
- Note:
- Writing and reading data
- ■Writing data to USB memory devices
- ■Reading data from a USB memory device
- MIDI SETTING
- Setting the MIDI channel
- TROUBLESHOOTING
- Error message display
- SPECIFICATIONS
- General
- Audio section
- Accessories
- CLASS 1 LASER PRODUCT APPAREIL Á LASER DE CLASSE 1
- VARO!
- Bouton/voyant MASTER TEMPO
- ■Bouton/voyant IN/REAL TIME CUE/HOT LOOP
- ■Bouton/voyant OUT/OUT ADJUST
- Affichage
- MEMORY-Anzeige
- WAARSCHUWING NETSNOER
- ACHTERWAARTSE WEERGAVE
- BEDIENING
- BEHANDELING VAN DE CD-SPELER
- Opstelling
- Display a segmenti x 3
- ±6, ±10, ±16 indicators
- PRECAUCIAON
- BUCLE CONTINUO EN TIEMPO REAL
- Visualizador
- Fraunhofer
Brand : PIONEER
Model : CDJ-400
Category : DJ Equipment