
CRM1042 - Compressor Ferm - Free user manual and instructions
Find the device manual for free CRM1042 Ferm in PDF.


| Product type | Air compressor |
| Brand | Ferm |
| Model | CRM1042 |
| Power supply | 230 V ~ 50 Hz |
| Motor power | 1.5 HP (1100 W) |
| Maximum pressure | 8 bar |
| Theoretical air flow | 180 L/min |
| Effective flow at 5 bar | 90 L/min |
| Tank capacity | 24 L |
| Number of cylinders | 1 |
| Lubrication type | Oil-free (low maintenance) |
| Dimensions (L x W x H) | 50 x 30 x 50 cm |
| Net weight | 15 kg |
| Noise level | 97 dB(A) |
| Main functions | Tire inflation, use of paint spray guns, nail guns, staple guns, stripping |
| Maintenance and cleaning | Drain the condensate from the tank after each use, clean the intake filter regularly, check the hoses |
| Safety | Integrated safety valve, automatic shut-off at max pressure, motor thermal protection |
| Spare parts and repairability | Parts available from Ferm after-sales service, repairability index calculated according to French regulations |
| General information | 2-year warranty, portable compressor with transport handle |
Frequently Asked Questions - CRM1042 Ferm
User questions about CRM1042 Ferm
0 question about this device. Answer the ones you know or ask your own.
Ask a new question about this device
Download the instructions for your Compressor in PDF format for free! Find your manual CRM1042 - Ferm and take your electronic device back in hand. On this page are published all the documents necessary for the use of your device. CRM1042 by Ferm.
USER MANUAL CRM1042 Ferm
natural_image
Ferm air compressor with visible branding and control panel (no readable text beyond brand name)EN Original instructions 05
DE Übersetzung der Originalbetriebsanleitung 09
NL Vertaling van de oorspronkelijke gebruiksaanwijzing 14
FR Traduction de la notice originale 19
ES Traducción del manual original 23
HU Eredeti használati utasítás fordítása 28

Fig. A
natural_image
Line drawing of a person handling an open cardboard box (no text or symbols)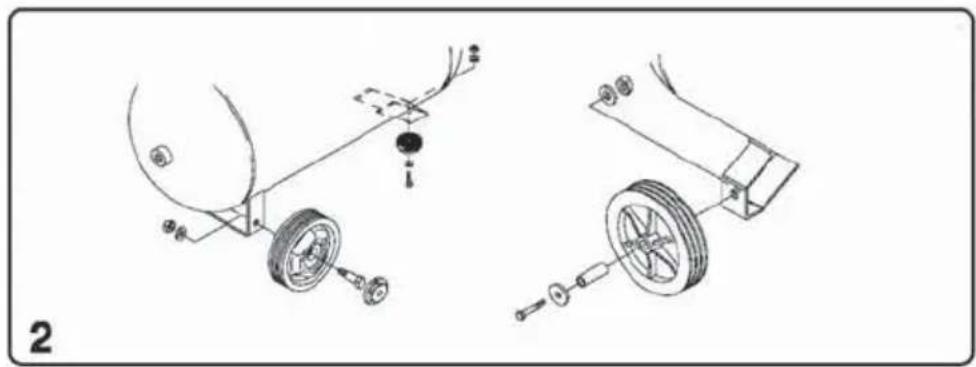
natural_image
Technical line drawing of two vehicle chassis components with wheels and suspension parts (no text or symbols)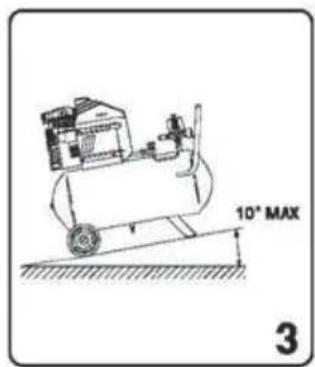

natural_image
Technical line drawing of an air compressor inside a brick wall, with no visible text or symbols
natural_image
Technical line drawings of a portable air lift and a forklift (no text or symbols)
natural_image
Line drawing of a person standing beside a wheeled cart on a horizontal surface (no text or symbols)
natural_image
Illustration of a hand holding a screwdriver next to an electrical outlet (no text or symbols)
natural_image
Illustration of a hand operating a pressure regulator device with valve and adjustment knob (no text or symbols)


natural_image
Exploded view diagram of a mechanical assembly showing internal components and housing (no text or labels)
natural_image
Line drawing of an air compressor with wheels and a small inset icon (no text or symbols)
natural_image
Illustration of a person standing near a vehicle with a cross symbol, next to a small dog (no text or symbols present)
natural_image
Line drawing of a person's face with a mask, labeled with number 21 (no text or symbols in the drawing itself)COMPRESSOR
The numbers in the following text correspond with the pictures at page 1 - 4.

Read the operating instructions carefully before using this device. Familiarise yourself with its functions and basic operation. Service the device as per the instructions to ensure that it always functions properly. The operating instructions and the accompanying documentation must be kept in the vicinity of the device.
Contents
- Machine details
- Safety instructions
- Use
- Maintenance
1. Machine details
Technical specifications
| Voltage | 230 |
| Frequency | 50 |
| Capacity 1.5 hp (1100 W) | |
| Idling speed 2850/min | |
| IP Class IP 20 | |
| Tank contents 24litre | |
| Air intake 161 l/min | |
| Max. outlet pressure 8.0 Bar | |
| Weight | 22.7 |
| Sound power level 93.0 dB (A) |
The value of the noise level may rise from 1 to 10 dB(A) as a function of the environment in which the compressor will be installed.
Product information
Fig. A
1 Cover
2. Handle
3. Switch button
4. Automatic stop switch
5. Pressure regulator
6. Quick coupler (outlet)
7. Quick coupler (outlet regulated pressure)
8. Pressure gauge (tank pressure)
9. Pressure gauge regulated pressure
10. Drain cock
11. Wheel
12. Rubber feet
- Tank
- Air filter
- Overload switch
- Quick coupler (tank outlet pressure)
2. Safety instructions
Explanation of symbols

Denotes risk of personal injury, loss of life or damage to the tool in case of non-observance of the instructions in this manual.

Risk of electric shock.

Caution: the compressor could start automatically in case of a black-out and subsequent reset

Wear ear protection.
V\~ Hz

Sound power level
Special safety instructions
- Warning! The compressor may only be used in suitable rooms (with good ventilation and an ambient temperature from +0°C to +40°C).
- Check that the tank is fully decompressed before connections with the tank are unscrewed.
- It is prohibited to make holes in, or welds to, or purposely to distort the compressed air tank.
- Do not perform any actions on the compressor without first having taken the power plug out of the plug socket.
- Do not aim water jets or jets of flammable liquids at the compressor.
- Do not place flammable objects near the compressor.
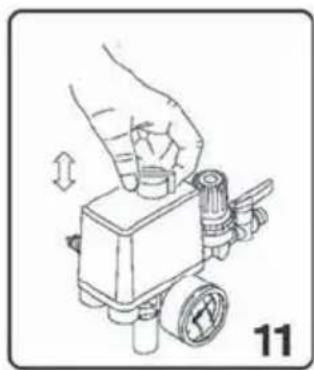
- Switch the switch (3) to the "0" position (OFF) during dwell time (fig. 11).
- Never aim the air jet at persons or animals (fig. 20).
- Do not transport the compressor with the tank pressurised.
• N.B.: some parts of the compressor such as
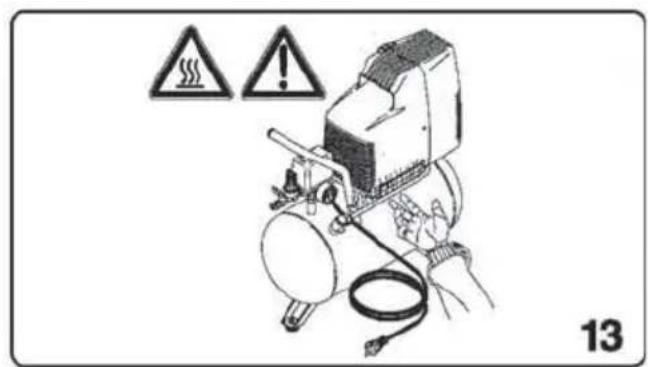
the head and the feed-through pipes may reach high temperatures. Do not touch these parts to avoid burns (fig. 12-13).
- Transport the compressor by lifting it or by using the special grips or handles (fig. 5-6).
• Children and animals should be kept far away from the area of operation of the machine.
• If you use the compressor to spray paint:
a) Do not work in enclosed spaces or near naked flames.
b) Make sure that the environment in which you will be working has dedicated ventilation.
c) Protect your nose and mouth with a dedicated mask (fig. 21).
- Do not use the compressor when the electrical cable or the plug is damaged, and instruct an authorised Support Service to replace them with an original part.
- When the compressor is placed on a surface higher than the floor, it should be secured to prevent it from falling down during operation.
- Do not put objects or your hands in the protective covers to avoid physical damage and damage to the compressor.
- Do not use the compressor as a blunt instrument against persons, objects or animals in order to prevent serious damage.
- If the compressor is no longer in use, always take the plug out of the plug socket.
- Always make sure that compressed-air hoses are used for compressed air and which are characterised by a maximum pressure adjusted to that of the compressor. Do not try to repair the hose if it is damaged.
Electrical safety
Earthing regulations
This compressor has to be earthed while in use in order to protect the operator against electrical shocks. The compressor is provided with a two-core cable plus an earth. The electrical connection has to be made by a qualified technician. We recommend never disassembling the compressor and neither making any other connections into the pressure regulator. Repairs should be carried out by authorised Support Services or by other qualified centres.

Never forget that the earthing core is the green or the yellow/green wire. Never connect this green wire to a terminal under load.
Before replacing the plug of the feed, make sure that the earth cable is connected. If in doubt, please call in a qualified electrician and have the earthing checked.
Electrical connection
Always check whether the input voltage of the motor corresponds to the mains voltage indicated on the specification plate. The compressors are supplied with an electrical cable and a two-pole plug + earth. It is important to connect the compressor with an earthed plug socket. (fig. 9)

Never use the earth-wire instead of the neutral (0-wire). The earthing should take place in accordance with accident prevention regulations.
Power supply
- The motor is fitted with an overload switch (15). If the compressor overloads, the overload switch switches the equipment off automatically to protect the compressor from overheating. If the overload switch triggers, switch off the compressor using the ON/OFF switch (8) and wait until the compressor cools down. Then press the overload switch (15) and restart the compressor.
3. USE

For homehold use only
NB: The information you will find in this manual has been written to assist the operator in the use and maintenance of the compressor. Some illustrations in this manual show details which may differ from those of your compressor.
Installation
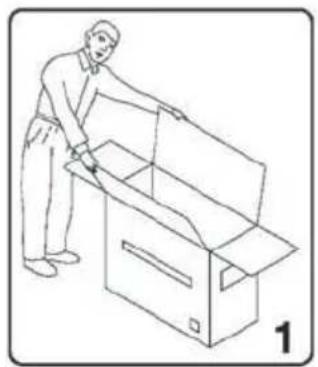
After having taken the compressor out of its packaging (fig. 1) and having checked that it is in perfect condition, and having noted that no damage occurred during transport, the following acts should be performed. If not yet fitted, fit the rubber feet and the wheels on the tank according to the instructions represented in fig. 2. Place the compressor on a flat surface or at a maximum slope of 10^ (fig.3), in a well ventilated area, protected against atmospheric factors and not in explosive surroundings. If the surface area is sloping and smooth, make sure that the
compressor will not move when in operation. If the surface area is a board or a shelf of a bookcase, just make sure that they cannot fall down by securing them properly. For proper ventilation and effective cooling, it is important that the compressor is positioned at least 100 cm from the wall (fig. 4).

Make sure that the compressor is transported in the right way, do not turn it upside down and don't lift it with hooks or ropes (fig. 5-6).
Installing the air filter.
Remove the transport lids and replace them with the supplied air filter before using the compressor
Starting up
- Check whether the mains voltage corresponds to that indicated on the electrical specification plate (fig. 10), the permitted tolerance range should be within 5%.
- Press the switch (3) situated on the upper part into the "0" position according to the pressure regulator type fitted on the device (fig. 11).
- Put the plug in the plug socket (fig. 9) and start the compressor up by putting the switch of the pressure regulator in the "I" position. The operation of the compressor is fully automatic. The pressure regulator will stop the compressor when the maximum value has been reached and start it up when the pressure drops below the minimum value. Normally the difference in pressure is approx. 2 Bar/29 psi between the maximum and the minimum value. For instance - The compressor will stop when it reaches 8 Bar (116 psi) (this is the maximum operating pressure) and will start up automatically when the pressure within the tank has dropped to 6 Bar (87 psi).

The head/cylinder/transmission pipe assembly may reach high temperatures, so take care when working close to these parts and do not touch them to avoid burns (fig. 12 - 13).
Adjusting the operating pressure
Fig. 14
It is not necessary continuously to use the maximum operating pressure, the compressed-air tools often require less pressure. With regard to compressors supplied with a pressure reduction valve it is necessary to set the operating pressure properly.
It is possible to set the operating pressure by using the turning knob on the reduction valve.
- By turning clockwise, the pressure will be increased.
- By turning anti-clockwise, the pressure will be reduced.
The compressor has two pressure gauges and two points to connect an air hose:
- Pressure gauge on the left (9): pressure on left outlet (7). The pressure of left this outlet can be regulated with help of the reduction valve (5).
• Pressure gauge on the right (8): tank pressure + pressure on right outlet (6)
Hints for accurate adjustment of the pressure regulation:
- Turn the turning knob (5) anti-clockwise till pressure is fully released
- Connect the air tool you want to use to the left quick coupler (6)
- Activate the air too shortly, so the pressure gauge (7) will show the right pressure level
- Turn the turning knob (5) clockwise, till the pressure gauge (7) shows the pressure level you need
- Your air tool is now ready to use.
Note: when not connecting an air tool while adjusting the pressure, it might occur the pressure gauge (7) is not reacting accurately on the pressure drop
4. Maintenance

Make sure that the power plug is removed from the mains when carrying out maintenance work on the motor.
The machine has been designed to operate over a long period of time with a minimum of maintenance. Continuous satisfactory operation depends upon proper machine care and regular cleaning. Before interfering in any way whatsoever with the compressor, please make sure that:
- The switch button (3) is in the "0" position and the power plug is removed from the power socket
- The air tank is fully decompressed (both pressure gauges must be pointed at 0 Bar)
Malfunction
Should the machine fail to function correctly, a number of possible causes and the appropriate solutions are given below:
Air loss
• May be caused by a poor seal of a connection.
- Check all air connections by wetting them with a soapy water solution (Never use the solution nearby electric connections)
- When the tank is empty and being filled. The user might hear a sisseling sound by the pressure switch. This is normal and will stop before the compressor reach a pressure of 1.5 bar
• Check if the drain valve (11) is closed well
The compressor will not start
• If the compressor is difficult to start, check:
- whether the voltage of the mains corresponds to that on the specification plate (fig. 10)
- whether electrical extension cables are being used with a faulty core or length.
- whether the operating environment is too cold (below 0°C).
- whether there is electricity supply (plug properly connected, magneto-thermal fuses not broken).
The compressor does not shut off
If the compressor does not shut off when the maximum pressure has been reached, the safety valve of the tank will be activated. It is necessary to contact the nearest authorised Support Service for the repair.

Repairs and servicing should only be carried out by a qualified technician or service firm.
Cleaning
Regularly clean the machine housing with a soft cloth, preferably after each use. Keep the ventilation slots free from dust and dirt.
If the dirt does not come off use a soft cloth moistened with soapy water. Never use solvents such as petrol, alcohol, ammonia water, etc.
These solvents may damage the plastic parts.
Drain the tank
Compressing air will cause water in the tank.
Regularly drain the water from the tank to prevent
tank corrosion (fig 16):
- First reduce the pressure in the tank till approximately 2 bar by connecting and activating an air tool.
- Then slowly turn the drain valve (11) on the lower side of the tank open.
- The water in the tank will now leak out of the tank
Take care when compressed air is in the tank because the water can come out with some force. Recommended pressure max. 1-2 Bar.
Clean the air filter
It is recommended to disassemble the suction filter every 50 operating hours and to clean the filter element by blowing it with compressed air (fig. 15). It is recommended that the filter element is replaced at least once a year if the compressor is working in a clean environment; more often if the environment in which the compressor is situated is dusty.
Lubrication
It is recommended to disassemble the suction filter every 50 operating hours and to clean the filter element by blowing it with compressed air (fig. 15). It is recommended that the filter element is replaced at least once a year if the compressor is working in a clean environment; more often if the environment in which the compressor is situated is dusty. The compressor makes condensed water which collects in the tank.
It is necessary to remove the condensed water in the tank at least once a week by opening the drain cock (fig. 16) under the tank. Take care when compressed air is in the bottle because the water can come out with some force. Recommended pressure max. 1-2 Bar.
Faults
Should a fault occur, e.g. after wear of a part, please contact the service address on the warranty card. In the back of this manual you find an exploded view showing the parts that can be ordered.
Environment
To prevent damage during transport, the appliance is delivered in a solid packaging which consists largely of reusable material.
Therefore please make use of options for recycling the packaging.

Faulty and/or discarded electrical or electronic apparatus have to be collected at the appropriate recycling locations.
Warranty
The warranty conditions can be found on the separately enclosed warranty card.
KOMPRESSOR
CE
DECLARATION OF CONFORMITY CRM1042 COMPRESSOR
(EN) We declare under our sole responsibility that this product is in conformity with directive 2011/65/EU of the European parliament and of the council of 9 June on the restriction of the use of certain hazardous substances in electrical and electronic equipment is in conformity and accordance with the following standards and regulations:
(DE) Der Hersteller erklärt eigenverantwortlich, dass dieses Produkt der Direktive 2011/65/EU des Europäischen Parlaments und des Rats vom 8. Juni 2011 über die Einschränkung der Anwendung von bestimmten gefährlichen Stoffen in elektrischen und elektronischen Geräten entspricht. den folgenden Standards und Vorschriften entspricht:
(NL) Wij verklaren onder onze volledige verantwoordelijkheid dat dit product voldoet aan de conform Richtlijn 2011/65/EU van het Europees Parlement en de Raad van 8 juni 2011 betreffende beperking van het gebruik van bepaalde gevaarlijke stoffen in elektrische en elektronische apparatuur en in overeenstem ming is met de volgende standaarden en reguleringen:
(FR) Nous déclarons sous notre seule responsabilité que ce produit est conforme aux standards et directives suivants: est conforme à la Directive 2011/65/EU du Parlement Européen et du Conseil du 8 juin 2011 concernant la limitation d'usage de certaines substances dangereuses dans l'équipement électrique et électronique.
(ES) Declaramos bajo nuestra exclusiva responsabilidad que este producto cumple con las siguientes normas y estándares de funcionamiento: se encuentra conforme con la Directiva 2011/65/UE del Parlamento Europeo y del Consejo de 8 de junio de 2011 sobre la restricción del uso de determinadas sustancias peligrosas en los equipos eléctricos y electrónicos.
(PT) Declaramos por nossa total responsabilida-de que este produto está em conformidade e cumpre as normas e regulamentações que se seguem: está em conformidade com a Directiva 2011/65/EU do Parlamento Europeu e com o Conselho de 8 de Junho de 2011 no que respeita à restrição de utilização de determinadas substâncias perigosas existentes em equipamento eléctrico e electrónico.
(IT) Dichiariamo, sotto la nostra responsabilità, che questo prodotto è conforme alle normative e ai regolamenti seguenti: è conforme alla Direttiva 2011/65/UE del Parlamento Europeo e del Consiglio dell'8 giugno 2011 sulla limitazione dell'uso di determinate sostanze pericolose nelle apparecchiature elettriche ed elettroniche.
(SV) Vi garanterar på eget ansvar att denna produkt uppfyller och följer följande standarder och bestämmelser: uppfyller direktiv 2011/65/EU från Europeiska parlamentet och EG-rådet från den 8 juni 2011 om begränsningen av användning av farliga substanser i elektrisk och elektronisk utrustning.
(FI) Vakuutamme yksinomaan omalla vastuullamme, että tämä tuote täyttää seuraavat standardit ja säädökset: täyttää Euroopan parlamentin ja neuvoston 8. kesäkuuta 2011 päivätyn direktiivin 2011/65/EU vaatimukset koskien vaarallisten aineiden käytön rajoitusta sähkö- ja elektronisissa laitteissa.
(NO) Vi erklærer under vårt eget ansvar at dette produktet er i samsvar med følgende standarder og regler: er i samsvar med EU-direktivet 2011/65/EU fra Europa-parlamentet og Europa-rådet, pr. 8 juni 2011, om begrensning i bruken av visse farlige stoffer i elektrisk og elektronisk utstyr.
(DA) Vi erklærer under eget ansvar, at dette produkt er i overensstemmelse med følgende standarder og bestemmelser: er i overensstemmelse med direktiv 2011/65/EU fra Europa-Parlamentet og Rådet af 8. juni 2011 om begrænsning af anvendelsen af visse farlige stoffer i elektrisk og elektronisk udstyr.
(HU) Felelősségünk teljes tudatában kijelentjük, hogy ez a termék teljes mértékben megfelel az alábbi szabványoknak és előírásoknak: je v souladu se směrnicí 2011/65/EU Evropského parlamentu a Rady EU ze dne 8. června 2011, která se týká omezení použití určitých nebezpečných látek v elektrických a elektronických zařízeních.
It is our policy to continuously improve our products and we therefore reserve the right to change the product specification without prior notice.
Ferm BV • Lingenstraat 6 • 8028 PM • Zwolle The Netherlands


- COMPRESSOR
- Contents
- Machine details
- Product information
- Fig. A
- Safety instructions
- Explanation of symbols
- Special safety instructions
- Electrical safety
- Earthing regulations
- Electrical connection
- Power supply
- USE
- Installation
- Starting up
- Adjusting the operating pressure
- Fig. 14
- Maintenance
- Malfunction
- Air loss
- The compressor will not start
- The compressor does not shut off
- Cleaning
- Drain the tank
- Clean the air filter
- Lubrication
- Faults
- Environment
- Warranty
- KOMPRESSOR
- CE
- DECLARATION OF CONFORMITY CRM1042 COMPRESSOR
Brand : Ferm
Model : CRM1042
Category : Compressor