
iPA Music System - Loudspeaker ALTO - Free user manual and instructions
Find the device manual for free iPA Music System ALTO in PDF.


| Product Type | Speaker |
| Brand | ALTO |
| Model | iPA Music System |
| Dimensions (approx.) | 20 x 15 x 10 cm |
| Weight (approx.) | 1.5 kg |
| Power Supply | Mains 220-240 V, 50/60 Hz |
| Wireless Connectivity | Bluetooth |
| Audio Input | 3.5 mm Jack |
| FM Radio | Built-in |
| Hands-free Function | Yes (built-in microphone) |
| Output Power | 10 W RMS |
| Frequency Response | 80 Hz - 20 kHz |
| Maintenance and Cleaning | Clean with a soft, dry cloth |
| Safety | Do not expose to moisture or extreme temperatures |
| Spare Parts | Contact ALTO after-sales service |
| Repairability | Repairability score: 8/10 (estimate) |
| Included Accessories | Power cable, audio cable, user manual |
Frequently Asked Questions - iPA Music System ALTO
User questions about iPA Music System ALTO
0 question about this device. Answer the ones you know or ask your own.
Ask a new question about this device
Download the instructions for your Loudspeaker in PDF format for free! Find your manual iPA Music System - ALTO and take your electronic device back in hand. On this page are published all the documents necessary for the use of your device. iPA Music System by ALTO.
USER MANUAL iPA Music System ALTO

USER MANUAL
ENGLISH (2-4)
MANUAL DEL USUARIO
ESPANOL (5 - 7)
MANUEL D'UTILISATION
FRANÇAIS (8 - 10)
MANUALE UTENTE
ITALIANO (11 - 13)
BEDIENUNGSANLEITUNG
DEUTSCH (14 - 16)
GEBRUIKERSHANDLEIDING
NEDERLANDS (17 - 19)
BOX CONTENTS
- iPA Music System
- Microphone
- Microphone cable (XLR)
- Power cable
- Quickstart Guide
- Safety Instructions & Warranty Information Booklet
QUICK SETUP
- Connect iPA Music System's POWER INPUT to power outlet using the included power cable. (Do not power on iPA Music System yet.)
- Optional: Connect microphone to INPUT using standard XLR or 1/4" cable.
- iPad (3rd generation) and iPad 2 users: Power on your iPad (not included). Slide it into plastic "sled" and gently connect it to the DOCK connector.
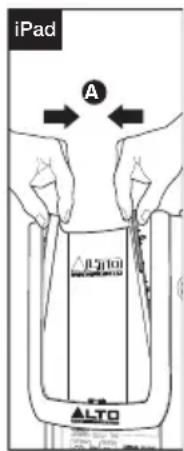
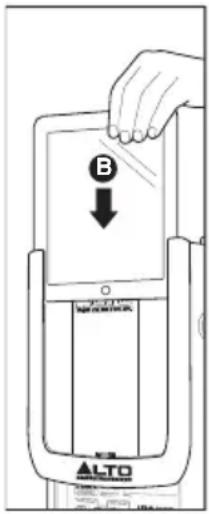
iPad users: iPA Music System's plastic "sled" has a plastic "rail" on each side to accommodate the new iPad and iPad 2, which are thinner. Use a screwdriver, your thumbs, etc. to remove these rails before using it (see the illustrations here as well as in the included Quickstart Guide poster). Power on your iPad (not included). Slide it into the sled and gently connect it to the DOCK connector.


- Set both volume knobs (INPUT VOLUME and DOCK VOLUME) at minimum setting.
- Turn iPA Music System's POWER SWITCH to ON.
- Play music on iPad. Adjust DOCK VOLUME to a reasonable volume level. The SIGNAL/PEAK LED will illuminate red.
- Optional: Talk into microphone (if one is connected to INPUT). Adjust INPUT VOLUME to reasonable volume level.
Note: You can connect an extension speaker (another iPA Music System, not included) to the MIX OUT using a standard XLR cable. If you do this:
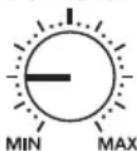
- So the extension speaker's playback level matches that of the main speaker, set the extension speaker's INPUT VOLUME at the "9 o'clock" knob position.
- You can set which channel (left, right, or summed mono) is sent to your extension speaker. See OUTPUT CHANNEL description under REAR PANEL OVERVIEW for more information.
INPUT VOLUME
CONNECTION DIAGRAM

flowchart
graph TD
    A["Microphone"] -->|* not included| B["Switch"]
    C["iPad*"] -->|Down arrow| B
    D["Power"] -->|Signal| E["Speaker*"]
    B --> F["Switch"]
    E --> G["Speaker*"]
IMPORTANT!
MICROPHONE USAGE
Here are some notes about using microphones with iPA Music System – and in general:
- iPA Music System includes a dynamic microphone and an XLR cable. Dynamic mics generally require no power, whereas many condenser mics require "phantom power" supplied by the device it's connected to. If you want to use a different mic, we recommend using a dynamic mic since iPA Music System does not supply phantom power.
• iPA Music System's INPUT is a "combo" jack, which accommodates both XLR- and 1/4"-style cables.
• Before connecting a mic to the INPUT, be sure the INPUT VOLUME is at its minimum setting. - After the mic is connected, slowly increase the INPUT VOLUME level to an appropriate level. A generally safe range is anywhere between the "9 o'clock" and "3 o'clock" knob positions.
-
Feedback is created when the sound from a speaker is fed back into the mic, resulting in a loud humming or squealing sound that swells in volume and can get dangerously loud. To avoid feedback:
-
Don't place the mic in front of the speaker. If you can't avoid it, use a longer mic cable so the mic can be placed as far away from the speaker as possible.
- Don't turn up the INPUT VOLUME to extremely high levels.
○ If you start to hear feedback—even if it's quiet—turn down the INPUT VOLUME knob.
- Hold the mic approximately 1-3 inches away from your mouth when using it. Holding it too far away requires unnecessarily turning up the INPUT VOLUME, and holding it too close can result in overly loud volumes, feedback, distortion, etc. when speaking.
- If several different people will be using the mic during a "session," keep an eye on your volume levels and adjust the INPUT VOLUME knob accordingly, since everyone naturally speaks at different volumes.
VOLUMES
When a sound source (music, voice, etc.) is loud enough, iPA Music System's SIGNAL/PEAK LED will light up.
A red light means the sound is loud enough to activate the speaker's protection circuit. This prevents the speaker from getting damaged from being "blown out," which can happen with other speakers. It's OK if the red light flickers occasionally or intermittently, but if you hear the speaker's audio becoming fuzzy, overly loud, "breaking up," etc., turn down the INPUT VOLUME and/or DOCK VOLUME knobs.
Generally, it's a good idea to monitor this light if you're playing several different kinds of music (different styles of music are produced at different volumes) or if several different people are using the mic (everyone naturally speaks at different volumes).
REAR PANEL FEATURES
- POWER INPUT – Connect the included power cable to this input and connect the other end of the cable to a power source. Make sure the speaker's POWER SWITCH is set to "off" when plugging and unplugging the cable.
- POWER SWITCH – Turns the speaker on/off. Make sure the VOLUME knob is set to "zero" before turning it on.
- POWER LED – Illuminates when the speaker is on.
- DOCK – Connect your iPad (not included) here.
- DOCK VOLUME – Turn this knob to adjust the iPad's volume (not included).
-
OUTPUT CHANNEL – Set this switch to determine which channel is sent out of the MIX OUT (to your extension speaker) and which channel is heard in the iPA Music System (your "local" speaker):
-
LEFT: The left channel will be sent to your extension speaker. The right channel will be heard through the local speaker.
- MONO: Both left and right channels will be summed and be sent to both your extension speaker and local speaker.
-
RIGHT: The right channel will be sent to your extension speaker. The left channel will be heard through the local speaker.
-
MIX OUT – Use a standard XLR cable (not included) to connect this jack to the input of another speaker (i.e., another ALTO Professional speaker).
- INPUT (XLR / 1/4") – Use a standard 1/4" TRS or XLR cable (not included) to connect another sound source to this input.
- INPUT (RCA) – Use a standard stereo RCA cable (not included) to connect another sound source to this input.
- INPUT VOLUME – Turn this knob to adjust the volume of a sound source connected to the inputs.
Note: If you have devices connected to both inputs, this knob will adjust the volume of both devices. To adjust the mix between the devices, we recommend adjusting the volume of the device connected to the RCA input.
-
SIGNAL / PEAK LED – This light will illuminate red, depending on the signal level being sent into the speaker:
-
Flickering red: The audio signal is high, triggering the speaker's built-in limiter.
-
Solid red: The audio signal being sent to the speaker is "clipping" or distorting. Reduce the volume of your sound source.
-
LOUDNESS CONTOUR – Engage (depress) this switch to emphasize low and high frequencies by +3 dB. Disengage the switch for flatter response for live performance or for maximum output.

CONTENIDO DE LA CAJA




Transducer Low: 10" woofer with 1.5" voice coil
Transducer High: 1" titanium diaphragm compression driver
Output Power: 200 W Continuous (135 W LF + 65 W HF) 400 W Peak (270 W LF + 130 W HF)
Frequency Range: 51 Hz – 20 kHz (@ -10 dB)
Frequency Response: 52 Hz - 20 kHz (+3 dB)
Max SPL @ 1m: 123 dB Continuous 126 dB Peak
Nominal Horn Coverage: 80/100° H x 60° V nominal (-6 dB)
Active Crossover: 2.5 kHz
Connectors: 1 Mic/Line XLR -1/4" combo inputs 1 stereo pair of RCA inputs 1 XLR mix output
External Controls: Input volume, dock volume, power switch with LED indicator, signal/peak LED indicator, contour switch, output mode switch
Input Control: -∞ to +50 dB (Line/Mic) -∞ to +10 dB (RCA) -∞ to +10 dB (Dock)
Cabinet: Trapezoidal with floor monitor capability; injection-molded polypropylene enclosure with perforated steel grille
Mounting: Integrated pole socket (36 mm diameter) 1 handle
Protections: Over-excursion, thermal, driver, DSP-based
Power supply: 100 VAC, 110-120 VAC, 220-240 VAC; 50/60 Hz Inrush current at initial switch-on: 0 A Inrush current after power supply interruption: 2.20 A
Dimensions (H x W x D): 20.2" x 13" x 11.4" (513 mm x 330 mm x 290 mm)
Weight (speaker only): 26.6 lbs (12.1 kg)

THIS DEVICE COMPLIES WITH PART 15 OF THE FCC RULES. OPERATION IS SUBJECT TO THE FOLLOWING TWO CONDITIONS: (1) THIS DEVICE MAY NOT CAUSE HARMFUL INTERFERENCE, AND (2) THIS DEVICE MUST ACCEPT ANY INTERFERENCE RECEIVED, INCLUDING INTERFERENCE THAT MAY CAUSE UNDESIRED OPERATION.
www.altoprofessional.com
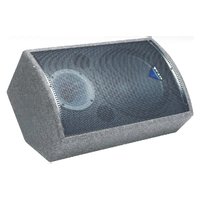
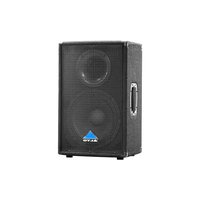
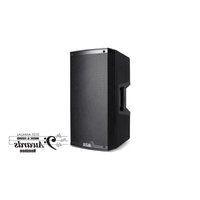
Brand : ALTO
Model : iPA Music System
Category : Loudspeaker