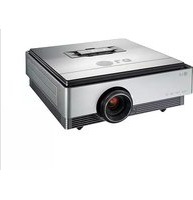
CF3DAT - Video projector LG - Free user manual and instructions
Find the device manual for free CF3DAT LG in PDF.


| Product Type | Video Projector |
| Model | CF3DAT |
| Brand | LG |
| Resolution | 1920 x 1080 (Full HD) |
| Brightness | 3000 ANSI Lumens |
| Contrast Ratio | 5000:1 |
| Lamp Life (Normal Mode) | 3000 hours |
| Lamp Life (ECO Mode) | 4000 hours |
| Projection Distance | 1.5 m – 10 m |
| Screen Size (Diagonal) | 60 – 300 inches |
| Aspect Ratio | 16:9 / 4:3 |
| Keystone Correction | ±30° (Vertical) |
| Optical Zoom | 1.2x |
| Input Ports | 2x HDMI, 1x USB, 1x VGA, 1x Composite, 1x Audio |
| Output Ports | 1x Audio Out, 1x RS-232C |
| Dimensions (W x H x D) | 400 x 150 x 300 mm |
| Weight | 5.0 kg |
| Power Consumption (Max) | 350 W |
| Standby Power | < 0.5 W |
| Lamp Type | UHP (Ultra High Performance) |
| Filter Cleaning | Clean every 1000 hours with vacuum |
| Suitable for Ceiling Mount | Yes (mount sold separately) |
| Warranty | 2 years (lamp 6 months) |
| Manual Language | English (60 pages) |
Frequently Asked Questions - CF3DAT LG
User questions about CF3DAT LG
0 question about this device. Answer the ones you know or ask your own.
Ask a new question about this device
Download the instructions for your Video projector in PDF format for free! Find your manual CF3DAT - LG and take your electronic device back in hand. On this page are published all the documents necessary for the use of your device. CF3DAT by LG.
USER MANUAL CF3DAT LG
Please read this manual carefully before operating your projector and retain it for future reference.
CF3DAT
LCOS PROJECTOR


The lightning flash with arrowhead symbol, within an equilateral triangle, is intended to alert the user to the presence of uninsulated "dangerous voltage" within the product's enclosure that may be of sufficient magnitude to constitute a risk of electric shock to persons.

The exclamation point within an equilateral triangle is intended to alert the user to the presence of important operating and maintenance (servicing) instructions in the literature accompanying the appliance.
WARNING/CAUTION
- TO REDUCE THE RISK OF FIRE AND ELECTRIC SHOCK, DO NOT EXPOSE THIS PRODUCT TO RAIN OR MOISTURE.
Warning - Class B
(b) For a Class B Digital device or peripheral, the instructions furnished the user shall include the following or similar statement, placed in a prominent location in the text of the manual:
NOTE: This equipment has been tested and found to comply with the limits for a Class B digital device, pursuant to part 15 of the FCC Rules. These limits are designed to provide reasonable protection against harmful interference in a residential installation. This equipment generates, uses and can radiate radio frequency energy and, if not installed and used in accordance with the instructions, may cause harmful interference to radio communications. However, there is no guarantee that interference will not occur in a particular installation. If this equipment does cause harmful interference to radio or television reception, which can be determined by turning the equipment off and on, the user is encouraged to try to correct the interference by one or more of the following measures:
- Reorient or relocate the receiving antenna.
- Increase the separation between the equipment and receiver.
- Connect the equipment into an outlet on a circuit different from that to which the receiver is connected.
- Consult the dealer or an experienced radio/TV technician for help.
This device meets the EMC requirements for home appliances (Class B) and is intended for home usage. This device can be used in all regions.
HDMI™
HDMI, HDMI logos and High-Definition Multimedia Interface are the trademarks or registered trademarks of HDMI Licensing LLC.

natural_image
Illustration of a rectangular electronic device with a circular vent and base, no text or symbols present.Contents
Safety Precautions....4
Parts and Components
Main Unit 9
Control Panel....9
Back....10
Name of remote control buttons 11
How to insert a battery ....11
Projector Status Indicators 12
Accessories....13
Optional Extras ....13
Installation and Configuration
Caution on Installation 14
Projection Distance per Screen Size 15
Turning on the Projector 16
Turning off the Projector 16
Focus and Position of the Screen Image 17
Selecting Input Signal 17
Connecting Device
Connecting a Speaker or Headphones 18
Connecting an Antenna 18
Connecting to a PC 18
Connecting to a Video Player 19
Connecting to a DVD Player 19
Connecting to a DTV Set-Top Box.... 19
3D Function
Caution When Watching 3D Video ....20
Requirements for Watching 3D Images....20
Watching 3D Images 2
Setting 3D Mode.... 22
Exiting 3D Mode 22
Function
Channel Functions
Auto Tuning....23
Changing Channels 23
Manual Tuning 23
Editing Channels 24
Setting Favorite Channels 24
Using the List of Favorite Channels 24
Displaying Program Information 25
Video Function
Picture Mode 26
Adjusting Color Temperature....26
Adjusting Picture Settings 27
Advanced Options 27
Picture Initialization Function 29
TruMotion Demo Function 29
Screen Function
Using the Pause Function 29
Using the Screen Size Function 30
Test Pattern Function 30
Using Keystone 30
Using the AUTO Function 30
Changing Projection Mode (PJT Mode) 30
Adjusting PC Input 31
Audio Function
Adjusting Volume 31
Stereo/SAP Broadcast Setup 31
Time Function
Setting Current Time 32
Scheduling On and Off 32
Using SLEEP Function ....33
Auto Off 33
Option Functions
Selecting a Language 33
Selecting Audio Language 34
Setting Caption 34
Using the Blank Image Function.... 35
Selecting the Blank Image Color 35
Camera Calibration 35
To adjust the brightness of the screen 36
High Altitude 36
Network Settings 36
Setting SET ID 38
Setting the Name of a Connected Device 38
Setting Power Sound ....38
LOCK
Setting a Password ....40
Changing a Password 40
Locking System 40
Enabling Block Channel 41
Movie Rating (MPAA) 41
TV Rating Children 41
TV Rating General 42
Downloadable Rating 42
Enabling Input Block 42
Information Function
Checking Projector Information 42
Serial Communication Function
Establishing Serial Communication 43
Communication Protocol ....43
Communication using Hyper Terminal 49
Miscellaneous
Supported Monitor Display 51
Maintenance 52
Do not turn off the projector 54
Troubleshooting 56
Product Specifications 57
Open Source software Information 58
MEMO....59
Safety Precautions
Please take note of the safety instructions to prevent any potential accidents or misuse of the projector.
- Safety Instructions are given in two forms, i.e. 'Warning' and 'Notes' as detailed below.
Warning: The violation of this instruction may cause serious injury and even death.
⚠️ Note: The violation of this instruction may cause injury or damage to the projector.
- Read the owner's manual carefully and keep it at hand.
Indoor Installation

Warning
Do not place the projector in direct sunlight or near heat sources such as radiators, fires, stoves etc.
There is a risk of fire.
Do not place flammable materials such as aerosols near the projector.
There is a risk of fire.
Do not allow children to hang from or climb on the projector.
This may cause the projector to fall, causing injury or death.
Do not install the product in a place with no ventilation (e.g., on a bookshelf or in a closet) or on a carpet or cushion.
Failure to do so may result in a fire due to the increase in the internal temperature.
Do not place the projector close to sources of steam or oil such as a humidifier or kitchen counter.
This may create a fire hazard or cause electric shock.
Do not place the projector where it might be exposed to dust.
There is risk of fire.
Do not use the projector in a damp place such as a bathroom where it is likely to get wet.
This may create a fire hazard or result in electric shock.
Make sure the air vent is not blocked by a tablecloth or curtain.
Failure to do so may result in a fire due to the increase in the internal temperature.
Ensure good ventilation around the projector. The distance between the projector and the wall should be more than 30 cm.
Failure to do so may result in a fire due to the increase in the internal temperature.
Indoor Installation

Caution
When placing the projector on a table or shelf, be careful not to put it near the edge.
The projector could fall, causing injury, and damage to the projector. Only use a suitable stand.
Disconnect the projector from the power supply and all connected apparatus before moving or cleaning.
The power cord may be damaged and may create a fire hazard or result in electric shock.
Do not place the projector on an unstable or vibrating surface such as a wobbly shelf or a slope.
It may fall and cause injury.
Power

Warning
The earth cable should be connected.
Ensure that you connect the earth cable to prevent possible electric shock. If it is not possible to ground the unit, have a qualified electrician install a separate circuit breaker. Do not try to ground the projector by connecting it to telephone wires, lightning rods or gas pipes.
The power plug should be inserted fully into the power outlet.
An unstable connection may cause a fire.
Do not place heavy objects on the power cord.
This may create a fire hazard or cause electric shock.
Power

Warning
Never touch the power plug with wet hands.
It could cause an electrical shock or short.
Do not plug too many devices into one multi-power outlet.
This may result in the power outlet overheating and creating a fire hazard.
Prevent dust from collecting on the power plug pins or outlet.
It could cause an electrical shock or short.
Power

Caution
Hold the plug firmly when unplugging.
A damaged wire may create a fire hazard.
Ensure the power cord and plug are not damaged, modified, severely bent, twisted, pulled, sandwiched or hot. Do not use the product if the power outlet is loose.
This may create a fire hazard or cause electric shock.
Keep the power cord away from heating devices.
The wire coating may melt, which may cause a fire or result in electric shock.
Place the projector where people will not trip over or tread on the power cord to protect the power cord and plug from any damage.
This may create a fire hazard or cause electric shock.
Do not turn the projector on/off by plugging in the power plug or unplugging it from the power outlet. (Do not use the power plug as a switch.)
This may create a fire hazard or result in electric shock.
When in Use

Warning
Do not place anything containing liquid on top of the projector such as a flower vase, flower pot, cup, cosmetics, or medicine; or ornaments, candles, etc.
This may create a fire hazard, result in electric shock, or cause injury due to falling.
In the event that there is a big impact shock or the cabinet is damaged, switch it off, unplug it from the power outlet and contact an authorized service center.
This may create a fire hazard or cause electric shock.
Do not insert pieces of metal such as coins, hairpins or metal debris, nor flammable materials such as paper or matches into the projector.
This may create a fire hazard or cause electric shock.
In the event that liquid or a foreign object falls into the projector, please switch it off and unplug it from the power outlet and contact an LG
Electronics Service Center.
This may create a fire hazard or cause electric shock.
Make sure that a child does not swallow the batteries when you replace the old remote control batteries with new ones. Keep batteries out of reach of children.
If a child swallows a battery, consult a doctor immediately.
Do not remove any covers except the lens or dust covers. There is a high risk of electric shock.
Do not look directly into the lens when the projector is in use. The strong light may damage your eyes.
When the lamp is on or has just been turned off, avoid touching the air vent or lamp cover because they will be very hot.
CAUTION concerning the Power Cord
It is recommend that most appliances be placed on a dedicated circuit; that is, a single outlet circuit which powers only that appliance and has no additional outlets or branch circuits. Check the specification page of this owner's manual to be certain.
Do not overload wall outlets. Overloaded wall outlets, loose or damaged wall outlets, extension cords, frayed power cords, or damaged or cracked wire insulation are dangerous. Any of these conditions could result in electric shock or fire. Periodically examine the cord of your appliance, and if its appearance indicates damage or deterioration, unplug it, discontinue use of the appliance, and have the cord replaced with an exact replacement part by authorized service personnel.
Protect the power cord from physical or mechanical abuse, such as being twisted, kinked, pinched, closed in a door, or walked upon. Pay particular attention to plugs, wall outlets, and the point where the cord exits the appliance.
| When in Use | Warning | |
| If there is a gas leak, do not touch the power outlet, and open the windows for ventilation.Sparks may cause fire or burns. | Always open the lens door and remove the lens cap when the projector lamp is on. | |
| When in Use | Caution | |
| Do not place heavy objects on the projector.It may fall and cause injury. | Be careful not to allow impact to the lens during transport. | Do not touch the lens. The lens may be damaged. |
| Do not use any sharp tools on the projector such as a knife or hammer, because this may damage the casing. | In the event that no image appears on the screen, please switch off the projector, unplug it from the power outlet and contact the LG Electronics Service Center.This may create a fire hazard or cause electric shock. | Do not drop anything onto the projector or allow anything to impact the projector.This may cause mechanical failure or personal injury. |
| Cleaning | Warning | |
| Do not spray the projector with water when cleaning. Make sure water does not flow into the projector.This may create a fire hazard or cause electric shock. | In the unlikely event of smoke or a strange smell coming out from the projector, switch it off, unplug it from the power outlet and contact the LG Electronics Service Center.Otherwise, it may create a fire hazard or result in electric shock. | Use an air spray or soft cloth or cotton swab moistened with a lens cleaning chemical or alcohol to remove dust or stains on the front projection lens. |
| Cleaning | Caution | |
| You need to clean the projector periodically.If you do not clean the projector, dust will accumulate inside and may create a fire hazard or malfunction. | When cleaning plastic parts such as the projector case, unplug the power first and wipe with a soft cloth. Do not spray with water or wipe with a wet cloth. Never use glass cleaner, automobile or industrial shiner, abrasives or wax, benzene, alcohol etc., which can damage the projector.This may create a fire hazard, result in electric shock or product damage (deformation, corrosion or breakage). | |
| Miscellaneous | Warning | |
| Only a qualified technician can disassemble or modify the projector. For diagnosis, adjustment, or repair, contact your seller or service center.This may create a fire hazard or cause electric shock. | ||
| Miscellaneous | Caution | |
| Do not mix new batteries with old ones.Burst or leaking batteries are a fire hazard or may result in electric shock. | Be sure to unplug if the projector is not to be used for a long period.Accumulated dust is a fire hazard and may result in electric shock due to overheating, ignition, or poor insulation. | Only use the specified type of battery.Burst or leaking batteries are a fire hazard and are toxic. |
Outdoor Antenna Grounding
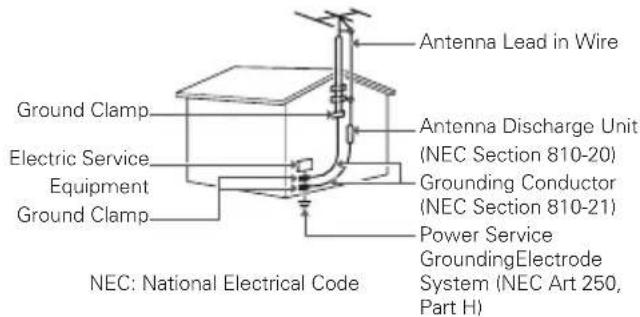
- If an outdoor antenna is installed, follow the precautions below. An outdoor antenna system should not be located in the vicinity of overhead power lines or other electric light or power circuits, or where it can come in contact with such power lines or circuits as death or serious injury can occur. Be sure the antenna system is grounded so as to provide some protection against voltage surges and built-up static charges. Section 810 of the National Electrical Code (NEC) in the U.S.A. provides information with respect to proper grounding of the mast and supporting structure, grounding of the lead-in wire to an antenna discharge unit, size of grounding conductors, location of antenna discharge unit, connection to grounding electrodes and requirements for the grounding electrode.
Antenna grounding according to the National Electrical
Code, ANSI/NFPA 70
Disposal of your old appliance

natural_image
Symbol of a trash bin crossed out by a diagonal line, representing no waste or discharge (no text or labels)
-
When this crossed-out wheeled bin symbol is attached to a product it means the product is covered by the European Directive 2002/96/EC.
-
All electrical and electronic products should be disposed of separately from the municipal waste stream through designated collection facilities appointed by your government or your local authorities.
-
The correct disposal of your old appliance will help prevent potential negative consequences for the environment and human health.
-
For more detailed information about disposal of your old appliance, please contact your city office, waste disposal service or the shop where you purchased the product.
Disposal of waste batteries/accumulators

natural_image
Symbol of a trash bin crossed out by a diagonal line, representing no waste or discharge (no text present)- When this crossed-out wheeled bin symbol is attached to batteries/accumulators of Your product it means they are covered by European Directive 2006/66/EC.
- This symbol may be combined with chemical symbols for mercury(Hg), cadmium(Cd) or lead(Pb) if the battery Contains more that 0.0005% of mercury, 0.002% of cadmium or 0.004% of lead.
- All batteries/accumulators should be disposed separately from the municipal waste stream via designated collection facilities appointed by the government or the local authorities.
- The correct disposal of Your old batteries/accumulators will help to prevent potential negative consequences for the environment, animal and human health.
- For more detailed information about disposal of Your old batteries/accumulators, please contact Your city offi ce, waste disposal service or the shop where You purchased the product.
For USA
NOTE TO CABLE/TV INSTALLER
This reminder is provided to call the CATV system installer's attention to Article 820-40 of the National Electric Code (U.S.A.). The code provides guidelines for proper grounding and, in particular, specifies that the cable ground shall be connected to the grounding system of the building, as close to the point of the cable entry as practical.
* The fluorescent lamp used in this product contains a small amount of mercury.
* Do not dispose of this product with general household waste.
* Dispose of this product must be carried out in accordance to the regulations of your local authority.
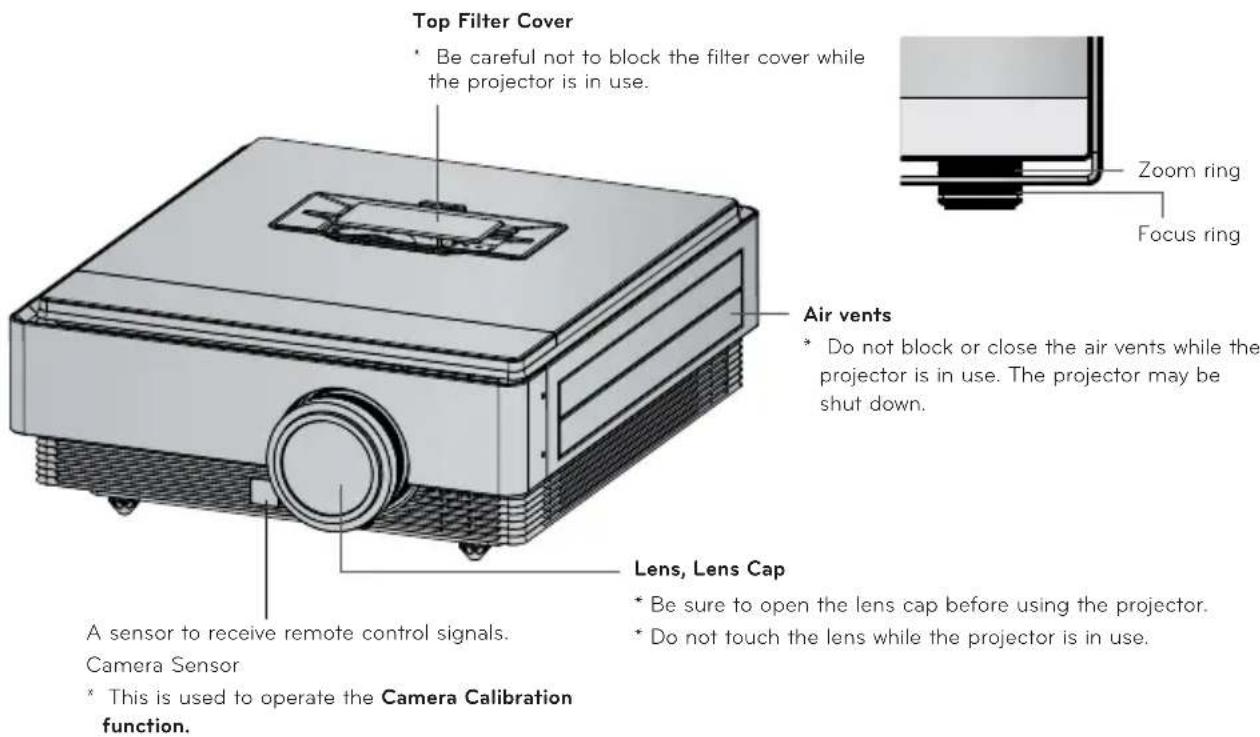
Parts and Components
Main Unit
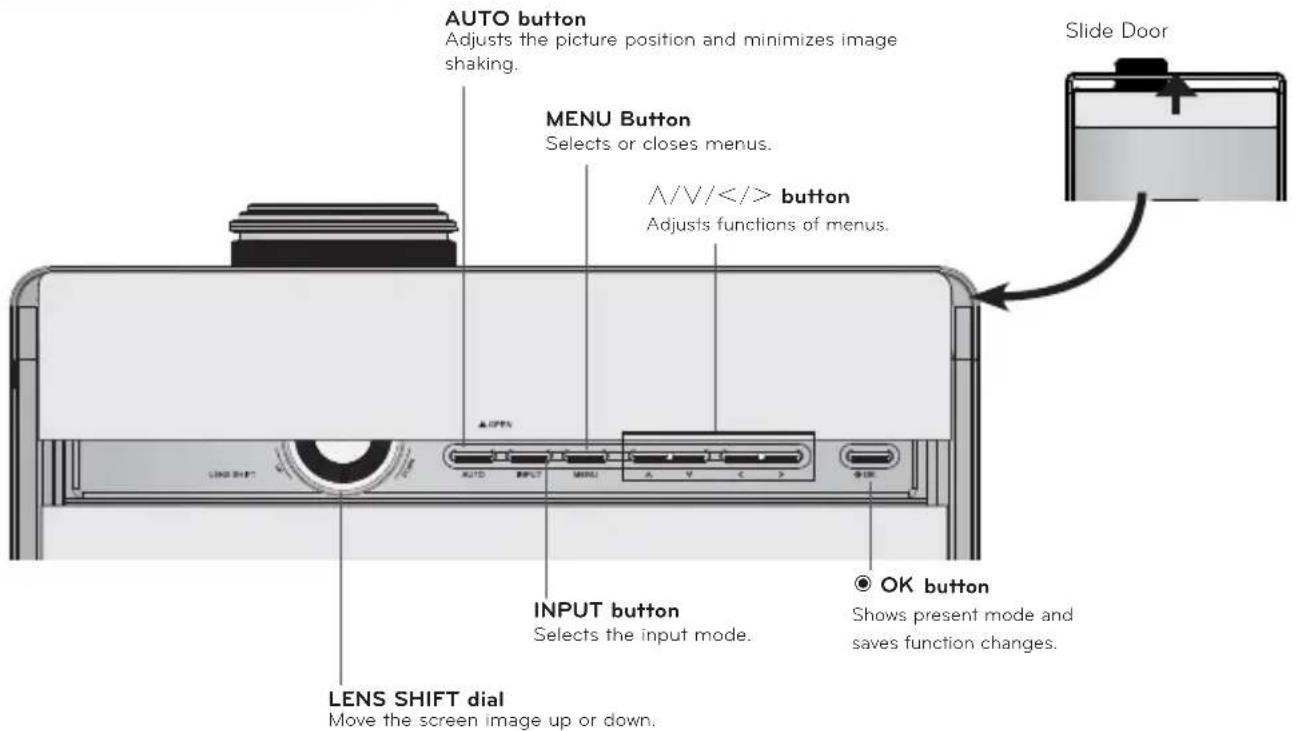
Control Panel
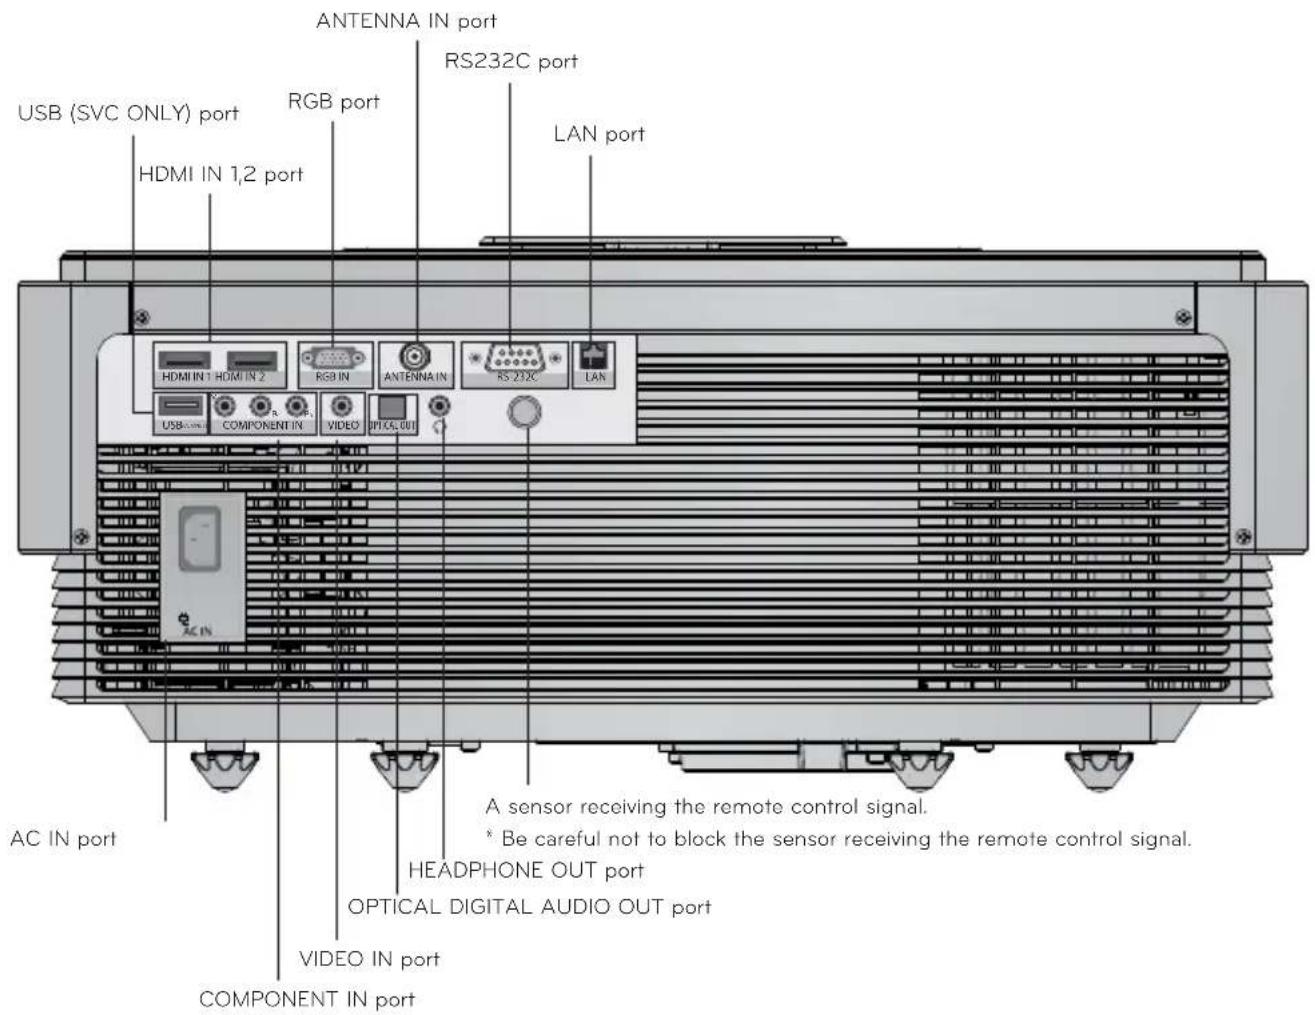
Back
Name of remote control buttons

How to insert a battery

natural_image
Line drawing of a rectangular electronic device with labeled ports (no text or symbols)- Open the lid at the back of the remote control and insert batteries as described by the + - instructions.
- Use new batteries of the same kind (1.5V AAA).
Projector Status Indicators
* Lamp indicator, operation indicator and temperature indicator at the top of the projector show the user the operating status of the projector.

| Display | Blue Standby. | |
| Green (Blinking) On | ||
| Green The projector is in use. | ||
| Cyan (Blinking) | Power off (It takes about 90 seconds for the lamp to switch off completely). | |
| Temperature | Red (Blinking) An error has occurred in the internal cooling fan. | |
| Yellow High temperature warning. | ||
| Yellow (Blinking) The projector is automatically turned off due to excessive heat. | ||
| Lamp | Magenta | The lamp is reaching the end of its life and needs to be replaced with a new lamp. |
| Magenta (Blinking) An error has occurred in the lamp. | ||
| Red The lamp cover is open. | ||
| Air vent Cyan | An error has occurred in the air vent. | |
| Filter Blue (Blinking) The filter cover is open. | ||
Accessories


Remote Control Battery (AAA) 2EA User Guide 3D Glasses


Power Cord Polishing Cloth eZ-Net Manager CD
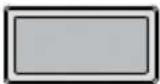


Top Filter Bottom Filter Lens Cap
Optional Extras
To purchase optional accessories, visit an electronics store or online shopping site or contact the retail store where you purchased the product.
Without prior notice, optional accessories are subject to change to improve the performance of the product, and new accessories may be added.

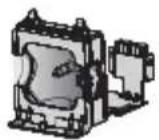


Projection Screen (3D) Lamp Computer Cable HDMI Cable
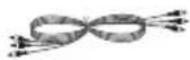

Video Cable
Component Cable
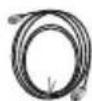
LAN cable RF cable


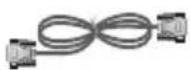
3D Glasses Optical cable RS-232C cable
Ceiling mount for projector
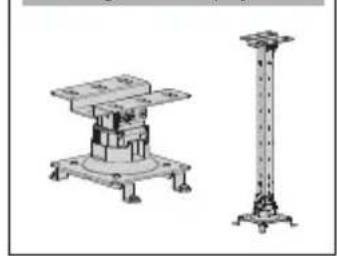
natural_image
Technical line drawings of two mechanical components: a flat base platform and a vertical column (no text or symbols)Installation and Configuration
Caution on Installation

Place the projector in a well-ventilated environment.
- To prevent internal heat build-up, install the projector in a well-ventilated place. Do not place anything near the projector as this may block its air vents. If the air vents are blocked, the internal temperature will increase.
- Do not place the projector on a carpet or rug. This may prevent proper ventilation at the bottom of the projector. This product should be mounted onto a flat surface or ceiling only.

- Be sure to prevent foreign objects such as paper debris from entering the projector.
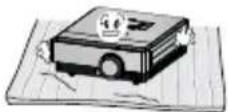
- Leave an adequate distance (30 cm or more) around the projector.



Do not place the projector in a hot or humid environment.
- Only install the projector in a place of moderate temperature and low humidity. (See page 57 regarding operating temperature and humidity.)

Do not place the projector in a place where it will easily collect dust.
• There is risk of fire.

Do not remove any covers except for the lens cap. There is a high risk of electric shock.

The projector is manufactured using high-precision technology. You may, however, see tiny black dots and/or bright colored dots (red, blue or green) that continuously appear on the projector screen. This is a normal result of the manufacturing process and does not indicate a malfunction.

The remote control may not work in an environment where a lamp equipped with electronic ballasts or a three-wave-length fluorescent lamp is installed.
Replace the lamp with an internationally standardized lamp for the remote control to work normally.
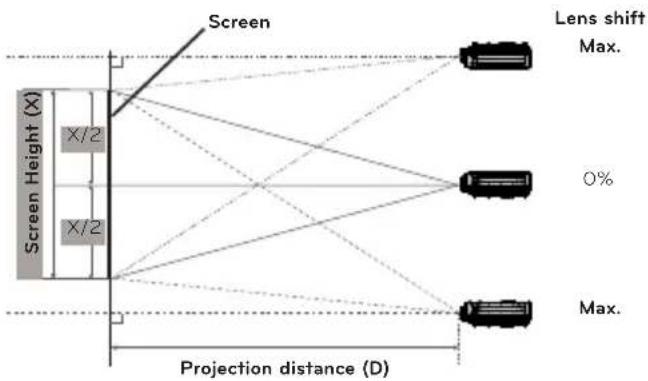
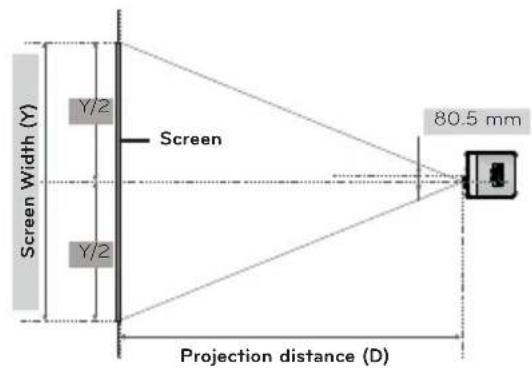
Projection Distance per Screen Size
- Place the projector on a sturdy, level surface, together with the PC or audio/video source.
- The distance between the projector and the screen determines the actual size of the image.
- Position the projector so that the lens is set at a right angle to the screen. If the projector is not set at a right angle, the image on the screen will be crooked. If the screen image is crooked, use the Keystone function.
- Connect the power cords of the projector and any connected devices to the power outlet.
flowchart
graph TD
    A["Screen"] --> B["Lens shift Max."]
    A --> C["Projection distance D"]
    B --> D["0%"]
    B --> E["Max."]
    C --> F["X/2 Screen Height (X)"]
    C --> G["X/2 Screen Height (X)"]
    style A fill:#f9f,stroke:#333
    style B fill:#ccf,stroke:#333
    style C fill:#cfc,stroke:#333
    style D fill:#fcc,stroke:#333
    style E fill:#fcc,stroke:#333
    style F fill:#cff,stroke:#333
    style G fill:#cff,stroke:#333
| 16:9 Aspect Ratio | ||||
| Screen Projection Distance | ||||
| Screen Size (mm) | Screen Width (Y) (mm) | Screen Height (X) (mm) | Min. projection distance (D1) (m) | Max. projection distance (D2) (m) |
| 762 | 664 | 374 | 0.87 | 1.15 |
| 1016 | 886 | 498 | 1.17 | 1.54 |
| 1270 | 1107 | 623 | 1.48 | 1.94 |
| 1524 | 1328 | 747 | 1.78 | 2.33 |
| 1778 | 1550 | 872 | 2.09 | 2.73 |
| 2032 | 1771 | 996 | 2.39 | 3.13 |
| 2286 | 1992 | 1121 | 2.70 | 3.52 |
| 2540 | 2214 | 1245 | 3.00 | 3.92 |
| 2794 | 2435 | 1370 | 3.31 | 4.32 |
| 3048 | 2657 | 1494 | 3.61 | 4.72 |
| 3302 | 2878 | 1619 | 3.92 | 5.11 |
| 3556 | 3099 | 1743 | 4.22 | 5.51 |
| 3810 | 3321 | 1868 | 4.53 | 5.91 |
| 4064 | 3542 | 1992 | 4.83 | 6.30 |
| 4318 | 3763 | 2117 | 5.13 | 6.70 |
| 4572 | 3985 | 2241 | 5.44 | 7.10 |
| 4826 | 4206 | 2366 | 5.74 | 7.49 |
| 5080 | 4428 | 2491 | 6.04 | 7.89 |
| 5334 | 4649 | 2615 | 6.35 | 8.29 |
| 5588 | 4870 | 2740 | 6.66 | 8.68 |
| 5842 | 5092 | 2864 | 6.96 | 9.08 |
| 6096 | 5313 | 2989 | 7.27 | 9.48 |
| 6350 | 5535 | 3113 | 7.57 | 9.87 |
| 6604 | 5756 | 3238 | 7.88 | 10.27 |
| 6858 | 5977 | 3362 | 8.18 | 10.67 |
| 7112 | 6199 | 3487 | 8.49 | 11.06 |
| 7366 | 6420 | 3611 | 8.79 | 11.46 |
| 7620 | 6641 | 3736 | 9.10 | 11.86 |
Turning on the Projector
-
Connect the power cord correctly to turn the projector on.
-
Press the POWER button. The power indicator blinks green.
• Power on time is long due to the characteristics of the 3D projector.
- Press the INPUT button to select an input signal.
• There will be a brief sound when the projector is turned on.
- Check if the lens cap is open before turning on the projector.
Turning off the Projector
- Press the POWER button.

- The unit will turn off when you press the POWER button a second time. Do not disconnect the power cord if the operation indicator is cyan, i.e. the fan is still running (90 seconds). Disconnect the power cord when the operation indicator becomes blue.
Focus and Position of the Screen Image
When an image appears on the screen, check if it is in focus and fits the screen properly.
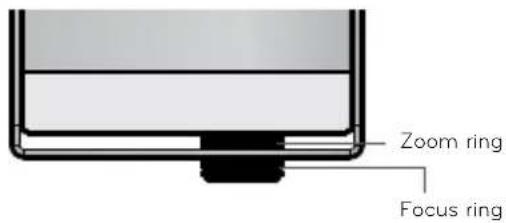
• To adjust the focus of the image, rotate the focus ring.
- To adjust the size of the image, rotate the zoom ring.
If you need to move the screen image up or down, use the lens shift dial at the top of the projector to adjust the height as shown below.
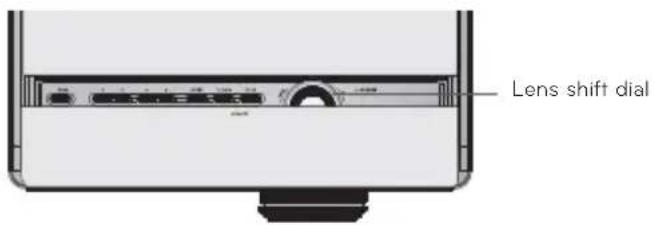
- Turn the LENS SHIFT dial left or right to adjust the projected image position up or down.
• Turning the LENS SHIFT dial with excessive force may cause damage to the projector.
Selecting Input Signal
- Press the INPUT button.
- Select an input signal using the remote control's INPUT button to connect the projector to the desired input. You can toggle between inputs using the <, > buttons.
Input List

- You can also select an input signal directly using the TV, VIDEO, COMPONENT, RGB, HDMI1 and HDMI2 buttons of the remote control.
• The connected input is displayed first.
Connecting Device
Connecting a Speaker or Headphones
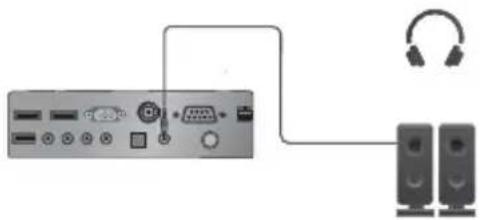
To listen to sound through speakers, earphones or headphones, connect them to the voice output jack of the projector.
natural_image
Diagram showing connection between a computer interface and two audio equipment units (no text or symbols visible)Connecting an Antenna
To watch TV programs using an indoor/outdoor antenna, connect the antenna line to the projector's ANTENNA IN port.
* Be careful not to bend the copper wire when connecting the (75Ω) coaxial cable.
* Turn the input jack to the right to fasten it.
* Ensure you use a standard coaxial cable (75Ω) when connecting to the TV input.
* To obtain better image quality in locations where signal strength is low, please purchase and install a signal amplifier (booster).
* A signal splitter is required if one antenna sends a signal to more than two TVs.
* If you have any problems with antenna installation, please consult a specialist retailer or the retailer from which you purchased the antenna.

Connecting to a PC
* You can connect the projector to a computer with an VGA, SVGA, XGA or SXGA output.
* See page 51 for a list of supported monitors.
Connect the projector's RGB IN port to the computer's RGB output port using a computer cable.

* For IBM PC/AT-compatible laptops, video can be displayed on both the laptop monitor and the external one. If the video is displayed on both, the image quality on the external monitor may not be satisfactory. In this case, configure the laptop's video output to the external monitor only. (For more detailed information, refer to your laptop's user manual.)

Connecting to a Video Player
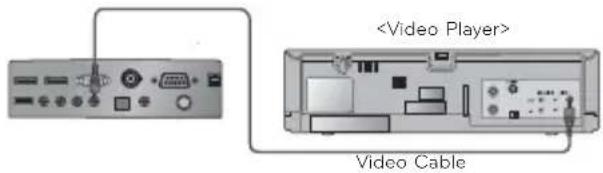
Connect the projector's VIDEO port to the audio/video device's output jack using a video cable.
Connecting to a DVD Player
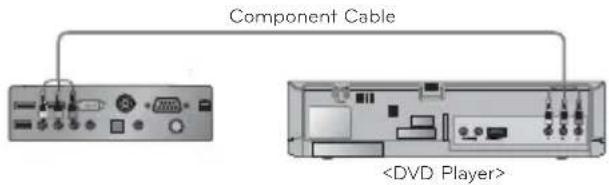
* The output jack Y, Pb or Pr of the DVD player may be marked as Y, Pb, Pr/Y, B-Y, R-Y/Y, Cb, or Cr depending on the model.
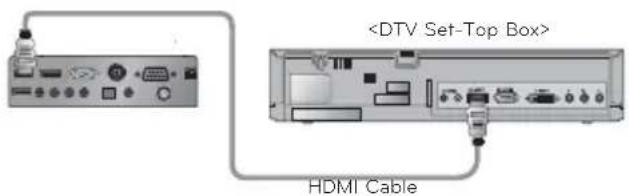
- Connect the projector's HDMI IN 1 (or HDMI IN 2) port to the DVD player's HDMI port using an HDMI cable.
- Set the DVD player's resolution to one of the following: 480p, 720p, 1080i, or 1080p.
Turn on the projector, then turn on the HDMI device.

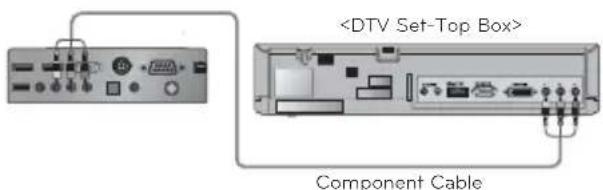
Connect the projector's COMPONENT IN port to the DVD player's output port using a component cable.
* Match the jack colors to the component cable when connecting. (Y=Green, PB=Blue, PR=Red)
Connecting to a DTV Set-Top Box
* Please refer to the user manual of the DTV set-top box to connect to the projector, as well as for instructions on how to use the DTV set-top box.
- Connect the projector's HDMI IN 1 (or HDMI IN 2) port to the DTV set-top box's HDMI port using an HDMI cable.
- Set the DTV's resolution to one of the following: 480p, 720p, 1080i, or 1080p.
Turn on the projector, then turn on the HDMI device.
Connect the projector's COMPONENT IN port to the DTV set-top box's output port using a component cable.
* Match the jack colors to the component cable when connecting. (Y=Green, PB=Blue, PR=Red)
3D Function
* 3D technology uses different video frames for each eye to add depth to the video.
* 3D images can be viewed only on a silver screen.
Caution When Watching 3D Video
- Watch 3D images within the optimum viewing angle and distance.
- If you are outside the optimum viewing angle or distance, you may not be able to watch 3D images.
- If you view 3D images too closely for a long period of time, this may cause blurred vision.
- If you view 3D images wearing 3D glasses for a long period of time, this may cause drowsiness or eye strain.
- You should stop watching if you experience a headache, fatigue or dizziness.
• If you are pregnant, a senior, have heart problems or easily feel motion sickness, we recommend you do not view 3D images.
- Because 3D images can cause disorientation and confusion, some viewers may get surprised or overexcited.
- Do not watch 3D images near fragile objects or any objects that can be knocked over easily.
- If you are startled or misconstrue the 3D images as real, you may knock over a nearby object or injure yourself trying to move your body.
- Do not use 3D glasses as ordinary glasses, sunglasses or protective goggles. If you do so, this may cause injury.
- Do not store 3D glasses in very hot or very cold conditions. If you do so, this may cause them to become deformed.
• The lenses of 3D glasses (polarizing film) are easily scratched. Use a soft clean cloth when cleaning them.
Be careful because any foreign particles on the cloth may result in scratches.
- Do not scratch the surface of 3D glasses' lenses (polarized film) with sharp objects or wipe them with chemicals.
- If the polarized film gets scratched, images may not look normal when viewing 3D.
- The lenses of 3D glasses are different from those of ordinary glasses and very thin. Therefore, handle the glasses with care as the lenses can pop out easily.
- Photosensitivity seizure warning – Some users may experience a seizure or other abnormal symptoms when they are exposed to a flashing light or particular pattern from a video game or movie. If anyone in your family has a history of epilepsy or has ever experienced any kind of seizure, please consult your doctor before viewing 3D images. You may exhibit any of the symptoms listed below even if you do not have previous medical problems of this nature.
- Dizziness, fatigue, twitching of the eye or face muscles, involuntary movements, cramp, loss of consciousness, confusion, loss of sense of direction, or nausea
If you exhibit any of these symptoms when viewing 3D images, please stop viewing immediately and consult your doctor. Extra special care is required for children watching 3D video. You can reduce the risk of photosensitive seizures with the following preventive measures.
- Do not watch 3D video when very sleepy, tired or sick, and avoid watching 3D video for a long period of time.
Requirements for Watching 3D Images

Note!
- Some menus and functions may not be available in 3D mode.
- You can watch 3D video properly only when the 3D video format option has been selected on the projector.
Watching 3D Images
- Please refer to the table below for supported 3D video formats.
| Signal Resolution | Horizontal Frequency (kHz) | Vertical Frequency (Hz) | Supported 3D Formats | ||
| HDMI | 720P 1280 x 720 | 45.00 60 | Top & Bottom, Side by Side HDMI 3D Top & Bottom | ||
| 37.50 50 | |||||
| 90.00 60 | HDMI 3D Frame Packing | ||||
| 75.00 50 | |||||
| 1080i | 1920 x 1080 | 33.75 60 | Top & Bottom, Side by Side HDMI 3D Side by Side (Half) | ||
| 28.125 50 | |||||
| 1080p | 27.00 24 | Top & Bottom, Side by Side, Checker Board, Frame Sequential HDMI 3D Top & Bottom | |||
| 54.00 24 HDMI 3D Frame Packing | |||||
| 33.75 30 | Top & Bottom, Side by Side, Checker Board, Frame Sequential | ||||
| 67.50 60 | |||||
| 56.25 50 | |||||
| RGB 1080p 1920 x 1080 67.50 60.00 Top & Bottom, Side by Side | |||||
| Signal | Supported 3D Formats | ||||
| DTV | 720p, 1080i | Top & Bottom, Side by Side | |||
- To play videos and media in HDMI 3D Frame Packing, HDMI 3D Side by Side or HDMI 3D Top & Bottom, the player need to support these formats.
-
HDMI 3D Frame Packing, HDMI 3D Side by Side or HDMI 3D Top & Bottom formatted video is converted into stereoscopic format automatically.
-
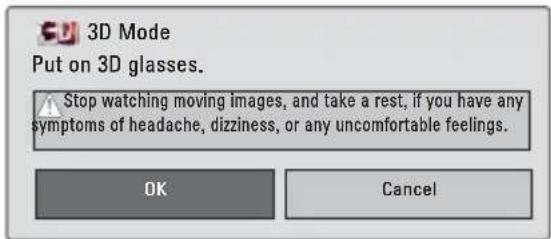
Press the 3D button and select OK.
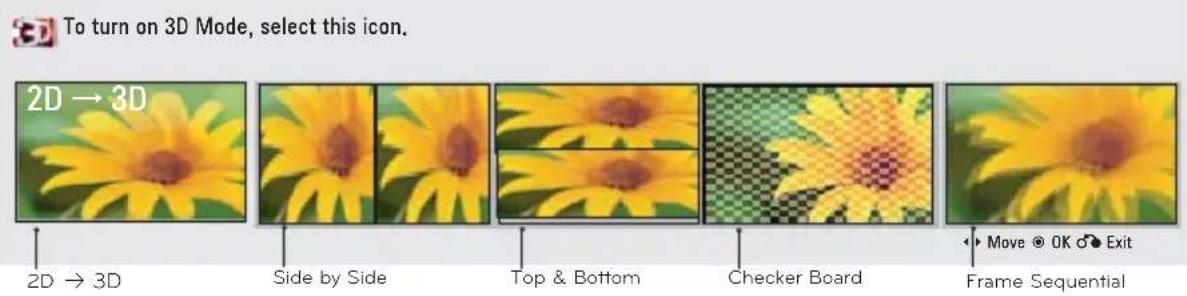
- Press the < or > button to select the picture display format to be shown on the screen, then put on your 3D glasses.
-
When you select 2D → 3D, you can watch 2D video as 3D video.
• The image quality of 2D → 3D video may be not as good as that of a video title originally made in 3D. -
Press the 3D button during viewing to exit 3D mode and watch 2D video.

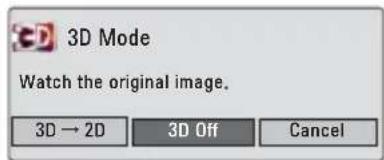
| Option Description | |
| 3D → 2D Watch | 3D Image in 2D mode. |
| 3D Off Watch the | original image. |
| 2D → 3D Show | 3D effects. |
| Cancel Close the | pop-up window. |
Setting 3D Mode
| Option Description | ||
| 3D Mode Setting | 3D Picture Correction | Switches left/right videos. Select a 3D video of better picture quality. |
| 3D Depth Adjusts the stereoscopic effect of the 3D image converted from a 2D image. | ||
| 3D Viewpoint | Moves the 3D image forwards and backwards to adjust the 3D perspective view. | |
| Set Video See | the Video Function - Screen Function sections. | |
Exiting 3D Mode
<3D Mode> <3D to 2D Mode>


Function
* The On-Screen Display (OSD) in this manual is an example to help you understand how to operate the product, and may be slightly different on your projector.
* Most of the examples shown are with RGB (PC) input.
Channel Functions
Auto Tuning
- Press the MENU button, then go to Channel with the ∧, ∨, <, > buttons and press OK ⓒ.
- Press the ∧, ∨ buttons to go to Auto Tuning and press OK Ⓞ.
- Press the ∧, ∨ buttons to go to Yes and press OK Ⓞ.

- You can save up to 1000 channels when setting to either Auto Tuning or Manual Tuning. The maximum number depends on the broadcasting signal environment.
• Auto Tuning only adds channels being broadcast. - Press the BACK button to exit the menu screen.
Changing Channels
Change channels by using Channel ∧, ∨ buttons or 0 - 9 buttons.
Manual Tuning
* While watching TV, you can add or delete a channel.
1. Press the MENU button, then go to Channel with the ∧, ∨, <, > buttons and press OK Ⓞ.
2. Press the ∧, ∨ buttons to go to Manual Tuning and press OK Ⓞ.
3. Press the , , <, > buttons to select the type and number of a desired channel.
4. Press the ∧, ∨ buttons to go to Delete (or Add) and press OK Ⓞ.

- Press the BACK button to exit the menu screen.
Editing Channels
-
Press the MENU button, then go to Channel with the ∧, ∨, <, > buttons and press OK Ⓞ.
-
Press the A, V buttons to go to Channel Edit and press OK ☑.
-
Press the , , <, > buttons to select a channel to edit.
-
The following buttons are used to edit channels.

Ch. Change ↩ Navigation ⬤ Page Change ⬦ Previous
Add/Delete
| Button Description | |
| , , <, > | Moves to a desired channel. |
| ◎ OK | Selects a channel. |
| Channel , | Moves to a page. |
| (Blue button) | Adds or deletes a channel. A deleted channel becomes blue. |
- Press the BACK button to exit the menu screen.
Setting Favorite Channels
* While watching TV, you can add a channel to your favorite channels.
- With Channel ∧, ∨ or 0 - 9 buttons, select a desired channel.
- Press the Q.MENU button on the remote control.
- Press the <,> buttons to select Del/Add/Fav.
-
Press the , V buttons to select Favorite.
-
If you select Delete, the selected channel is deleted. If you select Add, the selected channel is added.
- Press the BACK button to exit the menu screen.
Using the List of Favorite Channels
- Press the FAV button on the remote control.
- Press the ∧, ∨ buttons to go to a desired channel and press OK Ⓞ. Press Channel ∧, ∨ buttons to go to a desired page.
- Press the BACK button to exit the menu screen.


Displaying Program Information
If you press the Info button or OK button on the remote control, the program information is displayed on the screen.
1 Banner information
2 Program title
3 Day, Month, Year
4 Program audio, video information
5 Program start/finish time, progress bar
6 Present time

- Press the BACK button to exit the menu screen.
Video Function
Picture Mode
* The best picture quality is maintained according to the selected picture option.
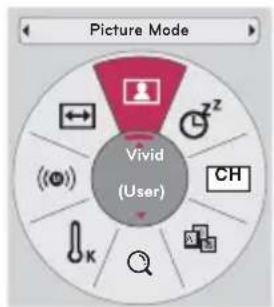
- Press the PICTURE button on the remote control.
- Press the , V buttons to select a picture Mode.
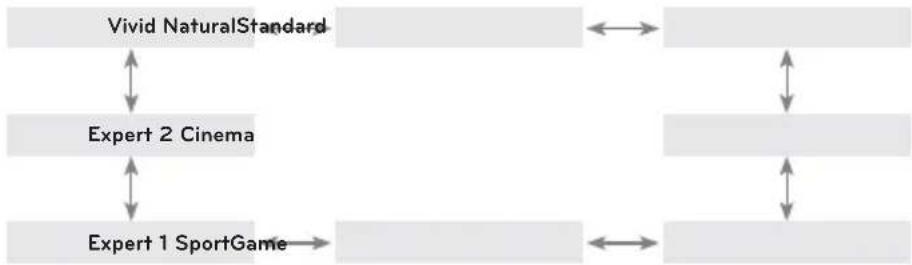
flowchart
graph TD
    A["Vivid NaturalStandard"] <--> B["Expert 2 Cinema"]
    B <--> C["Expert 1 SportGame"]
    C <--> D["..."]
• You can also use the MENU or Q.MENU button.
- Press the BACK button to exit the menu screen.
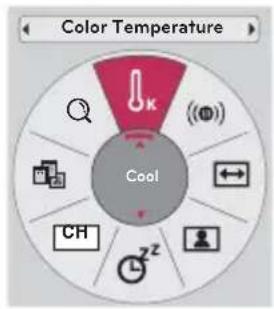
Adjusting Color Temperature
- Press the Q.MENU button on the remote control.
- Press the <,> buttons to go to Color Temperature.
- Press the , buttons to select a picture option.
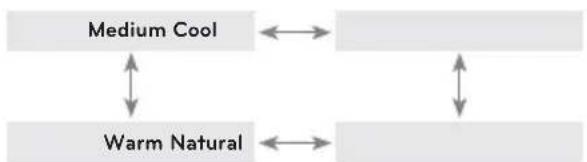
flowchart
graph TD
    A["Medium Cool"] <--> B["Warm Natural"]
    C[" "] <--> D[" "]
• This function is available only for Vivid/Standard/Natural/Cinema/Sport/Game.
• You can select this function through the MENU button.
- Press the BACK button to exit the menu screen.
Adjusting Picture Settings
- Press the MENU button, then go to Picture with the ∧, ∨, <, > buttons and press OK Ⓞ.
- Press the , V buttons to go to a desired picture option and press OK.
- Press the <,> buttons to adjust the picture settings and press OK Ⓞ.

• For each option and Picture Mode, you can set different picture preference values.
- If you save your settings after configuration, (User) is displayed in the picture. (excluding Expert 1/2)
- If you want to reset to factory defaults after picture configuration, initialize each Picture Mode.
- Press the BACK button to exit the menu screen.
Advanced Options
- Press the MENU button, then go to Picture with the ∧, ∨, <, > buttons and press OK Ⓞ.
- Press the ∧, ∨ buttons to go to Advanced Control and press OK Ⓞ.
- Press the , V buttons to go to a desired item.
-
Press the <,> buttons to adjust the picture settings and press OK Ⓞ.
-
For each option and Picture Mode, you can set different picture preference values.
- If you want to reset to factory defaults after picture configuration, initialize each Picture Mode.
- Press the BACK button to exit the menu screen.

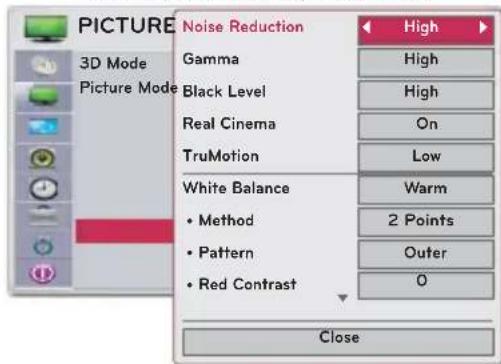
* Configurable options may differ depending on input signal or video settings, etc.
| Color Temperature | - This function is available only for Vivid/Standard/Natural/Cinema/Sport/Game.·Changes the color saturation settings. Warm will have more reds and cool will have more blues. |
| Noise Reduction | ·Reduces image noise. |
| Gamma | ·Sets a gradation curve of brightness between video input and output signal.You can select Medium/High/Low. |
| Black Level | ·Changes the ratio between the brightness and contrast of the screen. You can select Low/High.·If the black video is saturated or hazy, you can adjust it with High or Low.·This is not available for RGB input. |
| Real Cinema | ·Provides optimal picture quality for watching a movie. You can select On or Off.·If the component input is 480i signal/Video/Component 1080i/ HDMI, pictures may not be smooth depending on the output format of the DVD title. In this case, set Real Cinema to On. |
| TruMotion | ·Displays smooth video by increasing the frame rate.You can select Off/Low/High.·If you feel the video is not smooth with the High option, you can select Low or Off.·If the picture is set to Game, this option is switched to Off.·This is not available for PC mode.·When you configure the Keystone function, TruMotion is set to Off. To enable TruMotion, initialize the Keystone. |
| White Balance | - This function is for TV calibration professionals. This function is available only available in Expert 1/2.·You can select the screen color.a. Method: 2 Points- Pattern: Inner, Outer- Contrast Red/Green/Blue, Brightness Red/Green/Blue: Adjustable range -50 to +50.b. Method: 20 Points IRE- Pattern: Inner, Outer- IRE (Institute of Radio Engineers) is the unit indicating the size of a video signal in 5, 10, 15 to 95, 100.- Red/Green/Blue: Adjustable range -50 to +50 for each IRE configuration. |
| Color Management System | - This function is available only available in Expert 1/2.·Professionals use this for test pattern-based adjustment. 6 colors (Red/Green/Blue/Cyan/Magenta/Yellow) can be adjusted without affecting other colors. No significant color change is detected for a normal video.You can adjust Red/Green/Blue/Yellow/Cyan/Magenta colors.- Chroma Red/Green/Blue/Yellow/Cyan, Magenta: Adjustable range -30 to +30 for each.- Hue Red/Green/Blue/Yellow/Cyan, Magenta: Adjustable range -30 to +30 for each.- This is not available for RGB input. |
Picture Initialization Function
* The settings for each input and Picture Mode are reset to the factory defaults.
1. Press the MENU button, then go to Picture with the ∧, ∨, <, > buttons and press OK Ⓞ.
2. Press the ∧, ∨ buttons to go to Picture Reset and press OK Ⓞ.
3. Press the <,> buttons to select Yes and press OK Ⓞ.
- Press the BACK button to exit the menu screen.

TruMotion Demo Function
* You can preview the live scan function.
- Press the MENU button, then go to Picture with the , V, <, > buttons and press OK.
- Press the ∧, ∨ buttons to go to TruMotion Demo and press OK Ⓞ.
• This is not available for RGB input.
- Press any button to exit TruMotion Demo.
- Press the BACK button to exit the menu screen.

Screen Function
Using the Pause Function
- Press the STILL button on the remote control.
* You can temporarily stop a video being played.

- To clear the pause function, press the STILL button once again.
* The pause function is automatically cleared after 10 minutes.
Using the Screen Size Function
Press the RATIO button on the remote control.

flowchart
graph TD
    A["16:9 Set By Program Just Scan"] --> B["Cinema Zoom1 4:3Zoom"]
    B --> C[" "]
    C --> D[" "]
    D --> E[" "]
    E --> F[" "]
    F --> G[" "]
    G --> H[" "]
    H --> I[" "]
    I --> J[" "]
    J --> K[" "]
    K --> L[" "]
    L --> M[" "]
    M --> N[" "]
    N --> O[" "]
    O --> P[" "]
    P --> Q[" "]
    Q --> R[" "]
    R --> S[" "]
    S --> T[" "]
    T --> U[" "]
    U --> V[" "]
    V --> W[" "]
    W --> X[" "]
    X --> Y[" "]
    Y --> Z[" "]
    Z --> A
- Settings may vary depending on the input signal.
• You can also use the MENU or Q.MENU button. - Press the BACK button to exit the menu screen.

Test Pattern Function
* You can adjust screen size and focus while installing the projector.
Press the PATTERN button on the remote control.
- You can select this function through the MENU button.

natural_image
Simple geometric diagram with a circle centered within a rectangle divided by perpendicular lines (no text or symbols)Using Keystone
* To prevent the screen image from becoming trapezoidal, Keystone adjusts the top and bottom width of the image if the projector is not set at a right angle to the screen.
* Because the Keystone function may cause inferior screen image quality, use this function only when it is not possible to set up the projector at an optimal angle.
- Press the KEY.S button on the remote control.
- Press the ∧, ∨ buttons to select a desired option and press the > button.
- Press the ∧, ∨, <, > buttons to adjust the screen and press OK ●.
• The Keystone is adjusted -100 to 0 or 0 to 100 depending on position.
• To reset to the factory defaults, perform Picture Reset.
• You can select this function through the MENU button.
- Press the BACK button to exit the menu screen.

Changing Projection Mode (PJT Mode)
* You can flip the video up/down or left/right.
- Press the MENU button, then go to Screen with the ∧, ∨, <, > buttons and press OK Ⓞ.
-
Press the , V buttons to go to Projection Mode and press OK ☑.
-
Select Rear to project an image onto the back of a transparent screen purchased separately.
- Select Ceiling if you installed the projector on a ceiling.
• You can select this function through the MENU button. - Press the BACK button to exit the menu screen.
Using the AUTO Function
* AUTO provides optimized picture quality by automatically calibrating the mismatch of horizontal width and picture shake caused by clashes between the internal settings of the projector and various PC graphic signals in RGB mode.
* The AUTO function is available only for RGB input.
Press the AUTO button on the remote control.
- If you use AUTO for video signal from a PC, you may not be able to get optimized picture quality. Therefore, use the AUTO function for still images.
- You can select this function through the MENU button.

Auto Config.
Adjusting PC Input
- Press the MENU button, then go to Screen with the ∧, ∨, <, > buttons and press OK Ⓞ.
- Press the , buttons to go to RGB Config. and press OK
- Press the ∧, ∨ buttons to select a desired option and press the > button.
- Press the∧, ∨, <, > buttons to adjust the screen and press OK ●.
• Available resolutions are 768 resolution (1024x768/1280x768/1360x768, 60Hz) and 1050 resolution (1400x1050/1680x1050, 60Hz).
- Press the BACK button to exit the menu screen.

Audio Function
Adjusting Volume
Adjust the volume by using the VOL ∧, ∨ buttons on the remote control.
• You can select this function through the MENU button.
- You can adjust the volume only when a headset is connected. Adjust the volume of an audio receiver if only SPDIF is connected without a headset.
Stereo/SAP Broadcast Setup
* On analog signals, this projector can receive MTS stereo programs and any SAP (Secondary Audio Program) that accompanies the stereo program if the station transmits an additional sound signal. Mono sound is automatically used if the broadcast is only in Mono.
< Analog TV >
-
Press the Q.MENU button on the remote control.
-
Press the <, > buttons to move SAP.
-
Press the , button to select a desired item.
- Press the BACK button to exit the menu screen.

< Digital TV >
-
Press the Q.MENU button on the remote control.
-
Press the <, > buttons to move Multi Audio.
-
Press the ∧, ∨ button to select a desired item.
- Press the BACK button to exit the menu screen.

Time Function
Setting Current Time
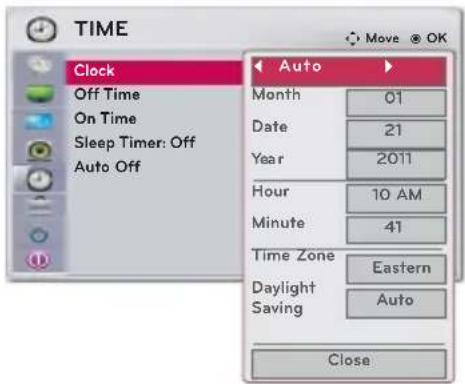
* You can check or change the time while using the projector.
- Press the MENU button, then go to Time with the ∧, ∨, <, > buttons and press OK Ⓞ.
- Press ∧, ∨ buttons to go to Clock and press OK●.
< Auto Setup >
- Press <, > buttons to set Auto.
In the case of digital broadcasting, date and time are automatically set when the projector receives information from a broadcasting station. Current time may not be automatically set or may be incorrect depending on the broadcasting station signal. If the current time is incorrect, use Manual to set it again.
< Manual Setup >
- Press<, > buttons to go to Manual.
- Press the ∧, ∨, <, > buttons to set Year/Month/Date/Hour/Minute.
• If there is a blackout or the power plug is disconnected from the power outlet, the current time is deleted and must be set again.
- Press the BACK button to exit the menu screen.
Scheduling On and Off
* You can set the On/Off Time of the projector.
- Press the MENU button, then go to Time with the ∧, ∨, <, > buttons and press OK Ⓞ.
- Press ∧, ∨ buttons to go to Off Time or On Time and press OK Ⓞ.
- Press ∧, ∨, <, > buttons to set Repeat.
- Press ∧, ∨, <, > buttons to set Hour/Minute/Input/Channel/Volume.
| Options D | Description |
| Repeat | If you did not set Power On/Off Time, select Off in Repeat. |
| Hour/Minute | Sets Hour/Minute of Power On/Off Time. |
| Input/Channel | Sets Input/Channel when the projector is turned on.If the input is set to TV, the channel can be one of DTV/TV/DTV Cable/TV Cable.If the input is set to external, no channel is available. |
| Volume | Sets the volume when the projector is turned on. |
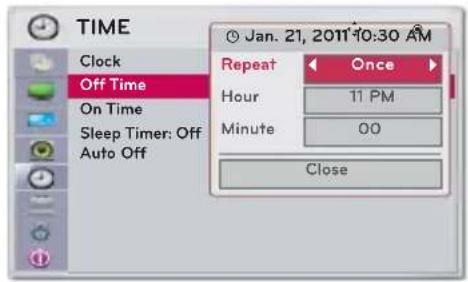
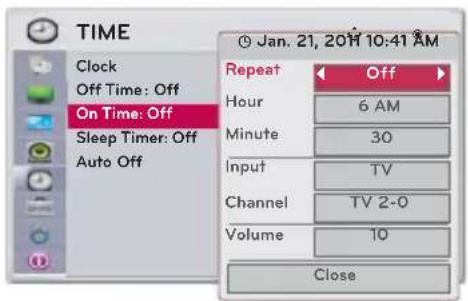
- This works normally only when current time is configured. If Off Time and On Time are the same, Sleep takes priority when the projector is on and Power On takes priority when the projector is off.
- Although the projector can be turned on by the On Time function, it is automatically turned off if no button is pressed within 120 minutes. This is a convenient function if you are away from your home for a long period of time.
- Press the BACK button to exit the menu screen.
Using SLEEP Function
* The projector can be turned off at a preset time.
-
Press the SLEEP button on the remote control.
-
Press the ∧, ∨ buttons to select a desired preset time.

flowchart
graph TD
    A["Off 30 min"] --> B["10 min. 20 min."]
    B --> C[" "]
    C --> D["60 min."]
    D --> E["240 min. 90 min. 180 min. 120 min."]
    E --> F[" "]
    F --> G[" "]
• You can also use the MENU or Q.MENU button.
- Press the BACK button to exit the menu screen.

Auto Off
* If there is no signal, the projector automatically turns off after the preset time has elapsed.
- Press the MENU button, then go to Time with the ∧, ∨, <, > buttons and press OK Ⓞ.
- Press the <,> buttons to go to Auto Off.
- Press the , V buttons to select a desired preset time.

flowchart
graph LR
    A["60 min. 10 min.Off"] --> B["Block"]
    B --> C["Block"]
    C --> D["30 min. 20 min."]
    D --> A
• You can select this function through the MENU button.
- Press the BACK button to exit the menu screen.
Option Functions
Selecting a Language
- Press the MENU button, then go to Options with the ∧, ∨, <, > buttons and press OK Ⓞ.
- Press ∧, ∨ buttons to go to Menu Language and press the OK Ⓞ.
-
Press ∧, ∨, <, > buttons to go to a desired item and press OK Ⓞ.
-
From now on, OSD is displayed in the selected language.
- Press the BACK button to exit the menu screen.

Selecting Audio Language
* Other languages may be available if a digital signal is provided by the broadcasting station. This feature operates only in DTV/CADTV mode.
- Press the MENU button. Then, move to OPTION with the , Vi <, > buttons and press the ⓄOK button.
- Press the , buttons to move Audio Language and press the OK button.
- Press the , buttons to select English, Spanish or French and press the ⓄOK button.
- Press the BACK button to exit the menu screen.

Setting Caption
- Press the MENU button. Then, move to OPTION with the ∧, ∨, <, > buttons and press the ⓄOK button.
- Press the∧, ∨ buttons to move Caption and press the ⓄOK button.
- Press the<,> buttons to select On.
< Analog Broadcasting System Captions >
* Caption must be provided to help people with hearing loss watch program. Select a caption mode for displaying captioning information if provided on a program. Analog caption displays information at any position on the screen
and is usually the program's dialog. Caption/Text, if provided by the broadcaster, would be available for both digital and analog channels on the Antenna/Cable. This projector is programmed to memorize the caption/text mode which was last set when you turned the power off. This function is only available when Caption is set On.

-
Press the <,> buttons to select CC1-4 or Text1-4.
-
When selecting Off, Sub-menus for Analog, DTV, and Digital Option become disabled.
- CAPTION: The term for the words that scroll across the bottom of the screen; usually the audio portion of the program provided for the hearing impaired.
TEXT: The term for the words that appear in a large black frame and almost cover the entire screen; usually messages provided by the broadcaster.
< Digital Broadcasting System Captions >
* Choose the language you want the DTV/CADTV Captions to appear in.
Other Languages can be chosen for digital sources only if they are included on the program. This function in only available when Caption is set On.
4. Press the <, > buttons to select CC1-4, Text1-4 or Service1 - 6.
5. Press the A, V buttons to move Digital Option and press the ⓄOK button.
6. Press the <,> buttons to select Custom.
7. Press the , V, <, > buttons to customize the Style, Font, etc., to your preference. A preview icon is provided at the bottom of the screen, use it to see the caption language.
• Size: Set the word size.
Font: Select a typeface for the text.
Text Color: Choose a color for the text.
Text Opacity: Specify the opacity for the text color.
Bg (Background) Color: Select a background color.
Bg (Background) Opacity: Select the opacity for the background color.
- Press the BACK button to exit the menu screen.
Using the Blank Image Function
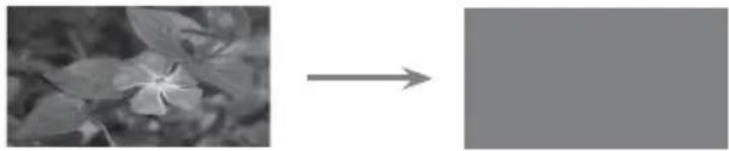
* To attract attention during a meeting or training, use the Blank Image function.
- Press the BLANK button on the remote control.
• The screen is covered by a background color.
- For more information about selecting background color, see the Selecting the Blank Image Color section below.
- Press any button to clear the Blank Image function.
- To cover the screen temporarily, press the BLANK button on the remote control. Do not block the lamp with any object while the projector is running. The object may be become misshapen and blocking the lamp is a fire risk.
natural_image
Two grayscale images showing a flower with leaves, one increasing and the other decreasing (no text or symbols)Selecting the Blank Image Color
- Press the MENU button, then go to OPTION with the ∧, ∨, <, > buttons and press OK ●.
- Press the ∧, ∨ buttons to go to Blank Image and press OK Ⓞ.
-
Press the , buttons to go to a desired item and press OK Ⓞ. (Black, Blue, Green, Logo)
-
The selected background color will be displayed when the Blank Image function is activated.
- Press the BACK button to exit the menu screen.

Camera Calibration
* This function automatically adjusts the brightness of the left and right engines of the 3D video projector, to provide a comfortable 3D video viewing environment by reducing eye strain when viewing.
- Press the MENU button, then go to OPTION with the ∧, ∨, <, > buttons and press OK●.
- Press the , V buttons to go to Camera Calibration and press OK ☑.
- Press the <,> buttons to select On.
- Press the A, V buttons to go to Calibration Start and press OK ☑.

• The value input on Camera Calibration applies only to 3D video. It does not apply to 2D video.
- When the surrounding lighting is too bright or the Projector screen size is less than 40 inches, the camera calibration may not work properly. In this case, refer to the warning message displayed on the screen.
• It operates 5 minutes after the power is turned on.
- Press the BACK button to exit the menu screen.
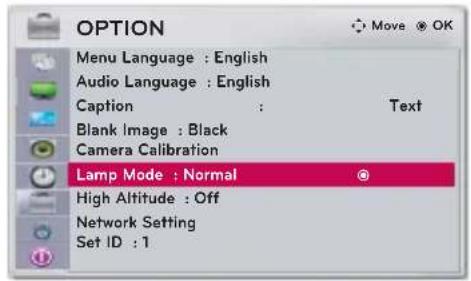
To adjust the brightness of the screen
- Press the MENU button, then go to OPTION with the ∧, ∨, <, > buttons and press OK Ⓞ.
- Press the ∧, ∨ buttons to go to Lamp Mode.
-
Press the , buttons to select an option. (Normal, Economic)
-
If room temperature is over 35°C or the 3D video is working, this is not available.
• You can select this function through the MENU button. - Press the BACK button to exit the menu screen.
High Altitude
* High Altitude is used at environments higher than 4,000 feet.
- Press the MENU button, then go to OPTION with the ∧, ∨, <, > buttons and press OK ●.
- Press the , V buttons to go to High Altitude and press OK ☑.
- Press the <,> buttons to select On and press OK Ⓞ.
- Press the BACK button to exit the menu screen.

Network Settings
< Notes >
• Use a standard LAN cable with this projector. (Cat5, Cat5E, or Cat6 with an RJ45 connector)
• If you experience any connection problems, restart your modem.
- A 10 Base-T or 100 Base-TX LAN port is required to connect to this projector. If your ISP (Internet Service Provider) does not provide such a connection, you will not be able to connect the projector to the network.
- To connect to a wireless router, a router that supports wireless connection is necessary; the wireless connection function of the corresponding router must also be activated. Ask the router manufacturer whether the router supports wireless connection.
- To connect to a wireless router, verify the SSID and security settings of the wireless router. Please refer to the user guide of the corresponding router regarding SSID and security settings of the wireless router.
- The projector may not work properly if network devices (wire/wireless router or hub, etc.) are incorrectly set up. Be sure to install the devices correctly by referring to their user guides before configuring network settings.
- When Ad-hoc is used, the projector may not be able to connect depending on the device (for example: notebook computer) that is connected.
• The connection method may vary according to the manufacturer of the wireless router.
Connect the LAN port of the projector to the LAN port of the PC or router using a LAN cable.

flowchart
graph TD
    A["PC"] --> B["LAN cable"]
    B --> C["<Router>"]
    C --> D["Connecting to a PC"]
- Press the MENU button, then go to OPTION with the ∧, ∨, <, > buttons and press OK Ⓞ.
- Press the , buttons to go to Network Setting and press OK.
-
Press the <,> buttons to select On for LAN option.
-
Press the , buttons to go to IP Auto Setting or IP Manual Setting and press OK Ⓞ.
-
Select IP Auto Setting for a server PC.
- Select IP Manual Setting for an ordinary PC.
- PC Setup: Set the Internet Protocol (TCP/IP) of the PC at your own discretion. Projector Setup: Set the IP Address as the same IP Address format of the PC, and select Close after entering the same gateway as the PC. Please refer to the eZ-Net Manager Guide for details of network settings.
:: Example::
| IP Address Subnet Mask Gateway | |||
| PC 192.168.0.10 255.255.255.0 | 192.168.0.1 | ||
| Projector | 192.168.0.254 | 255.255.255.0 | 192.168.0.1 |
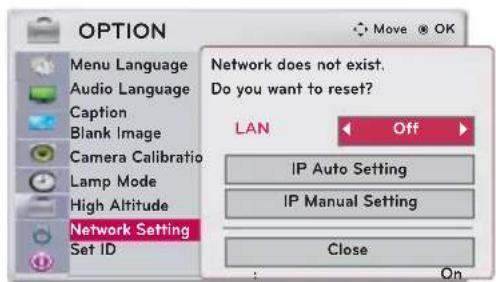

- If Network Setting is not working, check your network status and the LAN cable connection.
• If Network Setting is not completed, network functions may not work properly. - IP Auto Setting: Select this if there is a DHCP (Dynamic Host Configuration Protocol) server on the local area network (LAN) via a wired connection; the projector will automatically be allocated an IP address. It may not be possible to connect to DHCP if a firewall is installed or depending on the model of the computer.
IP Manual Setting: Select IP Manual Setting if there is no DHCP server on the network and you want to set the IP address manually.
- Press the BACK button to exit the menu screen.
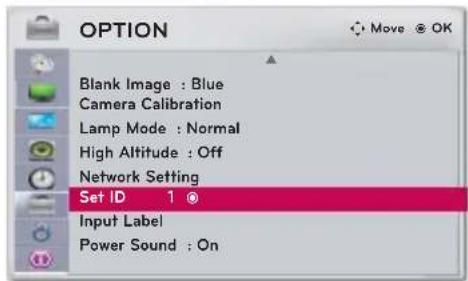
Setting SET ID
* Set ID is 1 - 99.
* Only the saved Set ID is effective.
- Press the MENU button, then go to OPTION with the ∧, ∨, <, > buttons and press OK Ⓞ.
- Press the ∧, ∨ buttons to go to SET ID and press OK ●.
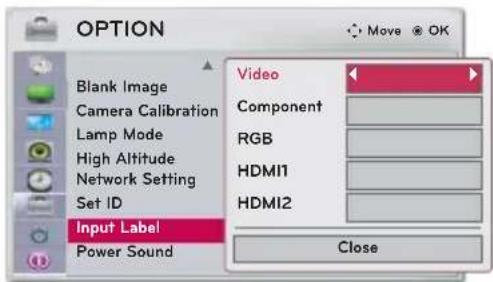
Setting the Name of a Connected Device
* You can set the name of an external device.
- Press the MENU button, then go to Options with the , , < , > buttons and press OK Ⓞ.
- Press the ∧, ∨ buttons to go to Input Label and press OK Ⓞ.
- Press the , V buttons to select an input.
- Press the <,> buttons to select a device.
- Press the ∧, ∨ buttons to select Close and press OK Ⓞ.
- Press the BACK button to exit the menu screen.
Setting Power Sound
* You can turn the opening sound on or off.
- Press the MENU button, then go to Options with the ∧, ∨, <, > buttons and press OK Ⓞ.
- Press the <,> buttons to go to Power Sound.
• You can select this function through the MENU button.
- Press the BACK button to exit the menu screen.

PARENTAL CONTROL/RATINGS
* Parental Control can be used to block specific channels, ratings and other viewing sources.
The Parental Control Function (V-Chip) is used to block program viewing based on the ratings sent by the broadcasting station. The default setting is to allow all programs to be viewed. Viewing can be blocked by choosing the type of the program and the categories. It is also possible to block all program viewing for a time period. To use this function, the following must be done :
- Set ratings and categories to be blocked.
- Specify a password
- Enable the lock
V-Chip rating and categories
Rating guidelines are provided by broadcasting stations. Most television programs and television movies can be blocked by TV Rating and/or Individual Categories. Movies that have been shown at the theaters or direct-to-video movies use the Movie Rating System (MPAA) only.
Ratings for Television programs including made-for-TV movies:
• TV-G (General audience)
• TV-PG (Parental guidance suggested)
• TV-14 (Parents strongly cautioned)
• TV-MA (Mature audience only)
• TV-Y (All children)
• TV-Y7 (Children 7 years older)
LOCK
Setting a Password
* To use Locking System function, you need to set a password.
-
Press the MENU button, then go to LOCK with the ∧, ∨, <, > buttons and press OK Ⓞ.
-
Press the 0 - 9 buttons to set a password.
• The password is entered.
• The initial password of projector is "O-O-O-O".
- Press the BACK button to exit the menu screen.

Changing a Password
* You can change the password.
- Press the MENU button, then go to LOCK with the ∧, ∨, <, > buttons and press OK Ⓞ.
- Press the 0 - 9 buttons to enter a password.
- Press the ∧, ∨ buttons to go to Set Password and press OK ●.
- Press the 0 - 9 buttons to enter a new password. Enter the password once again for verification.

- Press the BACK button to exit the menu screen.
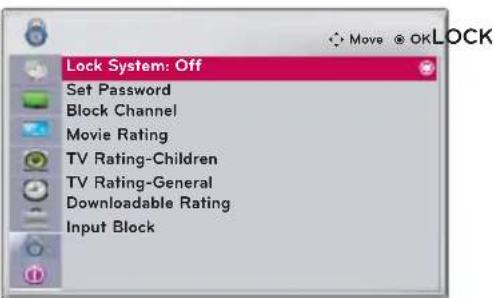
Locking System
* Turn on the Locking System of channels and external devices.
- Press the MENU button, then go to LOCK with the ∧, ∨, <, > buttons and press OK Ⓞ.
- Press the 0 - 9 buttons to enter a password.
- Press the A, V buttons to go to Lock System and press OK ☑.
-
Press the ∧, ∨ buttons to select On and press OK Ⓞ.
-
When you select On, the Lock System function of channels and external devices is activated.
- Press the BACK button to exit the menu screen.
Enabling Block Channel
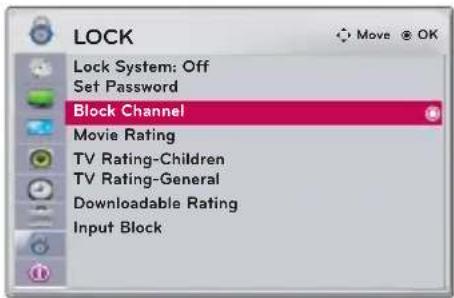
- Press the MENU button, then go to LOCK with the ∧, ∨, <, > buttons and press OK Ⓞ.
- Press the 0 - 9 buttons to enter a password.
- Press the ∧, ∨ buttons to go to Set Password and press OK Ⓞ.
-
Press the , V, <, > buttons to select a channel and press the GREEN (☐) button. A channel is locked or unlocked.
-
When you enter the password for a locked channel, the channel is unlocked.
- Press the BACK button to exit the menu screen.
Movie Rating (MPAA)
* Blocks movies according to the movie ratings limits specified, so children cannot view certain movies. You can set the ratings limit by blocking out all the movies with the ratings above a specified level. Keep in mind that the movie ratings limit only applies to movies shown on projector, not TV programs, such as soap operas.
- Press the MENU button. Then, move to LOCK with the ∧, ∨, <, > buttons and press the ⓄOK button.
- Press the number 0 - 9 to input the password.
- Press the∧, ∨ buttons to move Movie rating and press the ⓄOK button.
-
Move to a desired item with the\, V buttons and then press the OK button.
-
If Movie Rating, TV Rating-Children or TV Rating-General is locked, enter the password to unlock it temporarily.
• If you set PG-13: G and PG movies will be available, PG-13, R, NC-17 and X will be blocked. - Press the BACK button to exit the menu screen.

| Menu Description | |
| G General audience | |
| PG Parental guidance suggested | |
| PG-13 Parents strongly cautioned | |
| R Restricted | |
| NC-17 No one 17 and under admitted | |
| X Adult only | |
| Blocking Off Permits all programs |
TV Rating Children
* Prevents children from watching certain children's TV programs, according to the ratings limit set. The children rating does not apply to other TV programs. Unless you block certain TV programs intended for mature audiences in the TV Rating - sub menu, your children can view those programs.
- Press the MENU button. Then, move to LOCK with the ∧, ∨, <, > buttons and press the ⓄOK button.
- Press the number 0 - 9 to input the password.
- Press the∧, ∨ buttons to move TV Rating-Children and press the ⓄOK button.
- Move to a desired item with the∧, ∨ buttons and then press the Ⓞ OK button.
- Press the BACK button to exit the menu screen.

| Menu Description | |
| Age | applies to TV-Y, TV-Y7 |
| Fantasy Violence | applies to TV-Y7 |
TV Rating General
* Based on the ratings, blocks certain TV programs that you and your family do not want to view.
-
Press the MENU button. Then, move to LOCK with the ∧, ∨, <, > buttons and press the ⓄOK button.
-
Press the number 0 - 9 to input the password.
-
Press the , V buttons to move TV Rating-General and press the OK button.
-
Move to a desired item with the , V buttons and then press the ⓄOK button.
- Press the BACK button to exit the menu screen.
Downloadable Rating

| Menu | Description |
| Age | applies to TV-G, TV-PG, TV-14, TV-MA |
| Dialogue-sexual dialogue | applies to TV-PG, TV-14 |
| Language-adult language | applies to TV-PG, TV-14, TV-MA |
| Sex-sexual situations | applies to TV-PG, TV-14, TV-MA |
| Violence | applies to TV-PG, TV-14, TV-MA |
* This function is available only for digital channels. This function operates only when projector has received Region5 Rating data.
-
Press the MENU button. Then, move to LOCK with the , , <,> buttons and press the ⓄOK button.
-
Press the number 0 - 9 to input the password.
-
Press the , V buttons to move Downloadable Rating and press the OK button.
-
Move to a desired item with the , V buttons and then press the OK button.
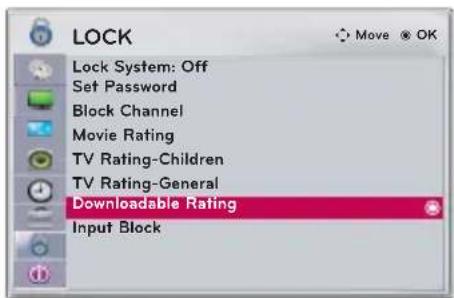
- If a Downloadable rating is locked, enter the password to unlock it temporarily.
- Press the BACK button to exit the menu screen.
Enabling Input Block
-
Press the MENU button, then go to LOCK with the ∧, ∨, <, > buttons and press OK Ⓞ.
-
Press the 0 - 9 buttons to enter a password.
-
Press the ∧, ∨ buttons to go to Input Block and press OK Ⓞ.
-
Press the , V buttons to select an input.
-
Press the <,> buttons to set it to On.
-
Press the ∧, ∨ buttons to select Close and press OK Ⓞ.
- Press the BACK button to exit the menu screen.

Information Function
Checking Projector Information
- Press the MENU button, then go to INFORMATION with the ∧, V, <, > buttons and press OK Ⓞ.
- You can check the current information of the projector.
- Press the BACK button to exit the menu screen.

Serial Communication Function
* If the projector is connected to a PC through an RS-232C cable, you can use the PC to control functions of the projector such as power On/Off or input selection, etc.
* You cannot use RJ45 AND RS-232C simultaneously. For serial communication, use LAN Off in the Network Settings.
Establishing Serial Communication
* Connect the RS-232C (serial connector) of the PC to the RS-232C connector at the back of the projector.
* You need to purchase a cable to connect the RS-232C connectors as it is not provided as an accessory.

natural_image
Diagram showing connection between a server rack and an electronic device (no text or symbols present)- A RS-232C cable is necessary for the remote control of the projector.
Communication Parameter Setup
• Baud Rate: 9600 bps(UART) - Data Length: 8 bit - Parity: none - Stop bit: 1 bit - Flow Control: none - Communication code: ASCII codeCommunication Protocol
1. Transmission
[Command1] [Command2] [ ] [Set ID] [ ] [Data] [Cr]
\* [Command1]: The first command to control the projector (k. j, x, ASCII code, 1 Character) \* [Command2]: The second command to control the projector (ASCII code, 1 Character) \* [Set ID]: An ID used to select a set to control; the ID is allocated to each set in the Special Menu in the range of '1\~99'. If Set ID is set to '0', you can control all the sets. \* [Data]: Used to send data necessary to the commands mentioned above. If it is in ASCII code, 2 characters are sent. \* If the data is 'FF', it means data read mode. \* [Cr]: Carriage Return It means ASCII code 'OxOD'. \* [ ]: ASCII code character corresponding to "Space Bar" separating command, Set ID, and data.2. OK Acknowledgement
[Command2] [ ] [Set ID] [ ] [OK] [Data] [x] \* If a set receives the data successfully, it returns ACK in the above format. Here, the data will be the information from the projector indicating the current status of the projector if it is in data read mode. The projector itself will return the data from the PC if it is in data write mode.3. Error Acknowledgement
[Command2] [ ] [Set ID] [ ] [NG] [Data] [x] \* If a set receives an abnormal piece of data such as a non-supported function or there is a communication error, it returns ACK in the above format. Data: [01]: illegal code (This command is not supported.), [02]: non-supported function (This function is not working.) [03]: wait and retry (Try later.)  Command Reference List| Command1 | Command 2 | Data | |
| 0 ~ 1ak01. Power | |||
| k02. Aspect Ratio *ck02. Aspect Ratio | |||
| k03. Screen Mute0 ~ 1dk03. Screen Mute | |||
| 04. Volume Mute | ek04. Volume Mute 0 ~ 1ek | ||
| 05. Volume Control | 0 ~ 64fk05. Volume Control | ||
| k06. Contrast | gk06. Contrast 0 ~ 64 | ||
| k07. Brightness | hk07. Brightness 0 ~ 64 | ||
| 08. Color | ik08. Color 0 ~ 64ik | ||
| 0 ~ 64jk09. Tint | |||
| 10. Sharpness | kk10. Sharpness 0 ~ 64 | ||
| 0 ~ 1lk11. OSD Select | |||
| 12. Remote Control Lock / Key Lock | mk12. Remote Control Lock/Key Lock | ||
| 0 ~ 64lk13. Balance | |||
| 14. Color Temperature | k | uk14. Color Temperature(Except 3) | |
| m15. Channel Add/Del | 0 ~ 1bm15. Channel Add/D | ||
| 16. Black Level | mn16. Black Level 0 ~ 1mn | ||
| pn17. Lamp Mode 0 ~ 1pn17. Lamp Mode | |||
| 18. Auto configure | 18. Auto configure | u 1uj | |
| x19. Input Select b x19. Input Select *b | |||
| 20. Key | mn20. Key | c * | |
| Sn21. Picture Mode 0 ~ 7Sn21. Picture Mode | |||
| x22. 3D | tx22. 3D | Data1:0 ~ 3Data2:0 ~ 3Data3:0 ~ 1Data4:0 ~ 14 | |
| vx23. 3D Option-Data1=0:0~1- Data1=1:0~14- Data1=2:0~14 | |||
01. Power (Command:ka)
→ Controls power On/Off of the projector.Transmission
[k] [a] [ ] [Set ID] [ ] [Data] [Cr] Data 0:Power Off 1: Power OnAck
[a] [ ] [Set ID] [ ] [OK] [Data] [x] Data 0: Power Off 1: Power On → Gives information about power On/Off.Transmission
[k] [a] [ ] [Set ID] [ ] [FF] [Cr]Ack
[a] [ ] [Set ID] [ ] [OK] [Data] [x] Data 0: Power Off 1: Power On \* As with other functions, if data is transmitted as 'OxFF' in the above format, the current status of each function is returned as a feedback in Ack data.02. Aspect Ratio (Command:kc)
→ Adjusts screen size.Transmission
[k] [c] [ ] [Set ID] [ ] [Data] [Cr] Data 1: Normal Screen (4:3) 2: Wide Screen (16:9) 4: Zoom 6: Set By Program 9: Just Scan 10-1f: Cinema Zoom 1-16Ack
[c] [ ] [Set ID] [ ] [OK] [Data] [x] Data 1: Normal Screen (4:3) 2: Wide Screen (16:9) 4: Zoom 6: Set By Program 9: Just Scan 10-1f: Cinema Zoom 1-1603. Screen Mute (Command:kd)
→ Controls Video Mute On/Off.Transmission
[k] [d] [ ] [Set ID] [ ] [Data] [Cr] Data 0: Screen Mute Off (video On) 1: Screen Mute On (video Off)Ack
[d] [ ] [Set ID] [ ] [OK] [Data] [x] Data 0: Screen Mute Off (video On) 1: Screen Mute On (video Off)04. Volume Mute(Command:ke)
→ Adjusts Volume Mute On/Off.Transmission
[k][e][ ][Set ID][Data][Cr] Data 0: Volume Mute On (Volume Off) 1: Volume Mute Off (Volume On)Ack
[e] [ ] [Set ID] [ ] [OK] [Data] [x] Data 0: Volume Mute On (Volume Off) 1: Volume Mute Off (Volume On)05. Volume Control (Command : kf)
⇒ Sets a volume.Transmission
[k] [f] [ ] [Set ID] [ ] [Data] [Cr] Data Min : OH - Max : 64H (\* Transmitted in hexadecimal code) \* Refer to the actual data structure 1.Ack
[f] [ ] [Set ID] [ ] [OK] [Data] [x] Data Min : O - Max : 6406. Contrast (Command : kg)
→ Adjusts screen brightness.Transmission
[k] [g] [ ] [Set ID] [ ] [Data] [Cr] Data Min : O - Max : 64Ack
[g] [ ] [Set ID] [ ] [OK] [Data] [x] Data Min:0 - Max:64 \* Refer to the actual data structure 1.07.Brightness(Command:kh)
→ Adjusts screen brightness.Transmission
[k][h][ ] [Set ID][ ] [Data][Cr] Data Min:OH-Max:64HAck
[h] [ ] [Set ID] [ ] [OK] [Data] [x] Data Min: OH - Max: 64H \* Refer to the actual data structure 1. (\* Transmitted in hexadecimal code)08. Color (Command: ki)
→ Adjusts screen color.Transmission
[k] [i] [ ] [Set ID] [ ] [Data] [Cr]
Data Min : O - Max : 64 (\* Transmitted in hexadecimal code)Ack
[i] [ ] [Set ID] [ ] [OK] [Data] [x]
Data Min : 0 - Max : 64 \* Refer to the actual data structure 1.09. Tint (Command : kj)
⇒ Adjusts screen color.Transmission
[k] [j] [ ] [Set ID] [ ] [Data] [Cr]
Data Red:OH-Green:64H (\* Transmitted in hexadecimal code)Ack
[j][ ][Set ID][ ][OK][Data][x]
Data Red:OH-Green:64H \* Refer to the actual data structure 2.10. Sharpness (Command: kk)
→Adjusts screen sharpness.Transmission
[k][k][ ] [Set ID][ ] [Data][Cr]
Data Min:OH-Max:64H (\* Transmitted in hexadecimal code)Ack
[k] [ ] [Set ID] [ ] [OK] [Data] [x]
Data Min:OH-Max:64H \* Refer to the actual data structure 1. \* This function is used when a remote control is not being used. When the remote control lock is On, all the buttons on the control panel and remote control do not support the Set function.11. OSD Select (Command : kl)
⇒ Selects OSD On/Off.Transmission
[k] [l] [ ] [Set ID] [ ] [Data] [Cr]
Data 0: OSD Select Mode Off 1: OSD Select Mode OnAck
[1] [ ] [Set ID] [ ] [OK] [Data] [x]
Data 0: OSD Select Mode Off 1: OSD Select Mode On12. Remote Control Lock/Key Lock (Command: km)
→ Sets the function of locking the remote control and local keypad of the remote control.Transmission
[k] [m] [ ] [Set ID] [ ] [Data] [Cr]
Data O: Lock Off 1: Lock OnAck
[m] [ ] [Set ID] [ ] [OK] [Data] [x]
Data O: Lock Off 1: Lock On \* This function is used when the remote control is not being used. If remote control lock is On, none of the buttons of the local keypad and remote control will work.13. Balance (Command: kt)
⇒ Adjusts Audio Balance.Transmission
[k] [t] [ ] [Set ID] [ ] [Data] [Cr]
Data L: OH - R : 64H (\* Transmitted in hexadecimal code)Ack
[t] [ ] [Set ID] [ ] [OK] [Data] [x]
Data L: OH - R : 64H \* Refer to the actual data structure 2.14. Color Temperature (ACC) (Command: ku)
→ Adjusts the value of color temperature.Transmission
[k] [u] [ ] [Set ID] [ ] [Data] [Cr]
Data 0: Medium 1: Cool 2: Warm 4. Natural (\* Transmitted in hexadecimal code) \* 3 is not used.Ack
[u] [ ] [Set ID] [ ] [OK] [Data] [x]
Data 0: Medium 1: Cool 2: Warm 4: Natural15. Channel Add/Del (Command: mb)
→ Adds/Deletes a channel.Transmission
[m] [b] [ ] [Set ID] [ ] [Data] [Cr]
Data O: Delete 1: Add (\* Transmitted in hexadecimal code)Ack
[b] [ ] [Set ID] [ ] [OK] [Data] [x]
Data O: Delete 1: Add16. Black Level (Command: nm)
⇒ Adjusts the value of Black LevelTransmission
[n] [m] [ ] [Set ID] [ ] [Data] [Cr] Data O: Low 1: High (\* Transmitted in hexadecimal code)Ack
[m] [ ] [Set ID] [ ] [OK] [Data] [x] Data O: Low 1: High17. Lamp Mode (Command: np)
→ A function used to set Lamp Mode.Transmission
[n] [p] [ ] [Set ID] [ ] [Data] [Cr] Data 0: Normal 1: Economic (\* Transmitted in hexadecimal code)Ack
[p][ ] [Set ID][ ] [OK] [Data][x] Data O: Normal 1: Economic18. Auto Configure (Command: ju)
→ Adjusts the video position by using RGB Mode and minimizing image shake.Transmission
[j] [u] [ ] [Set ID] [ ] [Data] [Cr] Data 1: To set (\* Transmitted in hexadecimal code)Ack
[u] [ ] [Set ID] [ ] [OK] [Data] [x] Data 1: To set19. Input Select (Command: xb)
⇒ Select the input signal of a set.Transmission
[x] [b] [ ] [Set ID] [ ] [Data] [Cr] Data 0: DTV 1: CADTV 10: ATV 11: CATV 20: Video 40: Component 60: RGB 90: HDMI1 91: HDMI2 (\* Transmitted in hexadecimal code)Ack
[b] [ ] [Set ID] [ ] [OK] [Data] [x] Data 0: DTV 1: CADTV 10: ATV 11: CATV 20: Video 40: Component 60: RGB 90: HDMI1 91: HDMI220. Key (Command: mc)
→ Sends a key code of the IR remote control.Transmission
[m] [c] [ ] [Set ID] [ ] [Data] [Cr] Data key code \* Refer to page 48. (\* Transmitted in hexadecimal code)Ack
[c] [ ] [Set ID] [ ] [OK] [Data] [x] Data key code21. Picture Mode (Command: ns)
→ A function used to set Picture ModeTransmission
[n] [s] [ ] [Set ID] [ ] [Data] [Cr] Data 0: Vivid 1: Standard 2: Natural 3: Cinema 4: Sport 5: Game 6: Expert 1 7: Expert 2 ( x Transmitted in hexadecimal code)Ack
[s] [ ] [Set ID] [ ] [OK] [Data] [x] Data 0: Vivid 1: Standard 2: Natural 3: Cinema 4: Sport 5: Game 6: Expert 1 7: Expert 2 (\* Transmitted in hexadecimal code)| Key CodeKey Name | |
| ^ | 0x40 |
| ∨ | 0x41 |
| > | 0x06 |
| < | 0x07 |
| POWER | 0xAD |
| INPUT | 0xEF |
| MENU | 0x43 |
| BACK | 0x28 |
| OK | 0x44 |
| STILL | 0xBC |
| RATIO | 0x79 |
| BLANK | 0x84 |
| PICTURE | 0x4D |
| AUTO | 0x92 |
| Q.MENU | 0x45 |
| SLEEP | 0x0E |
| 3D | 0xDC |
| PATTERN | 0x6F |
| 0x0FTV | |
| VIDEO | 0x5A |
| COMP | 0xBF |
| RGB | 0xD5 |
| HDMI 1 | 0xCE |
| HDMI 2 | 0xCC |
| Key CodeKey Name | |
| LIST | 0x4C |
| FLASHBK | 0x1A |
| FAV | 0x1E |
| MUTE | 0x09 |
| VOL + | 0x02 |
| VOL - | 0x03 |
| CH ^ | 0x00 |
| CH ∨ | 0x01 |
| KEY.S | 0xA4 |
| INFO | 0xAA |
| Red | 0x72 |
| Green | 0x71 |
| Yellow | 0x63 |
| Blue | 0x61 |
| 1 | 0x11 |
| 2 | 0x12 |
| 3 | 0x13 |
| 4 | 0x14 |
| 5 | 0x15 |
| 6 | 0x16 |
| 7 | 0x17 |
| 8 | 0x18 |
| 9 | 0x19 |
| 0 | 0x10 |
22. 3D (Command: xt)
⇒ Controls 3D. Transmission[x][t][ ][Set ID][ ][Data1][ ][Data2][ ][Data3][ ][Data4][Cr]
Data 1 (3D Mode) O: 3D Mode on 1: 3D Mode off 2: 3D to 2D 3: 2D to 3D Data 2 (3D Format) O: TOP and BOTTOM 1: Side by Side 2: Check Board 3: Frame Sequential Data 3 (LR) O: RL 1: LR Data 4 (3D Depth) O - 14 (\* Transmitted in hexadecimal code) \*\*\* Note \*\*\* → Depth is available in 2D to 3D mode.Ack
[t][ ][Set ID][ ][OK][Data1][Data2][Data3][Data4][x]
Data 1 (3D Mode) O: 3D Mode on 1: 3D Mode off 2: 3D to 2D 3: 2D to 3D Data 2 (3D Format) O: TOP and BOTTOM 1: Side by Side 2: Check Board 3: Frame Sequential Data 3 (LR) O: RL 1: LR Data 4 (3D Depth) 0 - 14 (\* Transmitted in hexadecimal code)23. 3D Option Control (Command: xv)
→In 3D, it controls LR, Depth, and Viewpoint.Transmission
[x][v][ ][Set ID][ ][Data1][ ][Data2][Cr]
Data 1 O: LR 1: Depth 2: Viewpoint Data 2 : i) Data1=0 (LR) → 0-1 ii) Data1=1 (Depth) → 0-14 III) Data1=2(Viewpoint) → 0-14 (\* Transmitted in hexadecimal code) \*\*\* Note \*\*\* → Depth is available in 2D to 3D mode.Ack
[v][] [Set ID]][OK][Data1][Data2] [x]
Data 1 O: LR 1: Depth 2: Viewpoint Data 2: i) Data1=0 (LR) 0-1 ii) Data1=1 (Depth) 0-14 III) Data1=2(Viewpoint) 0-14 (\* Transmitted in hexadecimal code) \*\*\* Note \*\*\* → Depth is available in 2D to 3D mode.Communication using Hyper Terminal
You can control multiple projectors from a single computer using the protocol.1. Setting Hyper Terminal
1. Specifying communication port in User Configuration  2. Set to 9600  3. Set to Test registration information  4. Set to ASCII  2. Example of entering input switching command by using Hyper Terminal. Miscellaneous
Supported Monitor Display
\* The following table lists the display formats supported by the projector.| Resolution Vertical | Frequency (Hz) | Horizontal Frequency (kHz) |
| 720X400 | 70.080 | 31.469 |
| 640X480 | 59.940 | 31.469 |
| 800X600 | 60.310 | 37.879 |
| 1024X768 | 60.000 | 48.363 |
| 1152X864 | 60.053 | 54.348 |
| 1280X768 | 59.870 | 47.776 |
| 1360X768 | 60.015 | 47.712 |
| 1280X960 | 60.000 | 60.000 |
| 1280X1024 | 60.020 | 63.981 |
| 1400X1050 | 59.979 | 65.317 |
| 1680X1050 | 60.000 | 65.300 |
| 1920X1080 | 60.000 | 67.500 |
| Signal Component | -*1 HDMI-*2 | ||
| NTSC (60 Hz) | 480i O X | ||
| 480p O O | |||
| 720P O O | |||
| 1080i O O | |||
| 1080p O O | |||
| 24 / 30 Hz 1080p | O | O | |
Maintenance
\* Clean the case, lens, suction ports and exhaust vents of the projector periodically. If dust or stains accumulate on the projector, it may appear on the screen, or the screen may appear darker. Cleaning is therefore very important. If replacement parts are required, contact your seller or an LG Electronics Service Center. To clean the parts of a projector, turn off the projector and pull the plug from the power outlet. Clean the projector more often if it is used for commercial purposes or it is used in a dusty environment.Cleaning the projector lens
If there is any dust or staining on the lens surface, you must clean the lens. Use an air spray or a cleaning cloth to clean the lens. To remove dust or stains, use an air spray or apply a small amount of cleaning agent onto a swab or soft cloth to clean the lens. Please be aware that liquid may flow into the lens if the product is sprayed directly onto the lens.Cleaning the projector case
To clean the projector case, first unplug the power cord. Do not use alcohol, benzene, thinners or other chemicals which may damage the case.Cleaning the air vents
Check the air vents for dust or contaminants often and remove them, as it is easy for them to accumulate. If you continue to use the projector without removing these materials, the projector may not work properly due to its internal components overheating.Cleaning the projector filter
It is recommended to clean the filter once a month to maintain the performance of the projector. When prompted to clean the filter, take the following steps.Do not turn off the projector
Replacing the Lamp
The lifetime of the lamp depends on the environment in which the projector is used. You can check how long the lamp has been used in the Lamp Time of the INFORMATION menu. You must replace the lamp when: • The projected image gets darker or starts to deteriorate in quality. • The lamp indicator is magenta. - The message "Replace the lamp" appears on the screen when turning the projector on. Be careful when replacing the lamp
- Press the POWER button to turn off the power. - If the operation indicator LED is cyan and blinking, do not disconnect the mains supply until the operation indicator LED has changed to blue as the fan is still running. - Allow the lamp to cool down for 1 hour before replacing it. - Replace only with the same type of lamp from an LG Electronics Service Center. Using another manufacturer's lamp may damage the projector and lamp. • Only pull the lamp out when replacing it. - Keep the lamp unit out of reach of children. Keep the lamp away from heat sources such as radiators, stoves etc. There is a risk of fire or burning. - Do not expose the lamp to liquids or foreign materials. The lamp may burst. - Do not insert any flammable or metal objects into the lamp socket after removing the lamp. This can result in electrical shock or damage the product. - Fix the new lamp with screws securely. If it is not securely fixed, the projected image may become darker and there may be a fire risk. - Do not touch the front glass of the new lamp or the glass of the lamp container. Picture quality and lamp lifetime may suffer.Purchasing a replacement lamp
Lamp model numbers are listed on page 57, "Product Specifications". Check the lamp model and then purchase it from an LG Electronics Service Center. (Using another manufacturer's lamp may damage the projector.)Disposing of the lamp
Dispose of the used lamp by returning it to the LG Electronics Service Center.Projector lamp control
Warning
• within the first 5 minutes of turning it on. - Frequent On/Off changes may reduce lamp performance. - Do not pull out the power cord while the projector or the cooling fan are running. - It may reduce the lifetime of the lamp and/or cause it to burst. • The lifetime of the projector depends on environmental and handling conditions. • The projector uses a high pressure mercury lamp. Shock or abuse to the projector can cause the lamp to burst loudly. • Continued use of the projector when neglecting to replace the lamp may cause the lamp to burst loudly. • If the lamp bursts, do the following: - Remove the power cord immediately. - Allow fresh air in immediately (Ventilation). - Go to a nearby service center to check projector condition and replace the lamp. - Only an authorized service technician is allowed to disassemble the projector. - Remove the power cord immediately. - Allow fresh air in immediately (Ventilation). - Go to a nearby service center to check projector condition and replace the lamp. - Only an authorized service technician is allowed to disassemble the projector.Replacing the lamp
1. Turn off the projector and unplug the power cord. Place the projector on a table or flat surface. (Allow the lamp to cool down for 1 hour before removing the used lamp from the projector because it is very hot.) 2. Unscrew the screws from the lamp cover using a screwdriver. After pulling out the screws, lift off the lamp cover.  3. After lifting the lamp cover off, remove the two retaining screws which hold the lamp.  4. Pull out the lamp knob from the hitch. 5. Hold the lamp knob and pull it out slowly to remove the lamp case. Insert the new lamp gently into the correct position. Push the lamp bottom to check if it is correctly installed. 6. Tighten the screws you removed in step 3. (Make sure they are fixed firmly.) 7. Close the lamp cover and install the screws from step 2 to install the cover. (If the power is switched on while the lamp cover is open, the lamp warning indicator will be blink red and the projector will not be turned on.)Note!
Make sure to use the same type of lamp for replacement. If the lamp cover is not installed correctly, the projector will not be turned on. In this case, check if the lamp is installed correctly before contacting LG Electronics Service Center.Troubleshooting
Please check the following when there is a problem with the projector before contacting LG Electronics Service Center.| Symptom Checkpoint and Solution | |
| Q. I cannot see video on the screen. | A. Check if the power light is turned on or the lens cap is closed.In addition, check if the cables are connected correctly according to the description in this manual.A wrong input signal may have been selected. Select another input signal by pressing the input selection button of the remote control or control panel. |
| Q. "No signal" is displayed on the screen. | A. A video input with no connection has been selected, there is no signal from a computer or video device, or a connector has been incorrectly connected. Check the connection between the projector and the video device and also check if the input signal from the video device has been selected correctly. |
| Q. "This mode is not supported (or 'No supported mode')" is displayed. | A. The projector cannot interpret the computer signal.Check supported monitor display format. |
| Q. Part of the video or the entire video is blurred or there is no focus. | A. Adjust the focus and position of the video.A. Adjust video settings.A. There may be dust or stains on the lens. Clean the lens according to the description in the Maintenance section. |
| Q. Video colors are abnormal. | A. It is necessary to adjust color balance. Adjust Color in Video Setting. |
| Q. There is no screen output for HDMI connection. | A. Check if the HDMI cable is a high-speed HDMl® cable.If it is not a high-speed HDMl® cable, the screen may flicker or not display anything. |
| Q. 3D video is displayed abnormally. | A. Select another 3D video.A. Press the "3D OPTION" button on the remote control and go to the 3D Configuration menu. Select better 3D video when changing the "3D Configuration". (Refer to page 20.)A. Check if the screen is 3D-compatible. |
| Q. The screen on all the channels or a specific channel is overlapped or there are stripe patterns. | A. Turn the antenna toward the broadcasting station or connect the antenna correctly according to "How to Connect an Antenna". |
| Q. I cannot see some channels. | A. Adjust the position or direction of the antenna.A. Add the desired channel in [Auto Tuning] / [Delete/Add] or [Channel List]. |
| Q. A video is stopped or broken for digital broadcasts. | A. This happens when a signal is weak or reception is unstable. Adjust antenna direction or check cable connection.A. If the intensity or quality of a signal is low in MENU → CHANNEL → Manual Tuning, contact your broadcasting station or administration office to check the signal. |
| Q. I cannot see digital broadcasts even though I am using a cable television. | A. Check your subscription information to your cable television service provider or ask for the signal to be checked.(Some products do not provide digital broadcasts.) |
Product Specifications
| MODELS CF3DAT (CF3DAT-JS) | |
| Resolution 1920 (H) x 1080 (V) pixels | |
| Aspect ratio 16:9 (H:V) | |
| Panel size (mm) 15.4 | |
| Projection distance(Video size) | Wide: 0.88 m - 9.08 m (76.2 cm - 762.0 cm)Tele: 1.14 m - 11.8 m (76.2 cm - 762.0 cm) |
| Ratio of upward projection 100 % | |
| Working range of the remote control | 12 m |
| Video compatibility NTSC | |
| POWER AC 110 V - 240 V - 50/60 Hz, 5.5 A | |
| Television System NTSC-M, ATSC, 64 & 256 QAM | |
| Program Coverage | VHF 2~13 channel, UHF 14~69 channel, Cable 01~135 channel, DTV 2~69 channel, DTV cable 1~135 channel |
| External Antenna Impedance | 75 Ω (VHF/UHF) |
| Headphone, earphone | Impedance: 16 Ω / Output power: 10mW / Jack thickness: 3.5mm |
| Height (mm) 190 | |
| Width (mm) 501 | |
| Length (mm) 560 | |
| Weight (kg) 21.1 | |
Operation environment Projector lamp
Temperature
Operating temperature: 0°C to 35°C Storage temperature: -20°C to 60°CHumidity
Operating humidity: 0% to 80% Relative humidity Storage humidity: 0% to 85% Relative humidityAltitude
Operating altitude: 0 m \~ 2500 mLamp model name
AJ-LCF3Power consumption of lamp
220 W (2EA)Open Source software Information
The following GPL/LGPL/MPL execution files and libraries in this projector comply with the GPL 2.0/LGPL 2.1/MPL 1.1 license agreement.GPL execution files:
Linux kernel 2.6, busybox, lzo, u-bootLGPL library:
uClibcMPL library:
nanox You can ask LG Electronics for the source codes at the e-mail address below. We will send you a CD-ROM if you pay for expenses such as media cost or delivery, etc.: opensource@lge.com This is effective for 3 years from the purchase date of the projector. You can download the original copies of the GPL, LGPL, or MPL licenses at http://www.gnu.org/licenses/ or http://www.mozilla.org/MPL/. In addition, you can check the translations of the GPL and LGPL at http://www.gnu.org/licenses/old-licenses/gpl-2.0-translations.html http://www.gnu.org/licenses/old-licenses/lgpl-2.1-translations.html Some software in the projector complies with the following copyright. ▶ jpeg: Independent JPEG Group, copyright © 1991 – 1998, Thomas G. Lane. ▶ libpng: copyright © 2004 Glenn Randers-Pehrson tinyxml: copyright © 2000-2006 Lee Thomason ▶ zlib: copyright © 1995-2002 Jean-Ioup Gailly and Mark Adler. All rights reserved. Permission is hereby granted, free of charge, to any person obtaining a copy of this software and associated documentation files (the "Software"), to deal in the Software without restriction, including without limitation the rights to use, copy, modify, merge, publish, distribute, sublicense, and/or sell copies of the Software, and to permit persons to whom the Software is furnished to do so, subject to the following conditions: THE SOFTWARE IS PROVIDED "AS IS", WITHOUT WARRANTY OF ANY KIND, EXPRESS OR IMPLIED, INCLUDING BUT NOT LIMITED TO THE WARRANTIES OF MERCHANTABILITY, FITNESS FOR A PARTICULAR PURPOSE AND NONINFRINGEMENT. IN NO EVENT SHALL THE AUTHORS OR COPYRIGHT HOLDERS BE LIABLE FOR ANY CLAIM, DAMAGES OR OTHER LIABILITY, WHETHER IN AN ACTION OF CONTRACT, TORT OR OTHERWISE, ARISING FROM, OUT OF OR IN CONNECTION WITH THE SOFTWARE OR THE USE OR OTHER DEALINGS IN THE SOFTWARE. MEMO  LG Life's Good The model and serial number of the projector is located on the back or one side of the projector. Record it below should you ever need service. MODEL SERIALLG Customer Information Center
1-800-243-0000 USA, Consumer User 1-888-865-3026 USA, Commercial User 1-888-542-2623 CANADA
- LCOS PROJECTOR
- WARNING/CAUTION
- Warning - Class B
- HDMI™
- Contents
- Parts and Components
- Installation and Configuration
- Connecting Device
- 3D Function
- Function
- Channel Functions
- Video Function
- Screen Function
- Audio Function
- Time Function
- Option Functions
- LOCK
- Information Function
- Serial Communication Function
- Miscellaneous
- Safety Precautions
- Indoor Installation
- Warning
- Caution
- Power
- When in Use
- CAUTION concerning the Power Cord
- Outdoor Antenna Grounding
- Antenna grounding according to the National Electrical
- Disposal of your old appliance
- Disposal of waste batteries/accumulators
- For USA
- NOTE TO CABLE/TV INSTALLER
- Main Unit
- Control Panel
- Back
- Projector Status Indicators
- Accessories
- Optional Extras
- Caution on Installation
- Place the projector in a well-ventilated environment.
- Do not place the projector in a hot or humid environment.
- Do not place the projector in a place where it will easily collect dust.
- Do not remove any covers except for the lens cap. There is a high risk of electric shock.
- Projection Distance per Screen Size
- Turning on the Projector
- Turning off the Projector
- Focus and Position of the Screen Image
- Selecting Input Signal
- Input List
- Connecting a Speaker or Headphones
- Connecting an Antenna
- Connecting to a PC
- Connecting to a Video Player
- Connecting to a DVD Player
- Connecting to a DTV Set-Top Box
- Caution When Watching 3D Video
- Requirements for Watching 3D Images
- Note!
- Watching 3D Images
- Setting 3D Mode
- Exiting 3D Mode
- Auto Tuning
- Changing Channels
- Manual Tuning
- Editing Channels
- Setting Favorite Channels
- Using the List of Favorite Channels
- Displaying Program Information
- Picture Mode
- Adjusting Color Temperature
- Adjusting Picture Settings
- Advanced Options
- Picture Initialization Function
- TruMotion Demo Function
- Using the Pause Function
- Using the Screen Size Function
- Test Pattern Function
- Using Keystone
- Changing Projection Mode (PJT Mode)
- Using the AUTO Function
- Adjusting PC Input
- Adjusting Volume
- Stereo/SAP Broadcast Setup
- < Analog TV >
- < Digital TV >
- Setting Current Time
- < Auto Setup >
- < Manual Setup >
- Scheduling On and Off
- Using SLEEP Function
- Auto Off
- Selecting a Language
- Selecting Audio Language
- Setting Caption
- < Analog Broadcasting System Captions >
- < Digital Broadcasting System Captions >
- Using the Blank Image Function
- Selecting the Blank Image Color
- Camera Calibration
- To adjust the brightness of the screen
- High Altitude
- Network Settings
- Setting SET ID
- Setting the Name of a Connected Device
- Setting Power Sound
- PARENTAL CONTROL/RATINGS
- V-Chip rating and categories
- Ratings for Television programs including made-for-TV movies:
- Setting a Password
- Changing a Password
- Locking System
- Enabling Block Channel
- Movie Rating (MPAA)
- TV Rating Children
- TV Rating General
- Downloadable Rating
- Enabling Input Block
- Checking Projector Information
- Establishing Serial Communication
- Communication Parameter Setup
- Communication Protocol
- Transmission
- [Command1] [Command2] [ ] [Set ID] [ ] [Data] [Cr]
- OK Acknowledgement
- Error Acknowledgement
- Power (Command:ka)
- Transmission
- Ack
- Aspect Ratio (Command:kc)
- Screen Mute (Command:kd)
- Volume Mute(Command:ke)
- Volume Control (Command : kf)
- Contrast (Command : kg)
- 07.Brightness(Command:kh)
- Color (Command: ki)
- [k] [i] [ ] [Set ID] [ ] [Data] [Cr]
- [i] [ ] [Set ID] [ ] [OK] [Data] [x]
- Tint (Command : kj)
- [k] [j] [ ] [Set ID] [ ] [Data] [Cr]
- [j][ ][Set ID][ ][OK][Data][x]
- Sharpness (Command: kk)
- [k][k][ ] [Set ID][ ] [Data][Cr]
- [k] [ ] [Set ID] [ ] [OK] [Data] [x]
- OSD Select (Command : kl)
- [k] [l] [ ] [Set ID] [ ] [Data] [Cr]
- [1] [ ] [Set ID] [ ] [OK] [Data] [x]
- Remote Control Lock/Key Lock (Command: km)
- [k] [m] [ ] [Set ID] [ ] [Data] [Cr]
- [m] [ ] [Set ID] [ ] [OK] [Data] [x]
- Balance (Command: kt)
- [k] [t] [ ] [Set ID] [ ] [Data] [Cr]
- [t] [ ] [Set ID] [ ] [OK] [Data] [x]
- Color Temperature (ACC) (Command: ku)
- [k] [u] [ ] [Set ID] [ ] [Data] [Cr]
- [u] [ ] [Set ID] [ ] [OK] [Data] [x]
- Channel Add/Del (Command: mb)
- [m] [b] [ ] [Set ID] [ ] [Data] [Cr]
- [b] [ ] [Set ID] [ ] [OK] [Data] [x]
- Black Level (Command: nm)
- Lamp Mode (Command: np)
- Auto Configure (Command: ju)
- Input Select (Command: xb)
- Key (Command: mc)
- Picture Mode (Command: ns)
- 3D (Command: xt)
- [x][t][ ][Set ID][ ][Data1][ ][Data2][ ][Data3][ ][Data4][Cr]
- [t][ ][Set ID][ ][OK][Data1][Data2][Data3][Data4][x]
- 3D Option Control (Command: xv)
- [x][v][ ][Set ID][ ][Data1][ ][Data2][Cr]
- [v][] [Set ID]][OK][Data1][Data2] [x]
- Communication using Hyper Terminal
- Setting Hyper Terminal
- Supported Monitor Display
- Maintenance
- Cleaning the projector lens
- Cleaning the projector case
- Cleaning the air vents
- Cleaning the projector filter
- Do not turn off the projector
- Replacing the Lamp
- Be careful when replacing the lamp
- Purchasing a replacement lamp
- Disposing of the lamp
- Projector lamp control
- Troubleshooting
- Product Specifications
- Operation environment Projector lamp
- Temperature
- Humidity
- Altitude
- Lamp model name
- Power consumption of lamp
- Open Source software Information
- GPL execution files:
- LGPL library:
- MPL library:
- LG Customer Information Center
Brand : LG
Model : CF3DAT
Category : Video projector