
BFL420 - USB Drive BLACK & DECKER - Free user manual and instructions
Find the device manual for free BFL420 BLACK & DECKER in PDF.


| Product Type | USB Rechargeable Fan |
| Brand | Black & Decker |
| Model | BFL420 |
| Power Source | 20V MAX Lithium Battery (sold separately) or USB DC 5V |
| Battery Voltage | 20V Max (18V nominal) |
| Battery Type | Lithium-ion (LBXR series compatible) |
| USB Input | 5V, 2A (for charging fan via USB) |
| USB Output | 5V, 2.5A (to charge external devices) |
| Airflow Speeds | 2 speeds (High/Low) |
| Head Tilt Angle | 0° to 90° (via flexible neck) |
| Flexible Neck | Yes, bendable to direct airflow |
| Hanging Hook | Integrated for hanging |
| Dimensions (H x W x D) | 6.5 x 9.5 x 12 inches (165 x 241 x 305 mm) |
| Weight | 2.5 lbs (1.13 kg) |
| Material | Plastic and metal |
| Noise Level | Approx. 55 dB (Low speed) |
| Operating Time (with 2.0Ah battery) | Up to 6 hours (Low speed) |
| Charging Time (fan battery via USB) | Not applicable (fan has no internal battery; uses external battery) |
| Maintenance | Clean with dry cloth; do not immerse in water |
| Safety | Use only Black & Decker batteries; keep away from water and children |
| Spare Parts | Battery sold separately; no other user-replaceable parts |
| Warranty | 2-year limited warranty (refer to manual) |
Frequently Asked Questions - BFL420 BLACK & DECKER
User questions about BFL420 BLACK & DECKER
0 question about this device. Answer the ones you know or ask your own.
Ask a new question about this device
Download the instructions for your USB Drive in PDF format for free! Find your manual BFL420 - BLACK & DECKER and take your electronic device back in hand. On this page are published all the documents necessary for the use of your device. BFL420 by BLACK & DECKER.
USER MANUAL BFL420 BLACK & DECKER
MANUAL DE INSTRUÇÕES
INSTRUCTIONS MANUAL
LINTERNA LED RECARGABLE
LANTERNA LED RECARREGÁVEL
RECHARGABLE LED FLASHLIGHT
BFL420
WARNING: READ INSTRUCTIONS MANUAL BEFORE USING PRODUCT.
English (original instructions) 17
natural_image
Technical line drawing of a flashlight with a downward arrow indicating compression or disassembly (no text or symbols present)¡ATINCIÓN!
Fig. C

Uso no Modo Lanterna ou Luz de Alerta
natural_image
Technical line drawing of a flashlight with a downward arrow indicating compression or disassembly (no text or symbols present)ATENÇÃO!
Definitions: Safety Alert Symbols and Words
This instruction manual uses the following safety alert symbols and words to alert you to hazardous situations and your risk of personal injury or property damage.
NOTICE: Indicates a practice not related to personal injury which, if not avoided, may result in property damage.
Fig. A

1 Power switch
2 Angle adjustment lock off switch
3 Spotlight lighting section
4 Charging port (inside rubber cap)
5 Magnetic holder
6 Swivel hooks
7 Micro USB Cable
NOTE: The image may differ slightly from the actual unit.
ENGLISH
DO NOT RETURN THIS PRODUCT TO THE STORE,
first contact your local BLACK+DECKER office
or nearest authorized service center.
NING! Read and understand all instructions.
Failure to follow all instructions listed below, may result in electric shock, fire and/or serious personal injury.
GENERAL SAFETY RULES
SAFETY INSTRUCTIONS

ral power tool safety warnings.
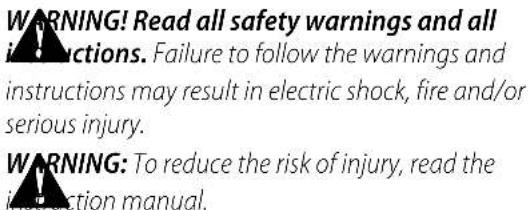
Warning! Read all safety warnings and all instructions.
Failure to follow the warnings and instructions listed below may result in electric shock, fire and/or serious injury.
Save all warnings and instructions for future reference. The term "power tool" in all of the warnings listed below refers to your mains operated (corded) power tool or battery operated (cordless) power tool.
- Read all of this manual carefully before using the appliance.
- The intended use is described in this manual. The use of any accessory or attachment or the performance of any operation with this appliance other than those recommended in this instruction manual may present a risk of personal injury.
- Retain this manual for future reference.
Using your Appliance
Always take care when using the appliance.
a) This appliance is not intended for use by young or infirm persons without supervision.
b) The appliance is not to be used as a toy.
c) Use in a dry location only. Do not allow the unit to become wet.
d) Do not immerse the appliance in water.
e) Do not open body casing. There are no user-serviceable parts inside.
f) Do not operate the appliance in explosive atmospheres, such as in the presence of flammable liquids, gases or dust.
g) To reduce the risk of damage to plugs and cords never pull the cable to remove the plug from a socket outlet.
After Use
h) When not in use, the appliance should be stored in a dry, well ventilated place out of the reach of children
i) Children should not have access to stored appliances
j) When the appliance is stored or transported in a vehicle it should be placed in the boot or restrained to prevent movement following sudden changes in speed or direction.
k) The appliance should be protected from direct sunlight, heat and moisture.
Inspection and Repairs
1) Before use, check the appliance for damaged or defective parts. Check for breakage of parts, damage to switches and any other conditions that may affect its operation.
m) Do not use the appliance if any part is damaged or defective.
n) Have any damaged or defective parts repaired or replaced by an authorised repair agent.
o) Never attempt to remove or replace any parts other than those specified in this manual.
Service
p) Have your power tool serviced by a qualified repair person using only identical replacement parts. This will ensure that the safety of the power tool is maintained.
Electrical Safety

Your tool is double insulated; therefore no earth wire is required. Always check that the main voltage corresponds to the voltage on the rating plate.
WARNING! If the power cord is damaged, it must be replaced by the manufacturer, authorized BLACK+DECKER Service Center or an equally qualified person in order to avoid damage or injury. If the power cord is replaced by an equally qualified person, but not authorized by BLACK+DECKER, the warranty will not be valid.
Labels on Tool
The label on your tool may include the following symbols. The symbols and their definitions are as follows:
V....volts
Hz hertz
min ...... minutes
or DC.....direct current
Class I Construction (grounded)
.../min.....per minute
BPM.....beats per minute
Construction (double insulated)
n_0 ......no load speed
n ......rated speed
⊕ ....earthing terminal
⚠️ ......safety alert symbol
△......visible radiation
......wearrespiratory protection
weareye
protection
O....wearhearing
protection
readall
documentation

This appliance is intended for indoor use only.

The charger automatically shuts off if the ambient temperature becomes too high. As a consequence the charger will be inoperable. The charging base must be disconnected from the mains supply and taken to an authorised service centre for repair.

This product must not be disposed of with normal household waste.
ADDITIONAL SPECIFIC SAFETY RULES
Additional Safety Instructions for Worklights
WARNING: To reduce the risk of injury, the user must read the instruction manual.
RISK OF DAMAGE TO THE EYES! never look directly in the LED.
- Allow the worklight to fully cool down before storage or charging.
- Keep combustible materials away from worklight lens. Extreme heat can cause fires.
- Never place the light face-down on any surface when it is switched on or cooling.
- Do not leave the worklight unattended. Keep children and animals away from the work area.
- Inspect the lens for damage following impact or if the worklight is dropped. Do not operate without the lens in place or with a damaged lens.
- The lens is manufactured from glass. The lens may crack or break if subject to an impact. If the lens is damaged it must be replaced by manufacturers original parts. Wear gloves as sharp edges may cause injury. Never look directly into the light or shine the light into another person's eyes.
- Do not immerse worklight in water.
- This product is sensitive to electrostatic discharge. During the electrostatic discharge, the lamp may switch on and off automatically.
• The light can only be used in dry in door areas. - Use only with the BLACK+DECKER charging adapters that are provided with unit. Plug in the charging adapter at the worklight first, then plug into the charging source.
- Inspect the lens for damage following impact or if the light bar is dropped.
- Do not operate without the lens in place or with a damaged lens.
- Never look directly into the light or shine the light into another person's eyes.
- Do not immerse light bar in water.
Specific Safety Instructions for Light Bars
ADDITIONAL SAFETY INSTRUCTIONS FOR BATTERIES AND CHARGERS
Batteries
- Never attempt to open for any reason.
- Do not charge damaged batteries.
- Do not expose the battery to water.
- Do not expose the battery to heat.
- Do not store in locations where the temperature may exceed 40 °C.
- Charge only at ambient temperatures between 4^ and 40^ .
- Charge only using the chargers provided with the tool.
- When disposing of batteries, follow the instructions given in the section "Protecting the environment".
Chargers
Your charger has been designed for a specific voltage. Always check that the mains voltage corresponds to the voltage on the rating plate.
WARNING! Never attempt to replace the charger unit with a regular mains plug.
Use your BLACK+DECKER charger only to charge the battery in the tool with which it was supplied. Other batteries could burst, causing personal injury and damage.
- Have defective cords replaced immediately.
- Do not expose the charger to water.
- Do not open the charger.
- Do not probe the charger.
All batteries lose charge with time, specially when they are warm. Recharge the unit every two months for 24 hours when not in frequent use.
If the unit is not going to be used for extended periods, disconnect the charger and store in a cool, dry place.
Handling Rechargeable Devices
DANGER OF FIRE! Only use batteries approved by the manufacturer. Only use chargers approved by the manufacturer. Keep battery away from metal objects that could cause short circuiting when not in use. There is a risk of injuries and fires.
- Prior to connecting the charger, verify that the power supply connection corresponds with the connecting data of the device.
- The fuse must be a residual current circuit-breaker with a measured residual current of no more than 30 mA.
- Only charge the battery in closed rooms.
- Fluid can escape from the battery when used incorrectly. Battery fluid may result in skin irritations and burns. Avoid contact! In the event of accidental contact, rinse thoroughly with water. Immediately seek the aid of a physician in the event of eye contact.
ENGLISH
Charging a Battery (Fig. B and C)
Before charging, make sure that all the lights are off. If the light is on, charging can not be performed correctly.
- Slide the rubber cap at the bottom of the main unit.
- There are charge port 4 and charger indicator 9 can be found inside.
- Connect the microUSB-B plug 11 of the USB cable to the charging port. Then connect the USB-A plug 10 to any compatible adapter, like the one for your phone..
- Charging is started by connecting the charging adapter to the wall outlet. While charging, the charging indicator 9 light is in red to notify you. When charging is complete, the charge indicator will turn green. When charging is complete, unplug the power plug from the outlet and unplug the plug from the charging port. After that, return the charge port 4 rubber cap to its original position.


A VENTION! The USB-A plug / microUSB-B plug has top and bottom. Check the plug and port shape and connect. If you try to connect in the wrong direction, you may be damaged.
Charging Time
In normal use, it will be fully charged in about 5 hours.
- At the time of shipment from the factory, the built-in rechargeable battery is not fully charged, so be sure to fully charge it before use.
- If you do not use it for a long time, it is recommended to fully charge it before storing.
- In order to avoid deterioration of the built-in rechargeable battery, please charge the empty rechargeable battery within one week.
When Charging Is Not Successful
- Connect another appliance such as a light to the power outlet and check if current is flowing.
- Check if the power outlet is linked to the wall power switch.
• Make sure that charging was performed in an environment where the ambient temperature is +10 °C or more and +40 °C or less. - If the battery still does not charge, please bring it to the store where you purchased the product, along with your receipt for purchase.
Notes on charging
- Use USB cable for charging.
- While charging, the adapter and the main unit feel warm when touched. This is normal and there is no problem.
- Recharge the built-in rechargeable battery if the brightness falls off while lighting, or it turns off immediately. Do not continue lighting while the rechargeable battery is weak.
- When charging continuously, make sure that the AC adapter is not extremely hot. If you feel it isextremely hot, disconnect and wait for the temperature to drop before plugging it in again.
OPERATION
ATTENTION: The product is shipped uncharged. We use it for the first time, be sure to fully charge it before using it.
Use in Spotlight Mode
- Press the switch 1 once to turn on the spotlight 3.
- Press the switch again to turn off the light.
Fig. D

Note
- Do not look into the light directly or keep it out of sight for a long time, as it may damage your eyes.
• The LED light source can not be replaced.
Adjust the Angle in Spotlight Mode
- When adjusting the angle, press the angle adjustment lock off switch 2 to release the lock, and adjust the spotlight lighting part 3 to the desired angle.
- After use, return the spotlight to its original position and press the angle adjustment lock-off switch until it clicks.
Fig. E

CAUTION! Be careful not to get your fingers caught when adjusting the angle.
Use In The Lantern Mode / Hazard Light Mode
- When using in the lantern mode and hazard light mode, hold the upper part (A) and lower part (B) of the main body with your left and right hand and pull out the side lighting part stored inside. When the side lighting unit is pulled out firmly, the lantern mode is automatically automatically activated, and the side light will turn on in bright mode.
Fig. F
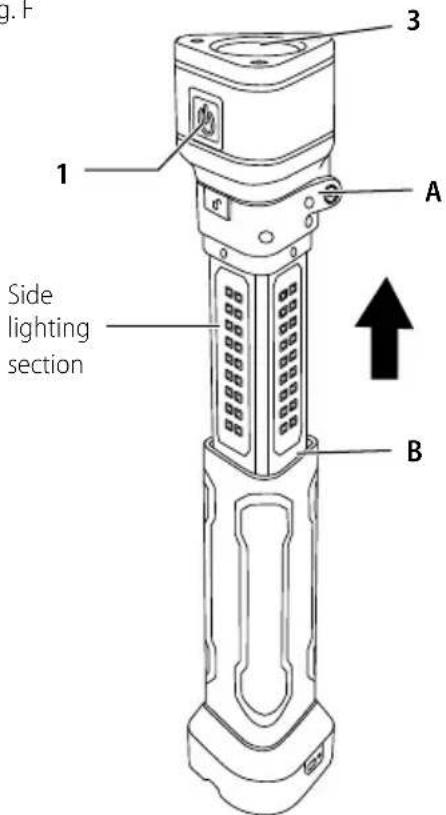
→Lantern mode (bright → Lantern mode (moderate) Spotlight mode ← Hazard light mode
- The lighting mode can be switched each time the switch 1 is pressed. The lighting mode changes in the following order, so please set it to the desired lighting mode.
| Lighting mode Lighting | pattern |
| Lantern mode (bright) Side | lighting section (2 sides) lights up brightly |
| Lantern mode (moderate) | Side lighting section (2 sides) lights up moderately |
| Hazard light mode Side lighting | section (1 side) flashes in red |
| Spotlight mode | The spotlight lighting part 3 lights up |
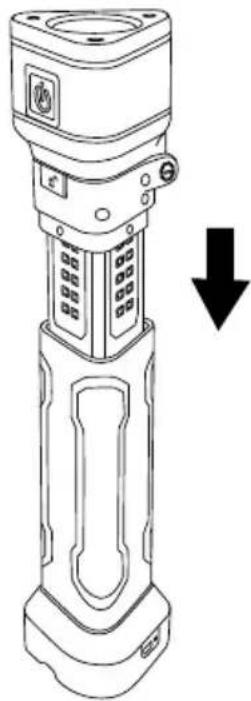
- When turning off the light, please follow the same procedure as when lighting. Automatically when the side lighting unit is firmly housed inside the main unit it will turn off.
Fig. G
natural_image
Line drawing of a handheld device with a downward arrow indicating compression or disassembly (no text or symbols present)
- Do not look into the light directly or keep it out of sight for a long time, as it may damage your eyes.
- The LED light of the light source can not be replaced.
- Be careful not to get your fingers caught when pulling out and storing the side light parts.
USE HANGING HOOK AND MAGNET
Use the Hanging Hook
- This product can be used by hanging it with a hook. In that case, please pull up and use the hanging hook 6 stored in the bottom of the main body.
• After use, store the hanging hook in the bottom of the main body.
Note: Before suspending the product, make sure that the surface from which it will be suspended can bear
ENGLISH
the weight of the product. The product may fall and be damaged.
Use the Magnet
- This product comes with a magnet 5 at the bottom of the main unit and can be used by fixing it to a surface made of a material such as iron. When fixing with the magnet, be sure that the hanging hook is stored.
MAINTENANCE
Your BLACK+DECKER tool has been designed to operate over a long period of time with a minimum of maintenance. Continuous satisfactory operation depends upon proper tool care and regular cleaning. Your charger does not require any maintenance apart from regular cleaning.
WARNING: To reduce the risk of serious personal injury, turn off the tool and disconnect it from the power source before making adjustments or removing / installing devices or accessories. An accidental start could cause injuries.
il important! To ensure product SAFETY and RELIABILITY, repairs, maintenance and adjustment (other than those listed in this manual) should be performed by authorized service centers or other qualified organizations, always using identical replacement parts. Unit contains no user service able parts inside.
CLEANING
WARNING: Never use solvents or other abrasive chemicals to clean non-metallic parts of the tool. These chemicals can weaken the plastic materials used in these parts. Use a cloth dampened only with water and neutral soap. Never allow liquid to penetrate inside the tool or immerse any of the parts in a liquid.
PROTECTING THE ENVIRONMENT

Separate collection. This product must not be disposed of with normal household waste. Should you find one day that your BLACK+DECKER product needs replacement, or if it is of no further use to you, do not dispose of it with household waste. Make this product available for separate collection.

Separate collection of used products and packaging allows materials to be recycled and used again. Re-use of recycled materials helps prevent environmental pollution and reduces the demand for raw materials. Local regulations may provide for separate collection of electrical products from the
household, at municipal waste sites or by the retailer when you purchase a new product.
BATTERIES

BLACK+DECKER batteries can be recharged many times. At the end of their useful life, discard batteries with due care for our environment:
- Run the battery down completely, then remove it from the tool.
- NiCd, NiMH and Li-Ion batteries are recyclable. Take them to any authorized repair agent or a local recycling station.
SERVICE INFORMATION
BLACK+DECKER offers a full network of company-owned and authorized service locations. All BLACK+DECKER Service Centers are staffed with trained personnel to provide customers with efficient and reliable power tool service. For more information about our authorized service centers and if you need technical advice, repair, or genuine factory replacement parts, contact the BLACK+DECKER location nearest you, or visit us at www.blackanddecker-la.com
TECHNICAL DATA
LED FLASHLIGHT BFL420
| 36 Lateral white LEDS | Lumen 300 | |
| 18 Lateral red LEDS | Flashing | |
| 1 Top LED | Lumen (W) | 120 (3) |
| Weight Ibs (kg) | 0.77 (0.35) |
CHARGER
| Charging cable connection USB | |
| Input voltage 5 V | === |
| Charge time hr 4 - 6 | |
BATTERY
| Voltage 3.7 V | --- |
| Capacity Ah 2.0 | |
| Type of battery Lithium Ion Integrated |
CNPJ: 53.296.273/0001-91
Insc. Est.: 701.948.711.00-98
S.A.C.: 0800.703.4644
Col. Santa Fé, Alvaro Obregón
- ¡ATINCIÓN!
- Uso no Modo Lanterna ou Luz de Alerta
- ATENÇÃO!
- Definitions: Safety Alert Symbols and Words
- ENGLISH
- DO NOT RETURN THIS PRODUCT TO THE STORE,
- GENERAL SAFETY RULES
- SAFETY INSTRUCTIONS
- Warning! Read all safety warnings and all instructions.
- Using your Appliance
- After Use
- Inspection and Repairs
- Service
- Electrical Safety
- Labels on Tool
- ADDITIONAL SPECIFIC SAFETY RULES
- Additional Safety Instructions for Worklights
- Specific Safety Instructions for Light Bars
- ADDITIONAL SAFETY INSTRUCTIONS FOR BATTERIES AND CHARGERS
- Batteries
- Chargers
- Handling Rechargeable Devices
- Charging a Battery (Fig. B and C)
- Charging Time
- When Charging Is Not Successful
- Notes on charging
- OPERATION
- Use in Spotlight Mode
- Note
- Adjust the Angle in Spotlight Mode
- Use In The Lantern Mode / Hazard Light Mode
- USE HANGING HOOK AND MAGNET
- Use the Hanging Hook
- Use the Magnet
- MAINTENANCE
- CLEANING
- PROTECTING THE ENVIRONMENT
- SERVICE INFORMATION
- TECHNICAL DATA
Brand : BLACK & DECKER
Model : BFL420
Category : USB Drive