
LSR100RU - Unknown LG - Free user manual and instructions
Find the device manual for free LSR100RU LG in PDF.


| Type de produit | Robot aspirateur |
| Marque | LG |
| Modèle | LSR100RU |
| Dimensions (L x l x H) | 34 cm x 34 cm x 9 cm |
| Poids | 3,5 kg |
| Alimentation | Batterie lithium-ion rechargeable, 14.8V, 2200 mAh |
| Autonomie | Environ 90 minutes en mode normal |
| Temps de charge | Environ 3 heures |
| Capacité du réservoir à poussière | 0,5 litre |
| Modes de nettoyage | Auto, Spot, Bordures, Programmé |
| Capteurs | Détection obstacles, anti-chute, détection poussière |
| Niveau sonore | Moins de 55 dB |
| Connectivité | Wi-Fi, compatible LG SmartThinQ |
| Entretien et nettoyage | Vider le réservoir après chaque utilisation, nettoyer les brosses et les filtres régulièrement |
| Sécurité | Arrêt automatique en cas de surchauffe, détection de seuils |
| Pièces détachées et réparabilité | Brosses, filtres, batterie, roues disponibles sur le site LG |
| Informations générales | Convient pour sols durs et tapis, programme de nettoyage quotidien |
Frequently Asked Questions - LSR100RU LG
User questions about LSR100RU LG
0 question about this device. Answer the ones you know or ask your own.
Ask a new question about this device
Download the instructions for your Unknown in PDF format for free! Find your manual LSR100RU - LG and take your electronic device back in hand. On this page are published all the documents necessary for the use of your device. LSR100RU by LG.
USER MANUAL LSR100RU LG
Read this owner's manual thoroughly before operating the appliance and keep it handy for reference at all times.
TABLE OF CONTENTS
This manual may contain images or content different from the model you purchased.
This manual is subject to revision by the manufacturer.
SAFETY INSTRUCTIONS ....4
IMPORTANT SAFETY INSTRUCTIONS....4
INSTALLATION....14
Compartments....14
Notes for Movement and Transport....15
Notes for Installation....15
Removing the Door....16
Refitting the Door....18
Adjusting the Height of the Door....18
OPERATION 20
Parts and Functions....20
Notes for Operation 24
Using Control Panel....25
InstaView Function 27
Auto Open Door Function....28
Auto Open Drawer Function....29
Suggestion for More Usable Space....29
CustomChill Pantry....30
Other Functions 32
SMART FUNCTIONS....33
Using Smart ThinQ Application....33
Using Smart Diagnosis™ 34
MAINTENANCE....35
Notes for Cleaning....35
Cleaning the Door Basket......36
Cleaning the Shelf 37
Cleaning the Vegetable Drawer....37
Cleaning the Freezer Drawer 39
Cleaning the Drawer Support 40
TROUBLESHOOTING 41
SAFETY INSTRUCTIONS
EN
The following safety guidelines are intended to prevent unforeseen risks or damage from unsafe or incorrect operation of the appliance.
The guidelines are separated into ‘WARNING’ and ‘CAUTION’ as described below.

This symbol is displayed to indicate matters and operations that can cause risk. Read the part with this symbol carefully and follow the instructions in order to avoid risk.

WARNING
This indicates that the failure to follow the instructions can cause serious injury or death.

CAUTION
This indicates that the failure to follow the instructions can cause the minor injury or damage to the product.
IMPORTANT SAFETY INSTRUCTIONS

WARNING
To reduce the risk of explosion, fire, death, electric shock, injury or scalding to persons when using this product, follow basic precautions, including the following:
Children in the Household
This appliance is not intended for use by persons (including children) with reduced physical, sensory or mental capabilities, or lack of experience and knowledge, unless they have been given supervision or instruction concerning use of the appliance by a person responsible for their safety. Children should be supervised to ensure that they do not play with the appliance.
For use in Europe:
This appliance can be used by children aged from 8 years and above and persons with reduced physical, sensory or mental capabilities or lack of experience and knowledge if they have been given supervision or instruction concerning use of the appliance in a safe way and understand the hazards involved. Children shall not play with the appliance. Cleaning and user maintenance shall not be made by children without supervision.
Installation
- This appliance should only be transported by two or more people holding the appliance securely.
- Ensure that the socket outlet is properly grounded, and that the earth pin on the power cord is not damaged or removed from the power plug. For more details on grounding, inquire at an LG Electronics customer information centre.
- This appliance is equipped with a power cord having an equipment-grounding conductor and a grounding power plug. The power plug must be plugged into an appropriate socket outlet that is installed and grounded in accordance with all local codes and ordinances.
- If the power cord is damaged or the hole of the socket outlet is loose, do not use the power cord and contact an authorized service centre.
- Do not plug the appliance into a multi socket adapter which does not have a power cable(mounted). Failure to do so may result in fire.
- Do not modify or extend the power cable.
- Avoid using any extension cords or double adaptor. The appliance should be connected to a dedicated power line which is separately fused.
- Do not use a multi socket outlet which is not properly grounded(portable). Upon using a properly-grounded multi socket outlet (portable), use a product with the current capacity of the power code rating or higher. Failure to do so may result in electric shock or fire due to the heat of multi socket outlet. The power may be shut off when the circuit breaker is operated.
- Install the appliance in a place where is easy to unplug the power plug of the appliance.
- Be careful not to point the power plug up or let the appliance lean against the power plug.
•Install the appliance on a firm and level floor. - Do not install the appliance in a damp and dusty place. Do not install or store the appliance in any outdoor area, or any area that is subject to weathering conditions such as direct sunlight, wind, or rain or temperatures below freezing.
- Do not place the appliance in direct sunlight or expose it to the heat from heating appliances such as stoves or heaters.
- Be careful not to expose the rear of the appliance when installing.
- Be careful not to let the appliance door fall during assembly or disassembly.
- Be careful not to pinch, crush, or damage the power cable during assembly or disassembly of the appliance door.
- Do not connect a plug adapter or other accessories to the power plug.
Operation
- Do not use the appliance for any purpose (storage of medical or experimental materials or shipping) other than any domestic household food storage use.
- In case of flood, disconnect the power plug and contact the LG Electronics customer information centre.
- Unplug the power plug during a severe thunderstorm or lightening or when not in use for a long period of time.
- Do not touch the power plug or the appliance controls with wet hands.
- Do not bend the power cable excessively or place a heavy object on it.
- If water penetrates electrical parts of the appliance, disconnect power plug and contact an LG Electronics customer information centre.
- Do not place hands or metallic objects inside the area emitting the cold air, cover or heat releasing grille on the back.
- Do not apply excessive force or impact to the back cover of the appliance.
- Do not put animals, such as pets into the appliance.
- Be careful of nearby children when you open or close the appliance door. The door may bump the child and cause injury.
- Avoid the danger of children getting trapped inside the appliance. A child trapped inside the appliance can cause suffocation.
- Do not place heavy or fragile objects, containers filled with liquid, combustible substances, flammable objects(such candles, lamps, etc.), or heating devices(such as stoves, heaters, etc.) on the appliance.
- If there is a gas leakage (isobutane, propane, natural gas, etc.), do not touch the appliance or power plug and ventilate the area immediately. This appliance uses a very eco-friendly gas (isobutane, R600a) as the refrigerant. Although it uses a small amount of the gas, it is still combustible gas. Gas leakage during appliance transport, installation or operation can cause fire, explosion or injury if sparks are caused.
- Do not use or store flammable or combustible substances (ether, benzene, alcohol, chemical, LPG, combustible spray, insecticide, air freshener, cosmetics, etc.) near the appliance.
- Immediately unplug the power plug and contact an LG Electronics customer information centre if you detect a strange sound, odour, or smoke coming from the appliance.
- Fill with potable water only into icemaker or dispenser water tank.
Maintenance
- Disconnect the power cord before cleaning the appliance or replacing the inside lamp (where fitted).
- Securely plug the power plug in the socket outlet after completely removing any moisture and dust.
- Never unplug the appliance by pulling on the power cable. Always grip the power plug firmly and pull straight out from the socket outlet.
- Do not spray water or inflammable substances (toothpaste, alcohol, thinner, benzene, flammable liquid, abrasive, etc.) over the interior or exterior of the appliance to clean it.
- Do not clean the appliance with brushes, cloths or sponges with rough surfaces or which are made of metallic material.
- Only qualified service personnel from LG Electronics service centre should disassemble, repair, or modify the appliance. Contact an LG Electronics customer information centre if you move and install the appliance in a different location.
- Do not use a hair drier to dry the inside of the appliance or place a candle inside to remove the odours.
- Do not use mechanical devices or other means to accelerate the defrosting process.
Disposal
- When discarding the appliance, remove the door gasket while leaving the shelves and baskets in place and keep children away from the appliance.
- Dispose of all packaging materials (such as plastic bags and styrofoam) away from children. The packaging materials can cause suffocation.
Technical Safety
- Keep ventilation openings, in the appliance enclosure or in the built-in structure, clear of obstruction.
- Do not use electrical appliances inside the food storage compartments of the appliance, unless they are of the type recommended by the manufacturer.
-
The refrigerant and insulation blowing gas used in the appliance require special disposal procedures. Consult with service agent or a similarly qualified person before disposing of them.
-
This appliance contains a small amount of isobutane refrigerant (R600a), natural gas with high environmental compatibility, but it is also combustible. When transporting and installing the appliance, care should be taken to ensure that no parts of the refrigerating circuit are damaged.
- Refrigerant leaking out of the pipes could ignite or cause an explosion.
- If a leak is detected, avoid any naked flames or potential sources of ignition and air the room in which the appliance is standing for several minutes. In order to avoid the creation of a flammable gas air mixture if a leak in the refrigerating circuit occurs, the size of the room in which the appliance is used should correspond to the amount of refrigerant used. The room must be 1m2 in size for every 8 g of R600a refrigerant inside the appliance.
- The amount of refrigerant in your particular appliance is shown on the identification plate inside the appliance.
- Never start up an appliance showing any signs of damage. If in doubt, consult your dealer.
- This appliance is intended to be used in household and similar applications only. It should not be used for commercial, or catering purposes, or in any mobile application such as a caravan or boat.
- Do not store explosive substances such as aerosol cans with a flammable propellant in this appliance.

CAUTION
To reduce the risk of minor injury to persons, malfunction, or damage to the product or property when using this product, follow basic precautions, including the following:
Installation
- Do not tilt the appliance to pull or push it when transporting.
- Make sure not to get a body part such as a hand or foot stuck while moving the appliance.
Operation
- Do not touch frozen food or the metal parts in the freezer compartment with wet or damp hands. It may cause frostbite.
- Do not place glass containers or bottles in the freezer compartment, shelves or ice bin that will be exposed to temperatures below freezing.
- The tempered glass on the front side of the appliance door or the shelves can be damaged by an impact. If it is broken, do not touch it with wet hands, as this may result in injury.
- Do not place heavy objects on top of the door in door.
- Do not use the door in door as a chopping board and ensure it is not scratched by a sharp tool, as this may cause appliance damage.
- Do not hang from the appliance door, storage room, shelf or fridge door in door or climb up into it.
-
Do not store an excessive amount of water bottles or containers for side dishes on the door baskets. The basket may break or your hand may bump into the surrounding structure, causing injury.
-
Keep food organized inside the appliance.
- Prevent animals from nibbling on the power cable or water hose.
- Do not open or close the appliance door with excessive force.
- If the hinge of the product door is damaged or operates improperly, stop using the appliance and contact an authorized service centre.
- Do not damage the refrigerant circuit.
- Do not place any electronic appliance (such as heater and mobile phone) inside the appliance.
- Do not clean glass shelves or covers with warm water when they are cold. They may break if exposed to sudden temperature changes.
- Never eat frozen foods immediately after they have been taken out in the freezer compartment.
- Do not open the door of the appliance with the door in door open, or do not open the door in door while the door of the appliance is open. The door in door may be struck by the edge of the appliance and damaged.
- Do not grab the side of the refrigerator door when closing it. When closing the door, please use the door handle.
Maintenance
- Do not insert the shelves upside down. The shelves may fall, causing injury.
- To remove frost from the appliance, contact an LG Electronics customer information centre.
- Dispose of the ice inside the ice bin in the freezer compartment during an extended power outage.
INSTALLATION
EN
Compartments
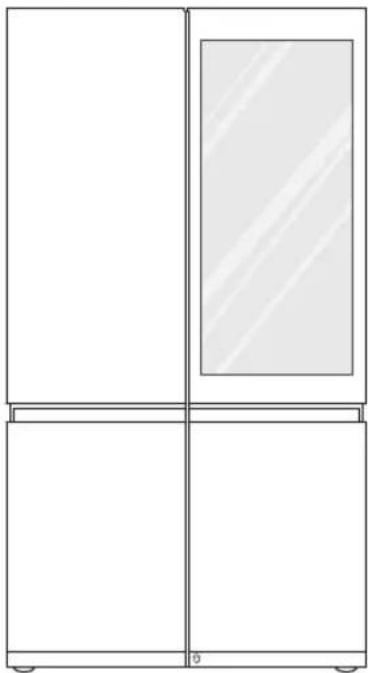
natural_image
Simple line drawing of a cabinet or enclosure with four panes and a door, no text or symbols present.


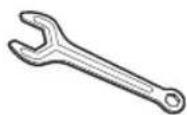
Spanner Type1 Spanner Type2 Owner's Manual
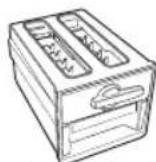

Ice Maker Egg Box
- The appearance or components of the appliance may differ from model to model.
Notes for Movement and Transport
- Remove all food from inside the appliance.
Then, transport the appliance only after fixing fragile parts such as shelves and the door handle with tape. Failure to do so may cause appliance damage. - Pull the power plug out, insert and fix it into the power plug hook at the rear or on top of the appliance. Failure to do so may cause damage to the power plug or floor scratch.
- When transporting the appliance, more than two people should transport the appliance carefully. Dropping the appliance, which is extremely heavy, may cause personal injury or appliance failure.
- When transporting the appliance over a long distance, keep the appliance upright. The appliance may fall over, causing malfunctions. Never transport the appliance laying down as it can cause a refrigerant circulation malfunction when it is turned back on again.
Notes for Installation
• Install the appliance on a solid and flat area.
- If the appliance is installed on an uneven floor, it can cause vibration and noise causing the appliance to fall resulting in injury. It could also cause the doors not to close correctly and introduce moisture inside the unit during operation.
- If the appliance front or rear is not level, adjust the front feet so that it can be corrected. Severe cases may need the floor to be packed out with strips of thin timber.
- Avoid placing the unit near heat sources, direct sunlight or moisture.
- Connect the power supply cord (or plug) to the outlet. Don't double up with other appliances on the same outlet.
- After connecting the power supply cord (or plug) to the outlet, Wait two or three hours before you put food into the appliance. If you add food before the appliance has cooled completely, your food may spoil.
- Models with handles should be located at least 55 mm from the wall on the hinge side to open door by 90°.
- Allow over 55 mm clearance to the right, left, back and top when installing.
Removing the Door
When it is necessary to move the appliance through a narrow opening, removing the doors is the recommended procedure.

WARNING
- Disconnect the power cord, house fuse or circuit breaker before installing or service the appliance. Failure to follow these instructions may result in death, fire or electric shock.
If your entrance door is too narrow for the appliance to pass through, remove the appliance doors and pass the appliance laterally.
[The Left Fridge Door]
1 Remove the screws from the hinge cover at the top of the refrigerator. Lift the hook (not visible), located on the side of the cover at the bottom edge, with a flat-head screwdriver.
![LG LSR100RU - [The Left Fridge Door] - 1](/content/2026/06/1246318/images/4e7dbd76c66793930c811f9b8d094a2a27a631035c8a1918802908607ad4481a.jpg)
natural_image
Technical line drawing of a mechanical bracket with mounting holes and fasteners (no text or symbols)2 Remove the cover. Disconnect all wire harnesses (1).
![LG LSR100RU - [The Left Fridge Door] - 2](/content/2026/06/1246318/images/b09e850bc5380376e9ca7ce8824a5769a8ccbc56af7f30ad20f2dcc862c82609.jpg)
natural_image
Diagram of a mechanical or electrical component with a cable and connector, no visible text or symbols3 Rotate the hinge lever counterclockwise (1). Lift the top hinge (2) free of the hinge lever latch.

![LG LSR100RU - [The Left Fridge Door] - 4](/content/2026/06/1246318/images/0a04416c92e8cd88dfc24bf098cbe23685d0964ff1c9fdf5c7ef1987b9a6447d.jpg)
CAUTION
- When lifting the hinge free of the latch, be careful that the door does not fall forward.
4 Remove the hinge lever by tapping the end of it toward the outside edge of the cabinet.

natural_image
Pure mechanical diagram showing a lever and bracket assembly without any text or symbols
CAUTION
- When lifting the hinge free of the latch, be careful that the door does not fall forward.
EN
[The Right Fridge Door]
1 Remove the screws from the hinge cover at the top of the refrigerator. Lift the hook (not visible), located on the side of the cover at the bottom edge, with a flat-head screwdriver.
![LG LSR100RU - [The Right Fridge Door] - 1](/content/2026/06/1246318/images/982d20b6bc883c03c229acc887aa5db4f11331fdec0922c3c7773f0a67c7dbd3.jpg)
natural_image
Technical line drawing of a metal bracket with four bolt holes (no text or symbols)2 Detach the wire harness (1).

3 Rotate the hinge lever (1) clockwise. Lift the top hinge (2) free of the hinge lever latch.

CAUTION
- When lifting the hinge free of the hinge lever latch, be careful that the door does not fall forward.
4 Lift the door from the middle hinge pin and remove the door.

natural_image
Pure mechanical diagram showing a lever and pivot point without any text or symbolsCAUTION
- Place the door on a non-scratching surface with the inner side facing up.
[The Freezer Doors]
1 Remove the two hinge bolts.
![LG LSR100RU - [The Freezer Doors] - 1](/content/2026/06/1246318/images/ecf04dbfcea90a2be55a4390caea85123c90016539174c2b80ea8bbbcc557765.jpg)
natural_image
Technical diagram showing a mechanical assembly with a magnified inset highlighting a specific component (no text or symbols present)2 Twist the hinge to raise the pivoting end so that the door can be lifted off. Lift the door off the lower hinge pin and remove it.
![LG LSR100RU - [The Freezer Doors] - 2](/content/2026/06/1246318/images/3707cd07470f41494edd3151a13265ca83009849815729d51716b37c252b260e.jpg)
natural_image
Technical line drawing of a mechanical bracket with a rotating arrow indicating rotation (no text or symbols)3 Unscrew the screw that attaches the lower hinge cover and remove the cover.

4 Disconnect all wire harnesses.
![LG LSR100RU - [The Freezer Doors] - 4](/content/2026/06/1246318/images/04b19fd0168ff03867260df82983b0465076196e5bf38eca6d5b4a8d49b07af5.jpg)
natural_image
Line drawing of a mechanical device with internal components and directional arrows (no text or symbols)5 Remove the door by lifting it off the lower hinge pin.
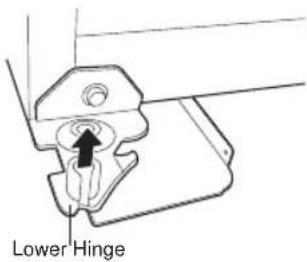
Refitting the Door
Mount them in the reverse sequence of removal after the appliance is passed through the access door.
Adjusting the Height of the Door
[Fridge Door Height]
Open the fridge door and use the spanner type1 to rotate the door hinge bolt as shown.

[Freezer Door Height]
[Method1]
Open the freezer door and use the spanner type1 to rotate the door hinge bolt as shown.

![LG LSR100RU - [Method1] - 2](/content/2026/06/1246318/images/e750a2be6b1e37f8cd6d7d4b2525ae237788dbd788bbb80347b098ef6ff12234.jpg)
CAUTION
- When tilting the appliance backward to loosen the screen at the bottom of the appliance, two or more people should hold the handles at the bottom and rear top side of the appliance.
[Method2]
With the refrigerator door open, fit the spanner type2 in the nut of the height adjustment screw, and turn until it is level.

NOTE
- Support the bottom of the appliance once the height adjustment screws on both sides of the bottom have been completely loosened. This way you can prevent the door from slanting downward due to the weight of stored food items.
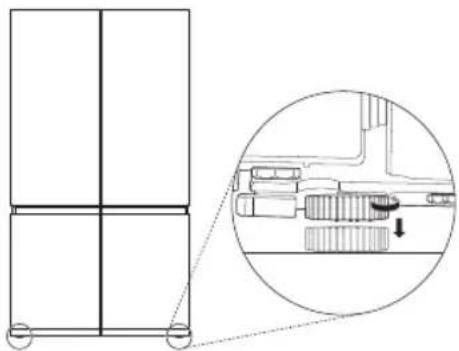
natural_image
Technical diagram showing a mechanical assembly with an inset close-up of internal components (no text or labels)Door Mullion and Auto Open Door
Once the door baskets are filled, the doors may become misaligned, preventing the door mullion or the Auto Open Door function from working properly.
If the mullion on the left refrigerator door does not open and close properly or the right door stays ajar after the Auto Open Door function, follow the directions below.
1 Make sure both front leveling legs are extended fully and in firm contact with the floor.
2 Follow the instructions in the Door Alignment section to raise the left refrigerator door until the door mullion is once again working properly.
3 Adjust the right refrigerator door so it aligns with the left refrigerator door.
OPERATION
EN
Parts and Functions
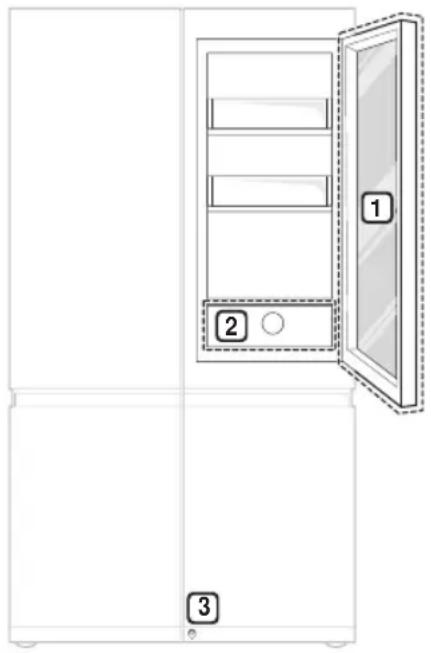
natural_image
Diagram of a refrigerator with labeled parts (1, 2, 3), showing open door and side panels (no text or symbols beyond labels)1 InstaView Door in Door™
The InstaView Door in Door TM compartment allows for easy access to commonly used food items.
2 Control Panel
To set the freezer and fridge temperatures.
3 Auto Open Door Sensor
The right fridge door opens automatically if you place your foot near the motion sensor at the bottom of the door.
- The appearance or components of the appliance may differ from model to model.

① Smart Diagnosis Unit
Use this function when contacting LG Electronics customer information centre to help make an accurate diagnosis when the appliance operates abnormally or a failure occurs.
② Hygiene Fresh+ Filter
• This function minimizes bacteria and odor inside the appliance.
③ Adjustable Fridge Shelf(Optional)
Shelves are adjustable to meet individual storage needs.

CAUTION
- If you close the fridge door without pushing back the Adjustable Fridge Shelf, the appliance may be damaged.
④ Vegetable Drawer
This is where fruits and vegetables are stored to remain fresh for as long as possible.
⑤ Custom Chill Pantry
This space is used to store meat, fish, dairy products, beverages, and other items that need to be kept chilled.
6 Hidden Bar Tray
Store small item fresher than shelf area or defrost frozen items.
EN

natural_image
Line drawing of an open refrigerator with numbered compartments (7, 8, 9) and doors open (no text or symbols)⑦ Fridge Door Basket
This is where small packages of refrigerated foods, drinks and sauce containers are stored.
8 InstaView Door in Door™ Basket
This is where foods which are taken out frequently such as beverages and snacks are stored.
9 Adjustable Moving Basket
Easily move Adjustable Moving Basket up and down as necessary.
10 Door Mullion
This blocks the cold air of the refrigerator from leaking.
CAUTION
- To reduce the risk of scratching the door or breaking the center door mullion, make sure that the refrigerator door mullion is always folded in.
EN
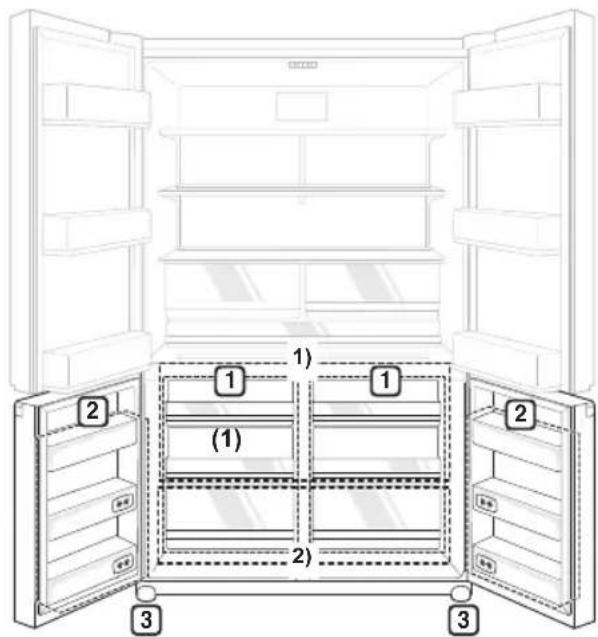
1 Auto Open Drawer
This is for long-term storage of frozen items.
Drawer 1)
- Preserve small packaged frozen food or frequently-taken out foods. To use larger space, remove drawers.
Drawer 2)
• Preserve frozen food to keep longer.
② Freezer Door Basket
This is where small packages of frozen food can be stored.
- Do not store ice cream or food which will be stored for a long period of time within these baskets.
3 Auto Open Drawer Sensor
The freezer drawers automatically open when the freezer door is opened by at least 85 degrees.
NOTE
- The 2-star section ( ** ) basket or drawer can be used to store ice and food from -12 °C to -18 °C for short periods.
- The top shelf of the freezer(1) will reach the set temperature the most quickly.
Notes for Operation
- Users should keep in mind that frost can form. If the door is not closed completely, if the humidity is high during the summer, or if the freezer door is opened frequently.
- Ensure there is sufficient space between food stored on the shelf or door basket to allow the door to close completely.
- Opening the door lets warm air enter the appliance, and may cause the internal temperature to rise.
- Do not open or close the appliance door excessively.
- The LED lamp is only intended for use in domestic appliances and is not suitable for household room illumination.
Suggestion for Energy Saving
- Ensure there is sufficient space between stored foods. This allows cold air to be circulated evenly and lowers electricity bills.
- Store hot food only after it has cooled in order to prevent dew or frost.
- When storing food in the freezer compartment, set the freezer temperature lower than the temperature indicated on the appliance.
- Do not set the temperature of the appliance lower than needed. For ice making in normal climates, the freezer temperatures should be set to -18 or colder.
- Do not put food near the temperature sensor of the fridge compartment. Keep a distance of at least 3 cm from the sensor.
- Please note that a temperature rise after defrosting has a permissible range in the appliance specifications. If you wish to minimise the impact this may have on the food storage due to a temperature rise, seal or wrap the stored food in several layers.
Storing Foods Effectively
- Store frozen food or refrigerated food inside sealed containers.
- Check the expiration date and label (storage instructions) before storing food in the appliance.
- Do not store food for a long period of time (more than four weeks) if it spoils easily at a low temperature.
- Place the refrigerated food or frozen food in each fridge or freezer compartment immediately after purchasing.
- Avoid refreezing any food which has been completely thawed. Freezing any food which has been completely thawed again will lower its taste and nutrition.
- Do not wrap and store vegetables with newspaper. Printing material of newspaper or other foreign substances may smear and contaminate food.
- Do not overfill the appliance. Fill less than 70 % of the space. Cold air can not circulate properly if the appliance is overfilled.
- Cool hot food before storing. If too much hot food is placed inside, the internal temperature of the appliance can increase and negatively affect other foods stored in the appliance.
- If you set an excessively low temperature for food, it may become frozen. Do not set a temperature lower than the required temperature for the food to be stored correctly.
• Always keep the appliance clean.
Max Freezing Capacity
- The Express Freeze function will allow the freezer to its maximum freezing capacity. This generally takes up to seven hours, however, it will automatically turn off after a given time and can also be turned off manually at any given time.
- To get better air circulation, insert all inner parts like baskets, drawers, and shelves.
Using Control Panel
Units and Functions

1 \* Wi-Fi
- This sets the refrigerator to connect to your home's Wi-Fi network.
② \*Lock
- This locks the buttons on the control panel.
③ Auto Door
• This sets the Auto Door function.
4 Auto Drawer
• This sets the Auto Drawer function.
⑤ Fridge Temperature
- This sets the target temperature of the fridge.
- Hold the Fridge Temperature button for 3 seconds or more to configure the Fresh Keeper option.
⑥ Freezer Temperature
• This sets the freezer target temperature.
⑦ Hygiene Fresh
• This sets the Hygiene Fresh function.
- This function minimizes bacteria and odor inside the appliance.
8 Express Freeze
• This sets Express Freeze functions.
⑨ Display Unit
You can check the appliance's settings.
• This image is the start-up screen.
- Press buttons\~ 8 to display the setting for each function.
- The actual control panel may differ from model to model.
Notes for Use the Control Panel
- The control panel will turn on in any of the following cases.
- When the power is turned on
- When a button is pressed
- When the appliance door (fridge compartment, freezer compartment, door in door) is opened
- The control panel will turn off automatically for energy saving in any of the following cases.
- When one minute has passed after turning on the power
- When no button operation is carried out for 20 seconds after a desired button is pressed
- When 20 seconds has passed after the appliance door (fridge compartment, freezer compartment, door in door) is opened and closed
- If there is any finger or skin contact to the control panel while cleaning it, the button function may operate.
Setting the Temperature
This sets the fridge temperature or freezer temperature.
- Press the Fridge button or Freezer button to adjust the temperature.
• The initial temperature is set.
- Fridge : 3 °C
- Freezer : -18 °C
• The temperature can be adjusted.
– Fridge : from 0 °C to 7 °C
– Freezer : from -24 °C to -16 °C
- The actual inner temperature varies depending on the food status, as the indicated setting temperature is a target temperature, not actual temperature within the appliance.
NOTE
- The default temperature setting may vary depending on the appliance.
- Wait until two or three hours have passed after connecting the appliance to the outlet before storing food in the appliance.
- The appliance can automatically detect problems during the operation.
- If a problem is detected, the appliance does not operate and an error code is displayed even when any button is pressed.
- When this occurs, do not turn off the power and immediately contact an LG Electronics customer information centre. If you turn off the power, the repair technician from the LG Electronics customer information centre. It may have difficulty finding the problem.
Setting the Fresh Keeper
You can minimize the spoiling of food from temperature changes by maintaining the refrigerator's temperature at 2 °C.
Press the Fridge Temperature button for 3 seconds and the Fresh Keeper will icon appear in the control panel. Then the Fresh Keeper can be configured.
- To turn off the Fresh Keeper, press the Fridge Temperature button once while the fridge temperature is displayed on the control panel or hold the Fridge Temperature button for 3 seconds when the fridge temperature is not displayed.
Setting Express Freeze
The function can quickly freeze a large amount of ice or frozen foods.
- When you press the Express Freeze button, the Express Freeze icon lights on the control panel.
- The function is enabled and disabled in turn each time you press the button.
- The Express Freeze function automatically terminates after a specific period has passed.
Setting and Resetting Lock
This locks the buttons on the control panel.
- When you press the Lock button for 3 seconds, the Lock/Unlock icon on the control panel lights. The function is enabled and disabled in turn each time you press the button.
- If you press a button other than lock when the lock is set, the button will not function.
- When you press a button other than lock when the lock is set, the Lock/Unlock icon on the control panel will flash 3 times.
- To change a setting, first press the Lock button for three seconds to disable the function.
Setting Wi-Fi
The Wi-Fi button, when used with the LG Smart ThinQ application, allows the refrigerator to connect to a home Wi-Fi network.
- The Wi-Fi icon shows the status of the refrigerator's network connection. The icon illuminates when the refrigerator is connected to the Wi-Fi network.
- Press and hold the Wi-Fi button for 3 seconds to connect to the network. The icon blinks while the connection is being made, then turns on once the connection is successfully made.
InstaView Function
The InstaView function on the Door-in-Door lets you see if you're running low on frequently used items like beverages and snacks, without opening the refrigerator door.

natural_image
Simple line drawing of a door with a hand holding a piece, no text or symbols present1 Knock twice on the glass to turn the LED light inside the Door-in-Door on or off.
2 The LED light turns off automatically after ten seconds.
- The InstaView Door-in-Door function is disabled when the right or left freezer door are open, for two seconds after closing the door, and when the ice dispenser is in use.
- Knock near the center of the glass. Knocking near the edges of the glass may not activate the InstaView Door-in-Door function.
- Knock hard enough so that the knocking sound is audible.
- The InstaView Door-in-Door function may activate if a loud noise occurs near the refrigerator.
Auto Open Door Function
The right refrigerator door opens automatically if you place a foot near the motion sensor at the bottom of the door. This is convenient when you have both hands full of groceries and need to open the refrigerator door. To set the Auto Open Door function, press the button repeatedly to toggle between the ON, Sound Off, and OFF settings.
Using the Auto Open Door Function
1 When the Auto Open Door Function is enabled, text is displayed on the floor near the motion sensor.

2 Pass one foot in front of the motion sensor and step on the displayed text. The right door opens. If the door opens less than 20 degrees and is not opened further, it will close automatically after 3 seconds.

natural_image
Line drawing of a person's lower legs and feet with a magnified inset showing foot details (no text or symbols)NOTE
- Place your foot close enough to the sensor that the text appears on top of the foot, not just on the toes.
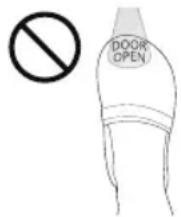
CAUTION
- Disable the Auto Open Door function if you have young children or individuals lacking in cognitive ability in the home. They could be injured if the door opens unexpectedly while they are nearby.
NOTE
- The displayed text may not be readable on some flooring materials, but this will not affect the performance of the Auto Open Door function.
- If flooring material is highly reflective (metal, glass tile), the motion sensor may malfunction and the Auto Open Door function may not work properly.
- Reflective objects placed in front of the motion sensor may cause the text to display, but the text disappears if no movement is detected.
- If a pet passes by when a person is standing in front of the product, the automatic door open function may be activated.
Auto Open Drawer Function
When Auto Open Drawer is enabled, the freezer drawers automatically open when the freezer door is opened. The drawers automatically close when the freezer door is closed.
Setting Auto Open Drawer Function
Press Auto Drawer to activate or deactivate the function. When the function is activated, an icon appears on the display.
Using Auto Open Drawer Function
Open the freezer door at least 85 degrees to automatically open the drawers. Slowly close the door to automatically close the drawers.


CAUTION
- Do not use excessive force to push or pull the freezer drawers.
- Do not slam the freezer door shut while the drawers are open. Failure to follow these warnings may result in personal injury or damage to the product.
Suggestion for More Usable Space
Using Without Drawer Support
To make more spacious refrigerator compartment, remove drawer supports and shelves.

natural_image
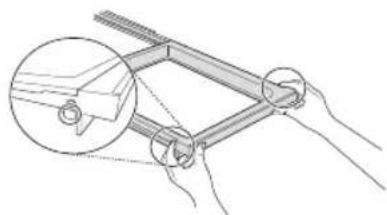
Diagram of a storage rack with two upward-pointing arrows indicating movement or force (no text or symbols present)1 Press the levers on either side of the drawer support.
natural_image
Diagram of hands operating a mechanical linkage or clamp device with a magnified inset showing the component (no text or symbols present)2 Keeping both levers pressed, lift the drawer support slightly and remove it from the rail system.
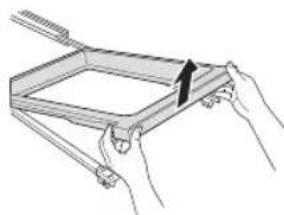
natural_image
Illustration of hands holding a rectangular frame with ropes and a pull rod (no text or symbols)Using Without Freezer Drawer
To make more spacious freezer compartment, remove freezer drawers.
1 Press the Auto Drawer button on the control panel to deactivate the Auto Open Drawer function.

2 Lift the empty freezer drawer slightly to remove it from the shelf.
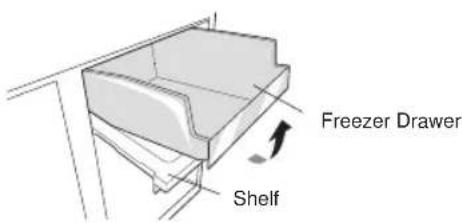
NOTE
- Deactivate the Auto Open Drawer function before using. Be careful that food does not fall from the shelf.
- Slightly pull and push the shelf. Be careful that food does not fall from the shelf.
- Freezer drawer may not be closed it food get stuck behind the drawer.
- 'Using Without Freezer Drawer' section demonstrates Drawer 1).

natural_image
Diagram of a cabinet with open doors and shelves, no text or symbols presentCustomChill Pantry
This space is used to store meat, fish, dairy products, beverages, and other items that need to be kept chilled.
Setting the CustomChill Pantry
Choose a temperature setting for the CustomChill pantry by pressing the Select button repeatedly to toggle between Meat, Deli, or Produce.

The temperature setting becomes progressively colder from Produce → Deli → Meat.

CAUTION
- Vegetables or fruit may freeze if placed in the CustomChill™ pantry when it is set to Meat or Deli.
Adjustable Moving Basket
Easily Adjustable Moving Basket up and down as necessary.
- Remove all items from the Adjustable Moving Basket before moving it up or down.
- Adjusting the Adjusting Moving Basket allows taller food items to be stored more conveniently.
1 To raise the Adjustable Moving Basket, hold the bottom of the basket in the center and push the basket up until it clicks into place.

2 To lower the Adjustable Moving Basket, press up to release the levers at the bottom of the basket and lower the basket until it clicks into place.

CAUTION
- To avoid personal injury or damage to the basket or its contents, empty the Adjustable Moving Basket bin before moving it up or down.
Hidden Bar Tray
The Hidden Bar Tray compartment is slightly cooler than the shelf or door bin areas, so it is a convenient place to store dairy snacks or other small items you want to keep especially cold. It is also a handy place to defrost meat.

natural_image
Architectural line drawing of a staircase with a highlighted horizontal beam (no text or symbols)CAUTION
- To reduce the risk of scratching the door and breaking the center door mullion, make sure that the refrigerator door mullion is always folded in.
- The door alarm sounds every 30 seconds if the door remains open longer than one minute. Ensure that the folding mullion is folded in before closing the left-hand door.
NOTE
- To open the cover, push the handle toward the rear of the bin to release the catch.
• To close the cover, slide the cover over the bin until the catch clicks into place.
Other Functions
Door Open Alarm
The alarm sounds 3 times in a 30 seconds interval if the door (fridge compartment, freezer compartment, door in door) is left open or not completely closed for one minute.
- Contact an LG Electronics customer information centre if the alarm sound continues even after closing the door.
Failure Detection
The appliance can automatically detect problems during the operation.
- If a problem is detected, the appliance does not operate and an error code is displayed even when any button is pressed.
- When this occurs, do not turn off the power and immediately contact an LG Electronics customer information centre. If you turn off the power, the repair technician from the LG Electronics customer information centre. It may have difficulty finding the problem.
SMART FUNCTIONS
EN
Using Smart ThinQ Application
Installing Smart ThinQ
Search for the LG Smart ThinQ application from the Google Play Store or Apple App Store on a smart phone. Follow instructions to download and install the application.
Wi-Fi Function
• For appliances with the or logo
Communicate with the appliance from a smart phone using the convenient smart features.
Firmware Update
Keep the appliance performance updated.
Smart Diagnosis™
If you use the Smart Diagnosis function, you will be provided with the useful information such as a correct way of using the appliance based on the pattern of use.
Settings
Allows you to set various options on the refrigerator and in the application.
NOTE
- To verify the Wi-Fi connection, check that Wi-Fi icon on the control panel is lit.
- LG Smart ThinQ is not responsible for any network connection problems or any faults, malfunctions, or errors caused by network connection.
- The machine supports 2.4 GHz Wi-Fi networks only.
- If the appliance is having trouble connecting to the Wi-Fi network, it may be too far from the router. Purchase a Wi-Fi repeater (range extender) to improve the Wi-Fi signal strength.
-
The Wi-Fi connection may not connect or may be interrupted because of the home network environment.
-
The network connection may not work properly depending on the internet service provider.
- The surrounding wireless environment can make the wireless network service run slowly.
- The application is subject to change for appliance improvement purposes without notice to users.
• Functions may vary by model.
Open Source Software Notice Information
To obtain the source code under GPL, LGPL, MPL, and other open source licenses, that is contained in this product, please visit http://opensource.lge.com.
In addition to the source code, all referred license terms, warranty disclaimers and copyright notices are available for download.
LG Electronics will also provide open source code to you on CD-ROM for a charge covering the cost of performing such distribution (such as the cost of media, shipping, and handling) upon email request to opensource@lge.com. This offer is valid for three (3) years from the date on which you purchased the product.
Smart Diagnosis™ Using a Smart Phone
• For appliances with the or logo
Use this function if you need an accurate diagnosis by an LG Electronics customer information centre when the appliance malfunctions or fails.
Smart Diagnosis ™ can not be activated unless the appliance is connected to power. If the appliance is unable to turn on, then troubleshooting must be done without using Smart Diagnosis ™ .
Using Smart Diagnosis™ Smart Diagnosis™ Through the Customer Information Centre
Use this function if you need an accurate diagnosis by an LG Electronics customer information center when the appliance malfunctions or fails. Use this function only to contact the service representative, not during normal operation.
1 Press the Lock button to activate the lock function.
- If the lock function has been activated already, press the Lock button to deactivate the lock function, and then press the Lock button again to activate the lock function.
- Please note that the Smart Diagnosis function will not operate until five minutes has passed since the lock function was activated.
2 Press and hold the Freezer button for three seconds or longer while continuing to hold your phone to the speaker.
3 Open the fridge door and then hold the phone on the upper right speaker hole.
- Position the phone so that its microphone is aligned with the speaker hole.

natural_image
Diagram showing a smartphone with an arrow pointing to its screen, connected by a dotted line to a bracket (no text or symbols present)4 After the data transfer is complete, the service agent will explain the result of the Smart Diagnosis™.
NOTE
- Position the phone so that its microphone is aligned with the speaker hole.
- The Smart Diagnosis™ sound is generated after around three seconds.
- Do not take the phone off the speaker hole while the data is transmitted.
- Hold the phone to the upper right speaker hole and wait while the data is transmitted.
- The data transfer sound may be harsh to the ear while the Smart Diagnosis™ data is being transmitted, but do not take the phone off the speaker hole for accurate diagnosis until the data transfer sound has stopped.
- When the data transfer is complete, the transfer completion message is displayed and the control panel is automatically turned off and then on again after a few seconds. After the customer information centre explains the diagnosis result.
- The Smart Diagnosis™ function depends on the local call quality.
- The communication performance will improve and you can transmit a better signal if you use a land line home phone.
- If the Smart Diagnosis™ data transfer is poor due to poor call quality, you may not receive the best Smart Diagnosis™ service.
MAINTENANCE
EN
Notes for Cleaning
- When removing a shelf or drawer from inside the appliance, remove all stored foods from the shelf or drawer to prevent injury or damage to the appliance.
- Otherwise, injury may occur due to the weight of stored foods.
- If cleaning the outside air vents of the appliance by means of vacuuming, then the power cord should be unplugged from the outlet to avoid any static discharge that can damage the electronics or cause an electric shock.
- Detach the shelves and drawers and clean them with water, and then dry them sufficiently, before replacing them.
- Regularly wipe the door gaskets with a wet soft towel.
- Door basket spills and stains should be cleaned as they can compromise storage ability of the basket and could even be damaged.
• After cleaning, check if the power cable is damaged, warm or improperly plugged. - Keep the air vents on the exterior of the appliance clean.
- Blocked air vents can cause fire or appliance damage.
- Waxing external painted metal surfaces helps provide rust protection. Do not wax plastic parts. Wax painted metal surfaces at least twice a year using appliance wax (or auto paste wax). Apply wax with a clean, soft cloth.
- For the appliance exterior, use a clean sponge or soft cloth and a mild detergent in warm water. Do not use abrasive or harsh cleaners. Dry thoroughly with a soft cloth.
- Never clean the shelves or containers in the dishwasher.
- The parts may become deformed due to the heat.
- If the appliance is equipped with an LED lamp, do not remove lamp cover and LED lamp in any attempt to repair or service it. Please, contact an LG Electronics customer information centre.
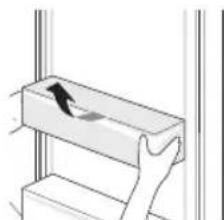
Cleaning the Door Basket Removing the Left Fridge Door Basket
Hold both edges of the basket and remove it by lifting it upward.
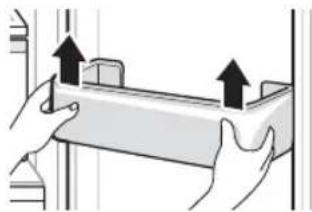
natural_image
Illustration of hands holding a rectangular object with two upward arrows indicating motion or force (no text or symbols)Removing the Freezer Door Basket and Lower InstaView Basket
To remove the door baskets, slightly lift both ends of the basket and pull forward to separate.
natural_image
Simple line drawing of a mechanical component with a handle and internal structure (no text or symbols)Refitting the Freezer Door Basket and Lower InstaView Basket
To replace, match both ends of the basket to the hole, and push with force until it clicks into place.

natural_image
Simple line drawing of a mechanical component with a handle and arrow (no text or symbols)Removing the Upper InstaView Basket
1 Open the latches underneath the basket by rotating them inwards. Tilt the front of the basket up until the tabs on the top sides clear the rails, then push the basket slightly backward.
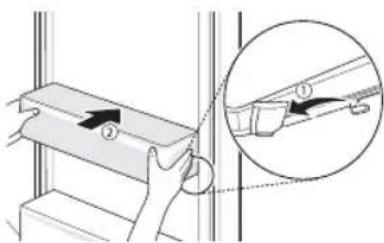
2 Hold both edges of the basket and remove it by lifting it upward.

natural_image
Diagram of a mechanical or architectural component with two arrows indicating upward movement (no text or symbols present)Cleaning the Shelf Removing the Fridge Shelf
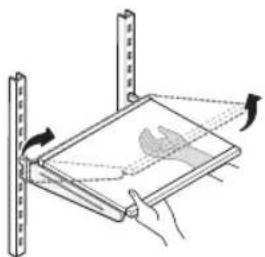
Tilt up the front of the shelf and lift it straight up. Pull the shelf out.
natural_image
Diagram of a mechanical assembly with rotating components and dashed lines indicating motion (no text or symbols)Refitting the Fridge Shelf
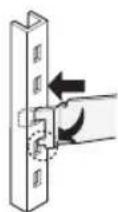
Tilt the front of the shelf up and guide the rear shelf hooks into the slots at the desired height. Then, lower the front of the shelf so that the hooks drop into the slots.

CAUTION
- Make sure that shelves are level from one side to the other. Failure to do so may result in the shelf falling or food spilling.
NOTE
- The left side shelf is marked "LEFT".

- If left and right side shelves are switched, they are not properly assembled.
Cleaning the Vegetable Drawer
Removing the Vegetable Drawer
1 Pull the crisper drawer out until it stops.

natural_image
Simple line drawing of a box with an arrow pointing to one side (no text or symbols)2 Slightly lift the crisper drawer to remove it from the support.

natural_image
Simple line drawing of a box with an arrow indicating rotation or movement (no text or symbols)
CAUTION
- Please note that injuries can be caused by the weight of stored food items when removing the vegetable drawer.
Removing the Vegetable Drawer Box
1 Fully open the fridge door and pull out all the shelves.
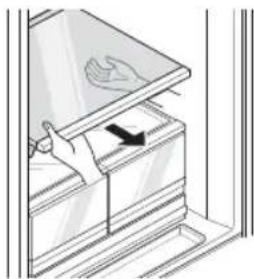
natural_image
Diagram of a cabinet or storage unit with a hand inserting a tray labeled 'Hand Capture' (no text or symbols present)
CAUTION
- To avoid injury, always empty the shelves and vegetable drawers before removing them.
2 Lift the front of the vegetable drawer cover until you hear a loud click.

natural_image
Illustration of hands installing or adjusting a tray with an upward arrow (no text or symbols)3 Tilt the cover slightly and support it with one hand while pulling it out.

natural_image
Illustration of a hand opening a stack of books with a black arrow indicating the open book (no text or symbols present)4 Open the convertible pantry and lift the front side of the vegetable drawer box with both hands.
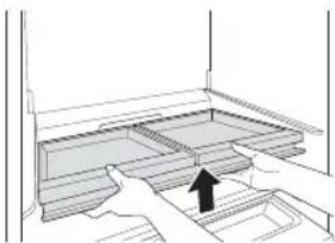
natural_image
Line drawing of a hand pressing down on a wooden shelf with an arrow indicating the process (no text or symbols present)5 Slide one hand under the vegetable drawer box and tilt the box up slightly to remove it.

natural_image
Diagram of a double-door refrigerator with an arrow indicating a loading or movement (no text or symbols present)Refitting the Vegetable Drawer Box
1 Use one hand to support the bottom of the vegetable drawer box while aligning the inner edge of the box with the groove inside the refrigerator. Lower the box into place.

natural_image
Diagram showing a hand pressing down on a rectangular panel with a magnified circular detail (no text or symbols)2 Angle the vegetable drawer cover into the refrigerator and then lower it into place.

natural_image
Illustration of a hand opening a stack of sheets with a lid, showing a black arrow indicating direction (no text or symbols present)3 Slide the vegetable drawer cover back until it stops.
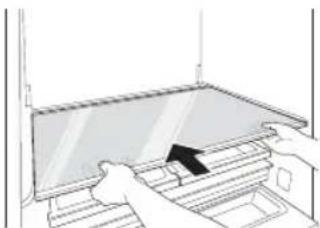
natural_image
Line drawing of hands installing or adjusting a laptop screen (no text or symbols)Cleaning the Freezer Drawer Removing the Freezer Drawer
1 Pull the freezer drawer out until it stops. Empty all contents out of the drawer before removing it.

natural_image
Simple line drawing of a 3D rectangular box with an arrow indicating direction (no text or symbols)2 Lift the empty freezer drawer slightly to remove it from the support.

natural_image
3D diagram of a mechanical or architectural component with no visible text, numbers, or symbolsCAUTION
- The drawers are heavy. Always use two hands when removing or assembling the drawers to avoid product damage or personal injury. Always empty drawers before removing them.
• Always open the freezer doors completely before removing or assembling the drawers.
Cleaning the Drawer Support Removing the Drawer Support
1 Press the levers on either side of the drawer support.
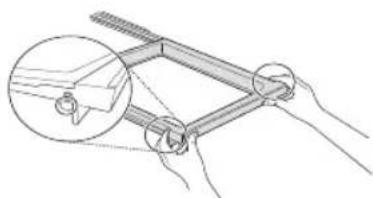
natural_image
Illustration of hands using a mechanical clamp or clamp device to adjust a component (no text or symbols present)2 Keeping both levers pressed, lift the drawer support slightly and remove it from the rail system.

natural_image
Illustration of hands holding a tray with a tool, no text or symbols presentRefitting the Drawer Support
1 Pull out and remove the rail of the drawer support.

natural_image
Technical line drawing of three mechanical components (no text or symbols)2 Align the drawer support on the rail and press it down until you hear snap sound.

natural_image
Illustration of hands using a mechanical device to interact with a small inset showing a separate component (no text or symbols present)TROUBLESHOOTING
EN
| Symptoms Reason | Solution | |
| There is no refrigeration or freezing. | Is there a power interruption? | · Check the power of other appliances. |
| If the power plug unplugged from the outlet? | · Plug the power plug in the outlet properly. | |
| There is poor refrigeration or freezing. | Is the fridge or freezer temperature set to its warmest setting? | · Set the fridge or freezer temperature to 'Medium'. |
| Is the appliance in direct sunlight, or is it near a heat generating object such as cooking oven or heater? | · Check the installation area and reinstall it away from heat generating objects. | |
| Did you store hot food without cooling it first? | · Cool the hot food first before putting it in the fridge or freezer compartment. | |
| Did you put in too much food? | · Maintain an appropriate space between food. | |
| Are the appliance doors completely closed? | · Completely close the door and make sure that stored food is not obstructing in the door. | |
| Is there enough space around the appliance? | · Adjust the installation position to make enough space around the appliance. | |
| The appliance contains a bad smell. | Is the fridge or freezer temperature set to 'Warm'? | · Set the fridge or freezer temperature to 'Medium'. |
| Did you put in food with a strong smell? | · Store foods with strong smells in a sealed containers. | |
| Vegetables or fruit may have spoiled in the drawer? | · Throw away rotten vegetables and clean the vegetable drawer. Do not store vegetables too long in the vegetable drawer. | |
| The inside lamp in the appliance does not turn on. | Does the inside lamp in the appliance turn off? | · It is hard for customers to replace the inside lamp in the appliance as they are not serviceable. If the inside lamp does not turn on, please contact the LG Electronics customer information centre. |
EN
| Symptoms Reason Solution | ||
| The appliance door is not closed tightly. | Is the appliance leaning forward? | Adjust the front feet to raise the front side slightly. |
| Were the shelves properly assembled? | Refit the shelves if needed. | |
| Did you close the door with excessive force? | If you apply too much force or speed when closing the door, it may remain briefly open before closing. Make sure that you do not slam the door closed. Close without force. | |
| It is difficult to open the appliance door. | Did you open the door right after you closed it? | If you try to open the appliance door within one minute after you closed it, you may have difficulties because of the pressure inside the appliance. Try to open the appliance door again in a few minutes so that the internal pressure stabilizes. |
| Door mullion does not fold in and out properly. | Are front leveling legs extended, refrigerator level, and doors aligned? | Once the door baskets are filled, the doors may become misaligned, preventing the door mullion or the Auto Open Door function from working properly. Extend both front leveling legs fully so they are in firm contact with the floor. Follow the instruction in the Door Alignment section to raise the left refrigerator door until the door mullion is once again working properly. Adjust the right refrigerator door so it aligns with the left refrigerator door. |
EN
| Symptoms Reason | Solution | |
| There is condensation inside the appliance or on the bottom of the vegetable drawer cover. | Did you store hot food without cooling it first? | Cool the hot food first before putting it inside the fridge or freezer. |
| Did you leave the appliance door open? | Although the condensation will disappear soon after you close the appliance door, you can wipe it with a dry cloth. | |
| Do you open and close the appliance door too frequently? | Condensation can form due to the temperature difference from the outside. Wipe out the dampness with a dry cloth. | |
| Did you put warm or moist food inside without sealing it in a container? | Store food in a covered or sealed container. | |
| Frosts has formed in the freezer compartment. | Doors may not be closed properly? | Check if the food item inside the appliance is blocking the door and make sure that the door is tightly closed. |
| Did you store hot food without cooling it first? | Cool the hot food first before putting in the fridge or freezer compartment. | |
| Is the air entry or exit of the freezer compartment blocked? | Make sure that air entry or exit is no blocked so that the air can circulate inside. | |
| Is the freezer compartment overfilled? | Maintain an appropriate space between items. |
EN
| Symptoms Reason | Solution | |
| Frost or condensation has formed inside or outside the appliance. | Did you open and close the appliance door frequently or is the appliance door improperly closed? | · Frosts or condensation can form if the outside air penetrates inside the appliance. |
| Is the installation environment humid? | · Condensation can appear on the exterior of the appliance if the installation area is too humid or on a humid day such as a rainy day. Wipe off any moisture with a dry cloth. | |
| The appliance is noisy and generates abnormal sounds. | Is the appliance installed on a weak floor or improperly leveled? | · Install the appliance on a solid and flat area. |
| Does the rear of the appliance touch the wall? | · Adjust the installation position to allow enough clearance around the appliance. | |
| Are objects scattered behind the appliance? | · Remove the scattered objects from behind the appliance. | |
| Is there an object on top of the appliance? | · Remove the object on top of the appliance. | |
| The side or front of the appliance is warm. | There are anti condensation pipes fitted to these areas of the appliance to reduce condensation forming from around the door area. | · The heat releasing pipe to prevent condensation is installed on the front and side of the appliance. You may feel it particularly hot right after the appliance is installed or during the summer. You can be assured that this is not a problem and is quite normal. |
| There is water inside or outside of the appliance. | Is there water leakage around the appliance? | · Check if the water has leaked from sink or another place. |
| Is there water on the bottom of the appliance? | · Check if the water is from the thawe frozen food or a broken or dropped container. |
EN
| Symptoms Reason | Solution | |
| Clicking noises | The defrost control will click when the automatic defrost cycle begins and ends. The thermostat control (or appliance control on some models) will also click when cycling on and off. | Normal Operation |
| Rattling nosies | Rattling noises may come from the flow of appliance, the water line on the back of the unit (for plumbed models only), or items stored on top of or around the appliance. | Normal Operation |
| Appliance is not resting evenly on the floor. | Floor is weak or uneven or leveling legs need to be adjusted. See the Door Alignment section. | |
| Appliance with linear compressor was moved while operating. | Normal operation. If the compresso does not stop rattling after three minutes, turn the power to the appliance off and then on again. | |
| Whooshing nosies | Evaporator fan motor is circulating air through the fridge and freezer compartments. | Normal Operation |
| Air is being forced over the condenser by the condenser fan. | Normal Operation | |
| Gurgling nosies | Appliance flowing through the cooling system | Normal Operation |
| Popping nosies | Contraction and expansion of the inside walls due to changes in temperature. | Normal Operation |
| Vibrating | If the side or back of the appliance is touching a cabinet or wall, some of the normal vibrations may make an audible sound. | To eliminate the noise, make sure that the sides and back do not make any contact with any wall or cabinet. |
PRODUCT INFORMATION
| Model GR-Q23FGNGL | |||
| Producer LG Electronics | |||
| Category Refrigerator-Freezer | |||
| Capacity (l) | ISO Gross | Total | 735 |
| Freezer | 272 | ||
| Refrigerator | 463 | ||
| ISO Storage | Total | 623 | |
| Freezer | 158 | ||
| Two stars section 29 | |||
| Refrigerator | 436 | ||
| Weight (kg) | Net / Packing | 195 / 209 | |
| Width x Height x Depth | Product | 912 X 1784 X 754 | |
| Packing | 954 X 1850 X 805 | ||
| Free standing / Built-in | Free standing | ||
| Defrost system | Frost Free | ||
| Sound Power (dB) | 39 | ||
| Energy Class | A++ | ||
| Energy Consumption (kWh/year) | 344 | ||
| Temperature rise time (hr) | 16 | ||
| Freezing Capacity (kg/24hr) | 7.5 | ||
| Refrigerant | R600a | ||
| Star Rating | *** | ||
| Climate Class | N - T | ||
* Climate Class : N - T (This appliance is intended to be used at an ambient temperature between 16°C and 43°C.)
LG SIGNATURE
natural_image
Simple line drawing of a cabinet with four panes and a side panel (no text or symbols)


natural_image
Technical line drawing of a mechanical bracket with mounting holes and three bolt holes (no text or symbols)natural_image
Technical diagram of a mechanical assembly with labeled component (1), showing no readable text or symbols.natural_image
Simple line drawing of a mechanical component with an upward arrow indicating motion (no text or symbols)ВНИМАНИЕ!
natural_image
Technical line drawing of a mechanical bracket with four bolt holes (no text or symbols)natural_image
Pure mechanical diagram showing a lever and bracket assembly without any text or symbolsВНИМАНИЕ!
natural_image
Technical diagram showing a mechanical component with a magnified inset highlighting a specific feature (no text or symbols present)natural_image
Technical line drawing of a mechanical clamp or bracket assembly with a rotating arrow (no text or symbols)natural_image
Line drawing of a vehicle's dashboard and steering wheel (no text or symbols)natural_image
Technical line drawing of a cabinet with an inset showing internal components (no text or symbols)natural_image
Diagram of a refrigerator with labeled parts (1, 2, 3), no text or symbols presentnatural_image
Simple line drawing of a hand holding a piece of paper, enclosed in a vertical window frame (no text or symbols)natural_image
Line drawing of a person's legs and feet with a magnified inset showing foot details (no text or symbols)ПРИМЕЧАНИЕ
natural_image
Diagram of a kitchen counter with two upward arrows indicating movement or force (no text or symbols present)natural_image
Diagram of hands operating a mechanical linkage or frame with a magnified inset showing a circular component (no text or symbols)natural_image
Illustration of hands holding a rectangular frame with a handle, no text or symbols presentnatural_image
Diagram of a double-door refrigerator with open doors and shelves, no text or symbols presentnatural_image
Diagram showing hand holding a shelf inside a refrigerator with an inset magnified view of the interior (no text or symbols)ВНИМАНИЕ!
natural_image
Architectural line drawing of a staircase with a highlighted horizontal beam (no text or symbols)ВНИМАНИЕ!
natural_image
Diagram showing a smartphone mounted on a table with an inset magnified view of its screen (no text or symbols present)natural_image
Illustration of hands holding a rectangular object with two upward arrows indicating motion or force (no text or symbols)natural_image
Simple line drawing of a mechanical component with a handle and arrow, no text or symbols presentnatural_image
Simple line drawing of a mechanical component with an arrow indicating direction (no text or symbols)natural_image
Diagram of a door handle with arrows indicating upward movement (no text or symbols)Очистка полок
natural_image
Diagram of a hand holding a flatboard with arrows indicating motion or force direction (no text or symbols)natural_image
Simple line drawing of a box with an arrow pointing to it, placed on a surface with diagonal lines (no text or symbols)natural_image
Simple line drawing of a rectangular box with an arrow indicating rotation or movement (no text or symbols)
ВНИМАНИЕ!
natural_image
Diagram of a hand placing a leaf on a cabinet (no text or symbols)ВНИМАНИЕ!
natural_image
Illustration of hands placing a tray with an upward arrow (no text or symbols)natural_image
Illustration of a hand opening a stack of books with a black arrow indicating the open book (no text or symbols present)natural_image
Line drawing of hands placing a tray into a storage unit with an arrow indicating direction (no text or symbols)natural_image
Diagram of a double-door refrigerator with an arrow indicating direction (no text or symbols)natural_image
Diagram of a hand pressing down on a mechanical component with a magnified inset showing a circular detail (no text or symbols)natural_image
Illustration of a hand opening a stack of sheets with a black arrow indicating direction (no text or symbols)natural_image
Illustration of hands installing or adjusting a laptop tray (no text or symbols visible)natural_image
Simple line drawing of a rectangular shelf or storage unit with an arrow indicating direction (no text or symbols)natural_image
Technical line drawing of a mechanical component or bracket assembly (no text or symbols)ВНИМАНИЕ!
natural_image
Illustration of hands holding a mechanical clamp or bracket with a magnified inset showing the handle (no text or symbols)natural_image
Illustration of hands holding a rectangular frame with a tool, no text or symbols presentnatural_image
Technical line drawing of two mechanical components with no visible text or symbolsnatural_image
Illustration of a mechanical device with a hand holding a lever and an inset showing a lever mechanism (no text or symbols)natural_image
Simple line drawing of a cabinet or storage unit with four panes and a door, no text or symbols present.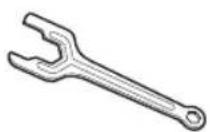

natural_image
Technical line drawing of a mechanical bracket with mounting holes and three downward-pointing arrows indicating force or movement (no text or symbols)natural_image
Technical diagram of a mechanical assembly with labeled component (1), showing no readable text or symbols.natural_image
Diagram showing a mechanical assembly with an upward arrow indicating force or direction (no text or symbols present)
ECKEPTY
natural_image
Technical line drawing of a mechanical bracket with mounting holes (no text or symbols)natural_image
Pure mechanical diagram showing a lever and lever assembly without any text or symbolsECKEPTY
natural_image
Technical diagram of a mechanical clamp or bracket with a magnified inset showing a circular detail (no text or symbols)natural_image
Mechanical diagram showing a lever mechanism with an arrow indicating rotational motion (no text or symbols)natural_image
Line drawing of a mechanical device with arrows indicating motion or movement (no text or symbols)natural_image
Technical diagram of a refrigerator with an inset showing internal components and a downward arrow (no text or labels)natural_image
Diagram of a refrigerator with labeled parts (1, 2, 3), showing open door and side panels (no text or symbols beyond labels)1 InstaView косымша eciri™
1 \* Wi-Fi
natural_image
Simple line drawing of a door with a hand holding a light bulb (no text or symbols)natural_image
Line drawing of a person's lower legs and feet with a magnified inset showing foot details (no text or symbols)ECKEPTNE
natural_image
Diagram of a storage rack with two upward-pointing arrows indicating flow or movement (no text or symbols present)natural_image
Line drawing of hands operating a mechanical device with a circular component (no text or symbols)natural_image
Illustration of hands holding a rectangular tray with a handle, no text or symbols presentnatural_image
Diagram of a cabinet with open doors and internal shelves, no text or symbols present
ECKEPTY
natural_image
Architectural line drawing of a staircase with a sloped roof and a black arrow pointing to a detail (no text or symbols)
ECKEPTY
natural_image
Diagram showing a smartphone with an arrow pointing to its screen, connected to a circular detail (no text or symbols present)natural_image
Illustration of hands holding a rectangular object with upward arrows indicating motion or force (no text or symbols)natural_image
Simple line drawing of a mechanical component with a handle and arrow, no text or symbols presentnatural_image
Simple line drawing of a mechanical component with an arrow indicating direction (no text or symbols)natural_image
Illustration of two hands holding a rectangular object with upward arrows indicating motion (no text or symbols)Сөрені тазалау
natural_image
Diagram of a mechanical setup with a ruler and a flat plate, showing motion arrows (no text or symbols)natural_image
Simple line drawing of a box with an arrow pointing to it, placed on a shelf (no text or symbols)natural_image
Simple line drawing of a box with an arrow indicating rotation or movement (no text or symbols)
ECKEPTY
natural_image
Diagram of a hand pressing down on a cabinet with a handle, showing no text or symbolsECKEPTY
natural_image
Illustration of a hand placing a tray with an upward arrow (no text or symbols)natural_image
Illustration of a hand opening a stack of sheets with a black arrow indicating direction (no text or symbols)natural_image
Line drawing of a hand placing a tray with an arrow pointing to the tray (no text or symbols)natural_image
Diagram of a hand pressing down on a tray with a black arrow indicating force or movement (no text or symbols present)natural_image
Illustration of a hand pressing down on a mechanical component with a magnified inset showing a circular detail (no text or symbols)natural_image
Illustration of a hand opening a stack of sheets with a black arrow indicating direction (no text or symbols)natural_image
Line drawing of hands operating a computer monitor with a mouse on the screen (no text or symbols)natural_image
Simple line drawing of a 3D rectangular box with an arrow indicating direction (no text or symbols)natural_image
3D diagram of a mechanical component with a curved top and stepped base, showing a directional arrow (no text or symbols)ECKEPTY
natural_image
Illustration of hands holding a mechanical frame with a magnified inset showing a small component (no text or symbols)natural_image
Illustration of hands holding a rectangular frame with a handle, no text or symbols presentnatural_image
Technical line drawing of three mechanical components (no text or symbols)natural_image
Illustration of a mechanical device with a hand holding a lever and an inset showing a lever mechanism (no text or symbols)


- TABLE OF CONTENTS
- SAFETY INSTRUCTIONS ....4
- INSTALLATION....14
- OPERATION 20
- SMART FUNCTIONS....33
- MAINTENANCE....35
- TROUBLESHOOTING 41
- SAFETY INSTRUCTIONS
- WARNING
- CAUTION
- IMPORTANT SAFETY INSTRUCTIONS
- Children in the Household
- For use in Europe:
- Installation
- Operation
- Maintenance
- Disposal
- Technical Safety
- Compartments
- Notes for Movement and Transport
- Notes for Installation
- Removing the Door
- [The Left Fridge Door]
- EN
- [The Right Fridge Door]
- [The Freezer Doors]
- Refitting the Door
- Adjusting the Height of the Door
- [Fridge Door Height]
- [Freezer Door Height]
- [Method1]
- [Method2]
- NOTE
- Door Mullion and Auto Open Door
- Parts and Functions
- ① Smart Diagnosis Unit
- ② Hygiene Fresh+ Filter
- ③ Adjustable Fridge Shelf(Optional)
- ④ Vegetable Drawer
- ⑤ Custom Chill Pantry
- Hidden Bar Tray
- Drawer 1)
- Drawer 2)
- Notes for Operation
- Suggestion for Energy Saving
- Storing Foods Effectively
- Max Freezing Capacity
- Using Control Panel
- Units and Functions
- \* Wi-Fi
- ② \*Lock
- ③ Auto Door
- Auto Drawer
- ⑤ Fridge Temperature
- ⑥ Freezer Temperature
- ⑦ Hygiene Fresh
- Express Freeze
- ⑨ Display Unit
- Notes for Use the Control Panel
- Setting the Temperature
- Setting the Fresh Keeper
- Setting Express Freeze
- Setting and Resetting Lock
- Setting Wi-Fi
- InstaView Function
- Auto Open Door Function
- Using the Auto Open Door Function
- Auto Open Drawer Function
- Setting Auto Open Drawer Function
- Using Auto Open Drawer Function
- Suggestion for More Usable Space
- Using Without Drawer Support
- Using Without Freezer Drawer
- CustomChill Pantry
- Setting the CustomChill Pantry
- Adjustable Moving Basket
- Hidden Bar Tray
- Other Functions
- Door Open Alarm
- Failure Detection
- SMART FUNCTIONS
- Using Smart ThinQ Application
- Installing Smart ThinQ
- Wi-Fi Function
- Firmware Update
- Smart Diagnosis™
- Settings
- Open Source Software Notice Information
- Smart Diagnosis™ Using a Smart Phone
- Using Smart Diagnosis™ Smart Diagnosis™ Through the Customer Information Centre
- Notes for Cleaning
- Cleaning the Door Basket Removing the Left Fridge Door Basket
- Removing the Freezer Door Basket and Lower InstaView Basket
- Refitting the Freezer Door Basket and Lower InstaView Basket
- Removing the Upper InstaView Basket
- Cleaning the Shelf Removing the Fridge Shelf
- Refitting the Fridge Shelf
- Cleaning the Vegetable Drawer
- Removing the Vegetable Drawer
- Removing the Vegetable Drawer Box
- Refitting the Vegetable Drawer Box
- Cleaning the Freezer Drawer Removing the Freezer Drawer
- Cleaning the Drawer Support Removing the Drawer Support
- Refitting the Drawer Support
- TROUBLESHOOTING
- LG SIGNATURE
- ВНИМАНИЕ!
- ПРИМЕЧАНИЕ
- Очистка полок
- ECKEPTY
- ECKEPTNE
- Сөрені тазалау
Brand : LG
Model : LSR100RU
Category : Unknown