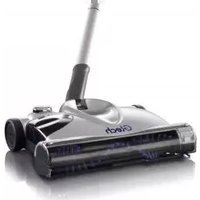
SW02 - Data Storage G-TECHNOLOGY - Free user manual and instructions
Find the device manual for free SW02 G-TECHNOLOGY in PDF.


| Product Type | External Hard Drive |
| Brand | G-Technology |
| Model | SW02 |
| Interface | USB 3.0 / USB-C (Compatible) |
| Storage Capacity | 1 TB (Standard configuration) |
| Dimensions (H x W x D) | 4.5 x 3.0 x 0.5 in (11.4 x 7.6 x 1.3 cm) |
| Weight | 0.5 lb (227 g) |
| Power Source | USB bus-powered (no external power adapter required) |
| Compatible Operating Systems | Windows 10/11, macOS 10.12+, iPadOS |
| Data Transfer Speed | Up to 5 Gbps (USB 3.0) |
| Key Features | Portable design, plug-and-play, shock-resistant |
| Maintenance & Cleaning | Wipe with a soft, dry cloth; avoid liquids |
| Safety Precautions | Avoid dropping or exposing to extreme temperatures |
| Spare Parts & Repairability | Non-user-serviceable; contact manufacturer for support |
| Warranty | 1-year limited warranty |
| Included Accessories | USB cable, quick start guide |
Frequently Asked Questions - SW02 G-TECHNOLOGY
User questions about SW02 G-TECHNOLOGY
0 question about this device. Answer the ones you know or ask your own.
Ask a new question about this device
Download the instructions for your Data Storage in PDF format for free! Find your manual SW02 - G-TECHNOLOGY and take your electronic device back in hand. On this page are published all the documents necessary for the use of your device. SW02 by G-TECHNOLOGY.
USER MANUAL SW02 G-TECHNOLOGY
natural_image
Line drawing of two vacuum cleaner units with green logo 'G Advance' on the right (no text or symbols on main body)Gtech
Advanced Power Sweeper
Model number:
SW02
OPERATING MANUAL
IMPORTANT SAFEGUARDS:

IMPORTANT: READ ALL INSTRUCTIONS BEFORE USE. RETAIN INSTRUCTIONS FOR FUTURE REFERENCE.

Do not use in rain or leave outdoors whilst raining.

WARNING: Basic safety precautions should always be observed when using an electrical appliance, including the following to reduce the risk of fire, electrical shock, or injury:
Personal Safety:
- Store indoors in a dry place out of the reach of children.
- Always use responsibly. This appliance can be used by children aged from 8 years and above and persons with reduced physical, sensory or mental capabilities or lack of experience and knowledge if they have been given supervision or instruction concerning use of the appliance in a safe way and understand the hazards involved.
- Don’t let children play with the appliance; supervise children using or maintaining the appliance.
- Use only manufacturer's recommended attachments as described in this manual; misuse or use of any accessory or attachment other than those recommended, may present a risk of personal injury.
• Take extra care when cleaning stairs. - Keep the appliance and accessories away from hot surfaces.
• Particularly keep hair away from openings and moving parts.
Electrical safety:
- Only use batteries and chargers supplied by Gtech.
- Never modify the charger in any way.
- The charger must only be used for UK mains supply.
A charger that is suitable for one type of battery pack may create a risk of fire when used with another battery pack; never use the charger with another appliance or attempt to charge this product with another charger.
- Before use, check the charger cord for signs of damage or ageing. A damaged or entangled charger cord increases the risk of fire and electric shock.
- Do not abuse the charger cord.
- Never carry the charger by the cord.
- Do not pull the cord to disconnect from a socket; grasp the plug and pull to disconnect.
- Don't wrap the cord around the charger when storing.
- Keep the charger cord away from hot surfaces and sharp edges.
- The supply cord cannot be replaced. If the cord is damaged the charger should be discarded and replaced.
- Do not handle the charger or the appliance with wet hands.
- Do not store or charge the appliance outdoors.
- Unplug the charger before removing the battery, cleaning or maintaining the appliance.
Battery safety:
- This appliance includes NiMH batteries; do not incinerate batteries or expose to high temperatures, as they may explode.
- Liquid ejected from the battery may cause irritation or burns.
- In an emergency situation contact professional help immediately.
- Leaks from the battery cells can occur under extreme conditions. Do not touch any liquid that leaks from the battery. If the liquid gets on your skin wash immediately with soap and water. If the liquid gets into your eyes, flush them immediately with clean water for a minimum of 10 minutes and seek medical attention. Use gloves to dispose of the battery immediately in accordance with local regulations.
- Shorting the battery terminals may cause burns or fire.
- Store battery away from metal objects that could connect the terminals.
- When you dispose of the appliance remove the battery and dispose of the battery safely in accordance with local regulations.
- When you dispose of the appliance remove the battery and dispose of the battery safely in accordance with local regulations.
Service:
- Before using the appliance and after any impact, check for signs of wear or damage and repair as necessary.
- Do not use the appliance if any part is damaged or defective.
- Repairs should be carried out by a service agent or a suitably qualified person in accordance with relevant safety regulations. Repairs by unqualified persons could be dangerous.
- Never modify the appliance in any way as this may increase the risk of personal injury.
- Only use replacement parts or accessories provided or recommended by Gtech.
Intended use:
- This appliance has been designed for domestic dry sweeping only.
- Do not use on wet surfaces.
- Do not pick up anything that is flammable, burning or smoking.
- Use only as described in this manual.
- Don't use on concrete, tarmacadam or other rough surfaces.
- The sweeper has a constantly rotating brush bar. Never leave the cleaning head in one spot for an extended period of time as this may damage the floor surface.
WARNING:
- Do not use water, solvents, or polishes to clean the outside of the appliance; wipe clean with a dry cloth.
- Never immerse the unit in water and do not clean in a dish washer.
Thank you for choosing a Gtech Power Sweeper
"I started Gtech to create sensible, easy to use products, which do a great job. Your opinion is important to us and we will use your feedback to improve our products and services and let other people know what it's like to be part of the Gtech family."
Nick Grey – Inventor, Owner of Gtech
Please take the time to write a review of the Gtech Sweeper by visiting www.gtech.co.uk/product-reviews or if you didn't purchase directly from Gtech please leave a review with the retailer.
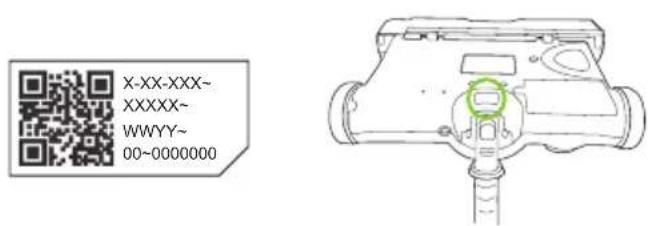
Make a note of your product serial number code for future reference. You can find this on the underside of item 1


X-XX-XXX\~ XXXXX\~ WWYY\~ 00\~0000000

natural_image
Technical line drawing of a mechanical component with no visible text or symbolsWhat's in the box

Assembly

natural_image
Line drawing of a hand holding a tool interacting with a mechanical component (no text or symbols visible)To assemble the lower handle Pull out the locking clip.

natural_image
Diagram of a mechanical device with a lever and handle, showing green directional arrows indicating motion (no text or symbols)Place the lower handle into the socket. Push the locking clip back into place. Push handle forward.

The three parts of the telescopic handle also click into place. The duster can be clipped onto the back of the handle.
Operation

natural_image
Line drawing of a hand using a vacuum cleaner to clean or install a device (no text or symbols present)Pull back the handle and press the "on" button with your foot.


Emptying the bin

natural_image
Line drawing of a hand holding a pen-like object with a shaded interior (no text or symbols)Remove the dust tray by pinching the window slightly, and pulling out.
natural_image
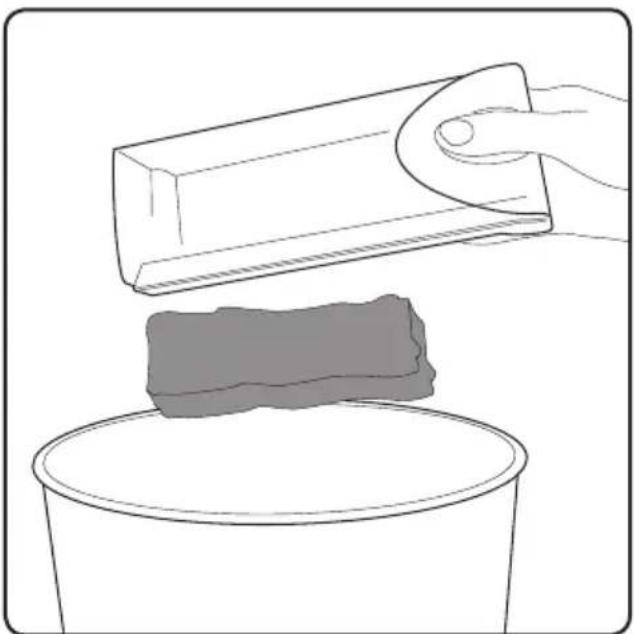
Illustration of a hand using a tool to lift a rectangular block over a container (no text or symbols)Tip the dirt into the bin. If you need to you can wipe the tray clean with a dry cloth.
Removing telescopic handle and using duster
natural_image
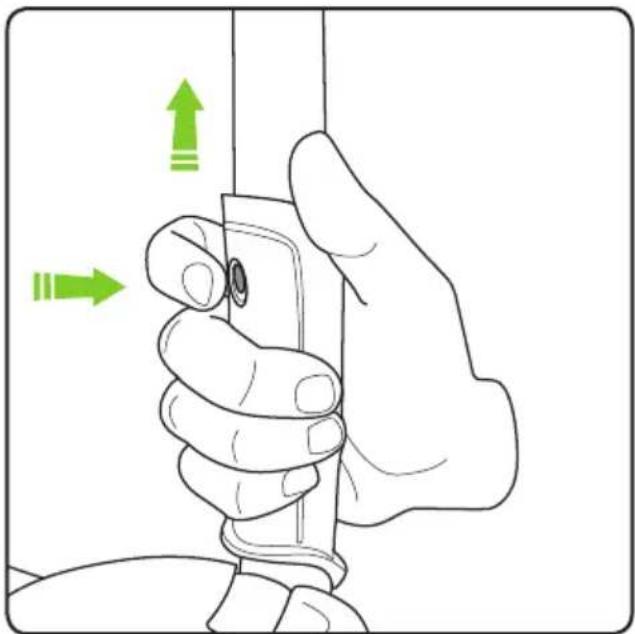
Illustration of a hand holding a small object with green directional arrows indicating movement or force (no text or symbols)Remove the telescopic handle by pressing the button at the front of the lower handle and pulling the tube out.

natural_image
Diagram showing three stages of a spray gun with green directional arrows indicating motion (no text or symbols)The telescopic handle can now be attached to the duster.
Handheld use and stair cleaning
natural_image
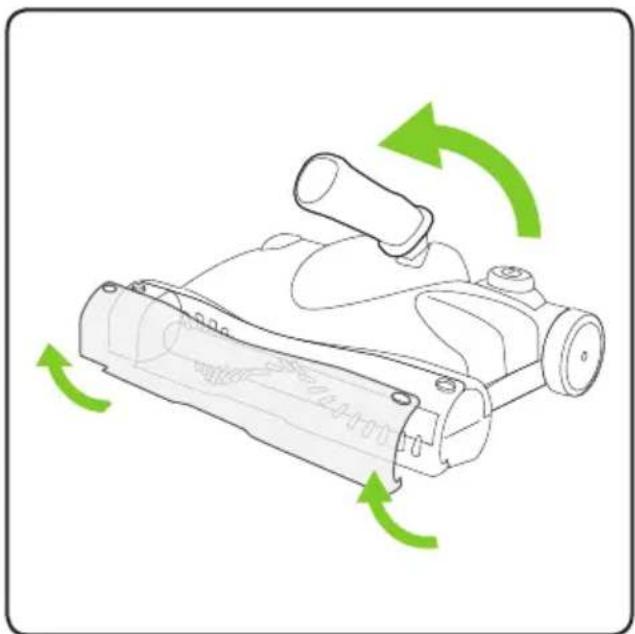
Diagram of a mechanical device with green arrows indicating rotational or directional motion (no text or symbols)Remove the visor by unclipping the bottom outer edges at the same time then lifting off. Push lower handle fully forward.

natural_image
Diagram of a robotic device with green directional arrows indicating motion or force (no text or symbols)Use on stairs, starting at the top and front of each step then moving down and towards you.
Recharging
natural_image
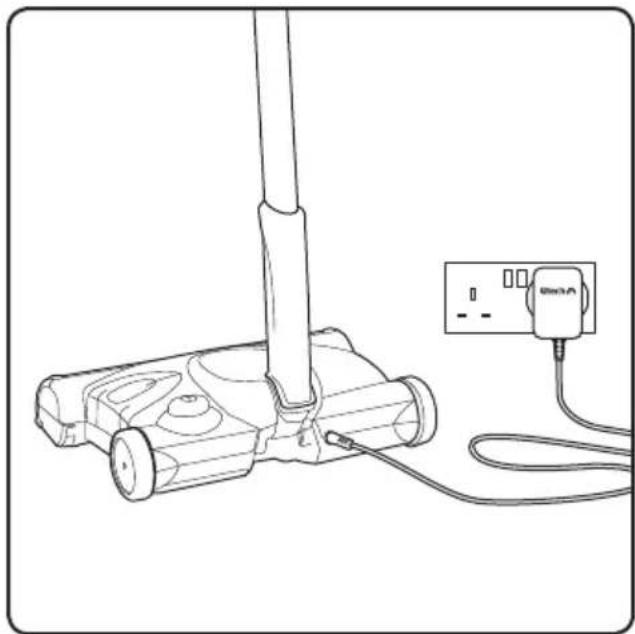
Line drawing of a vacuum cleaner with attached power outlet (no text or symbols)Plug in the charger and connect the jack to the socket at the rear of the sweeper. A full recharge will take 16 hours. Do not charge for longer than 24 hours.

natural_image
Line drawing of a device casing with control panel and green arrow indicating direction (no text or symbols)The light will show red while the sweeper is charging and green while it is running.
Clearing the brush bar Carrying

natural_image
Line drawing of a mechanical tool with scissors cutting through a cylindrical component (no text or symbols)From time to time you may need to remove hair and thread from the brush bar. Take off visor and use a pair of scissors to remove the hair.

natural_image
Diagram of a mechanical device with green X-shaped prohibition symbol (no text or labels)Try to avoid carrying the sweeper 'nose down' as you risk spilling dirt from the dust tray.
Changing the battery
natural_image
Line drawing of a mechanical device with no visible text or symbols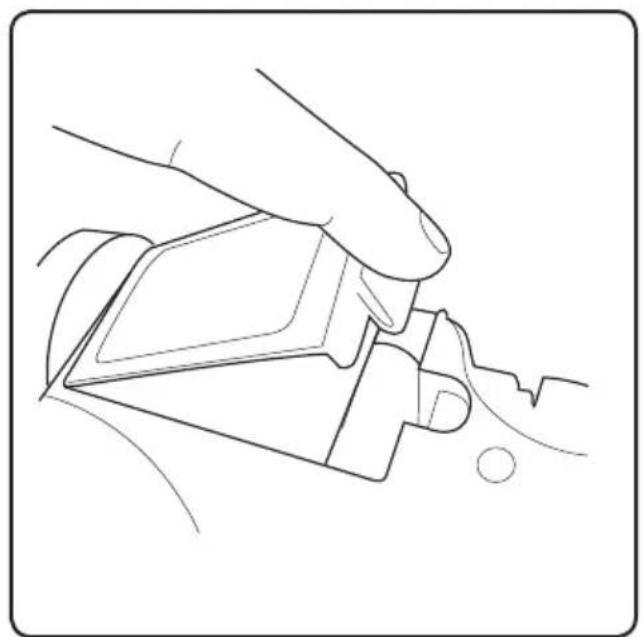
natural_image
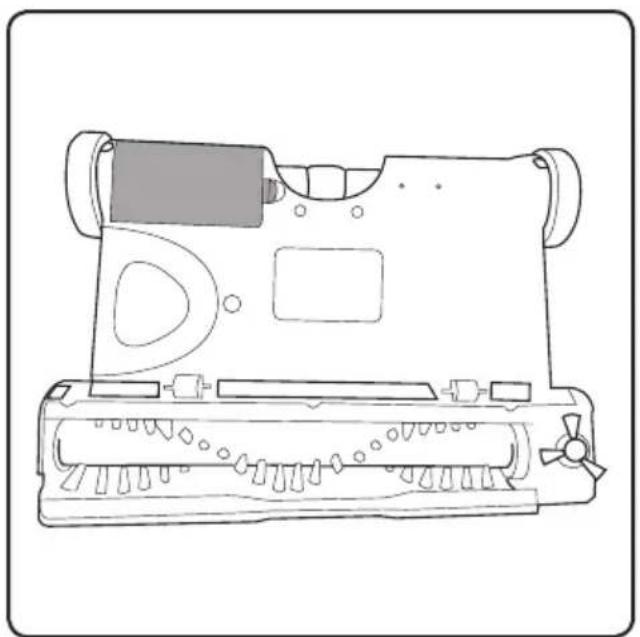
Line drawing of a hand holding a car seatbelt, no text or symbols presentLocate the battery cover. Lift off the battery cover.

natural_image
Line drawing of a hand using a tool to cut a cloud-shaped object into a container (no text or symbols)Lift out the battery pack. Straighten up the cable connectors so you can handle them more easily.
natural_image
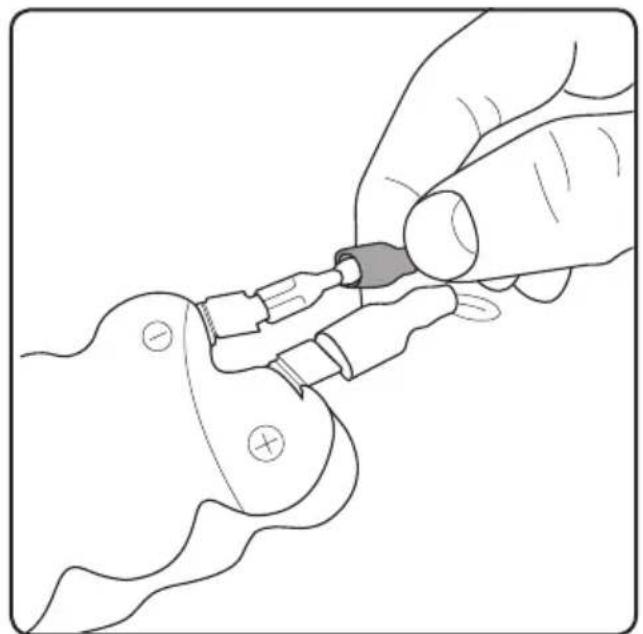
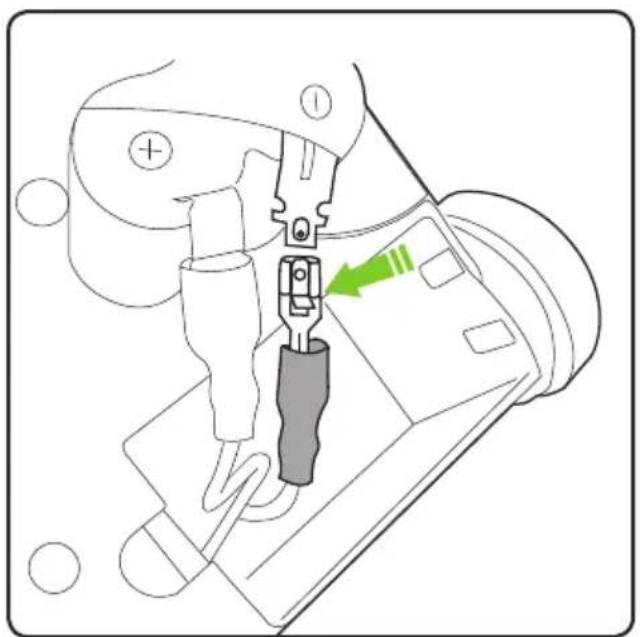
Line drawing of a hand using a tool to adjust or install a component, no text or symbols presentSlide plastic cover off the BLACK cable connector ONLY. Leave cover on the red cable connector.
natural_image
Technical diagram of a sewing machine's internal components, showing no text or symbolsGently press down fixing latch on cable connector.

natural_image
Line drawing of a hand using a tool to adjust or install a component, no text or symbols presentRepeat the previous two steps for the RED wire.

natural_image
Line drawing of a car electrical plug with a cable inserted, showing no text or symbolsRe-attach the wires to the new battery, attaching the BLACK wire first. Fold the terminals back along the battery.

natural_image
Line drawing of a hand holding a small object, possibly a tool or device, with no visible text or symbols.Put the battery back into the compartment and replace the cover.
Product Care
Your Gtech sweeper doesn't need much maintenance: empty the dust tray, remove hair and fibre from the brush bar and edge wheel and charge the battery. Wipe it with a dry cloth if it gets dirty, including in and around the bin. Never wash it with liquid or run it under a tap. Avoid cleaning over rug tassels or frayed carpets as this will tangle the brush bar. The battery, drive belt, brush bar and side brush are all replaceable items.
If you find you ever need to replace these items there is an FAQ section on our website at www.gtech.co.uk
Troubleshooting
| Sweeper is not cleaning well 1. Empty | the bin.2. Remove any build-up of hair from brush bar and edge wheel. |
| Sweeper has stopped or won’t work | 1. Fully recharge for 16 hours. |
Product Support
If these initial tips don't solve your problem, we have various other ways to help.
Visit: www.gtech.co.uk/support

natural_image
Icon of a computer monitor inside a black circle (no text or symbols)
natural_image
Black circular icon with two white speech bubbles, no text or symbols present.
natural_image
Black circular icon with a white envelope containing an @ symbol (no text or numbers)
natural_image
Circular play button icon with white triangle (no text or symbols)support@gtech.co.ukLive chat supportOnline How to '
Visit www.gtech.co.uk/warrantyregistration to register your product to ensure that we have all the information required to provide you with quick and efficient support.
You will need your product's serial code.
If you purchased directly from Gtech your details are already registered and your 1 year warranty will start automatically.
If you purchased from an authorised Gtech retailer, please register your warranty within 3 months and you will need to provide proof of purchase to support any claim against your warranty.
WARRANTY - TERMS AND CONDITIONS
Your Gtech Sweeper is guaranteed against material or manufacturing faults for 1 year from the date of purchase, subject to the following terms and conditions:
WHAT ISN'T COVERED SUMMARY
Gtech does not guarantee the repair or replacement of a product as a result of:
• Normal wear and tear (e.g. brush bar and edge brush)
- Accidental damage, faults caused by negligent use or care, misuse, neglect, careless operation or handling of the Sweeper which is not in accordance with Gtech Sweeper operating manual.
- Use of the Sweeper for anything other than the normal domestic household purposes.
- Use of parts and accessories which are not Gtech genuine components.
• Faulty installation (except where installed by Gtech)
- Repairs or alterations carried out by parties other than Gtech or its authorised agents.
- If you are in doubt as to what is covered by your guarantee, please call the Gtech Customer Care Helpline on 01905 345 891.
- The guarantee becomes effective at the date of purchase (or the date of delivery if this is later).
- You must provide proof of delivery/purchase before any work can be carried out on the Sweeper. Without this proof, any work carried out will be chargeable. Please keep your receipt or delivery note.
- All work will be carried out by Gtech or its authorised agents.
- Any parts which are replaced will become the property of Gtech.
- The repair or replacement of your Sweeper is under guarantee and will not extend the period of guarantee.
- The guarantee provides benefits which are additional to and do not affect your statutory rights as a consumer.
SW02 TECHNICAL SPECIFICATION
| Unit operating cycle with full battery | up to 60 mins (dependent on floor surface) |
| Battery type NiMH | |
| Battery voltage 7.2V | |
| Charging period for fully discharged battery | 16 hours |
| Battery charger output 12V DC, 150mA | |
| Battery charger model JOD-$-120015BS | |
| Sound Level 75db (A) | |
| Weight 1.6kg | |

The symbol indicates that this product is covered by legislation for waste electrical and electronic products (EN2002/96/EC) When the sweeper has reached the end of its life, it and the NiMH battery it contains should not be disposed of with general household waste. The battery should be removed from the sweeper and both should then be disposed of properly at a recognised recycling facility.
WARNING: Only use the charger supplied with the product.
Call your local council, civic amenity site, or recycling centre for information on the disposal and recycling of electrical products. Alternatively visit
www.recycle-more.co.uk
for advice on recycling and to find your nearest recycling facilities.

Using another charger may damage the product and the battery and will invalidate your guarantee.
Grey Technology Limited
Brindley Road, Warndon, Worcester WR4 9FB
email: support@gtech.co.uk
telephone: 01905 345891
www.gtech.co.uk


- Gtech
- IMPORTANT SAFEGUARDS:
- IMPORTANT: READ ALL INSTRUCTIONS BEFORE USE. RETAIN INSTRUCTIONS FOR FUTURE REFERENCE.
- Personal Safety:
- Electrical safety:
- Battery safety:
- Service:
- Intended use:
- WARNING:
- Thank you for choosing a Gtech Power Sweeper
- What's in the box
- Assembly
- Operation
- Emptying the bin
- Removing telescopic handle and using duster
- Handheld use and stair cleaning
- Recharging
- Clearing the brush bar Carrying
- Changing the battery
- Product Care
- Product Support
- WARRANTY - TERMS AND CONDITIONS
- WHAT ISN'T COVERED SUMMARY
- SW02 TECHNICAL SPECIFICATION
- www.recycle-more.co.uk
- Grey Technology Limited
Brand : G-TECHNOLOGY
Model : SW02
Category : Data Storage